Using ELECTRIC MINT
Learn how to use ELECTRIC MINT. From basic functionality like loading patterns and playing melodies to advanced techniques like playing endings and slides.
Just like in other products of the SESSION GUITARIST series, the new melody feature is provided in a separate Melody instrument. While the regular Electric Mint.nki is designed for the convenient playback of patterns, the melody instrument allows you to play your own melodies and combine them with the included patterns within a single instrument.
The ELECTRIC MINT instruments are designed to be played using a MIDI keyboard. The patterns are triggered and selected via MIDI keyswitches, allowing for fast arranging.
Patterns will automatically sync to the master or host tempo. The patterns in this library can be played at any tempo from 60-65 bpm to 160 bpm and above. Since there is no time-stretching involved in the process, you will always hear the patterns in the highest possible quality.
Note
The patterns are based on actual recordings by a professional studio musician, so they sound best in the typical tempo range for a given musical style.

KONTAKT’s on-screen keyboard, presenting the current keyboard layout.
On KONTAKT’s on-screen keyboard, all relevant keys and key ranges are color-coded: keyswitches for melody articulations (yellow), patterns (red), endings (purple), and slide (green). Melodies or chords can be played in the blue key range.
Note
To view a detailed description of each key, you can open the Mapping Panel by clicking the small keyboard icon in the bottom right corner of the instrument.
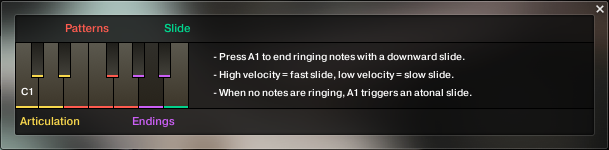
The Mapping panel, which presents a more detailed graphical overview of the keyboard layout.
Playing Melodies
After loading the Melody instrument up, you are presented with a melody section on the left and a pattern section on the right. If the melody section is selected, the instrument will play the notes you press instead of sequencing a pattern. This enables you to play your own melodies with ELECTRIC MINT.
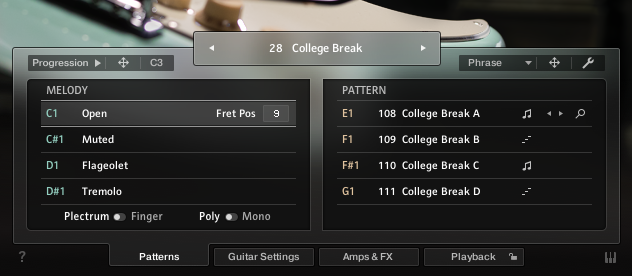
Melody and pattern sections in the melody instrument.
To change melody articulations, use the keyswitches from C1 to D#1 to switch between open, muted, flageolet, and tremolo styles.
The Open articulation is the most commonly used articulation: Plucking individual strings with either the fingers or a plectrum. To trigger hammer-ons and pull-offs, play overlapping notes from which the subsequent note is played with softer velocity than the initial note.
The Muted articulation is created by resting the palm of the plucking hand on the strings, close to the bridge of the guitar while plucking the strings. Muted hammer-ons and pull-offs can be triggered in the same manner as open hammer-ons and pull-offs.
The Flageolet articulation is also called harmonics. It is created by dividing the string into sections of equal length by lightly touching the string either exactly in the middle or at one third, fourth, fifth etc. of the string's length while plucking it at the same time. As a result, higher overtones are played instead of the original note. In plectrum mode, velocities 115 and above will trigger the octave above the played note, which is the first overtone.
The Tremolo articulation is created by repeatedly plucking the strings with either fingers or a plectrum. When playing overlapping notes, the instrument will create a continuous volume modulation. When playing notes without overlap, the tremolo samples are velocity-sensitive.
To change the fret position value of the selected melody articulation, adjust its Fret Pos value. Choose higher values to have the instrument perform notes in higher fret positions on lower strings, resulting in a more mellow tone. You can control the fret position in real-time for all melody articulations combined with the MIDI CC#114.
Plectrum / Finger switch: Below the articulation keyswitches, you can choose to play all of the above articulations with either Plectrum or Finger.
Poly / Mono switch: The monophonic mode creates smooth transitions between notes, which helps to create realistic sounding solo lines and riffs. The polyphonic mode enables you to play multiple notes at the same time. Use this mode only if you intend to play multiple notes at the same time. In both modes, you can use the sustain pedal just like on a piano.
To apply vibrato or pitch bend, use the pitch and modulation wheels of your keyboard.
When playing patterns, the pitch wheel doubles as an Impact controller, modifying the velocity and accent intensity of performed patterns (for more information, refer to Controlling the Dynamics of the Performance).
Using the Vibrato drop-down menu, you can choose between six different vibrato styles. The first three styles emulate finger vibrato, which raises the pitch periodically by bending the string. The other three styles emulate tremolo bar vibrato, which lowers the pitch periodically.
The Bend drop-down menu offers the standard pitch bend mode (All), as well as a mode in which only specific notes (lowest, highest, softest, loudest, latest note) in a voicing are affected by the pitch bend. This enables the emulation of a specific playing technique by which only some of the played strings are bent and others, for example open strings, retain their original pitch.
Tip
You can switch between the different vibrato speeds via MIDI CC#112 and choose between different pitch bend modes via MIDI CC#113. For more information on MIDI controllers, refer to chapter Further MIDI controllers.
Tip
When playing adjacent open notes, hammer-on and pull-off samples are added automatically if the velocity of the following note is significantly softer than the one previously played. This works only for overlapping (legato) notes up to an interval of a minor third. Monophonic mode is recommended, but not required to use this feature.
Combining Melodies and Patterns
The melody instrument provides two different modes, namely the Melody mode and the Pattern mode. By default, it is in Melody mode.
To switch from melody to pattern, hold down one of the pattern keyswitches from E1 to G1 with your left hand, while playing notes with your right hand. The instrument will temporarily perform those notes as a pattern. If a pattern is in Voicing or Phrase mode, triggering its keyswitch will cause the pattern to be played back using the notes contained in the voicing or phrase, transposed to the key of the note you play on the keyboard.
To switch back to melody, release the pattern keyswitch with your left hand. If you still hold notes in your right hand at that moment, the instrument tries to sequence one more note that would have followed had you continued with the pattern playback. For example, if you release the pattern keyswitch shortly before the next downbeat while still holding notes with your right hand, the instrument will switch back to melody mode with one last note onto that downbeat.
To play patterns instead of melodies by default: If you are mainly intending to use the melody instrument to play patterns, you can change the default mode from Melody to Pattern on the Playback page (refer to The Playback Page). When Pattern is selected as the default mode, holding down one of the Melody keyswitches (C1 to D#1) will engage the melody mode temporarily. However, the Pop articulation is not available when Pattern is selected as the default mode.
Tip
To achieve musically convincing results, it is advisable to use the instrument within your sequencer and to play along with its metronome.
Note
The included pattern library is identical in the pattern instrument and the melody instrument, and the procedures to load, modify and play back patterns are similar. However, to accommodate the melody articulations, the number of pattern slots has been reduced from eight to four in the melody instrument.
Pattern Selection and Playback
The following section describes the pattern instrument. While most of the information also applies to the melody instrument, refer to Playing Melodies and Combining Melodies and Patterns for detailed information about the features which are specific to the melody instrument.
To select a pattern, press the corresponding keyswitch MIDI note or click on the pattern you wish to play.
To play a pattern, play notes on your MIDI keyboard. After releasing the keys, playback will be stopped within a specified note duration (refer to Latch Mode in The Playback Page).
To end the playback at a precise point in time, it is recommended to use the Bb1 keyswitch or one of the other ending keyswitches (refer to Playing Dead Notes, Endings and Slides).
To load a different pattern into a slot, click on the magnifier icon in the current slot. This will open the Pattern Browser (refer to The Pattern Browser).
To load the next or previous pattern of the pattern library, click on the little left or right arrow buttons in the current slot.
To remove a pattern (clear the slot), [Alt] + click on a slot.
Note
It is recommended to play notes or pattern changes briefly ahead of the beat and avoid overlapping notes to give the playback engine time to anticipate the transition. This way, the engine has enough time to add fret noises and the transition will sound more natural. As the performance is bound to the metronome of the sequencer, the timing of incoming MIDI events has no effect on the timing of the performance. For more information, read Tips and Tricks.
Tip
If available, Chase Events should be activated in your DAW settings. This will ensure that the engine gets proper note information on sequencer start or cycle jumps.
Strumming, Arpeggio, and Phrase Pattern Types
The playback engine creates patterns in one of three different ways: some of the patterns are based on recorded performances, while others are based on sequenced single note samples (referred to as single note patterns below).
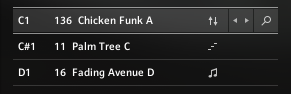
Three different pattern types, distinguished by different icons.
Strumming Patterns: Recorded loops based on a strumming performance are indicated by small up and down arrows next to their name. If you play more than one note, additional notes will be added on top of the originally recorded loop, which allows you to create voicings with up to six notes sounding at a time.
Arpeggio Patterns: Arpeggio patterns based on single notes are indicated by a small staircase icon next to their name in the Pattern Browser. When playing arpeggio patterns, the playback engine analyzes the incoming chord and allocates the individual notes to different strings of the guitar. The more notes you press on the keyboard, the more sophisticated the resulting arpeggio pattern will sound. Therefore, playing up to six notes at a time can lead to interesting variations. Depending on the selected pattern, several notes of a voicing will be performed as hammer-ons and pull-offs.
Phrase Patterns: If a recorded loop includes melodic lines, it is referred to as a phrase. Those patterns are indicated by a small note icon next to the name.
Note
The chord detection engine cannot successfully process overlapping notes since an overlap would technically mean that two different chords exist at the same time. To avoid overlaps, release a chord, or some of its notes, shortly before you play new notes.
Tip
When playing arpeggio patterns, you can trigger slides between different chords or voicings by playing the newly added keys with a very high velocity: the next suitable note will start with a slide if it is being played with a velocity greater than 110. To use slides when playing melodies, hold down the B1 keyswitch while playing melody notes.
Voicings and As Played Mode
Strumming and Arpeggio patterns allow you to play a large variety of different chords and voicings. If you are less familiar with playing typical guitar voicings on a piano or keyboard, you can use the integrated voicing presets instead of playing your own voicings.
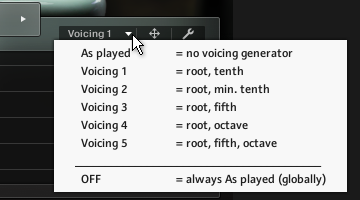
To activate the voicing generator, select a pattern and choose the desired voicing 1–5 from the voicing drop-down menu, which is available for strummed and arpeggiated patterns.
Press one single key to hear the unaltered voicing.
Play chords or intervals to adapt the selected voicing to incoming notes. For example, if a voicing contains a minor third, pressing a C major chord on the keyboard will turn all minor thirds into major thirds. You can adjust sevenths and other options in the same way.
To add additional notes to a voicing, simply play them on the keyboard.
To deactivate preset voicings, select As played in the voicing menu. This lets you play a virtually endless number of different voicings, chords, inversions, suspensions, top lines, bass lines etc. over the entire pitch range.
To permanently deactivate preset voicings for all patterns and songs, select OFF from the voicing menu.
Phrase and One Pitch Mode
Phrase patterns, indicated by a small note icon next to the pattern name, can be toggled between Phrase mode and One Pitch mode.
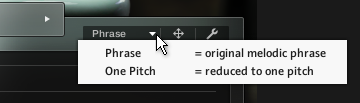
In Phrase mode, the pattern will be played back with its original note sequence.
In One Pitch mode, the rhythm of a phrase pattern will remain the same, but the melody is reduced to one single pitch. Play different pitches on the keyboard to create custom note progressions, which are still based on the rhythm and articulation of the selected phrase.
MIDI Drag and Drop and Chord Progressions
ELECTRIC MINT lets you drag and drop voicings, phrases and entire chord progressions into your sequencer or DAW. Voicings and phrases can be dragged using the MIDI drag icon on the right-hand side of the user interface. Chord progressions can be dragged using the MIDI drag icon next to the Progression button on the left-hand side of the user interface.
To play back the included chord progression of a pattern, select the pattern and press the Progression Playback button.

To export the included chord progression into your DAW, drag and drop the arrow icon next to the Progression button into your DAW.

To export the voicing or phrase of a selected pattern into your DAW, drag and drop the arrow icon next to the Voicing/Phrase menu into your DAW. If the phrase is in one pitch mode, or if no voicing is selected, MIDI drag will be deactivated.


You can set the key of voicings, phrases and chord progressions using the prelisten key field before dragging them.

Dragging a progression, phrase or voicing into your DAW will create a MIDI part with the notes contained in the progression, phrase or voicing, positioned slightly ahead of the beat to enable natural sounding transitions (refer to Tips and Tricks). Additionally, the MIDI part contains a keyswitch ensuring that the correct pattern is selected. Since the different MIDI notes of a phrase are now being sequenced by the DAW, the pattern will be automatically switched to One Pitch mode (for Phrases), or As Played mode (for Strumming and Arpeggio Patterns). Now, you can transpose the MIDI notes to change the melodic line. Ensure to not transpose the keyswitch note, however. The original rhythmic structure is still being provided by the pattern and cannot be changed in the MIDI editor of the DAW.
Note
Since ELECTRIC MINT is based on two-bar patterns, make sure to drag the MIDI loop onto an uneven bar number (bar 1, bar 3, bar 5, bar 17 etc.). Please note that loading a different pattern, changing the pattern tempo (half time, double time), or adjusting the length or the start shift in the pattern inspector will render the corresponding MIDI part incompatible. In this case, delete the old MIDI part and drag the phrase into your DAW again.
Playing Dead Notes, Endings and Slides
In addition to the actual patterns, ELECTRIC MINT provides a variety of endings, as well as slides and percussive sounds. The corresponding sets of keys are marked purple and green on the KONTAKT on-screen keyboard. The table below describes the functionality of each keyswitch for both the pattern instrument and the melody instrument:
Pattern Instrument | Melody Instrument | |
|---|---|---|
G#1 | Long ending | Slide up: End sounding notes with an upward slide. If there are no sounding notes, you will hear a regular slide. The speed of the slide depends on the incoming velocity. |
A1 | Slide down: End sounding notes with a downward slide. If there are no sounding notes, a long ending will be played and the slide will sound only when releasing the key. | Slide down: End sounding notes with a downward slide. If there are no sounding notes, you will hear a regular slide. The speed of the slide depends on the incoming velocity. |
Bb1 | Mute strings → Hit guitar body with knuckles → Slap strings with thumb | Mute strings → Hit guitar body with knuckles → Slap strings with thumb |
B1 | Pickup slide down | Slide modifier: Hold this key to start melody notes with a slide. The slide interval and direction depends on the previous note. |
Controlling the Dynamics of the Performance
The patterns included in ELECTRIC MINT ignore the velocity information coming from your MIDI keyboard or DAW. Instead, you can continuously control the dynamics of the performance with the impact slider. As the melody instrument is velocity-sensitive while in melody mode, the pitch bend wheel doubles as a pitch bend controller when playing melodies.

The Impact feature
Use your MIDI keyboard’s pitch wheel to control the Impact/pitch bend. It works as a bi-polar control to increase or decrease the playing intensity of the musician. The neutral default position is the center position which can also be recalled via [Cmd] + click.
Tip
The Impact feature can be used to smoothen transitions between patterns with differing overall dynamics.
Tip
While the velocity coming from your keyboard doesn’t affect the dynamics of the performance, you can use it to trigger slide transitions when playing patterns. Try playing notes with a velocity greater than 110, a slide transition will be added at the next suitable position.
Loading and Saving Sound Presets
With ELECTRIC MINT, you can easily customize the sound. Each sound preset includes all parameters of the Amps & FX page as well as some of the parameters of the Guitar Settings page (refer to The Amps & FX Page and The Guitar Settings Page). You can load sound presets from the Sound Preset drop-down menu in the top right corner of the instrument.
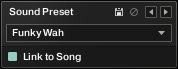 |
The Sound Preset box in the top right corner of the instrument.
To load a factory or user sound preset, either select a preset from the drop-down menu, or cycle through all presets by clicking the little left and right arrow buttons.
To save a new user sound preset, enter a preset name into the text field and click on the floppy disk icon. This will store the current sound settings into a new user preset.
To overwrite a user sound preset, first load it and then make changes on the Guitar Settings or Amps & FX page. Then click the floppy disk icon without changing the preset name. If you change the preset name before saving a preset, a new sound preset will be created instead of overwriting the existing one.
To delete a user sound preset, select it from the drop-down menu, then click the circular Delete button.
Linking sound presets to Song presets: If the Link to Song switch is activated, selecting a song preset (refer to The Song Browser) will also load its corresponding sound preset. Deselect it to change songs without altering your guitar and effects settings.
Locking Parameters When Loading Snapshots or Songs
Normally, when you load snapshots or songs (refer to The Song Browser) of the instrument, all parameters will be set accordingly. Therefore, snapshots and songs are stored and recalled globally. To prevent the Playback parameters from being changed by loading snapshots or songs, click the lock icon on the Playback tab.
 |
If the Playback parameters are locked, they will not be changed by snapshots or songs.
Resetting the Round Robin Counter
To enhance the realism of ELECTRIC MINT, the entire sample content employs a method which is called “Round Robin”: Each sample was recorded multiple times and if the same pitch is being played with the same velocity multiple times in a row, ELECTRIC MINT automatically alternates between those different recorded samples of a given pitch and velocity. These variations are called “Round Robins”. The result is repetitions that sound less mechanical and more like a performance by a real musician, as the tone varies ever so slightly. As the instrument is automatically cycling through the different Round Robins, the performance will slightly differ each time you’re playing it back in your sequencer.
While this is beneficial to the overall realism, you might find that a certain Round Robin sample matches the required phrase better than another. You can reset the Round Robin counter by sending continuous controller 3 (CC#3) to the instrument at the beginning of a song section. This way, you will be hearing the exact same samples every time the section is being played back.
Tip
When exporting/bouncing your song, placing a CC#3 value at the beginning of your arrangement will lead to a deterministic result: Each bounce will be using the exact same samples, rather than a random constellation of Round Robins.
Defining the Downbeat after Signature Changes
Since there is no way for the instrument to recognize signature changes or insertions of half a bar etc., present in your DAW session, its pattern playback would get out of sync in those cases. To solve this problem, you can use the global transport offset feature to compensate for a change of signature or bar length during playback.
→ To define a global transport offset in ticks, send MIDI CC#111.
The value you send (ranging from 0 to 127) will be multiplied by 80 ticks and added as an offset to the host transport. 80 Ticks is the length of a 32th triplet, which is the greatest common divisor for all note values available in the instrument. Twelve 32th triplets equal a quarter note. Therefore, to insert half a 4/4th bar (i.e. shift the playback by two quarters or 2 × 12 32th triplets), you would need to send MIDI CC#111 with value 24, etc.
The following table shows typical values needed for common offsets:
Offset | CC#111 value |
|---|---|
No offset | 0 |
One quarter | 12 |
Two quarters | 24 |
Three quarters | 36 |
Four quarters (= one 4/4 bar) | 48 |
Five quarters | 60 |
Six quarters | 72 |
Seven quarters | 84 |
Two 4/4 bars (= no offset) | 96 |
Minus one quarter | 84 |
Minus two quarters | 72 |
Minus three quarters | 60 |
One eighth note | 6 |
One eighth triplet | 4 |
Further MIDI controllers
CC#112: Set Vibrato speed. You can change the setting for the Vibrato speed by sending a continuous MIDI controller event to ELECTRIC MINT:
Offset | CC#112 Value |
|---|---|
Slow Finger (up) | 0–21 |
Medium Finger (up) | 22-42 |
Fast Finger (up) | 43–63 |
Slow Tremolo bar (down) | 64–84 |
Medium Tremolo bar (down) | 85-105 |
Fast Tremolo bar (down) | 106–127 |
CC#113: Set Pitchbend Mode (only available in the "Melody" nki). In the melody instrument, you can change the Pitch Bend mode by sending a continuous MIDI controller event to ELECTRIC MINT:
Pitchbend Mode | CC#113 Value |
|---|---|
All: Bend all notes | 0–21 |
Low: Bend lowest note only | 22–42 |
High: Bend highest note only | 43–63 |
Soft: Bend softest note only | 64–84 |
Loud: Bend loudest note only | 85–105 |
Last: Bend latest note only | 106–127 |
CC#114: Set Fret Position for all melody artics (only available in the "Melody" nki). In the melody instrument, you can change the Fret Position of all Melody articulations sending a continuous MIDI controller event to ELECTRIC MINT:
Fret position | CC#114 Value |
|---|---|
0 ( = Open Strings included) | 0–9 |
1 | 10–19 |
2 | 20–29 |
3 | 30–39 |
4 | 40–49 |
5 | 50–59 |
6 | 60–69 |
7 | 70–79 |
8 | 80–89 |
9 | 90–99 |
10 | 100–109 |
11 | 110–119 |
12 | 120–127 |