Loading and Creating Instruments
This chapter covers the basics of loading existing Kontakt instruments or creating your own.
Loading and Creating Instruments in Kontakt can be done in a number of ways. Using the Files menu, Instruments can be loaded and created, and the default Instrument template saved.
Loading Instruments
You can also load an Instrument to your Multi, either in Kontakt format (.nki) or in one of the supported third-party formats from the Side pane. You can either:
Drag the Instrument into a blank space of the Rack to add it to the Multi.
Drag the Instrument onto an Instrument already loaded in the Rack to replace it with the new one.
Alternatively, you can choose the Load command from the Files menu; a file selection dialog will appear that lets you locate and select any Instrument, Multi, or Instrument Bank file on your system.
Tip
If you have activated the Side pane Double click loads instrument option in the Options dialog, you can also load Instruments by double-clicking them in the Side pane.
After the Instrument has been loaded successfully, it will appear in the Rack. If required, you can now change its Output and MIDI channel assignments from the controls in the Instrument’s Header. Once these are correctly set, you should be able to play the Instrument via your MIDI keyboard or the virtual On-Screen Keyboard.
Creating Instruments
If you would like to create an Instrument from scratch, you have the following options:
Use the New Instrument command in the Files menu to add an empty Instrument that’s based on the default Instrument template. You can change this template by creating a default Instrument of your choice and saving it via the Save as Default Instrument command in the Files menu.
Alternatively, start out with a Sample or a set of Samples and let Kontakt do the work of combining them into an Instrument. Locate and select the Sample files that you want to use in the Side pane, then drag them into an empty space in the Rack. Kontakt will create a new Instrument based on the default Instrument template and spread the Samples across the keyboard. If you do this with a WAV file that contains Slice markers or with a REX file, Kontakt will switch the new Instrument to Beat Machine mode, so that you can play your Sample in sync to your song tempo right away.
Samples Missing Dialog
Kontakt uses different ways to reference the Samples that are being used by an Instrument. When Instruments are being saved in a monolith, the Sample data gets embedded in the file itself, and thus can’t be accidentally separated. In a lot of cases, though, you will encounter Instruments that reference external Sample files on your system via their respective paths and file names. It’s obvious that while this method creates small Instrument files and avoids unnecessary duplication of Sample data, it’s not as bullet-proof as combining Instrument and Sample data into a monolith; whenever you move referenced Sample files to a different location, Kontakt won’t be able to find them anymore in the location that’s being specified within the respective Instrument files. Depending on whether Kontakt used a relative path for referencing Samples, this can even happen when you move Instrument files while keeping their referenced Samples in their original locations.
Whenever you attempt to load an Instrument whose Samples cannot be found in their expected location, Kontakt will open a Content Missing dialog. This window offers various options that help Kontakt locate the missing files on your system. Once it has found them, you can then re-save the Instrument with the corrected references in order to make the changes permanent.
The Content Missing dialog contains the following options and features:
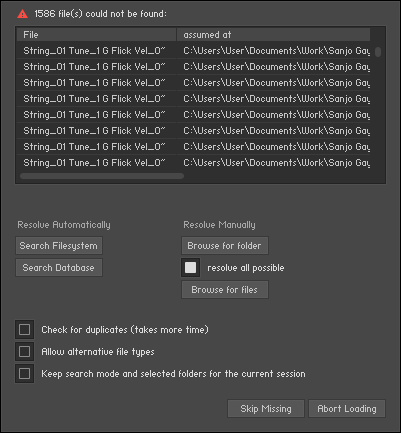
File Display: In its upper half, the Content Missing dialog displays a list of all Sample files that were referenced within the Instrument file, but couldn’t be found in the expected locations; these locations are shown in the right column. Whenever you’re not sure which action might have caused the Content Missing dialog to appear, study the locations displayed in the assumed at column carefully; you might recognize a folder that you’ve moved to a different location at some point in the past.
Resolve Automatically: In the lower half of the dialog, Kontakt provides a number of commands that will either search for the missing files automatically (left side), or allow you to specify the new location manually (right side). If you’re not sure where the missing Samples could be located, choose one of the automatic options on the left side:
Search Filesystem: This will search for the missing Samples on all file systems of your hard disks. Depending on the size and speed of your hard disks, the scanning process might take a considerable amount of time, but if the Sample files have not been renamed or deleted, they will eventually be found.
Search Spotlight: Spotlight in macos’s indexed “search” function built into the OS. (Unless disabled) it’s always running in the background updating file locations which means that if you use the search spotlight feature it resolves missing sample conflicts immediately
Check for Duplicates: By default, all these options search for the missing Samples by their file names only; in some cases, two or more different Samples on your hard disk might share a common name. This can cause Kontakt to load the wrong Sample; if you notice this in your Instrument, don’t save it. Instead, remove it from your Multi, load it again, and repeat the search process after you’ve activated the Check for Duplicates option at the bottom of the Samples Missing dialog. This will make Kontakt examine any files with matching names more thoroughly, which will sort out duplicates, but take more time than searching without this option.
Resolve Manually: If you already know where the missing Samples are located on your system, there is no need for an automatic search. Instead, choose one of the options on the right side, which allow you to locate files manually:
Browse for Folder: When you click this button, a folder selection dialog will appear. After you’ve located and chosen a folder, Kontakt will look for the missing Samples inside this folder and all of its sub-folders.
Browse for Files: This option will ask you to locate each missing file manually, one at a time, via a file selection dialog. During this process, the name of the currently searched file will be displayed in the title bar of the selection dialog window.
If the resolve all possible option is activated, Kontakt will look for all missing Samples in each location that you specify via the Browse for Folder or Browse for Files option. If it’s deactivated, you will be asked to provide a location for each missing file separately.
Once you have selected the appropriate search action, Kontakt will start the file scanning process. During this scan, the missing Sample list will shrink whenever a Sample has been successfully located. Once all Samples have been found, the dialog will disappear and the Instrument will be loaded into your Rack. You should now make sure that it works correctly and then re-save it to its original location with the Save as… command in the Files menu.
Tip
If you have moved a whole library, and the Samples Missing dialog appears each time you attempt to load an Instrument from this library, you don’t need to click through the Samples Missing dialog and re-save the Instrument each time; the Batch Re-Save command in the Files menu allows you to locate the referenced Samples of all Instruments below a folder at once and re-save all of them automatically. This command is explained in section Handling Tab of this manual.
If there are still missing Samples after the scanning process, the Content Missing dialog will reappear, which allows you to try another search option. If each attempt to locate the missing Samples fails, they either don’t exist on your system anymore, or have been renamed. In such cases, you can choose to either abort loading the Instrument by clicking the right button at the bottom of the dialog, or load the Instrument without the missing Samples with the left button.
Allow alternate file types: This option allows you to ignore the audio file extension and resolve missing samples with alternative file types with the same name. For example, if you had an instrument which referenced uncompressed WAV files, but at some point you compressed the files to NCW format, you can reference the NCW files in place of the WAV files.
Keep search mode and selected folders for the current session: If you are opening multiple Instruments that could require searching for Samples in the same location, checking this option will tell Kontakt to repeat the search mode for any newly opened Instrument while you are still running the same session. Closing and reopening Kontakt will reset this option.