Modulation Sources
This chapter explains Kontakt's modulation sources in detail.
Now that you know how to create assignments that connect a modulation source to a parameter, let’s have a closer look at the various modulation sources that Kontakt has to offer. As explained in the previous chapter, all modulation sources fall in one of four general categories: Envelopes for (usually) non-periodic, finely adjustable curve shapes, LFOs for periodic waveforms, Other for special modulators like step sequencers, and External for modulation signals that don’t originate from one of Kontakt’s modulation modules.
Envelopes
Kontakt offers three kinds of envelope shapes, each one with a different set of controls:
AHDSR: This is Kontakt’s take on the most common envelope type out there, the ADSR envelope, which is named after its parameters (attack time, decay time, sustain level, and release time). With these four parameters, ADSR envelopes can create a surprisingly large number of different modulation shapes, which are well-suited to simulate the natural dynamic behaviors of acoustic instruments. Kontakt’s flavor of this envelope provides an additional Hold Time control, which will be described below.
DBD: This is a rather simple one-shot envelope that rises or falls from zero to an adjustable breakpoint above or below, then returns to zero. It works well for simulating things that happen during the initial attack phase of sounds.
Flexible Envelope: As the name suggests, this envelope doesn’t force any limitations whatsoever on your modulation shape. It allows you to create almost arbitrarily complex controller curves, which span anything from milliseconds to several minutes.
AHDSR Envelope
The AHDSR (Attack, Hold, Decay, Sustain,Release) envelop contains the following controls:

AHD Only: If this button is activated, the envelope will be reduced to its attack, hold, and decay phases (see below for a description of what these do). As this eliminates the sustain parameter, what you’ll get is a simple one-shot envelope, which will always be completed no matter how long the key is being held. It is thus best suited for drum and percussion sounds.
Retrigger: If this button is activated, the envelope will be restarted every time Kontakt receives a note, even if another note is still being held at the same time. If it’s inactive, the envelope will keep its current position until the last note has been released, then be restarted on the next note.
Curve: Adjusts the curve shape of the attack phase. A value of zero results in a linear attack curve, negative values make the shape more concave, and positive values make it more convex.
Attack: The initial time it will take the envelope to reach its maximum level after it has been triggered.
Hold: The (fixed) time the envelope will stay at its maximum level after it has completed the attack phase and before it enters the decay phase.
Decay: The time it will take the envelope to fall from its maximum level to the level set by the Sustain control.
Sustain: After it has completed its attack, hold, and decay phases, the envelope will stay at this level as long as the key is being held.
Release: The time it will take the envelope to fall from its sustain level back to zero after the key has been released.
DBD Envelope Controls
The DBD (Decay, Break, Decay) envelop contains the following controls:

Retrigger: If this button is activated, the envelope will be restarted every time Kontakt receives a note, even if another note is still being held at the same time.
Decay 1 (D1): The time it will take the envelope to rise or fall from zero to the breakpoint after it has been triggered.
Break (B): The level of the breakpoint. If this value is negative, the envelope will fall, then rise, and behave the other way around if it’s positive.
Decay 2 (D2): The time it will take the envelope to rise or fall back to zero after it has reached the breakpoint.
Easy Mode: In Easy Mode, the DBD Envelope's Break and Decay 2 parameters are de-activated, leaving just one parameter: Decay 1. The breakpoint will be set to zero. The Easy Mode is generally easier to work with than the full mode for basic percussive instruments.
Flexible Envelopes
This powerful envelope type allows you to create arbitrary modulation shapes by defining up to 32 breakpoints, each at a defined level and point in time. Similar envelopes appear in a few other places of Kontakt, for instance as Zone Envelopes in the Wave Editor.
When you create a new flexible envelope, you’ll initially see a shape which roughly resembles a traditional ADSR envelope in its panel. Any changes to the shape of the envelope will take place within this graphical representation. Just like within the other envelope editors, the X axis represents the time, while the Y axis represents the modulation level.
You can define an envelope shape by creating or deleting breakpoints, moving them around (thereby changing their position in time and their level), and changing the shape of the curves that connect them. The initial preset is an envelope with four breakpoints; this is also the minimum number of breakpoints that have to be present in an envelope.
In order to add a breakpoint to your envelope, right-click (Windows) or [Ctrl] + click (macOS), on the position where you want it to be created. Deleting breakpoints works in the same way: right-click (Windows) or [Ctrl] + click (macOS) on an existing breakpoint will delete it, causing its neighbors (if the breakpoint wasn’t the last one of the envelope) to be connected with a straight line. You can change these connections between breakpoints from straight lines to convex or concave curves by dragging the small circles in their middle up or down.
If your envelope is becoming longer than the time window that’s currently being displayed in the editor, you can left-click and drag the time line horizontally to scroll, or right-click (Windows) or [Ctrl] + click (macOS) and drag it to zoom in and out.
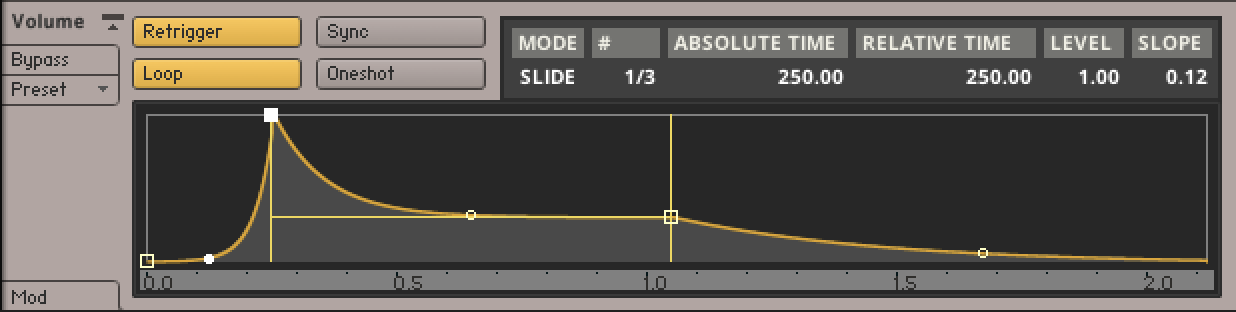
You can move breakpoints around by dragging them with the mouse. The currently selected breakpoint will be indicated with a filled square icon. In addition to its graphical position in the editor, you can view its parameters as numerical values in the breakpoint status line above the editor.

The status bar of the flexible envelope panel displays data of your currently selected breakpoint in numerical form.
These values indicate the current positioning mode, the number of the currently selected breakpoint, its absolute position in time (displayed in milliseconds), its relative distance in time to the preceding breakpoint, its level, and the shape of the curve to the left of the breakpoint (with a value of 0.5 indicating a linear shape, higher numbers indicating a convex shape, and lower numbers a concave shape).
When you move any point (except the last one) horizontally, all points that follow it will move along by the same amount, thereby changing the overall duration of the envelope. To deactivate this feature, click the Mode entry of the breakpoint status line above the envelope editor; this will toggle the breakpoint positioning mode:
SLD: Slide mode is the default setting and shows the described behavior.
FIX: Fixed mode allows independent positioning without affecting other breakpoints.
In addition to the envelope shape, the editor displays three orange lines; two vertical, one horizontal, drawn in a “H” shape. The section between the vertical lines, which can be dragged to other breakpoints (except the first and last point of the envelope), marks the envelope’s sustain phase. This phase affects how the envelope will behave while a note is being held. What exactly will happen during this time depends on whether there are any additional breakpoints between the two orange lines. If the sustain part spans only the curve between two breakpoints, with no other breakpoints in between, the envelope will “freeze” when it reaches the second point’s level — indicated across the sustain part with the horizontal orange line — while the note is being held. In contrast, if there are any additional breakpoints between the start and end markers of the sustain phase, the whole section will be looped until the note is released, in which case the envelope immediately jumps to the section that follows the sustain phase.
The first 8 breakpoints of a flexible envelope are special in that their positions in time and their levels can be modulated via external modulation sources; to do this, open the envelope editor’s Modulation Router and create modulation assignments in the usual way. The slope of these first 8 segments can also be modulated.
Now that you know how the envelope editor works, let’s have a look at the four remaining buttons of the panel:
Retrigger: If this button is activated, the envelope will be restarted every time Kontakt receives a note, even if another note is still being held at the same time.
Tempo Sync: When activated, a vertical grid of note values will be drawn on top of the editor, the step size of which will depend on your current zoom factor (remember you can zoom in and out horizontally by right-clicking or [Ctrl]-clicking and dragging your mouse on the time line). All breakpoints you move around in this mode will snap their position in time to these grid lines, allowing you to create modulation curves in sync to your host or Master Editor tempo. Since this will make the actual length of your envelope change with the host tempo, the breakpoint timing values that were previously displayed in milliseconds will now be displayed in note divisions.
Loop: When activated, the two gray vertical lines in the editor will turn yellow. The envelope segments within the range defined by these lines will loop during the sustain phase of the envelope.
Oneshot: When active, the envelope will always play through to the end, ignoring key release. When inactive, the envelope will jump to the release phase (indicated by the rightmost verticale line) when a key is released. When both Loop and Oneshot are active, the envelope will play indefinitely.
LFOs
Low Frequency Oscillators (LFOs) generate periodic (or in some cases, random) signals, which are typically used for modulation across all kinds of synthesizers and samplers. Their name stems from the modular analogue synthesizer behemoths of the past, where they first originated: it was meant to reflect that their typical operating frequency was the only thing that set them apart from the audio oscillators (which were mostly just being referred to as “oscillators”), since otherwise, they worked pretty much the same, and had similar controls. While audio oscillators generate signals in the audible range of 20 Hz up to 20.000 Hz, LFOs provide a much lower range. This aspect makes sense when you consider that most practical parameter modulations call for speeds that are actually humanly perceivable as changes, not as continuous sounds. Take the canonical vibrato example from the last chapter — even 20 Hz would be much too fast for a vibrato, so the actual frequency is actually far outside the useful audio range.

An LFO, outputting a sine waveform at 1 Hz.
All of Kontakt’s LFOs can generate frequencies within the range of 0.01 Hz to around 210 Hz. You’ll notice that the upper part of this range actually overlaps the audio range, which opens up some rather interesting and creative modulation possibilities, but the better part of your traditional LFO assignments will likely call for frequencies between 0.01 Hz and 40 Hz.

A Multi LFO, which lets you mix all other waveforms into a complex waveform.
Depending on their output waveform, these LFOs will all look slightly different, however they should not be treated like separate modules. Once you have created an assignment that uses an LFO as its source, you can conveniently switch the waveform on this LFO’s control panel in the Modulation section of the Rack; the displayed set of controls will follow your selection. The following section explains every control only once, with an appropriate remark if a control is specific to a waveform.
LFO Controls
LFOs contain the following controls and options:
Waveform: Displays the waveform of this LFO’s output signal and allows you to select a different one via a drop-down menu. The available waveforms are Sine, Triangle, Rectangle, Sawtooth (falling), Random, and Multi, which is a mixture of all other waveforms.
Retrigger: If this button is activated, the LFO waveform will be restarted at the same position each time a note is received. If it’s inactive, the LFO will run in a “freewheel” fashion, without reacting to notes.
Freq: Adjusts the frequency of this LFO’s output signal in Hz (cycles per second). Values range from 0.01 Hz (one cycle in 100 seconds) to around 210 Hz.
Sync (unit icon): The LFO speed can be synchronized to your host tempo, an external MIDI clock, or your Master Editor tempo. To accomplish this, click the displayed unit of the frequency readout. A drop-down menu will appear, allowing you to choose from a list of note values. After you’ve selected a value, the LFO is in sync mode, and the frequency control will adjust and display how many notes of this value will make up the duration of one cycle. For instance, if you select Whole and dial in a value of 1.0, an entire LFO cycle will span exactly one bar of a 4/4 measure. To return to unsynchronized mode, just select Default from this drop-down menu.
Fade in: If this value is greater than zero, the LFO will not start the waveform right away when a note is received, but rather smoothly ramp it up over a time of up to 5 seconds. This works great on human-like vibratos. Like the frequency control, this parameter can be synchronized to a song tempo in the way described above.
Start Phase: Adjusts the position within a cycle at which the LFO will start its waveform when it’s triggered. The value is displayed in degrees, with 0° being the start of the waveform, 180° the mid-point of the cycle, and 360° the start of the next cycle. Setting this parameter only makes sense when the Retrigger button is activated.
Pulsew. (Pulse width, Rectangle waveform only): The pulse width adjusts the duty cycle of the waveform, which determines the ratio between the high and low parts of the cycle. A pulse width of 50% results in a perfect square wave.
Waveform Mixer (Multi waveform only): The Multi waveform is special in that it’s the result of an addition of other waveforms. Which waveforms will appear in this mixture, and at which respective amounts, can be adjusted with an additional set of controls which appears below the main row of knobs when you switch to the Multi waveform. Note that these mix controls are bipolar and thus allow you to reverse the polarity of source waveforms. At a value of 0.0, the respective waveform will be absent from the mixture.
Normalize Levels (Multi waveform only): If this button is activated, and the sum of all component waveforms in the current mixture would exceed the level of a simple waveform at its peaks, the LFO will reduce its level accordingly.
Multi Digital LFO
The Multi Digital LFO is a new LFO type with identical controls to the standard Multi LFO. The difference is in the signals themselves; the standard Multi LFO approximates analog signals, including ripples in signals with sudden value changes (like Rect and Saw), while the new Multi Digital LFO is more mathematically accurate. This is particularly useful for creating precise, rhythmically complex modulation sources.
 |
A Multi Digital LFO.
Other Modulators
This category includes all internal modulation sources that won’t fit into one of the other categories.
32-Step Modulator
The Step Modulator works similarly to a classic step sequencer in that it allows you to freely define a row of up to 32 values, which will then be “played back” at a constant speed. You can define these bipolar values by drawing bars that originate from the middle line with your mouse; the higher a bar, the further the modulated parameter will stray from its original value at this point in the row. To draw a linear change across multiple bars, right-click ([Ctrl]-click on Mac OS X) and drag the mouse in your editor; this will draw a line which will be reproduced with bars when you release the mouse button. The speed at which the Step Modulator will move from bar to bar can be synchronized to your host or Master Editor tempo.
The Step Modulator contains the following options and controls:
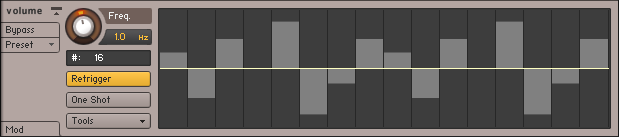
Freq: Adjusts the “playback speed” of the Step Modulator. Values range from 0.01 Hz (an entire cycle through all bars will take 100 seconds) to around 210 Hz. You can synchronize the speed to your host or Master Editor tempo by clicking on the displayed unit, then choosing a note value from the drop-down menu and adjusting the speed knob to a number of these note values that will be spanned by one cycle.
# (number sign): Determines the number of steps in the sequence. Click this field, then drag your mouse up or down to change the number of steps in your row. As the modulator will immediately wrap to the first row after it has reached the end, a power of two in this field (like 8, 16 or 32) will ensure that the Step Modulator keeps aligned with a binary song meter during playback.
Retrigger: If this button is activated, the Step Modulator will restart its sequence at the first bar each time a note is received. If it’s inactive, the step modulator will run in a “freewheel” mode without reacting to notes.
One Shot: If this button is activated, the Step Modulator will play the row once, then stop. Otherwise, it will loop the row indefinitely.
Tools: Opens a drop-down menu with two utility functions: Reset will set all step amplitudes to 0, Snap 1/12 will restrict all edits to a grid of 24 steps (12 in each direction), which, in combination with a pitch assignment with full modulation intensity, allows you to create note sequences within a chromatic scale.
Envelope Follower
The Envelope Follower continually analyzes the amplitude of the currently played sample and generates a modulation signal from it, thereby replicating the dynamic envelope of the audio signal for your own use. In other words, whenever your audio signal gets louder, the modulation signal will rise accordingly; when it gets quieter, the modulation signal will fall.
The Envelope Follower contains the following controls:

Attack: Adjusts the Envelope Follower’s response time to rising levels. Larger values will “smooth out” the attack phases that correspond to increasing audio levels. Very short values can cause distortions, as the Envelope Follower will begin to track each cycle of the audio waveform.
Decay: Adjusts the Envelope Follower’s response time to falling levels. Larger values will “smooth out” the decay phases that correspond to decreasing audio levels. Very short values can cause distortions, as the Envelope Follower will begin to track each cycle of the audio waveform.
Gain: Adjusts the Envelope Follower’s sensitivity to the audio signal. Larger values result in a higher envelope amplitude.
Adapt: Sets a baseline transient response time for the Envelope Follower.
Glide
The Glide module acts as a source for a special modulation signal that’s needed to create a portamento effect. This effect is known from monophonic synthesizers and adds a sliding transition between the pitches of two consecutive notes when they are played in a legato fashion. To create a portamento, assign the Glide module to the pitch of your source module, and set the corresponding modulation intensity to the maximum value. Using this module in other ways rarely makes sense. Also note that while using this facility with polyphonic Instruments certainly works, the effect is usually associated with monophonic Instruments.
The Glide module contains the following controls:

Time/Speed: Selects one of two different glide modes. If Time is selected, all transitions happen in the same time, regardless of the interval between the notes; in Speed mode, wide-spaced intervals will result in longer transitions than close-spaced intervals, as the glide speed will be kept constant.
Speed: Adjusts the speed of the portamento. You can synchronize this parameter to your host or Master Editor tempo by clicking on the displayed unit, then selecting a note value from the drop-down menu and adjusting a numerator for this value with the speed knob.
External Sources
This category encompasses modulation sources whose signals don’t originate from one of Kontakt’s source modules; most of the sources found in this category reference incoming MIDI data of any sort, allowing you to use data like pitch bend, aftertouch, or MIDI controllers for parameter modulation.
The External category contains the following options and controls:

An external modulation assignment which maps MIDI Velocity to the volume parameter of an Amplifier Module.
Pitch Bend: This kind of MIDI data is usually sent by pitch bend wheels or levers on master keyboards. Unlike normal MIDI controllers, pitch bend data is transmitted in a rather fine resolution of 14 bit, which provides 16,384 value steps. If both your controller and the parameter that you’d like to modulate can work with this resolution, Kontakt will use it to its full extent.
Poly Aftertouch: This controller, also referred to as key pressure, is sent by a rather small number of MIDI keyboards and allows you to receive aftertouch pressure data for individual keys. Note that in order to create an Instrument that responds to polyphonic aftertouch, you’ll need to spread your voices across multiple Groups that are cycled in a round-robin fashion, so that the pressure of each key can be processed within its own group.
Mono Aftertouch: This controller, which is also being referred to as channel pressure, provides a single value for the aftertouch pressure that’s applied to held keys. It’s sent by a wide range of master keyboards.
MIDI CC: The MIDI specification provides 128 continuous controllers (0-127) for general use. These are supported by almost all MIDI controller devices and used for transmitting the status of controllers like modulation wheels, sustain and volume pedals, or general purpose fader banks. Some controller numbers are assigned to standard devices (#1 = modulation wheel, #7 = volume, #11 = expression, #64 = sustain pedal, to name a few), but Kontakt doesn’t take that into account — you can use all controller numbers between 0 and 127 as modulation sources.
Key Position: This source provides access to the MIDI note number of a pressed key. It can be used to change parameters, like a filter cutoff, in response to the pitch of the played note in order to make keyboard tracking possible.
Velocity: This is a value between 0-127 that indicates how hard (technically, fast) a key has been hit. It’s transmitted by nearly all master keyboards and is frequently being assigned to parameters like volume, brightness, or (inversely) the length of the attack phase.
Release Velocity: This value is sent by a rather limited number of master keyboards. It indicates how slow or fast a key is being released and is useful for changing the length of a sound’s release phase accordingly.
Release Trigger Counter: This value is generated for Groups that are being triggered on release and indicates the time between the trigger and the release signal. Read the description of release triggers in The Source Module for an in-depth explanation of this facility.
In addition to external MIDI data, the External category also includes 3 special sources of scalar values that won’t change over time:
Constant will simply add or subtract the value of the modulation intensity fader to the modulated parameter. It can be used to easily “bend” parameter values beyond the range limits of their controls.
Random Unipolar will generate a random value between 0 and 1 for each received note.
Random Bipolar will generate a random value between -1 and 1 for each received note.
From Script is a special modulator which responds to per-event generated modulation data from Kontakt's script processor. See the KSP manual for more information.