Signal Processors in Kontakt
This section provides an overview on how to work with Kontakt's signal processing modules, both filters and effects.
Kontakt has a sophisticated signal flow structure that allows you to create flexible signal routings and process your audio signals with a range of effects and filters. This chapter will provide an overview on how to work with Kontakt’s signal processing modules; it will explain what kinds of modules are available and how they can be be used in an optimal way. The term 'signal processor' refers to both effects (audio processors you would expect in a typical multi-effects device) and filters (modules that change the frequency content of your signals).
The following chapters will provide in-depth descriptions of the effects and filters available in Kontakt’s extensive collection of signal processors, but for the moment let’s stick to the general basics. The following diagram depicts Kontakt’s signal flow structure:
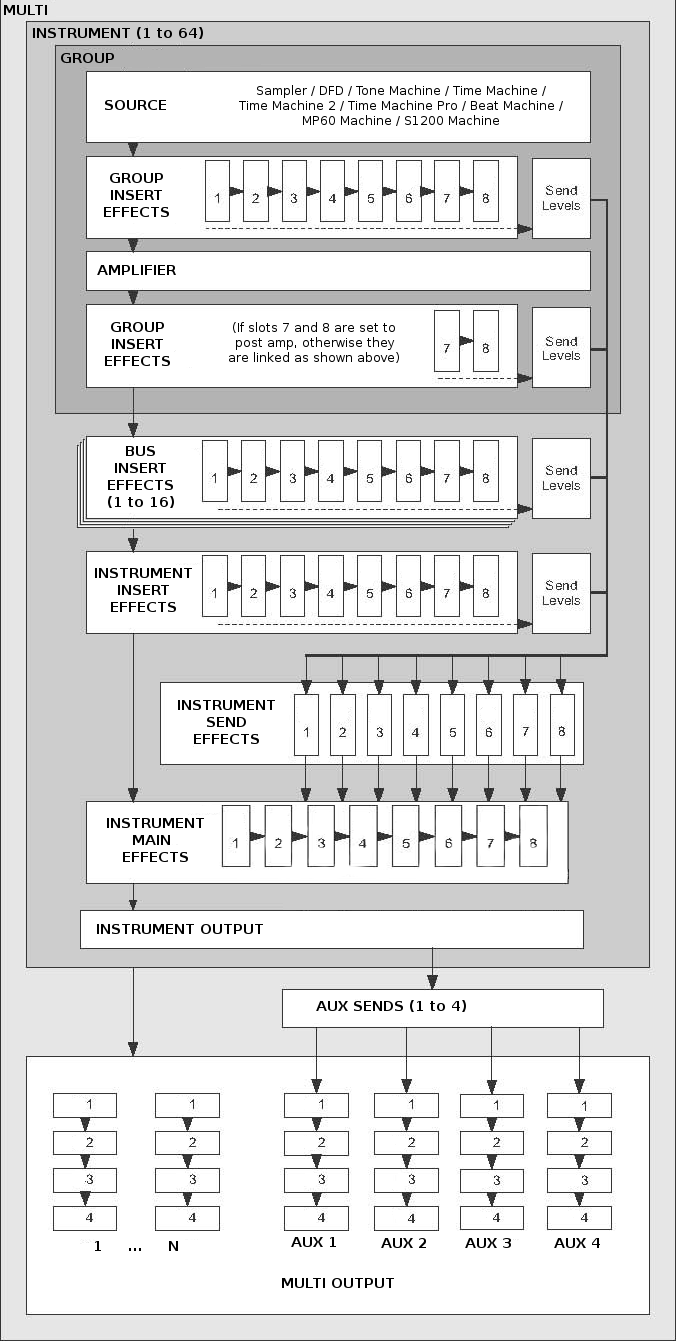
Audio Signal Path
Take a look at the five rows of eight slots each that reside within the Instrument and Group structures: these are the slots that can take up signal processor modules of your choice. Four rows — titled Group Insert Effects, Bus Insert Effects, Instrument Insert Effects, and Main Effects — form chains of insert modules. This means that the audio signal is processed in its entirety by each of the signal processors in the order in which they are placed in the chain, with the output of the rightmost module in the chain being used as the output signal of the Group, Bus or Instrument.
In contrast, the slots of the Instrument Send Effects section take up modules that work independently from each other in a parallel fashion. The idea behind send effects is that you can “tap” your signals at various points of the signal flow, and send them to a send effect at an adjustable level.
If you’re familiar with how signal processors are used in a studio environment, with devices like compressors and equalizers usually being inserted into the signal flow, and effects like reverbs being fed through the aux sends of a mixing console and added back to the main mix, you’ll discover that Kontakt’s signal flow replicates these concepts and uses the same terminology in a lot of cases. Let’s take a closer look at each row of slots.
Group Insert Effects
This chain takes up to eight modules which will process the output signal of a specific Group in the order of their placement in the chain. Here’s a typical application example: Suppose you’re creating a drum kit Instrument, which has the typical array of drums (e.g. bass drum, snare, toms, and cymbals) separated into a Group for each drum. The snare is a bit lacking in “punch”, so you want to use a compressor with a long attack time to bring out its initial “slam, but you don’t want your cymbals to be treated in the same way. You can enable the “snare” Group in the Group Editor for editing (take care that you deactivate all other Groups, or else their chains will be changed in unison), and add the compressor to this Group’s Group Insert Effects chain. Only the snare sounds will pass the compressor; all other Groups are unaffected.

The Group Insert Effects Chain
The Group Insert Effects chain has an additional feature that separates it from the Instrument Insert Effects chain: while the slots to the left of the chain always receive the signal before it enters the Amplifier module, the slots on the right can optionally be placed after the Amplifier module in the signal flow. This is very useful in cases where you want to use the Send Levels module, which allows you to send signals to modules in the Instrument Send Effects slots. While you usually wouldn’t want the operation of a distortion effect to be affected by your volume envelope, and therefore would place it before the Amplifier, sending a pre-Amplifier signal to a reverb or delay can give unexpected results. In most cases, you’ll want send effects to receive the output of the Amplifier as you’re hearing it, so placing the Send Levels module in one of the two rightmost slots by default is a good idea.
To specify the number of post-amplifier effects:
Click and drag on the numeric value in the PostAmpFX section.
There are a few other details to keep in mind when you’re working with Group Insert Effects:
Group insert modules work in a polyphonic fashion, which means that their effect will be computed separately for each voice that you play. In some cases, this can result in different sounds than you might expect, for instance when you use compressors or distortion effects. This behavior allows you to create modulations that work on a per-Voice basis, such as velocity-controlled distortion, or key-tracking filters. Keep in mind, though, that in consequence, this multiplies each module’s CPU resources by the number of voices; if you don’t need Group-specific or polyphonic processing, it’s more efficient to move a module into the Bus or Instrument Insert Effects chain instead, where it will operate on the summed signal.
Most parameters of Group insert effects can be modulated internally via a modulation matrix. This matrix can be accessed via the Modulation button in the lower left corner of an effect panel. Kontakt’s modulation system is explained in detail in section Modulation in Kontakt .
Many of Kontakt’s signal processors are capable of processing multichannel signals. If a compatible effect follows a multichannel zone or a Surround Panner, it will operate on all surround channels.
Bus Insert Effects
You can select one of Kontakt’s 16 Instrument Buses as an additional effect chain for several Groups. You can have up to 16 buses, each with an independent effect setup. You can select the Bus you wish to edit by clicking on the output level meter to the top of this section or by selecting it from the drop down menu below the Edit All Buses button. If you want to edit all Buses at once, activate the Edit All Buses button. While this button is active, any changes you make on the Bus level will affect all Buses at once.
The Bus level also has an amplifier section, with Volume, Pan, Phase Invert, and L/R Swap controls, as well as an output selector drop down. The Output menu functions much in the same way as the Group level, but with one extra option to route the output through the instrument output, but bypassing the Instrument Insert Effects Chain. To do this, select program out (bypass insertFX) from the Output menu.

You can route Groups through the Instrument Buses for more flexible effect routing.
The outputs of the Groups you have routed to any Bus are summed and processed together; all processors operate in a monophonic fashion, without any means to discern between voices. The effect chain section can be edited in a similar fashion to the Group Insert Effects Chain, but without the pre or post amp optional routing.
A typical application of the Instrument Buses would be if you had several different Groups, but these could be grouped into audio chains for similar processing, for example: drums. Here you may have different Groups for each articulation, but for the effects processing you want each instrument type (kick, snare, toms, etc) grouped together to be processed through different effect chains.
Instrument Insert Effects
This chain operates on the summed output signal of all Groups and Buses (unless they are routed directly to an Output Channel). It works exactly as the Bus Insert Effects chain, with the exception that it doesn’t offer an Amplifier section; any volume, pan and output control at this point is placed in the instrument header. Like the Bus Insert Effects Chain, all processors operate in a monophonic fashion, without any means to discern between voices. A typical application of modules in this chain would be a compressor or EQ that should operate on an Instrument signal in its entirety.

The summed signals from your Groups will pass the Instrument Insert Effects chain just before they’re sent to the Master Effects chain.
Instrument Send Effects
To use a module as a send effect, add it to one of your Instrument’s Send Effects slots, and tap a source signal to be sent there by adding the Send Levels module to a Group, Bus or Instrument Insert Effects chain. A typical effect to be used in this way is a reverb: you might want to send different levels from the different parts of your instrument to the reverb, but then control the reverb as a single effect unit, Send Effects let you accomplish this.
The amount of signal that’s being sent to the effect is called the send level, while the effect’s output level is called the return level. In contrast to the Insert chains, the Instrument Send Effects work in parallel, and only receive signals that you explicitly send to them via the Send Levels module.

After you have added an effect to a slot in the Send Effects row, you will notice on its panel that it has a control labeled Return on its right side. This knob allows you to adjust the return level for this effect, as well as choose a routing target for its output signal by clicking on the small “I” icon next to the numerical readout.
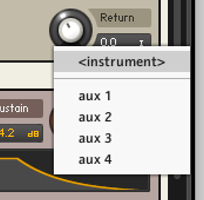
Changing the output assignment of your send effects modules allows you to isolate wet effect signals from your Instrument’s Output Channel.
Notice
Note that you can send a signal to a send effect from more than one place within your Instrument. In such cases, the signals will be summed before they enter the effect; in other words, all send effects operate in a monophonic fashion.
Main Effects
The Main Effects chain operates on the summed output signal of all Insert Effects and Send Effects (unless they are routed directly to an Aux Channel). The chain is comprised of eight module slots which act as the final processor chain of your signal before the Instrument Output. The eight modules will process the signal of the selected Instrument in the order of their placement in the chain.
A typical use for the Main Effects section is to apply a limiter to the final output of your Instrument, in order to avoid digital clipping. Using a compressor in this chain enables you to control the final dynamic content of the signal, and also glue sounds together for a more well balanced sound. Modules in this chain should be applied with the intention of operating on an Instrument signal in its entirety.
 |
The Main Effects Chain
Common Parameters
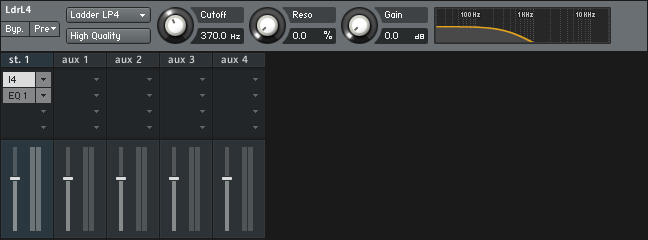
All signal processing modules have a few functions in common; you can find these on the left side of their parameter panels.

Each control panel provides buttons for bypassing the module, opening a list of presets, and showing or hiding the Modulation Router for this module if it resides on the Group level.
Byp. (Bypass): Clicking on this button will toggle a bypass mode, which causes the module to pass its input signal on to its output, without any processing taking place. In the process of tweaking parameters, it’s sometimes easy to lose objectivity and unintentionally go “over the top” with your processing, so it’s good practice to re-check your signal against the unprocessed sound every so often when you’re tweaking parameters.
Pre (Preset): This button opens a drop-down menu which allows you to pick a set of parameter values for this module from Kontakt’s preset library, as well as save your current settings as a new preset. Note that the insert and send slot rows (and, for that matter, most other modules in Kontakt) have their own preset menus; these allow you to load and save entire signal processing chains.
Mod (Modulation): Only modules that have been added as Group inserts have this button. It opens a Modulation Router, which allows you to create modulation assignments for most effect parameters via Kontakt’s internal modulation system. The modulation system is explained in section Modulation in Kontakt.
Adding Modules
There are two ways of adding a signal processing module to a slot:
To add an Effect Module to a slot, click the + icon in the lower right corner of an empty slot and select a module from the drop-down menu.
To change a module’s position in a chain, you can drag it onto the separator line between two slots; a vertical line will appear if it can be moved to this position. All modules to the right of this position (if any) will move one slot further to the right in order to make place for the module.
Deleting Modules
To delete a module from a slot, either click on the X icon in the upper right corner of the module field, or select this module’s parameter panel and press the delete key on your keyboard.
Editing Module Parameters
Whenever you add a signal processing module to a slot, this module’s control panel will appear below the slot row. The panel can be shown and hidden by either clicking the button labeled Edit in the lower left corner of the row, or by double-clicking on an effect module in that row. While the control panel is visible, it will show the controls of the currently selected module; clicking on another module will switch over to that one, so there will be only one module’s panel displayed below the row at any time.

Each signal processing module provides a panel with controls that let you adjust its parameters.
Signal Processors in the Outputs Section
The facilities described so far in this chapter allow you to use signal processors in various places and configurations throughout your Instrument. But what if you want an effect to operate on more than one Instrument in your Multi?
For this reason, Kontakt also provides effect slots that can be used to perform signal processing in both flavors — as inserts or sends — within the Outputs section, which is described in detail in section Modulation in Kontakt of this manual. Inserts are provided within the Output Channel strips, while separate channels, called Aux Channels, provide the necessary means to use send effects across Instruments. Let’s look at both of these in detail.
Output Channel Inserts
Display the Outputs section from the Workspace menu. To the left, you’ll see one or more output channel strips. Just below the channel name at the top, there are four slots; this is the insert chain for the respective channel. If you can’t see these slots, check that the Outputs panel is maximized by clicking on the button to the top right of the Outputs section.
The Output Channels with Effects inserted
The Output Insert chain works exactly the same as the Bus Insert Effects or Instrument Insert Effects chains, though laid out in a vertical fashion, with the topmost slot being the first of the chain. Clicking on the small arrow icon next to a slot will open a drop-down menu with the names of all available signal processors. Once you’ve selected and inserted a module from this list, you can show and hide its parameters for editing either by clicking on its name. Opening the drop-down menu and selecting the Empty label at its top will remove a module from the chain.
Aux Channels
Remember that the Instrument Send Effects slots provide a means to use effect modules as send effects, which can be used across multiple Groups and Buses; in a similar fashion, Aux Channels allow you to use send effects across multiple Instruments. You’ll find the Aux Channel strips on the right side of the Outputs section mixer; technically, they’re just additional output strips that get their signals from different places throughout the signal flow. Consequently, this also means that effects can be added in the same way as with the normal output channel strips; just open the drop-down menu at one of the insert slots and select a signal processor for the respective slot.
The Aux Channels can be fed from two places in Kontakt. By clicking on the aux button in the Rack header in Multi Instrument mode, a row of level controls will appear below each Instrument Header. With these controls, you can send the respective Instrument’s output signal to one or multiple Aux channels at adjustable levels.

Instrument Aux Sends
Alternatively, you can re-route the output signal of any effects module that you added to a Send Effects slot to one of the Aux Channels. While this might seem counter-intuitive at first, it makes sense when you consider that you might want to access the wet signal of a send effect separately from the main output; routing it to an Aux Channel not only allows you to further process the wet signal in isolation, but also makes it possible to route the signal to different physical Kontakt outputs. You can also use the Gainer module within a Send Effects slot to build a “bridge” to the Aux channels and feed them with Group-specific signals; this process is explained in section Gainer of this manual.