The Mapping Editor
Samples, which are essentially audio files by another name, are made playable in Kontakt by creating Zones that reference these files. A Zone is a kind of container that holds information in order to tell Kontakt which Sample to play when a specific note is received. A Zone needs to specify a range of note and velocity values that it should respond to. In addition, a Zone can contain other values, like volume, pan, and tune adjustments.
All of the facilities required to specify the parameters of a Zone (and a few more) are provided in the Mapping Editor.
Click on the Mapping Editor button just below the Instrument Header to toggle the Mapping Editor view on and off.
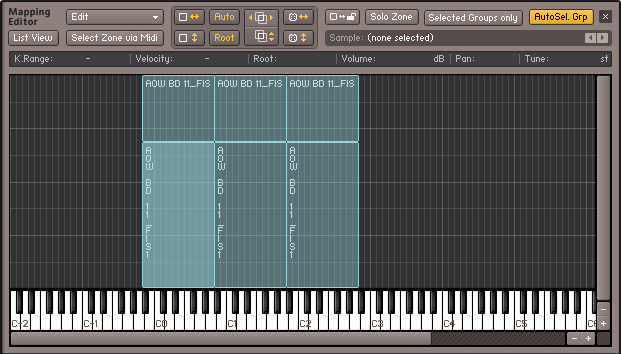
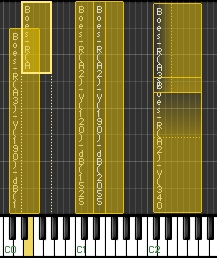
The Mapping Editor, displaying the Zones of an Instrument which contains 3-layer velocity switches throughout its playable range.
The Mapping Editor consists of three parts:
At the top, a control strip with two rows of buttons and menus provides access to a number of utility functions that operate on your selected Zones.
A status line displays the parameters of the currently selected Zone and allows you to change it.
The largest space is taken up by the Zone grid, a two-dimensional panel with a keyboard at its bottom. It displays and lets you change the key range (horizontal axis) and velocity range (vertical axis) of each Zone in an intuitive, graphical way. Scroll bars at the right and lower border allow you to move the view around, as well as zoom vertically and horizontally by clicking the “-” and “+” buttons; the “-” and “+” keys on the number pad of your keyboard will do the same. Alternatively, you can quickly zoom into a specific region by holding the Alt key while clicking and dragging the mouse on the grid; this will open a “rubber band” selection frame, which will fill up the whole view with its selected area when you release the mouse button. To zoom out again, just click somewhere on the grid while holding the Alt key. When you play a note on your MIDI keyboard, a small red marker should appear above the corresponding key of the on-screen keyboard, with higher velocities being indicated with a higher position in the grid.
Mapping Samples Manually
You can manually create Zones by dragging one or multiple Samples from the Side pane or your desktop into the Zone grid of the Mapping Editor. While dragging, a highlighted region will tell you where Kontakt would place the Zone(s) on the keyboard. When you release the mouse button, the Zones will be created; if you change your mind and don’t want to add new Zones, just move your mouse outside the Mapping Editor and release the button.
While you keep your mouse button depressed, Kontakt will highlight the pattern in which it would map new Zones to the keyboard.
The way Kontakt will distribute the new Zone(s) depends on your mouse position and whether you’re dragging one or multiple Samples:
Dragging a single Sample into the Zone grid will create a Zone that spans the entire velocity range, and will be placed on one or several adjacent keys. When you move the mouse all the way to the bottom of the grid, the Zone will be assigned to a single key; moving the mouse upwards will gradually enlarge the keyboard range of the Zone, until it spans the entire keyboard when you’re at the top of the grid.
Dragging multiple Samples into the Zone grid will create a corresponding number of adjacent, non-overlapping Zones, starting with the key at your horizontal mouse position. Just like when you drag single Samples, the vertical mouse position will adjust the size of each Zone’s key range. When you move your mouse all the way to the top of the grid, all Samples will be layered in overlapping Zones that span the whole key range.
Dragging multiple Samples onto a key of the keyboard below the grid will create a corresponding number of Zones that evenly divide the velocity range on that key. This makes for a convenient way to quickly create velocity switches.
Note that when you drag multiple samples from the Side pane into the Mapping Editor, the sort order in which they appeared in the Side pane will also determine the order in which the corresponding Zones will be placed. For instance, if you’d like to create an eight-way velocity switch out of samples named “Piano-C3-1.wav” through “Piano-C3-8.wav”, you should make sure that the Samples list in the Side pane is sorted by name in ascending order before you select and drag the Samples into the Mapping Editor.
In addition to Samples, you can also drag one or multiple sliced loops into the Mapping Editor to place them on the keyboard. In this case, the newly created Zones won’t belong to the currently selected Group; instead, a new Group will be created for each Loop with its Source Module set to Beat Machine mode.
Mapping Samples Automatically
Placing Zones manually by dragging Samples from the Side pane into the Zone grid works well if your Instrument won’t contain a lot of Zones, or if your Samples are conveniently named in a way that makes it possible to pre-sort them in the Side pane before you create Zones out of them. But what if the samples of your violin set are not named “Violin-1.wav” through “Violin-14.wav”, but instead “Violin-G2-A2” through “Violin-A#5-C6”? There’s no way to get the Side pane to sort them in any meaningful way.
For scenarios like this, the Mapping Editor includes an Auto-Mapping feature. It consists of a customizable filename scanner that first attempts to determine which parts of your Sample’s filenames could contain valuable information, then lets you assign to which Zone parameters these parts should be mapped.
To use the Auto-Mapping feature, you’ll have to create Zones out of your Samples first by dragging them into the Mapping Editor as described above. While doing this, you won’t have to care about aspects that can be derived from the Sample filenames later. For instance, if your filenames contain the key range, you don’t need to place the Zones anywhere particular; they will be moved to their correct destinations by the Auto-Mapping feature anyway.
In the next step, mark all Zones in the Mapping Editor upon which you want the Auto-Mapping feature to act. You can select multiple Zones either by holding the [Shift] key while clicking on them, or by clicking on the grid background and dragging the mouse to open a “rubber band” selection frame. When all Zones you want to process are selected, open the Edit drop-down menu at the top of the Mapping Editor and choose Auto Map — Setup. A dialog window will appear that displays the result of the filename scanning process.
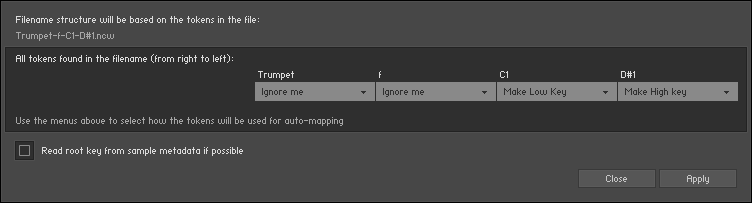
The Auto Mapping dialog, displaying a filename that has been split up into four tokens.
At the top of this dialog, you can see which filename has been used to determine where the interesting parts of the filename could be. These so-called “tokens” are any strings that appear in the filename and are separated from each other with non-alphanumeric characters like spaces, dashes, or underscores. Below, the filename is displayed again, this time split up into its determined tokens, with a drop-down menu below each of them. These menus allow you to specify for each token whether it shall be ignored or used to derive any Zone information. For example, if your Samples are named similar to “Trumpet-f-C1-D#1.wav”, with the “f” indicating the dynamic layer and the notes representing the low and high endpoints of the key range, you can leave the drop-down menu of the first token (“Trumpet”) at its Ignore Me entry, while setting the menus of the second, third and fourth tokens (“f”, “C1” and “D#1”) to Make Group Name, Make Low Key, Make High Key and Set to Single Key respectively.

Tokens marked “Ignore me” won’t be used for any automatic Zone adjustment.
Of course, this applies only if you want to separate multiple dynamic layers into Groups, otherwise you can leave the second menu set to Ignore Me as well.
When you enable the Read root key from sample metadata if possible option at the bottom of the dialog, Kontakt will read and use the root key information that’s embedded in some WAV and AIFF files, if available, instead of trying to get it from the filename. Once the settings accurately reflect the information contained in your filenames, click the Close button at the bottom of the dialog.
Now, with the Zones still selected, choose the Auto map selected command from the Edit menu at the top of the Mapping Editor, or use the keyboard shortcut [Ctrl] + T ([Cmd] + T on Mac OS X). If you correctly identified all filename tokens in the previous step, Kontakt will now automatically arrange and place the Zones according to the information it gets from the filenames of their referenced Samples.
Managing Zones
Once you’ve created Zones for your Samples, you can take care of adjusting their parameters to your needs. Each Zone carries the following parameters with it:
Key Range: This is the range of notes on your keyboard to which the Zone will respond. For instance, a keyboard range of “C3–D#3” tells Kontakt that the respective Zone shall be played when a C3, C#3, D3, or D#3 note is received. If a Zone is being assigned to a single key (as it’s the case with chromatically sampled Instruments), the keyboard range will look similar to “C3–C3”.
Vel Range: The values here specify the lowest and highest velocity values the Zone will respond. A Zone that will be triggered regardless of the velocity will have a velocity range of “0–127”.
Root Key: This is the pitch at which the sample was originally recorded. When the Zone is being played at this key, no transposition will take place. Note that an incorrect root key value will result in a transposition offset of the whole Zone, as Kontakt will transpose Zones based on the distance between their root key and the actual received note. Also, for any transposition to occur at all, the Tracking parameter of the respective Group’s Source Module needs to be activated.
Volume: This parameter lets you specify a volume offset for each Zone. The default volume setting of all Zones is 0 dB.
Pan: This parameter allows you to place each Zone independently within the stereo panorama.
Tune: This parameter lets you change the tuning of a Zone within a range of +/- 36 semitones.
Note that the last three parameters are mainly intended for a non-destructive correction of Samples which deviate in volume, panorama position, or tuning. They work in combination with the identically named parameters of the Source and Amplifier modules. If you want to modulate these parameters on a per-Zone basis, read about Zone Envelopes in section Zone Envelopes.
Editing Parameters in the Status Bar
In order to view and change the parameters of a Zone, first select it in the Zone grid of the Mapping Editor by clicking on it. All parameters of the currently selected Zone will now be displayed in the status bar above the Zone grid. You can change a parameter by clicking on its value and dragging your mouse upwards or downwards. While this is the only way to change the volume, pan and tune parameters of a Zone, there are several alternate ways to adjust its keyboard range, velocity range, or root key.
Editing Parameters Graphically
You can change the keyboard and velocity range of a Zone, as well as its root key, graphically within the Zone grid of the Mapping Editor:
Clicking into a Zone and moving the mouse horizontally will move the whole Zone across the keyboard. Using the left and right cursor keys while holding [Ctrl] ([Cmd] on Mac OS X) will move the currently selected Zone(s) across the keyboard.
Clicking on the left or right border of a Zone (the mouse cursor will change when it’s right on the border) and dragging it horizontally, thereby changing the horizontal size of the Zone, will change that Zone’s keyboard range. Using the left and right cursor keys while holding [Shift] and [Ctrl] ([Cmd] on Mac OS X) will adjust the high key limit of the selected Zone’s key range.
Clicking on the upper or lower border of a Zone and dragging it vertically will change this Zone’s velocity range. Using the up and down cursor keys while holding [Ctrl] ([Cmd] on Mac OS X) will move the velocity range of the currently selected Zone(s) by two velocity steps; holding [Shift] and [Ctrl] will change their upper velocity limits.
Clicking on the yellow key on the keyboard below the Zone grid and dragging it horizontally will change the Zone’s root key.
[Ctrl]-clicking and dragging while your mouse is on the left or right border of a Zone will create a Zone crossfade. This function will be explained below.
Alt-clicking and dragging will open a “rubber band” zoom frame; when you release the mouse button, the contents inside the selection frame will zoom in to fill the whole pane. To zoom out again, just Alt-click somewhere on the grid.
You can select multiple Zones by clicking on them while holding the [Shift] key, or clicking on an empty space of the grid and dragging the mouse to open a “rubber band” selection (when you hold [Shift], you can open the selection frame at any point, also on Zones).
Tip
If multiple Zones overlap and you can’t reach one that’s hidden behind another, try holding the [Ctrl] key ([Cmd] on Mac OS X) while clicking inside them repeatedly; this will cycle through all Zones you’re pointing at.
By using the cursor keys while holding [Shift], you can add adjacent Zones to your current selection. This way, you can use the described methods to move or modify the Zones in unison; the status bar, however, will only show values that are identical across all selected Zones when multiple Zones are selected.
Editing Parameters via MIDI
A third alternative that lets you change the keyboard and velocity ranges of a Zone in an intuitive way is using your MIDI keyboard. After you’ve selected a Zone in the Zone grid of the Mapping Editor, enable one of the buttons depicted with a small MIDI jack and a double arrow in the control strip, or both.
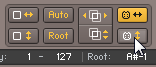
Enabling MIDI Mapping
The button with a horizontal arrow lets you change the keyboard range, the one with a vertical arrow lets you change the velocity range.
When these are active, play two keys on your keyboard; it doesn’t matter whether you play them at the same time or in succession. Depending which of the two buttons you have activated, Kontakt will use the note numbers and the velocity of both notes as endpoints for the Zone’s new keyboard and/or velocity range.
Control Strip
The control strip is located at the top of the Mapping Editor and consists of two rows of controls. This is where you can find most utility functions for managing and editing your Zones.

The Control Strip of the Mapping Editor provides a number of options and utility functions.
Let’s take a look at the elements of the control strip:
Edit menu: This button opens a drop-down menu with utility functions that operate on all currently selected Zones, such as clipboard operations, functions for assigning Zones to Groups, and batch processes. You can find a thorough explanation of all entries in this menu in the next section of this chapter.
List View: This button switches the Zone grid to an alternate view mode that displays all Groups and their contained Zones in a hierarchical list structure at the left side.
Tip
When you’re in list view, you can expand or collapse all Groups at once by holding [Shift] when you click an expand/collapse button.
This mode is especially handy when you’re working with lots of Zones that overlap in large areas, as Zones that are hidden behind others can be difficult to select and edit in the normal, flat view. The downside of the list view is that it doesn’t convey any information about the velocity ranges; the only way to modify these is by editing them numerically in the status bar after you have selected a Zone. Just like the default view, the list view can be moved around with the scrollbars and zoomed with either the zoom buttons or by clicking and dragging a “rubber band” zoom frame while holding the Alt key.
Select Zone by MIDI: If this button is activated, any incoming MIDI note will automatically select any Zone(s) that match its note number and velocity. The function works similarly to the Select by MIDI feature of the Group Editor.
Auto-Spread Zone Key Ranges: This function automatically fills “holes” in your key mapping by successively extending the key range of each selected Zone to both sides until it “touches” its neighbors. The algorithm ignores the root keys of the selected Zones; it simply uses the current key range as a starting point for extension. If you want the root keys to be accounted for, use the Auto-Spread Key Ranges via Root Key function instead. The Auto-Spread Zone Key Ranges function is also available in the Edit menu.
Auto-SpreadVelocity Ranges: This function works similarly to Auto-Spread Zone Key Ranges, but operates on the velocity range of each selected Zone instead of the key range. This function is also available in the Edit menu.
Auto-Map Selected: When you click the Auto button, the Auto-Mapping feature will change the parameters and placement of each selected Zone according to information it has derived from its Sample’s filename. This function is also available in the Edit menu. The Auto-Mapping feature is explained in detail in the previous section of this chapter.
Auto-Spread Key Ranges via Root Key (Root): This function works similarly to the Auto-Spread Zone Key Ranges command; however, it aims for the smallest possible maximum transposition that can occur in each Zone by accounting for the root keys and trying to keep them in the center of their respective Zone. This function is also available in the Edit menu.
Resolve Overlapping Key Ranges: This function eliminates key range overlaps between the selected Zones by successively shrinking the key range of each Zone until it doesn’t overlap its neighbor anymore. It aims for optimal utilization of root keys (and consequently, the smallest possible amount of transposition). This function is also available in the Edit menu and via the keyboard shortcut [Ctrl]-R ([Cmd]-R on Mac OS X).
Resolve Overlapping Velocity Ranges: This function works similarly to the Resolve Overlapping Key Ranges command, but operates on the velocity ranges of the selected Zones. It’s also available in the Edit menu and via the keyboard shortcut [Shift] + [Ctrl] + [R] ([Shift] + [Cmd] + [R] on Mac OS X).
Set Key Range via MIDI: If this button is activated and a Zone is selected, Kontakt will use the next two incoming MIDI notes as the endpoints of a new key range for the selected Zone. This function is described in the previous section.
Set Velocity Range via MIDI: If this button is activated and a Zone is selected, Kontakt will use the velocities of the next two incoming MIDI notes as the endpoints of a new velocity range for the selected Zone. This function is described in the previous section.
Lock Zones: When this button is activated, the key and velocity ranges of all Zones will be protected from being changed graphically inside the Zone grid. This can be handy when you’re doing editing tasks that require you to switch between Zones a lot, and want to avoid accidentally moving one of them or changing its key or velocity ranges.
Zone Solo: This button will mute all Zones in your Instrument except of the currently selected one(s). Once activated, the solo function will follow your selection, so you can quickly check out the contents of specific Zones acoustically.
Selected Groups Only: When this button is activated, the Mapping Editor will only show Zones that belong to the currently selected Group. To help you keep the overview, other Zones will be displayed dimly in the background, but won’t be able for selection or editing.
Auto Sel Grp: When this button is activated, the Group selection will follow your Zone selection. In other words, selecting a Zone will automatically select the respective Group to which it belongs in the Group Editor.
Sample Field: This text field displays the filename of the Sample that’s assigned to the currently selected Zone. When you hover the mouse pointer over this field, Kontakt will additionally display the full path to the Sample file. Using the arrow buttons on the right side of the field, you can assign a new Sample to the selected Zone; the buttons will switch to the previous or next Sample within the folder of the current one.
Batch Functions
You can find these tools in the Batch functions submenu of the Edit menu. In addition to functions that place root keys in relation to the respective Zone borders, the menu includes several utility operations that let you create crossfades between Zones, which needs a brief introduction.
When you create Sample sets of tonal instruments that don’t include a Sample for each note, the notes that haven’t been sampled need to derive their signal from the Samples of nearby notes. This is usually done by transposing these “native” Samples upwards or downwards. This method has a downside — the necessary re-sampling process can “skew” the sound character of your instrument, especially when transposition over a wider note range is required. Consequentially, this means that two consecutive notes on a scale which happen to cross the “border” between two Zones, and thus are both transposed versions of different Samples, can sound dissimilar.
The same problem can arise with velocity switched Sample sets; suppose you’re using four Samples per note, each assigned to one of four equally large velocity ranges. Especially when you’re sampling an acoustic instrument, it can easily happen that two consecutive notes with only marginally different velocity values still happen to fall into two different velocity ranges, thus resulting in noticeably different timbres.
Crossfades provide a way to counteract these effects. The basic idea is that overlapping your Zones and creating a crossfade between them, thus making them blend into each other within the overlapping parts, will mask the difference in sound for notes that fall “between” them.
Crossfades are being depicted with colored gradients.
Consider this example: You’re sampling an instrument in minor thirds and have just sampled D and F. You create two Zones out of the Samples and extend them a major second to both sides. Now, Zone 1 covers the key range between C and E, with its root key being D. Zone 2 has its root key on F and covers the key range between D# and G. Notice that the Zones overlap on D# and E, where both will be transposed. Now you create a key crossfade on both Zones; as a result, D# and E notes will play a blend of both Zones, with the D Zone’s Sample being predominant on D# notes, and the F Zone’s Sample being predominant on E notes. Of course, this method works just as well with larger sampling intervals. Just make sure that your Zones overlap in ranges you’d like to be crossfaded, whether in key (horizontal) or velocity (vertical) direction.
With this knowledge, let’s get back to the contents of the Batch Tools sub-menu:
Auto-apply key crossfades: Creates crossfades between all selected Zones whose key ranges overlap to some extent. Active crossfades will be indicated with a shaded area between Zones; if this makes your Zone grid look too cluttered, try zooming in or switching into List View.
Tip
You can manually create crossfades by [Ctrl]-clicking and dragging the left or right border of a Zone.
Auto-apply velocity crossfades: Creates crossfades between all selected Zones whose velocity ranges overlap to some extent.
Remove key crossfades: Removes all key range crossfades from the selected Zones, if any, which reverts them to normal overlapped Zones.
Remove velocity crossfades: Removes all velocity range crossfades from the selected Zones, if any.
Move root keys to lower border: Moves the root key of each selected Zone to the lowest note in the key range.
Move root keys to center: Moves the root key of each selected Zone to the center of the Zone’s key range.
Move root keys to upper border: Moves the root key of each selected Zone to the highest note in the key range.