The Outputs Section
Kontakt's Outputs section provides a routing and mixing environment in the style of a traditional mixing console.
Kontakt's Outputs section provides a routing and mixing environment in the style of a traditional mixing console. The output signals from all Instruments in the Rack are sent to this section, then routed to the physical outputs of an audio interface or host software. Use the Outputs section to create, delete, rename, and configure Output Channels, which act as mono, stereo, or multichannel signal routing destinations for your Instruments. Rename and configure Aux Channels, adjust the Output and Aux volumes, and monitor your output levels.
To display the Outputs section:
Select the Outputs option in the Workspace menu.
The Outputs panel will appear in the lower half of the Rack space.
The Outputs section contains the following controls:
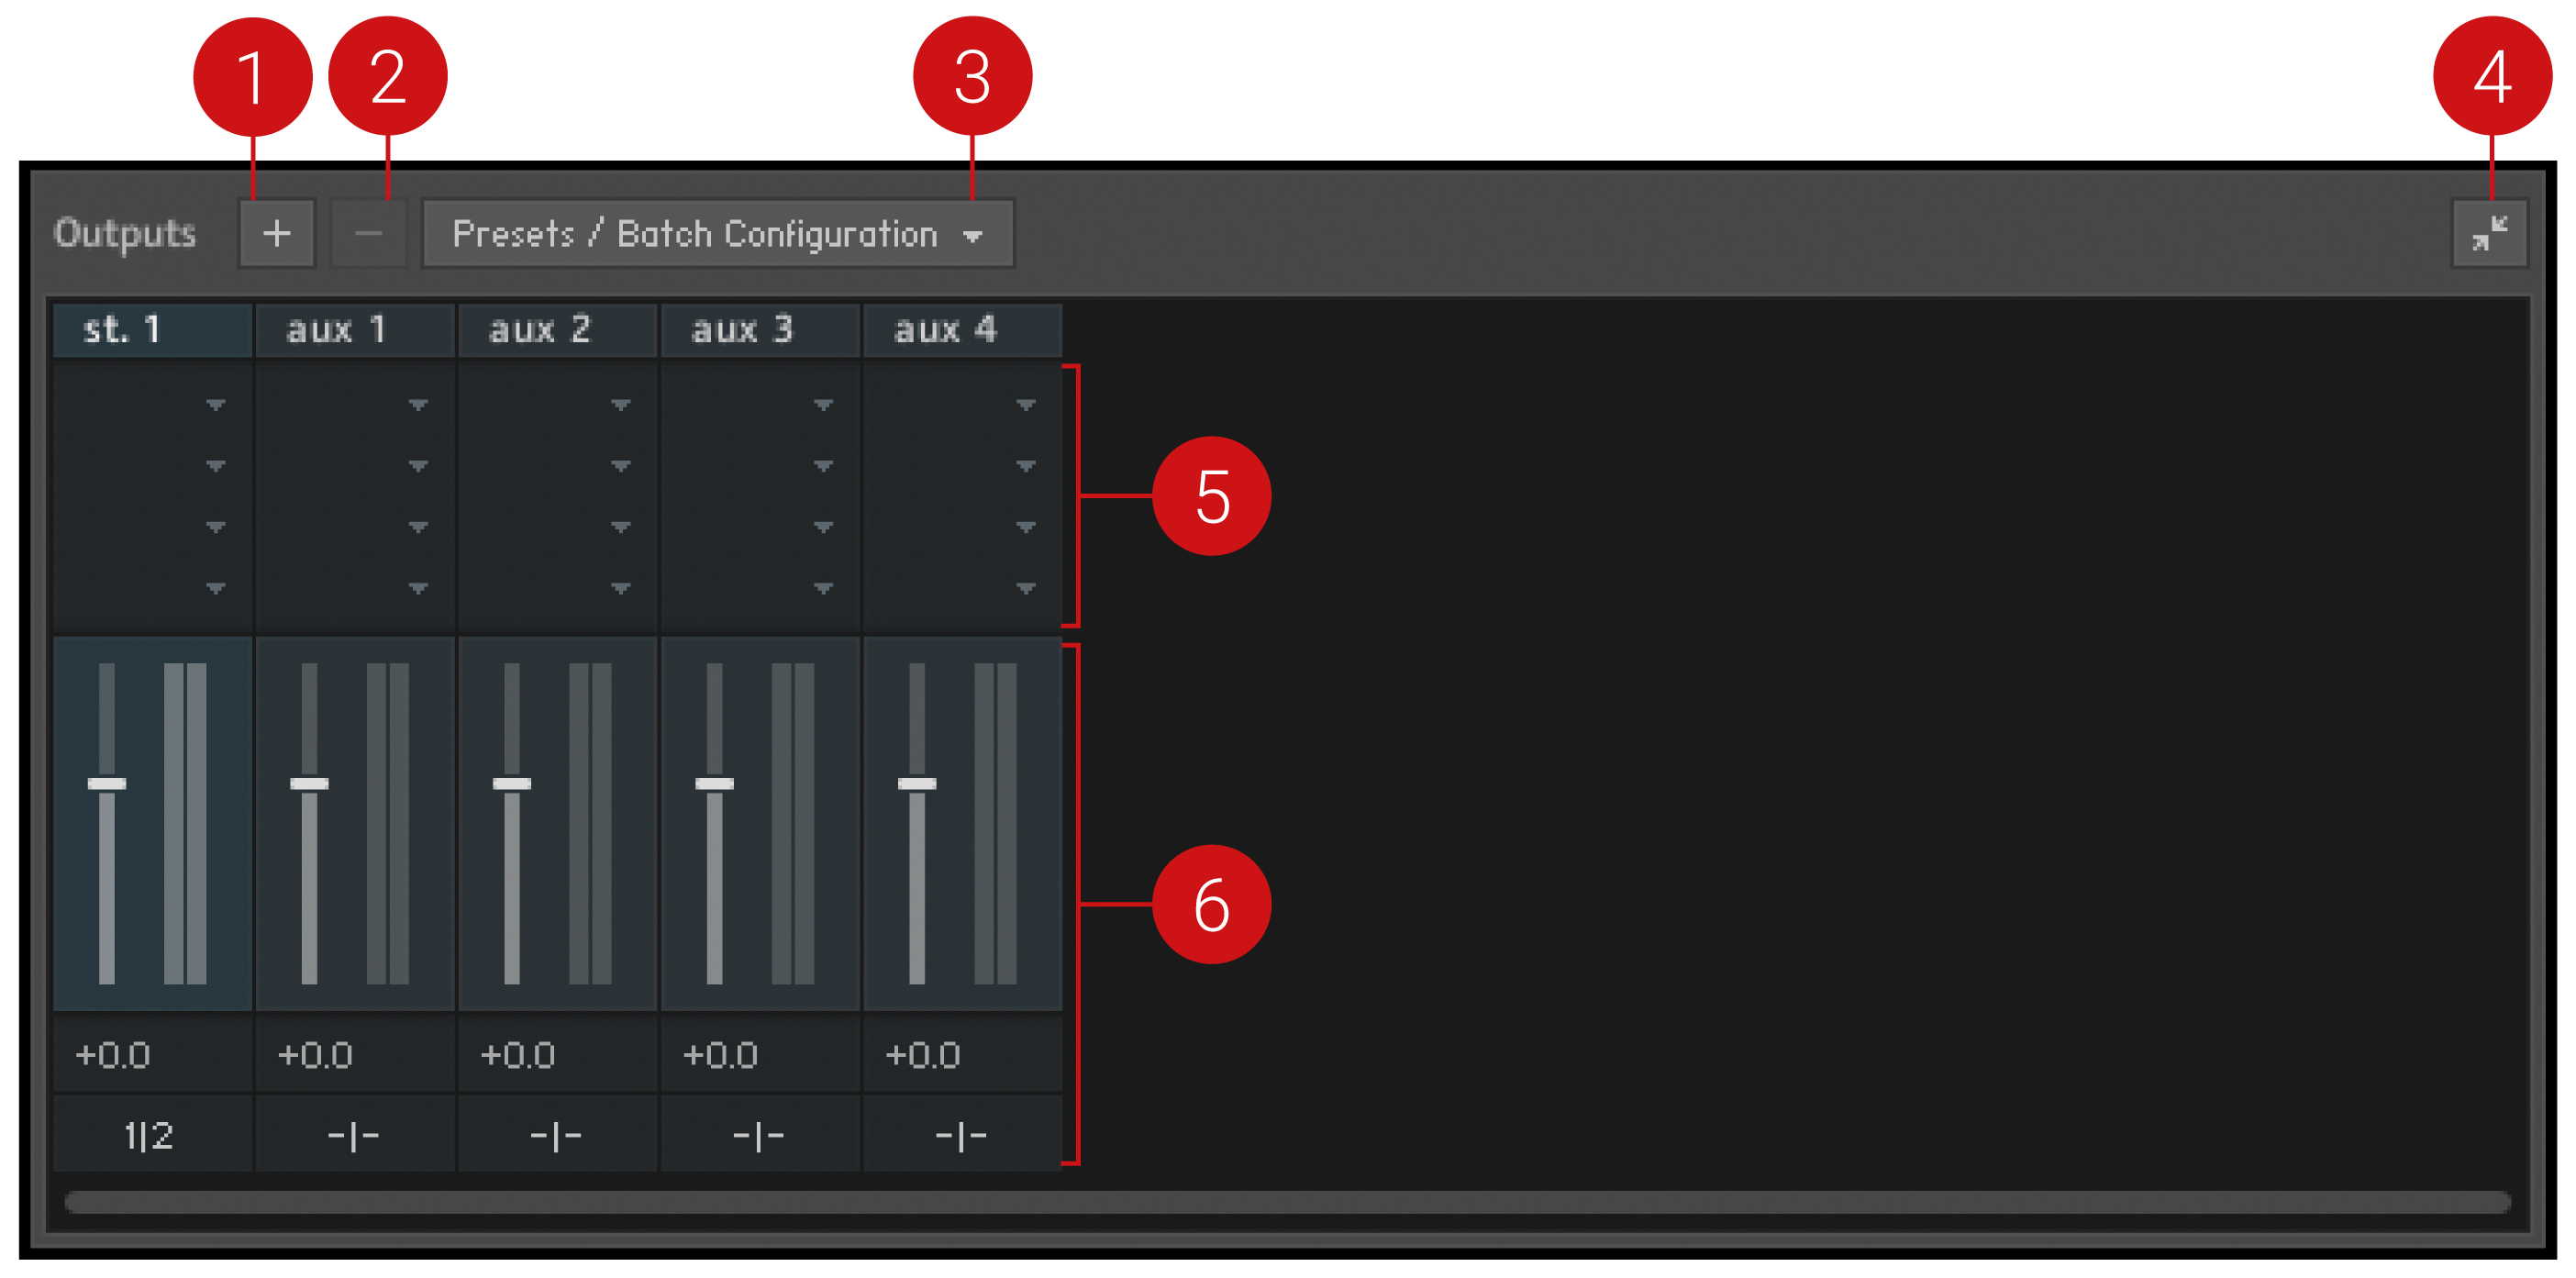 |
The Outputs section, displaying a stereo Output Channel strip and the four Aux Channel strips, left to right.
Add Channels (+ icon): Opens a dialog to create and configure new output channels. For more information, refer to Working with Output Channels.
Delete Channel (- icon): Removes the currently selected channel from the Outputs section. To select a channel, click its border.
Presets/Batch Configuration: Opens a dropdown menu containing options for saving, resetting, or reconfiguring the Outputs section.
Show Inserts: Toggles the Insert slots display. If deactivated, the Insert slots are hidden and the height of the panel is reduced in order to save screen space.
Channel Insert Slots: Contains slots for signal processing modules, which can be inserted onto a channel to process its signal. The Insert slots are only visible if the Outputs panel is at full size. For more information, refer to Working with Signal Processors.
Channel Strips: Displays the controls for the Output Channel strips, followed by four Aux Channel strips. For more information, refer to Channel Strips.
Channel Strips
Output Channels and Aux Channels contain the following identical controls:
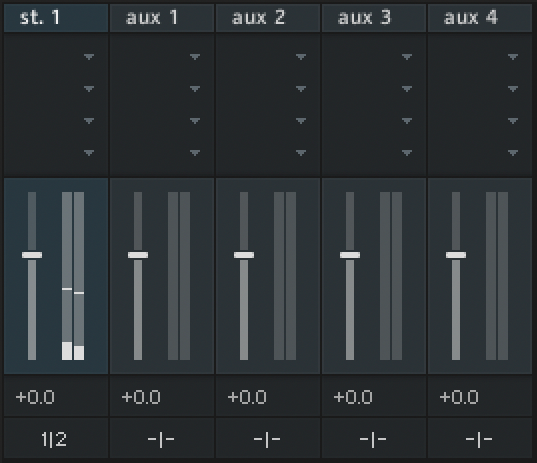 |
Channel Name: This name will be used throughout Kontakt whenever it refers to this channel. Change the name by clicking the text field and entering a new name.
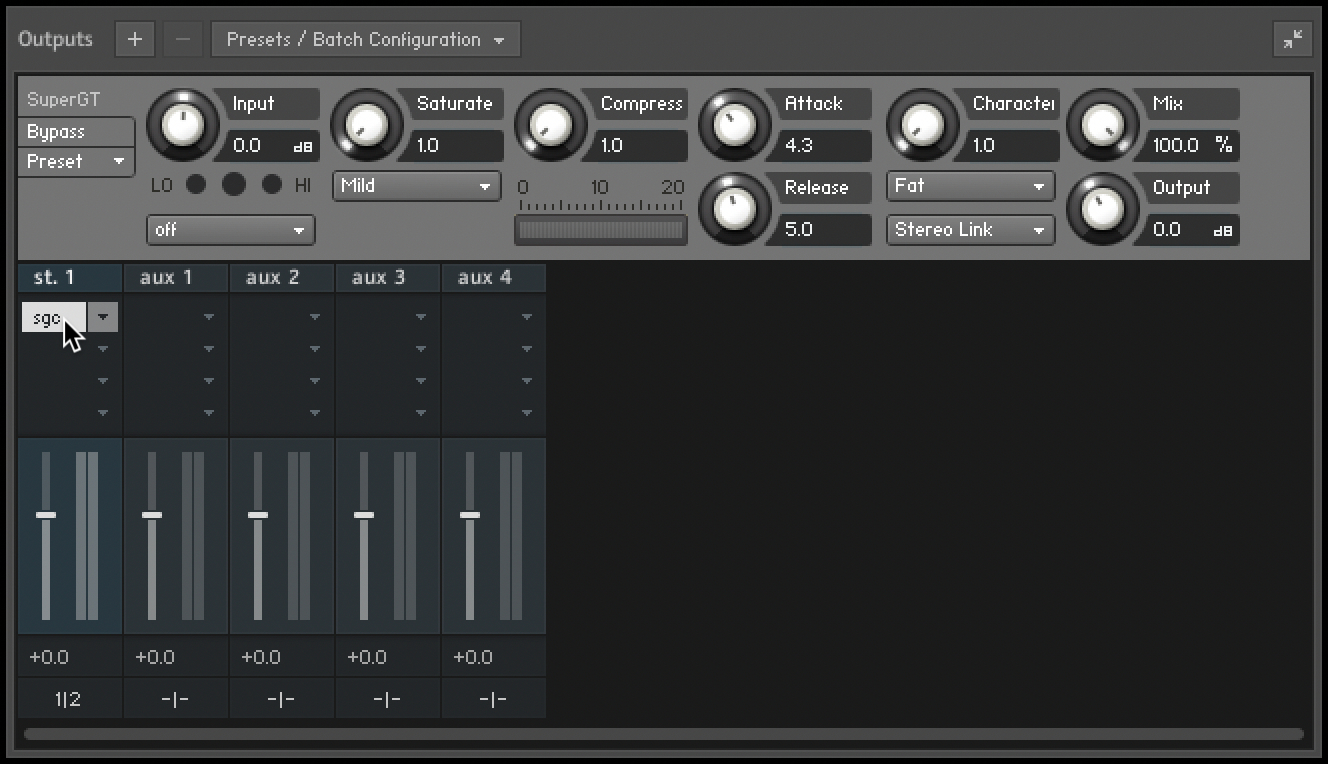
Channel Insert Slots: These slots host signal processing modules, which can be inserted onto a channel to process its signal. The Insert slots are only visible if the Outputs panel is at full size. For more information, refer to Working with Signal Processors.
Channel Fader and Level Meter: The vertical fader adjusts the output gain of its respective channel. The corresponding bar meter provides visual feedback on the signal level.
Channel Configuration: This button opens a dialog window with options to configure the channel's name, the number of audio channels it carries, and its physical output assignment.
Working with Output Channels
In Kontakt, the output signal of each Instrument in the Multi can be routed to any Output Channel that is defined in the Outputs section. Each of these Output Channels can be configured to carry between 1 and 16 audio channels. When a note is played, the respective Instrument’s output signal arrives at the assigned Output Channel, then passes through any channel Inserts, the volume fader, and is finally sent to the the physical output defined in the channel’s Configuration dialog. The bar-graph display next to the channel fader indicates the signal level at the output.
Note
The Master Volume control, located in the Master Editor, will affect the levels of all Output and Aux Channels in the Outputs section. For more information, refer to The Master Editor.
Output Configuration
The Output configuration must contain at least one channel. New Output Channels are configured for stereo signals by default, and can be changed in the channel’s configuration dialog. New Instruments will always be assigned to the leftmost channel in the Outputs section by default.
The Channel Configuration dialog contains the following elements:
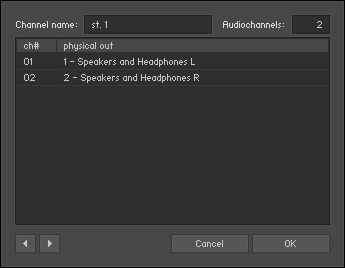
The Channel Configuration dialog
Channel name: Displays the name of the channel. Rename a channel by clicking on the text field and entering a name.
Audiochannels: Adjusts the number of audio channels this channel will carry, up to a maximum of 16. To change the number, click the field and drag your mouse up or down, or double-click the value field and enter a number (1-16).
Output Map: Displays all audio channels of this Output Channel along with their assigned physical destinations, both output jacks on your audio interface or virtual connections to your host. To change a physical output assignment, click its name and choose a new output from the drop-down menu.
Previous/Next (arrow icons): Moves to the settings of the previous or next channel of the Outputs section, allowing you to quickly adjust the output configuration for all channels at once.
Working with Aux Channels
The four Aux Channels in Kontakt offer identical controls to the Output Channels, but receive their signal from other places. While each Instrument routes its output signal to only one Output Channel, you can additionally send this signal to one or multiple Aux Channels, at adjustable levels. This allows you to easily create sub-mixes.
You can also use the Aux Channels as routing destinations for all Send Effects that appear in your Instruments. This allows you to “tap” wet effect signals in order to process them independently from the dry signals. How this kind of routing works is explained in Signal Processors in Kontakt.
Aside from this difference, Aux Channels work in exactly the same way as Output Channels; each has its own channel strip in the Outputs section, can contain up to four insert signal processors, and can be routed to specific physical outputs. In addition, the levels of all Aux Channels can be adjusted globally with the Master Volume control located in the Master Editor.
Working with Signal Processors
Kontakt provides a range of signal processors that can be added as inserts and sends in the Outputs section. Inserts are provided within the Output Channel strips, while the Aux Channels can be used to send effects across Instruments. Each Channel has four slots, which can be loaded with different signal processors for varying uses.
To add a signal processor to a slot:
Click the menu button (arrow icon) on a slot to open the Effects menu.
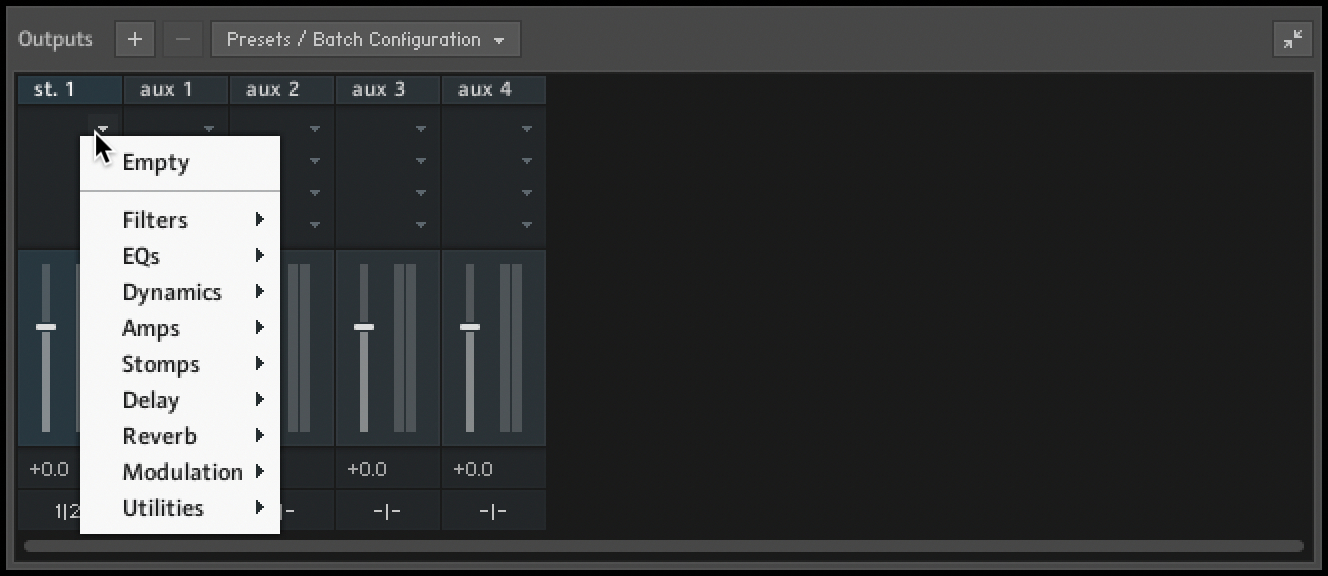
Select from the nine categories, then select a module to load it onto the slot.
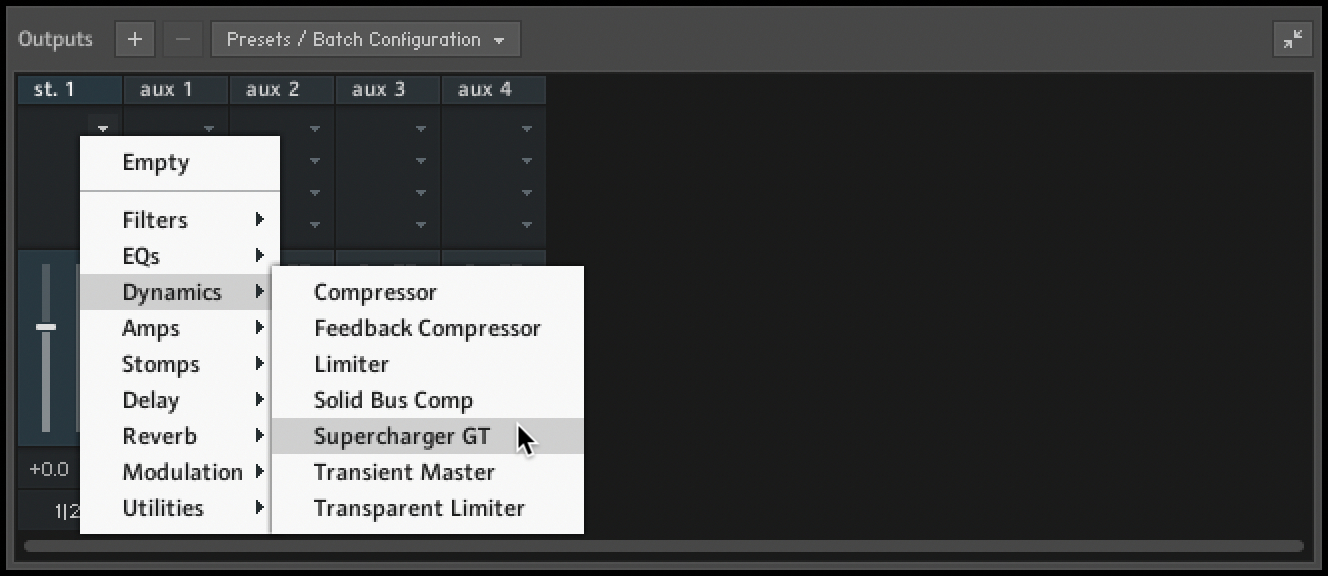
Click the module name to access its parameter controls and editing options.
Tip
For an overview of the signal processors, refer to the Kontakt User Manual.
Outputs in Host Mode
When using Kontakt in stand-alone mode, physical outputs are also assigned within the Channel Configuration dialog. The drop-down menu contains all outputs that are provided by the audio interface selected in the Audio tab of the Options dialog. When using Kontakt as a plug-in in audio hosts, there are more details to consider as each host handles plug-ins with multiple outputs differently.
The maximum number of (mono) audio channels that can be assigned in host mode is limited to 64 for the VST/VST3 version of Kontakt, and 16 for the AU and AAX versions.
Changes to output configuration cannot be made during operation. In consequence, when making changes in the Outputs section, a dialog will appear asking to save and reload the song. First, go to the Presets/Batch Configuration menu and select the appropriate option from the Save current output section state as default for sub-menu.
Another caveat relates to the fact that the output configuration of each Kontakt instance will be saved along with your song; this can result in the rather unfortunate case of several loaded Kontakt instances with different output configurations. This can confuse your host and lead to unexpected behavior, so when you’re working with Kontakt as a plug-in, it is recommended that you make all output configuration changes as default for that specific plug-in type.