The Rack Instrument Edit Mode
This chapter covers all the different functions to manipulate a Kontakt instrument in the Instrument Edit Mode.
Whenever you edit an Instrument, the Rack will switch into Instrument Edit mode. In this mode, all other Instrument Headers will no longer be visible. You can still access them via the Instrument Navigator pane of the Side pane, refer to Instrument Navigator Pane. Instead, the whole Rack space will be dedicated to the editors, control panels, and modulation tables of your selected Instrument.
When in Instrument Edit mode, the Rack header allows you to manage your Groups, Undo or Redo your most recent actions, save the Instrument, or switch the edit view to the previous or next Instrument in your Multi.
To edit an Instrument:
Click the wrench icon of its Instrument Header when the Rack is in Multi Instrument mode.
The Rack Header
When switching to Instrument Edit mode, the header at the top of the Rack pane will change. In Instrument Edit mode, the Rack header contains the following controls:

Exit button: Reduces the Instrument and returns to the Multi Instrument view.
Displayed Group: Indicates the name of the Group whose parameters are currently being displayed by the Group level modules. When you click it, a drop-down menu that contains all Groups in your Instrument will appear. Choosing one of these Groups will select it for display and editing.
Edited Groups: Indicates whether parameter adjustments on the Group level will affect just one or multiple Groups. If it reads Group, any parameter changes will only affect the current Group; Multi indicates that multiple Groups are currently selected for editing, and All warns you that all Groups of your Instrument are currently selected for editing.
Edit All Groups button: Toggles the selection of all Groups for editing, with the same function as the Edit All Groups button in the upper left corner of the Group Editor.
Undo button: When you click the circled arrow of this button, your last action will be undone. As Kontakt keeps a log of your actions, you can revert more than one action to return to a specific point in your editing history. Clicking on the small down arrow icon at the right of this button will open your edit history in a dialog window; selecting an action will take you back to this point in your edit history. Note that the Undo and Redo facilities are only available when you’re working in Instrument Edit mode. To enable the Undo function, open the Handling tab in Global Options and select the Enableundo option.
Redo button: If you reverted one or more actions via the Undo button and change your mind, you can restore parts of your changes by clicking on the circled arrow of the Redo button. Note that you have to do this right after using the Undo function; if you perform any other actions after using Undo, your edit history cannot be restored. Just like the Undo button, the Redo button will open a history list dialog when you click the small down arrow at its right side.
Quick-Save: Saves your Instrument in its current state; if you haven’t saved it before, a Save dialog will appear, otherwise Kontakt will overwrite the last version right away. Use this button generously when you’re in the middle of complex editing tasks; this way, you can always revert to the last saved version if something goes wrong.
Previous / Next Instrument buttons: Switches the Instrument Edit view to the previous or next Instrument in your Multi.
Instrument Edit Mode
Below its own header, the Rack displays the Instrument Header of your edited Instrument (this is identical to the one that’s being displayed in Multi Instrument mode), a row of buttons that will show and hide editors for various aspects of your Instrument, and a flexible vertical view in which you can access all editors, modulation and routing tables, control panels, and signal processing chains of your Instrument. The four sections at the bottom of the Rack — labeled Buses, Insert Effects, Send Effects, and Modulation — can be optionally hidden from view by clicking the button next to their titles. When you choose to show all details, the Instrument Edit view of a full-sized, complex Instrument might look similar to this:
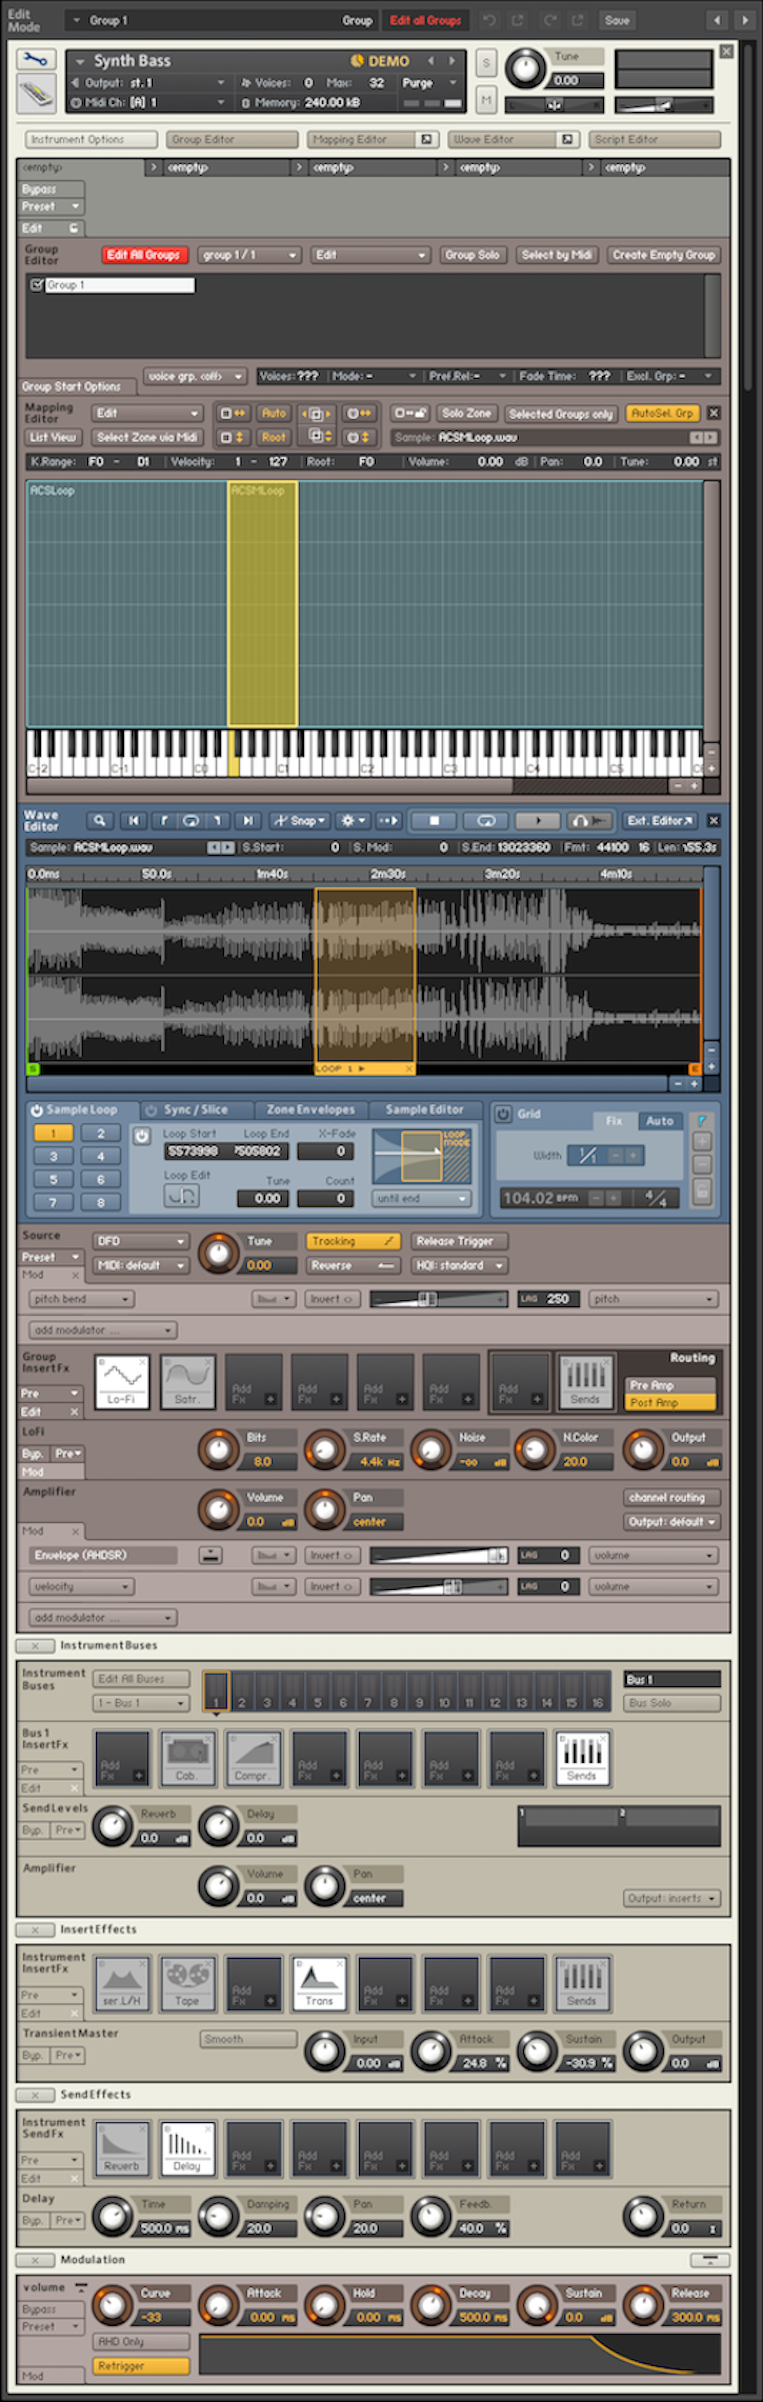 |
This is the Instrument Edit rack, with all editors and panels open; you don’t have to know every panel inside out before you can create useful Instruments or edit existing ones. Conquer the interface one step at a time and refer to this manual and the Info Pane whenever you are unsure of a specific knob, button or menu function
The Instrument Edit rack contains the following panels and features:
Instrument Header: This is the same header that is displayed when the Rack is in Multi Instrument mode. You can switch back to the Multi Instrument mode by clicking on the wrench icon. For more information, refer to Instrument Header
Editor Buttons: These buttons toggle the display of various editor panels in the Instrument Edit view. The Mapping Editor and Wave Editor buttons have an arrow icon on their right sides; clicking on this when you’re running Kontakt in stand-alone mode will open the respective editor in a separate window. The leftmost button, labeled Instrument Options, is special and will be explained below.
Script Editor (visible if the Script Editor button is activated): In this editor, you can load Scripts, access their user interfaces, and edit their source code. For more information, refer to The Script Editor.
Group Editor (visible if the Group Editor button is activated): This is where you select, edit, and manage the Groups in your Instrument. For more information, refer to The Group Editor.
Mapping Editor (visible if the MappingEditor button is activated): This editor lets you add Samples to your Instrument, map them to the keyboard, assign them to velocity ranges, and manage the Zones in your Instrument. For more information, refer to The Mapping Editor.
Wave Editor (visible if the WaveEditor button is activated): This is where you work on the Sample level to create loops, define Slice markers for rhythmic Samples, create Zone Envelopes, and perform destructive audio editing operations. For more information, refer to The Wave Editor.
Source Module: This core module takes care of the Sample playback mode for the Group. For more information, refer to The Source Module.
Source Modulation Router: In this table, you can define modulation assignments, which change parameters of the source module over time in a variety of different ways.
Group InsertEffects: This chain consists of 8 slots, each of which can take up a signal processing module. Each Group has its own Insert Effects chain, which will operate polyphonically (i.e. on the signal of each voice that originates in this Group separately). For more information, refer to Group Insert Effects.
Signal Processor Controls (visible if the Edit button on the chain module above is activated): This panel contains the controls of a signal processing module in the Group Insert Effects chain. For more information, refer to Group Insert Effects.
Amplifier Module: This module will shape the volume, pan, and phase of the source signals in each Group. For more information, refer to The Amplifier Module.
Modulation Router (visible if the ChannelRouting button on the Amplifier panel is activated): This matrix allows you to configure the signal handover between the Group and Instrument signal flow level.
Instrument Bus Effects Chain: In this area you can apply different effect chains to up to 16 different buses. Buses can be used to apply effect chains to different collections of Groups. In the same way a Group processes a collection of Zones, a Bus will process a collection of Groups (however Bus level effects are not polyphonic and cannot have modulation assignments like Group level effects). For more information, refer to Bus Insert Effects.
Signal Processor Controls (visible if the Edit button on the chain module above is activated): This panel contains the controls of a signal processing module in the Instrument Bus Effects chain.
Instrument Insert Effects chain: This chain could be considered the master effects of the instrument, affecting all signals that pass through the instrument’s main output. For more information, refer to Instrument Insert Effects.
Signal Processor Controls (visible if the Edit button on the chain module above is activated): This panel contains the controls of a signal processing module in the Instrument Insert Effects chain.
Send Effects Slots: These slots take up signal processing modules which act as send effects; they can be fed individually with signals from various points of the signal flow. They are routed in parallel to each other and to the Insert Effects chain. For more information, refer to Instrument Send Effects.
Signal Processor Controls (visible if the Edit button on the Send Effects slots module above is activated): This panel contains the controls of a signal processing module in one of the Send Effects slots.
Modulation Sources: This section contains a panel for each modulation source that you have defined in the displayed Group. For more information, refer to Modulation Sources.
Instrument Options Dialog
When you click on the leftmost button below the Instrument Header while editing an Instrument, the Instrument Options dialog will appear. It allows you to adjust parameters that affect this Instrument’s playback behavior, MIDI response, and appearance in the Rack. The Instrument Options are divided into four categories; you can access these by clicking on the respective tabs on the left side of the dialog window.
Instrument Tab
The Instrument tab of the Instrument Options dialog contains general options that affect the playing behavior of the respective Instrument.
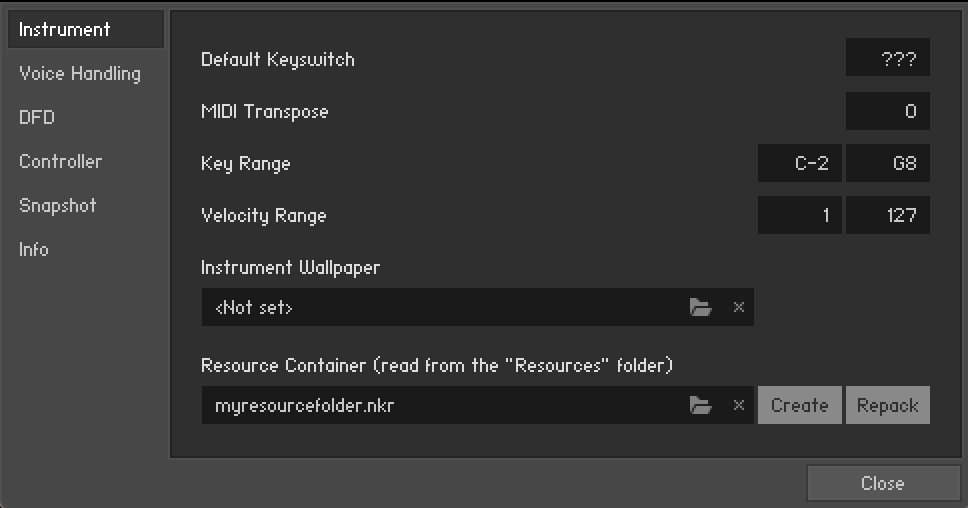
Key Switch default Key: If you have defined any keyswitches for your Instrument, this value specifies the default switch that will be active right after the Instrument has been loaded.
MIDI Transpose: This parameter allows you to apply a transposition offset to all incoming MIDI notes. In contrast to the Tune knob in the Instrument Header, which alters the pitch of the sample playback, this value will change the MIDI notes only; for instance, a setting of 12 will have the same effect as playing an octave higher.
Key Range: The keyboard range to which this Instrument will respond. Setting this parameter to different ranges across multiple Instruments is a quick way to create keyboard splits.
Velocity Range: Limits the velocity range to which this Instrument will respond.
Instrument Wallpaper: To give your Instruments a distinctive appearance in the Rack, you can create your own skins. This parameter lets you choose an image file in TGA or PNG format that will be used instead of the default panel background of the Instrument Header at its normal size. The image needs to have a color depth of 16, 24, or 32 bits and should be 633 pixels wide — larger widths will be cut off, smaller widths will be filled with black. We have included some sample skins in the Kontakt installation.
After you have added a skin to your Instrument, we recommend that you save it once with samples; this will put the skin image file into a “wallpaper” sub-folder inside the Instrument’s sample folder.
Resource Container: Now that Kontakt libraries can link to many different types of files, the Resource Container was designed as a tool for library developers to help them keep all of these files in a convenient location. In this area you can Create a Resource Container, or attach an nki to an existing one via the browse button.
Repack: Only shows when a resource container is assigned to the loaded instrument. Allows you to repack your resource container if you have made changes to the instrument within Kontakt.
Voices Handling Tab
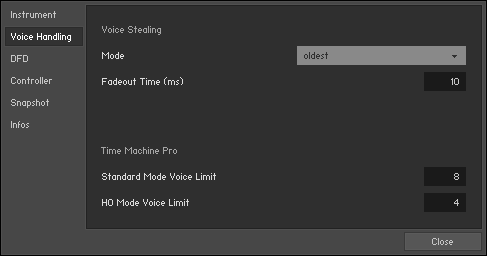
Voice Stealing
This section contains options for setting how the instrument should react when it starts to exceed its voice limit.
Mode: This sets the default way in which Kontakt will free up voices when the Instrument’s maximum voice count has been reached. These options are explained in section Voice Groups.
Fadeout Time: When Kontakt has to recycle a voice, it won’t just cut it off abruptly, but apply a short fade-out; this eliminates clicking noises. This parameter adjusts the length of the fadeout in milliseconds.
Time Machine Pro
In order to produce high quality time and pitch manipulation, the Time Machine Pro machine mode uses more resources than the other machine modes. As such, the number of voices it can process at any one time have their own limits, separate from the main Instrument voice limit. These limits are set in this section.
Standard Mode Voice Limit: Sets the voice limit for groups using the standard quality Time Machine Pro mode.
HQ Mode Voice Limit: Sets the voice limit for groups using the HQ Mode option in Time Machine Pro.
DFD Tab
In the DFD Tab you can access the options for Direct From Disk streaming. This allows Kontakt to read samples directly from the Hard Drive, and only load a small section of the sample in RAM, reducing the overall RAM usage of the Instrument.
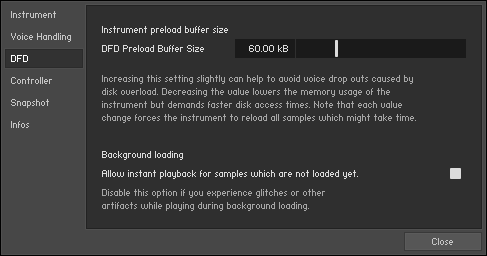
DFD Preload Buffer Size: With this slider, you can adjust the size of each Sample portion that will be buffered in memory for instant playback. This value applies only to Samples that belong to Groups whose Source Module is operating in DFD mode. If any Group in DFD mode causes drop-outs which disappear when you put the respective Source Module into Sampler mode, you might want to try increasing this parameter.
Background loading: The Background loading option Allow instant playback for samples which are not loaded yet is available here. Enable this option to have Kontakt play every triggered note during Background Loading. Under certain special circumstances, playing notes while loading samples in the background may cause ’flam’-like glitches or other unexpected audio artifacts as Kontakt attempts to play a sample it has not yet loaded. Disable this option to avoid such artifacts.
Controller Tab
This tab contains the options for how the instrument should react to certain standardized MIDI controller messages.

MIDI Controller #64 (Sustain Pedal) acts as: You can choose how Kontakt should interpret and handle incoming MIDI controller #64 messages, which are usually being sent by sustain pedals:
Pedal + CC will keep the Instrument in its sustain phase as long as the sustain pedal is depressed, and also treats the message like a normal MIDI controller (which allows you to use it as a modulation source).
Sustain Pedal without Controller will keep the Instrument in its sustain phase as long as the sustain pedal is depressed, but the message will not be available as a normal MIDI controller.
Controller Only: Kontakt won’t use sustain pedal messages for sustaining notes, but you will be able to access them as MIDI controllers for your own purposes.
Accept all notes off / all sounds off: When activated, Kontakt will interpret and adhere to incoming “all notes off” MIDI messages.
Accept standard controllers for Volume and Pan: When activated, you can change the output volume and pan settings of an Instrument by sending MIDI CCs #7 and #10, respectively. These are the standard controller numbers for volume and pan.
MIDI Controller #7 (Volume) range: This drop-down menu lets you choose how the value range of MIDI CC #7 controller messages will be mapped to the output volume slider if the previous option is activated. The selected range endpoints correspond to the volume levels at MIDI values 0 (minimum) and 127 (maximum), respectively. The default setting is negative infinity .. 0dB, which mutes the Instrument at controller value 0 and puts it at unity gain at controller value 127.
Snapshot Tab
Snapshots are a way of saving any processing related information associated with an Instrument, without the need to save the whole instrument. For example, if you want to create an Instrument with some synthesizer samples, and then save a version of that same Instrument with a low pass filter applied, you can save that filtered version as a Snapshot.
In the Snapshot Tab you can view the locations of the Snapshot files associated with the Instrument.
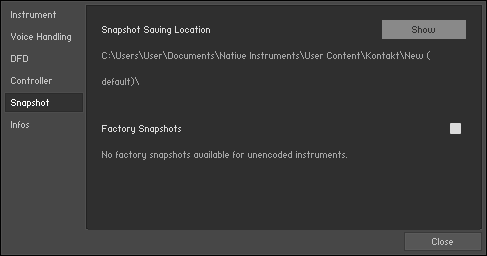
Snapshot Saving Location: This area will display the location on your computer where the user Snapshots for this Instrument will be saved to and loaded from. Clicking on the Show button will open this folder in your operating systems file browser.
Factory Snapshots: Some 3rd Party libraries will come with their own Snapshots, which cannot be overwritten. These Snapshots are stored in a separate location, which you will be able to see here. You can toggle the availability of factory Snapshots by clicking the button to the right of this section.
Info Tab
The Info tab of the Instrument Options dialog contains information about the selected instrument and provides editable parameters to document additional information. If the Instrument is from a third-party library, then it will display information about the library and will not be editable.
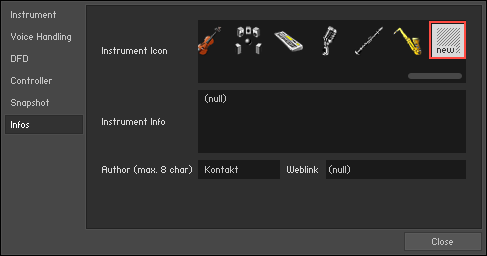
Instrument Icon: Kontakt allows you to assign icons to your Instruments; these will be displayed within normal-sized Instrument Headers in the Rack and provide visual hints about the Instrument category. The rightmost icon in the list, labeled new, is the default icon for newly created Instruments. Note that Kontakt will assign special icons to Instruments that were imported from third-party formats; these don’t appear in this list.
Instrument Info: Use this text field to enter any information, credits, or production notes you’d like to be attached to your Instrument.
Author: When you have created an Instrument and want to distribute it, you can enter your own or your company’s name here.
Weblink: This field lets you provide a web location where people can find more information about you and your Kontakt creations.