The Wave Editor
Learn how to manipulate source samples in Kontakt's Wave Editor.
In the previous chapters of this manual, we explained how you can use Kontakt to turn Sample files on your hard disk into playable Instruments. Building Zones, Groups and Instruments out of ready-made Samples is fine by itself, but if you want to really get into creative sound design, you’ll sooner or later want a tool that lets you work directly on the waveform of your audio material. As you might have guessed already, the Wave Editor is this tool. Let’s have a look at what you can do with it:
View and audition Samples This sounds trivial, but it’s sometimes helpful to listen to a Sample in its “raw” form instead of playing it via the keyboard right away. Also, there are some problems that that can be hard to spot by listening alone, such as DC bias, inaccurate Sample starts, or excessively long silence at the end of your Samples; such issues are easy to notice when you’re looking at a graphic representation of your waveform.
Create and edit loops . Ever since digital sampling became feasible, sound creators have used looping as a means to render the maximum playable note length independent from the actual sample length. In the days of sampling libraries that routinely exceed the 10 GB mark, this might not be the predominant reason for looping Samples anymore; Kontakt’s looping facilities go far beyond the traditional concepts, though, and open up a whole range of creative sound design applications.
Slice Zones: Slicing is a method that lets you deconstruct drum and percussion loops or musical phrases into their rhythmic “atoms” and trigger these either from the outside or using an internal sequencer. This makes it possible to change the tempo of a drum loop or phrase without the sonic artifacts associated with conventional time-stretching algorithms. It also allows you to reconstruct your loops into entirely new patterns and process their elements separately. As slicing your Zones provides Kontakt with information about their rhythmic structure, you can also align most selection and processing operations to the rhythm pattern by making them snap to Slice markers.
Create and edit Zone Envelopes: Just like you can use envelope generators as a source for parameter modulation on the Group level, Kontakt also provides envelopes that operate on separate Zones. The most striking aspect of Zone Envelopes, apart from the added flexibility, is that you can edit them right on top of the Sample waveform; this makes it possible to create precise automation curves in perfect sync to your audio material.
Perform destructive Sample editing: Kontakt offers a range of operations that modify your Samples permanently on the hard disk; this is useful for editing tasks that prepare your Samples for smooth operation within Kontakt, such as clean editing of start and end positions, normalizing, fades, or removal of DC bias.
To open the Wave Editor, click the Wave Editor button at the top, just below the Instrument Header.
Usually you’ll want to open the Mapping Editor along with it, as the Wave Editor always displays the content of the currently selected Zone; this way, you can easily switch between the Samples in your Instrument by selecting Zones in the Mapping Editor.
Double-clicking a Zone in the Mapping Editor will open the Wave Editor with this Zone right away.
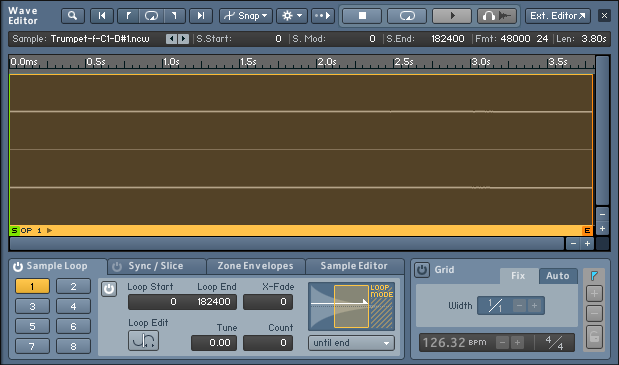
The Wave Editor panel. In its lower half, the Sample Loop tab has been selected, which lets you create and edit loop regions.
The Wave Editor’s interface panel is divided into five sections:
At its top, a horizontal tool bar provides common utility functions and playback controls.
Below that, a status bar displays various aspects of your current Zone, such as its start and end positions, in numeric form. These readouts make it possible to edit with sample accuracy.
The largest space is taken up by the waveform view, which contains the Sample waveform and allows graphical editing of various position-related parameters. At the top of the waveform view, you’ll notice a time line that informs you about the currently displayed time region and scale of the display. If you don’t see a waveform in this section, select a Zone in the Mapping Editor first.
At the bottom of the editor, four tabs provide access to function sets, which relate to the various tasks you can perform in the Wave Editor: creating and editing loops, synchronizing sliced Zones to your song tempo, creating and editing Zone Envelopes, and editing your Sample destructively.
Next to the tab section, a Grid panel allows you to define a number of markers at rhythmically relevant points across your Zone; we’ll refer to this process as “slicing”. Slicing your drum loops or phrases opens up a range of possibilities for changing their speed and patterns, and can be used to align most editing operations to rhythmical values of your material.
Before we get to the more sophisticated facilities that the Wave Editor has to offer, let’s stick to the basics and take a closer look at the utility sections, starting at the top.
Tool Bar
The topmost row of buttons in the Wave Editor pane provides various navigation functions that affect which part of the Sample is currently being displayed, a set of playback controls, and menus that contain selection options and utility commands.

The Wave Editor Toolbar
From left to right, here’s what the elements do:
Size (only visible in external window): If you have opened the Wave Editor within an external window by clicking the arrow next to the Wave Editor button at the top of the Rack, this drop-down menu lets you choose between three predefined window sizes.
Magnify Tool: This is a toggle button. When it’s activated, clicking and dragging your mouse in the waveform view will open a zoom frame; when you release the button, the area within the selection frame will be horizontally zoomed in so that it fills the entire view. Just clicking somewhere within the waveform view will zoom out again. You can obtain the exact same behavior by holding the Alt key while performing the same mouse actions inside the waveform view.
Jump to Zone Start: When you click this button, the waveform view will jump to the start marker of your Zone (which may or may not coincide with the actual beginning of the Sample data).
Jump to Loop Start: Clicking on this button will center the waveform view on the start point of the currently selected loop region.
Zoom on Loop: Zooms the waveform view so that the currently selected loop region fills the entire view.
Jump to Loop End: This button will center the end point of the currently selected loop region in the waveform view.
Jump to Zone End: When you click this button, the waveform view will jump to the end marker of your Zone.
Snap: This drop-down menu contains three toggle options, which affect whether Kontakt will automatically adjust (“snap”) the start and end positions of your loop regions to match certain features of your waveform, which can be helpful in finding inaudible loops and avoid clicking. The loop snap modes apply to the whole instrument. Snap loop to zero crossing will snap the start and end points of your loops to positions at which your waveform crosses the zero line and matches the direction of the respective other point; Snap loop to value crossing will snap start and end points to the nearest position where the waveform value and direction matches the value at the respective other point. You can only choose one of these options, or none; the currently active one is indicated with a small check mark icon next to it. Note that when you choose a snap option, Kontakt won’t change your loop right away; you’ll have to move both the start and end point of your loop manually in order to make them snap to the selected features. How to do this will be explained in section Sample Loop Tab. Finally, you can select Snap sample start/end to zero crossing. This can be done in addition to the loop options.
Command Menu (the cog icon): This drop-down menu contains utility functions that adjust your loops automatically in various ways; the available operations will be explained below.
Stop: This button stops Sample playback.
Loop: When this toggle button is activated, the Play button next to it will play your currently selected loop in repetition. Note that only the section between the start and end points of your loop is played, not the initial portion of the Zone before the loop; therefore, the playback result will be different from what you will hear when you trigger the Zone with a note.
Play: Clicking on this button will either play your Zone once (if the Loop button next to it is inactive), or the currently selected loop region (if the Loop button is activated).
Auto Pre-Listen: When this button is activated, Kontakt will play any region as soon as you select or change it; depending on which tab is selected, this works with loop regions, Slices, or edit selections.
Ext. Editor: When you click this button, the current Sample will be opened within your favorite external Sample editor. This requires that you have set the External Wave Editor option on the Handling tab of the Options dialog beforehand. Note that while your external editor is running, Kontakt will freeze and not respond to any input; as soon as you quit your external editor, Kontakt will examine the Sample on your hard disk for changes and reload it if required.
Command Menu
This drop-down menu appears when you click the menu with the cog icon in the tool bar. It contains various functions that operate on the loops of either your current Zone, or all loops of the currently selected Zones. Note that some options are only visible when you have selected an active loop on the Sample Loop tab.
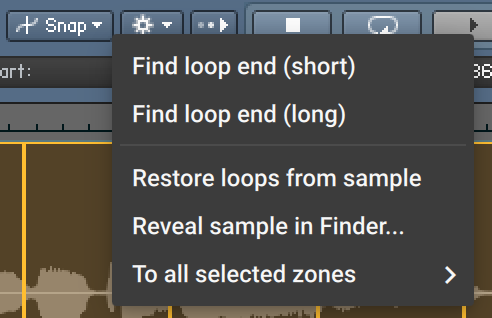
The Command Menu
The following commands are available:
Find loop end (short) (only visible when a loop region is selected): Attempts to find a well-working end point for the selected loop region automatically, but will only look for it in the vicinity of your current end point, thereby keeping your loop at roughly the same length.
Find loop end (long) (only visible when a loop is selected): Attempts to determine an optimal end point for the selected loop region. In contrast to the previous entry, this function can increase the length of your loop by a significant amount if the detection algorithm deems a more distant position an optimal candidate for a new end point.
Restore loops from sample: Some audio file formats, such as WAV and AIFF, can optionally carry metadata that specifies one or more loop regions. When you choose this function, Kontakt will look for this data in the Sample file and, if it finds any, use it for creating loops.
Reveal sample in Finder/Explorer...: Opens the folder where the sample is located in either the explorer (Windows) or finder (macOS).
The following functions can be found below the To All Selected Zones sub-menu. As the name suggests, these functions operate on all Zones that you have currently selected in the Mapping Editor, not just the currently displayed one.
Restore loops from samples: Attempts to retrieve and use loop data from the Samples of all selected Zones. This function works like the similarly named function explained above, but acts upon multiple Zones.
Copy current zone’s loop settings: Copies the loop settings of the currently visible Sample to all selected Zones.
Copy current sample start settings: Copies the sample start offset of the currently visible sample to all selected Zones.
Copy current start mod settings: Copies the sample start modulation amount of the currently visible sample to all selected Zones.
Copy current sample end settings: Copies the sample end offset of the currently visible sample to all selected Zones.
Adjust Loop Starts +/- 1: This nudges the start points of any loop regions in all selected Zones forward or backward by one sample value. This function is meant for correcting loops that were incorrectly imported; some editors and samplers use different offsets than Kontakt for saving their loop points, which results in loops being off by one or more sample values when you import them.
Adjust Loop Ends +/- 1: This function works like the previous one, but acts upon the loop end points.
DC Removal: This function will detect and remove any DC bias from the Samples of all selected Zones. DC bias appears as a constant offset between the sample values and the zero line. While it’s inaudible, it can reduce your headroom and cause problems at mixdown. It’s also a possible side effect of a few signal processing and re-sampling functions found in sample editors, so it’s generally a good idea to execute this function on your Samples once before you proceed with further editing. Note though that it’s a destructive function, which will alter the Sample data on your hard disk.
Status Bar
The status bar is located below the tool bar and contains the filename of the Sample that’s assigned to your current Zone, as well as a number of numeric values.

The status bar of the Wave Editor displays various details of your Sample and your currently selected loop region, if any.
It serves as a precise position monitor for various editing operations that take place in the waveform view. You can adjust editable values either by clicking on them and moving your mouse up or down, or by double-clicking on them and entering a new value. The status bar consists of the following elements:
Sample: This is the filename (without extension) of the Sample that’s assigned to the currently selected Zone. Hovering your mouse over the name will display the full path to this file. Using the left and right arrow buttons at the right side of the field, you can switch to the previous or next Sample file in the same folder as the current one. This will assign a new Sample to the currently selected Zone, so this field works in the same way as the identically named one in the Mapping Editor.
S. Start (Sample Start): The position of your Zone’s start marker, indicated in sample values. Moving the start marker will change the position from which the Sample will be played when the respective Zone is being triggered; you can change it either by dragging the vertical green line in the waveform view, or by adjusting this value as described above.
S. Mod (Sample Start Modulation Range): This value indicates the maximum amount by which the Zone start position can be modulated forth and back. For instance, if this range covers two seconds to both sides of the Start position, modulation assignments can change the Start position by two seconds at most. The modulation range is indicated graphically in the waveform view with a green line at the top, which extends horizontally to both sides of the Zone start marker to the earliest and latest start position attainable through modulation. You can change this value by clicking on it and dragging your mouse up or down.
S. End (Sample End): The position of your Zone’s end marker. All playback will stop at this position, and any material beyond the marker will be ignored. You can change this position either by dragging the vertical red line in the waveform view, or by adjusting this value as described above.
Format: This readout indicates the sampling rate and bit depth at which your Sample was recorded. It’s not adjustable.
Len (Length): The total length of your Sample. This value is not adjustable.
Waveform View
The central element of the Wave Editor is the waveform view in the middle of the panel. It displays a navigable, visual representation of your Sample and allows you to perform a number of editing functions in a direct and intuitive graphical way.
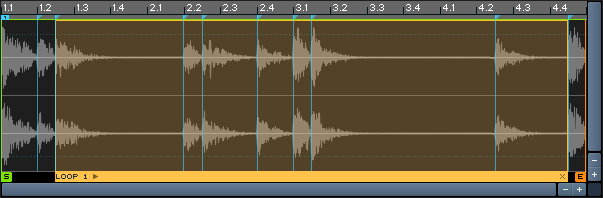
The Waveform View
If you don’t see a waveform when you open the Wave Editor, remember that you first need to select a Zone in the Mapping Editor. It’s a good idea to keep the Mapping Editor open as well when you’re using the Wave Editor, as this arrangement allows you to quickly switch between the Zones in your Instrument. When a Zone is selected, the waveform view will display the waveform of the assigned Sample, with each audio channel being drawn on a separate zero line. The time line at the top of the view indicates which portion of the Sample is currently being shown, and allows you to estimate the length of loops, Slices, and selections visually. In addition to the waveforms, the waveform view contains a variable number of additional items. Note that some of these, such as the loop regions, envelopes, or Slice markers, pertain to features which will be explained in detail later in this chapter.
The start position of your Zone is indicated with a green vertical line that ends in a flag at the bottom. Unless the Zone start position is being modulated, any playback of the current Zone will always start at this marker, and the Sample portion to the left of the marker is discarded. To change the position of the Zone marker, click its green flag at the bottom and drag it horizontally, or adjust the S. Start value in the status bar as explained in the previous section.
The end position of your Zone is indicated with a red vertical line. It marks the position in your Sample where all playback will stop. Apart from that, you can handle it in the same way as the start marker.
The range in which your Zone start position can be modulated back and forth is indicated with a horizontal green line above the Zone start marker. You can adjust this range by clicking on its numeric value in the status bar and dragging your mouse vertically.
When the Sample Loop tab at the bottom of the editor is selected, loop regions will be highlighted, with the currently selected region being indicated with a brighter color and a small status bar at its bottom. Loop crossfades will show up as diagonal lines at the beginning of a loop section. When one of the other tabs is selected, the borders of your loop regions will be shown as vertical lines, with a horizontal, dashed line in between.
When the Grid is activated, Slice markers will appear as vertical lines across your waveform. The first marker, which allows you to adjust the Grid offset, is marked with a small “1” at its top.
If your Grid is in Auto mode, thereby aligning the Slice markers to peaks in your Sample, the threshold above which a peak will create a Slice marker is shown graphically with horizontal lines across the view.
When the Zone Envelope tab is selected, the currently selected Zone Envelope will be displayed as a curve on top of the waveform. If your Zone Envelope contains a loop region, it will be highlighted. A vertical line indicates where clipboard contents will be inserted when you use the Paste function.
When you switch to the Sample Editor tab, a vertical line indicates where clipboard contents will be inserted when you use the Paste function.
The Sync / Slice, Zone Envelopes, and Sample Editor tabs allow you to select contiguous regions of your Sample for editing; these selected regions will be highlighted.
Just like in other editors, you can move the portion of the content that’s currently being displayed by clicking and dragging the horizontal and vertical scroll bars. The horizontal scroll bar allows you to move to a different time position of the Sample. The vertical scroll bar shifts the waveform of each channel up or down within its view region; when you have zoomed in vertically, this scroll bar allows you to view the signal at different parts of the level range.
There are different ways to zoom in and out of your waveform. Firstly, there’s a noteworthy difference between zooming horizontally and vertically. Horizontal zooming works in the same way as in other editors: zooming in magnifies a region of the content (in this case, a specific time range) so that it fills up the view, thereby displaying a greater level of detail, zooming out fits more content into the view. Vertical zooms in the waveform view, on the other hand, will always keep the zero line of each channel at its respective position, thus magnifying only the amplitude of each waveform. This makes it possible to see level changes that are too small to be noticed at a normal zoom level; by zooming in vertically, you can make out small sonic details, such as release trails, in regions that look like plain silence on a lower zoom level.
You can zoom in and out horizontally or vertically one level at a time by clicking the “+” and “-” buttons next to the scroll bars. Whenever you use this method to zoom vertically, the zero lines of each channel will be re-centered in their respective regions of the view. An alternative that’s often more convenient is to hold the Alt key while clicking and dragging your mouse in the view; this opens a “rubber band” selection frame. Once you release the mouse, the selected region will be zoomed in so it fills the whole view. To zoom out again, just click somewhere in the view. This method allows you to quickly and intuitively get a detail view of a specific region of your Sample. Enabling the button marked with a magnifying glass in the tool bar has the same effect as holding Alt.
Grid Panel
The Grid settings affect most other operations in the Wave Editor, so we’ll describe this feature before we get to the function tabs. You can find all settings that pertain to the Grid on the panel in the lower right corner of the Wave Editor. When the Grid is inactive, this panel will be shaded.
The Grid Panel
In a nutshell, whenever you’re working with Samples that contain rhythmic material or musical phrases, the Grid allows you to put a marker on every single hit or note that occurs within your Sample, thus splitting it up into a number of musically significant regions — we will refer to these regions as “Slices” from now on. Preparing your material in this way (“slicing”) has lots of advantages:
By aligning loop regions with Slice markers, you can instantly create clean Sample loops that stay in perfect tempo.
Using the functions on the Sync / Slice tab, you can adapt your drum loop or phrase to your song tempo in various ways.
The mapping features of the Sync / Slice tab allow you to turn Slices into separate Zones, which makes it possible to trigger them separately; this way, you can instantly create a playable “drum kit” from any drum loop, and construct entirely new patterns out of its elements.
When you’re working with Zone Envelopes, you can make their breakpoints snap to Slice markers. This way, it’s easy to create rhythmical modulation curves.
When you’ve selected the Sample Editor tab, the region selection for destructive operations will snap to Slice markers as well, which lets you perform operations like removing, exchanging, or reversing Slices in isolation very quickly.
It’s almost always a good idea to activate and adjust the Grid panel first before doing any further editing on rhythmic material. To activate the Grid, click the “power” button in the upper left corner of the Grid panel. The panel will light up, and a number of vertical markers will appear across your waveform view — if you can’t see them, try zooming out horizontally. Each of these markers indicates the start of a Slice (and the end of the preceding one). You can always move these markers around by clicking on the small arrows at their top and dragging them horizontally, but in a lot of cases, you won’t have to. That’s because the Grid offers two modes that take care of the correct marker placement for you, namely Fix and Auto. You can switch between these modes by selecting one of the tabs in the Grid panel.
Fix Mode
The Fix mode is intended for slicing material that has a very precise timing; it’s less ideally suited for sloppily played acoustic drums. Also, it helps to have your drum loop or phrase edited cleanly when you’re planning to use the Fix mode, with the first beat being exactly at the beginning of the Sample, and no silence after the last beat; this is not a requirement, though. When you activate the Grid on a Zone for the first time, it’s in Fix mode by default; if you’re currently in Auto mode, you can switch to the Fix mode by clicking on the Fix tab of the Grid panel.
The Grid Panel in Fix mode
The idea behind the Fix mode is that your Sample will be split up into Slices of equal length, which is determined by the tempo of the loop, it’s time signature, and a selectable note value.
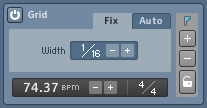
To achieve a proper slicing, Kontakt first needs to know the native tempo of your Sample. It tries to guess this by looking at its total length and assuming that it’s a whole number of measures, played in a 4/4 meter. The resulting tempo is displayed in BPM at the bottom of the Grid panel. Note that this guess will only have a chance of success if your Zone has been cleanly edited, with the first hit or note being exactly at the beginning, and no excess space behind the last one. If you’ve made sure that this is the case, but the displayed tempo value is still incorrect, there can be two reasons for this:
First, your drum loop or phrase could be in a different meter than 4/4. This is easy to correct: next to the tempo readout, you’ll notice a Time Signature value. By clicking on either its numerator or its denominator and dragging your mouse up or down, you can specify a different meter.
If the Time Signature value matches the meter of your loop, but the tempo is still incorrect, Kontakt has estimated the number of bars in your Sample incorrectly. You can validate this by switching to the Sync / Slice tab and checking the value of the Zone Length field. For instance, if your Zone consists of one bar at a tempo of 50 BPM, Kontakt might misinterpret it as two bars at 100 BPM. In such cases, the detected tempo will always be a multiple of the actual tempo, or vice versa. You can correct this by halving or doubling the tempo value with the “-” and “+” buttons next to it, respectively, until the correct tempo is indicated. Note that this will change the length as indicated in the Zone Length field on the Sync / Slice tab as well; the tempo and (musical) length values are invariably tied to each other.
Of course, if you already know the tempo of your Sample, you can skip all this and just enter the correct tempo value after double-clicking on the tempo value. Alternatively, click the time line and drag your mouse horizontally; this will stretch or compress your Grid until it matches the tempo of your Sample. Provided that your Sample start is cleanly edited, adjusting the tempo directly will give you a perfectly set up Grid right away. If there’s any silence at the beginning, the Slice makers will all land slightly before the actual hits; you can compensate this by moving the first Slice marker, labeled “1” at its top, which will move all following Slice markers along, thereby adding a time offset to your Grid.
Once the tempo of your Sample is set to the correct value and you have compensated any possible time offset, you’ll notice that the Slice markers in the waveform view split your Sample into 16th notes. That’s because the Grid uses the length of one 1/16th note as the default width for Slices. You can change this value by adjusting the control labeled Width in the middle of the Fix tab. You can change both the numerator and the denominator of the displayed note value by clicking on it and dragging your mouse vertically; also, clicking on the -/+ buttons next to the note value will halve or double the denominator, thereby increasing or decreasing the size of your Slices.
Tip
The Slice width directly affects the usefulness and quality of later tempo adaptations, either via the Beat Machine or by triggering the Zones from the outside. For instance, if your loop contains a constant 16th hi-hat groove and is sliced up into 8th notes, two hi-hat hits will end up in each Slice, with the duration between them remaining constant. This would create a shuffle effect with increasing tempo. While this trick can be useful in some cases, it’s usually a better idea to use the smallest rhythmical division that occurs in your drum loop as the Slice width: 1/8 for a straight heavy rock beat, 1/16 for a more delicate funk groove, 1/12 for a ternary shuffle, and so on.
Once you’re done with all required adjustments and made sure that the Slice markers are well-aligned with your beat, you might want to remove or add Slice markers to accommodate pauses or additional ghost notes outside of the Grid, or manually correct the position of some Slice markers. These actions will be described after the next section.
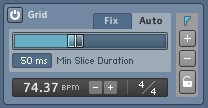
Auto Mode
The Fix mode of the Grid works well for exact and predictable beats or phrases, possibly of an electronic origin, that follow a fixed pattern in tempo and articulation. It’s less practical with irregular beats or loops that were recorded live and played by a drummer with less than perfect timing: in such cases, most Slice markers that were placed in Fix mode will land slightly before or after the hits they were meant for, and would need careful manual tweaking to be corrected. This makes the Auto mode the better choice for such material. You can switch over to this mode by clicking on the Auto tab at the top of the Grid panel.
The Grid Panel in Auto Mode
In Auto mode, Kontakt detects transients in the waveform of your Sample and creates Slice markers at these positions. For instance, each bass drum and snare hit in a typical rock groove will be clearly visible as a level peak in its waveform; intermediate hi-hat hits will be visible as smaller peaks. By using the attack phases of these peaks as Slice positions, Kontakt can split these elements into Slices automatically. All you have to do is telling Kontakt the level above which a transient shall be considered for slicing; this level threshold is the most important parameter of the Auto mode.
When you switch the Grid into Auto mode, you’ll notice two dotted, horizontal lines that appear at the top and bottom of your waveform view. By moving the horizontal slider on the Auto tab, these lines will change their position; they indicate the peak detection threshold graphically. Any peaks in your waveform that cross these lines will result in a Slice marker being placed at their respective position. As an example, reconsider the straight rock groove mentioned above: adjusting the threshold so that only the strong bass drum and snare hits cross the threshold will create large Slices, possibly at the length of 1/4 and 1/8 notes. Slowly lowering the threshold will gradually add more Slices, until all hi-hat hits and ghost notes will be marked separately.
When you’re using this function frequently, you’ll sooner or later encounter a drum loop where no threshold setting seems to work just right: on higher settings, hits that you’d like to be included will be ignored, while lower settings will add too many unwanted bits to the Grid. There are two ways to deal with this problem: if a low threshold tends to add lots of very small slices (for instance, on snare flams), try increasing the parameter labeled Min Slice Duration below the threshold fader. This will ignore all slices that would be shorter than the specified length. If this does not work, try to find a compromise threshold that covers most of the hits you’d like to be included, and then add or remove Slices manually as needed. This process will be explained in the next section.
Note that even if you’re using the Grid in Auto mode, Kontakt still needs to know the tempo of your Sample if you want to use one of the features for automatic synchronization. Therefore, the tempo control is still visible at the bottom of the Grid panel in Auto mode and might need manual adjustment as described in the previous section. In contrast to the Fix mode, though, it won’t affect the position of your Slice markers; it’s only important if you use the Beat Machine or Time Machine to adapt your Sample to a new tempo.
Editing Slices Manually
You can manually modify or delete any Slice, including those that were generated by Kontakt, and add new Slice markers to your Sample. This allows you to fine-tune automatically generated Slices, or manually slice material that’s not suitable for being processed automatically.
Note that whenever you move an existing Slice or add a new one, it will be automatically locked. While Slice markers that were created via the Fix or Auto mode will change their positions or disappear when you adjust the tempo or switch the Grid mode, locked markers will always remain at their absolute position within the Sample until you change their position or remove them manually. Locked markers will appear as gray vertical lines in the waveform view.
There are several ways in which you can engage in the slicing process:
To move an existing Slice, click the small triangle at the top of its marker in the waveform view, and drag it horizontally. If you need to change it with more precision, try zooming in on the waveform. The first Slice marker in your Sample, indicated with a small “1” flag at its top, is special; when you move it, all following markers will move along by the same amount. This allows you to compensate silence at the beginning of your Sample.
To remove a Slice from your Sample, enable the “-” button on the right side of the Grid panel, then click the small triangle icons on top of the Slice markers that you’d like to remove from your Sample. Remember to disable the “-” button when you’re finished to avoid accidental deletions. Alternatively, you can remove a Slice marker by right-clicking on the triangle at its top.
To add a new marker to your Sample, activate the “+” button on the right side of the Grid panel, then click in the waveform view wherever you’d like the new marker to be located. When you’re done, remember to deactivate the “+” button again. Alternatively, you can right-click anywhere in the narrow strip below the time line in order to create a marker at that position.
Finally, if you want to toggle the “locked” status of a Slice marker manually, activate the lock icon on the right side of the Grid panel, then click the small triangle on top of the marker(s) that you’d like to lock or unlock. To lock all slices at once, Alt-click the lock icon. Remember that any unlocked Slice markers will be changed when you adjust the tempo or switch the Grid mode.
Sample Loop Tab
The functionality of the Wave Editor is split across four tabs at the bottom of its panel. Any tab that you select changes the behavior of the wave editor and the details that are being shown in the waveform view to a certain amount; for instance, when you switch to the Sample Loop tab, Kontakt will highlight all loop regions in your Sample; when you change to the Zone Envelopes tab, loop regions will merely be hinted at with vertical amber lines, but any selected Zone Envelope will appear as an orange curve on top of the waveform. In this section, we’ll take a look at the Sample Loop tab.
First of all, a little semantics. In the context of sampling, the term “loop” is used for two different concepts, which are related, but should be distinguished anyway for sake of clarity:
Technically, a loop is a contiguous region of a Sample that will be played back repeatedly; in a traditional forward loop, the playback position will jump to the start of this region whenever it reaches its end. In Kontakt, loops can be played forward and backward alternately, or played only a specific number of times before playback will proceed as usual. When we refer to loops in the context of this section, we’re talking about this technical concept.
A more colloquial use of the term is to describe Samples that contain musical phrases (as opposed to single notes). Often, these Samples are pre-produced drum or percussion phrases (“drum loops”), which makes them useful as building blocks for rhythm parts. As the name implies, these Samples are usually meant for being played in repetition in order to fill the required number of measures. This can be done by looping them in the sampler as described above; however, this is not a prerequisite. Many people prefer to trigger them inside their sequencer on each downbeat instead; this method has the added benefit of avoiding tempo drifts that can occur over time when a loop region doesn’t match the length of a measure exactly.
Sample loops were common in the heyday of hardware samplers, when both disk space and sample RAM were sparse. This limitation made it all but impractical to capture notes of an instrument like a piano, which can have a natural decay time in the order of a minute, in their entirety. Instead, it was reasoned that the most critical part of an instrument sound is its attack phase; after that, most sustained instruments quickly settle to a predominantly periodic waveform of some sort. By using sample loops to keep these periodic parts sounding during the sustain phase, thereby artificially “stretching” the sound beyond the length of the actual sample data, sample creators overcame the space limitations.
With the advent of software sampling and hard disk streaming, this application of loops became a little less important. They’re still being used in this way, but their predominant appeal nowadays is creative sound design. As you might guess, loops in Kontakt are equally well-suited for both approaches; let’s see how they work. To create and edit loops, first click the Sample Loop tab in the Wave Editor.
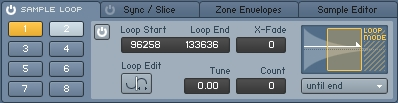
The Sample Loop tab of the Wave Editor is split into a number of loop selection buttons, and a parameter view for the currently selected loop region.
You’ll notice a small “power button” icon to the left of the tab title. Clicking on this icon will globally activate or deactivate all loops of your Sample. When your Zone contains any active loop region, this button will be lit up.
Kontakt allows you to define up to eight different loop regions per Zone. These “slots” are accessible via eight buttons, which are arranged in a 2x4 grid below the tab. When you start with an unlooped Zone, none of these buttons will be highlighted, which indicates that there are currently no active loop regions. Each selection button can take up one of 3 colors:
Non-highlighted (dark blue): The respective loop region has either not been defined yet, or has been temporarily deactivated.
Yellow: The respective loop region is active and currently selected for editing. The region will also be highlighted with a bright amber color in the waveform view. Only one loop region can be selected for editing at any time.
Light blue: The respective loop region is active, but not currently selected.
Clicking on one of these buttons will select the respective loop region for editing; if it’s not active or has not been defined yet, it will be activated in the process. When you select a loop region, Kontakt will display its parameters within the edit panel next to the selection buttons, and highlight the region in the waveform view. You can instantly create a loop region by right-clicking into the waveform view and dragging your mouse horizontally. This will replace your currently selected loop region, or, if none is selected, define the first one. You can change the start and end positions of a loop region graphically by clicking on its left or right border, respectively, and dragging it horizontally. Clicking inside a region and dragging it allows you to move loop regions without changing their size. You can view and change these and all other parameters of a loop region numerically within the edit panel.
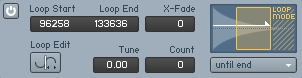
The detail view allows you to adjust the start and end positions of your loop regions numerically with sample value accuracy.
To change any value, either click it and move your mouse vertically, or double-click it and enter a new value. Let’s have a look at each parameter of the edit panel:
Power Button: Indicates whether the current loop region is active. When you select a loop region for editing, it will automatically be activated. To disable (and de-select) a region, click this button. Note that this applies to the power button in the edit panel of the selected loop region; the power button next to the tab title will globally activate or deactivate all loop regions.
Loop Start: The start position of the loop region within your Sample, displayed in sample values.
Loop End: The end position of the loop region within your Sample, displayed in sample values.
X-Fade: To mask imperfect loop points, Kontakt can fade the end of the loop region into its beginning. This value adjusts the length of this crossfade in milliseconds. Kontakt will indicate a loop crossfade in the waveform view with a diagonal line on the left side of a loop region.
Loop Edit: When activated, Kontakt will switch the waveform view to an alternate display mode that allows you to adjust your loop points in a very intuitive way.
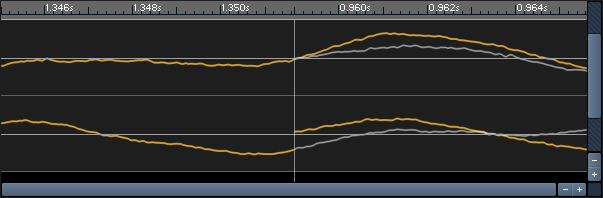
The Loop Edit View
The Loop Edit view is split vertically; the left side will show the waveform just before the loop end point, the right side will show the waveform just after the loop start point. In other words, the boundary in the center depicts the transition that will occur at the loop point. In addition, the original progression of the waveform after the end point is shown in a dim gray in the right part of the view, which allows you to assess how close the transition matches the unlooped waveform. You can move your loop start and end by clicking in the right or left part of the view, respectively, and dragging the mouse horizontally. Alternatively, you can adjust the numerical values within the edit panel in the usual way. While you change the positions, observe the transition in the center of the view; the more it looks like a continuous waveform, the cleaner your loop will turn out to be. To return to the normal waveform view, just click the Loop Edit button again.
Tune: This control allows you to change the pitch of Sample loops independently from the rest of your Zone. Note that the detuning will affect all playback passes after the first loop jump; in other words, Kontakt will play the region at its normal pitch once until the playback position reaches the end marker of the loop, then the specified pitch will come into effect for the duration of the loop.
Count: This value specifies how many times the loop region will be repeated before Kontakt proceeds to play the rest of the Sample. A value of zero will loop the region indefinitely, which means that playback will never reach any following Sample material and loop regions.
Loop Mode: This drop-down menu lets you choose between several different loop characteristics. In addition to the displayed entry, the selected behavior is depicted with an illustration above the menu. Kontakt provides the following loop behaviors:
Until End: Kontakt will play the loop in a forward direction. The loop will keep playing during your amplitude envelope’s release phase, if any.
Until End <->: Kontakt will play the loop in alternating forward and backward directions (“ping-pong loop”). The loop will keep playing during the release phase of your sound.
Until Release: Kontakt will play the loop in a forward direction as long as the key is being held. When it’s released, it will resume normal playback of the Sample, starting from the current playback position.
Until Release <->: Like Until Release, but with an alternating forward and backward playback direction during the loop.
One Shot: If the first loop region of your Sample is set to this mode, Kontakt will ignore all other active loop regions and play the Sample in its entirety when it’s triggered, without stopping at note-off events. This is useful for drum samples that should always play to their end, regardless of the actual trigger note length. Note that this works only if you’re not using a volume envelope on your Group; otherwise, the release phase will still fade the Zone out as soon as the key is released.
If the Grid is active, all changes to the start and end points, whether they take place graphically within the waveform view or numerically within the edit panel, will snap to the nearest Slice marker; this makes creating exact loop regions within rhythmic material very easy. For a thorough description of the Grid feature, refer to the previous section of this chapter.
Sync / Slice Tab
In the section about the Grid panel, we mentioned that slicing your drum or percussion loop with the Grid allows you to synchronize its playback speed to your song tempo in a number of different ways, or map the resulting Slices to your keyboard, which lets you trigger the elements of a drum loop or a phrase at your own tempo and in your own pattern. The launch pad for all these features is the Sync / Slice tab in the lower part of the Wave Editor. Note that an active Grid that’s adjusted to match your Sample is a prerequisite for most of these functions to work; if you want to synchronize or rearrange any rhythmic material, you should therefore always set up the Grid first, then proceed to use the functions on the Sync / Slice tab. Section Grid Panel of this chapter explains how to activate and adjust the Grid.
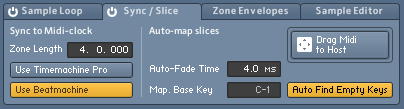
The Sync / Slice tab
The Sync / Slice tab provides four different approaches to make your Sample independent from its original tempo or pattern: you can feed your slices to the Beat Machine, time-stretch your Sample with the Time Machine, or map your Slices to the keyboard in a manual or automated fashion. Let’s have a look at the advantages and peculiarities of each approach.
Using the Beat Machine
The Beat Machine, which is one of the playback modes provided by Kontakt’s Source Module, plays all Slices of your Zone in succession via an internal sequencer. This retains the original pattern of your drum loop or phrase, but allows you to adapt it to your song’s tempo, or freely change the playback pitch of the Slices. To use this feature, make sure your Grid is correctly set up, and enable the Use Beatmachine button on the Sync / Slice tab. Depending on the contents of the Group to which your current Zone belongs, one of two things will happen:
If the current Zone is the only one in your Group, Kontakt will switch the Source Module of this Group into Beat Machine mode.
If there are any other Zones in your Group, Kontakt will move the current Zone into its own Group first and then switch that Group’s Source Module into Beat Machine mode. This reassignment is necessary to avoid disrupting the playback of other Zones which cannot be triggered correctly by the Beat Machine.
Once the Source Module that plays your Zone is in Beat Machine mode, any key to which the Zone is assigned will trigger the tempo-synchronized playback of all Slices in succession. When you look at the Speed knob of your Group’s Source Module, you will notice that it displays the keyword Zone instead of the usual numeric value. This indicates that it uses the Zone Length value (as displayed on the left side of the Sync / Slice tab) to determine at which speed it has to play the Slices so that the phrase will span the same length at your song tempo. This is the same mechanism that allows you to select a note value from the drop-down menu of any time-related control in order to synchronize it, and in fact, the special Zone keyword appears among the usual note values in the drop-down menu of the Speed control if you use the Beat Machine via the Sync / Slice tab. Of course, nothing prevents you from selecting a different note value from the drop-down menu, or selecting the Default entry in order to adjust the playback speed independently from your tempo. You can always return to synchronized mode by selecting Zone again.
Note that all changes to the slicing of your Sample will be immediately picked up by the Beat Machine, which lets you hear any modifications instantly. For example, you might notice during playback that some ghost notes are not properly marked in your Sample and are thus being played back with incorrect timing. Just add the respective Slice markers, as explained within the Grid section of this chapter — the Beat Machine will adopt your changes right away, even during playback.
Using the Time Machine
As an alternative to the Beat Machine, Kontakt can also use the more conventional time-stretching algorithms of the Time Machine mode to sync your Sample to the tempo of your song. While using the Beat Machine or one of the Slice mapping features explained below is usually the better choice for percussive material, the Time Machine can be very useful for tonal phrases.
As the Time Machine treats your Sample as one contiguous region with no regard to Slices, you don’t necessarily need to have the Grid activated in order to use this feature. However, Kontakt still needs to know the length (and therefore, the tempo) of your Sample in order to determine how far it has to be stretched or compressed in time to match your current tempo. Therefore, you need to specify the correct (rhythmical) length of your Zone in the Zone Length field of the Sync / Slice tab. If you don’t know the length, you can alternatively activate the Grid and specify the tempo of your Sample instead. Kontakt needs to know only one of these values, as the respective other one can be derived. Note that specifying the Zone Length value explicitly will only change the tempo correctly if the end marker of your Zone coincides with the actual Sample end; otherwise, it will change the end marker position to match the length that you entered. In such cases, you should therefore adjust the tempo in the Grid panel instead.
Once the Zone Length field displays the correct length, enable the Use Timemachine Pro button on the left side of the Sync / Slice tab. If your Zone is not the only one in its Group, Kontakt will move it into a new Group first to avoid disrupting the playback of other Zones. The Source Module of the Group that contains your Zone will then be put into Time Machine mode.
Just like the Beat Machine, the Time Machine will have its Speed control set to the special Zone value by default when you’re using it via the Sync / Slice tab. This means that your Sample will be played back at your host or Master Editor tempo right away when you trigger it. The meaning of the Zone keyword and how you can override it to freely adjust the playback speed is explained in the previous section of this chapter.
Mapping Slices Manually
Once you have placed Slice markers across your Sample via the Grid, you might want to trigger these Slices directly with your keyboard or from within your sequencer. The manual mapping feature of the Sync / Slice tab lets you do just that.
Provided that you have correctly set up the Grid for your Sample and selected the Sync / Slice tab, you can select Slices that you want to map to your keyboard simply by clicking between two Slice markers in the waveform view. Kontakt will highlight any selected Slice in blue. To add more Slices to your selection, either hold the [Ctrl] key ([Cmd] on Mac OS X) and click further Slices one at a time, or hold the [Shift] key and click a second Slice to select all Slices in between. For instance, if you want to map all Slices of your Sample to keys, click the first one, then hold [Shift] and click the last one; this will select all Slices and highlight the entire Sample.
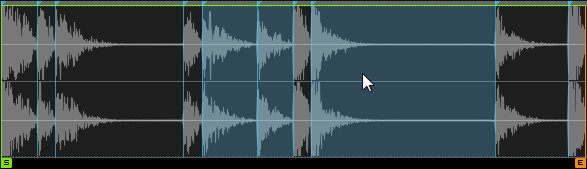
Selecting Slices
Once you’re happy with your Slice selection, make sure the Mapping Editor is visible above the Wave Editor. Now, click one of the selected Slices, and drag it over into the Zone grid of the Mapping Editor; all other selected Slices will move along. You’ll notice that while keeping your mouse button pressed, Kontakt will highlight a range of keys in the Zone grid, starting from the key below your mouse pointer. This allows you to position the Slices you’ve selected on the keyboard. The process works exactly as if you’re dragging a number of Samples from the Side pane into the Mapping Editor — the horizontal mouse position determines the key at which Kontakt will begin to map the Slices, while the vertical mouse position within the Zone grid determines the number of adjacent keys each Slice will be assigned to.
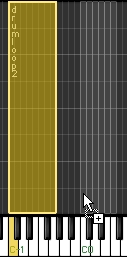
While you keep your mouse button depressed, Kontakt will indicate where it would place the new Zones on the keyboard.
If you agree with the displayed assignment pattern, release your mouse button. Kontakt will now create a new Zone for each Slice in your selection, and place all Zones in succession in the order in which they appear in your Sample. Each of the new Zones will reference the original Sample from which it was created, with its Sample start and end markers set to the boundaries of the original Slice. You can now trigger these Zones from your keyboard or within your sequencer, create new patterns with them, or adjust the playback or effect parameters of each Zone separately via Zone Envelopes.
Mapping Slices Automatically
While mapping your Slices manually in the way described above works well if you want to place only specific Slices or a range of Slices onto keys, the more frequent case will probably be that you’d like to put all Slices on adjacent keys and then trigger them from within your sequencer. Of course, you can do this manually as well; there’s a better way, though. The auto mapping feature of the Sync / Slice tab allows you to automatically map all Slices of your Sample to adjacent keys. What’s more important, it can generate a MIDI sequence for you that, when placed in your sequencer, will trigger all Slices in exactly the same pattern as they occur in your Sample. As your sequencer will obviously play MIDI sequences at the song tempo, the pattern will always be in sync, thereby replicating the functionality of the Beat Machine. The feature leaves more room for creativity, though: once you have imported the MIDI sequence into your arrangement, you can go ahead and make modifications to this pattern. Of course, you can also discard it altogether and build your own patterns from scratch, thereby reassembling your drum loop or phrase in an infinite number of ways.
Before the auto mapping can take place, you may need to adjust some parameters first that affect where the new Zones will be placed and how Kontakt will handle the Zone creation process. You can find these parameters in the middle and on the right side of the Sync / Slice tab.

The Auto Mapping parameters
Auto-Fade Time: Kontakt can optionally create volume fade envelopes for each Zone that it creates from your Slices. When you set this parameter to a value other than zero, each new Zone will contain a volume Zone Envelope which fades the respective Slice in and out; the specified value determines the fade-out time, the fade-in time will be shorter than that. Creating auto-fades for your Slices can give smoother results when you change the playback speed of the pattern. The specifics of how Zone Envelopes work will be explained in the next section of this chapter.
Mapping Base Key: This is the first key at which Kontakt will start mapping the Slices.
Auto Find Empty Keys: If activated, Kontakt will leave out any keys that trigger existing Zones when it maps Slices to the keyboard. This avoids mapping Slices to the same keys as other Zones.
After adjusting these parameters, you can go ahead and start the auto mapping process. You’ll notice a rectangular field labeled Drag’n’Drop MIDI at the right side of the Sync / Slice tab. From here, you can “pick up” the MIDI sequence that corresponds to your Slice pattern; just click inside the field and drag its content onto either your desktop (which will create a standard MIDI file) or into the arrangement window of your MIDI sequencer (which will insert the MIDI sequence right into your arrangement). If you’re sure you won’t need the MIDI file, you can also just click the field instead; this will only create the mapped Zones.

Using Drag Midi to Host
At the same time, Kontakt will create the required Zones, map them to the keyboard, and put them into a new Group. If you’ve placed the MIDI sequence on the correct track of your arrangement — it has to be sent to the MIDI channel of your current Kontakt Instrument — and play it back, you should hear your drum loop or phrase played back at your song tempo. If you want, you can now proceed with modifying this MIDI sequence. Of course, should you decide to delete the sequence, the generated Slice mapping will stay in place, so you can build your own patterns from scratch as well. To get rid of the mapping, just delete the Group that was created in the process.
Zone Envelopes
Envelopes are a common source for modulating parameters in synthesizers and samplers; they provide a flexible way to create finely adjustable and repeatable modulation patterns. In Kontakt, envelopes are usually being generated by envelope generators, which act as signal sources for modulation assignments. These can be added to Group-level modules, which means that any conventional envelope affects all Zones in a Group in the same way. There are cases, however, when modulating parameters on a per-Zone basis would be really helpful; Zone Envelopes make this possible. What’s more, since they are directly tied to the Sample of the Zone in which they appear, you can edit them on top of the waveform view; this allows you to intuitively create all kinds of modulations in perfect sync with the Sample content.
To create and edit Zone Envelopes, click the Zone Envelopes tab at the bottom of the Wave Editor.
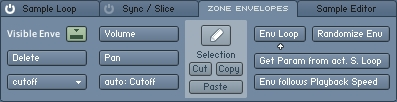
From left to right, the Zone Envelopes tab provides selection and delete functions, assignment buttons, edit tools, and utility functions.
Assigning and Selecting Envelopes
Similarly to normal Group-level modulation assignments, the first step to create a Zone Envelope is to tell Kontakt which parameter you’d like to modulate. For this purpose, the Zone Envelopes tab provides three assignment buttons, labeled Volume, Pan, and Add. These are located in the middle of the panel. Each of these buttons creates a new Zone Envelope for a specific parameter and selects it for display; if an envelope for the selected parameter already exists, an info message will appear instead.

The upper two assignment buttons create a Zone Envelope for volume and panorama position, respectively; using the lower button, you can create a Zone Envelope for any Group-level parameter.
The upper two buttons create envelopes for the playback volume and the panorama position, respectively; as these are parameters that you will probably want to modulate frequently, they are provided here for quick access. The third button, labeled Add:, allows you to create Zone Envelopes for any parameter that appears on a panel of a Group-level module. Whenever you click the control of such a parameter, the Add: button will pick it up and display its name. By clicking on the Add: button then, you can create a new Zone Envelope which modulates the chosen parameter. For instance, you might want to modulate the cutoff frequency of a filter that resides in the Group Insert Effects chain of your current Group; just locate the Cutoff knob on the filter panel (you may have to double-click the filter module in the chain if you don’t see it) and click it — you don’t need to move it. The lowest assignment button on the Zone Envelopes tab of the Wave Editor should now read Add: Cutoff. When you click this button, a new cutoff envelope will appear as a straight horizontal line within the waveform view.
In theory, you can create a Zone Envelope for every Group-level parameter, all within one Zone. However, Kontakt will only display one of your envelopes in the waveform view at any time. In order to select a Zone Envelope for viewing and editing, click the drop-down menu button on the left side of the Zone Envelopes tab, and choose an existing envelope from the menu.

The selection drop-down menu contains all Zone Envelopes of your current Zone. Selecting one will display it in the waveform view.
If you want to get rid of an envelope, first select it for editing via the drop-down menu, then click the Delete button below. This will remove the envelope from the list and return the respective parameter to its unmodulated state.
Adjusting Assignment Parameters
There are a few adjustable parameters that change the way in which the Zone Envelope’s shape will affect the modulated parameter. For this purpose, each Zone Envelope that you create will add an entry to the Modulation Router of the module that contains its target parameter. You can jump to the corresponding assignment parameters of a currently selected Zone Envelope by clicking on the Modulation Quick-Jump button that’s located next to the assignment buttons on the Zone Envelopes tab.

The Modulation Router of a Zone Envelope
A Modulation Router entry of a Zone Envelope looks and works exactly like one that belongs to a normal modulation assignment — it provides a modulation intensity slider, an Invert button, a Lag control, and an optional Modulation Shaper. To find out what these controls do, refer to section Assignment Controls of this manual. In contrast to normal Modulation Router entries, though, entries that pertain to Zone Envelope assignments can’t be created in the usual way of assigning other modulation sources; the only way to add them is implicitly by creating a Zone Envelope within the Wave Editor.
Tip
Adjustments made to parameters for individual Zones stand in proportion to adjustments made on Group level: The value of a parameter for a single Zone can only be edited in relation to the value of the corresponding parameter on Group level.
Notice
Editing parameters for factory content is only possible on Group level.
Editing Envelopes
After you have created a new Zone Envelope, it will be selected right away and displayed within the waveform view of the Wave Editor as an orange, horizontal line. Zone Envelopes work similarly to flexible envelopes (refer to Flexible Envelopes) in that they consist of a series of breakpoints, which are connected by either straight lines or curves. The minimum length of a Zone Envelope is predetermined by the length of your Sample, though. At the beginning of the envelope, you’ll notice a small rectangle; this is the first breakpoint of your envelope. Click this breakpoint and drag it up or down to change the envelope’s initial level.
To add a new breakpoint, right-click ([Ctrl]-click on Mac OS X) somewhere within the waveform view. Kontakt will connect the new breakpoint to its neighbors with straight lines. You can change each breakpoint’s level and position in time by clicking on it and dragging it around; the waveform display in the background provides visual feedback if you want to align it to features of your Sample. The envelope display will always keep in sync with the waveform; thus, zooming in and out of the waveform or scrolling the view, as described at the beginning of this chapter, will change the envelope view accordingly.
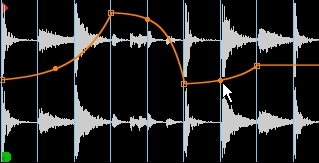
Zone Envelopes allow you to create arbitrarily complex modulation shapes.
In the middle of a segment between two breakpoints, you’ll notice a small, filled circle. Clicking on this circle and dragging it up or down will change the curve shape of this segment. To remove a breakpoint from your envelope, right-click ([Ctrl]-click on Mac OS X) on it.
If the Grid is active, all breakpoints will snap their position in time to the nearest Slice marker when you move them. This allows you to create rhythmically useful modulation patterns very quickly. Also, the Pencil Tool explained below allows you to create straight envelope lines for each Slice.
When you use this function in combination with the Beat Machine, as explained in section Using the Beat Machine, it opens up a whole range of possibilities that were only possible in previous Kontakt versions if you separated each Slice into its own Group: since straight lines, as created with the Pencil Tool, set the target parameter to a value that will remain constant over the duration of the Slice, you can easily adjust parameters for each Slice separately. As an example, suppose you’re playing a sliced dub drum loop via the Beat Machine and want to add reverb to a single snare hit. To accomplish this, add a reverb module to a free Instrument Send Effects slot first, then insert a Send Levels module into the Group Insert Effects chain of the Group that contains your drum loop. Now, with the Sample being displayed in the Wave Editor and the Zone Envelopes tab selected, click the send level button in the panel of the Send Levels module which corresponds to the reverb. The name of this send parameter should now appear in the Add: button on the Zone Envelopes tab. Click this button; a new envelope will appear in the waveform view. Now select the Pencil Tool and click inside the Slice of the snare hit that you’d like to process; a new “plateau” will be added to your envelope at this spot. Clicking and dragging it allows you to adjust the reverb level of this slice in isolation. With a little creative thinking, the possibilities of this approach are virtually boundless.
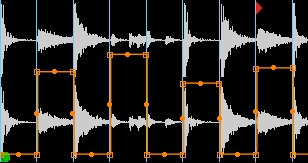
Using the Pencil Tool and/or the Randomize Env function, you can quickly change Group-level parameters for each Slice in isolation.
You can cut, copy, and paste regions of your Zone Envelope. For this purpose, the waveform view provides a selection feature and a paste cursor. When you click anywhere in the waveform view and drag your mouse horizontally, Kontakt will highlight the selected region; you can change an existing selection by clicking and dragging one of its borders, or move it across the envelope by clicking inside it and dragging your mouse horizontally. To put the contents of a selected region into the clipboard, click either Cut or Copy in the middle of the Zone Envelopes tab — Cut will remove the selected region in the process, while Copy won’t change your envelope. To insert the clipboard contents into your envelope, click the Paste button below; Kontakt will insert the clipboard region at the position of your edit cursor, which is indicated with a vertical red line that you can position by clicking anywhere within the waveform view. This method also works across different envelopes.
Utility Functions
The right side of the Zone Envelopes tab contains a number of utility functions that change the behavior of your currently selected Zone Envelope in various ways:
Loop Env: When this button is activated, you can define a loop region within your Zone Envelope. This feature works similarly to the loop sections of flexible envelopes, though in contrast, it does not need to be anchored to breakpoints. This aspect is rather important, as Kontakt allows you to reproduce a loop region of your Zone within the envelope, which makes it possible to keep the Zone and its Zone Envelope in perfect sync during loops. Of course, you can just as well adjust your loop region freely and independently from any Zone loops; clicking and dragging one of its borders will resize it, and you can move it as a whole by clicking inside the region and dragging your mouse horizontally. Note that when you’re using an envelope loop that doesn’t match an identical loop region in your Sample, your envelope and the Sample will eventually drift out of synchronization.
Randomize Env: If you’re working on a sliced Sample, this button will create a random step pattern which changes its value at each Slice marker; using this feature, you can quickly create rhythmic modulation patterns that resemble classic “sample and hold” modulations of synthesizers. Using the Pencil Tool described below, you can easily change the level of each step. Note that this function will overwrite your currently selected Zone Envelope.
Get Param From Cur. S. Loop: When you click this button, Kontakt will copy the start and end positions of the loop region that’s currently selected on the Sample Loop tab and use them for your envelope’s loop region. This is useful for getting your envelope in sync with a looped Sample.
Env Follows Playback Speed: When this button is active, the selected Zone Envelope will always speed up or slow down in unison with your Sample. For instance, when you’re playing your Sample an octave above its original pitch in Sampler or DFD mode, its playback speed will be doubled; enabling the Env Follows Playback Speed button ensures that the Zone Envelope will speed up accordingly, so that your Sample and its envelope always stay in sync. When this button is inactive, the envelope will always be processed at the original speed of the Sample.
Pencil Tool: This button is located above the Cut, Copy, and Paste buttons in the middle of the Zone Envelopes tab. It provides a tool that lets you create and edit straight lines between Slice markers. This way, the target parameter of your envelope will be set to a constant value during the length of the respective Slice. For example, you might want to adjust the volume of each Slice of a Beat Machine-triggered drum loop separately. When the Pencil Tool button is activated, clicking between any two Slice markers will create a straight horizontal line between them; you can change the level of these lines later by dragging them up or down with the Pencil Tool.
Sample Editor
Most of the available operations in the Wave Editor work in a non-destructive way, which means that they affect only the playback of your Sample and don’t change the actual Sample data on your hard disk. Therefore, they can be easily reversed if needed. This is not always what you’ll want, though: for example, if your Sample starts with a region of excess silence, you might want to get rid of it permanently (instead of working around it by changing your Zone start markers). Similarly, if there’s a DC bias in your Sample, there’s no practical reason to keep it in there. For these cases, Kontakt provides a built-in collection of destructive editing tools that allow you to cut, copy, and paste your material, create fades and regions of silence, reverse portions of your Sample, normalize its peak levels, or remove any DC bias. To access Kontakt’s palette of destructive editing tools, click the Sample Editor tab in the lower part of the Wave Editor. If any other currently loaded Instruments use the Sample which you’re just trying to edit, Kontakt will ask you first which of these Instruments should adopt your changes, and which should keep the original version.
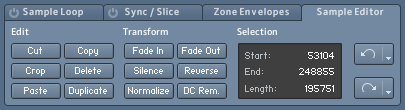
The Sample Editor tab
As you can see, the elements on this tab are split into three functional blocks, namely Edit, Transform, and Selection. The Edit tools let you remove and reorder regions of your sample, but leave the Sample data within these regions unaffected; the Transform tools process the actual Sample data, for instance by changing the level.
When the Sample Editor tab is selected, the behavior of the waveform view will depend on whether the Grid is active or not.
Tip
If the Auto Pre-Listen button in the tool bar of the Wave Editor is activated, Kontakt will automatically play your selected region whenever you change it.
If it’s inactive, clicking into the waveform view will position a vertical marker at this location; this is the edit cursor, which indicates where the contents of the clipboard will be inserted when you select Paste. Clicking on the waveform and dragging your mouse horizontally will highlight a contiguous region of your Sample; all Edit and Transform commands will operate on this region. To change an existing selection, click its left or right border and drag it horizontally; holding the [Shift] key while doing this allows you to make finer adjustments. The boundaries of the currently selected region will also be displayed numerically in the Selection panel of the Sample Editor tab; you can adjust any of these values directly by clicking on it and moving your mouse vertically, or by double-clicking on it and entering a new value.
If the Grid is active, the position of the edit cursor, as well as all selection boundaries, will snap to the nearest Slice markers. You can select a contiguous series of Slices by clicking into a Slice and moving your mouse horizontally. Changing the left or right border of the selection or moving it as a whole works as described above, but the selection will remain tied to the Slice markers.
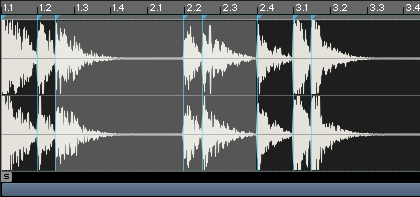
Selecting slices for editing
While you’re working on your Sample, Kontakt will actually write out any changes to a backup copy, so your original file will be left untouched. Kontakt will create the backup copy inside a folder named “__edited__”, which is located in your original Sample’s location. Once you’re finished with editing, your Instrument (and any other loaded Instruments that use this Sample and have been selected by you when you switched to the Sample Editor tab) will reference this backup copy instead, and you will hear your changes instantly. By saving your Instrument, you’ll make the reference to the modified backup copy permanent; your original Sample will remain unaffected during the whole process, so other Instruments on your hard disk that use it will still work as expected.
Before we explain what each operation on the Sample Editor tab does, we should mention an important feature that will turn out to be rather helpful if things go wrong, namely the Undo and Redo buttons on the right of the tab.

Undo and Redo button
These work like the identical buttons in the Instrument Edit Rack header. Clicking on the curved arrow on the Undo button (left) will reverse the effects of the last operation, thus reverting the waveform to its former state; clicking on the small down arrow on the same button will open a drop-down menu with a list of the most recent operations that lets you select to which point in the operation history you want to return. Note that the last entry of this list will always be Restore Orig., which will undo all changes that took place since you switched to the Sample Editor tab, thus restoring the Sample reference in your Instrument to the original Sample again. If you don’t do any further editing on the Sample Editor tab after this, the “__edited__” folder will be deleted when you quit Kontakt. The Redo button to the right works similarly, but the other way around: it will restore any effects that you have just reversed with the Undo button.
Edit Operations
Cut: Puts the currently selected region of your Sample into the Sample clipboard, removing it from the Sample in the process.
Copy: Leaves your Sample intact, but copies the selected region to the Sample clipboard for later use.
Crop: Removes all audio data outside the selection; in other words, the selected region will become your new Sample.
Delete: Removes the selected region from the Sample, without putting it into the clipboard.
Paste: Inserts the contents of the clipboard into your Sample. The insert location depends on whether a region is currently selected: if so, it will be replaced with the clipboard contents, which erases the previous contents of the region and will change the overall length of your Sample in most cases. If no region is selected, the contents of the clipboard will be inserted at the location of the edit cursor; this location is indicated with a vertical blue line, which you can position by clicking into the waveform view.
Duplicate: Inserts a copy of the selected region right after the region.
Transform Operations
Fade In: Creates a smooth fade in from silence that spans the selected region.
Fade Out: Creates a smooth fade out into silence that spans the selected region.
Silence: Replaces the selected region with digital silence, i.e. a series of zero values.
Reverse: Reverses the selected region, so that it plays backwards.
Normalize: Amplifies the selected region to the greatest possible level without clipping. The Normalize function analyzes your Sample region and applies a gain factor that makes it utilize the entire available dynamics range; in other words, after you’ve used this operation, the highest peak in the region will just hit the 0 dB mark.
DC Removal: Detects and removes any DC bias from the selected Region. DC bias appears as a constant offset between the sample values and the zero line. While it’s inaudible, it can reduce your headroom and cause problems at mixdown. Usually, you’ll want to use this operation on your whole Sample.