Sequencer
Use the MELTED VIBES sequencer to create melodic and modulation sequences. Write musical phrases and modulate parameters to shape the sound's dynamics.
MELTED VIBES replicates the power and functionality of an analog sequencer. Accessed via the SEQ tab, the sequencer provides one lane for creating a melodic sequence of up to sixteen steps, and a further six lanes to modulate each of the macro controls and its respective assignments. These additional sequencing lanes allow you to shape your sound with precision and nuance over the course of a sequence.
Sequencing the pitch means you can create a musical phrase, and then modulate the velocity of each step to change the dynamics of the sound. Additionally, the velocity of the modulated steps can be set to change relative to how hard you play, using the Scale by Velocity feature in the Settings view. For more information, refer to Settings. The sequencer can be set to affect only one layer, or both layers together. Parameters like Rate, Direction, and Swing provide control over the timing and playback of your sequences.
Sequencer Overview
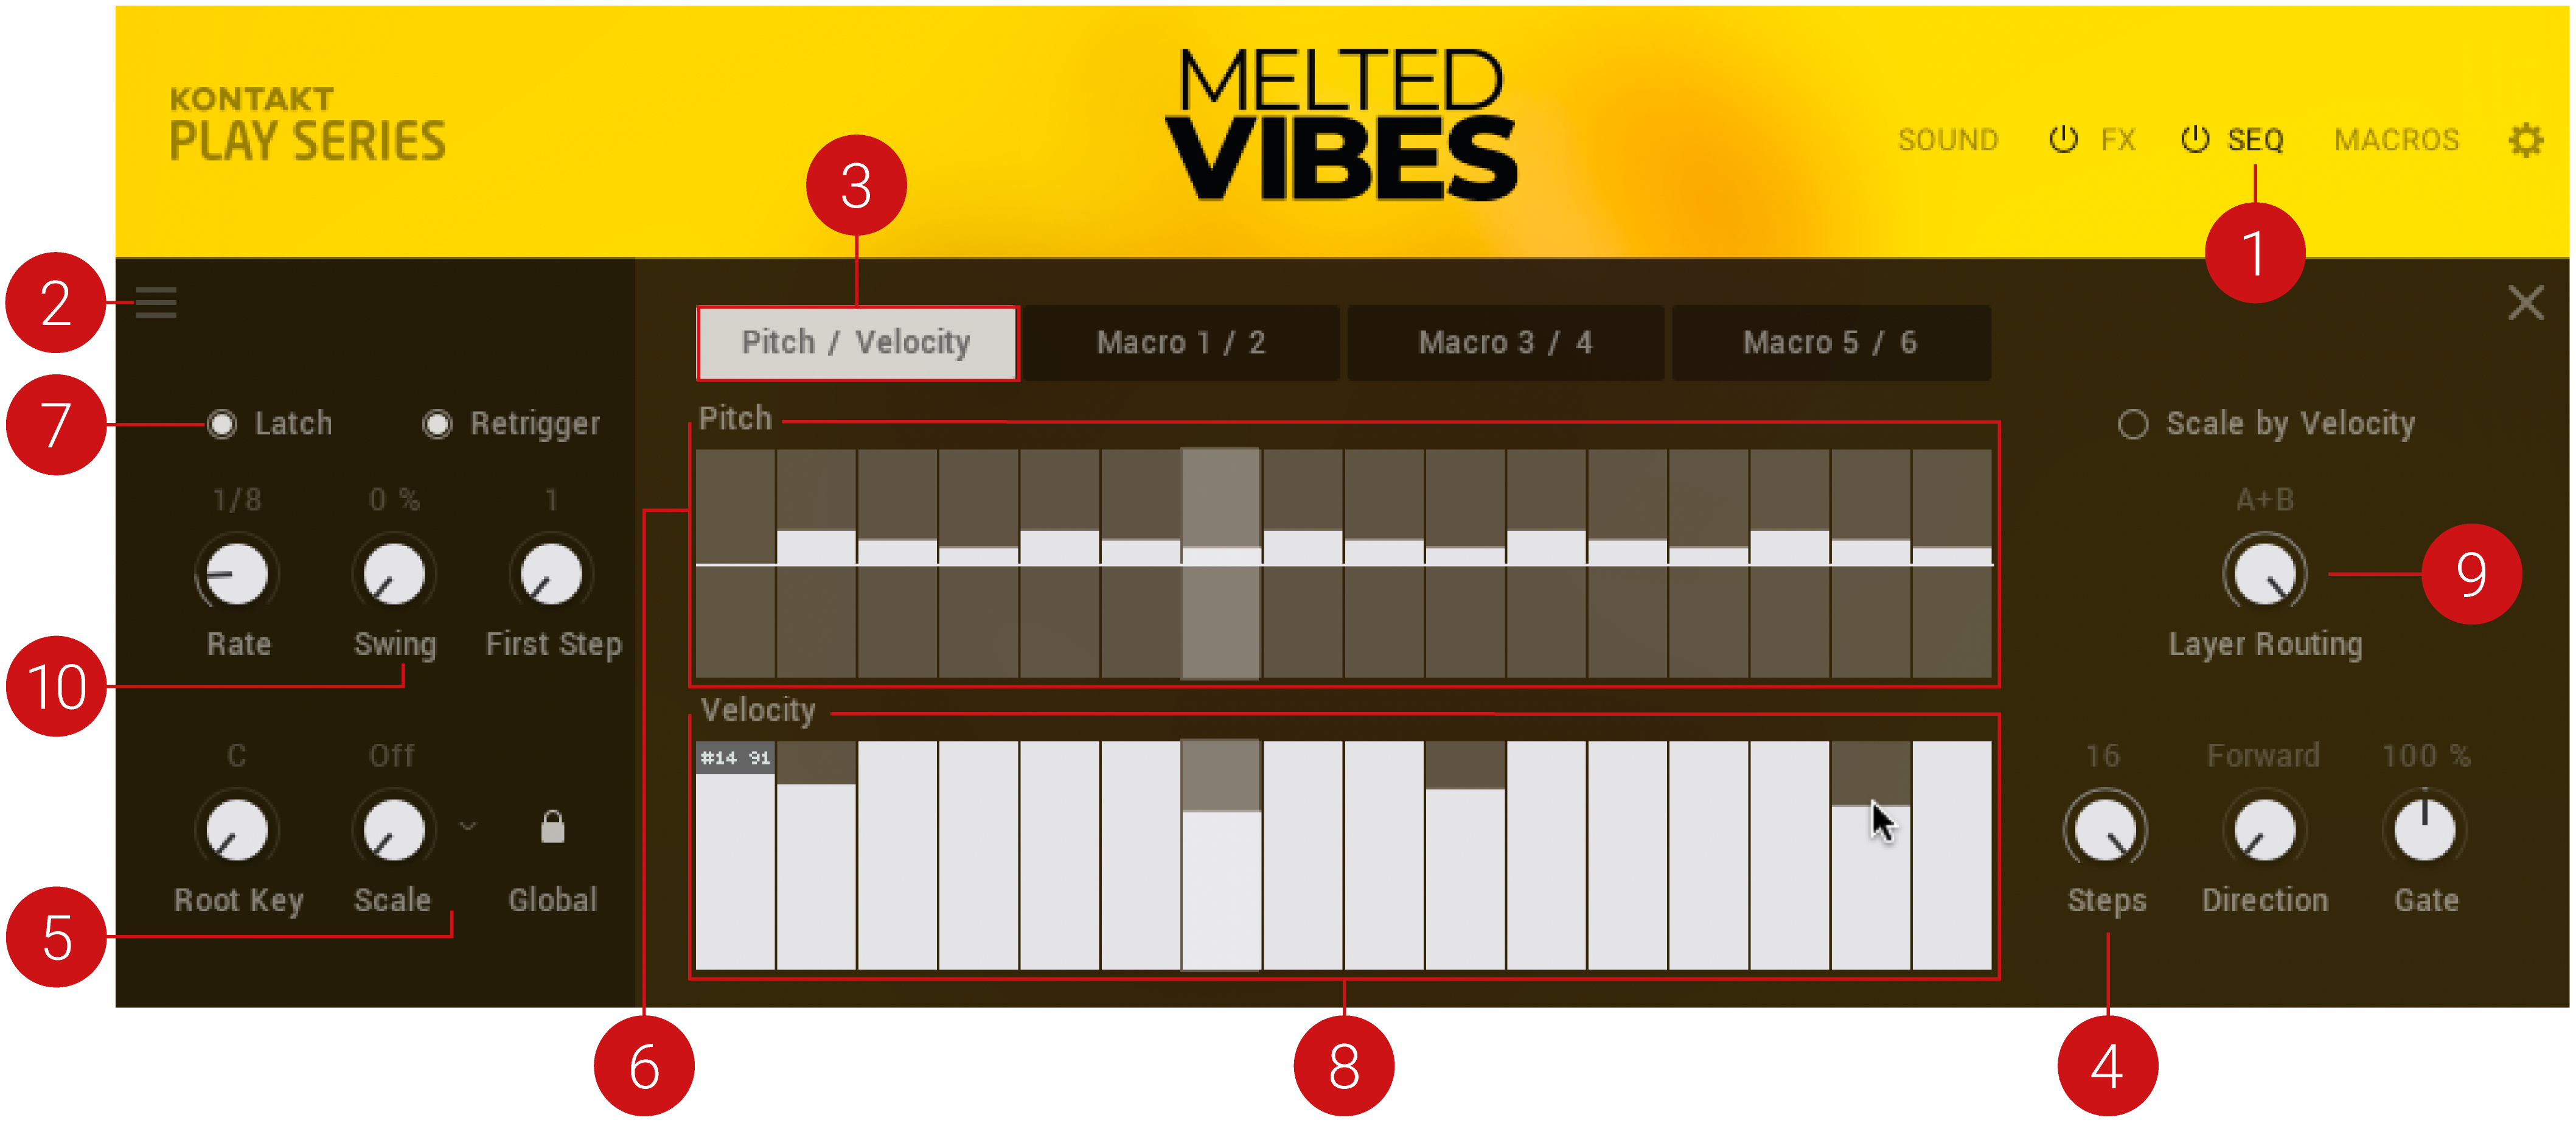
The Sequencer contains the following controls that are available at all times and apply to all sequencer lanes (Pitch/Velocity and Macros 1–6):

The global controls of the Sequencer
Sequencer Preset menu: Use this menu to save and load sequencer presets, and initialize sequencer lanes. For more information see, Managing Sequencer Presets.
Latch: Latches the sequencer on or off. When Latch is on, the sequencer will run continuously from a single note trigger. Notes played will continue to play until the sequencer or Latch is turned off. Pressing a new note will transpose the sequence relative to the new note value.
Retrigger: Switches retrigger on or off. When Retrigger is on the sequencer restarts every time a new note is played.
First Step: Sets the starting step of the sequence when it is retriggered.
Rate: Sets the playback rate of the sequencer relative to the DAW/host tempo (in BPM) and is adjustable in specific note values.
Swing: Sets the sequencer swing amount. Turning the Swing knob to the right increases the amount of swing added to the sequence.
Root Key: Sets the root key of the sequencer.
Scale: Sets the scale of the sequencer. Turn the control or use the drop-down menu to select a scale.
Global: Switches the sequencer scale lock on or off. When activated, the currently selected scale type and its root key will be used for all Snapshots.
Sequence Lanes: Displays the individual sequence lanes for the selected set of controls.
Pitch and Velocity
The following controls are displayed when the Pitch / Velocity tab is selected in the Sequencer view:
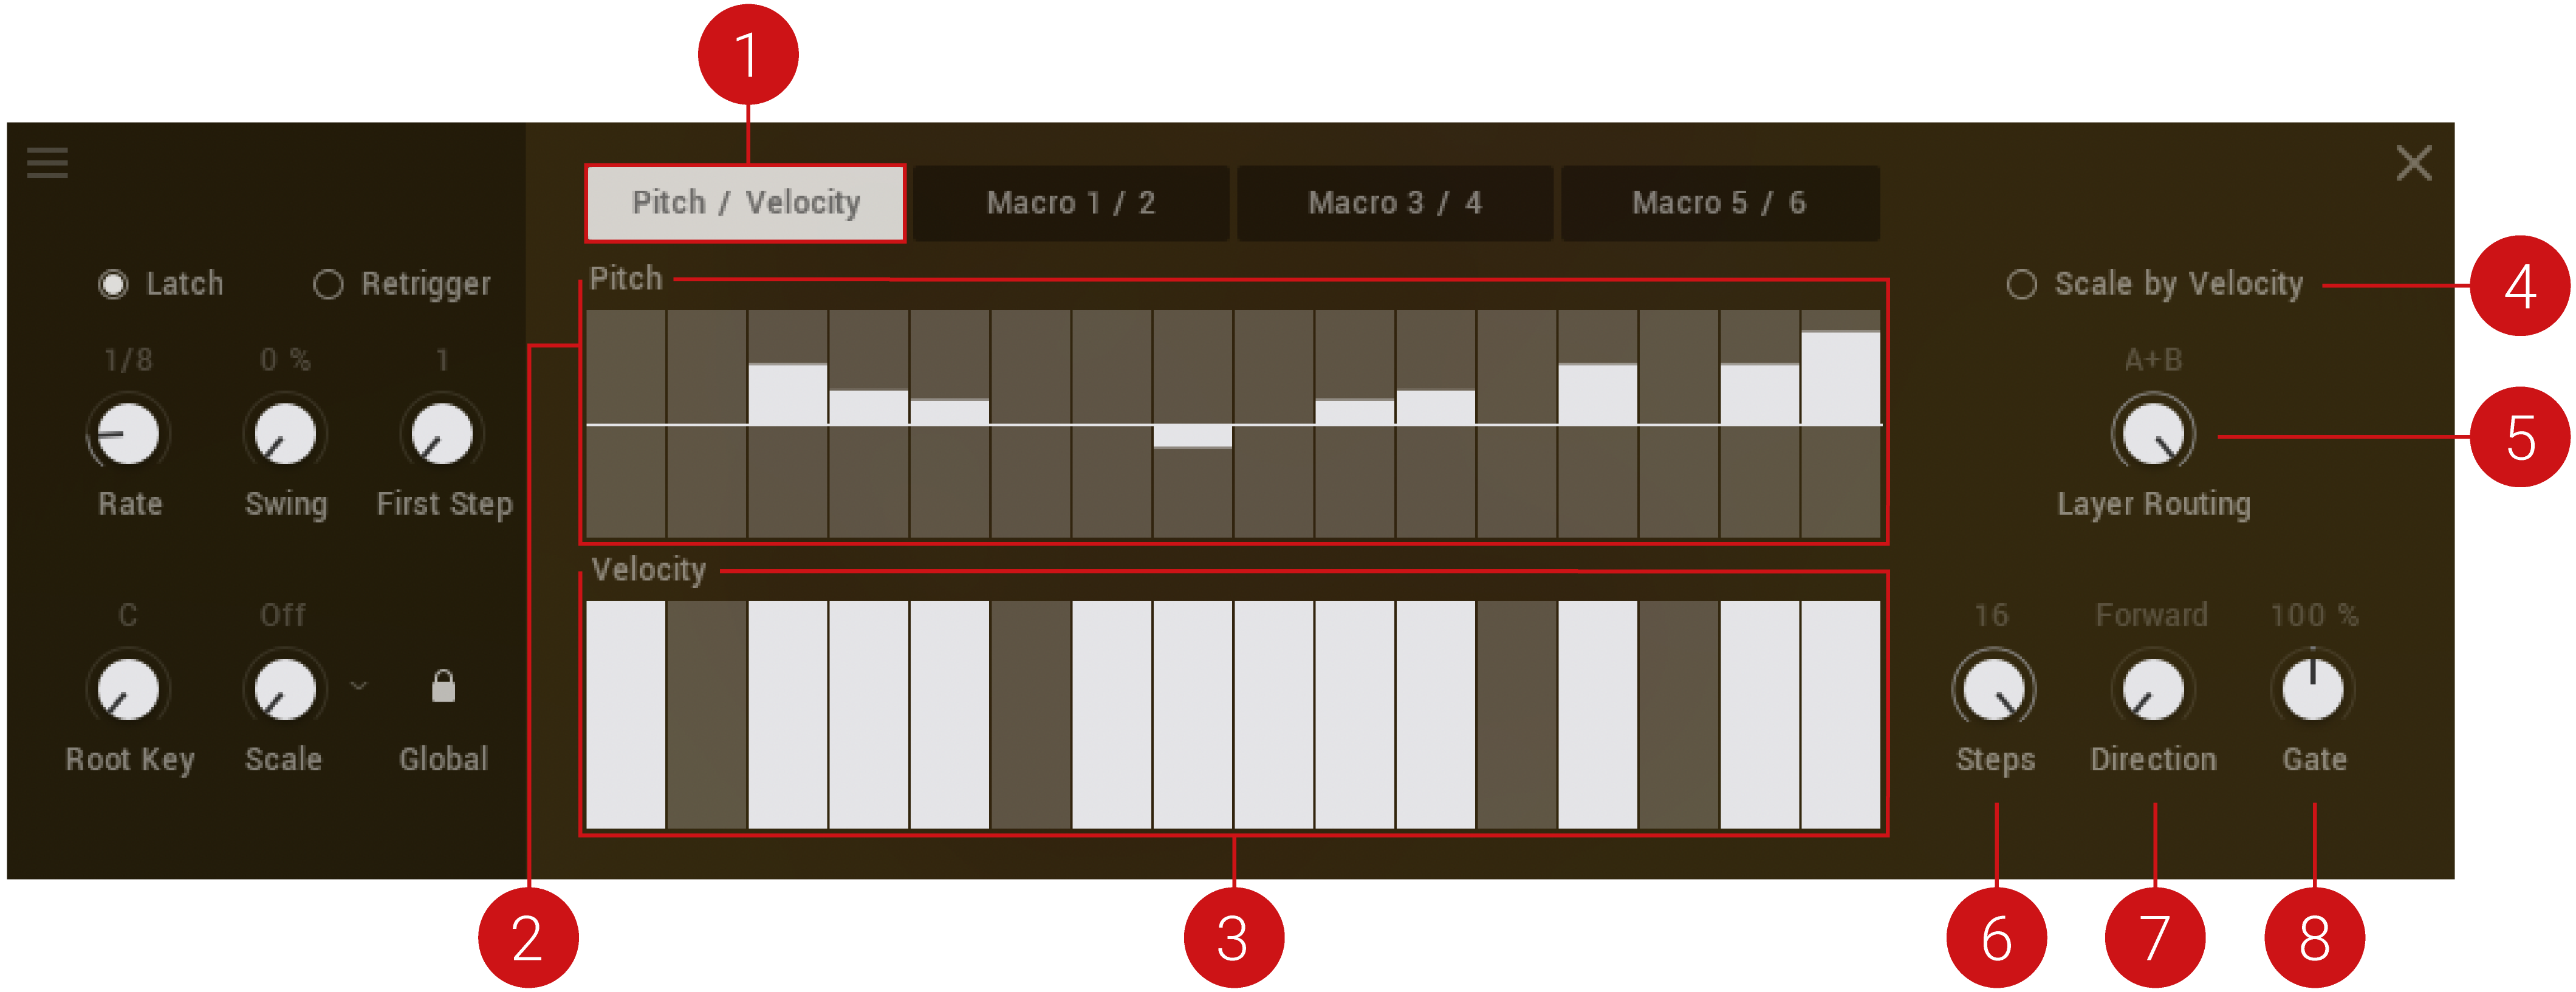
The Pitch and Velocity controls of the Sequencer
Pitch / Velocity tab. Displays the pitch and velocity sequencing lanes where you can enter notes and velocity levels.
Pitch Sequence Lane: Sets the offset for the pitch. The range is +/- 2 octaves.
Velocity Sequence Lane: Sets the offset for the velocity. The range is 0–127. A value of 0 results in no note being triggered for that step, even if there is a value already set in the pitch lane.
Scale by Velocity: Switches the Scale by Velocity on or off. This function scales the note velocity of the sequence with input velocity that is played via a keyboard or MIDI device.
Layer Routing: Sets which layers are affected by the pitch sequencer. Turn the control to route the pitch sequence to a layer. The available options are as follows:
None: Plays no layers.
A: Plays only layer A.
B: Plays only layer B.
A+B: Plays both layers A and B. The balance of the layers can be adjusted using the Balance macro knob on the far-left.
Steps: Sets the sequence length in steps. Click and drag the mouse up or down to adjust the number of steps.
Direction: Sets the direction of the sequencer. Click and drag the mouse up or down to adjust the direction of the sequence. The available options are in the following order:
Forward: This is the default playback direction. The sequence plays forward from left to right.
Backward: The sequence plays in reverse, beginning with the final note of the sequence.
Fwd > Bwd (Forward-Backward): The sequence plays forward in its entirety, then backward in its entirety.
Bwd > Fwd (Backward-Forward): The sequence plays backward in its entirety, then forward in its entirety.
|Fwd > Bwd| (Forward-Backward with repeating edge notes): The sequence plays forward in its entirety, then backward in its entirety with repeating edge notes.
|Bwd > Fwd| (Backward-forward with repeating edge notes): The sequence plays backward in its entirety, then forward in its entirety with repeating edge notes.
Random: The sequence plays in continuously varying random order.
Gate: Sets the note sequence gate length (scales to a percentage of the sequencer rate value).
Macros
The following controls appear when a Macro tab is selected in the Sequencer:
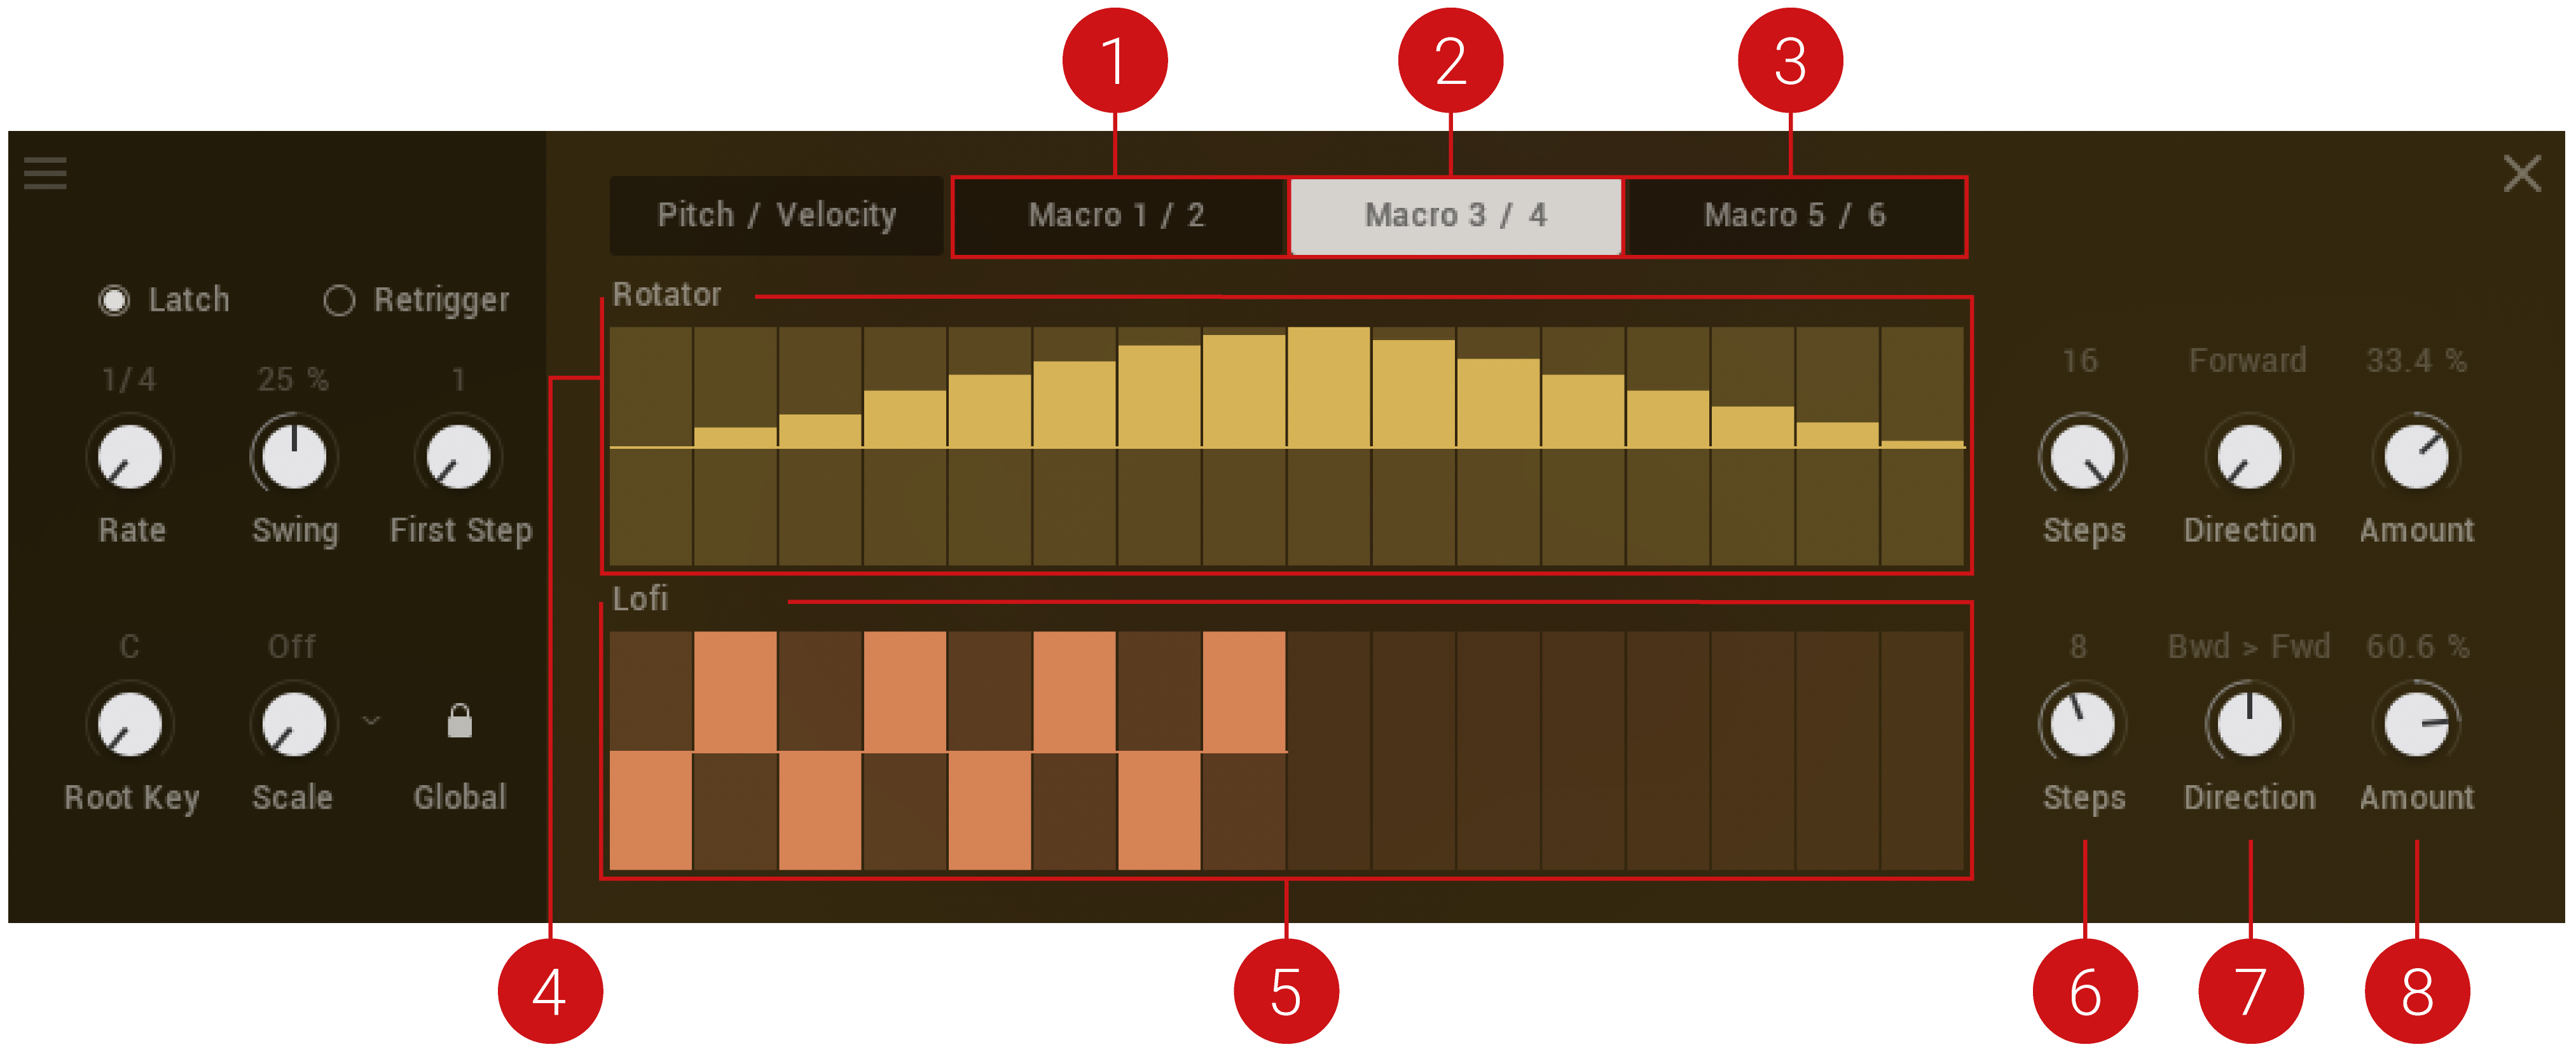
The Macro controls of the Sequencer
Macro 1 / 2 : In the sequencer lanes that appear you can add modulation for up to 16 steps.
Macro 3 / 4: Displays the sequence lanes for Macros 3 and 4. In the sequencer lanes that appear you can add modulation for up to 16 steps.
Macro 5 / 6: Displays the sequence lanes for Macros 5 and 6. In the sequencer lanes that appear you can add modulation for up to 16 steps.
Macro Sequence Lane: Draw in the modulation amount for the corresponding macro. Press [Ctrl] / [Cmd] + click any step to reset any its current modulation value.
Macro Sequence Lane: Draw in the modulation amount for the corresponding macro.
Steps: Sets the sequence length of the corresponding macro in steps. Click + drag the mouse up or down to adjust the number of steps.
Direction: Sets the sequence playback direction for the corresponding macro. The options are the same as listed for the Pitch and Velocity controls above.
Amount: Sets the sequence modulation amount for the corresponding macro. Press [Ctrl] / [Cmd] + click to set to 0%, effectively bypassing the macro sequencer. Press [Alt] / [Opt] + click to set the amount to the maximum positive value, or press [Ctrl] / [Cmd] + [Alt] / [Opt] + click to set the amount to the maximum negative value.
Sequencing Pitch
Using the sequencer you can create a musical phrase of up to 16 steps long. Each step has a range of +/- two octaves from the root note. The root note is equal to the note information received from your keyboard, MIDI device or DAW. A sequence is automatically transposed relative to any new note that's played. For greater range, use the Transpose Up or Transpose Down buttons on your keyboard.
Sequencing Pitch in the Sequencer
To sequence pitch:
Open the sequencer by clicking SEQ in the top-right header.
If your snapshot already contains a sequence, you can initialize it using the Sequencer Preset menu, refer to Managing Sequencer Presets.
Select the Pitch / Velocity tab to open the Pitch and Velocity Sequence lanes.
Set the number of steps for your sequence by adjusting the Steps value. The default setting is 16.
Set the Root Key and Scale for your sequence.
To add a pitch value to each step of the sequence, click + drag the mouse upwards or downwards from the horizontal line in the middle. The horizontal line represents the root note of the pitch played. To add note values in semitones above the root note, click + drag upwards. To add values below the root note, click + drag the mouse downwards. As you drag upwards or downwards, the distance from the root note is indicated in semitones and octaves and displayed on the interface.
Turn on Latch and trigger a note to hear the sequence play. With Latch activated, the sequencer will run continuously from a single trigger, freeing up your hands to adjust and fine-tune the pitch values for each step.
Adjust the Velocity amount for each step to change the dynamics of the sound. By default, all steps are set to full Velocity. Drag the mouse down to decrease the Velocity amount for the selected step.
Optionally, you can decide if the sequence affects layer A, layer B or both layers using the Layer routing control on the right-hand side. You can adjust this at any time.
Experiment with the Swing control.
When you are satisfied with your sound you can save it as a User snapshot or as a separate Sequencer Preset. For more information, refer to Saving a User Snapshot and Managing Sequencer Presets.
Sequencing Macros
In addition to sequencing notes, you can also sequence Macros. These are the six knobs along the bottom of the instrument used to control the preassigned parameters that work best with the selected Snapshot. By sequencing the Macros you can change the sound of the Snapshot over time to create interesting textures and movement when the sequence is triggered. As when sequencing notes, you can also set each Macro to can have a different playback length and direction for more complex modulation patterns.
The Macros are presented in pairs but each Macro has its own individual sequence lane where modulation values can be added for each step of the sequence.
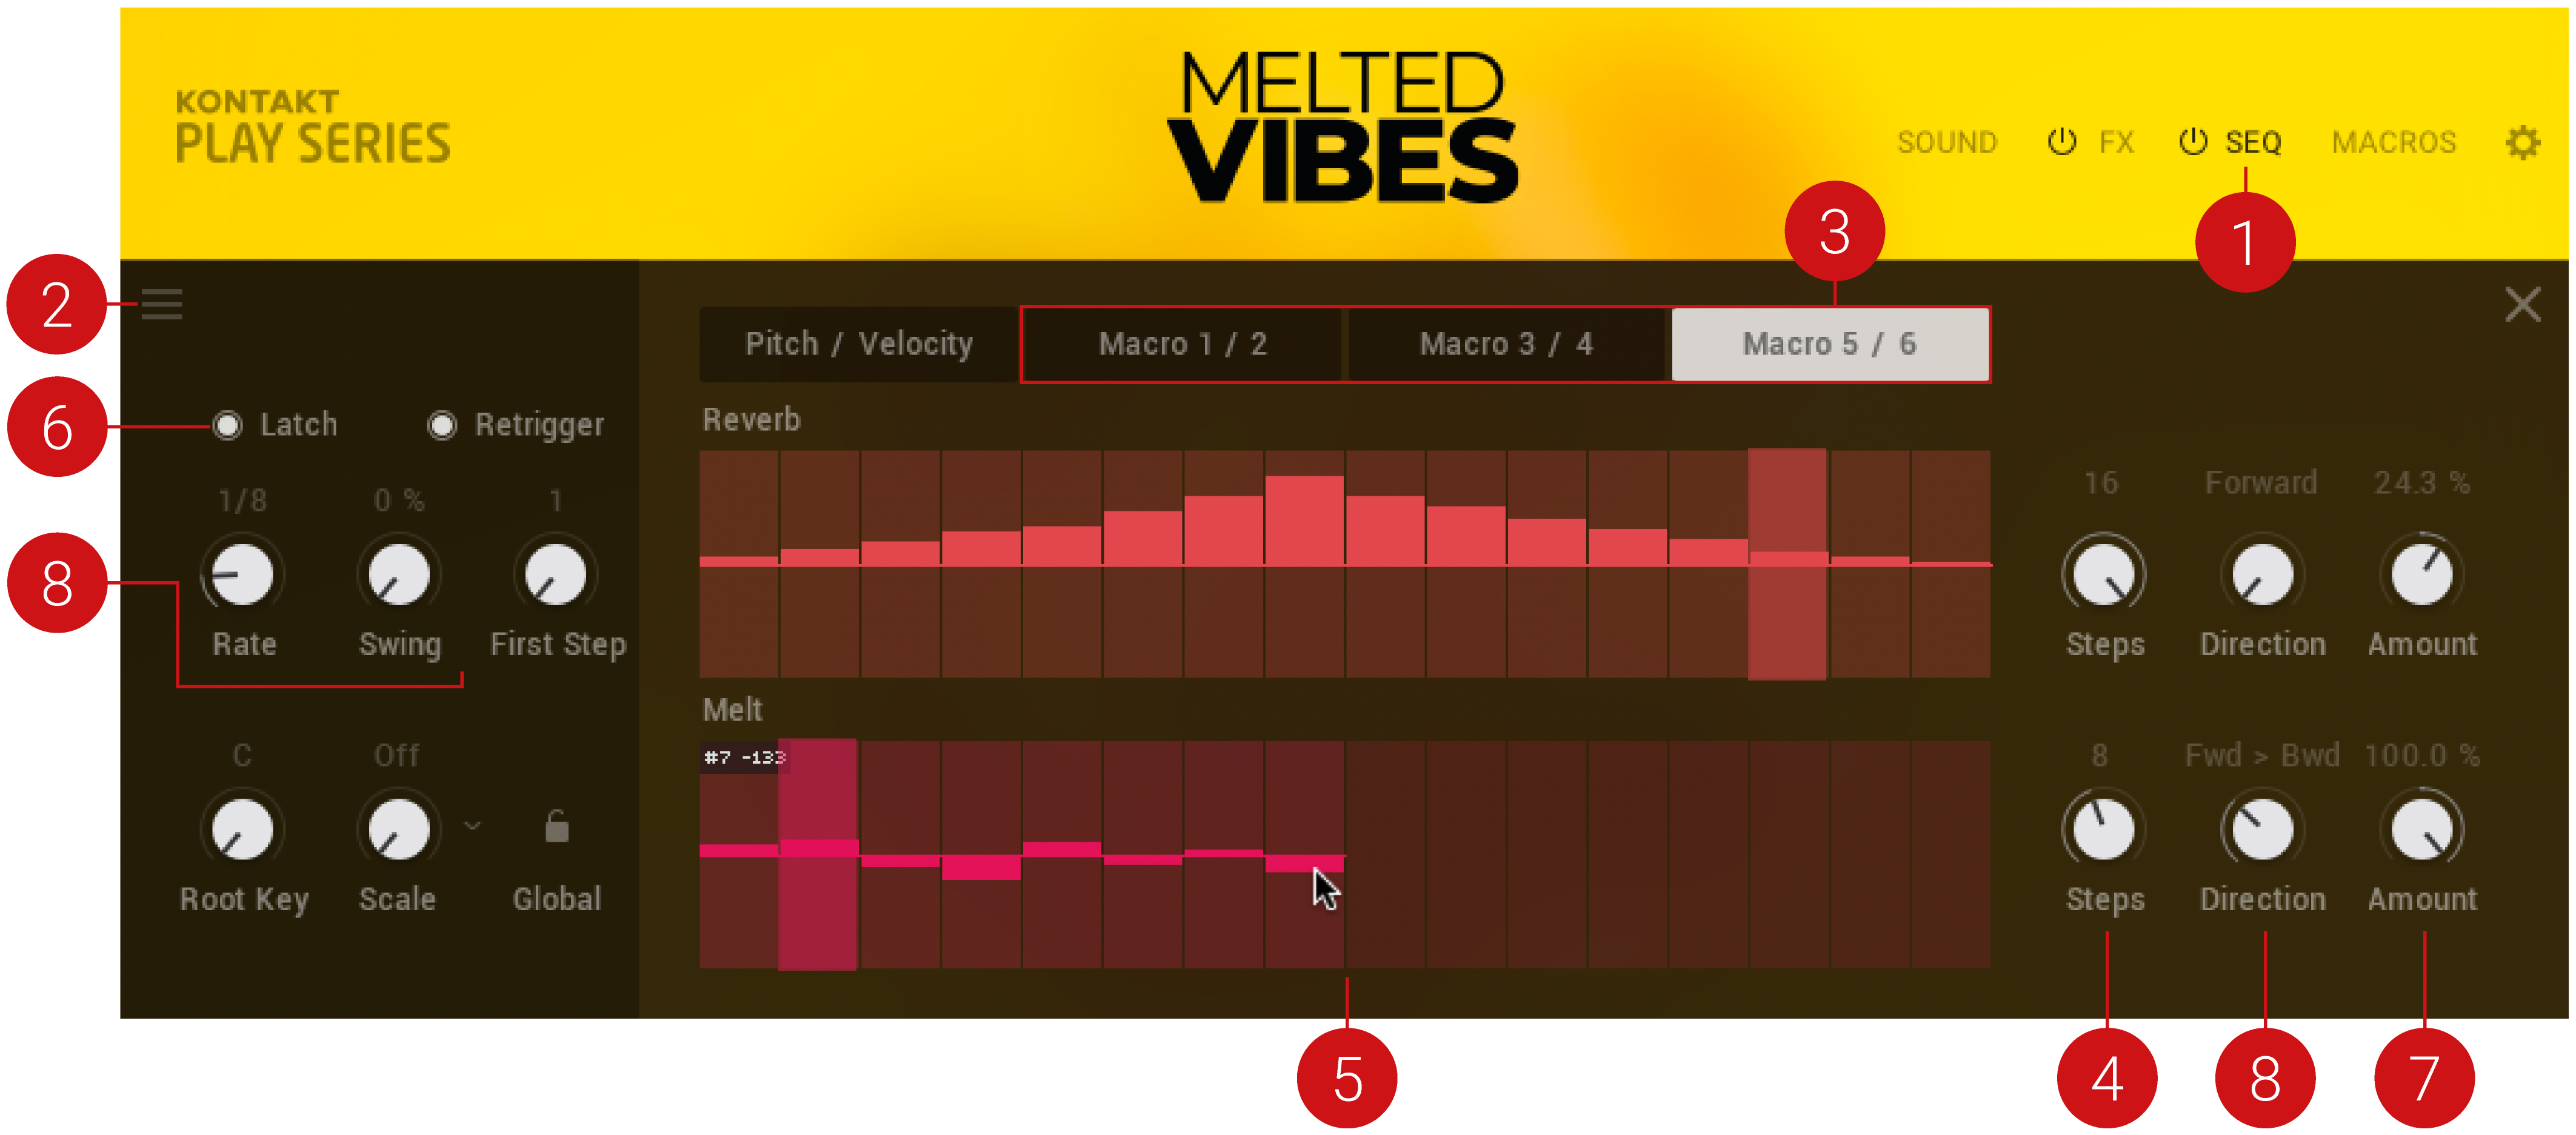
Sequencing Macros in the Sequencer
To sequence a Macro:
Access the sequencer by clicking SEQ in the top-right header.
If your Snapshot already contains a sequence, you can initialize it using the Sequencer Preset Management menu, refer to Managing Sequencer Presets.
Select the sequence lane of the macro you want to sequence, for example, if you want to sequence the fifth macro, select the Macro 5 / 6 tab. In this example, the horizontal sequencing lanes for Macros 5 and 6 open with the sequencing lane for Macro 5 appearing at the top.
Set the number of steps you would like to sequence by adjusting the Steps value on the right. Setting a different number of steps for each macro can create interesting tonal polyrhythms.
To add a parameter modulation value to a step, click + drag the mouse upwards from the horizontal line in the middle to add positive values, or click + drag the mouse downwards to add negative values.
Turn on Latch and trigger a note to hear the sequence play. With Latch activated, the sequencer will run continuously from a single trigger, freeing up your hands to adjust and fine-tune the modulation values for each step.
Adjust the modulation Amount to determine how much the sequence affects the macro control. Dragging the knob left decreases the modulation amount, and dragging it right increases the amount.
Optionally, to create more diverse patterns, experiment with the Direction controls. For more information on these controls, refer to Sequencer Overview.
Managing Sequencer Presets
While sequences are automatically saved with each Snapshot, the Sequencer Preset Management allows you to save sequences separately and load them onto other sounds. Additionally, the menu provides an initialization function that enables you to reset any part of a sequence to the default values.
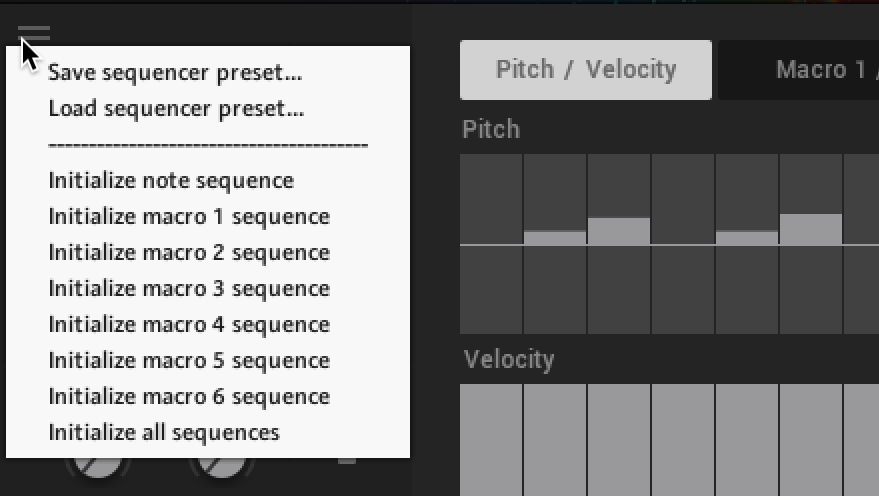 |
The Sequencer Preset Management menu
The following workflows demonstrate how to use Sequencer Preset Management to save, load, and initialize your sequences.
Saving a Sequence
To save a sequencer preset:
Click SEQ to enter the Sequencer view.
Click the Sequencer Preset Management icon in the top left corner.
Select Save sequencer preset...
Enter a name for your sequence.
Click Save.
Loading a Sequence
To load a sequencer preset:
Click SEQ to enter the Sequencer view.
Click the Sequencer Preset Management icon in the top left corner.
Select Load sequencer preset...
Select a sequence file.
Click Load.
Note
Loading a sequence will overwrite any current user sequence being used with the Snapshot.
Initializing a Sequence
To initialize all or any part of a sequence:
Click SEQ to enter the Sequencer view.
Click the Sequencer Preset Management icon in the top left corner.
To reset all note values, select Initialize note sequence.
To individually reset any of the macro sequences, select Initialize macro 1–6 sequence
To reset the whole sequence (note values and all macros), select Initialize all sequences.