Interface and Operation
This chapter will introduce you to ALICIA’S KEYS specific controls, which are situated in the Performance View section of the Instrument within your KONTAKT / KONTAKT PLAYER software.
Press the Performance View button (PV) in the lower right of the Instrument Header to show/hide the Performance View.

To learn how to operate the Instrument Header’s controls, refer to the documentation of your KONTAKT / KONTAKT PLAYER software.
Caution
ALICIA'S KEYS will not work properly if you transpose it using KONTAKT's Instrument option MIDI Transpose (Instrument Options > Instrument > MIDI Transpose): pedal noises will not sound, and 'pedal down' samples will not be released, but play until end.
Basic Controls
There are five basic types of controls: knobs, buttons, drop-down menus, click menus, and numericals.
Knobs
To change a knob value, click on it and drag up to move the knob clockwise, or down to move it counter-clockwise.
Knobs can be fine-tuned by holding down your computer keyboard’s [Shift] key as you move the knob.
[Ctrl] + Click (Mac OS X: [Cmd] + Click) resets a knob to its default value.
Sliders
To change a slider value, click on it and drag to the right to increase, or to the left to decrease the value.
Sliders can be fine-tuned by holding down your computer keyboard’s [Shift] key as you move the slider.
[Ctrl] + Click (Mac OS X: [Cmd] + Click) resets a slider to its default value.
Buttons
These are all toggles – click once to turn on, again to turn off. The background of most buttons will change its color for the On and Off states.
Drop-Down Menus
These look like buttons, but have small arrows that point down. To access a drop-down menu’s entries, click on the menu. A list holding several entries drops down. To select one of the entries, move the mouse to the regarding entry so that the entry gets highlighted, then release the mouse button. The piano takes whatever action you’ve requested, then closes the menu.
Click Menus
These work like scroll bar arrows in any computer program. Click the top arrow to access the previous setting. Click the bottom to access the next one (Click menus are only available in the Instrument Header).
Numericals
These are fields that contain numbers.
Click on the numerical, then drag the mouse up to increase the value, and drag down to decrease the value.
or
Double-click on the numerical, and type in the desired value.
Directly editable numericals are only available in the Instrument Header. The parameter values in the Performance View can be changed only by operating the accordant knob.
The Performance View
The Performance View holds all the relevant controls for shaping the sound of the piano.
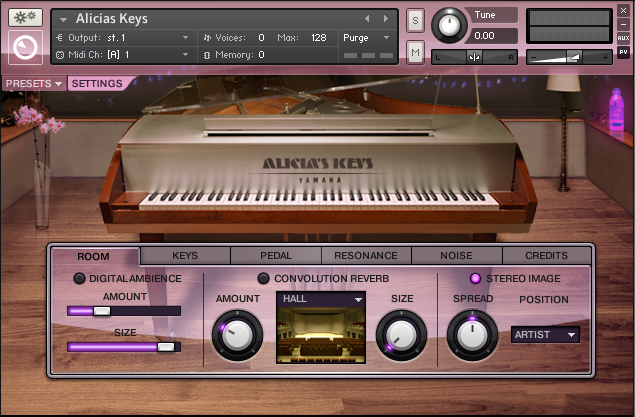
Press the Settings button in the top left corner to open the Settings window. The Settings controls are organized in five categories: Room, Keys, Pedal, Resonance and Noise.
The Room Tab
The settings in the Room tab let you add a room simulation of your choice to the piano sound. The dimensions of a room and the type of surface materials have a big impact on the sound of the piano. For example, the sound of a piano played in a large concert hall is very different to that experienced when the same piano is played in a small studio space. Each type of room creates a unique sound and has its own ambience, because of the way sound waves are reflected by the room.
You can adjust the type and feel of the room using three settings: Digital Ambience, Convolution Reverb and Stereo Image. Each of these effects is turned on and off by pressing the button next to the effect name.
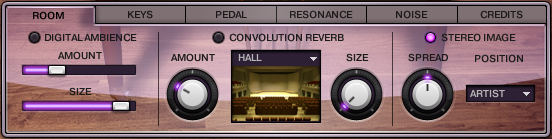
Digital Ambience
Amount: Adjusts the amount of digital ambience.
Size: Adjusts the virtual size of the room.
Convolution Reverb
Amount: Adjusts the convolution reverb amount.
Location: These predefined convolution effects allow you to determine the reverb that would be experienced in different acoustic spaces. Select one of the following rooms to load a convolution preset:
Hall
Auditorium
Studio
Size: Adjusts the virtual size of the room.
Stereo Image
Spread: adjusts the width of the stereo effect. The larger the value, the greater the width of the stereo image and vice versa.
Position: Choose the perspective from which the piano is heard, either artist or audience.
The Keys Tab
The settings in the Keys tab deal with how the piano will respond and give expression to your individual playing style.
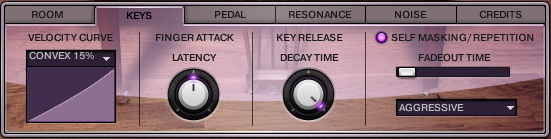
Velocity Curve
Changing the Velocity Curve will affect how the piano will respond to your playing at different MIDI velocities, that is, how hard or softly you play the keys. With a positive or convex slope, the piano will be more sensitive to softer playing. When the slope is negative or concave, there is less response to softer playing and more sensitivity to harder strokes. There are 10 different velocity curves to choose from.
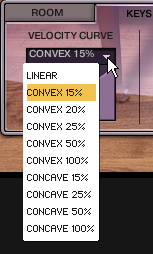
Select an entry from the Velocity Curve menu to adjust the response of the piano to your needs.
Finger Attack
Turn the Latency knob to adjust how much the sample start is offset. At 0% you get a slower attack but more of the noise as the finger touches the key. With higher values you get a quicker attack and less latency. Select a low percentage for low latency. Select a high percentage for a larger part of the original attack of the note to be included. The default latency value is 50%.
Key Release
Adjust the Decay Time knob to determine the amount of time before a key is released.
Self Masking / Repetition
Controls whether to fade-out old notes when the same note is played at a higher velocity. Turn this feature on or off by pressing the button.
Fadeout Time: Determines how long it takes for a note to fade out once it is masked (released).
Style: Select an entry from this menu to determine how often the Self Mask should set in. The three options are: Aggressive / Repetition Friendly / Kill only old notes.
Aggressive: fade-out notes with less velocity irrespectively of the time that has passed since they were played.
Repetition friendly: fade-out notes with velocity values at least ten steps below the value of the most recently played note and with more than 500 ms passed since they were played.
Kill only old notes: fade-out notes with velocity values at least 40 steps below the value of the most recently played note and with more than 800 ms passed since they were played.
The Pedal Tab
The settings in the Pedal tab let you adjust how the piano pedals will respond to pedal action. Alicia’s piano has the Sustain (Damper) and Sustenuto pedals. The Sustain Pedal causes the dampers to be lifted off all strings of the piano, allowing them to ring out while the pedal is depressed. The Sustenuto Pedal has the same effect, but only on the notes that are played before the pedal is depressed, and afterwards are released. These notes will continue to ring out after they have been released.
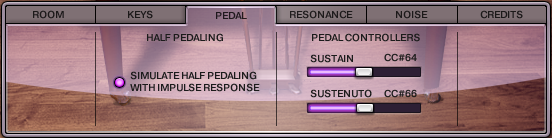
Half Pedaling: Click the button labeled Simulate Half Pedaling with Impulse Response to enable half pedaling simulation (based upon impulse responses). When this is enabled, you can gradually press the Sustain Pedal and the more you press it the more resonance emerges. In this way you can go continuously from a pedal-up sound to a pedal-down sound. This assumes that you have a Sustain Pedal that is capable of sending continuous values.
Note
If you play a note with the pedal up and then press the pedal afterwards, the triggered pedal-up sample will gradually change into a more pedal-down like one This is simulated using the Impulse Response. However, if you play a note while the pedal is down, releasing the pedal afterwards will not cause a gradual change of the sound.
Pedal Controllers: Drag the sliders to change the amount of sustain achieved when the Sustain and Sustenuto pedals are depressed.
The Resonance Tab
On a real piano, when a particular note is played and the Sustain pedal is depressed, other strings corresponding to the harmonics of that note will also vibrate in sympathy. This is known as sympathetic resonance.
The same effect can be achieved without the use of the pedal, by silently pressing the keys corresponding to these harmonics instead (This has the same effect as pressing the Sustain Pedal on these strings). Using this method allows you to determine exactly which harmonics you would like to resonate.
Sympathetic Resonance Rules
Setting these rules allows you to determine how much Sympathetic Resonance is experienced when playing the piano. You can set the number of rules for Pedal Up and Pedal Down mode separately. Click the button to enable or disable Sympathetic Resonance Rules. In Pedal Down mode it is generally better to use fewer rules for performance reasons.
Note
More rules means more sympathetic resonance harmonics but also a higher voice count which could negatively affect performance.
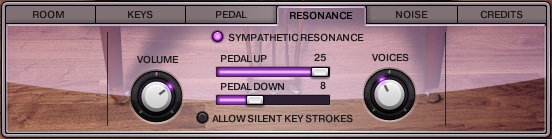
Volume: Adjusts the overall volume of resonance sounds.
Pedal Up: Controls the number of different resonance intervals for keys that are physically pressed, rather than sustained using the pedal. The higher the number, the higher the voice count and CPU usage.
Pedal Down: Controls the number of different resonance intervals for keys that are not physically pressed, but rather sustained using the pedal. The higher the number, the higher the voice count and CPU usage.
Voices: Determines the maximum number of voices. This should be lowered if you experience performance problems.
Allow Silent Key Strokes: Activating this control will cause notes with velocity 1(notes pressed very softly) to be completely silent. Even though such notes are silent you can get sympathetic resonances in them.
The Noise Tab
The settings in the Noise tab help further to achieve a more realistic piano sound. Here you can adjust how much sound the keys and pedals make when they are depressed and released. Furthermore, you can control the amount of microphone noise to create a static microphone effect.
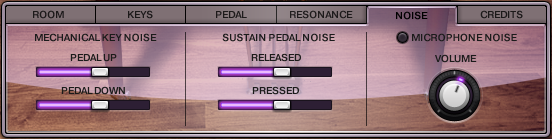
Mechanical Key Noise
Pedal Up: Level of the mechanical noise generated as key bounces back in position after being released while the pedal is not depressed.
Pedal Down: Level of the mechanical noise generated as key bounces back in position after being released while the pedal is depressed.
Sustain Pedal Noise
Released: Level of the sound when the pedal is released.
Pressed: Level of the sound when the pedal is depressed.
Microphone Noise
To add microphone noise to the piano sound, click the Microphone Noise button. Adjust the Volume knob to control the level of static microphone noise. The volume of the noise is constant as long as something is being played. More static noise adds an old-school vintage effect to the piano.