Overview of Creator Tools
Creator Tools consists of three panels: the Project Panel, Top Panel and Bottom Panel. Each panel contains different tools and can be shown or hidden from the View menu of the application top menu or by using dedicated shortcuts. Switching between the tools is possible from the tabs at the top of each panel, from the Go menu of the application top menu or by using the dedicated shortcuts. These shortcuts trigger actions related to the active panel in Creator Tools.
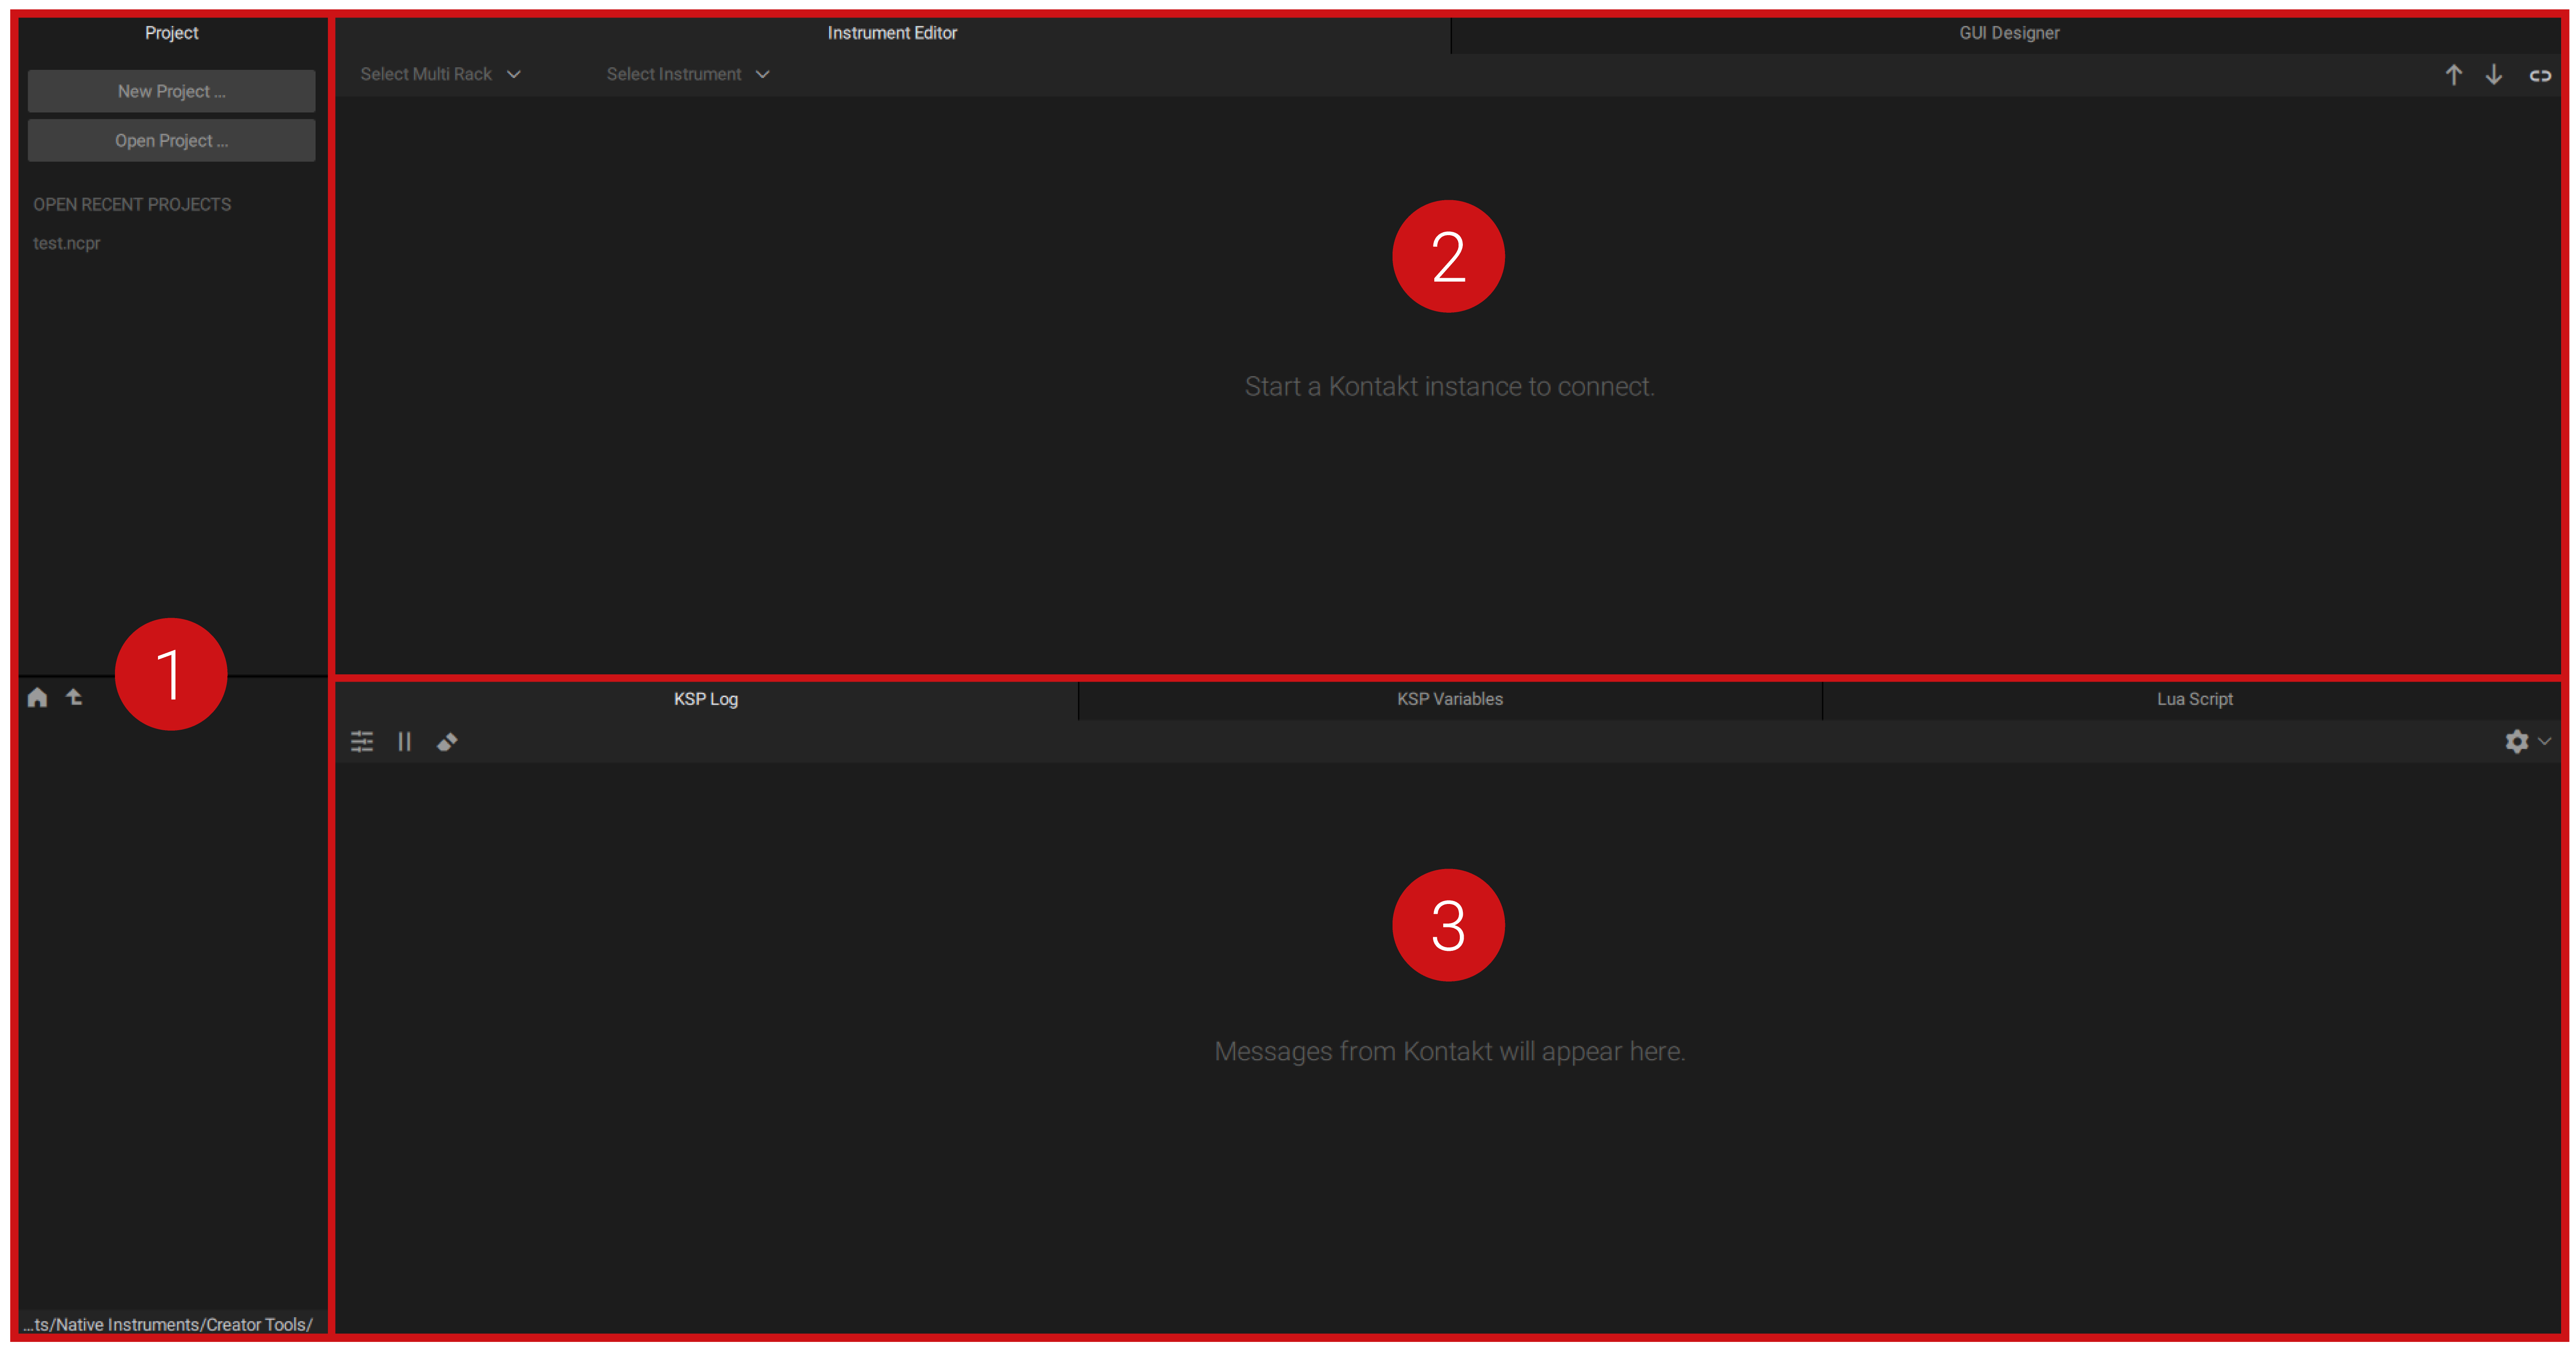
Project Panel: For more information, refer to chapter Project Panel [⌘/Ctrl-1].
Top Panel: For more information, refer to chapter Top Panel [⌘/Ctrl-2].
Bottom Panel: For more information, refer to chapter Bottom Panel [⌘/Ctrl-3].
Project Panel [⌘/Ctrl-1]
The Project Panel consists of the Project Manager (located at the top of the panel) and the File Browser (located at the bottom of the panel). It is a tool for browsing the filesystem and a project's resources and it allows files to be opened directly from Creator Tools by double-clicking on them.
Project Manager [F1]
A Creator Tools project file contains all data relevant for the instrument creation process. The format of a Creator Tools project file is JSON, which allows you to use source code version control systems.
The Project Manager is an editable view of a Creator Tools project file and therefore can only be used when a Creator Tools project file is open. It serves as a central access point for a project's resources and can, although not necessarily, contain all used resources.
The following items are shown in the Project Manager:
File and Folder items in a project file reference the corresponding files and folders in the filesystem. If the referenced entity is located in the project file folder or any of its children, the reference is encoded relative to the project file location. Otherwise, the absolute reference is used.
Group items in a project file organize a project as a hierarchical structure. A group can contain another group, a file or a folder.
There are no rules enforced about a project file's location or structure. There's not necessarily a project folder or any form of enforced project folder structure. Multiple project files can exist side-by-side.
Note
It is recommended to have a project file residing in a project folder together with sub-folders for common resources. When moving a project to other devices or platforms, it is important that the project is self-contained, i.e., contains only relative references.
Insert Menu [⌘/Ctrl-↵]
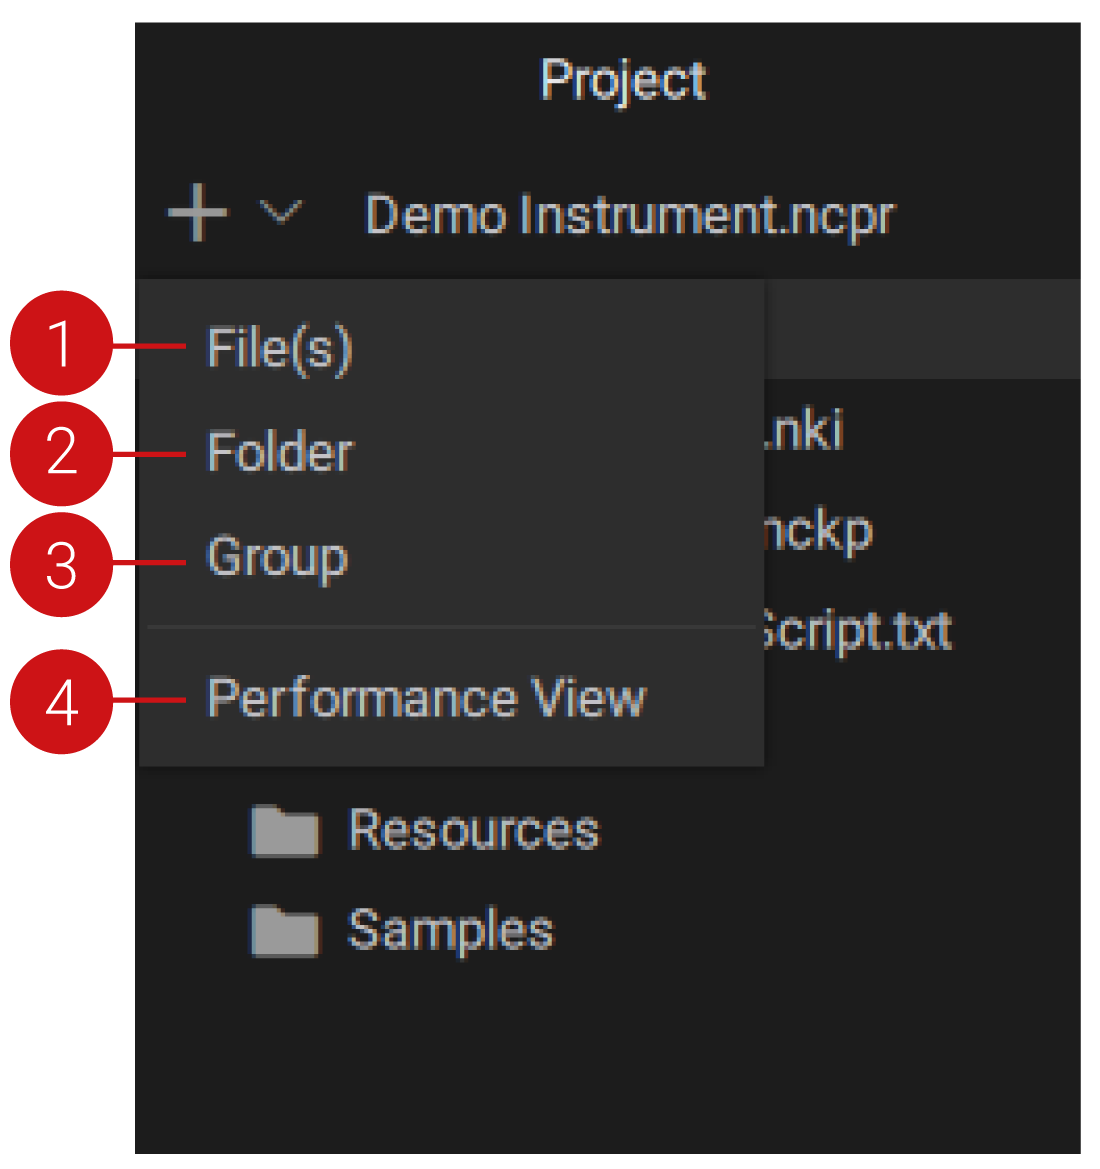 |
Files: Opens the OS file selection dialog. For each selected file an entry is inserted.
Folder: Opens the OS file selection dialog and inserts the selected folder. Once a folder is selected, its contents are displayed in the File Browser area below.
Group: Inserts a new group. Group items can contain files, folders and groups, and can be renamed.
Performance View: Opens the OS Save As dialog, which sets the saving location of the new performance view file. The new performance view item is added to the project.
For all the items described above, if a group is selected and expanded in the Project Manager, the inserted item(s) will be placed into this group. In any other case, the inserted item(s) will be placed above the currently selected item.
Shortcuts
Up/down arrows [↑/↓] | Navigate up/down |
Left/right arrows [←/→] | Expand/collapse group |
Return [↵] | Rename group if the current item is a group Open the system file-browser if the current item is a folder Open the file within Creator Tools if the current item is an associated file e.g. performance view Open the file with the system associated app e.g. a text editor |
Double-click | Rename groups if the current item is a group Open the file within Creator Tools if the current item is an associated file e.g. performance view Open the file with the system associated app e.g. a text editor |
File Browser
The File Browser is a secondary area in the Project Panel, located below the Project Manager. It is a read-only view of the filesystem and allows navigation through files and folders. It displays a flat list of files and/or folders within the current root.
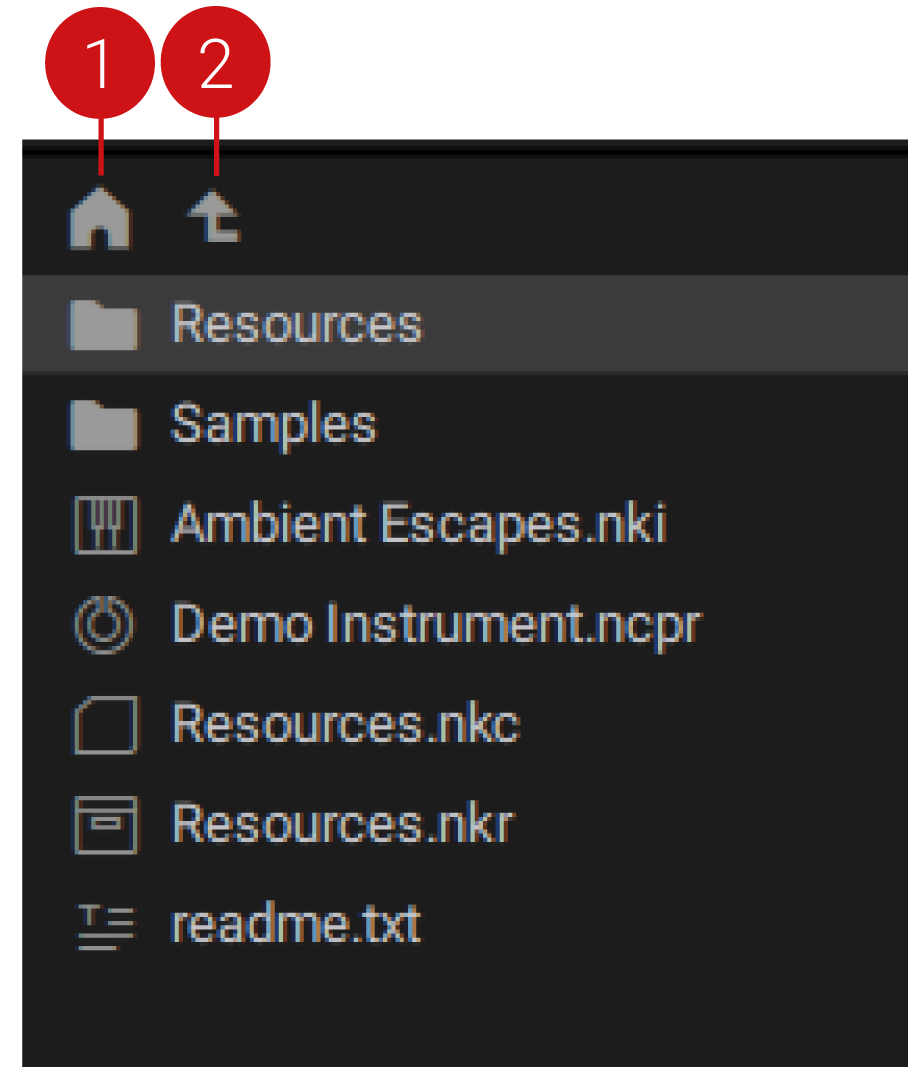 |
Home Button: Navigates to the folder where the project file is located.
Parent Button: Navigates to the parent folder of the currently displayed folder.
Shortcuts
Up/down arrows [↑/↓] | Navigate up or down |
Cmd/Ctrl-up [⌘↑] | Navigate to parent folder |
Cmd/Ctrl-down [⌘↓] | Enter folder |
Return [↵] | Open the system file-browser if the current item is a folder Open the file within Creator Tools if the current item is an associated file e.g. performance view Open the file with the system associated app e.g. a text editor |
Double-click | Enter folder Open the file within Creator Tools if the current item is an associated file e.g. performance view Open the file with the system associated app e.g. a text editor |
Top Panel [⌘/Ctrl-2]
The Top Panel consists of the Instrument Editor and the GUI Designer.
Instrument Editor [F2]
The Instrument Editor connects to a running instance of Kontakt (either plug-in or standalone) and displays the structure of an instrument in the form of a nested tree. Combined with the Lua Script tool in the Bottom Panel, it offers programmatic access to parts of a Kontakt instrument’s structure through Lua-based scripting.
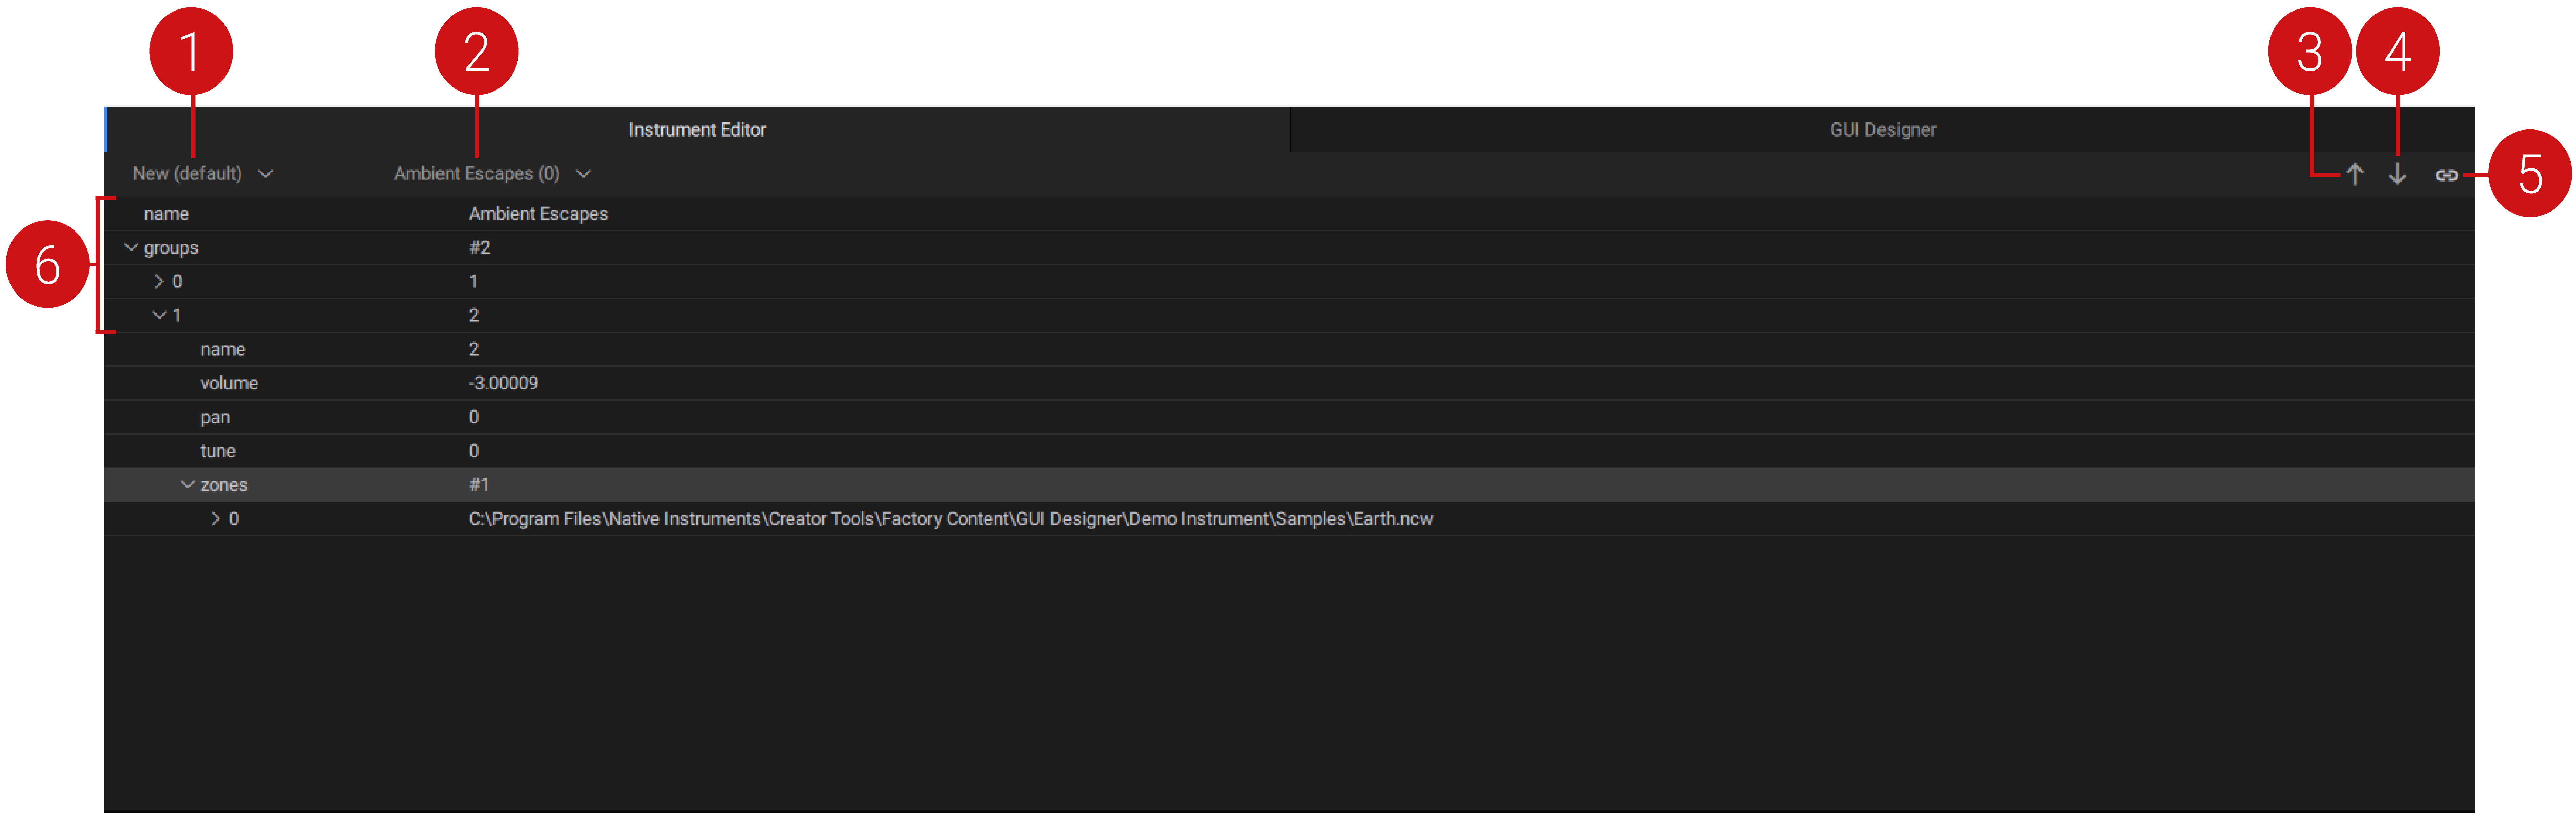
Multi Rack Menu: Sets the focus of the tool on the Multi Rack of one of the connected Kontakt instances.
Instrument Menu: Sets the focus of the tool to a specific instrument from the selected Multi Rack (1) that is loaded in one of the connected Kontakt instances.
Note
Note that instruments with locked edit views cannot be selected.
Push: [⌘/Ctrl-Alt-↑] Applies all changes from the Tools' side to Kontakt. If changes are not pushed, an indication on the button appears to notify for the pending changes.
Pull: [⌘/Ctrl-Alt-↓] Overwrites the current Kontakt state to the tools. Whenever a change takes place on the Kontakt side, Pull needs to be manually pressed in order to apply the changes in the Tools. If changes are not pulled, an indication on the button appears to notify for the pending changes.
Connection Indicator: Indicates whether a successful connection between the tools and the Kontakt instances is established.
Instrument Tree View: The instrument structure is displayed in the form of a nested tree. The tree view shows the basic instrument structure and instrument properties that can be modified through Lua scripts.
GUI Designer [F3]
The GUI Designer allows one to assemble, customize and reuse Kontakt performance views and controls, without the need to write code. It can generate two types of files, the performance view files (.nckp) and the control files (.nckc).
The performance view files (.nckp) contain all the information about an instrument’s graphical interface. These files can then be loaded in a KSP script, refer to Loading in KSP. A new performance view file can be created from the Insert menu of the Project Manager.
The control files (.nckc) are files that are created by exporting a single control or a container of controls (refer to also Panels). These files can then be imported in a later GUI Designer project, shared with collaborators or set the foundation for building custom UI libraries. Control files cannot be loaded in KSP.
The two main areas of the tool are the Tree View and the Properties.
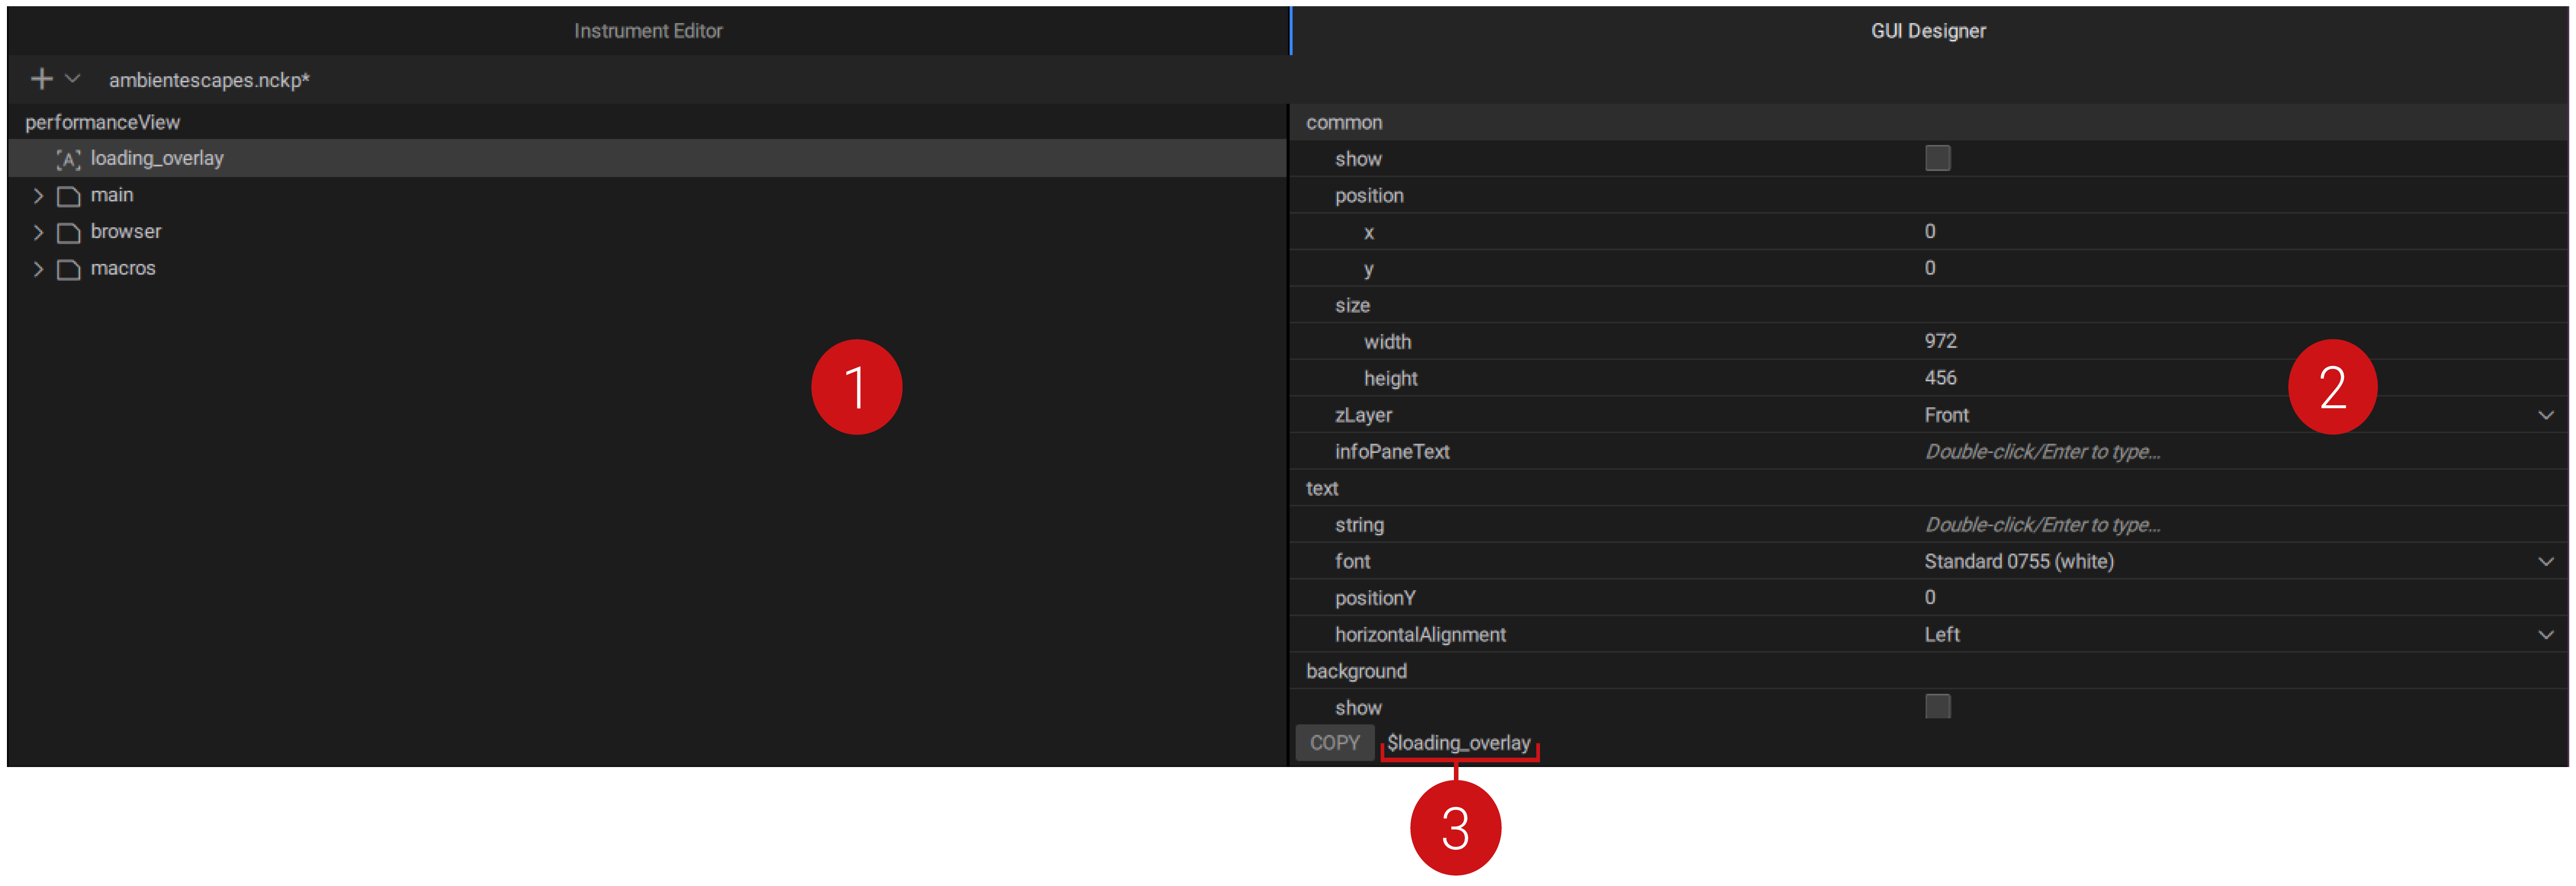
Tree View: The structure of a Kontakt performance view is displayed here in the form of a tree. A new performance view has one hierarchy level; the root level. Additional levels can be created when controls are added in Panels. For more information, refer to Panels.
Actions on one or more selected controls can be performed from the Tree View’s context menu. The context menu actions are:
Cut [⌘/Ctrl-X]
Copies selection to the clipboard and deletes it from the tree
Copy [⌘/Ctrl-C]
Copies selection to the clipboard
Paste [⌘/Ctrl-V]
Pastes controls from the clipboard above selection
Duplicate [⌘/Ctrl-D]
Duplicates selection
Rename [↵]
Enters renaming mode for selection
Delete [⌘/Ctrl-⌫]
Deletes selection
Import [⌘/Ctrl-I]
Opens the system’s file browser in order to locate and import a control file (.nckc) from the disk. The imported control will be placed above the currently selected control
Export [⌘/Ctrl-E]
Opens the system’s file browser in order to save the selected control’s file (.nckc) in a desired location
Properties: Displays the properties of the element selected in the Tree View. Changes can be made by double clicking on a specific property. Alternatively, the arrow buttons can be used to navigate the properties and changes can be made via hitting enter. Undo and redo actions are available via the usual shortcuts: [⌘/Ctrl-Z] for Undo and [⌘-Shift-Z/Ctrl-Y] for Redo.
Image: As input, image fields take the filename of a picture (.png) that is contained in the pictures subfolder of the KONTAKT Instrument' s resources folder.
Fonts: From the dropdown menu, one can select to set 1 of the 25 factory fonts or a custom font. If “Custom” is selected, then the filename of the picture font is expected. Similar to the Image property, the picture font should be contained in the pictures subfolder of the KONTAKT Instrument's resources folder.
Variable name: The KSP variable name of the currently selected control is displayed here. Use this name when scripting in KONTAKT. You can use the Copy button next to it to save the variable name to the clipboard.
Adding a Control
Insert Control Menu [⌘/Ctrl-↵]
A new control can be inserted in the performance view tree from the Insert Control menu. The menu lists all the known Kontakt UI controls, including a new control called panels (see Panels).
Import [⌘/Ctrl-I]
Previously exported controls can be added in the tree via the context menu’s Import function. Select a control and right click to reveal the context menu. Click on Import and locate the control’s .nckc file in the system’s file browser. Select Open and the control will be added in the tree, on top of the currently selected control.
Panels
A panel is a control that can contain one or multiple controls. Unlike the other controls, panels don’t have a size. They are very useful for grouping controls that are meant to be handled together. This allows one to simultaneously modify the Show, Position or zLayer property of all the controls contained in that panel. The position of a contained control is relative to the panel’s position, meaning that the control’s (0,0) position is the current (x,y) position of the panel.
Panels can be nested, so they can contain other panels. If panelA is contained in panelB, then panelA will appear in front of panelB. This is because children panels have a higher zLayer value than their parent panels. Use this logic to easily create hierarchies in a performance view.
Panels can also be used to keep the Tree View organized. They can be expanded or collapsed. When a panel is selected and expanded, new controls will be added on top of the panel’s contained controls. When a panel is selected but collapsed, new controls will be added above it, on the same hierarchy level as the panel.
Panels in KSP
Panels, like any other control, can also be used with pure KSP outside the GUI Designer, using the following command and control parameter:
declare ui_panel $<my_panel_name>
Creates a panel
set_control_par(<control-to-add-ui-ID>,$CONTROL_PAR_PARENT_PANEL,<panel-ui-ID>)
Adds a UI control (or panel) in a panel
Example
declare ui_panel $mixer
declare ui_knob $volume (0, 300, 1)
set_control_par(get_ui_id($volume), $CONTROL_PAR_PARENT_PANEL, get_ui_id($mixer))
Adding a volume knob in a mixer panel
Loading in KSP
The Resource Container is a dedicated location to store scripts, graphics, .nka files and impulse response files that can be referenced by any NKI or group of NKIs linked to the container.
When creating the Resource Container, Kontakt versions that are compatible with the GUI Designer will create a new subfolder named performance_view.
In order for a performance view to be displayed in an NKI, the performance view file (.nckp) must be stored in the performance_view subfolder of the NKI. It can then be loaded in the NKI via the KSP command:
load_performance_view("filename")Where "filename" is the filename of the .nckp file without the extension. Performance view filenames can only contain letters, numbers or underscores.
When saving a .nckp file in the GUI Designer, any changes will be automatically applied to the Kontakt side. This means when editing the performance view of an NKI, if that NKI is loaded in a running Kontakt instance, all changes can be previewed in real time upon Save.
To avoid conflicts, only one performance view file can be loaded per script slot. If needed, more controls can be additionally declared in the KSP script.
Connecting UI controls to engine parameters still occurs via KSP. The variable name of a control contained in a performance view is auto generated based on its hierarchy, with underscore characters as concatenation.
Example
Control knobVolume is contained within panel eqTab, which is also contained within panel mixerTab. The KSP variable name of the control will be: mixerTab_eqTab_knobVolume.
The KSP variable name of a selected control is displayed at the bottom of the properties area. Click on the Copy button next to it (or use the shortcut [⌘/Ctrl-Alt-C]) to copy the variable name to clipboard.
Creating and previewing your first Performance View
To create and preview a performance view:
Create a new NKI in Kontakt.
Create the Resource Container for the NKI.
Create a new performance view in Project Manager and double-click it to open it in the GUI Designer. Start adding controls.
Make sure all the referenced data (images, picture fonts) are stored in the images subfolder of the NKI’s Resource Container.
Save the performance view file in the performance_view subfolder of the NKI’s Resource Container.
In the NKI script editor, write and apply the following script:
on init
load_performance_view ("filename")
end on
You can now continue to edit the performance view in the GUI Designer. Each time you want to preview any changes in the performance view, save the Creator Tools project.
Bottom Panel [⌘/Ctrl-3]
The Bottom Panel consists of the KSP Log, KSP Variables and Lua Script.
KSP Log [⇧F1]
The KSP log connects to all running instances of Kontakt, both plug-in and standalone.
It logs messages, warnings and errors coming from KSP, supports inspecting script variables, provides timestamps per notification and some basic filtering options.
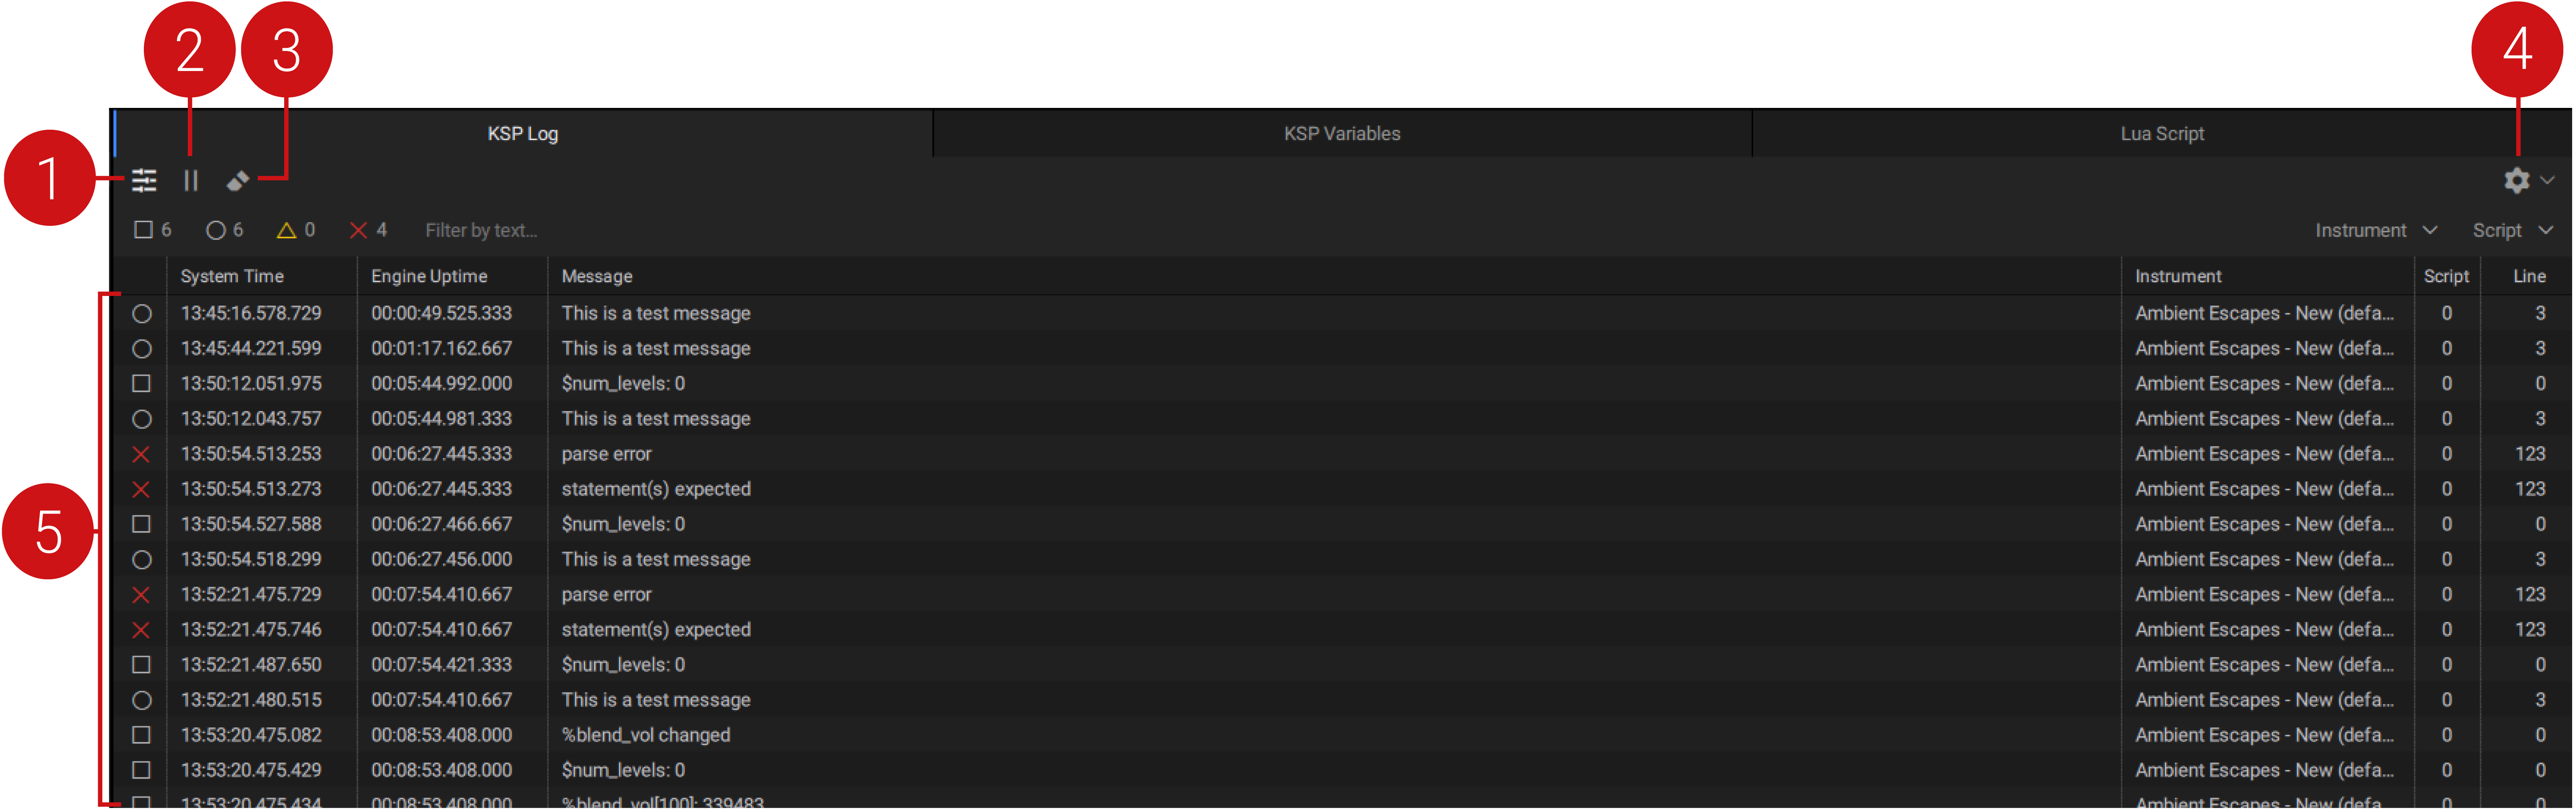
Filter: [⌘/Ctrl-F] When active, it reveals the filtering options and applies them.
Filter by type (Variable Watching, Message, Warning, Error)
Filter by text (characters in the Message column)
Filter by Instrument
Filter by Script slot
Pause: [⌘/Ctrl-P] Suspends the debugging session. When active, the Pause button blinks. Once the session is resumed, all messages that were received during pause will appear.
Clear: [⌘/Ctrl-Backspace] Clears all content of the log.
Settings: Defines the behavior of the log.
Log: All notifications from Kontakt appear in the Log area. The Log contains seven columns:
Type
System Time
Engine Time
Message
Instrument
Script
Line
Type and Message are set, but all other columns can be hidden. Right-click on the column header to reveal the column menu.
KSP Variables [⇧F2]
This is where the current values of all watched variables and arrays are displayed, in order of appearance. For every variable or array that is inspected, an entry is created upon initialization and updated every time a value change occurs. All value changes appear also in the KSP Log, in chronological order.
Inspecting a variable or array is possible via the dedicated KSP commands watch_var and watch_array_idx.
For example watch_var($count) inspects the value changes of the variable count and watch_array_idx(%volume,5) inspects the value changes of index 5 of the array volume.
Please also refer to the KSP Reference Manual for more details.
Lua Script [⇧F3]
Changes to an instrument's structure from within the Tools happen exclusively by running a Lua script. A script can see and modify the instrument copy in the Tools. All parameters that can be modified are displayed in the Instrument Editor tool. Scripts can be created and modified with an external editor.
The Lua Script tool loads and runs Lua scripts that have been created in a text editor and saved to disk. In this way an instrument structure can be modified. One can now easily rearrange, add or remove groups and zones, edit their names and some of their properties, like tune, volume, and mapping. Limited file system access also allows the creation of new instruments based on samples on the disk. The added MIR functions (like pitch and RMS detection) assist or automate parts of the instrument creation process.
Some Lua example and tutorial scripts are provided for the above in the application folder, to help you get started. Ideally, the content of the scripts’ folder can be copied to “user/Documents/Native Instruments/Creator Tools".
The script output will appear in the console output. All console output can be copied to the system clipboard via the command [⌘/Ctrl-Alt-C]. The script log limit is 100,000 lines.
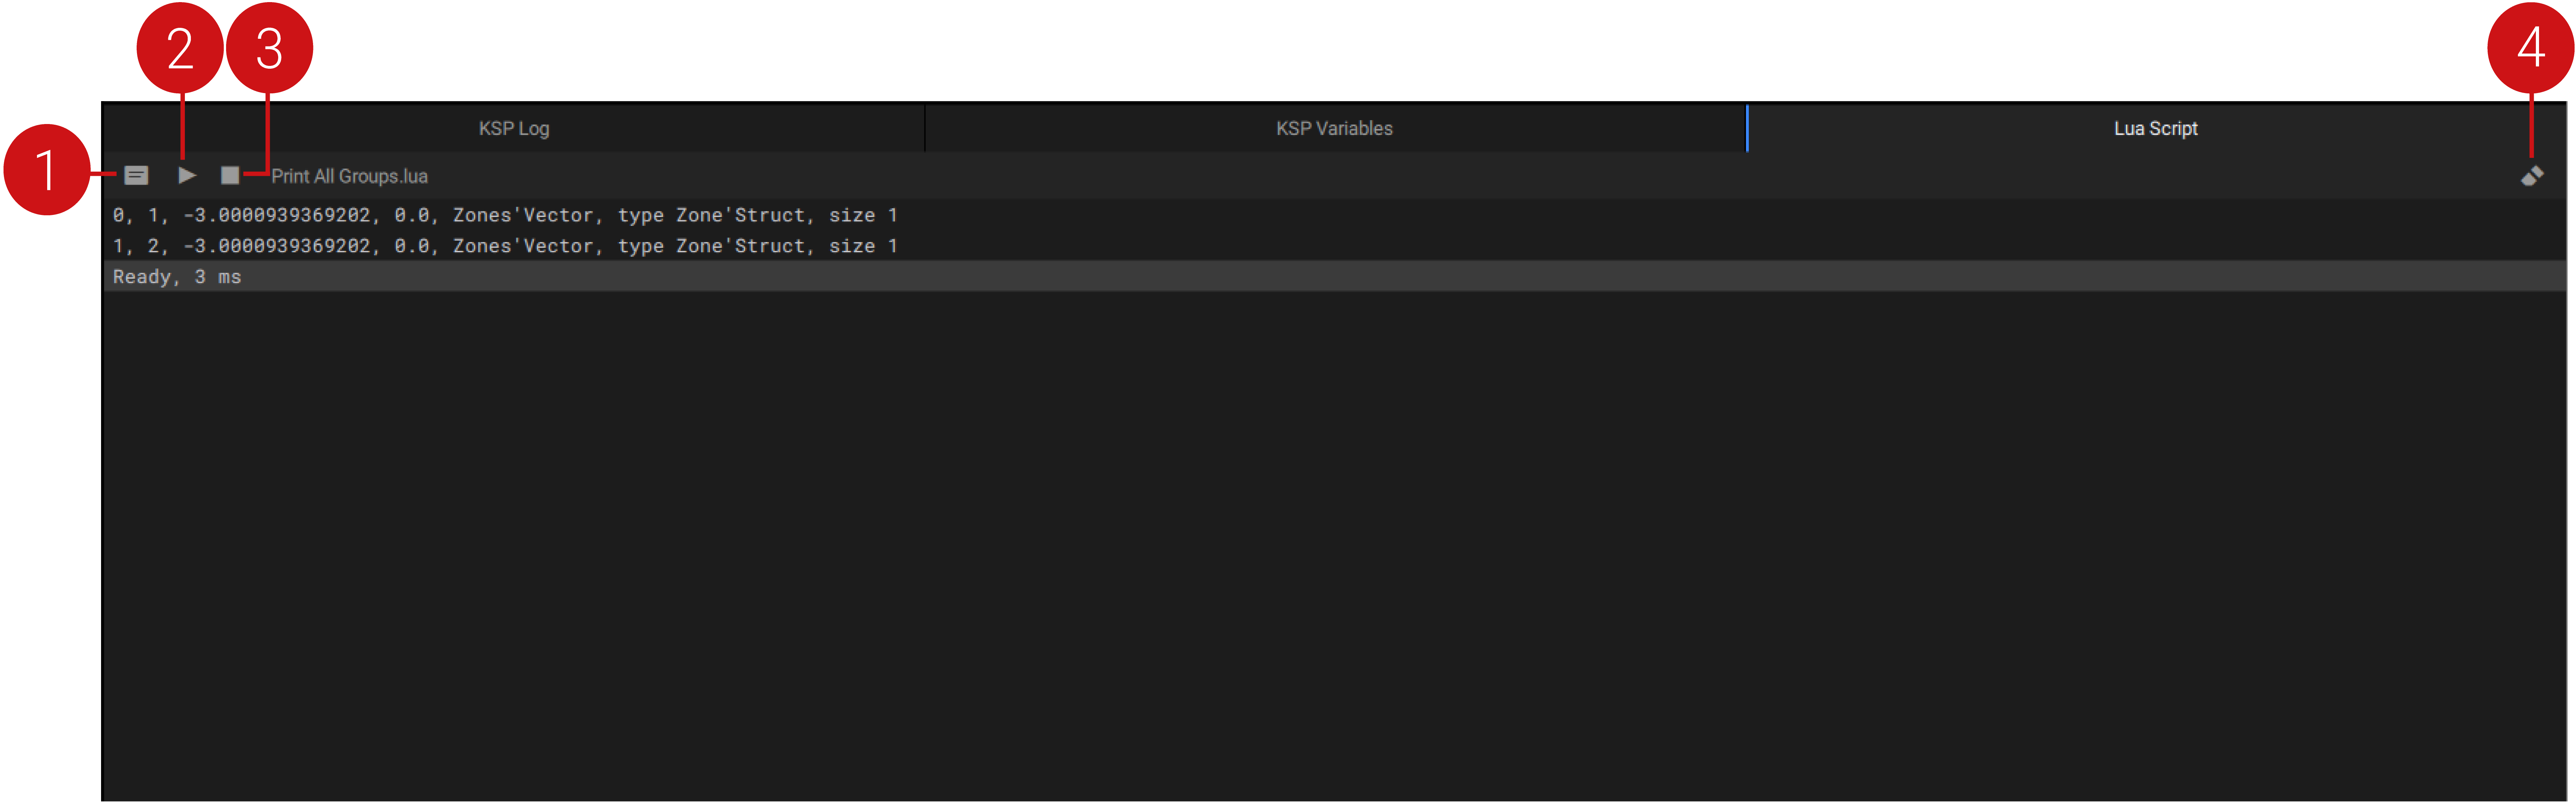
Open in text editor: [⌘/Ctrl-E] Opens the loaded script file in the system’s default editor.
Run: [⌘/Ctrl-R] Executes the loaded .lua script. Changes are immediately reflected in the Instrument Editor tool.
Stop: [⌘/Ctrl-I] Stops the execution of the running script. The Instrument Editor state is reverted, as if the script never run.
Clear: [⌘/Ctrl-Backspace] Clears all content of the tool's output console.
Loading a script
A script can be loaded by double-clicking it in the Project Manager or File Browser, or by dragging it directly from any disk location. The filename of the loaded file will then appear in the filename area.
Note
Currently the Creator Tools Lua runtime on Windows does not support filepaths that contain Unicode characters. Please rename the script’s filepath accordingly to successfully load it.
Preferences [⌘/,]
Preferences provides access to settings relating to Usage Data Tracking and Lua Script Filesystem Permissions.
To access Preferences, open the Creator Tools menu and click Preferences.
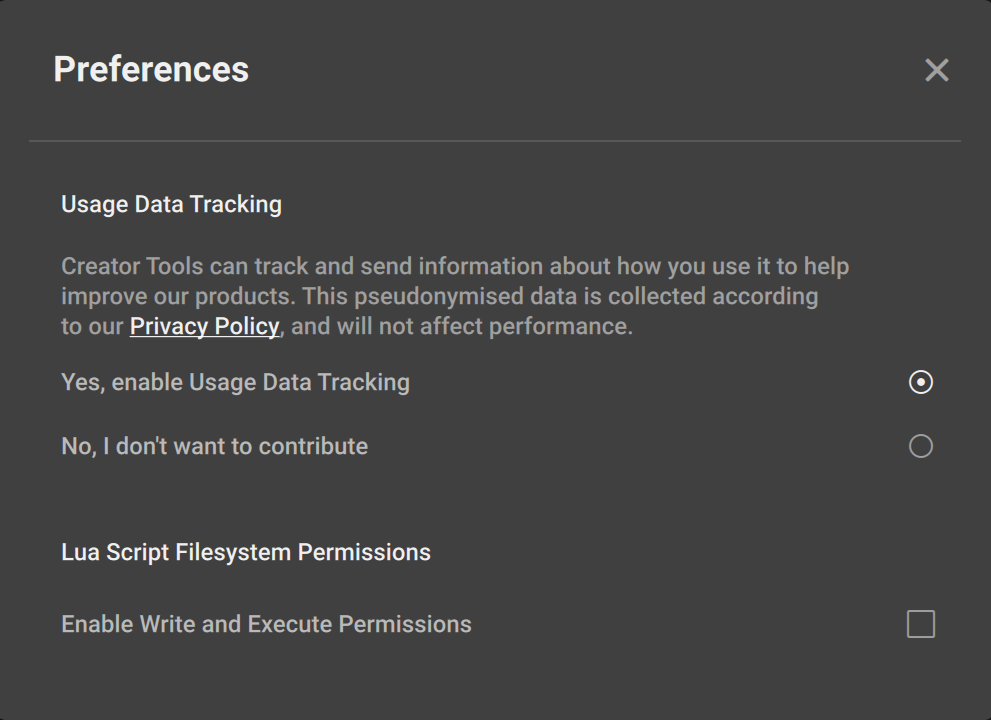 |
Usage Data Tracking
To help improve our products, Creator Tools can track and send information about how you use it. Data is collected according to our Privacy Policy, and will not affect the performance of the application.
Yes, enable Usage Data Tracking: When selected, Usage Data Tracking is collected.
No, I don't wan't to contribute: When selected, no Usage Data is collected.
Lua Filesystem Access
File System access can now be activated in the Creator Tools' Preferences. Once activated, operations like running terminal commands and writing to files can be performed with the Lua Script tool.
Enable Write and Execute Permissions: When selected, Lua Script Filesystem access is activated.
Examples
local path_sep = package.config:sub(1,1)
local terminal_command
if path_sep == "\\" then
    terminal_command = "dir"
else
    terminal_command = "ls"end
f = assert (io.popen(terminal_command))
for line in f:lines() do
    print(line)
end
f:close()
Print the directory structure to the Lua console
local some_text = "best text ever"
local some_file = scriptPath .. filesystem.preferred("/some_file.txt")

file = io.open(some_file,"w")
file:write(some_text)
io.close(file)
Write a file