Mixer Control
The X1 MK3 can be switched to mixer mode in order to control Traktor Pro's mixer using the effects section at the top of the device.
The mixer includes the following controls:
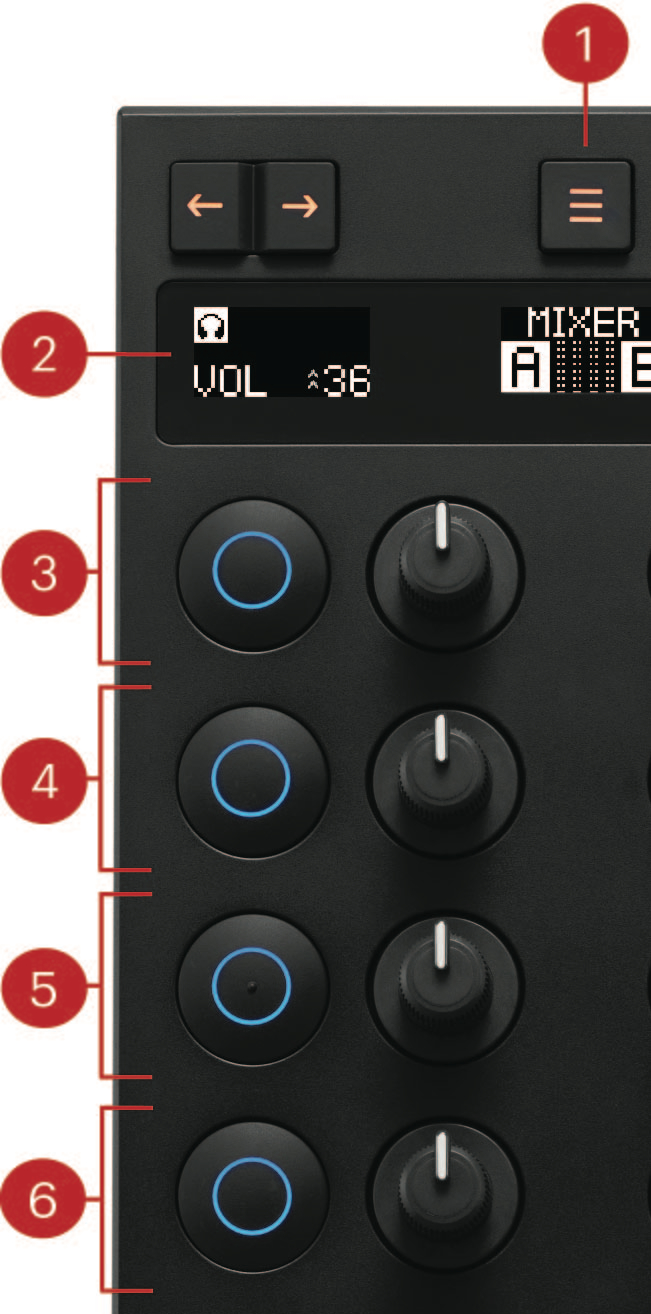 |
Mode Select Button: Press this button to enter mixer mode. If four FX units are configured in your layout you might have to press this button repeatedly until the central Mode display at the top shows MIXER.
Displays: Each deck on the left and right has a dedicated display that shows the value of the control that was last changed using one of the knobs below. Additionally, the headphone icon turns on when Cue is active. The central display includes a volume meter as well as a representation of which decks are active. Active decks are represented by their corresponding letter (A, B, C, or D) in black on a white background, while inactive decks are represented by a white letter on black background.
Hi: The first button and knob controls the high band of Traktor Pro's equalizer. Turning the knob clockwise boosts high frequencies of that deck, while turning it counterclockwise will attenuate high frequencies. Pressing the button activates a high cut filter. The button lights up in bright blue and stays lit while the high-cut is active. Pressing the button again deactivates the filter.
Mid: The second button and knob controls the middle band of Traktor Pro's equalizer. Turning the knob clockwise boosts middle frequencies of that deck, while turning it counter clockwise attenuates middle frequenies. Pressing the button activates a mid-cut filter. The button lights up in bright blue and stays lit while the mid-cut is active. Pressing it again deactivates the filter.
Lo: The third button and knob controls the low band of Traktor Pro's equalizer. Turning the knob clockwise boosts low frequencies of that deck, while turning it counter clockwise attenuates low frequencies. Pressing the button activates a low-cut filter. The button lights up in bright blue and stays lit while the low-cut is active. Pressing it again deactivates the filter.
Cue and Volume: The last button activates the Cue functionality, allowing you to listen to a track through your headphones. The last knob controls the volume of the track.
Transport Control
The transport section of the X1 MK3 includes controls for playing and navigating tracks in Traktor Pro.
 |
Nudge Arrows: These two arrow buttons allow you to gently nudge your track. Pressing the left arrow slightly slows the track down while pressing the right arrow speeds it up.
REV: Pressing and holding this button triggers reverse playback, during which Traktor's Flux mode is active. Pressing SHIFT and REV toggles Flux mode on for this deck. This is indicated by the button being lit when holding SHIFT. Pressing SHIFT and REV again turns Flux mode off.
CUE: Triggers the temporary cue point. When a track is paused, pressing CUE will set the temporary cue point at the current position. Pressing CUE while a track is playing jumps to the cue point position and stops playback. Pressing and holding CUE plays the track from the cue point. Upon release the track jumps back to the cue point position and stops playing. Pressing SHIFT and CUE resets the playback position to the start.
PLAY: Starts and stops tracks. When a track is playing, the PLAY button lights up in bright green.
SYNC: Switches sync on or off for the respective deck. When sync is active, the button lights up blue. When sync is active but the track is playing out of phase with the other deck, it lights up red. Pressing SHIFT and SYNC sets the corresponding deck to master. Pressing and holding SYNC while turning the loop encoder changes the tempo of the track. If you also press the loop encoder during this interaction, the tempo changes in larger increments.
Loop and Browse Section
The loop and browse section enables loading and navigating tracks as well as various looping functions. The SHIFT button can also be found here, which unlocks many secondary functions across the device.
The Loop and Browse section includes the following controls:
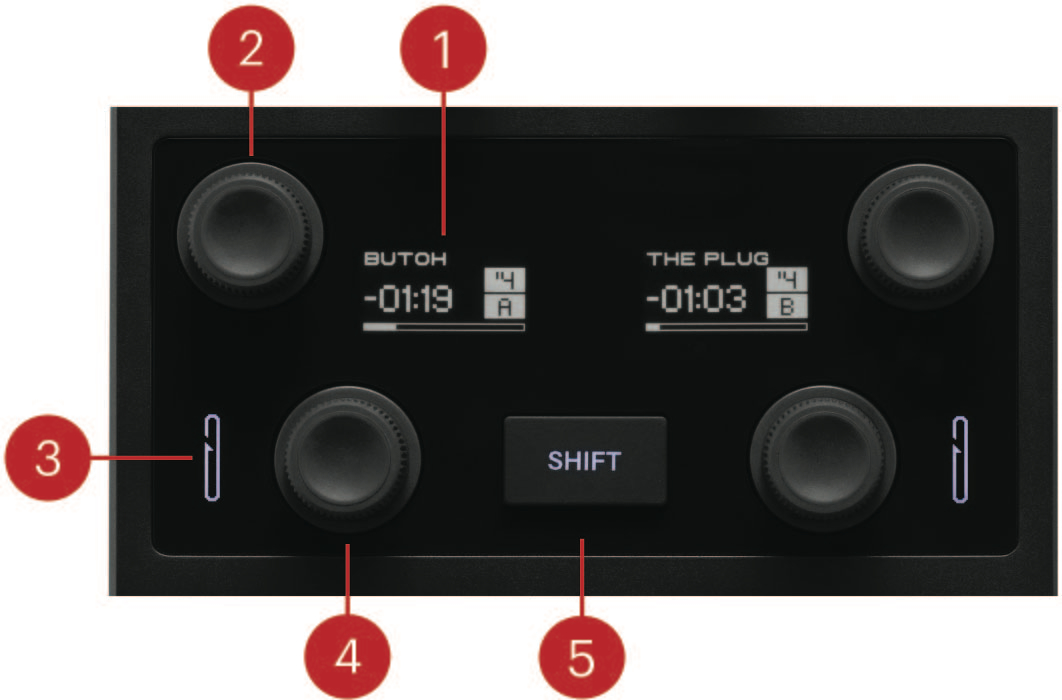 |
Deck Displays: The deck displays provide essential information about their respective track deck. At the top they display the current track name, below the remaining time of a given track, and at the bottom a progress bar indicating the current track position. On the right side of the display, the number at the top represents the loop length, and the letter at the bottom the current deck. When a loop is active or a track is playing, the background of the loop length and track indicator turns white. If a deck is configured as live input, the display will just show Live Input.
Browse Encoder: Browse and load tracks using this encoder. Turning it navigates the track list. Pressing it loads the selected track into the corresponding deck. Holding SHIFT while turning navigates the file tree and pressing while holding SHIFT opens folders in the tree.
Loop Indicator LED: This icon lights up when a loop is active.
Loop Encoder: Turning this encoder changes the loop length. Pressing it activates the loop. Pressing it again deactivates the loop. Holding SHIFT while turning the encoder will jump through the track using the current loop length as increment. Doing this while a loop is active also moves the loop.
SHIFT Button: The SHIFT button unlocks many secondary functions across the controller. These are explained in the respective control description.
Hotcues
Hotcue buttons are used to set and jump to Hotcues. Pressing an unassigned Hotcue button sets this Hotcue to the current track position. Pressing it again jumps to that track position. They are also highly customizable using the Preferences of the Traktor Pro software. For more information on the available options, refer to Customizing the Controller.
 |
Traktor X1 MK3's Hotcue buttons.