Using ELECTRIC SUNBURST
This section describes key concepts of ELECTRIC SUNBURST like selecting patterns via MIDI, loading and saving presets, and controlling the dynamics of your performance.
The ELECTRIC SUNBURST instrument is designed to be played using a MIDI keyboard. The patterns are triggered and selected by MIDI, allowing for fast arranging.
Patterns will automatically sync to the master, or host tempo. The patterns in this library can be played at any tempo between ca. 60-65 bpm and up to 160 bpm and even above. Since there is no time-stretching involved in the process, you will always hear the patterns in the highest possible quality.
Note
The patterns are based on actual recordings by a professional studio guitarist, so they sound best in the typical tempo range preferred by most guitarists.
Pattern Selection and Playback
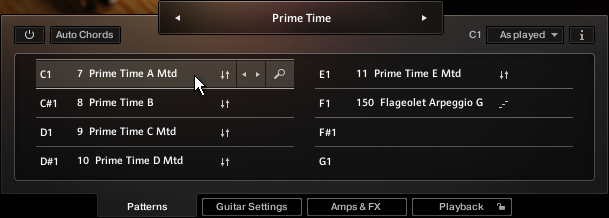
Up to eight patterns can be assigned to chromatic keyswitches from C1 to G1 (this process is described in section The Pattern Browser). These keyswitches are displayed as red keys in the KONTAKT on-screen keyboard. If no pattern is assigned to a slot, the corresponding key will have no color.

The KONTAKT on-screen keyboard displaying the keyswitches for patterns (red), endings (yellow), and slides (green). Chords can be played in the blue key range.
To select a pattern using your MIDI keyboard, press the corresponding keyswitch MIDI note.
To select a pattern via the user interface, click on the pattern you wish to use.
To play a pattern, play chords on your MIDI keyboard. After releasing the keys, playback will be stopped within a specified note duration (see the Latch Mode section in chapter The Playback Page).
To stop the playback, either trigger one of the three endings (see section Playing Endings and Slides) via keyswitch, or release all keys on your keyboard.
Because the transitioning from one pattern/chord to another is always legato (without breaks), it is best to make changes a little before the intended position, so that the engine is able to anticipate and add any requested effects (e.g. fret noise). The switch will occur seamlessly at the nearest possible position. Find more information in chapter Tips and Tricks.
Note
If available, “Chase Events” should be enabled in your DAW settings; this will ensure that the engine gets proper note information on sequencer start or cycle jumps.
Playing Strummed or Arpeggiated Chords and Riffs
ELECTRIC SUNBURST offers three different pattern types and each type reacts to incoming MIDI notes in a slightly different manner:
Strumming patterns: Strumming patterns are based on recorded loops. If you play more than one single note, additional single notes will be added on top of the originally recorded loop. For best results, do not play too many notes a time.
Arpeggio patterns: When playing arpeggio patterns, the playback engine analyzes the incoming chord and allocates the individual notes to different strings of the guitar. The more notes you press on the keyboard, the more sophisticated the resulting arpeggio will sound. Therefore, playing up to six notes at a time can lead to interesting variations. Depending on the selected pattern, several notes of an incoming MIDI voicing will be performed as hammer-ons and pull-offs on a single string.
Riffs: Riffs come as pre-recorded performances. However, they adapt to incoming chords by chromatically adjusting individual notes of the riff to the incoming chord. For example, if the preset riff contains minor thirds and sevenths, pressing a Cma7 voicing on the keyboard will cause the playback engine to adapt the pattern in such a manner, that the minor third is replaced by a major third and the minor seventh is replaced by a major seventh.
ELECTRIC SUNBURST recognizes all intervals, as well as a great variety of chords, including major, minor, no-third, diminished, augmented, half-diminished, various suspensions, options and alterations, and even slash chords (e.g. C/E, D/C, Dmi7/F, Ami/E, etc.). You can also hold a chord or a interval with your left hand while playing a melody on top with your right hand, or the other way round: say you hold a fifth interval in your right hand while you play different bass notes in your left hand, which is especially well suited for the arpeggio patterns. Generally, the instrument tries to play everything in the very pitch range you press it. This leads to a virtually endless number of available chords and voicings.
Note
The chord detection engine does not like overlapping notes, because an overlap would technically mean that two different chords exist at the same time. To avoid those overlaps, fully release a chord, or some notes of it, shortly before you play new ones.
When playing arpeggio patterns, you can trigger slide transitions between different chords or voicings by hard pressing the newly added keys: The next suitable note of an arpeggio pattern will start with a slide if it is being played with a velocity greater than 110.
If you are less familiar with playing chords on a piano or keyboard, you have two additional options:
make use of an intelligent voicing generator, and/or
activate the Auto Chords mode.
The Voicing Generator and Auto Chords
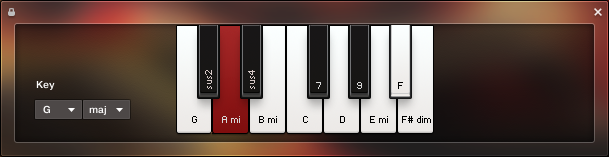
The Chords Panel with the key set to G major. Thus, the root pitch G is mapped to the original C key; all other pitches are mapped (transposed) consequently.
To enable or disable the voicing generator, select a pattern, and then click on the Voicing drop-down menu.
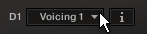
Each pattern offers five individual, pre-defined voicings that suit it well. If you press only one single key, you will hear the unaltered voicing preset. If you press thirds, sixths, sevenths and/or other options, the voicing preset will be adapted accordingly.
To take full control of your voicings, disable the voicing generator by selecting “as played”.
To enable or disable the Auto Chords mode, click on the little power button next to the Auto Chords button. The Auto Chords mode can be combined with the voicing generator and provides the most basic chords (major and minor as well as some options), auto-mapped and auto-transposed on the white keys.
To show or hide the Auto Chords Panel, click on the Auto Chords button.

To set the key of your song, select the key and mode from the drop-down menus. This will transpose/shift the chord layout such that, in case of a major key, the root pitch will always be assigned to the original C key; in case of a minor key, the root pitch will always be mapped to the original A key.
To play chords in the Auto Chords mode, simply click or play a single white key anywhere in the chord range (see keyboard layout of section Pattern Selection and Playback). This will play the chord labeled on that key. In other words, no matter which key and mode you choose, you can always play the seven diatonic pitches (plus the diminished seventh pitch) with the white keys from C to B (plus the B flat key, which is represented as a white key as well).
To add options or suspensions, click, or play and hold, any of the labeled black keys. To remove an option or suspension, click the corresponding key again, or release that key on your MIDI keyboard.
To exclude the Auto Chords settings from Songs or snapshots, click the lock icon in the top left corner of the Auto Chords Panel (see section Locking Parameters When Loading Snapshots or Songs).
Note
Although only one octave is displayed in the Auto Chords Panel, you can play the full range of the instrument even in Auto Chords mode. However, the most powerful mode is the standard chord mode, where chords, intervals, options, or tensions are played on the very pitches you press on the keyboard
Playing Endings and Slides
In addition to the actual patterns, ELECTRIC SUNBURST provides a variety of endings, as well as slide sounds and additional palm hits on the guitar’s body and strings of the guitar. The corresponding sets of keys are marked yellow and green on the KONTAKT on-screen keyboard.
To trigger an ending with the current chord, play any of the three keyswitches from G#1 up to Bb1 with the intended intensity (i.e. velocity). These ending keys are marked yellow in KONTAKT's on-screen keyboard. When an ending is played back, the current pattern playback will be stopped.
To trigger an ending with a different chord, hit the new chord just before triggering the desired ending keyswitch. As a result, only the ending chord will be played back with the new chord.
To play a slide sound, play the B1 key, marked in green, with the intended intensity (i.e. velocity).
Note
Only the volume of Slides and Endings can be altered via input velocity. To alter the dynamics of patterns, use the Pitch Wheel (see section Controlling the Dynamics of the Performance).
Controlling the Dynamics of the Performance
The patterns included in ELECTRIC SUNBURST ignore the velocity information coming from your MIDI keyboard or host software/DAW. Instead, you can continuously control the dynamics of the performance with the bipolar (i.e. positive and negative) Impact slider.
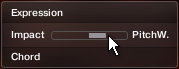
The Impact feature
It works like this: With positive Impact settings, the guitarist will play more intensely, whereas negative Impact values will produce softer results. Using this feature, you can add a lot to the overall musicality of the performance.
To adjust the Impact slider with the mouse, drag the Impact slider. The default center position can be recalled via [Cmd] + click.
To adjust the Impact slider via MIDI, move the pitchbend wheel on your MIDI keyboard. The default center position of the Impact slider should correspond with the default center position of your pitchbend wheel.
Tip
The Impact slider, or the pitch wheel automation in your sequencer, can also be used to smoothen transitions between patterns with differing overall dynamics in order to create a more natural performance.
Tip
While the velocity coming from your keyboard doesn’t affect the dynamics of the performance, you can use it to trigger slide transitions when playing arpeggio patterns. When playing a chord change, try hitting a chord very hard (i.e. velocity > 100). A slide transition will be added at the next suitable position.
Loading/Saving Sound Presets
With ELECTRIC SUNBURST, you can customize the sound both easily and effectively. Each sound preset includes all parameters of the “Guitar Settings” page as well as the “Amps & FX” page (see chapters The Guitar Settings Page and The Amps & FX Page). You can load sound presets from the Sound Preset drop-down menu in the top right corner of the instrument.
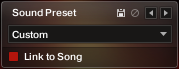
The Sound Preset box in the top right corner of the instrument
To load a factory or user sound preset, either
select a preset from the drop-down menu, or
cycle through all presets by clicking the little triangular left and right arrow buttons.
To save a new user sound preset, enter a preset name into the field and click on the floppy disk icon. This will store the current sound settings (see chapter The Guitar Settings Page), including the Voicing and Impact slider positions, into a new user preset.
To overwrite a user sound preset, click on the floppy-disk icon again, after you've changed sound settings, without changing the preset name itself.
To delete a user sound preset, select it from the drop-down menu, then click the circular Delete button.
Linking sound presets to Song presets: When you check the Link to Song checkbox, each loading of a Song preset (see section The Song Browser) will recall and apply a specific factory sound preset.
Note
Any modification or deletion of user sound presets is being performed on a global level. This means that all these changes will be persistent, even if you close the instrument without saving it.
Locking Parameters When Loading Snapshots or Songs
Normally, when you load snapshots or Songs (see section The Song Browser) of the instrument, all parameters will be set accordingly. Thus, snapshots and Songs are stored and recalled globally. To prevent the Playback and/or Auto Chords parameters from being changed by loading snapshots or Songs, click the lock icon on the Playback tab.

When the Playback parameters are locked, they will not be changed by snapshots or Songs.
Defining the Downbeat after Signature Changes
Since there is no way for the instrument to recognize signature changes or insertions of half a bar etc. present in your DAW session, its pattern playback would get out of sync in those cases. To solve this problem, you can use the global transport offset feature to compensate for a change of signature or bar length during playback.
To define a global transport offset in ticks, send MIDI CC#111.
The value you send (ranging from 0 to 127) will be multiplied by 80 ticks and added as an offset to the host transport. 80 Ticks is the length of a 32th triplet, which is the greatest common divisor for all note values available in the instrument. Twelve 32th triplets equal a quarter note. Therefore, to insert half a 4/4th bar (i.e. shift the playback by two quarters, or 2 × 12 32th triplets), you would need to send MIDI CC#111 with value 24 etc. The following table shows typical values needed for common offsets:
Offset | CC#111 value |
No offset | 0 |
One quarter | 12 |
Two quarters | 24 |
Three quarters | 36 |
Four quarters (= one 4/4 bar) | 48 |
Five quarters | 60 |
Six quarters | 72 |
Seven quarters | 84 |
Two 4/4 bars (= no offset) | 96 |
Minus one quarter | 84 |
Minus two quarters | 72 |
Minus three quarters | 60 |
One eighth note | 6 |
One triplet | 4 |