Instrument page
The Instrument page in Electric Keys lets you modify the sonic characteristics of your keyboard.
The Instrument page lets you modify the sonic characteristics of your keyboard and adjust the mix between the two sources used when sampling the original instrument.
Click INSTRUMENT at the top right of the instrument to open the Instrument page.

The Instrument page is split into four sections:
Sources: Controls the mix between the two source signals being used (pickup and microphone). For more information, refer to Sources section.
Shape: Provides parameters affecting the shape of the sound. For more information, refer to Shape section.
Tone: Adjusts different components of the keyboard sound. For more information, refer to Tone section.
Noise: Adds various noises to the sound. For more information, refer to Noise section.
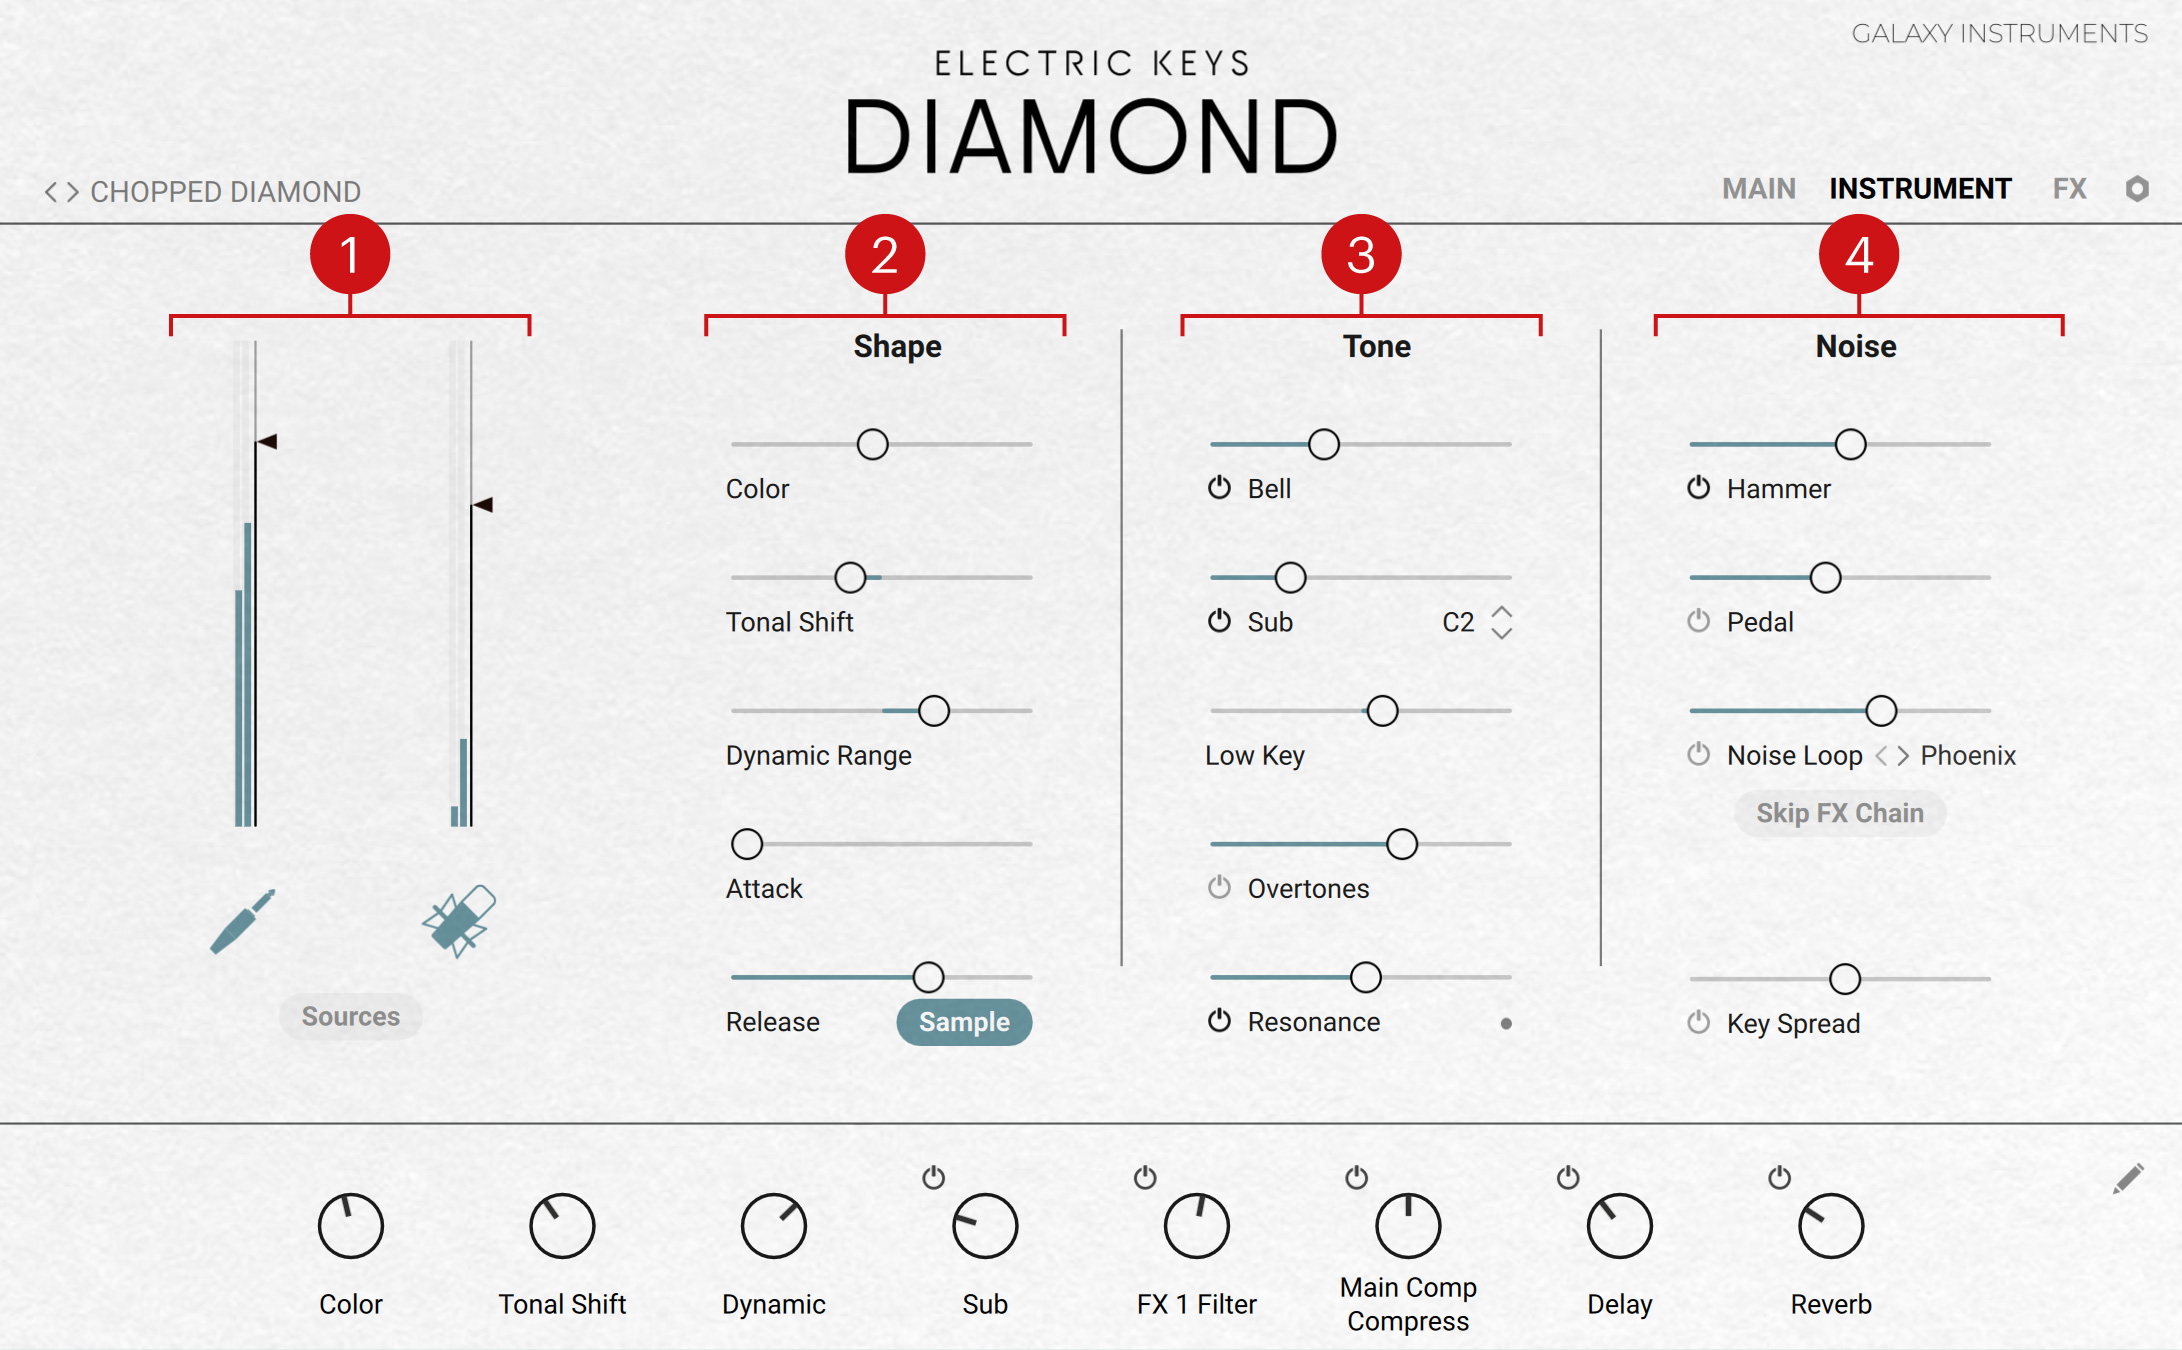
Sources section
The Sources section of the Instrument page lets you adjust the mix between the two source signals available in your instrument:
The pickup signal (jack plug icon) has been recorded at the output of the pickups converting the vibrations of the tines into electrical signals. This is the signal used on the real electric piano in common setups, where it is sent to the preamp, amp and speaker.
The microphone signal (microphone icon) has been recorded by a microphone placed next to the tone generators (tines + tone bars) of the piano. This signal contains many subtle mechanical details naturally produced by the instrument.
By default, the Sources section contains the following controls:
 |
Pickup fader, meters, and button: On the left, you can move the fader vertically to adjust the level of the pickup signal. The current pickup signal level is indicated by the meters near the fader. Click the jack plug icon below the fader to mute or unmute the pickup signal (the icon turns off when the signal is muted).
Microphone fader, meters, and button: On the right, you can move the fader vertically to adjust the level of the microphone signal. The current microphone signal level is indicated by the meters near the fader. Click the microphone icon below the fader to mute or unmute the microphone signal (the icon turns off when the signal is muted).
Sources button: Opens or closes the mixer details.
Sources: mixer details
When the Sources button is on, the Sources section shows additional controls between the faders:
 |
Main knob and On/Off switches: The Main knob adjusts the ratio between the pickup and the microphone source signals. The On/Off switch on either side mutes or unmutes the corresponding signal.
Release knob and On/Off switches: The Release knob adjusts the relative levels of the release samples (if active) in the pickup and microphone signals. Turning the knob to the left will accentuate the release samples in the pickup signal compared to the microphone signal, and inversely. The On/Off switch on either side mutes or unmutes the release samples in the corresponding signal.
Hammer knob and On/Off switches: The Hammer knob adjusts the relative levels of the hammer samples (if active) in the pickup and microphone signals. Turning the knob to the left will accentuate the hammer samples in the pickup signal compared to the microphone signal, and inversely. The On/Off switch on either side mutes or unmutes the hammer samples in the corresponding signal.
Pedal knob and On/Off switches: The Pedal knob adjusts the relative levels of the pedal samples (if active) in the pickup and microphone signals. Turning the knob to the left will accentuate the pedal samples in the pickup signal compared to the microphone signal, and inversely. The On/Off switch on either side mutes or unmutes the pedal samples in the corresponding signal.
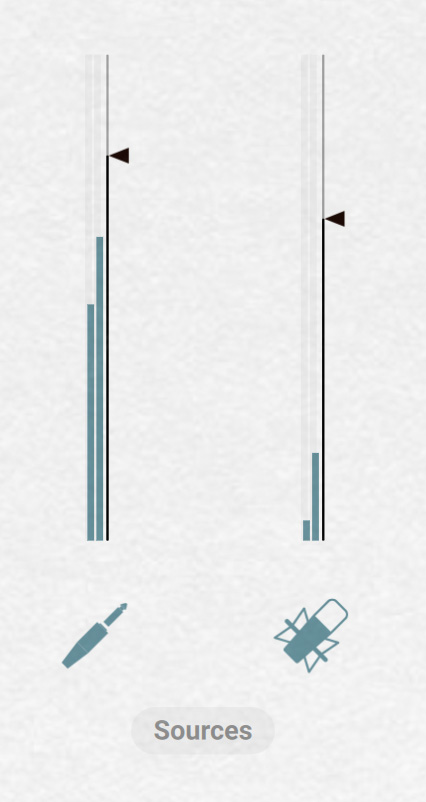
Shape section
The Shape section of the Instrument page provides the following controls:
 |
Color: Adjusts the tone from soft to hard by readjusting the sample mapping. Dragging the slider right will make the instrument sound harder and crisper, with a more pronounced attack phase. Dragging the slider left will achieve a warmer and softer sound, and the attack phase will be less pronounced.
Tonal Shift: Adjusts the playback speed of each sample, resulting in formant or character changes. Dragging the slider right will make the instrument sound sharper, and dragging it to the left will result in a deeper, darker sound with a less defined attack.
Dynamic Range: Controls the dynamic range by adjusting the volume while still using all velocity samples. Drag left to shrink or drag right to expand the dynamic range.
Attack: Adjusts the attack time of the sound.
Release: Adjusts the release phase of the sound depending on the state of the Sample button:
If the Sample button is on, the Release knob adjusts the level of additional, dedicated release samples.
If the Sample button is off, the Release knob adjusts instead the release time of the sound.
You can adjust the level of the release samples for each source signal by using the Release controls in the Sources section on the left.
Note
All the parameters in the Shape section affect both the pickup and the microphone signals.
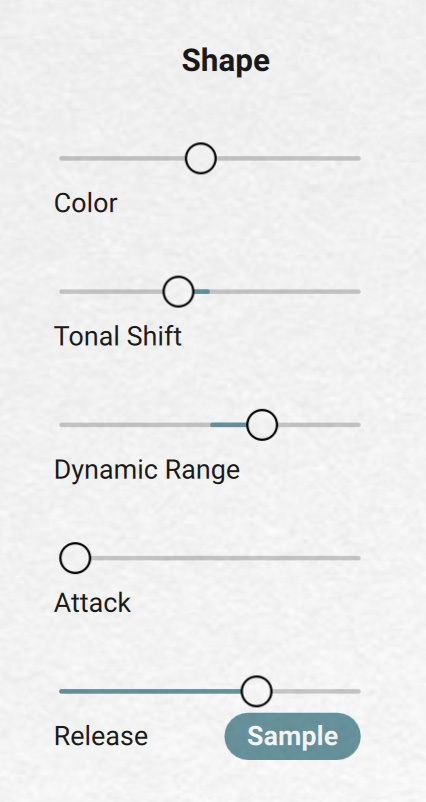
Tone section
The Tone section of the Instrument page provides the following controls:
 |
Bell controls: The so-called “bell” samples are additional samples recorded by hitting the tone bars with a little hammer. They provide an extra metallic, bell-like component to the sound. The Bell controls affect only the pickup signal.
Bell On/Off switch: Activates or deactivates the bell samples.
Bell slider: Adjusts the volume of the bell samples.
Sub controls: Add low-frequency samples to the sound. The Sub controls affect only the pickup signal.
Sub On/Off switch: Activates or deactivates the sub samples.
Sub Key selector: Sets the split key below which the sub samples are being triggered.
Sub slider: Adjusts the volume of the sub samples.
Low Key: Adjusts the volume of the keys below middle C. Moving the slider to the left decreases the volume of the lower keys. Moving the slider to the right will increase it. The lower the key, the stronger the effect.
Mute (only available in Electric Keys – Ember): Switches the sample set used in Electric Keys – Ember.
Overtones controls (not available in Electric Keys – Ember): Add overtone samples to the sound. These overtones add liveliness to the sound. The Overtones controls affect only the pickup signal.
Overtones On/Off switch: Activates or deactivates the overtone samples.
Overtones slider: Adjusts the volume of the overtone samples.
Resonance controls (not available in Electric Keys – Teak and Ember): Add resonance samples when pressing the sustain pedal. Pressing the sustain pedal on the piano raises all the dampers at once, enabling all tines and tone bars to resonate sympathetically. This adds a fuller and deeper sound to the note. The Resonance controls affect only the pickup signal.
Resonance On/Off switch: Activates or deactivates the resonance samples.
Resonance slider: Adjusts the volume of the resonance samples.
Pedal indicator: The resonance samples are triggered only when using the sustain pedal, which is indicated by this LED.
Noise section
The Noise section of the Instrument page provides the following controls:
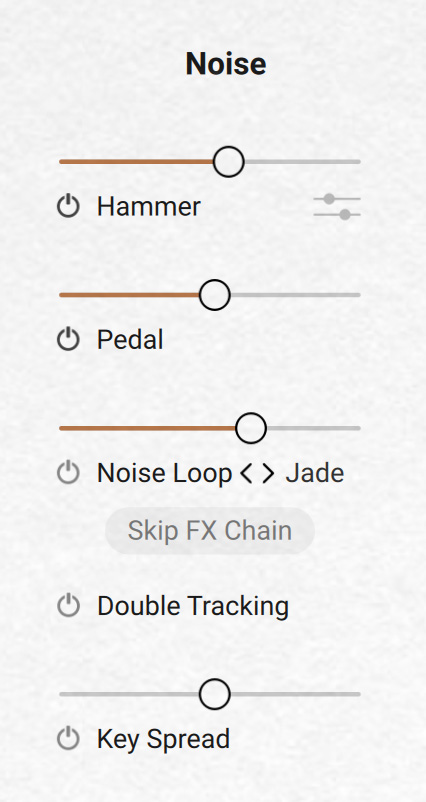 |
Hammer controls: Add samples of the noises induced by the hammer mechanism (e.g., when releasing the keys). The Hammer controls affect both the pickup and the microphone signals.
Hammer On/Off switch: Activates or deactivates the hammer samples.
Hammer slider: Adjusts the volume of the hammer samples.
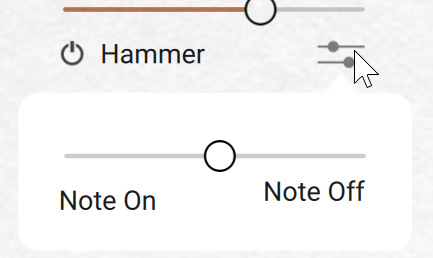
Hammer Settings button: Opens a small panel with one slider adjusting the balance between the hammer noises occurring when you hit the keys (Note On) and when you release them (Note Off).
You can adjust the level of the hammer samples for each source signal by using the Hammer controls in the Sources section on the left.
Pedal controls (not available in Electric Keys – Teak and Ember): Add samples of the noises induced by the pedal mechanism. The Pedal controls affect both the pickup and the microphone signals.
Pedal On/Off switch: Activates or deactivates the pedal samples.
Pedal slider: Adjusts the volume of the pedal samples.
You can adjust the level of the pedal samples for each source signal by using the Pedal controls in the Sources section on the left.
Noise Loop controls: Add samples of the noises induced by the instrument’s electrical circuitry as well as noises from other electronic gear and field-recording ambience. The Noise Loop controls affect only the pickup signal.
Noise Loop On/Off switch: Activates or deactivates the noise loop samples.
Noise Loop slider: Adjusts the volume of the noise loop samples.
Noise Loop menu: Selects a noise loop from various types of circuitry. You can click the current noise loop type and select the desired entry from the menu, or click the little left/right arrows to select the previous/next noise loop type.
Skip FX Chain: If this is on, the noise loop samples are sent directly to the instrument’s output without passing through the modules on the Effect page.
Double Tracking On/Off switch : Activates or deactivates the double tracking effect, which widens the sound by simulating the effect of recording the instrument twice on separate tracks. When Double Tracking is on, the Key Spread controls below are deactivated.
Key Spread controls: Pan the sound in the stereo field depending on the played key. The Key Spread controls affect both the pickup and the microphone signals.
Key Spread On/Off switch: Activates or deactivates the panning of the notes in the stereo field.
Key Spread slider: Adjusts the panning of the notes. With the slider in the middle (0 %), no panning happens. From the middle, if you move the slider to the right, lower notes will be panned to the left and higher notes to the right. If you move the slider to the left instead, lower notes will be panned to the right and higher notes to the left. The further your move the slider away from its middle position, the stronger the panning effect will be.