Quickstart
Everything you need to know to get started with STUDIO DRUMMER right away.
In this chapter, you will find a quick guide to navigating the controls of STUDIO DRUMMER, as well as step by step guides to certain functions.
Basic Navigation
The interface has four main pages of control. You can navigate among these pages by clicking on the tabs at the bottom of the instrument's Performance View.
The different pages and their uses are as follows:

Grooves page: On this page is a browser of many genre-separated MIDI grooves and fills with variations that can be dragged to your host for immediate song creation.
Options page: This page has options for technical kit settings such as kit mapping and velocity options, as well as randomization parameters.
Kit page: You can select each drum on this page to adjust the overhead and room mixes, tuning, and volume envelopes for those drums. You can also select which snare you want to use, as well as load and unload the separate kit pieces.
Mixer page: This page has all of the standard controls for an audio mixer, including levels, panning, solo, mute, send levels and channel routing. This is also where all effect settings and effect routing options are edited.
Editing the Drums
Fine-Controlling Individual Drums and Articulations
To change the individual kit piece's sound settings and articulations:
Click on the Kit tab.
To edit the settings for a particular drum or cymbal, just click on its picture. Percussion is selected from a sub-menu of icons next to the drum kit image.
To change the overhead and room mix amounts for each piece, adjust the corresponding OH MIX and ROOM MIX knobs.
To alter the tuning, adjust the TUNE knob.
To change the volume envelope of the selected piece, you can adjust the ATTACK, HOLD and DECAY with the respective knobs.

A typical drum's control panel
Changing the Snare
Each kit has alternate snares to choose from. To change the snare:
Click on the Kit tab.
Click on the snare drum image.
Click on the A or B button located underneath the snare drum image to switch between the snares.
The snare image will change to indicate the newly selected snare.
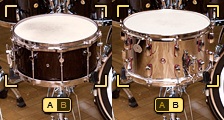
Switching between the snares
Creating a Mix
To create a mix of the kit, click on the Mixer tab. This will give you a virtual mixing console with many of the same controls you would find on a real mixing desk. Here you can control the volume, pan, mute, solo, and routing of the various tracks. You can also add many customizable effects to all channels.

A typical channel on the Mixer page
You can also adjust the levels of the in, out, and sub mics on the kick, the top and bottom mic on the snare, and the amount of snare mic bleed when the kick and toms play.
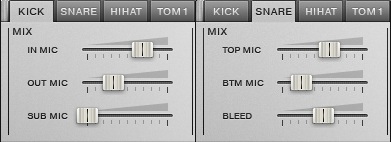
Additional controls for the Kick and Snare channels
Adding and Removing Drums
If you will not be using a particular drum, cymbal or percussion instrument, you can remove it from the kit, thus freeing up more computer memory. To do this:
Click on the Kit tab.
Select the instrument that you want to remove.
Click on the small memory chip icon above the instrument name at the bottom left of the page.
A drop-down menu will appear, giving you the option to add or remove the instrument from the kit with Load Instrument and Unload Instrument options. When an instrument is unloaded, a darkened version of it will replace the original image.
Note
If you unload an instrument, you can always load it back again using the same method.
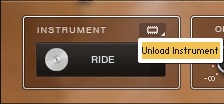
Unloading an instrument on the Kit page.
Preset Handling
In this section you will learn how to manage presets in STUDIO DRUMMER.
Loading Presets
You can load presets using the preset menu.
To step through the presets, simply click on the right and left arrows.
To load a specific preset from the list, simply select the preset from the drop-down menu.
Saving User Presets
You can save presets for the settings of the whole mixer on the Mixer page, as well as kit mapping layouts on the Options page. Each of these preset menus contains a selection of factory presets and allows you to save your own custom presets. Factory presets cannot be overwritten (indicated by the darkened Ø icon), but they can be adjusted and saved as a new user preset.
To save a user preset:
Adjust the settings you want to save and recall for your preset.
Click in the text area on the preset drop-down menu.
Type in the name for the new preset and click on the Save icon above the drop-down menu.
The new preset will now appear at the bottom of the drop-down menu and is ready to be used when opening the kit again.
Note
If you save a user preset without changing the name, it will overwrite the current user preset.
Removing User Presets
To remove a user preset:
Select the preset in the drop-down menu.
Click on the Ø icon above the drop-down menu.
The user preset will be deleted and not be available when opening the kit again.