The Performance View
Learn about the interface of STUDIO DRUMMER and its controls of the four pages Kit, Mixer, Grooves, and Options
This chapter describes the Performance View interface of STUDIO DRUMMER. Learn how to use the functions and controls of the four pages: Kit, Mixer, Grooves, and Options.
Kit Page
The Kit page has a view of the drum kit where you can select each drum and adjust instrument parameters such as tuning, the volume envelope, and mix controls for the various microphones.
You can also choose which snare you want to use, as well as load or unload the selected drum.
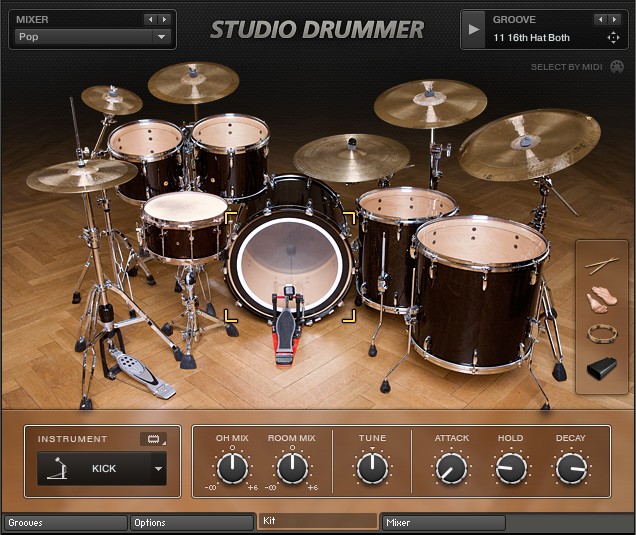
Kit page Performance View of the Stadium Kit
To select a drum or cymbal for editing, click on it with the mouse. To select a percussion instrument, click on its icon at the right of the drum kit image. For details on editing the instrument settings on the Kit page, see section Fine-Controlling Individual Drums and Articulations.
Tip
Clicking on an instrument will also play the sound of that instrument, giving you a quick preview of the sound. For instructions on how to disable (or enable) sound playback on mouse click, see section KIT VIEW Settings.
After selecting an instrument, its name and controls will appear in the panel at the bottom of the page. Editing the sound of a selected instrument will edit all articulations of that instrument.
Each kit has two snare drums to choose from. You can select the snare drum you want to use by clicking on the A and B buttons below the snare image. Switching between the snares will unload the current snare from memory and load the other one, and will change the image of the snare drum.
When the SELECT BY MIDI icon at the upper right of the Kit page is activated, the drums will be selected depending on the notes played with your MIDI input device.
Note
This function is automatically turned off during host playback, or while the file player of the KONTAKT stand-alone application is running (e.g. playing back a MIDI groove).
Tip
You can also select the kit pieces by using the INSTRUMENT drop-down menu at the left of the panel at the bottom.
You can remove the selected instrument from the kit (and thus unload it from memory) by clicking on the small memory chip icon to the right of the INSTRUMENT header, as described in section Adding and Removing Drums. Removing unused kit pieces is useful for freeing up computer memory. You can always load the kit pieces back at any time. When a kit piece is unloaded, its image turns dark.
The rest of the panel contains the controls for the Overhead (OH) and Room microphone mixes, the drum Tuning control, and the volume envelope of the drum with controls for the Attack, Hold, and Decay (AHD envelope). For more information on these controls, see sections OH and ROOM MIX Knobs, TUNE Knob, and ATTACK, HOLD and DECAY Knobs.
OH and ROOM MIX Knobs
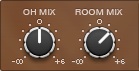
OH MIX and ROOM MIX knobs
The OH MIX and ROOM MIX knobs adjust the volume levels of the Overhead microphone(s) and the Room microphone(s) of the selected drum, cymbal, or percussion instrument. This allows you to create your own custom mix of those microphones for each individual drum, which is not possible in a traditional studio recording.
Note
Please note that this is a separate control from the overall level of the OH and Room mics. These levels can be adjusted on the Mixer page.
TUNE Knob

TUNE knob
The TUNE knob changes the pitch of the selected kit piece. The pitch changes for all microphones and all articulations of that piece. The range of the TUNE knob is limited to values that are relatively realistic.
ATTACK, HOLD and DECAY Knobs
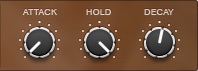
ATTACK, HOLD and DECAY knobs
The ATTACK, HOLD and DECAY knobs are controls for a typical AHD volume envelope for each selected drum.
Increasing the ATTACK value adds more of a fade-in to the beginning of the sound.
The HOLD knob adjusts how long the sound stays at maximum volume.
The DECAY knob adjusts how quickly the sound fades out after the HOLD time has passed.
For the most natural drum sound, the default setting is the best (ATTACK is off, and HOLD is at maximum). Adjusting these controls is only necessary if you want to shape the sound in an “unnatural” way.
Mixer Page
The Mixer page has the same microphone level and panning controls as a real mixing board, as well as a large selection of effects and routing controls. You can save and load all mixer settings by using the MIXER panel at the upper left of the page. This panel appears on every page of STUDIO DRUMMER, in order to select different mixer page presets while using other parts of the interface. As each kit has a very different sound, these mixer presets can only be used for the kit that they are saved with.
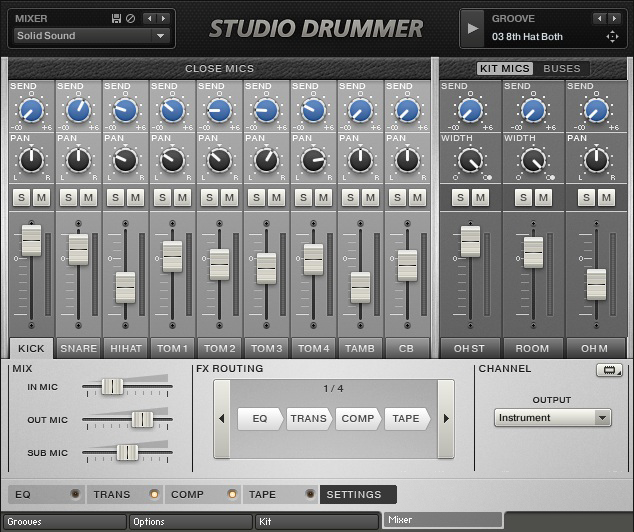
Mixer page Performance View
Common Mixer Controls
Note
The levels of each instrument within the overhead and room microphones can be adjusted separately, but this is done on the Kit page (see section Kit Page above).
The channel faders on the Mixer page control the volume level of the various microphones. The faders in the CLOSE MICS area control the volume of the individual direct microphones, and the KIT MICS faders control the volume of the overhead and room microphones.
Each close mic and mono kit mic has a PAN knob to change the left and right location of that mic in the stereo field.
Each stereo kit mic has a WIDTH knob, ranging from MONO to STEREO. STEREO is the standard setting, where the left and right channels are independent on the left and right sides. As the knob is turned towards MONO, the left and right channels are combined until they become a single central sound source when the knob is turned all the way to the left.
The S and M buttons allow you to solo (S) and mute (M) the individual channels. When a track has the Solo button pressed, all other channels are silent and only the soloed channel can be heard. Putting additional channels into solo mode will add those channels into the mix, but still keep all other channels silent. When the mute button is pressed, the selected track can no longer be heard. Mute has a higher “ranking” than solo, so if a track has both buttons pressed, the track will be muted.
The SEND knob at the top of each channel controls the amount of reverb effect to be included in the mix for that channel. The global reverb level is adjusted with the reverb fader in the BUSES area.
CLOSE MICS Area
The CLOSE MICS area takes up the left portion of the Mixer page. As the name suggests, this area contains the channel controls for the close microphones. The close microphones (also known as “direct” mics) are placed very close to the drums. There are close microphones for the kick, snare, hi-hat, toms, and some percussion.
KIT MICS/BUSES Area
The right portion of the Mixer page displays the controls for either the kit microphones or the busses:
The Kit Microphones view includes controls for the overhead and room microphones. These microphones are placed in such a way to record the sound of the entire kit, either with a stereo pair or with a single mono microphone.
The controls in the Buses view are used to adjust the levels of the master output, master panning and reverb return level.
To switch between the Kit Microphones and Buses view, click on the BUSES or KIT MICS button, respectively, both of which are located at the top-right of the Mixer page.
You can also switch the left and right position of the master out with the L↔R button on the MASTER channel. All channels are labeled at the bottom, and the labels are highlighted when editing the channels.
Effects
Several new high quality effects are included with STUDIO DRUMMER, specifically tailored for acoustic drum production. These effects are Convolution Reverb, Solid G-EQ, Solid Bus Comp, Tape Saturation, and the Transient Master. Each of these effects can be turned on or off for any of the channels by clicking on the LED next to each effect name at the bottom of the page.
Convolution Reverb
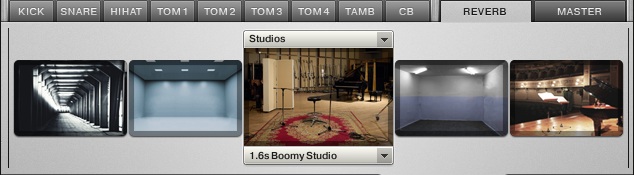
Convolution Reverb effect
The Convolution Reverb includes many impulse samples of some of the best acoustic spaces for acoustic drum production.
To select an acoustic space, click on the BUSES tab and then click on the Reverb channel. The various spaces will then appear at the bottom of the screen.
To shift the selection over to reveal more room types, click on the room images to the right and left of the selected image.
To select the room type, click on the drop-down menu above the selected room image. The drop-down menu below the room image allows you to select a specific room preset within that room type.
To adjust the overall level of the reverb, move the fader on the Reverb channel. The amount of reverb in each channel is adjusted with the SEND knobs at the top of each microphone channel.
Solid G-EQ
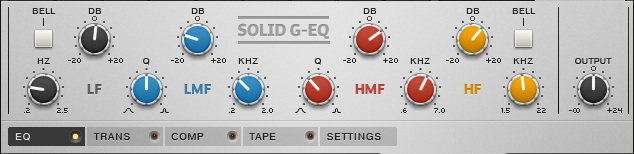
Solid G-EQ effect
The SOLID G-EQ is a uniquely musical EQ. Up to four frequency ranges can be adjusted with high precision.
The HZ/KHZ knobs set the center frequency that is being adjusted with the EQ.
For the two mid frequency ranges, there are Q knobs to adjust the width of the bell curve for the adjusted frequency range.
The DB knobs adjust the gain boost or gain reduction of the selected frequencies.
The low and the high frequencies can switch between bell curve and shelf modes by clicking on the BELL button.
The OUTPUT knob on the right side adjusts the overall output level.
Solid Bus Comp

Solid B-Compression effect
Also available as a fully-fledged product in its own right, this virtual reproduction of a legendary compressor adds presence and drive to your drums without blurring the detail.
The ATTACK knob adjusts the amount of time in milliseconds that it takes for the compressor to reach the ratio after the input signal exceeds the threshold level.
The RELEASE knob adjusts the amount of time in milliseconds that the compressor will take to stop affecting the sound after the input signal falls below the threshold.
The THRESHOLD knob adjusts the level in dB that the input signal must exceed before the compressor starts affecting the sound.
The RATIO knob controls the amount of compression expressed as a ratio of “input level” to “output level change”. The higher the RATIO knob is set, the more the output level will be reduced as the sound goes beyond the threshold.
The MIX knob allows you to add the dry signal to the mix as well, for a parallel compression sound.
The MAKEUP knob allows you to increase the overall output level of the compressed sound.
The OUTPUT knob on the right side adjusts the overall output level.
Tape Saturator
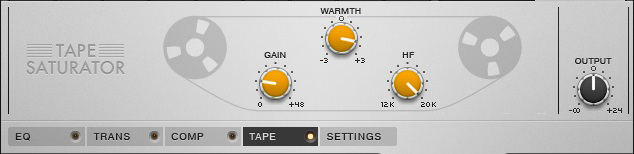
Tape Saturator effect
The Tape Saturator adds the simulated warmth of sound that comes from an analog tape machine.
The WARMTH knob manipulates the frequencies of the audio to give a “warming” tone to the sound.
The GAIN knob adjusts the amount that the input signal is boosted with the saturated sound.
The HF knob takes away the highest frequencies in a similar way that analog tape rolls off those high frequencies.
The OUTPUT knob on the right side adjusts the overall output level.
Transient Master
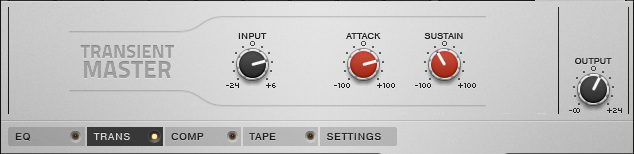
Transient Master effect
The Transient Master can subtly or drastically change the sound of the drums, depending on how you want to use it.
The INPUT knob adjusts the level of the input signal going into the effect.
The ATTACK knob adjusts the level of the attack of the signal.
The SUSTAIN knob adjusts how long the sound will ring out, which can effectively sound like changing the dampening or the size of the various drums, or even changing the size of the room that the drums are in.
The OUTPUT knob on the right side adjusts the overall output level.
Channel Settings
Each channel has its own settings for effect routing and channel output routing, and each mic channel can also be unloaded from memory if not in use.
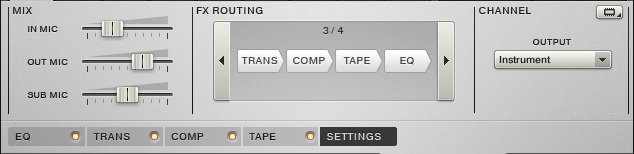
Channel Settings view for the Kick Drum
In the FX ROUTING area, there are four different effect routing presets to choose from. These change the order of which effect comes before the other, depending on your preference in a mix (for example, some engineers prefer to use EQ before compression, while others prefer to use it after compression). The signal chain of the effects goes from left to right according to the image, and you can step through the different order presets using the right and left arrows.
The CHANNEL area gives an OUTPUT drop-down menu to select which output that channel will be routed to. Please note that the channel outputs must first be setup in KONTAKT before being able to route them here. To unload a channel that is currently not in use from your computer's memory, select it from the drop-down menu (represented by a memory chip icon) in the top-right corner of the CHANNEL area. You can always load that channel back at any time.
Additional Kick and Snare Controls
The Kick and Snare close microphones have additional controls to adjust multiple direct microphone levels:
For the Kick close mic, there is an additional area on the left where you can adjust the separate levels of the Direct In mic (placed inside the kick drum pointing towards the front head), the Direct Out mic (placed a short distance outside of the kick drum) and the Direct Sub mic (a special inverted speaker microphone placed next to the Direct Out mic to pick up the sub frequencies of the kick drum).
For the Snare close mic, there is an additional area on the left where you can adjust the separate levels of the Direct Top mic (placed over the snare drum pointing down), the Direct Bottom mic (placed under the snare drum pointing up), and the Snare Bleed. The Snare Bleed fader adjusts the amount of the “buzzing” sound that the bottom of a snare produces when resonated by the Kick and Toms.
Grooves Page
The Grooves page is a browser with a huge library of organized MIDI grooves that can be used to quickly create drum parts for a song or production. You can edit several parameters to change the beats, and all grooves can be dragged into your host.
The GROOVE panel at the top right of the page allows you to play the groove with the play button, and select through the variations of that groove with the right and left arrow buttons. This panel is available on every page of STUDIO DRUMMER so you can play the grooves when using any of the other pages.
To use a groove in your host, click in the area of the groove name and drag the groove to your track in the host. A MIDI file of the groove will be created in your track.
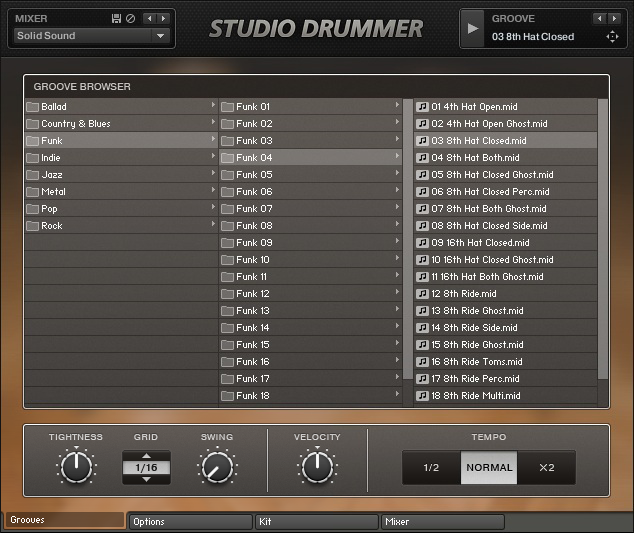
Grooves page Performance View
The GROOVE BROWSER has a total of three columns:
The leftmost column shows a list of Genre folders, each with its own set of customized Grooves, Fills and Variations.
The middle column shows the list of Grooves and Fills available for that Genre. The standard time signature is 4/4, unless otherwise shown in the name of the Groove or Fill. And the end of each Groove, there is a suggested BPM (beats per minute) tempo to use, but the grooves can be used at any tempo.
The rightmost column is a list of all Variations for the selected Groove or Fill. To select a Variation, double click on the variation name. After selecting one variation, you can use the up and down arrows on your computer keyboard to select among the variations, or the right and left arrows in the GROOVE panel.
Available Grooves
The 8 Genres included with STUDIO DRUMMER are Pop, Rock, Funk, Jazz, Indie, Metal, Country, and Blues.
A Groove for a particular Genre is a typical beat that would be used for that genre. Similarly, a Fill for a particular Genre is a drum fill that would be used in music for that genre. A Variation has the same general sound and feel of the main Groove or Fill, but has some small changes, ranging from different hi-hat rates to additions of ghost notes to changes of drums used, etc. The different Variations have key words in their names to identify the changes made in a particular variation, which are listed below:
4th, 8th, 16th, etc.: This represents the note division on which the tempo of the groove is played or felt. This is usually based on the instrument that is keeping the time, such as the hi-hat or ride cymbal.
Hat/Ride/Other: This is the instrument that is keeping the time of the groove, typically a hi-hat or ride cymbal.
Closed/Open/Both: This term is used when a hi-hat is keeping the time, and describes whether the hi-hat is always closed, always open, or uses both closed and open hits. This term will not be used if a ride cymbal or other instrument is keeping the time.
“Extra”: Sometimes an extra word is added at the end to classify the sound of the groove:
Ghost: This is used when there are additional ghost notes added to the groove, such as snare or kick ghost hits.
Side: This term is used if a snare sidestick is used instead of a center hit.
Toms: When additional toms are included in the groove, this term will appear.
Perc: If additional percussion sounds are used, which includes extra percussion such as cowbells or hand claps, as well as “rim only” articulations, then this term will be used.
Multi: If more than one of the above sounds or techniques is used, then the term at the end will be Multi to represent multiple types.
Groove Controls
The TIGHTNESS knob changes the amount of “groove” in the beat. The center value is the original sounding played beat. When turned all the way to the right, the beat is completely quantized and “machine-like”. As the knob is turned to the left, the beat gets more and more loose until it sounds very “sloppy” when turned all the way to the left. Depending on the type of music, all knob positions can be useful for different styles.
The SWING knob adjusts the amount of swing in the beat. Swing allows for rhythmic shifting of a groove where the first note in a series plays longer than the one that follows. When the knob is all the way to the right, the swing is the most severe. When all the way to the left, a “negative” swing is applied, where the first note in the series is actually shorter than the one that follows. Different time signatures affect the swing in different ways, so it is often best just to try the SWING knob to see how it sounds with the selected groove.
The GRID selector allows you to select different quantization timings for the TIGHTNESS and SWING knobs. For example, selecting 1/8 will push the grooves towards or away from the 8th notes of the beat when using the TIGHTNESS knob.
The VELOCITY knob changes the range of the velocities in the grooves. At the center position, the groove plays with the same velocities that were recorded with it. As the knob is turned to the right, the range is “compressed” to the high range so that all velocity values increase until they are all at maximum when the knob is all the way to the right. Similarly, when the knob is turned to the left the velocities are “compressed” to the low range until all velocities are the lowest when turning the knob all the way to the left.
The TEMPO selection buttons allow you to immediately change the tempo of the groove or fill to be half the speed or double the speed of the originals. This can be useful when a song is recorded at a high BPM tempo, but the feel of the song is actually half of that speed (or vice versa).
Options Page
The Options page is where additional “technical” parameters of a kit are adjusted, such as the MIDI note mapping and velocity ranges. There is also a RANDOMIZE section where various sound parameters have random values applied.
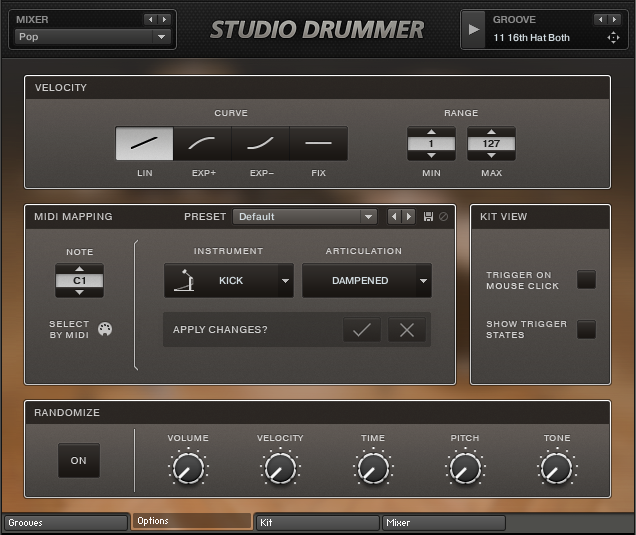
Options page Performance View
VELOCITY Settings
The VELOCITY area at the top allows you to fine-tune the way STUDIO DRUMMER responds to MIDI input:
In the CURVE section you can select a curve for incoming MIDI note velocities. The default is a linear curve, but many MIDI input devices have different levels of sensitivity, making a convex or concave curve more appropriate. There is also an option to select a constant “fixed” velocity (represented by a horizontal line).
Utilizing the RANGE controls, you can change the lowest and highest velocity values. This is useful for preventing the quietest and/or the loudest sounds from playing, and instead be limited to the specified minimum and maximum. Different MIDI input devices, such as MIDI keyboards and electronic drum kits, will also need their own velocity setting adjustments to match your playing style.
MIDI Mapping
The MIDI MAPPING area contains all of the controls for changing the mapping layout of the kits. Each articulation can be assigned to one or more MIDI notes, allowing for your own customized mapping. This is very useful for adjusting the mapping to the way that suits you best when playing the drums with a MIDI keyboard, or for adjusting the mapping to a custom electronic drum setup.
To assign the MIDI notes manually by entering or selecting the note in the NOTE selector:
Select the INSTRUMENT and the ARTICULATION in the drop-down menus.
Click on the checkbox next to the APPLY CHANGES? label.
The changes will be applied.
Tip
You can also click the SELECT BY MIDI icon to change to the NOTE value by playing the MIDI note, and then following the procedure above to assign the note.
All custom MIDI mappings can be saved and loaded from the mapping preset menu.
Mapping Presets
STUDIO DRUMMER also comes with a selection of mapping presets that are set up to work with popular software and electronic drum setups. These include General MIDI, V-Drums (two options), DrumIt Five, EZDrummer, Superior Drummer, BFD, iMap, and Addictive Drums. These mappings can be selected from the PRESET drop-down menu in the MIDI MAPPING area. If you want to make changes to these mappings, you can always do so and save the mapping preset under a different name.
Note
Please keep in mind that every e-drum setup is different, and almost every drum kit has some particularities to it. Therefore the mapping presets will not fully match your e-drum setup without any adjustments. These mapping presets have been included to provide you with the best possible starting point. You can make additional changes to these mappings and save a new preset to fit your e-drum needs.
KIT VIEW Settings
The KIT VIEW area holds the properties of the Kit page:
TRIGGER ON MOUSE CLICK: This option defines if the sound of an instrument is played back when the instrument’s image on the Kit page is clicked on with the mouse.
SHOW TRIGGER STATES: This option defines whether the drum kit view on the Kit page displays a real-time animation when instruments are triggered (played) during song or MIDI groove playback.
Note
It is recommended to deactivate the SHOW TRIGGER STATES option when computing power is scarce, e.g. when working on projects with high track counts. Switching off the user interface animations may considerably reduce the CPU load.
RANDOMIZE Settings
The controls in the RANDOMIZE area add custom levels of humanization and variation in the sound output. The higher the value of a knob, the higher the range of randomization for the relevant control. The randomized parameters are:
VOLUME: The volume level of the played drum increases or decreases by a random amount with each hit.
VELOCITY: The velocity of the played drum will increase or decrease slightly, which can trigger different samples above or below the one at the original velocity.
TIME: This will add a slight random amount of delay to each hit.
PITCH: The pitch of the played drum will be higher or lower by a slight amount with each hit.
TONE: This will slightly change the frequency curve of each hit. Different drums have different frequency ranges, specific to the sound of each drum.
Tip
A good way to add even more subtle variation to the sounds in the kit is to change the randomization parameters just slightly, especially the PITCH, TONE and VOLUME knobs. For all knobs, turning them a maximum of a quarter of the way up will allow the effect to remain subtle. Turning these knobs up to a high value can be used for a more experimental sound.