Browser
Learn how to browse VALVES's factory presets using filter tags, and how to save your own User presets.
The Browser lets you access VALVES' factory presets. They are all contained within the main VALVES .nki that you initially load in Kontakt. The Browser has five columns. The first four columns are used to filter the presets using tags and the fifth column displays the list of results.
Browser Overview
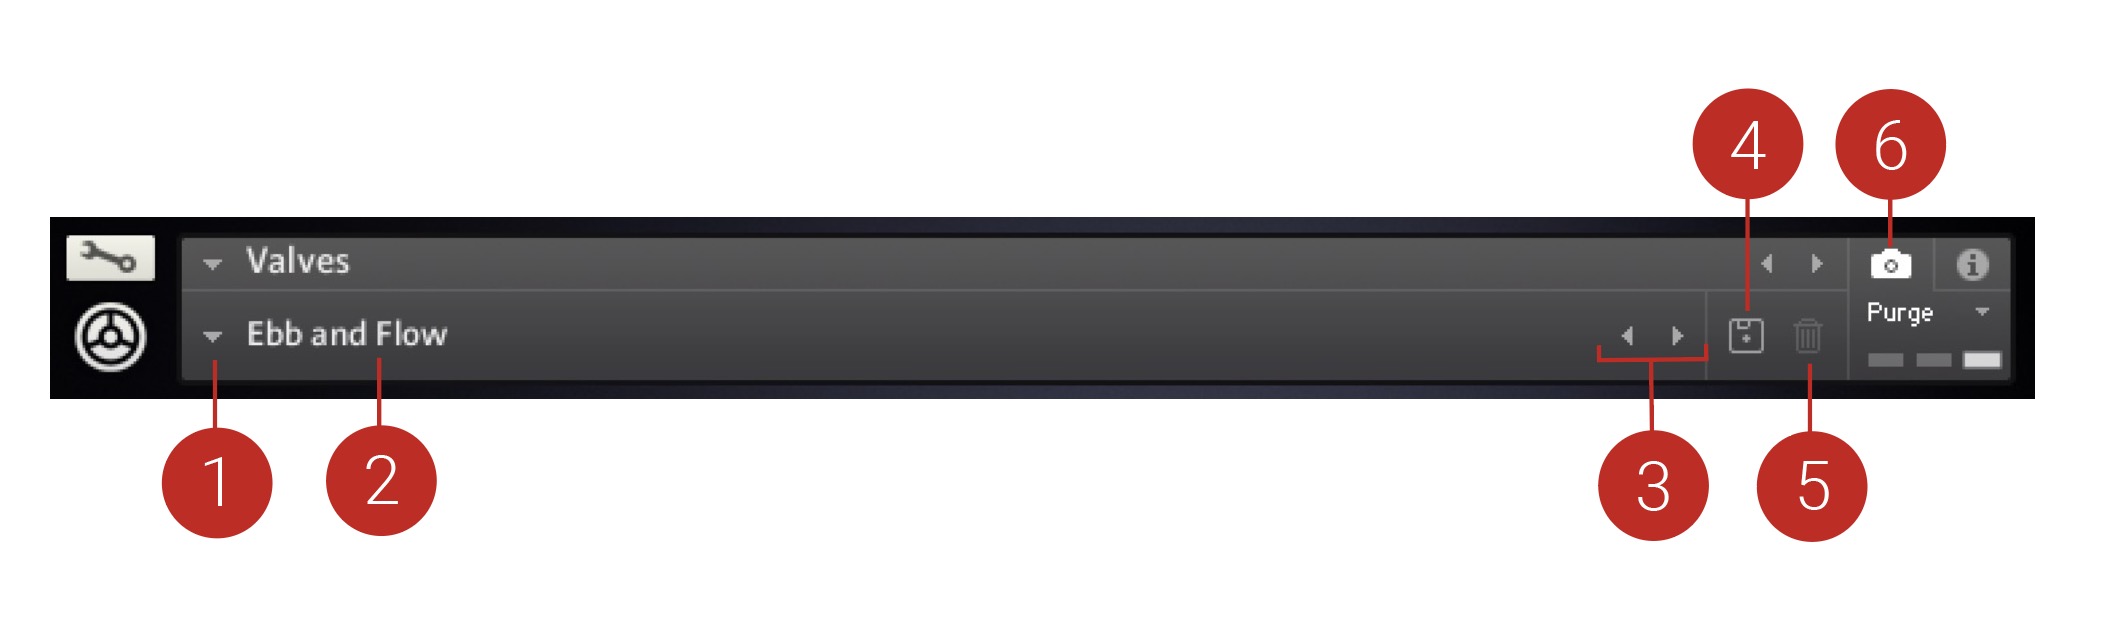
The Browser contains the following elements:
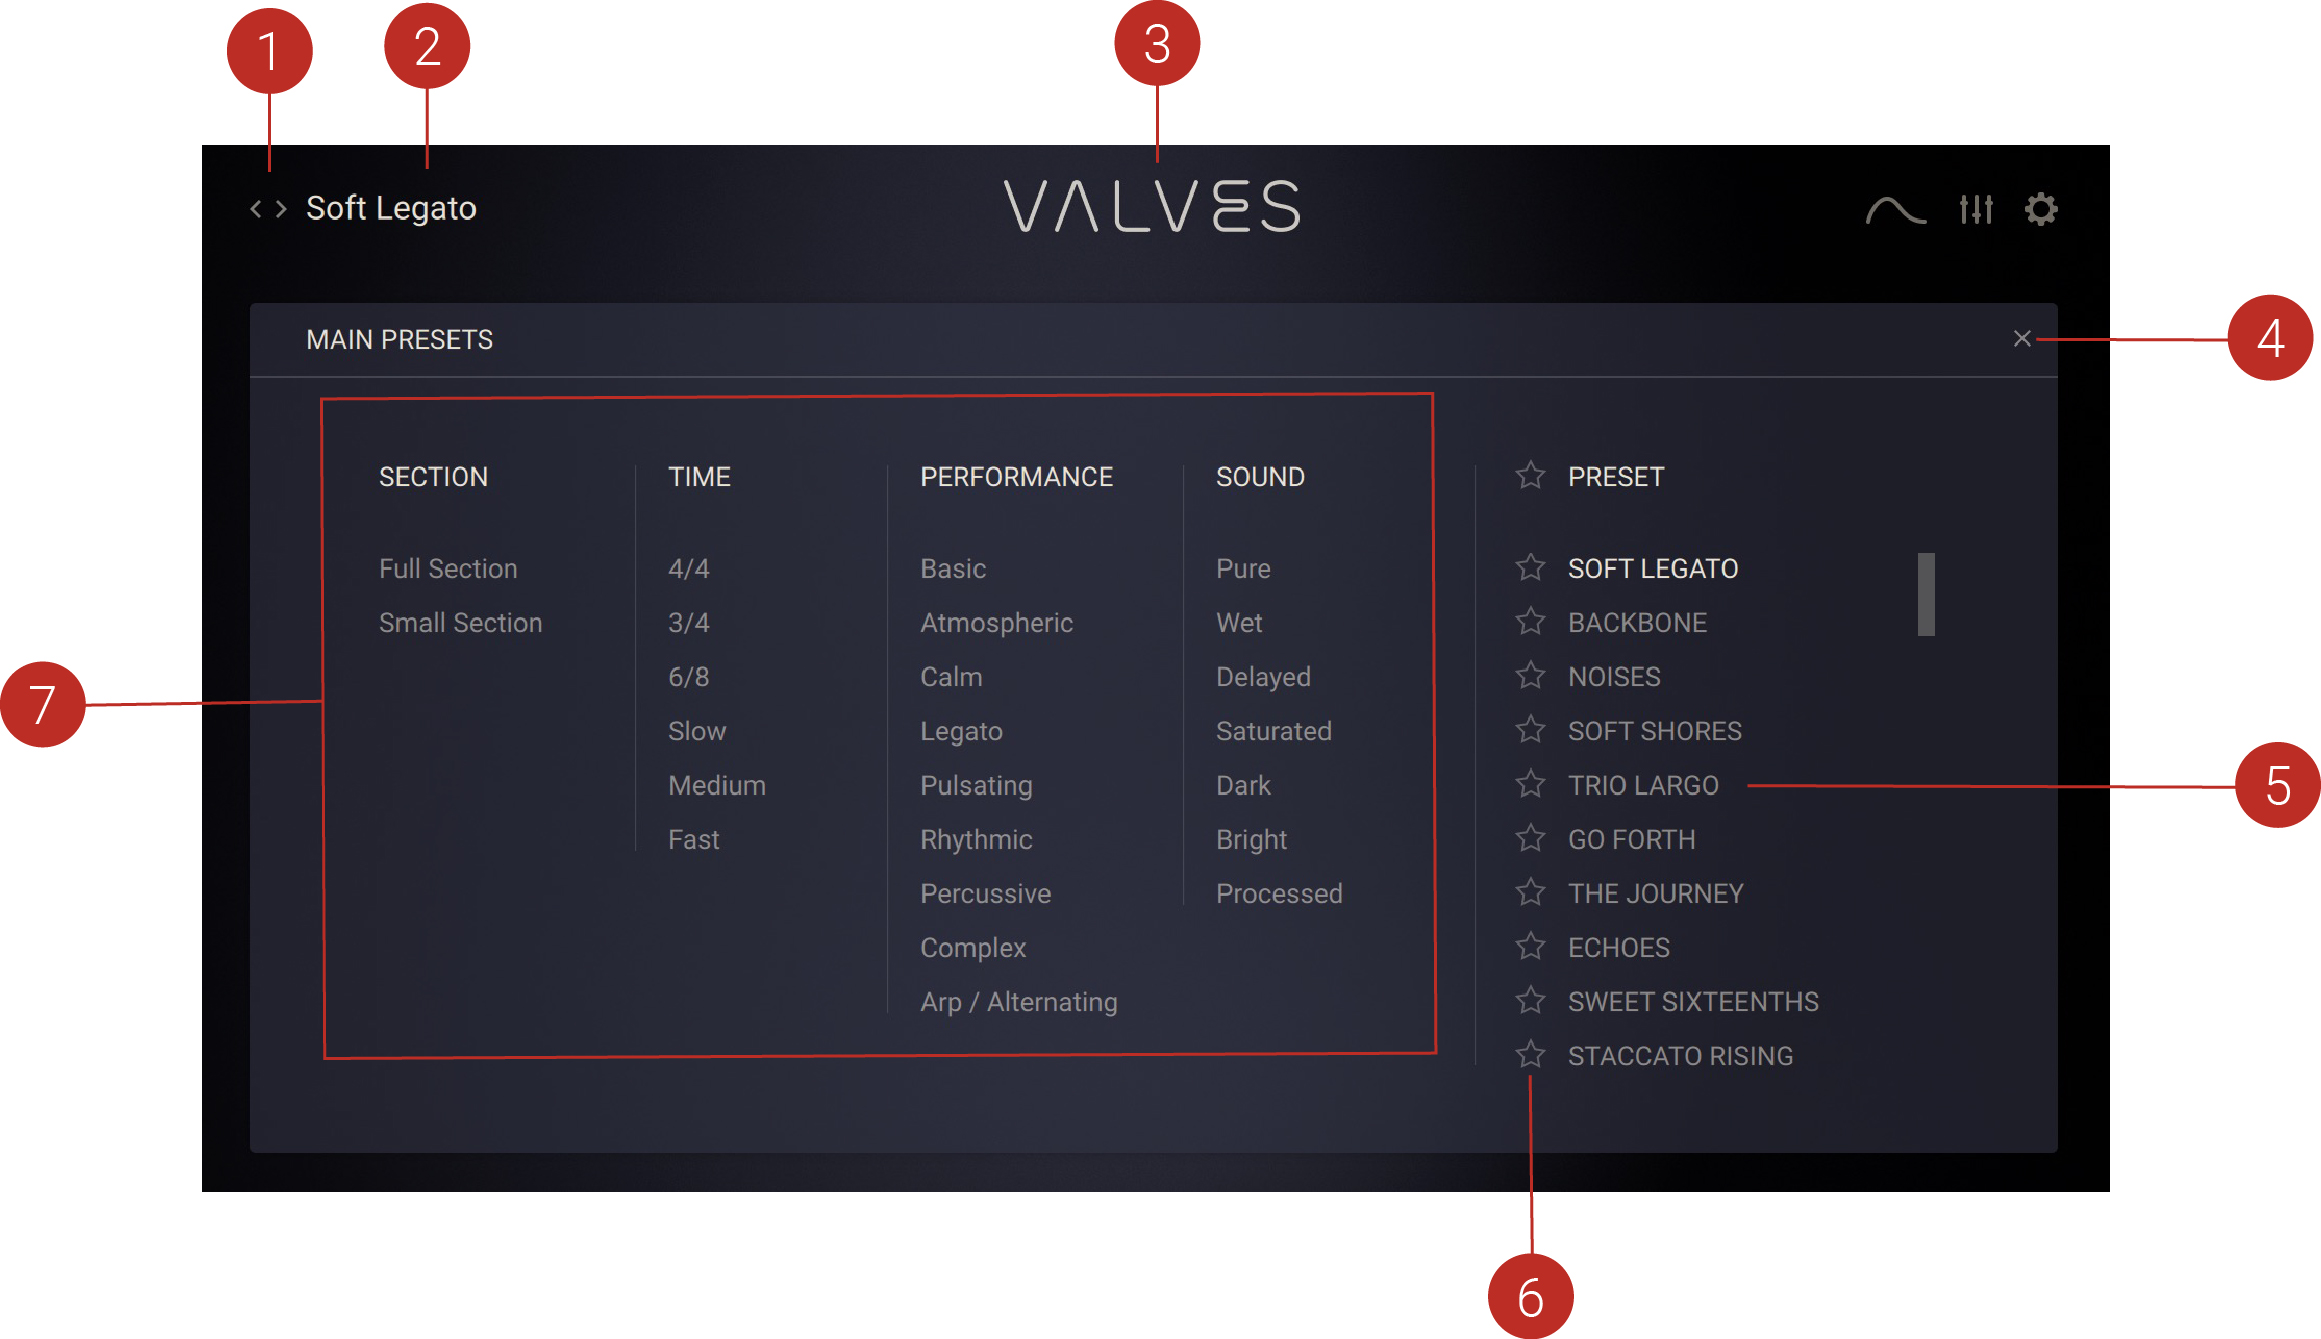
Preset previous / next: Loads the previous and next preset from the Results list in the browser.
Preset Name: Displays the name of the currently loaded preset.
VALVES Logo: Can be clicked to return to the Main page at any time.
Close: Closes the Browser.
Presets Results List: Displays all of VALVES' presets. This list reacts to filter tags that you may have selected. With one or more tags selected the list will show only presets matching those tags.
Favorites: When clicked, the Favorites icon (Star) marks a preset as a favorite.
Sound Categories: Displays the available filter tags for refining your search.
Opening and Closing the Browser
To open the Browser:
Click on the Preset selector to the left of the VALVES Logo. This can be done from any page in the instrument.
To close the Browser there are several options:
Click on a preset from the Preset list in the Browser to load the preset and then click the x icon at the top right corner to close the Browser.
Click on the VALVES Logo.
Click on the Preset selector a second time.
Click on any of the three buttons that lead to the Sequencer, Mixer or Settings pages.

The Preset selector, VALVES logo, and page buttons
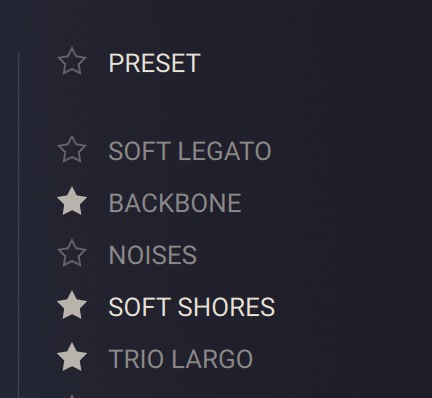
Using Favorites in the Browser
The Favorites feature is another way you can tailor your browsing experience in VALVES. They can help to organize your sounds and streamline your preset searching, and can also be useful for collecting all the inspiring sounds that you may encounter as you explore VALVES' extensive sound library.
To mark a preset as a Favorite:
Open the browser.
Click the star icon next to the preset in the Results List.
The preset is now marked as a Favorite, indicated by the highlighted star icon.
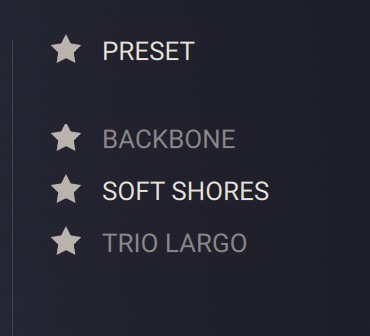
To filter by Favorites:
Click the star icon next to the PRESETS label of the Results list.
The Results list now displays all presets marked as Favorites.
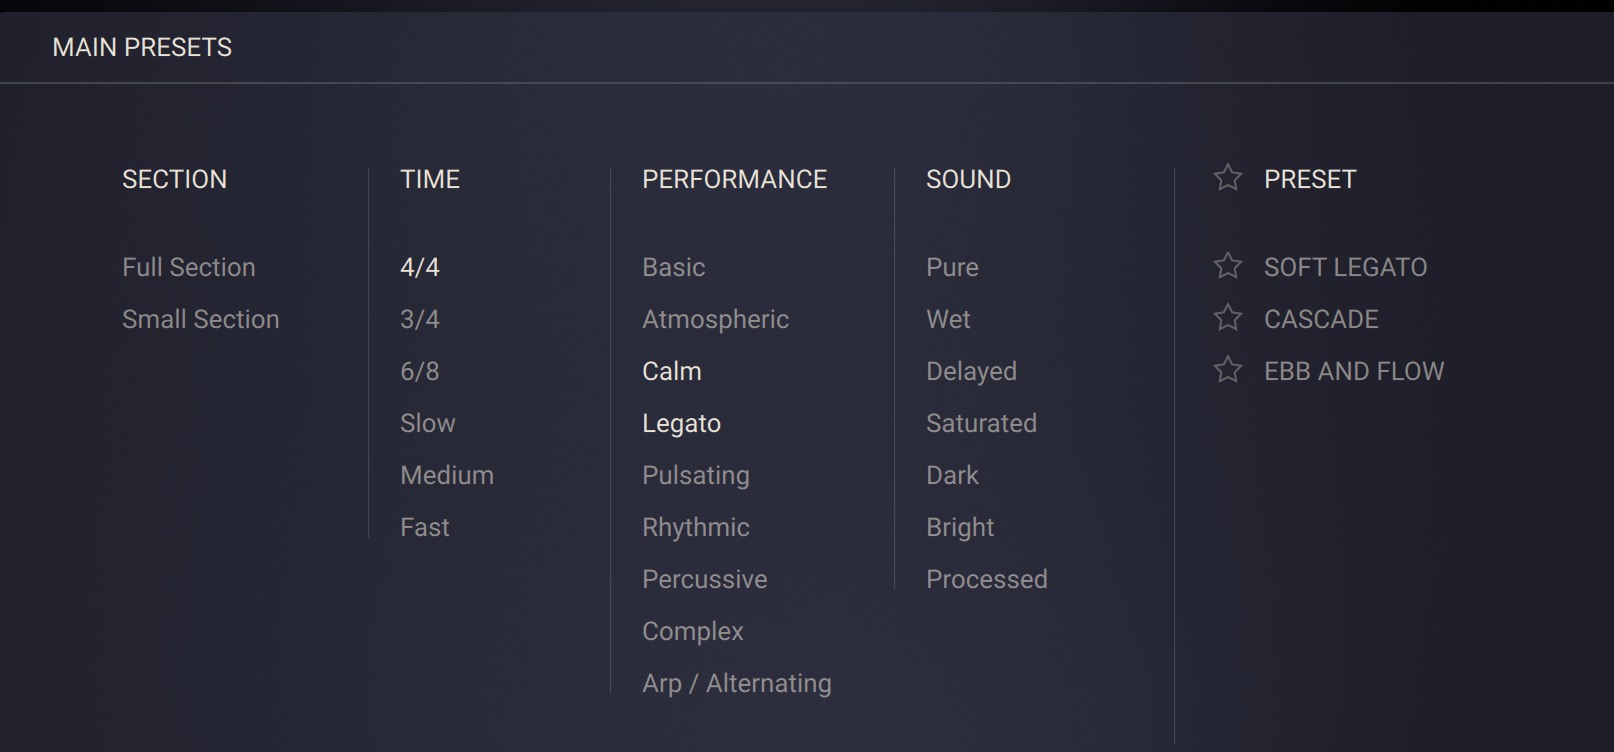
Filter Tags
When clicking on any of the tag categories, the results list on the right hand side will update to show only the presets matching those tags. Select multiple tags to refine your search further to match only presets tagged with those characteristics. For example, select a Time Signature of 4/4 and Performance tags Calm and Legato to display only the presets matching those tags. The available types of tags are described in detail below.
Tip
The Favorites feature ist a special type of filter allowing you to curate a list of your favorite presets. For more information, refer to Using Favorites in the Browser.
Filter tags in the Browser
Section
Selects the kind of ensemble you want to load. Full Section shows presets containing all five instruments. Small Section shows presets containing less than five instruments.
Time
Choose presets based on the time signatures or tempos used in their sequencers. Time tags include different time signatures like 4/4 and 3/4, as well as different tempi.
Tip
Choose more than one tag to find for example all presets in 3/4 time that are suitable for a faster tempo.
Performance
Selects from the various performance styles that presets employ. Each of the five instruments in a preset can use its own independent sequencer so you can achieve different playback styles. The performance styles cover a range of moods and percussive characteristics.
Sound
Filters presets using the character of their sound. These different characters are a result both of playing styles, the types of instruments layered together and the effects used to process the output. Select more than one tag to show more results.
Snapshots
KONTAKT contains a collection of presets that were produced from the sounds of 16 classic analog synthesizers and keyboards.
Snapshots are KONTAKT's underlying file format for instruments presets. They offer a quick and convenient way of browsing for new sounds and saving custom presets. When a User Snapshot is saved, the macro settings, parameter controls, and sequence are also stored within the preset. Using Snapshots, you can create your own preset sounds, save them in the .nksn file format and use them in other projects, across computers or even share them with other users.
Snapshots Overview
Snapshots contain the parameters and controls:
Load Snapshot: Opens the Snapshot menu where you can load a Snapshot from the Factory or User library. For more information, refer to Loading a Snapshot.
Snapshot Name: Displays the name of the currently selected Snapshot.
Snapshot Previous/Next (<> icons): Allows you to quickly browse and load Snapshots. Pressing an arrow icon will load the previous or next Snapshot in the selected category. If no Snapshot is active, the first Snapshot on the list will be loaded. For more information, refer to Loading a Snapshot.
Save Snapshot (floppy disk icon): Allows you to save changes made to a sound. When a User Snapshot is saved, the macros settings, parameter controls, and sequence are stored within it and can be accessed at any time via the User library. For more information, refer to Saving a User Snapshot.
Delete Snapshot (bin icon): Deletes the currently selected Snapshot from the User library. You can only delete User Snapshots and not Factory Snapshots. For more information, refer to Deleting a User Snapshot.
Snapshot View (camera icon): Provides access to the Snapshot features described above; saving, loading, browsing, and deleting. When Snapshot View is selected, configuration settings and features relating to the Info View are replaced in the display.
Loading a Snapshot
Snapshots are loaded from the drop-down menu in the top header of the instrument. You can also use the arrows to the left of the floppy disk icon to load the previous or next preset.
To load and browse Snapshots using the arrow icons:
Click the Snapshot View (camera icon) to open Snapshot view.
Click the arrow icons (<>) in the Snapshot header to browse through the Snapshots list.
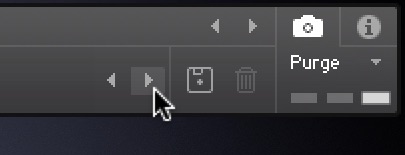
The previous or next Snapshot will load immediately each time an arrow icon is clicked.
To load a Snapshot from the library:
Click the Snapshot View (camera icon) to open Snapshot view.
Click the arrow icon next to the Snapshot name field to open the Snapshot menu.
Select the Factory category to load a Factory preset, or select the User category to load one of your own Snapshots.
Select an instrument category, if available.
Select a Snapshot to load it.
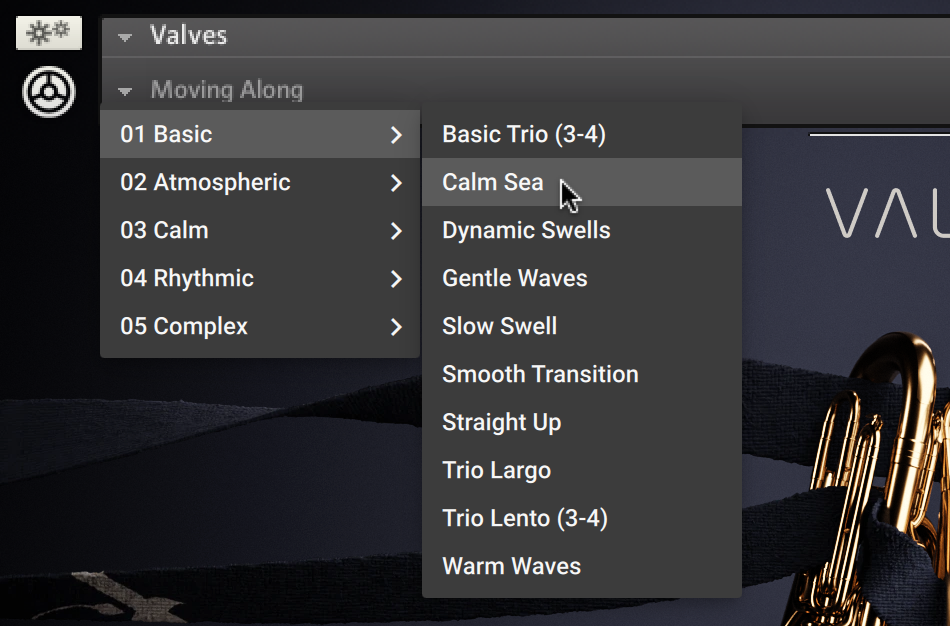
The loaded Snapshot is displayed in the instrument header.
Note
The User category will not appear until you have first saved a Snapshot.
Saving a User Snapshot
Snapshots can be saved at any time while you are working on them. When a Snapshot is saved, all parameters and controls are also saved.
To save a Snapshot:
Click the Snapshot View button (camera icon) to open Snapshot view.
Click the Save button (floppy disk icon).
Enter a name for your new Snapshot in the Save dialog box.
Click Save to finish the process and close the dialog box.
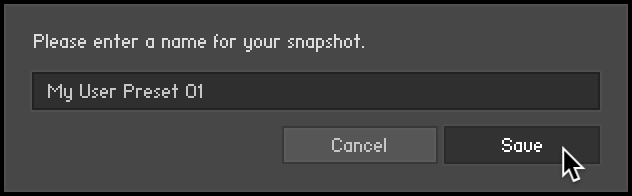
Your Snapshot .nksn file is saved to the User Snapshot Library. It appears in the User Snapshot list.
To overwrite a Snapshot:
Click the Snapshot View button (camera icon) to open Snapshot view.
Click the Save button (floppy disk icon).
Click Overwrite to confirm the process.
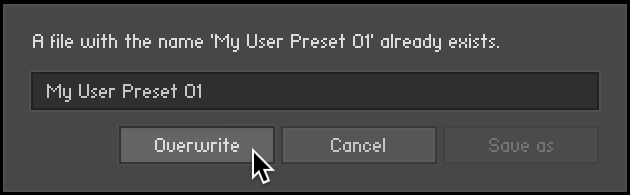
Your Snapshot .nksn file is saved to the User Snapshot Library, in replace of the old file.
Deleting a User Snapshot
Snapshots can be deleted using the bin icon in the instrument header. To delete a User Snapshot:
Click the Snapshot view (camera icon) to open Snapshot view.
Load the User Snapshot you wish to delete.
Click the Delete button (bin icon).
Confirm deletion of the Snapshot by selecting Yes in the dialog box.

The User Snapshot .nksn file is deleted from the User Snapshot Library.