Mixer Page
The Mixer page of VALVES enables you to mix and balance the individual instruments, as well as apply a variety of different effects.
The Mixer is where you change and balance the levels of each of the instruments and assign insert, send and master effects. It has the following elements:
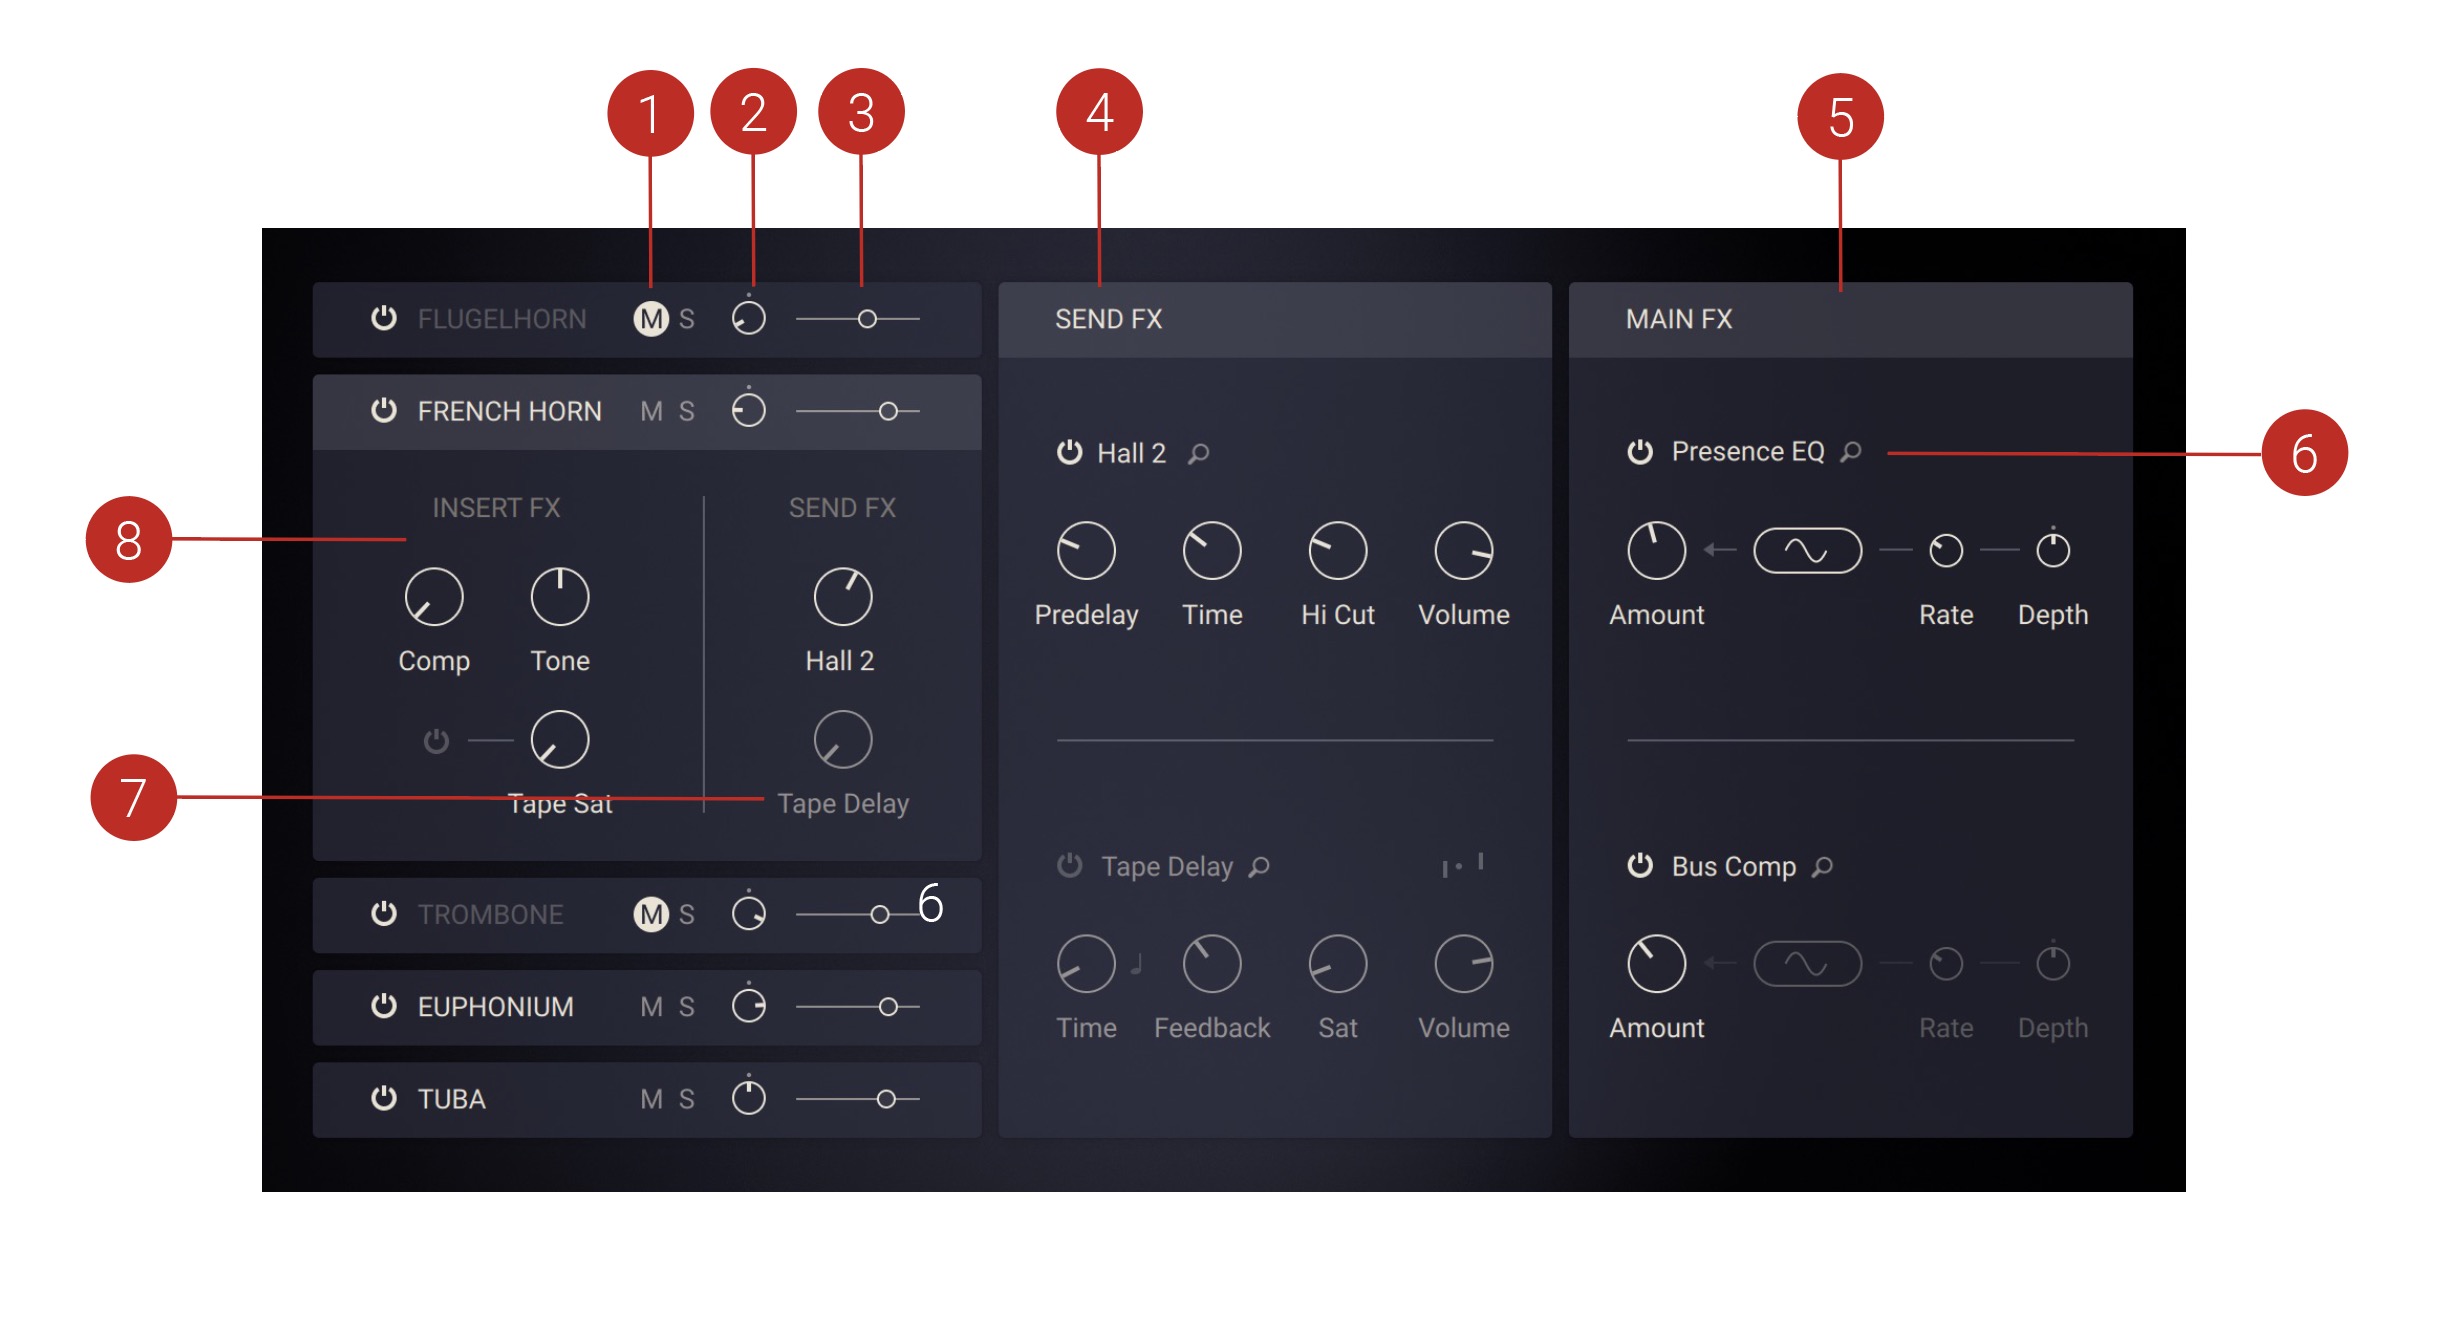
Mute and Solo: Mute or Solo any instrument.
Pan: Change the stereo panning of an instrument between left and right sides.
Volume Level: Set the instrument's volume level.
Send FX: Activate and control up to two send effects per preset. For more information, refer to Send FX.
Main FX: Activate and control up to two main effects per preset. For more information, refer to Main FX.
FX Chooser: Open the effects browser.
Send FX Level: Adjust the amount of send effect applied to each instrument.
Insert FX: Adjust parameters related to the insert effects of each instrument. For more information, refer to Insert FX.
Insert FX
The Instrument controls area contains Insert FX controls for each instrument. The three knobs here are actually Macros which means they control several parameters at once. The controls are:
 |
Comp: Adjusts the amount of compression applied to the instrument. The compression is tailored to the specific instrument.
Tone: Adjusts a tilt equalizer that is tailored to the specific instrument. When set to center position, the frequency response is flat. Turning the control to the left emphasizes low-frequency content and attenuates high-frequency content. Turning the control to the right emphasizes high-frequency content and attenuates low-frequency content.
Tape Sat: Adjusts the amount of tape saturation applied to the instrument.
Send FX
Each individual instrument in VALVES can send its output to either of the two available send effects. The Send FX consist of the following controls:
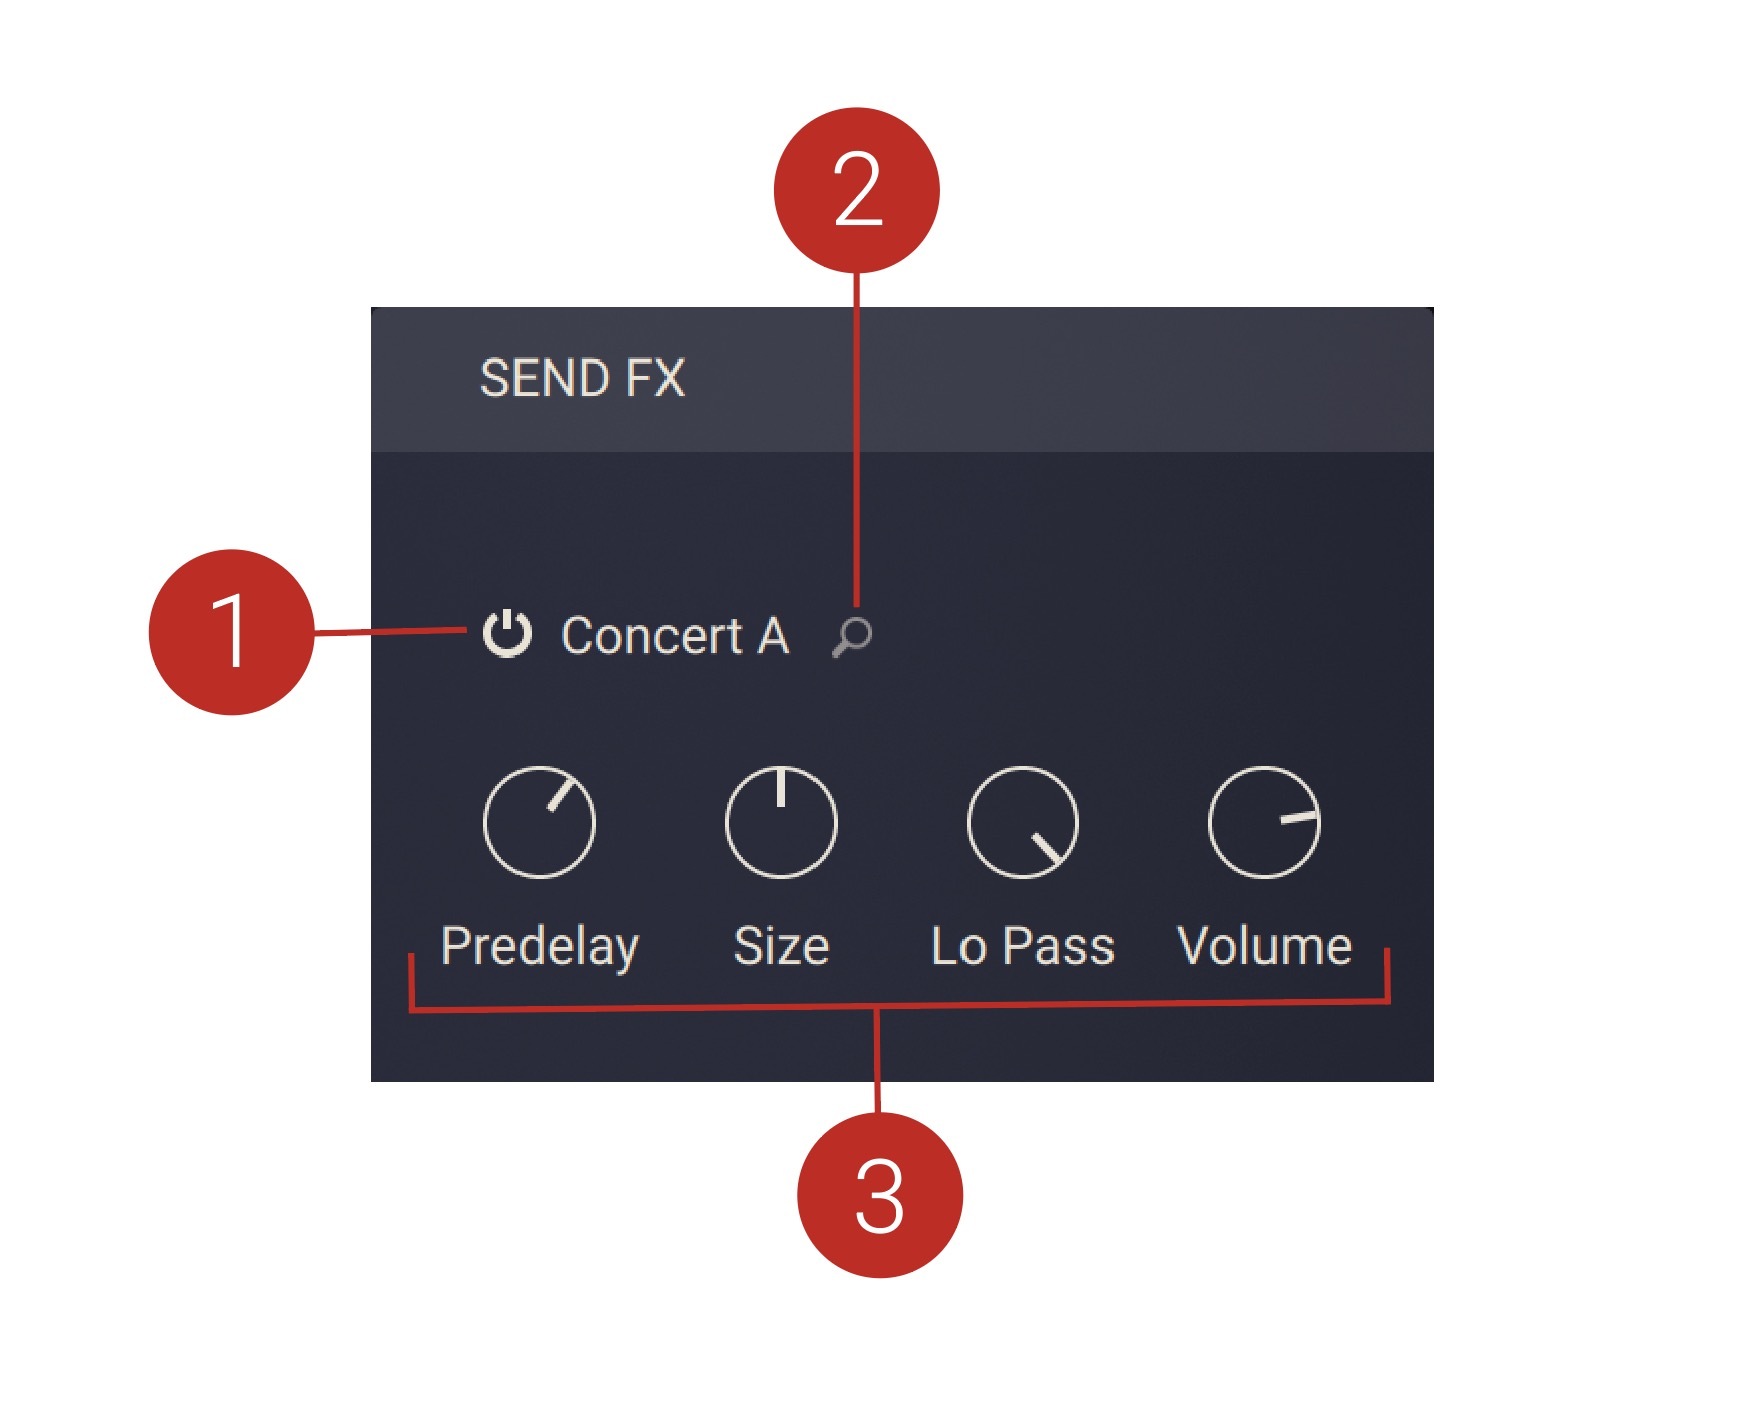 |
Effect On/Off: Activates or deactivates the effect.
Send FX Browser: Opens the Send FX Browser which you can use to select an effect from six categories of echo and reverb effects. The categories include Delay, Room, Hall, Plate, Spring, and Special.
Effect Controls: The controls are specific to the selected effect and allow you to fine-tune key parameters.
Delay
Send effects in this category provide a set of four parameters, and the additional Stereo option. You can find descriptions of all parameters used in this category below.
Basic Delay Parameters
The following basic parameters are used in all of the effects in the Delay category.
Stereo: When activated, the modulation between the left and the right channel is offset in time, resulting in a wide stereo effect. When deactivated, the modulation affects both channels in the same way. This control is not available for the Pitch effect.
Time: Adjusts the delay time in milliseconds. When tempo sync (note icon) is activated, you can set Time in note divisions relative to the tempo of your host or Master Editor.
Feedback: Adjusts the level of the signal that is fed back to the delay's input. Increasing Feedback adds delay repeats. Levels above 100% create swelling echo repeats up to self-oscillation.
Volume: Adjusts the output level of the effect.
Additional Delay Parameters
The following additional parameters are specific to particular effects in the Delay category.
Depth: Adjusts the amount of modulation applied to the delay time.
Lo Cut: Cuts low-frequency content in the feedback path of the delay with a non-resonant filter. Turned fully counter-clockwise, the filter is off.
Sat: Adds tube-like saturation at the delay input. Turning it clockwise pushes the sound from subtle warmth to overdrive. Turned fully counter-clockwise, the saturation is bypassed.
Flutter: Increases the effects introduced by mechanical imperfections of the tape delay’s motor and tape transport, resulting in pitch variations over time.
Modulation: Sets the depth and speed of modulation applied to the diffusion, shifting the timing and pitch of the reflections for a wide reverb effect.
Hi Cut: Cuts high-frequency content in the feedback path of the delay with a non-resonant filter. Turned fully clockwise, the filter is off.
Pitch: Adjusts the pitch of the echo repeats in the range of -12 to +12 semitones. Combined with feedback you can use this to create progressively harmonized echo cascades.
Room, Hall, Plate, Spring, Special
Send effects in these categories provide a set of four parameters. You can find descriptions of all parameters used in these categories below.
Predelay: Introduces a short amount of delay between the direct signal and the convolution output. This is useful when used with reverb responses to simulate the reverberation of big rooms, where a short delay occurs between the direct sound and the first reflections from distant walls.
Size: Artificially compresses or stretches the impulse response in time.
Time: Adjusts the duration of the reverb effect.
Lo Pass: Adjusts the cutoff frequency above which the signal’s frequency content will be attenuated.
Hi Cut: Cuts the high-frequency content of the reverb signal.
Volume: Adjusts the output level of the effect.
Main FX
The mix of all individual instruments can be processed using two main effects. The Main FX consist of the following controls:
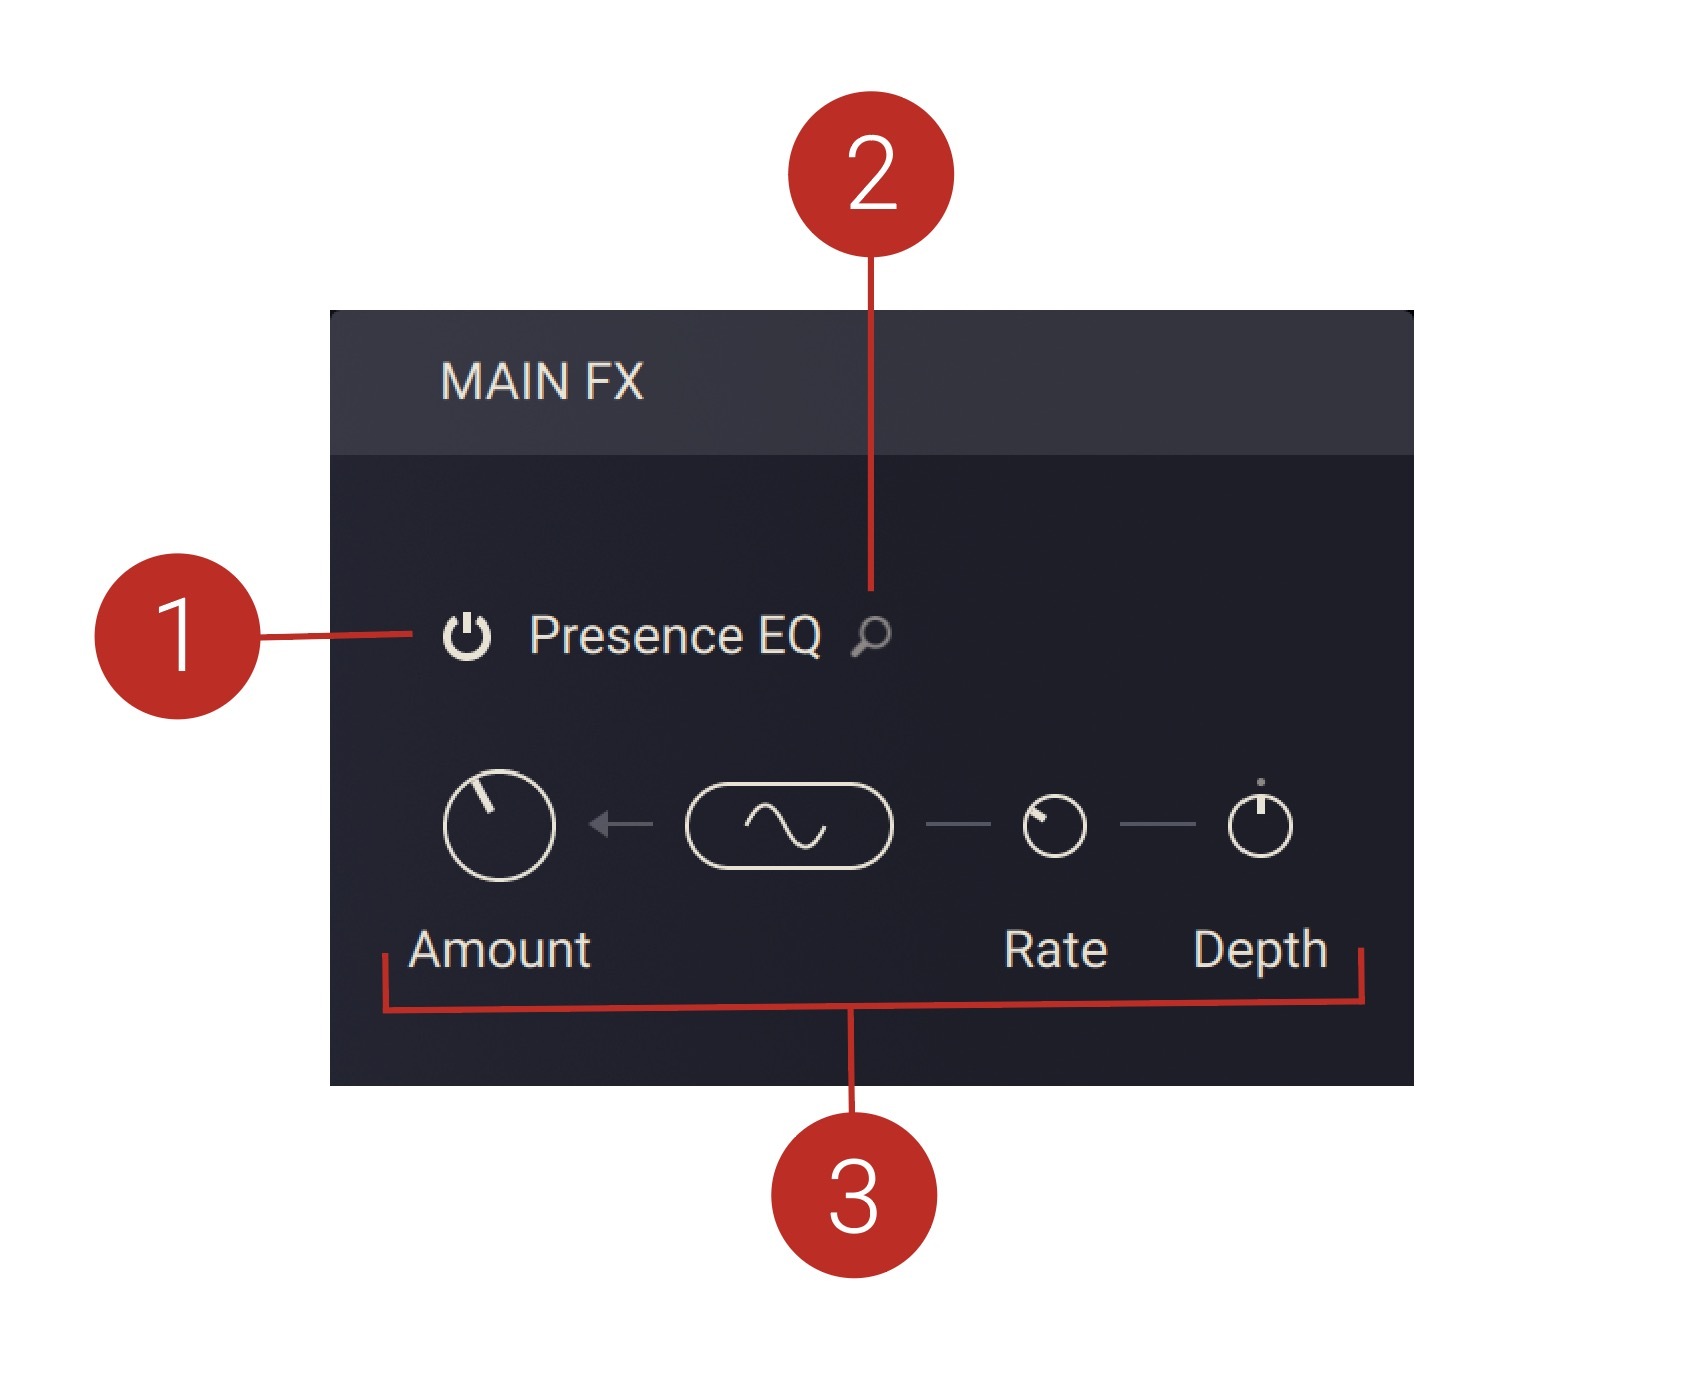 |
Effect On/Off: Activates or deactivates the effect.
Main FX Browser: Opens the Main FX Browser which you can use to select an effect from six available categories, including Filter, Equalizer, Saturation, Modulation, Compression, Utility.
Effect Controls: The controls are specific to the selected effect and allow you to fine-tune key parameters.
Filter
Main effects in this category provide a set of four parameters. You can find descriptions of all parameters used in this category below.
Amount: Adjusts the cutoff frequency of the filter.
Modulation Wave Selector: Selects the waveform of the LFO (low-frequency oscillator) modulation applied to the Amount control.
Rate: Adjusts the speed of the LFO (low-frequency oscillator) modulation applied to the Amount control.
Depth: Adjusts the strength of the LFO (low-frequency oscillator) modulation applied to the Amount control.
Equalizer
Main effects in this category provide a set of four parameters. You can find descriptions of all parameters used in this category below.
Amount: Adjusts the gain of the equalizer.
Modulation Wave Selector: Selects the waveform of the LFO (low-frequency oscillator) modulation applied to the Amount control.
Rate: Adjusts the speed of the LFO (low-frequency oscillator) modulation applied to the Amount control.
Depth: Adjusts the strength of the LFO (low-frequency oscillator) modulation applied to the Amount control.
Saturation, Modulation, Compression, Utility
Main effects in these categories provide a set of four parameters. You can find descriptions of all parameters used in these categories below.
Amount: Adjusts the intensity of the effect.
Modulation Wave Selector: Selects the waveform of the LFO (low-frequency oscillator) modulation applied to the Amount control.
Rate: Adjusts the speed of the LFO (low-frequency oscillator) modulation applied to the Amount control.
Depth: Adjusts the strength of the LFO (low-frequency oscillator) modulation applied to the Amount control.
Note
The modulation controls are not available for effects in the Compression category.