Layers page
The Layers page of Erosia lets you adjust the sound of its four layers in detail.
The Layers page of Erosia lets you adjust the sound of its four layers in detail.
To open the Layers page, click the Layers button in the top right corner of the instrument.

The Layers page contains the following elements:
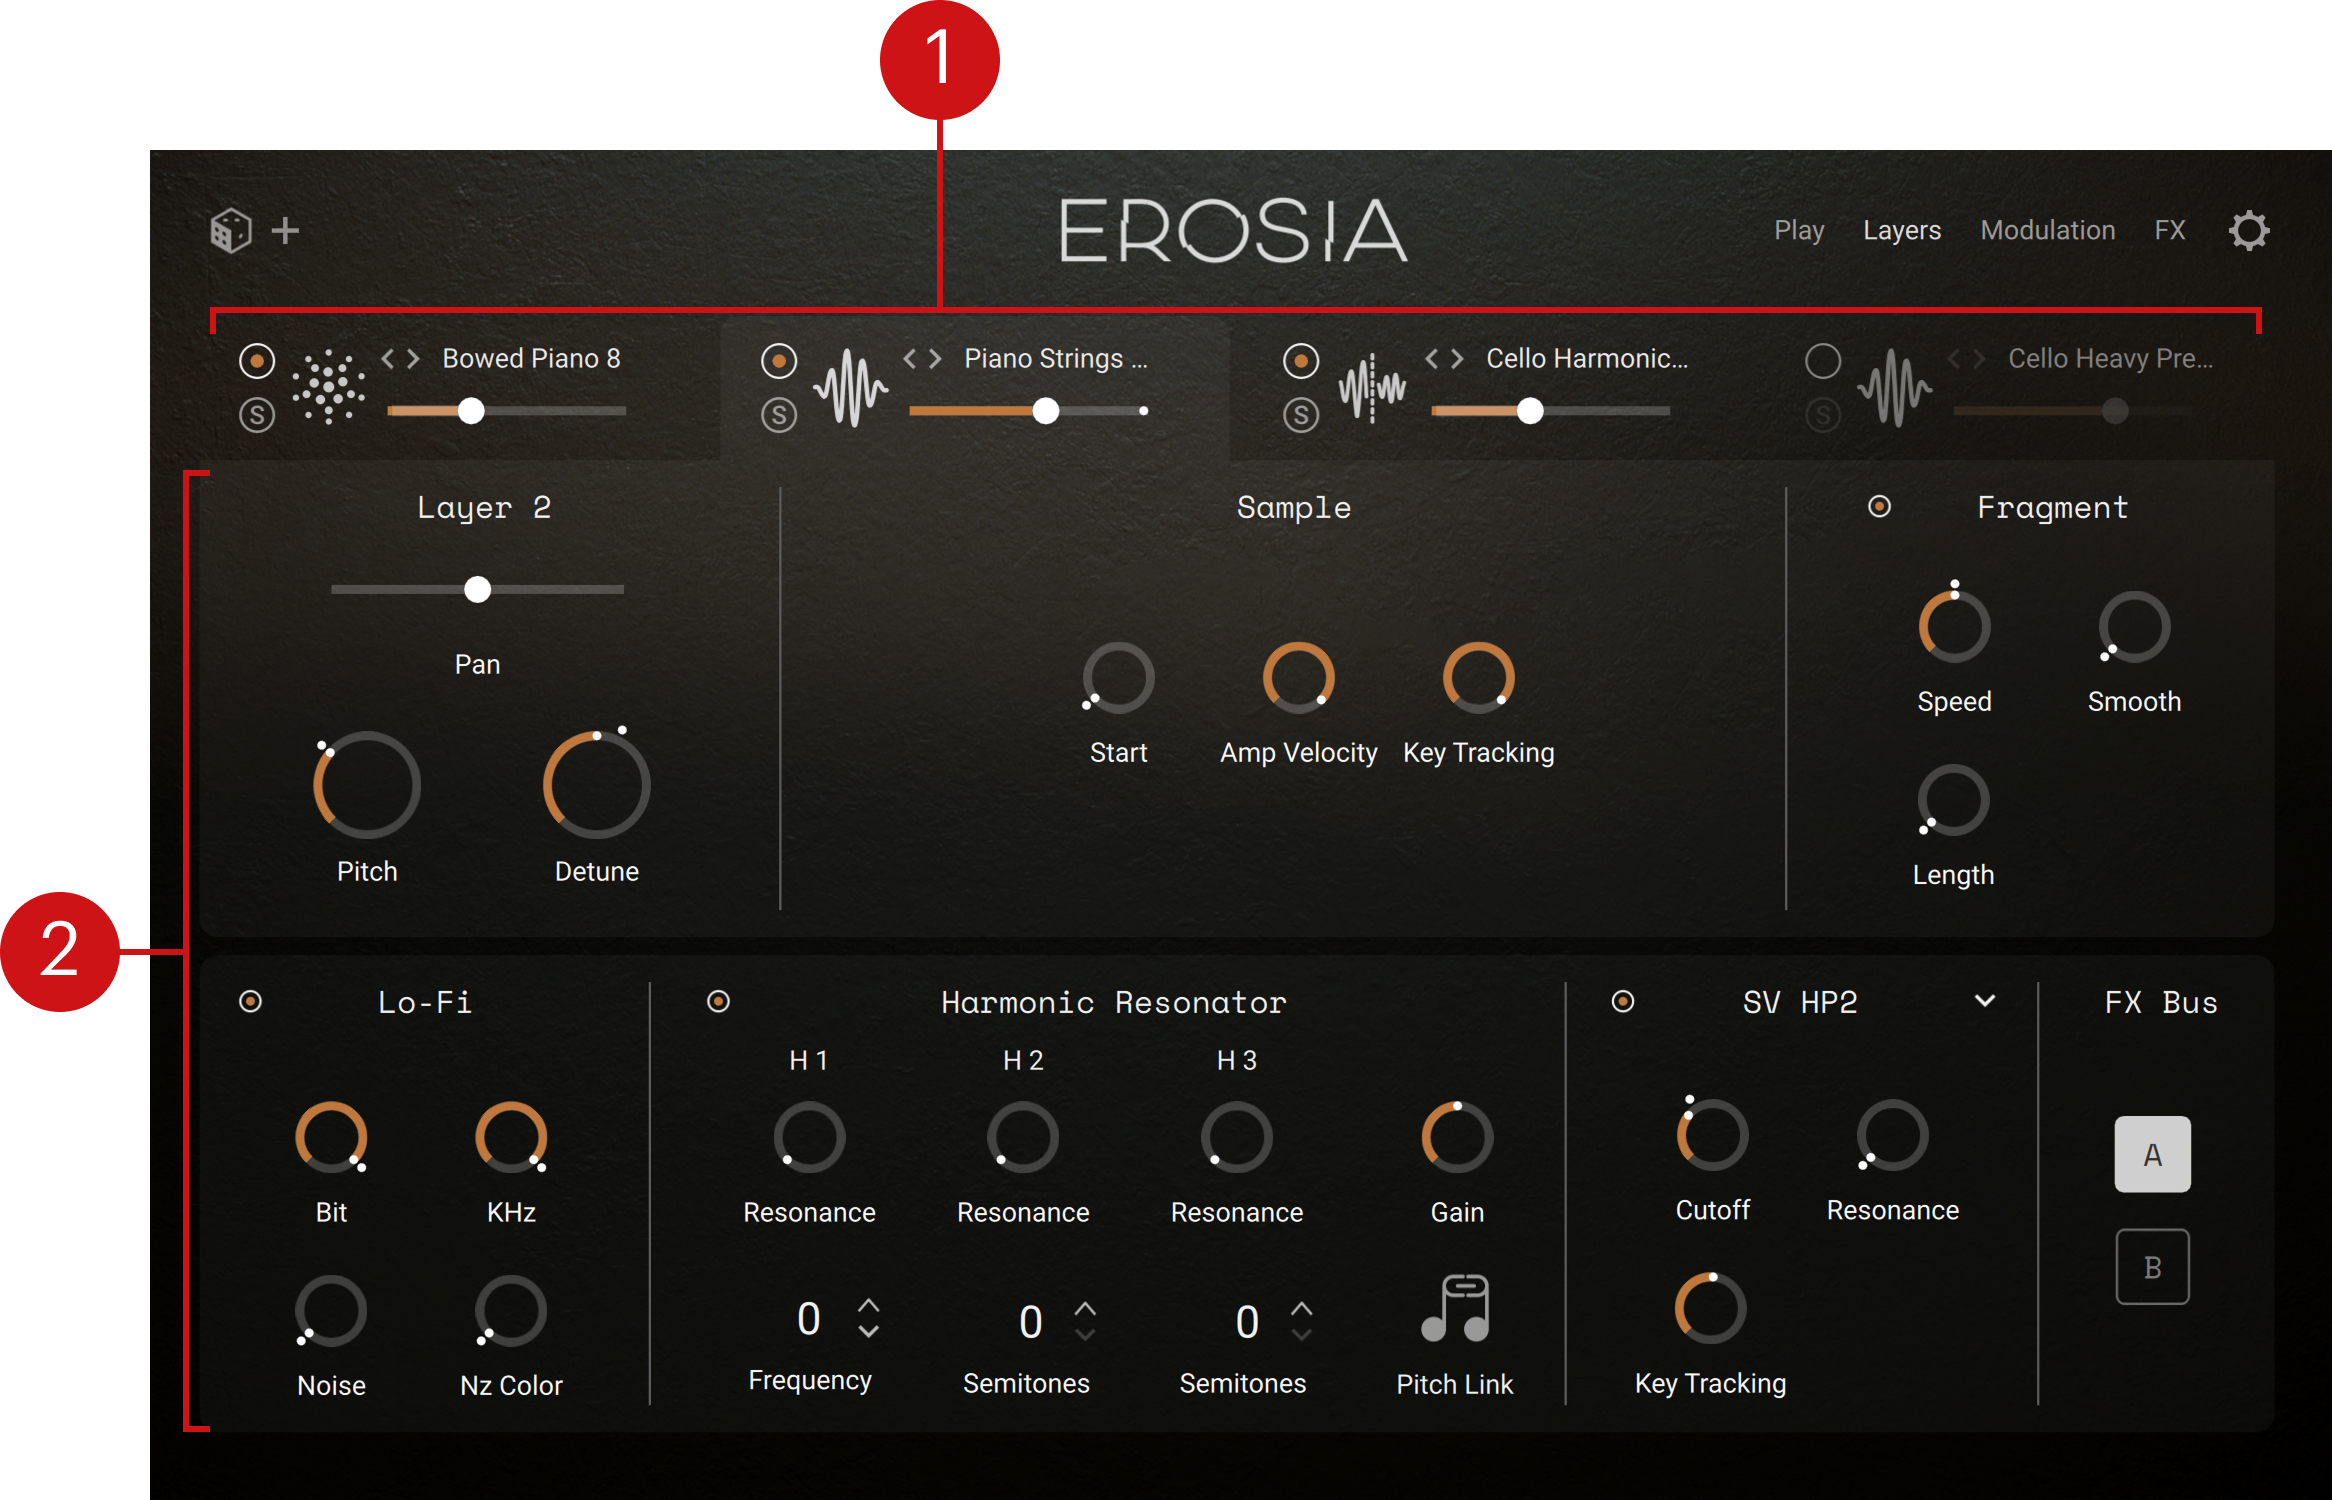
Tab headers: Each header provides a set of basic controls for one layer, and lets you display the layer’s details below. All the controls in the areas below apply to the layer selected here. Refer to Tab headers.
Layer parameters: Each tab lets you adjust in detail the sound of a particular layer. Refer to Layer parameters.
Tab headers
At the top of the Layers page, the tab headers let you switch between the layer tabs, and provide for each layer the same set of basic controls as in the Layer Inspector of the Play page:

Each tab header contains the following controls:
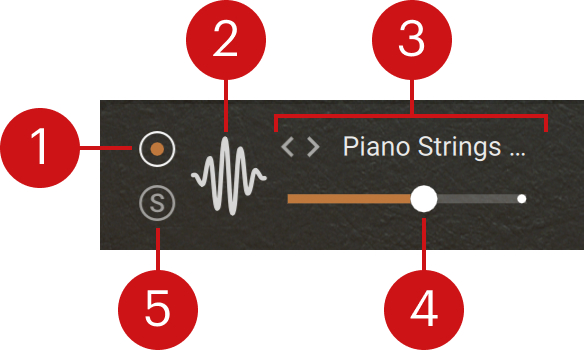 |
Layer on/off switch: Activates or deactivates the layer. Inactive layers don’t generate any sound.
Layer icon: Indicates the type of layer: grain, sample, or wavetable. Clicking the icon opens the corresponding layer tab below.
Source selector: Displays the name of the sound used as source in the layer. You can click the sound name to open the Source browser and select another source for that layer. Alternatively, you can click the left and right arrows to quickly load the previous or next sound from the browser’s result list without opening the browser.
Layer Level slider: Adjusts the volume level of the layer.
Solo (S): Mutes all the other layers. Soloing a layer can be useful to focus on that layer when designing your sound.
Tip
The four Layer Level sliders can be modulated. For more information, refer to Modulating your sound.
Layer parameters
The layer parameters are organized into various sections, which are available for all three types of layers (grain, sample, and wavetable) unless otherwise indicated.
On the layer tabs, the signal flows from top to bottom and from left to right:
In the top row, the layer engine generates the sound as configured in the first row in the Main and Grain, Sample or Wavetable sections. In grain and sample layers, the sound additionally passes through the Fragment section.
The sound then goes through the bottom row and is successively processed by the layer’s internal effects of the Lo-Fi, Harmonic Resonator, and Filter sections.
Finally, the FX Bus section sends the sound to the desired effect bus A or B.
Note
The layer sound will then pass through the effect chain on the selected bus for further processing. This is described in FX page.
Main section
The Main section contains basic controls for the layer.
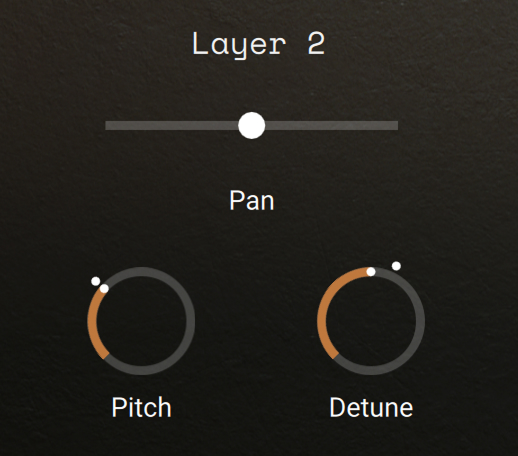 |
Pan: Adjusts the panoramic position of the layer in the stereo field.
Pitch: Adjusts the coarse pitch of the layer in semitones.
Detune: Adjusts the fine pitch of the layer in cents.
Grain section (grain layer only)
The Grain section lets you configure the grain engine of the layer.
Note
The Grain section is only available in the grain layer, which corresponds to the leftmost tab header.
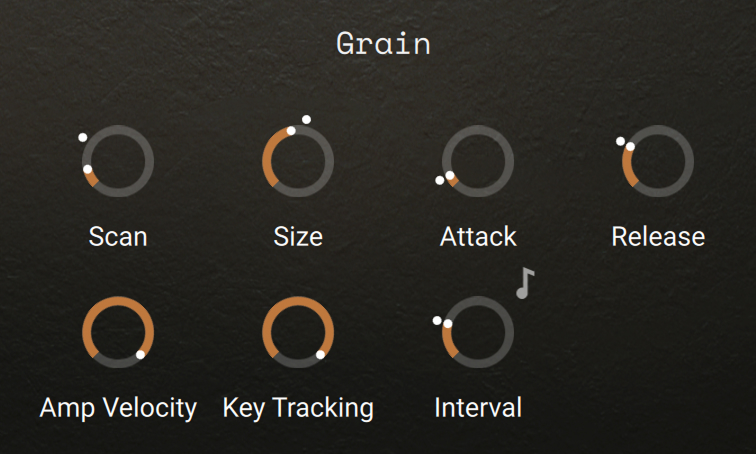 |
Scan: Adjusts the position in the source sample from which the grains are created. The position is set as percentage of the range between the left and right boundaries of the source sample.
Size: Adjusts the duration of each individual grain.
Attack: Adjusts the fade applied at the beginning of each grain. You can use this to soften the edges of the grains.
Release: Adjusts the fade applied at the end of each grain. You can use this to smoothen the release of the grains.
Amp Velocity: Adjusts how much the note velocity will affect the amplification level. At full left, the sounds will always have the same level no matter how strong you hit the keys. The more you turn the knob to the right, the stronger the note velocity will affect the level of the resulting sounds.
Key Tracking: Adjusts how much the note pitch will affect the pitch of the sounds. At full left, the sounds will always have the same pitch no matter which key you press on your keyboard. At full right, the sound pitches follow exactly the key pitches.
Interval: Adjusts the time between the generation of individual grains from the source sample.
Interval Sync (note icon): Allows you to set the Interval value relative to Kontakt’s main tempo, which is the tempo of your DAW if Kontakt or Kontakt Player is running as a plug-in.
Sample section (sample layers only)
The Sample section lets you configure the sampler engine of the layer.
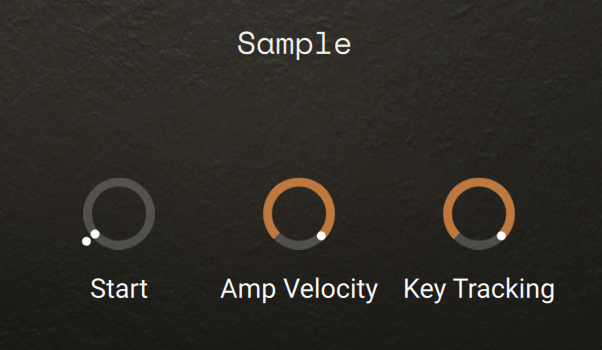 |
Start: Adjusts the start position of the playhead in the source sample.
Amp Velocity: Adjusts how much the note velocity will affect the amplification level. At full left, the sounds will always have the same level no matter how strong you hit the keys. The more you turn the knob to the right, the stronger the note velocity will affect the level of the resulting sounds.
Key Tracking: Adjusts how much the note pitch will affect the pitch of the sounds. At full left, the sounds will always have the same pitch no matter which key you press on your keyboard. At full right, the sound pitches follow exactly the key pitches.
Fragment section (grain and sample layers only)
The Fragment section lets you split the audio into short fragments and modify their playback speed before reassembling them together.
The Fragment section contains the following controls:
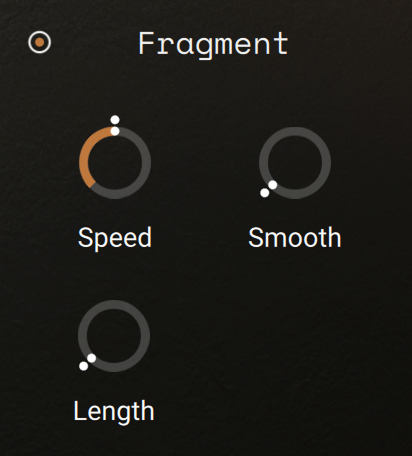 |
On/off switch: Activates or deactivates the section. When deactivated, the section does not process the audio.
Speed: Changes the playback speed of the fragments. This value is displayed as a percentage of the original speed, so 200 % doubles the playback speed, while 50 % halves it. The control goes all the way down to 0%, which freezes the sound at its current playback position.
Smooth: In order to reduce artifacts during playback, the fragments are crossfaded into each other. This control adjusts the shape of these very short crossfades. Higher values will result in a smoother sound, while lower values will generate a buzzing sound.
Length: Adjusts the size of the fragments in milliseconds.
Wavetable section (wavetable layers only)
The Wavetable section lets you configure the wavetable engine of the layer.
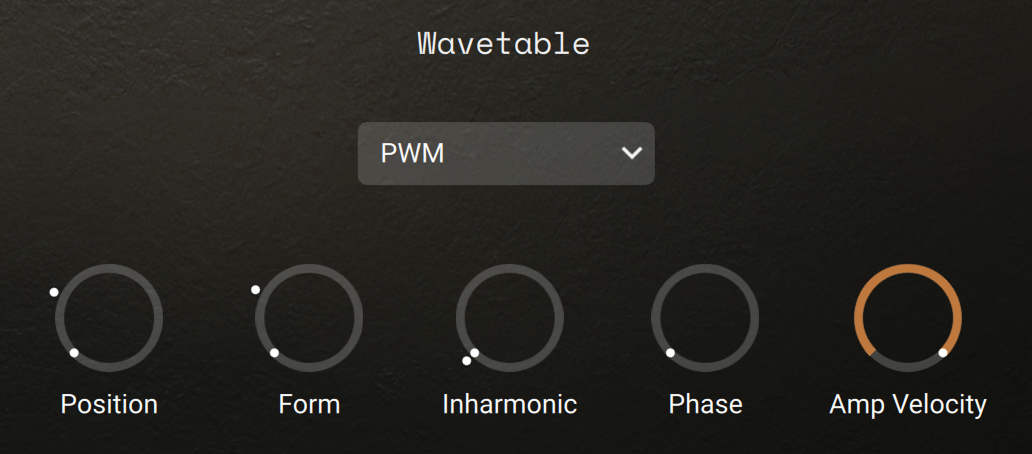 |
Type menu: Selects the type of wave shaping applied to the oscillator's phase. This fundamentally changes the way the wavetable is read out, therefore bending and warping the resulting waveform.
Position: Morphs between the waveforms included in the loaded wavetable.
Form: Adjusts the amount of wave shaping applied to the oscillator’s phase. The type of wave shaping can be selected using the Type menu.
Inharmonic: Adjusts how far the partials are stretched away from the harmonic series.
Phase: Adjusts the reset point of the oscillator’s phase. This determines the sound’s start position in the waveform when a new note is triggered.
Amp Velocity: Adjusts how much the note velocity will affect the amplification level. At full left, the sounds will always have the same level no matter how strong you hit the keys. The more you turn the knob to the right, the stronger the note velocity will affect the level of the resulting sounds.
Lo-Fi section
The Lo-Fi section adds various digital artifacts like quantization noise or aliasing by reducing the audio quality.
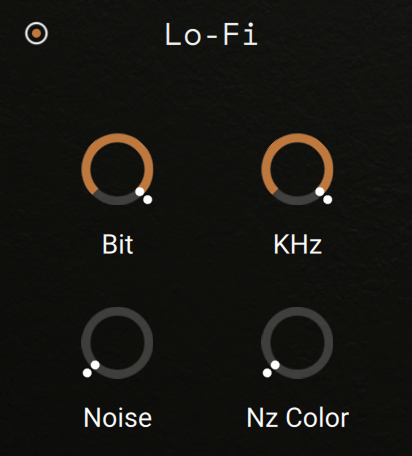 |
On/off switch: Activates or deactivates the section. When deactivated, the section does not process the audio.
Bit: Re-quantizes the signal to an adjustable bit depth. Fractional bit levels (such as 12.4 bits) are possible and can add considerable “grit”. Audio CDs have a quantization depth of 16 bits, old samplers frequently used 8 or 12 bits, and 4 bits evoke memories of countless irritating children’s toys.
KHz: Re-samples the signal to an adjustable sample rate. The re-sampling is done without any kind of (usually mandatory) low-pass filtering, which causes all kinds of wonderful aliasing artifacts. The sample rate goes all the way down to 50 Hz, which will not leave much of the original signal.
Noise: Adds hiss to the sound.
Nz Color: Adjusts the frequency characteristic of the noise and acts as a low-pass filter.
Harmonic Resonator section
The Harmonic Resonator section provides an advanced filtering with three separate bandpass filters (H1, H2, H3). Each filter band has a slope of 12 dB/octave. In addition, at high Resonance values the filter will begin to oscillate and produce sound, even if there is no signal present at the input. This effect is known as self-oscillation.
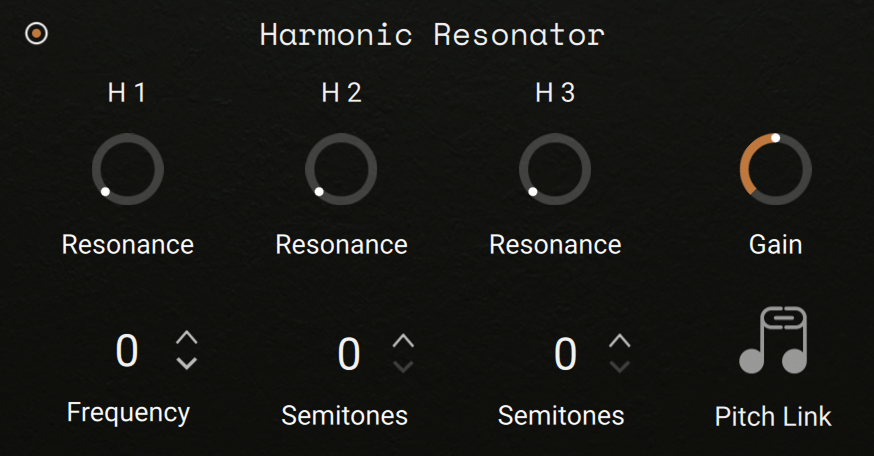 |
On/off switch: Activates or deactivates the section. When deactivated, the section does not process the audio.
H1 Frequency: Adjusts the cutoff frequency of the first filter band (H1), which directly affects the cutoff frequencies of the three filter bands in unison, since the other two bands have cutoff frequencies defined relative to this one. The cutoff frequency is measured in octaves relative to the pitch of the played key. The available values range from -3 to +3 octaves.
H2 Semitones: Adjusts the cutoff frequency of the second filter band (H2) in semitones as an offset in relation to the first band (H1). With a value of 0, both filters will have identical cutoff frequencies, while increasing the value will set the second cutoff frequency higher than the first. The available values range from 0 to 60 semitones.
H3 Semitones: Adjusts the cutoff frequency of the third filter band (H3) in semitones as an offset in relation to the second band (H2). With a value of 0, both filters will have identical cutoff frequencies, while increasing the value will set the third cutoff frequency higher than the second. The available values range from 0 to 60 semitones.
H1, H2, H3 Resonance: These adjust the resonance (boost at the cutoff frequency) for each filter band. Values of 98 % or higher will result in self-oscillation.
Gain: As high resonance settings can significantly increase the signal level, the instrument will automatically reduce the output level in such cases. You can compensate this with the Gain control, but be careful: It is easy to get excessive volume levels from this filter.
Pitch Link: When this is active, the cutoff frequencies of the three filter bands will follow the global pitch of the layer, as set by the Pitch and Detune controls in the Main section.
Filter section
At the bottom right of the Layers page, the Filter section lets you process the layer sound using one of many available filters.
The Filter section contains the following elements:
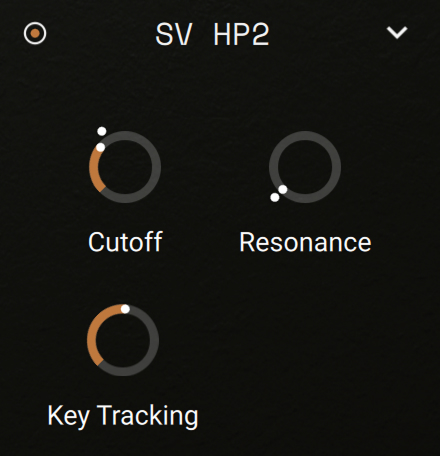
On/off switch: Activates or deactivates the section. When deactivated, the section does not process the audio.
Filter menu: Shows the name of the current filter at the top of the slot. You can click that name and choose another filter from the menu, or select None to leave the slot empty.
Filter parameters: The filter parameters vary with the selected filter. You can find a list of the available filters and a description of their parameters in Filter reference.
FX Bus section
The FX Bus section is the last step of the sound on the Layers page. Here you can choose which of the two available effect chains A or B should process the layer’s sound.
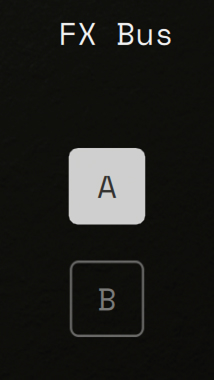 |
The FX Bus section contains only one element:
A/B Bus switch: Selects the effect bus A or B to which the layer’s signal will be routed.
You can choose and configure the effects loaded into each effect chain using the FX page.