Lores Overview
The Main page of Lores provides key parameters and performance controls that enable you to play and tweak presets.
Once you have completed the installation and loaded Lores in KONTAKT, you can start playing the Instrument. Lores opens with the Main page, which provides key parameters and performance controls that enable you to play and tweak presets. With only a few controls and options, you can quickly create an abundance of inspirational sounds.
Lores is built around three Instruments that you can interact with. At the top of the Main page, the Instrument Inspector controls various aspects of each Instrument and allows you to select Instrument presets. Here you can solo Instruments, lock them, so they don't change when new presets are selected, or completely deactivate them if needed to reduce the load on your computer. In the middle of the page, the Instrument Stage lets you mix the sound of each Instrument on an XY pad using your mouse. If you double-click the XY pad, you can open the Layer Editing controls and customize Instruments to create your own presets. Finally, at the bottom of the page, the Performance Controls let you shape the sound of the preset and add expression while you are playing or recording into your DAW.
Lores contains the following key elements and controls:
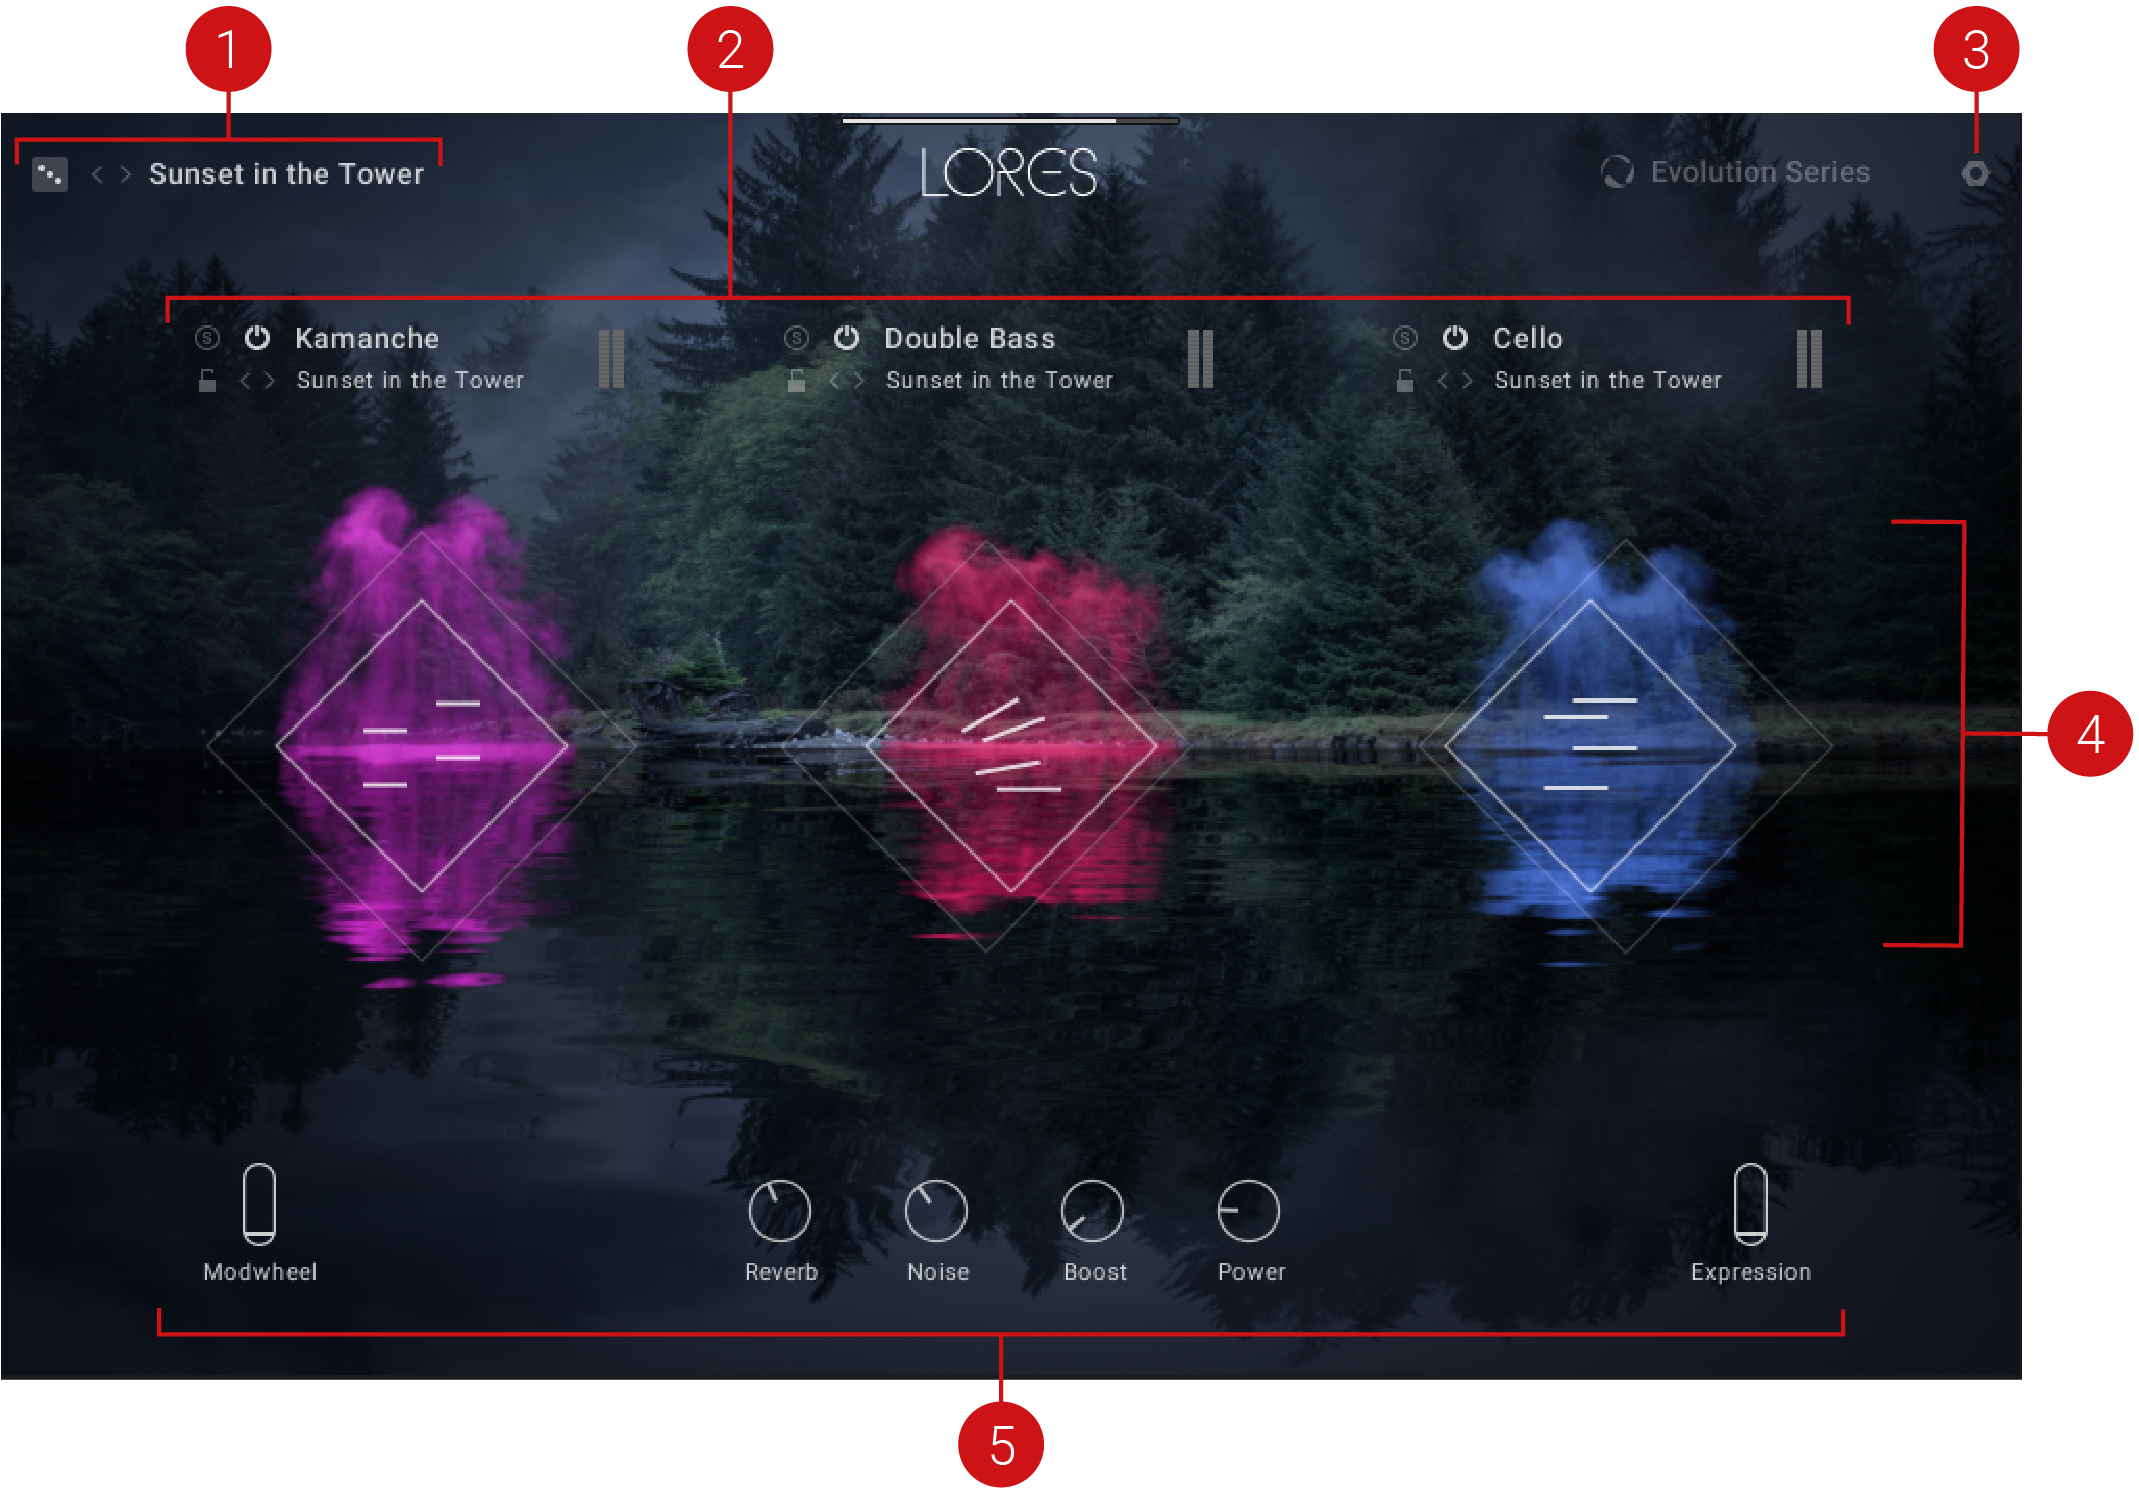
Main Preset Selector: Displays the name of the loaded preset, the randomize function, and the previous/next buttons. Use the previous/next buttons to quickly browse through presets or click the presets' name to open the Main Preset browser. Alternatively, try your luck and click the dice icon to select a preset at random. Refer to Main Preset Selector.
Instrument Inspector: Contains a set of controls for each Instrument that allow you to switch the Instrument on and off, solo, and try another Instrument preset by clicking the next and previous buttons. You can also open the Instrument browser to view all available instrument categories and presets by clicking the presets' name. Additionally, you can prevent an Instrument from changing by clicking the Lock icon. Refer to Instrument Inspector.
Settings: Opens and closes the Settings page. Here you can configure velocity and voicing settings that work best with your playing style. Refer to Settings.
Instrument Stage: Contains a set of mix controls for each of the three instruments mapped to an XY pad. By clicking an Instrument stage, you can open the Layer Editor and edit the sound and mapping of each Layer. Refer to Instrument Stage and Layer Editor.
Performance Controls: Provides a set of real-time sound controls that you can interact with while playing the Instrument. Refer to Performance Controls.
Main Preset Selector
The Main Preset selector lets you browse presets quickly using the previous/next buttons or by using the randomize function on the left.
The name of the selected preset is displayed at all times, and by clicking on it, you open the Main Preset browser. You can see all presets in the browser and filter them by categories or favorites. Refer to Main Presets Browser.
The Main Preset Selector contains the following key elements:
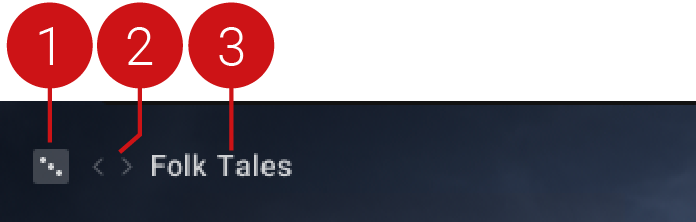 |
Randomize Preset: Loads a random preset from the selected category in the Main Preset browser. If any Instruments in the current preset are locked, then they will not change when selecting new presets. For more information on the Lock feature, refer to Instrument Inspector.
Previous/Next: Enables you to quickly step through the next or previous preset in the Main Preset browser. Refer to Main Presets Browser.
Preset Name: Displays the name of the selected preset. You can open the Main Preset browser by clicking the preset's name. Refer to Main Presets Browser.
Instrument Inspector
The Instrument Inspector contains a set of controls for each of the three Instruments within a preset. These controls allow you to switch the Instrument on and off, set it to solo, and view its volume level. In addition, you can experiment with other Instrument presets by clicking the next or previous arrows. If you click the Instrument preset name, it will open the Instrument browser to display all available instrument categories and presets.
Once you have selected an instrument you like, lock it by clicking the Lock icon, meaning that even if you change presets, the locked Instrument will not change. This is a great way to try different instrument combinations.
The Instrument Inspector contains the following elements and controls:
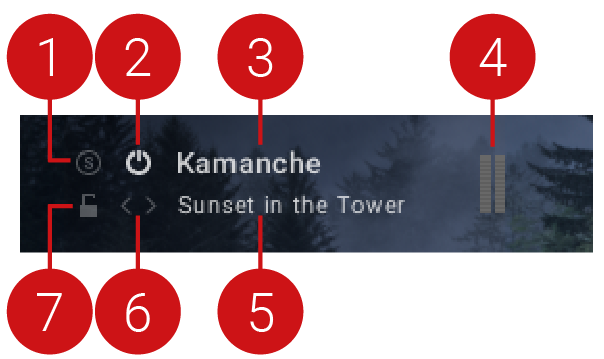 |
Solo: Solos the Instrument. Solo is useful when you only want to hear the Instrument you are editing.
Instrument On/Off: Activates or deactivates the selected Instrument.
Instrument Preset Selector: Displays the name of the loaded Instrument. Click the preset name to open the Instrument browser.
Volume Level: Displays the volume level of the Instrument.
Instrument Preset: Displays the name of the selected Instrument preset. An Instrument preset contains up to three Layers and is a convenient way to apply a set of Layers to an Instrument. Click the name of the Instrument preset to open the Instrument browser. Refer to Instrument Browser.
Previous/Next: Loads the previous or next Instrument preset from the Instrument browser. Refer to Instrument Browser.
Lock: Prevents the selected Instrument from being changed. When Lock is activated, the Instrument preset will not change when loading other presets or using Random. For more information on Random, refer to Main Preset Selector.
Instrument Stage
Each of the three Instruments contains an Instrument Stage, which allows you to mix the sound of each Instrument in real-time using an XY pad.
By clicking and dragging around the virtual stage on the XY pad, you can change the Instrument’s position in the room. Note that this process uses actual recordings of microphone positions, not artificial reverb. For example, if you move the bottom of the XY pad, the VR algorithm will favor the close and overhead microphones. Moving it to the top of the XY pad will favor the room and far microphones. By moving left and right, you can control the panning of the Instrument.
The Instrument Stage contains the following control:
 |
XY Pad: Controls the sound in real-time by clicking and dragging your mouse along the X and Y-axis.
Click and drag your mouse vertically to adjust distance.
Click and drag your mouse horizontally to adjust pan.
Performance Controls
The Performance Controls contain four knobs and two sliders preassigned to the most useful parameters that can embellish your playing. They are accessible at all times from the bottom panel and help define the sound. You can adjust them in real-time or automate them in your DAW to add more expression to your music.
The Performance Controls contain the following elements:

Modwheel: Controls the volume of the Instruments. Use this to add dynamic expression to a sound, for example, to create swells, quieter passages, or movement. Use the slider or the modulation wheel on your keyboard to adjust the level.
Reverb: Adjusts the return level of the Reverb effect. You can use this to simulate the natural sound of an acoustic space.
Noise: Adjusts the room noise level. This is useful if you want to add a little bit of grit to the sound.
Boost: Boosts low and high frequencies. This is great if you want to make the sound more pronounced in the mix.
Power: Adjusts the amount of parallel compression. Parallel compression is a form of upward compression achieved by mixing an unprocessed 'dry' or lightly compressed signal with a heavily compressed version of the same signal.
Expression: Fades Layers in or out. The triggering of individual Layers can be adjusted using the Mapping controls and is excellent for making more expressive sounds. Refer to Mapping.