FX page
Learn how to use Motion and audio effects in Playbox to transform your sounds. Use the modulation, Macros, and performance controls to create movement in your sound.
The FX page provides in-depth editing of the Effects Chain with its Motion and audio effects, enabling you to completely transform your sounds. Extensive modulation, Macros, and performance controls create movement in your sound.
The FX page contains the following elements and controls:
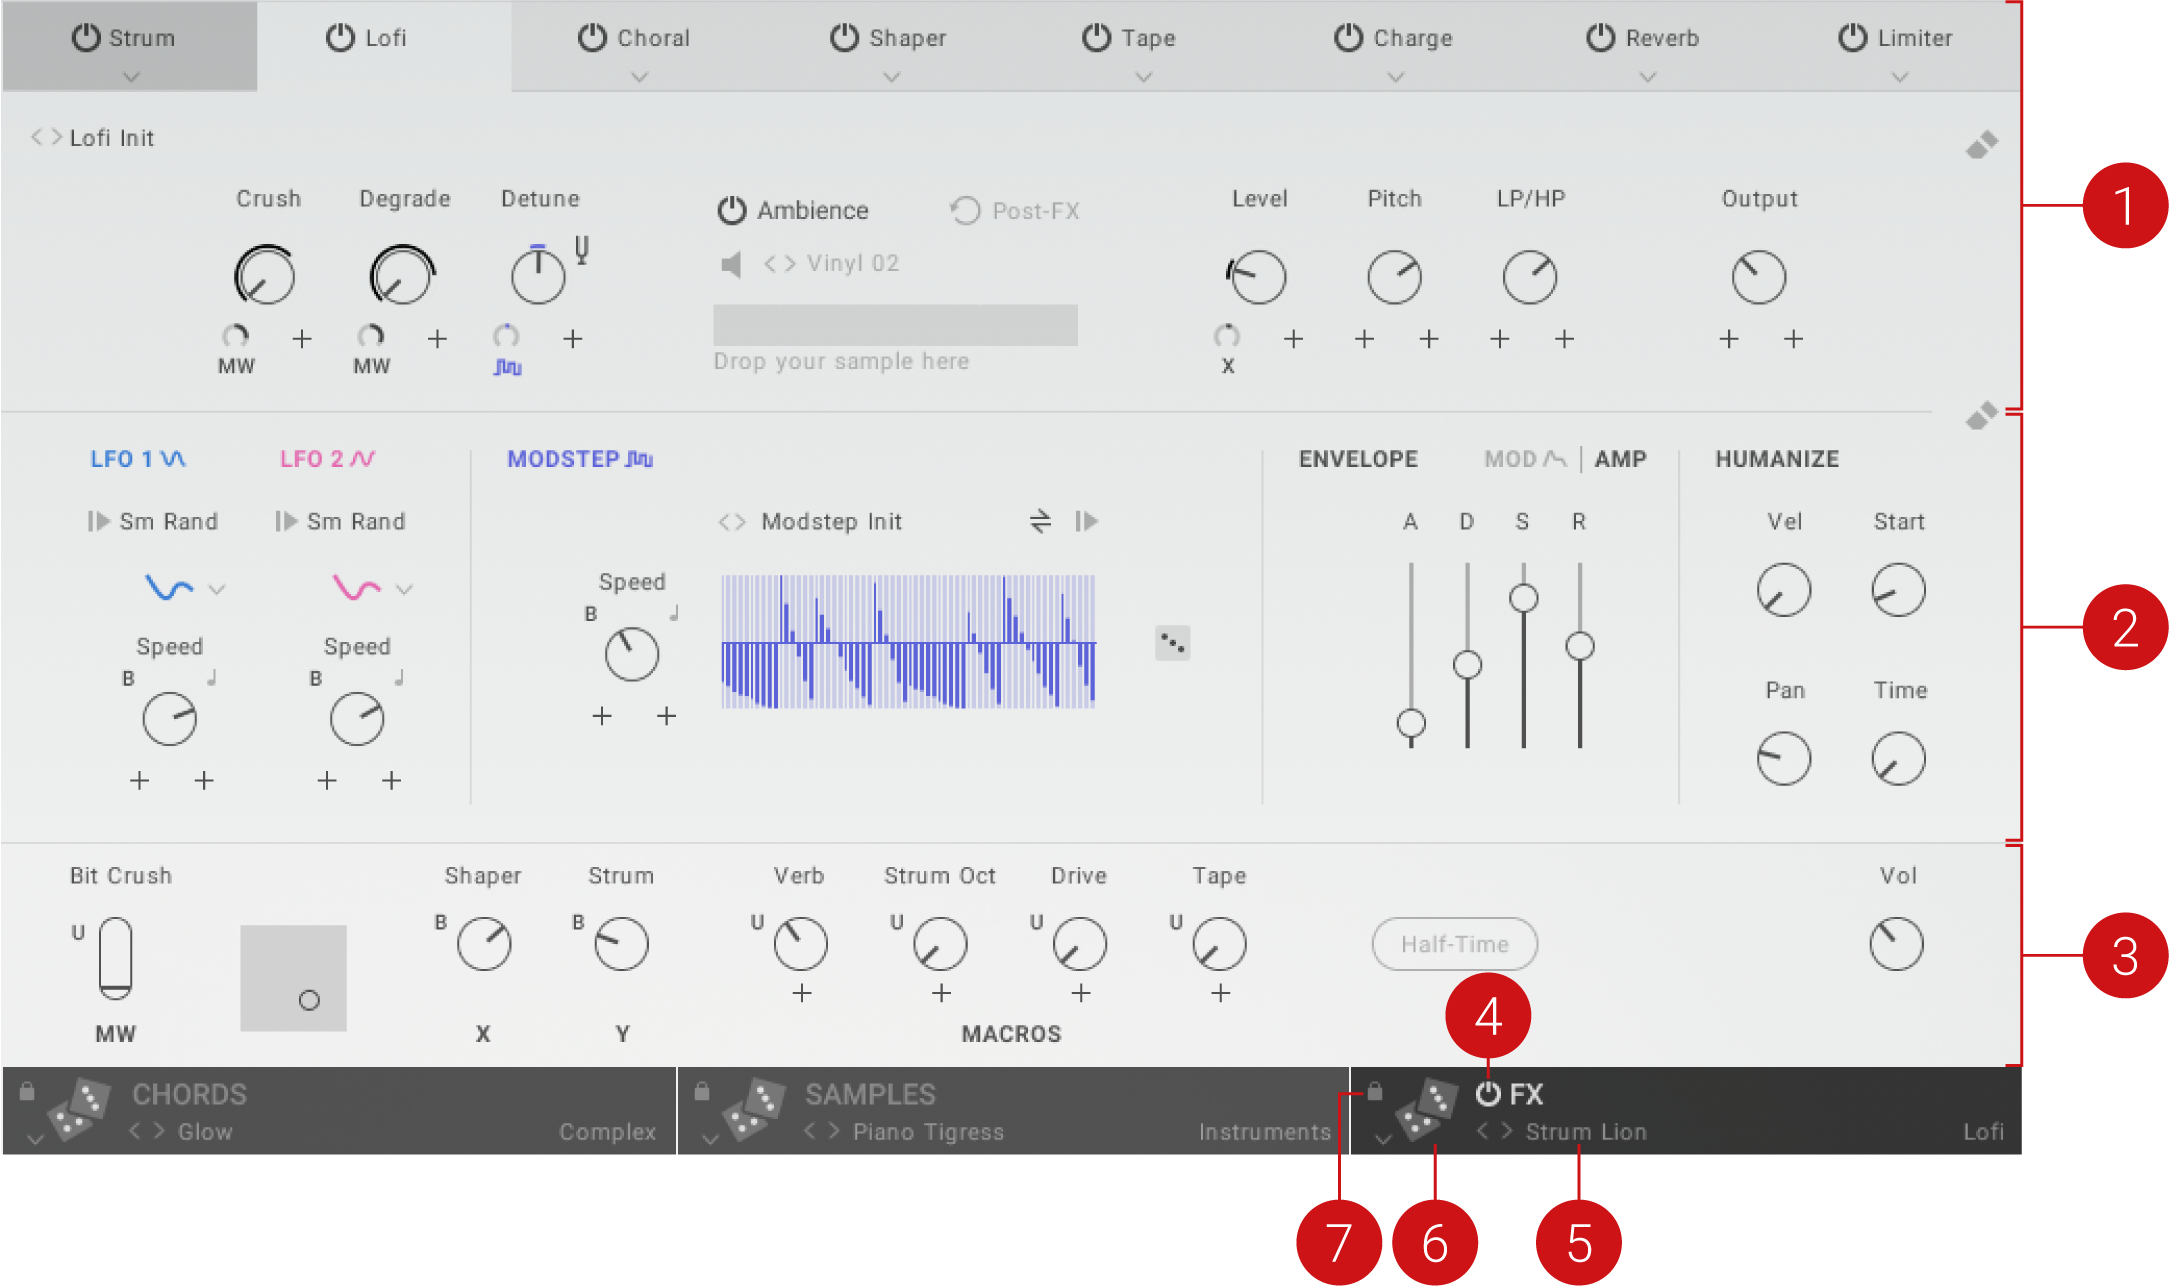
Effects Chain: The Effects Chain consists of the Motion and audio effects, which are organized in eight effect slots and can be applied in various combinations. For more information, refer to Effects Chain.
Modulators: Consists of a variety of different modulation sources that can be applied to effect parameters, and the Humanize function that brings life to key aspects of the sound. For more information, refer to Modulators.
Macros and Performance Controls: Consists of the Macros as well as performance controls like the modulation wheel and the XY pad. For more information, refer to Macros and performance controls.
FX On/Off: Switches all effects on the FX page on or off. When switched off, the effects are bypassed and do not affect the sound.
FX Set Selector: Enables you to quickly load FX Sets. You can switch between Sets using the left and right arrow buttons, or click on the selector to open the FX Sets browser.
Randomize FX Set: Loads a random Set from the selected category in the FX Sets browser. By default, the All category is selected, making all Sets available for randomization.
Lock FX Set: Locks the FX Set and excludes it from the Randomize Sets function on the Main page. Therefore it will be preserved when randomizing Sets.
Effects Chain
The Effects Chain consists of the Motion and audio effects, which are organized in eight effect slots and can be applied in various combinations. Each of the effect slots offers in-depth editing of effect parameters.
To select an effect slot for editing, click on the corresponding tab in the Effect Chain's header.
The Effects Chain contains the following key elements and controls:
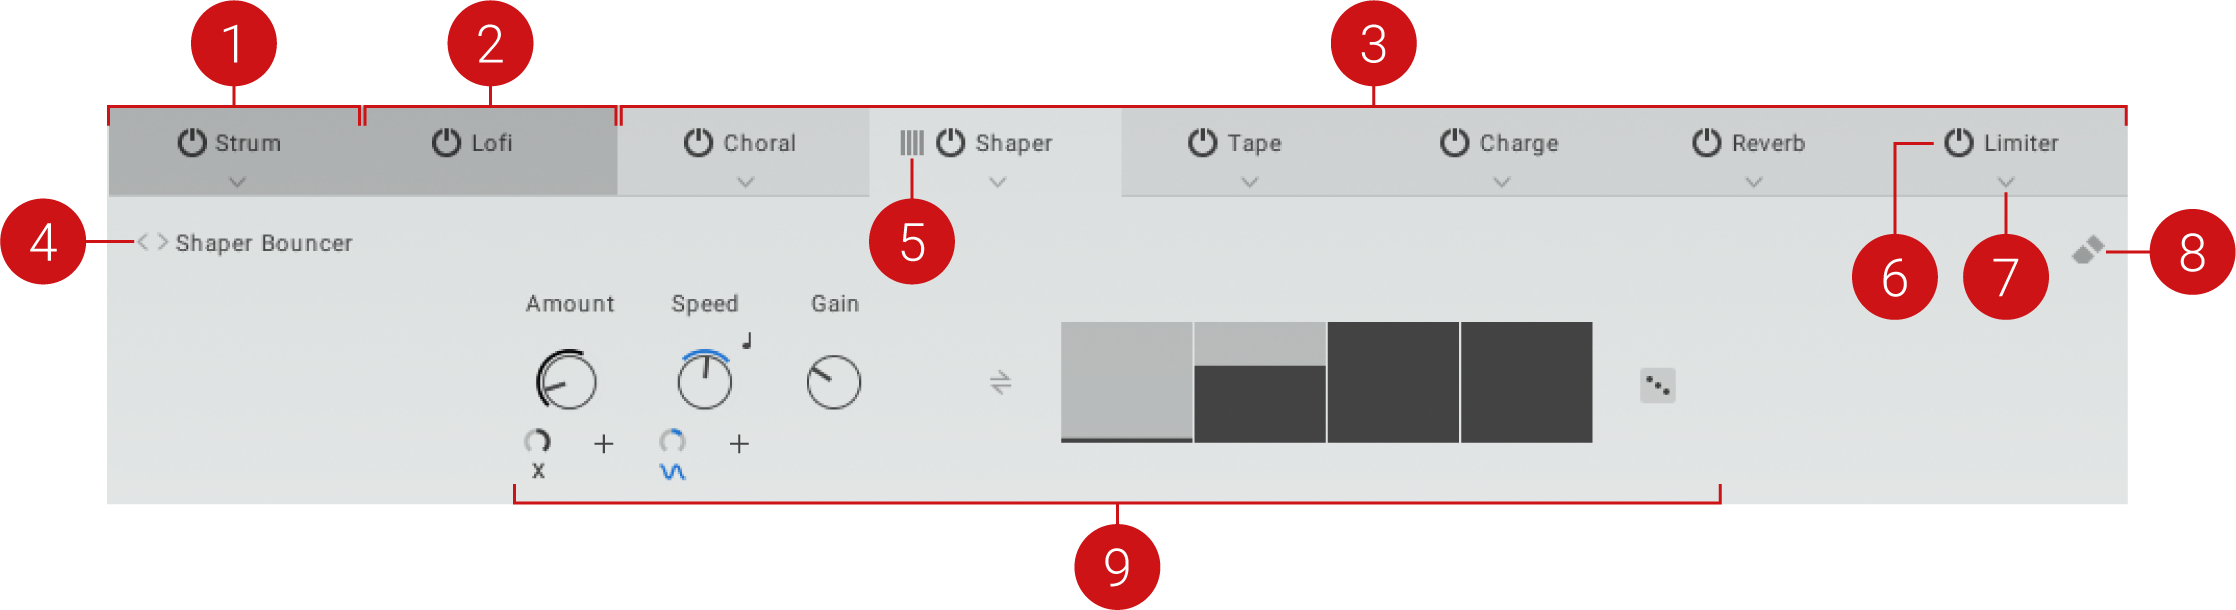
Motion Effects: The three Motion effects, Arp, Strum, and Grain, add rhythm and articulation to your sound. Their position in the Effects Chain is fixed at the first effect slot. For more information, refer to Motion effects.
Lofi Audio Effect: This special audio effect adds grit, texture, and ambience to your sound. Its position in the Effects Chain is fixed at the second effect slot. For more information, refer to Lofi.
Audio Effects: A selection of 15 different audio effects can be loaded in six effect slots. Their position in the Effects Chain can be changed freely. For more information, refer to Audio effects.
Effect Preset Selector: Enables you to quickly load settings for the effect loaded in the selected effect slot. You can switch between presets using the left and right arrow buttons, or click on the selector to open a drop-down menu.
Change Order: Changes the position of the respective effect slot in the Effects Chain when clicked and dragged left or right.
Effect On/Off: Switches the respective effect slot on or off. When switched off, the effect is bypassed and does not affect the sound.
Effect Selector: Opens a drop-down menu that enables you to select the audio effect for the respective effect slot. For more information about the available effects, refer to Audio effects.
Clear FX Mod: Removes all modulation assignments from the selected effect slot. For more information, refer to Modulation assignments.
Effect Editor: Enables you to change the parameters and settings of the effect loaded in the selected effect slot.
Motion effects
The three Motion effects, Arp, Strum, and Grain, add rhythm and articulation to your sound. As MIDI effects, they alter the notes you play in real time to add expression and excitement.
Arp
Arp is a classic arpeggiator that is applied to the notes contained in the Chord Set. When you press a single key to play a chord, Arp will play a sequence of the respective notes and their corresponding samples. The sequence will be played back in a loop for as long as you press the key.
Arp contains the following parameters:

Pattern Selector: Selects the type of sequence. Each pattern contains a different rhythm and succession of pitches.
Speed: Adjusts the rate at which the sequence is played back. When Sync is activated, Speed is set in note lengths relative to the tempo of the DAW.
Sync: Synchronizes Speed to the tempo of the DAW.
Length: Adjusts the lengths of the individual notes in the sequence.
Swing: Adjusts the amount of swing, or shuffle, applied to the rhythm of the sequence.
Octave: Adjusts the range of the distribution of notes in octaves.
Strike: Adjusts the number of consecutive repetitions of each note in the sequence.
Strum
Strum is a special arpeggiator that is applied to the notes contained in the Chord Set. When you press a single key to play a chord, Strum will play a sequence of the respective notes and their corresponding samples. Contrary to an arpeggiator, the sequence will only play once after pressing a key, emulating the sound of strumming a string instrument.
Strum contains the following parameters:

Pattern Selector: Selects the type of sequence. Each pattern contains a different rhythm and succession of pitches.
Speed: Adjusts the rate at which the sequence is played back. When Sync is activated, Speed is set in note lengths relative to the tempo of the DAW.
Sync: Synchronizes Speed to the tempo of the DAW.
Length: Adjusts the lengths of the individual notes in the sequence.
Swing: Adjusts the amount of swing, or shuffle, applied to the rhythm of the sequence.
Octave: Adjusts the range of the distribution of notes in octaves.
Grain
Grain is a special MIDI effect that fundamentally changes how the chords are played. Inspired by granular synthesis, it generates a huge number of MIDI events that trigger the notes and samples in exciting new ways. The MIDI events effectively turn the sound into small pieces of sound, also called grains. The playback of the grains can be altered in terms of speed, size, and various other parameters, enabling you to create a wide range of rhythmic and textural effects.
Tip
You can record the MIDI events generated by Grain in your DAW by selecting Kontakt's plug-in MIDI output as the input in a new MIDI track.
Grain contains the following parameters:

Speed: Adjusts the rate at which the grains are generated. When Sync is activated, Speed is set in note lengths relative to the tempo of the DAW.
Sync: Synchronizes Speed to the tempo of the DAW.
Start: Adjusts the sample start point of the grains.
Size: Adjusts the duration of the grains.
Shape: Adjusts the contour of the crossfade applied between grains. Turning the control from left to right changes the sound from percussive and textured to sustained and smooth.
Random Start: Adjusts the amount of randomization applied to the sample start position of each grain.
Random Velocity: Adjusts the amount of randomization applied to the note velocity, or level, of each grain.
Random Pan: Adjusts the amount of randomization applied to the stereo position of each grain.
Pitch: Adjusts the probability for grains to be played back at different pitches. Turning the control to the right increases the amount of pitch variation.
Octave: Adjusts the probability for grains to be played back in different octaves. Turning the control to the right increases the amount of octave variation.
Audio effects
The audio effects consist of 15 different effects can be loaded in six effect slots. The additional Lofi effect adds grit, texture, and pitch-shifting artifacts your sound.
Lofi
Lofi is a special audio effect that you can use to add grit, texture, and ambience your sound.
The Lofi effect contains the following parameters:

Crush: Adjusts the amount of bit reduction, or bit crushing, applied to the sound.
Degrade: Adjusts the amount of sample rate reduction applied to the sound.
Detune: Detunes the sound by means of pitch-shifting in the range of -12 to +12 semitones or -1000 to +1000 cents, depending on the setting of the Range button.
Range (tuning fork symbol): Switches the range of the Detune control from -12 to +12 semitones to -1000 to +1000 cents.
Ambience: Layers a sample containing textures and ambient noises onto the sound.
Ambience On/Off: Switches the effect on or off.
Post-FX: Changes the audio routing, effectively moving the Ambience effect to the end of the Effects Chain.
Restart: Restarts the sample at the start of each note. When deactivated, the sample playback continues at the last position.
Ambience Selector: Selects the type of texture or ambient noise.
Sample Import: Imports your own sample. You can drag and drop a sample onto the gray area to import it.
Level: Adjusts the volume level of the sample.
Pitch: Adjusts the pitch of the sample.
LP/HP: Adjusts the timbre of the sample from dark to bright. Turning the control to the left adds low-pass filtering to the sound. Turning the control to the right adds high-pass filtering to the sound.
Output: Adjusts the output level of the Lofi effect.
Delay
The Delay effect is based on the Replika XT delay plug-in. It provides presets for five different modes (Modern, Analog, Tape, Vintage and Diffusion) that add distinct colour to your sound. It offers controls for Amount, Time, Feedback, Low Cut and High Cut filters, and Ping Pong.
The Delay effect contains the following parameters:

Preset Selector: Enables you to quickly browse and load presets. You can switch between presets using the left and right arrow buttons, or click on the selector to open a drop-down menu. The name of the currently loaded preset is displayed.
Amount: Blends between the input signal and the effect signal.
Time: Adjusts the delay time in milliseconds.
Sync (crotchet symbol): Synchronizes Time to your host tempo. Click the crotchet symbol to sync the delay time, and turn the knob to select a note length value.
Feedback: Adjusts the level of the signal that is fed back to the delay's input. Increasing Feedback adds delay repeats. Levels above 100% create swelling echo repeats up to self-oscillation.
Low Cut: Cuts low-frequency content in the feedback path of the delay with a non-resonant filter. Turned fully counter-clockwise, the filter is off.
High Cut: Cuts high-frequency content in the feedback path of the delay with a non-resonant filter. Turned fully clockwise, the filter is off.
Ping Pong: Switches the Ping Pong effect on and off. When on, the delay repeats are panned hard left and right in an alternating pattern.
Reverb
This algorithmic Reverb effect offers Room and Hall presets. Room sounds generate a natural reverb with strong initial reflections and a quick decay. You can use this to simulate the natural sound of a small acoustic space. With a faster reverberation time, it is particularly suited to drums and guitars.
Hall presets emulate the immensity of a large hall space, with a warm and rich sounding reverb. This can be used to replicate a vast, natural space. The large reverberation and long decay time make it a great tool to experiment with on a variety of sounds.
The Reverb effect contains the following parameters:

Preset Selector: Enables you to quickly browse and load presets. You can switch between presets using the left and right arrow buttons, or click on the selector to open a drop-down menu. The name of the currently loaded preset is displayed.
Amount: Adjusts the amount of reverb applied to the signal.
Size: Adjusts the size of the room simulated by the reverb effect. Higher values replicate larger rooms.
Time: Adjusts the duration of the reverb effect.
Low Shelf: Attenuates or amplifies the low-frequency content of the reverb signal.
High Cut:: Cuts the high-frequency content of the reverb signal.
Shaper
The Shaper is a modulation effect that enables you to draw shapes to produce custom modulation signals. The Shaper contains Amount, Speed, and Gain controls, as well as Pendulum and Randomize buttons for added versatility.
The Shaper contains the following parameters:

Preset Selector: Enables you to quickly browse and load presets. You can switch between presets using the left and right arrow buttons, or click on the selector to open a drop-down menu. The name of the currently loaded preset is displayed.
Amount: Adjusts the amount of Shaper effect applied to the signal. Turning the knob right increases the amount of the effect, in a range from 0% to 100%.
Speed: Adjusts the frequency of the modulation. When Sync is activated, Speed is set in note lengths relative to the tempo of the DAW.
Sync (crotchet button): Synchronizes Speed to your host tempo. Click the crotchet button to sync the modulation speed, and turn the knob to select a note length value.
Gain: Adjusts the amplification or attenuation value applied to the signal in dB.
Pendulum: Activates Pendulum mode for the Shaper playback. When activated, the Shaper runs forward and backward in an alternating pattern.
Shaper Editor: Shows and edits the contents of the Shaper. You can adjust the steps by right-clicking in the Shaper editor and dragging up and down. By dragging left and right, you can adjust multiple steps at the same time.
Randomize: Loads randomized Shaper settings into the Shaper editor.
Choral
Choral is inspired by synthesizers and studio rack processors from the seventies and early eighties, with enhanced parameter controls that allow you to customize the effect with minimal effort. Chorus effects are used to enrich sounds by adding spatial movement and giving them an ensemble-like quality. They can add space and body to the sound as if it was played from multiple sources at the same time. The results range from subtle shifts in timbre to extremely lively textures with a wide stereo image.
The Choral effect contains the following parameters:

Preset Selector: Enables you to quickly browse and load presets. You can switch between presets using the left and right arrow buttons, or click on the selector to open a drop-down menu. The name of the currently loaded preset is displayed.
Amount: Blends between the input signal and the effect signal by means of an equal-power crossfade.
Speed: Adjusts the speed of modulation, from slow pitch changes to fast vibratos. This becomes more pronounced as the Amount is increased.
Modulation: Adjusts the amount of modulation applied to the Delay, altering the delay times of the chorus voices. Due to the configuration of the delays, this also changes the pitch of the chorus voices, creating the typical chorusing effect.
Width: Pans the chorus voices in opposite directions, widening the stereo image. When Width is set to 0, the stereo image of the input is preserved.
Delay: Adjusts the delay times of the chorus voices, allowing you to change the spatial depth of the sound. This parameter strongly interacts with Feedback.
Feedback: Adjusts the level of the feedback signals from the outputs of the chorus voices to their inputs, creating a more sustained and spacious sound.
Flair
Flair is a new take on the flanger effect, with additional features that allow for more sophisticated and extreme sounds than possible with common flangers. Flangers are used to enrich sounds by adding distinct harmonic effects that can completely transform a sound. They are based on comb filters, with built-in modulation of the comb filter frequency. A comb filter consists of an extremely short delay with feedback that produces harmonically related peaks and notches in the frequency spectrum. This way a flanger adds dramatic filtering effects and resonances to the sound. The results range from metallic textures to the warped sound of a starting jet engine.
The Phasis effect contains the following controls:

Preset Selector: Enables you to quickly browse and load presets. You can switch between presets using the left and right arrow buttons, or click on the selector to open a drop-down menu. The name of the currently loaded preset is displayed.
Amount: Blends between the input signal and the effect signal. When the control is turned fully left, only the dry input signal is heard.
Speed: Adjusts the frequency of the modulation applied to the effect. The modulation becomes more pronounced as the Amount is increased. When Speed Sync is activated, modulation is synchronized to the host and the Speed knob.
Sync (crotchet button): Synchronizes Speed to your host tempo. Click the crotchet button to sync the modulation speed, and turn the knob to select a note length value.
Modulation: Adjusts the amount of modulation applied. Turning the knob right increases the amount of modulation and movement in the flanging effect.
Width: Duplicates the flanger voices internally and pans them in opposite directions. A wide and lively stereo image is created by adding a phase offset to the modulation applied between the left and right stereo channels. Additionally, a special type of cross-feedback is introduced, further animating the stereo image as Feedback is increased.
Damping: Attenuates the high frequency content of the feedback signals from the outputs of the flanger voices to their inputs, allowing for soft sounds even at high Feedback settings.
Feedback: Adjusts the level of the feedback signals from the outputs of the flanger voices to their inputs, creating a more resonant and metallic sound.
Phasis
Phasers are used to enrich sounds by adding spectral animation and complex filtering. They are based on a series of all-pass filters, with built-in modulation of the filter’s frequencies. The all-pass filters produce peaks and notches in the frequency spectrum that can be altered over time, transforming and animating the harmonic structure of the sound.
Phasis is a new take on the concept with additional features that have been carefully chosen to allow for more sophisticated and extreme sounds than possible with common phasers, while staying true to the ease of use associated with these devices.
The Phasis effect contains the following parameters:

Preset Selector: Enables you to quickly browse and load presets. You can switch between presets using the left and right arrow buttons, or click on the selector to open a drop-down menu. The name of the currently loaded preset is displayed.
Amount: Adjusts the amount of modulation applied to Center and Spread, adding movement to the phasing effect.
Speed: Adjusts the frequency of the modulation applied to the effect. The modulation becomes more pronounced as the Amount is increased. When Speed Sync is activated, modulation is synchronized to the host and the Speed knob.
Sync (crotchet button): Synchronizes Speed to your host tempo. Click the crotchet button to sync the modulation speed, and turn the knob to select a note length value.
Mix: Blends between the input signal and the effect signal. When the knob is turned fully left, only the dry input signal is heard.
Notches: Sets the number of peaks and notches in the frequency spectrum.
Feedback: Adjusts the amount of feedback, or resonance, applied to the all-pass filters that create the phasing effect. Turning the knob right will increase the Feedback, making the peaks and notches in the frequency spectrum more pronounced.
Center: Shifts the peaks and notches in the frequency spectrum by changing the frequencies of the all-pass filters that create the phasing effect (relative to the Center frequency).
Spread: Adjusts the density of the peaks and notches in the frequency spectrum. Turning the knob left moves the peaks and notches closer to each other. Turning the knob right moves the peaks and notches further apart from each other.
Filter I
A filter is a signal processor that changes the frequency content of a signal that passes through it. The Filter I effect contains Low Pass, High Pass, Band Pass, Formant and Vowel presets.
Filter I contains the following parameters:

Preset Selector: Enables you to quickly browse and load presets. You can switch between presets using the left and right arrow buttons, or click on the selector to open a drop-down menu. The name of the currently loaded preset is displayed.
Cutoff: Adjusts the cutoff frequency of the filter.
Reso (Resonance): Boosts a small frequency range around the cutoff frequency when a value greater than 0 is selected.
Filter II
A filter is a signal processor that changes the frequency content of a signal that passes through it. The Filter I effect contains Low Pass, High Pass, Band Pass, Formant and Vowel presets.
Filter II contains the following parameters:

Preset Selector: Enables you to quickly browse and load presets. You can switch between presets using the left and right arrow buttons, or click on the selector to open a drop-down menu. The name of the currently loaded preset is displayed.
Cutoff: Adjusts the cutoff frequency of the filter.
Reso (Resonance): Boosts a small frequency range around the cutoff frequency when a value greater than 0 is set
EQ
The EQ effect is a fully parametric peak equalizer allowing for a wide range of tonal alterations and corrections. Using up to three EQ bands per module, you can boost or cut any frequency range throughout the entire spectrum by up to 18 dB, with an adjustable Width parameter allowing you to choose between soft fades for gentle corrections or steep slopes for surgical edits.
The EQ contains the following parameters:

Preset Selector: Click the name to open the preset menu or click the arrows to load the previous/next available preset.
Freq (Frequency): Adjusts the center frequency at which the boost or cut will occur.
Width (Bandwidth): Adjusts the width of the frequency range that will be affected in octaves.
Gain: Adjusts the amount of boost (positive values) or cut (negative values) at the center frequency.
Punch
Punch is an easy to use compressor designed to control the attack and sustain of a sound. Instead of following the amplitude of the sound like a traditional compressor, it follows the general envelope and is thus not as susceptible to changes in input gain. The Punch effect is designed primarily for sounds with fast attacks, like drums, percussion, pianos or guitars.
The Punch effect contains the following parameters:

Preset Selector: Enables you to quickly browse and load presets. You can switch between presets using the left and right arrow buttons, or click on the selector to open a drop-down menu. The name of the currently loaded preset is displayed.
Input: Controls the input gain to the effect.
Attack: Adjusts the scaling of the attack portion of the input signal’s volume envelope. Turning the knob right (0% to 100%) will add more punch, and turning the knob left (0% to -100%) will reduce sharp attacks.
Sustain: Controls the scaling of the sustain portion of the input signal’s volume envelope. Increasing this parameter will add more body to the sound and decreasing it will reduce the sound’s tail.
Output: Sets the output level of the effect in dB. For dynamic effects like compressors, this is very important.
Comp
The Compressor is a dynamic tool which reduces the level of loud passages in a signal, thereby affecting the signal’s dynamic range. It is invaluable for many common tasks, allowing you to reduce level peaks, thereby increasing the average volume of a signal. By careful adjustment of the attack and release times, the compressor can also modify signal transients, adding punch to weak-sounding drums or taming exaggerated clicking in percussion sounds. Too much compression can result in a rather strained and weak sound.
The Compressor effect contains the following parameters:

Preset Selector: Enables you to quickly browse and load presets. You can switch between presets using the left and right arrow buttons, or click on the selector to open a drop-down menu. The name of the currently loaded preset is displayed.
Thresh.: Sets a threshold level above which the Compressor starts working. Only levels that rise above this threshold will be reduced by the compression; signals that stay below it will be left unprocessed.
Attack: Adjusts the time the Compressor will take to reach the full compression after an input signal exceeds the Threshold level. If you’re using compression mainly for transparent dynamic reduction, values between 5 and 10 ms are a good starting point. Longer attack times can be useful for emphasizing transients and adding punch to a signal.
Release: Adjusts the time the compressor will take to fall back to non-compression after the input signal falls below the threshold. Typical values range from 50 to 250 ms.
Ratio: Controls the amount of compression, expressed as a ratio of input level change against output level change. A Ratio of 1:1 results in no compression. A Ratio of 2:1 means that a level increase of 2 dB at the input will raise the output level by only 1 dB. A 4:1 Ratio results in more aggressive compression, with a 4 dB level increase at the input causing a 1 dB increase at the output.
Makeup: Compensates for the gain reduction of the effect. Use the make-up gain control to bring the output signal up to the same peak level as the input signal after compression. Once you have found a compression setting, adjust the input and output signals so they have comparable levels.
Mix: Controls the dry/wet mix of the compressor. This can be used to create a parallel compression style routing, which increases the quieter signals rather than reducing the louder ones. At a setting of 100% you will only hear the compressed signal; at a setting of 0% you will only hear the unprocessed input signal.
Output: Controls the output level of the effect.
Limiter
The Limiter can be used to tame signal peaks that would otherwise overload the output, without requiring you to turn the overall signal volume down. You can think of a limiter as a special form of compressor, with a ratio of one to infinity, a threshold just below the maximum level, and a very short attack time. While compressors have a range of artistic applications, limiters are typically used for technical reasons.
The Limiter contains the following parameters:

Preset Selector: Enables you to quickly browse and load presets. You can switch between presets using the left and right arrow buttons, or click on the selector to open a drop-down menu. The name of the currently loaded preset is displayed.
Threshold: Sets the threshold at which the limiter begins to affect the input signal. To prevent the signal from clipping, leave the Threshold at 0 dB. To make the signal louder, reduce the Threshold value by turning the control to the left. The Threshold can be set in the range from -40.0 dB to 0.0 dB.
Release: Adjusts the length of the release phase, which determines how long it takes for the limiter to stop after the input signal falls below the Threshold level. The Release can be set in the range from 1.0 ms to 500.0 ms.
Ceiling: Sets the maximum output level of the limiter in dB. The Ceiling can be set in the range from -40.0 dB to -0.3 dB.
Tape
Tape saturation emulates the soft compression and distortion of recording to tape. The Tape effect can be used to add subtle warmth and coloring to a sound, or heavy, aggressive distortion.
The Tape effect contains the following parameters:

Preset Selector: Enables you to quickly browse and load presets. You can switch between presets using the left and right arrow buttons, or click on the selector to open a drop-down menu. The name of the currently loaded preset is displayed.
Gain: Controls the input gain of the effect. This will increase the amount of tape distortion and compression.
Warmth: Controls the low frequency boost/cut of the effect.
HF Rolloff: Controls the high frequency rolloff starting frequency. Frequencies above this point will be attenuated.
Output: Controls the output level of the effect.
Charge
The Charge effect offers high-end tube compression emulation, inspired by boutique hardware. It is a particularly musical compressor that allows you to apply subtle harmonic and spatial enhancement as well as heavy and aggressive tube drive.
Compressor tools affect both the dynamic range and color of a signal. They can be used to tame level peaks, but can also add coloration, character and warmth to a signal, which is especially inherent with tube-style compressors.
The Charge effect contains the following parameters:

Preset Selector: Enables you to quickly browse and load presets. You can switch between presets using the left and right arrow buttons, or click on the selector to open a drop-down menu. The name of the currently loaded preset is displayed.
Input: Adjusts the input gain to the compressor in dB. The ideal setting of the Input is indicated by the Input Level Meter.
Saturation: Applies saturation to the signal. Turn the control right to apply more saturation.
Compress: Determines the amount of compression applied to the input signal. The higher the value, the more compression is applied to the input signal.
Character: Changes the sound characteristic of the compression effect by applying equalization to the signal.
Mix: Controls the dry/wet mix of the compressor. This can be used to create a parallel compression style routing, which increases the quieter signals rather than reducing the louder ones. When the Mix control is set to 0%, only the uncompressed (dry) signal will be heard, and at 100%, only the compressed signal will be heard. Settings between the 0% and 100% are a mix of both signals.
Output: Controls the output level of the effect.
Stereo
The Stereo modeller effect allows you to control the width of your signal’s stereo base, change the panning, and create a pseudo-stereo signal from mono sources.
Stereo contains the following parameters:

Preset Selector: Enables you to quickly browse and load presets. You can switch between presets using the left and right arrow buttons, or click on the selector to open a drop-down menu. The name of the currently loaded preset is displayed.
Spread: Reduces or expands the signal’s stereo base. Turning the knob far left, will sum the stereo signals to mono. Turning the knob right to produce positive values will result in an artificial widening of stereo sources.
Pan: This control allows you to place your signal within the stereo field. It works exactly like the Pan control of the Amplifier module.
Modulators
The Modulators consist of a variety of modulation sources that can be applied to effect parameters. Modulation adds movement to your sound by changing parameters over time. Each modulator offers a different type of modulation, from periodic changes (LFO), to complex sequences (MODSTEP) and contours that follow note events (AMP and MOD envelopes). Additionally, HUMANIZE brings life to key aspects of each musical note.
The following Modulators and controls are available:
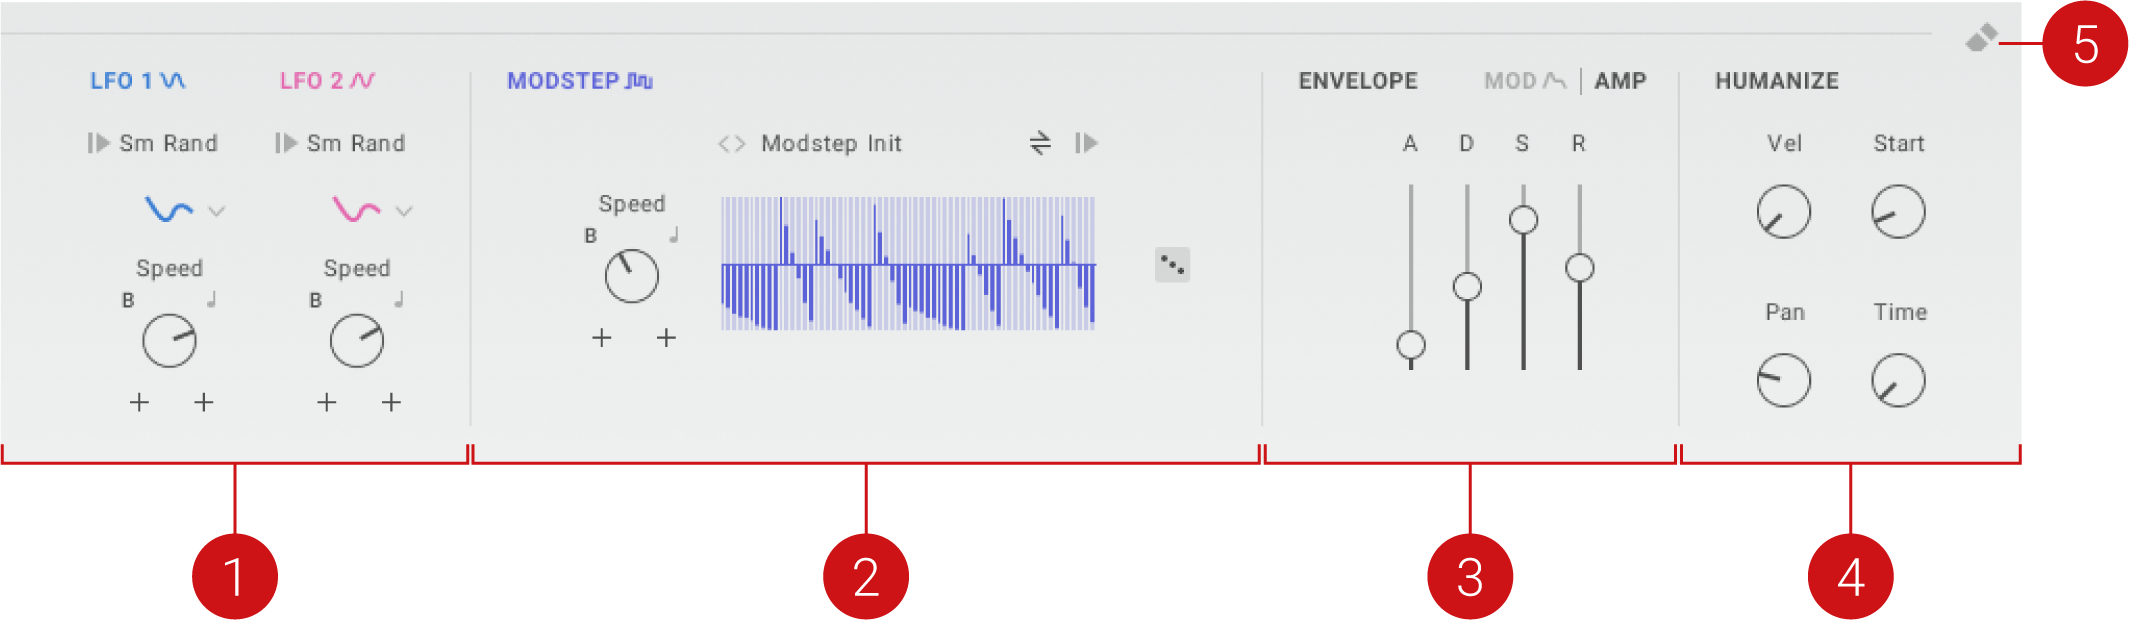
LFO 1 and LFO 2: Low-frequency oscillators that enable you to add movement to sounds. For more information, refer to LFO 1 and LFO 2.
Modstep: Modulation sequencer that enables you to create intricate modulation signals, from stepped sequences to complex shapes. For more information, refer to Modstep.
Amp Envelope: Basic ADSR (Attack, Decay, Sustain, Release) envelope that enables you to adjust the volume contour of the sound. For more information, refer to Amp envelope.
Mod Envelope: Enhanced ADSR (Attack, Decay, Sustain, Release) envelope that enables you to add a contour to effect parameters. For more information, refer to Mod envelope.
Humanize: Brings life to key aspects of each musical note by introducing unpredictable changes.. For more information, refer to Humanize.
Clear Mod Assignments: Removes modulation assignments of all or specific Modulators. For more information, refer to Modulation assignments.
LFO 1 and LFO 2
LFO 1 and LFO 2 are low-frequency oscillators (LFO) that enable you to add movement to sounds. LFOs produce periodic modulation that changes the value of parameters over time.
Note
You can assign this Modulator to any effect parameter, and to parameters of other Modulators. For more information, refer to Modulation assignments.
Both LFO 1 and LFO 2 contain the following parameters:
 |
Waveform Type: Selects one of eight waveform types (Sine, Triangle, Square, Sawtooth, Random, Smooth Random) that define the shape of the modulation.
Speed: Adjusts the frequency of the modulation. When Sync is activated, Speed is set in note lengths relative to the tempo of the DAW.
Sync: Synchronizes Speed to the tempo of the DAW.
U/B: Switches between unipolar (U) and bipolar (B) modulation. Unipolar modulation produces positive parameter changes (relative to the base value), bipolar modulation produces positive and negative parameter changes.
Reset and Phase: Resets the LFO at the start of each note. The reset point in the waveform can be adjusted using the Phase slider below the Reset button.
Modstep
Modstep is a modulation sequencer that enables you to create intricate modulation signals, from stepped sequences to complex shapes.
Note
You can assign this Modulator to any effect parameter, and to parameters of other Modulators. For more information, refer to Modulation assignments.
Modstep contains the following parameters:
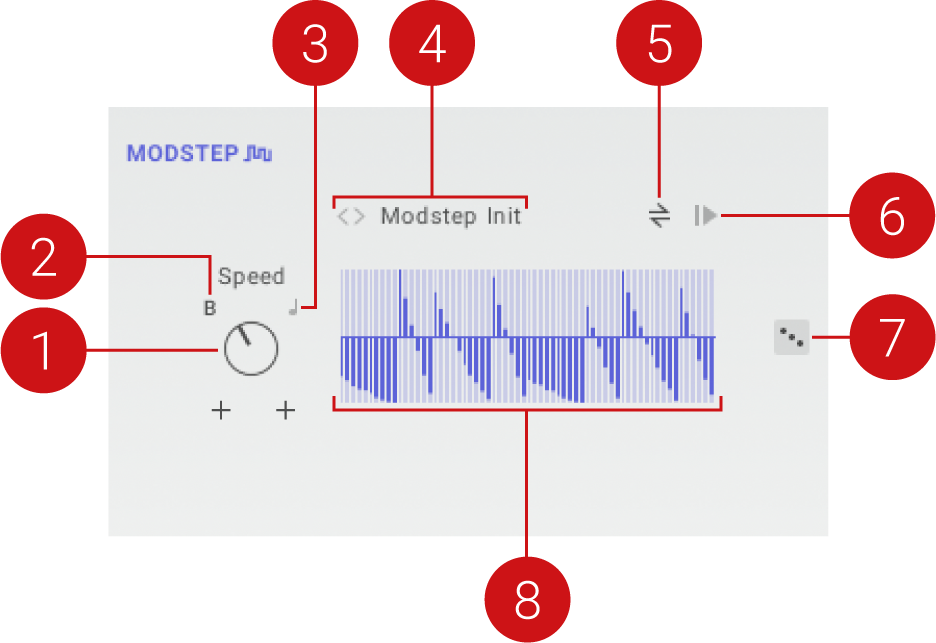 |
Speed: Adjusts the frequency of the modulation. When Sync is activated, Speed is set in note lengths relative to the tempo of the DAW.
U/B: Switches between unipolar (U) and bipolar (B) modulation. Unipolar modulation produces positive parameter changes (relative to the base value), bipolar modulation produces positive and negative parameter changes.
Sync: Synchronizes Speed to the tempo of the DAW.
Sequence Preset Selector: Enables you to quickly load sequences with various patterns and shapes. The loaded preset determines the number of steps in the sequence. You can switch between presets using the left and right arrow buttons, or click on the selector to open a drop-down menu.
Pendulum: Activates Pendulum mode for the sequence playback. When activated, the sequence runs forward and backward in an alternating pattern.
Reset: Resets the sequence to the beginning at the start of each note.
Randomize Sequence: Randomizes the steps in the sequence. The number of steps in the sequence is not randomized. You can change it by selecting a different preset from the Sequence preset selector.
Sequence Editor: Shows and edits the contents of the sequence. You can adjust the steps by right-clicking in the Sequence editor and dragging up and down. By dragging left and right, you can adjust multiple steps at the same time.
Amp envelope
The Amp envelope is a basic ADSR (Attack, Decay, Sustain, Release) envelope that enables you to adjust the volume contour of the sound. Each of the four basic envelope stages can be adjusted independently.
The Amp envelope contains the following parameters:
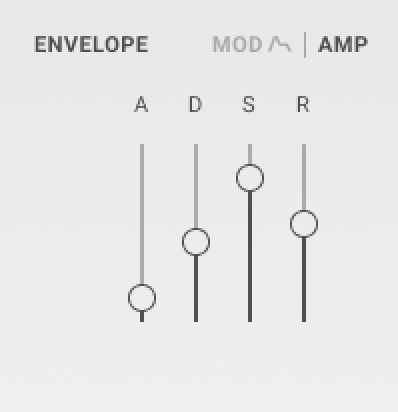 |
Attack (A): Adjusts the duration of the envelope’s attack stage, which is the time the envelope takes to rise from zero to peak level.
Decay (D): Adjusts the duration of the envelope’s decay stage, which is the time the envelope takes to fall from peak to sustain level.
Sustain (S): Adjusts the level of the envelope’s sustain stage, at which the envelope stays as long as a note is held.
Release (R): Adjusts the duration of the envelope's release stage, which is the time the envelope takes to fall from the sustain level to zero.
Mod envelope
The Mod envelope is an enhanced ADSR (Attack, Decay, Sustain, Release) envelope that enables you to add a contour to effect parameters. In addition to the four basic envelope stages, it features synchronization to to the tempo of the DAW, an adjustable attack curve, and either unipolar or bipolar operation.
Note
You can assign this Modulator to any effect parameter, and to parameters of other Modulators. For more information, refer to Modulation assignments.
The Mod envelope contains the following parameters:
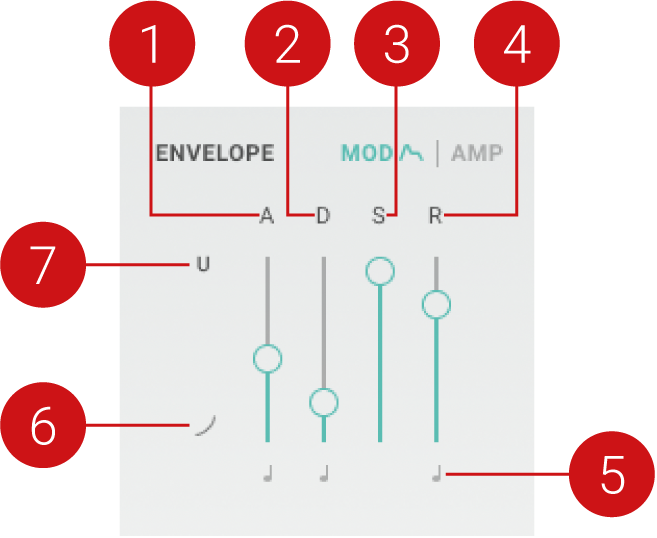 |
Attack (A): Adjusts the duration of the envelope’s attack stage, which is the time the envelope takes to rise from zero to peak level.
Decay (D): Adjusts the duration of the envelope’s decay stage, which is the time the envelope takes to fall from peak to sustain level.
Sustain (S): Adjusts the level of the envelope’s sustain stage, at which the envelope stays as long as a note is held.
Release (R): Adjusts the duration of the envelope's release stage, which is the time the envelope takes to fall from the sustain level to zero.
Sync: Synchronizes the respective envelope stage to the tempo of the DAW. When Sync is activated, the duration of the envelope stage is set in note lengths relative to the tempo of the DAW.
Attack Curve: Adjusts the shape of the envelope’s attack stage from an exponential response with a slow onset (-100%) to a logarithmic response with a fast onset (100%). At center position (0%), the response is linear, making the attack stage rise evenly for its entire duration.
U/B: Switches between unipolar (U) and bipolar (B) modulation. Unipolar modulation produces positive parameter changes (relative to the base value), bipolar modulation produces positive and negative parameter changes.
Humanize
Humanize brings life to key aspects of each musical note by introducing unpredictable changes. It adds random variation to the note velocity (Vel), sample start point (Start), stereo position (Pan), and rhythmic timing (Time). The amount of variation can be set independently for each of these parameters.
Note
When using the Grain Motion effect, Humanize does not affect the sound. For more information about Grain, refer to Grain.
Humanize contains the following parameters:
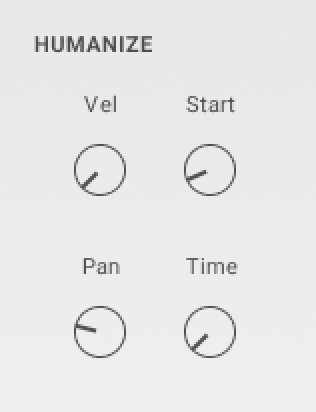 |
Vel: Adjusts the amount of random variation applied to the velocity of each note.
Start: Adjusts the amount of random variation applied to the sample start point of each note.
Pan: Adjusts the amount of random variation applied to the stereo position of each note.
Time: Adjusts the amount of random variation applied to the rhythmic timing of each note.
Macros and performance controls
The Macros and performance controls enable you to play and tweak key parameters in an intuitive way. You can freely assign the modulation wheel, XY pad, and Macros to parameters on the FX page. Additionally, you can rename controls and change their operation between unipolar and bipolar.
Note
For information about assigning Macros and performance controls to parameters, refer to Modulation assignments.
The following Macros and performance controls are available:

Control Labels: Show the name of the Macro or performance control. You can change the name by clicking on it and entering a new name.
Vol: Adjusts the main output volume of the instrument.
Half-Time: Activates a half-time effect that momentarily reduces the playback speed of all samples by 50%.
Macros: Each control adjusts key effect parameters for immediate tweaking of sounds.
XY Pad: Provides expressive control of effect parameters in two dimensions by moving the ball across the XY plane. You can also control each dimension independently using the dedicated X and Y controls.
Modulation Wheel: Shows the parameter assignment of the modulation wheel, which can be played on a MIDI keyboard. You can also adjust the modulation wheel directly in the user interface.
U/B: Switches between unipolar (U) and bipolar (B) modulation. Unipolar modulation produces positive parameter changes (relative to the base value), bipolar modulation produces positive and negative parameter changes.
Modulation assignments
Modulation assignments determine which parameters respond to modulation sources, including both Modulators and Macros. Both Modulators and Macros can be assigned to any effect parameter. Additionally, you can assign Modulators and Macros to parameters of other Modulators, and assign Modulators to Macros.Options to remove modulation assignments include single assignments, all assignments created in an effect slot, or all assignments of a specific modulation source.
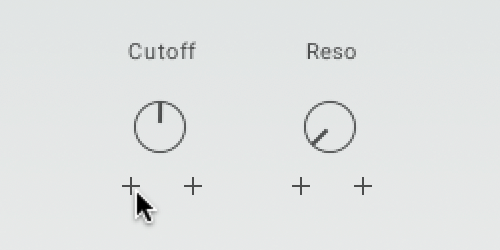
Modulation slots
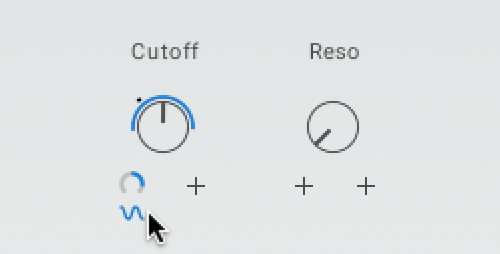
Modulation slots are used to create modulation assignments. Each modulation slot can host a single connection from a Modulator or Macro. Modulation slots are located beneath the respective parameter or Macro. Effect parameters feature two modulation slots, while Macros feature one modulation slot:
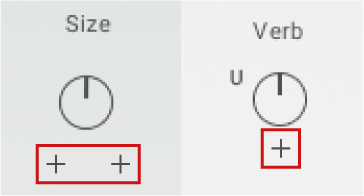 |
Creating a modulation assignment
To create a modulation assignment:
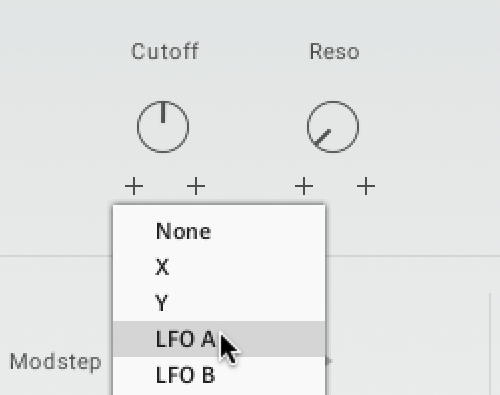
Click on a free modulation slot beneath the parameter or Macro you want to create the assignment for.
Select a modulation source from the drop-down menu. The available modulation sources differ depending on whether you are assigning modulation to an effect, Modulator, or Macro.
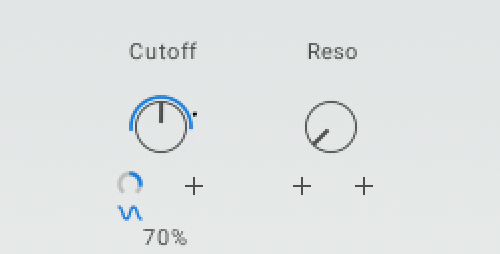
Click the modulation amount control and drag it up and down to adjust the depth of modulation.
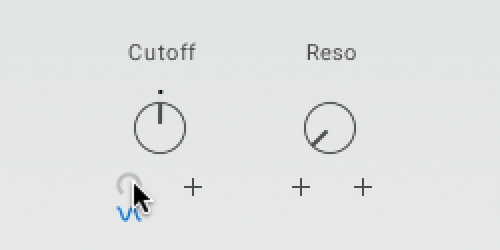
The chosen modulation source is assigned to the parameter, indicated by the respective symbol. A ring around the parameter control shows the depth of modulation, and the dot represents the current parameter value.
Removing a modulation assignment
To remove a modulation assignment:
Click on the symbol of the modulation source beneath the parameter or Macro you want to remove the assignment from.
Select None from the drop-down menu.
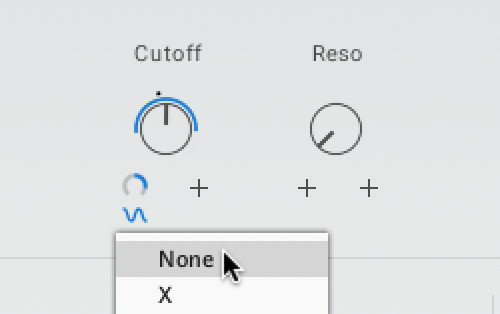
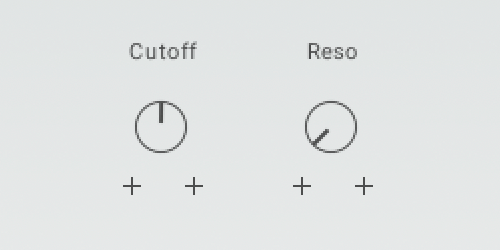
The modulation assignment is removed and the modulation slot is empty.
Removing all modulation assignments from an effect slot
To remove all modulation assignments from an effect slot:
Select the effect slot by clicking on the respective tab in the Effects Chain.
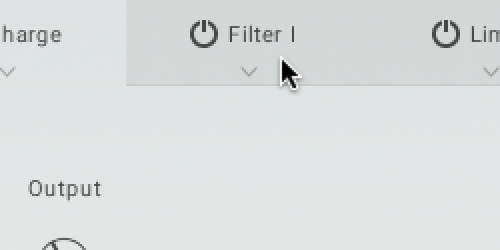
Click the eraser icon in the top-right corner of the Effect editor.
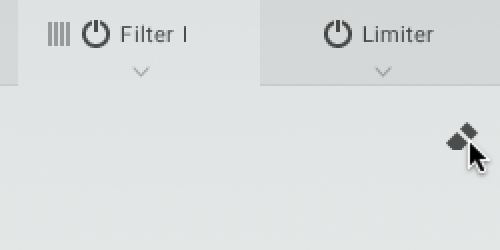
Select Clear FX Mod from the drop-down menu.
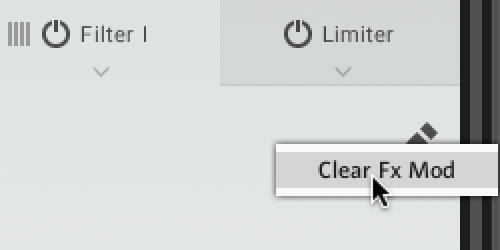
All modulation assignments are removed from the selected effect slot.
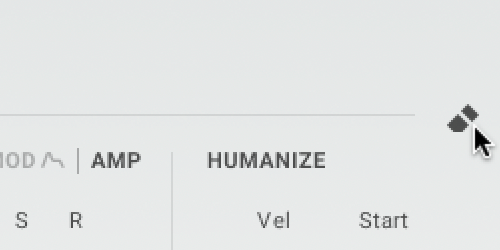
Removing modulation assignments for all or specific modulation sources
To remove all modulation assignments for all or specific modulation sources:
Click the eraser icon in the top-right corner of the Modulators.
Select the modulation source you want to remove all modulation assignments for. If you want to remove all modulation assignment for any modulation source, select ALL.
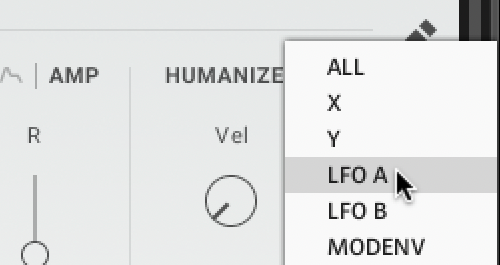
The modulation assignments of the chosen modulation source, or all modulation sources, are removed.