Samples page
The Samples page provides in-depth editing of the samples used in the sound, enabling you to create complex layers and textures.
The Samples page provides in-depth editing options for the samples used in the sound, enabling you to create complex layers and textures.
The Samples page contains the following elements and controls:
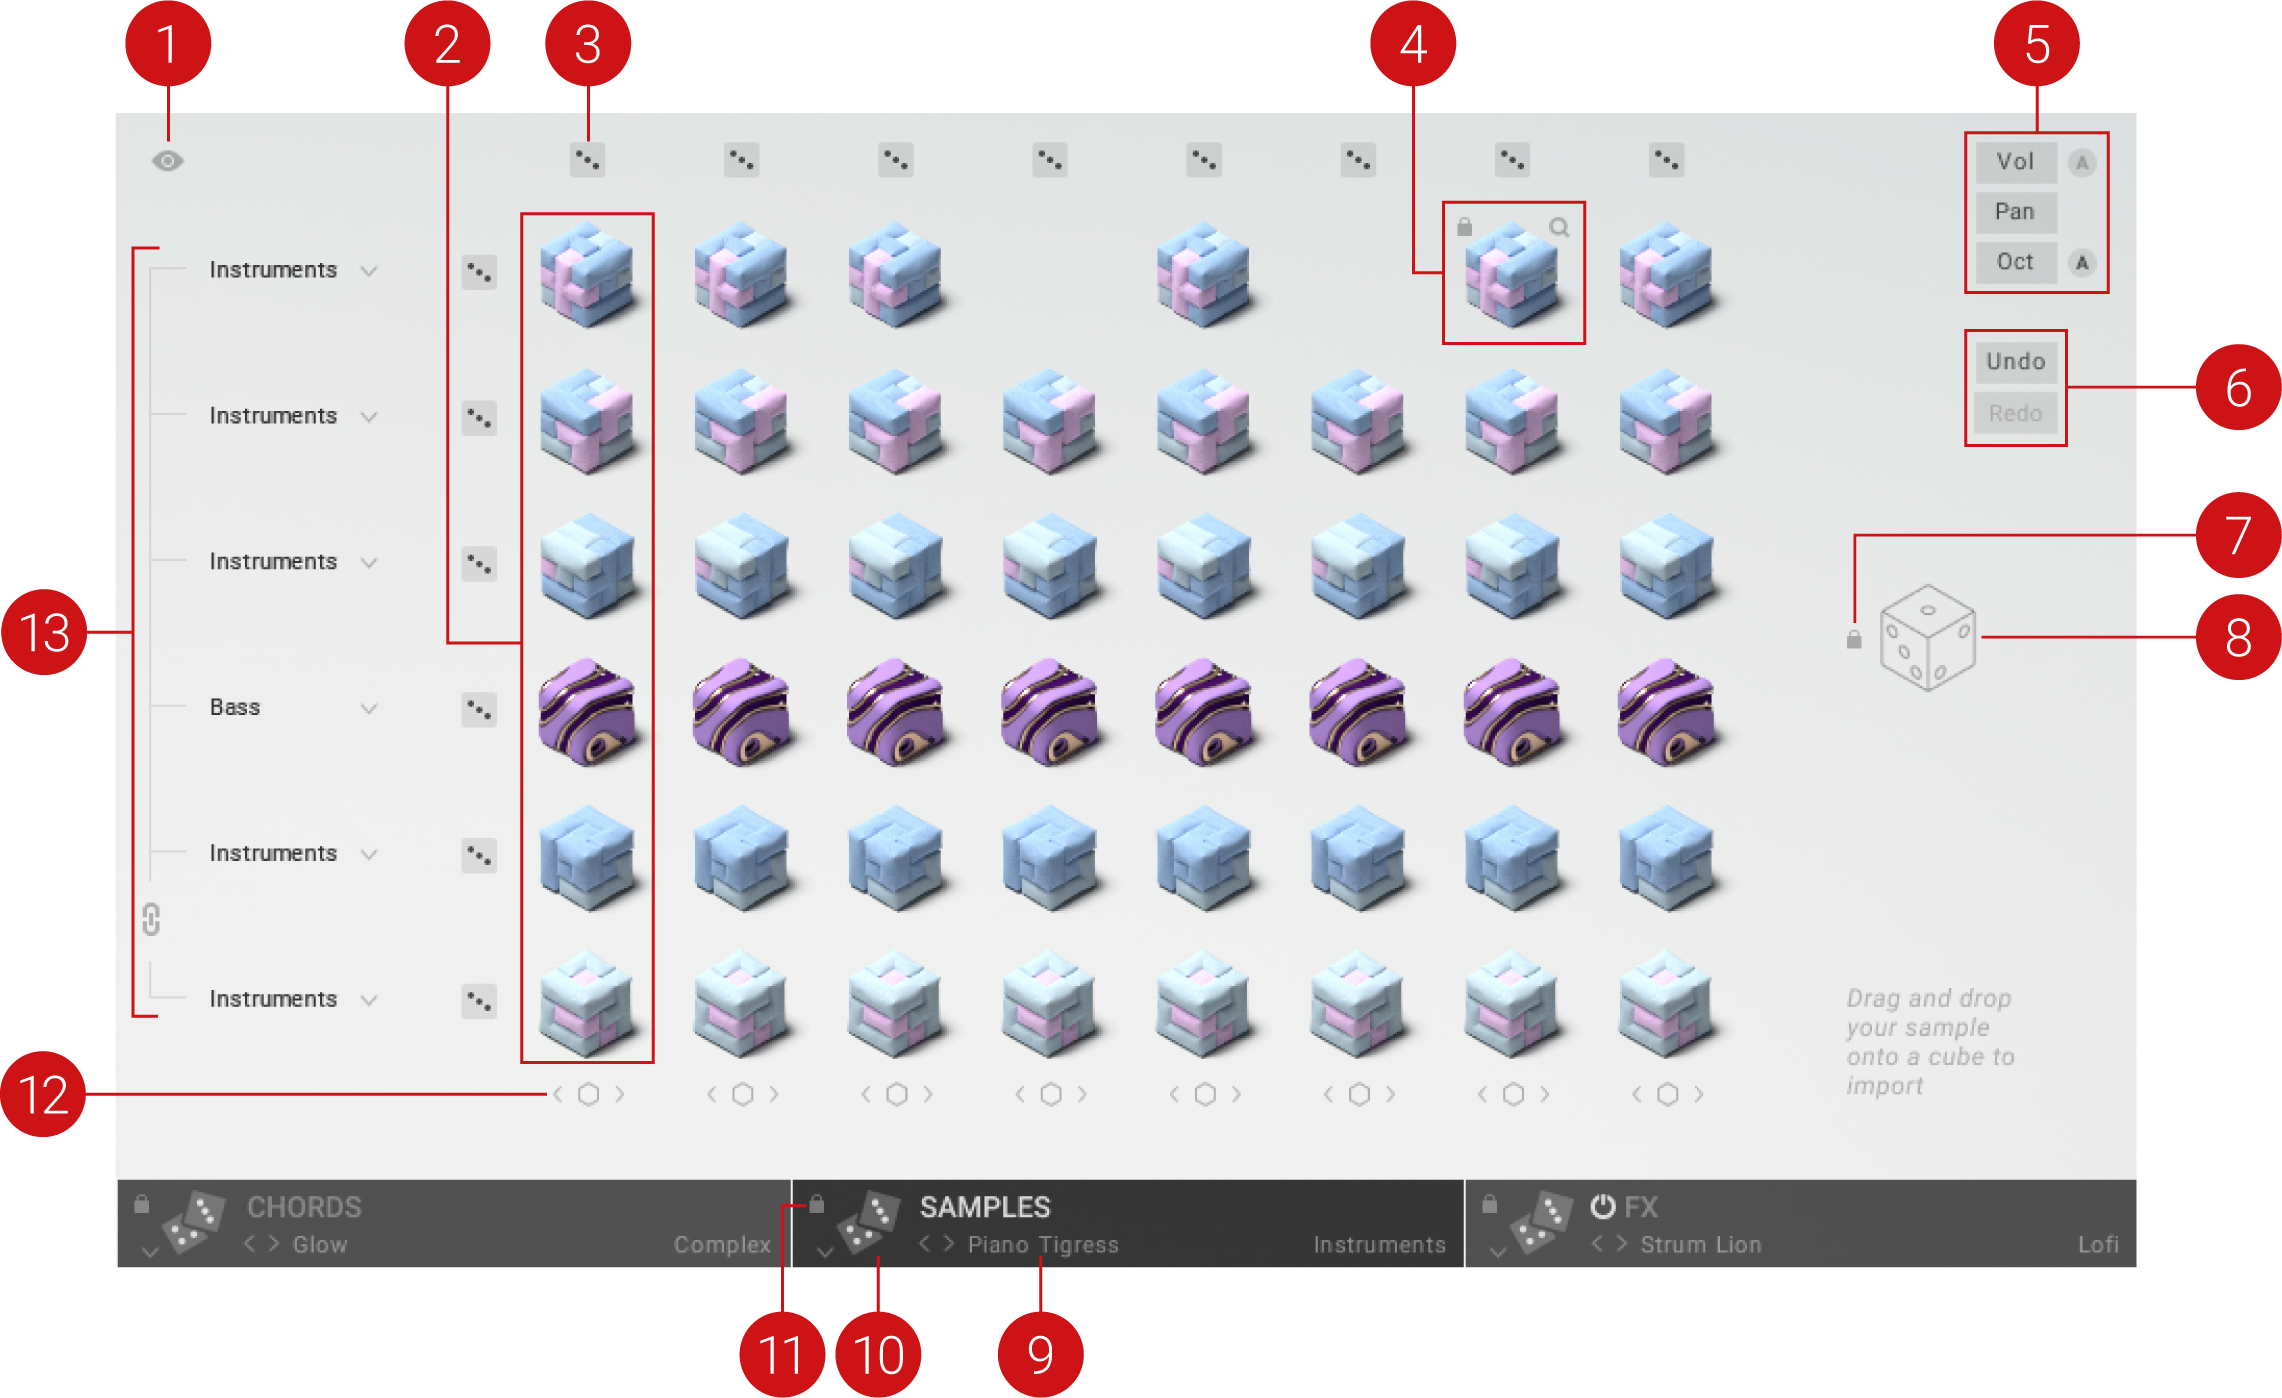
Note Display: Shows or hides the corresponding MIDI note values next to each sample. You can change the notes in each chord on the Chords page. For more information, refer to Chords page.
Chord: Each column in the Sample Matrix represents a chord that consists of up to six samples, represented by cubes. Chords correspond to single keys in the MIDI play octave (C3 - C4, whole notes only). The cubes visualize their contents by using a different shape for each sample category. For more information, refer to Sample categories and visualization.
Randomize Samples: Loads random samples for each cube in the respective column or row of the Sample Matrix. The samples are loaded from the categories selected using the Category selector on the left side of the Sample page. Cubes can be excluded from randomization by using the Lock function.
Lock and Browse: Playing the cursor over a cube shows the Lock and Browse functions.
Lock: Clicking on the lock icon locks the cube and excludes it from the Randomize Samples and Randomize All Samples functions. Pressing [shift] while clicking locks all cubes in the same column. Pressing [alt] while clicking locks all cubes in the same row.
Browse: Clicking on the magnifying glass icon opens the Samples browser. For more information, refer to Samples browser.
Mixer Settings: Enable you to adjust the level, stereo position, and the octave for each cube. For more information, refer to Mixer settings.
Undo / Redo: Enables you to undo or redo changes made by using the Randomize Samples and Randomize All Samples functions, as well as the Category selector.
Lock All Cubes: Locks all cubes and excludes them from the Randomize Samples function. You can use this function to then unlock individual cubes for randomization.
Randomize All Samples: Loads random samples for all cubes in the Sample Matrix. The samples are loaded from the categories selected using the Category selector on the left side of the Samples page. Cubes can be excluded from randomization by using the Lock function.
Sample Set Selector: Enables you to quickly load Sample Sets. You can switch between Sets using the left and right arrow buttons, or click on the selector to open the Sample Sets browser.
Randomize Sample Set: Loads a random Set from the selected category in the Sample Sets browser. By default, the All category is selected, making all Sets available for randomization.
Lock Sample Set: Locks the Sample Set and excludes it from the Randomize Sets function on the Main page. Therefore it will be preserved when randomizing Sets.
Spread: Enables you to apply the samples contained in a single chord to all chords in the Sample Set. For more information, refer to Spread mode.
Category Selector: Selects the categories used for randomization of samples in the Sample Matrix. For more information, refer to Category selector.
Note
Additional editing functions for the Sample Matrix can be accessed using keyboard shortcuts. For more information, refer to Editing the Sample Matrix using keyboard shortcuts.
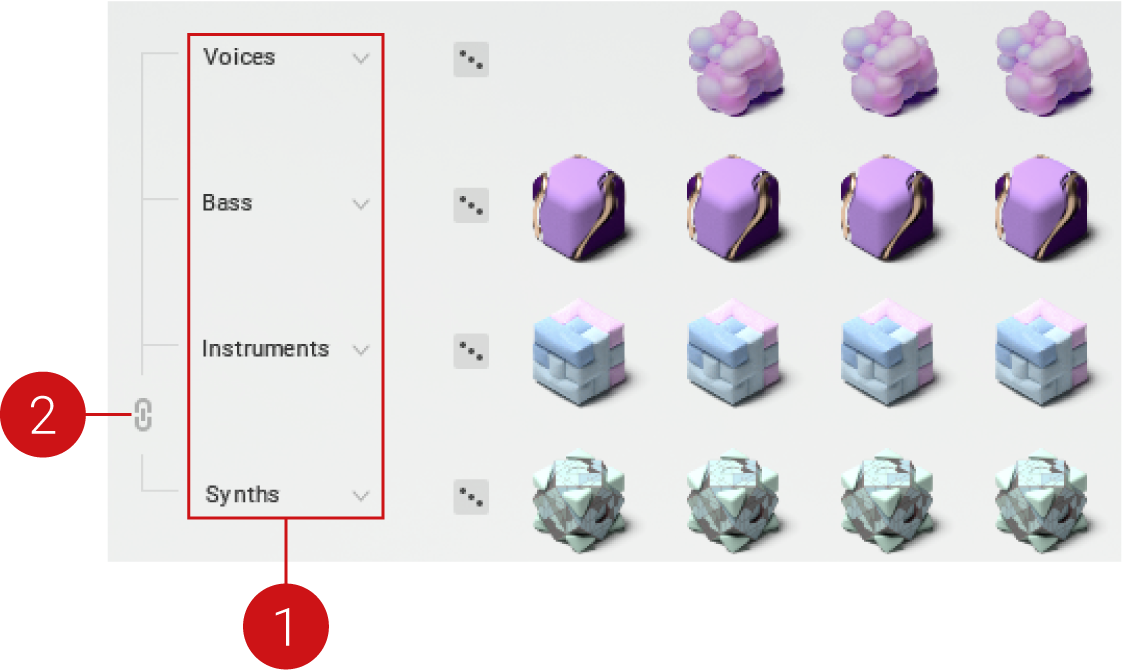
Sample categories and visualization
The cubes in the Sample Matrix visualize their contents by using a different shape for each sample category from the Samples browser.
The following categories are available:
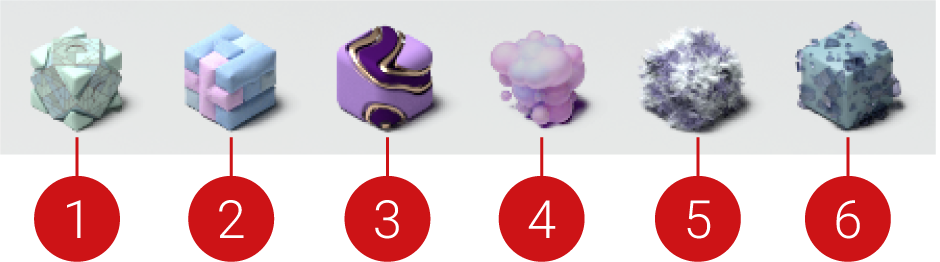 |
Synths: Samples recorded using analog and digital synthesizers, with varying degrees of articulation and processing included in the sample.
Instruments: Samples recorded using instruments from all over the world, including treated samples that were processed to add depth and movement.
Bass: Samples recorded using acoustic and electronic basses, as well as synthesizers.
Voices: Samples based on vocal recordings, from vowels to spoken word and singing. In most cases, the recordings are heavily processed using effects.
Noises: Samples using foley and field recordings, drum hits, and additional processing that cover a wide range of ambient noises and textures.
User: Samples from the User Slots in the Samples Browser. For more information, refer to Importing and managing samples.
Mixer settings
The Mixer settings enable you to adjust the level (Vol), stereo position (Pan), and octave (Oct) for each cube. You can also activate automatic settings for Vol and Oct, which help you find the most balanced sound for a given set of samples.
The Mixer settings contain the following options and controls:
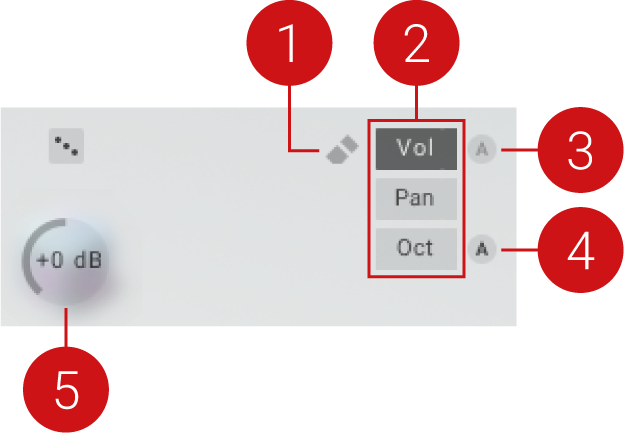 |
Reset Setting: Sets the selected setting to its default value for all cubes.
Setting Selector: Selects one of three available settings (Vol, Pan, Oct) that can be adjusted individually for each cube in the Sample Matrix.
Vol: Adjusts the level of the sample in the range of -inf to +24 dB (default value 0 dB).
Pan: Adjusts the stereo position of the sample in the range of -100% to 100% (default value 0 %).
Oct: Adjusts the transposition of the sample in the range of -6 to +6 octaves (default value 0 oct).
Auto Vol: Sets the levels for all cubes automatically. The automatic settings are optimized based on an analysis of the samples.
Auto Oct: Sets the octaves for all cubes automatically. The automatic settings are optimized based on an analysis of the samples.
Cube Control: Adjusts the selected setting for the respective cube. You can change the value by clicking on the control and dragging up and down. The value is shown at the center of the cube while adjusting, or when clicking on the cube.
Spread mode
Spread mode enables you to apply the samples contained in a single chord to all chords in the Sample Set.
To activate Spread mode for a chord, click on the Spread Mode button underneath the respective column in the Samples Matrix.
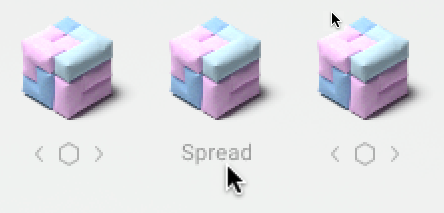
The chosen chord is highlighted and its samples are used for all chords in the Sample Set.
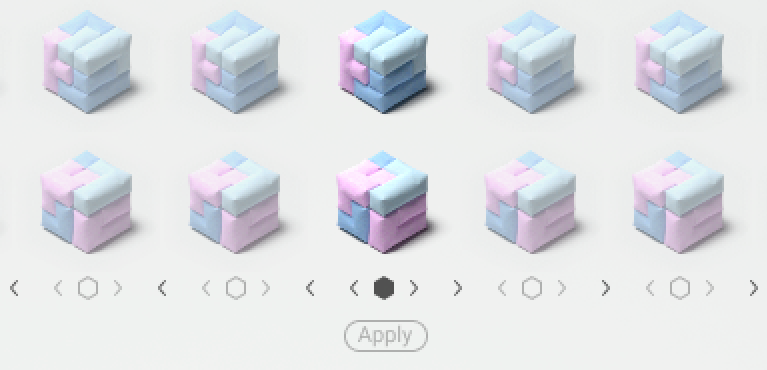
When deactivating Spread mode, each chord will use its original samples again. If you wish to replace the samples in all chords according to Spread mode, you can also apply the changes permanently.
To apply Spread mode permanently, click Apply.

Spread mode is deactivated and the samples contained in the chosen chord are applied to all chords.
Category selector
The Category selector selects the categories used for randomization of samples in the Sample Matrix. The samples are loaded from the selected categories when using the Randomize Sample and Randomize All Samples functions. For information about these functions, refer to Samples page.
Tip
You can use the Category selector to select User Slots and randomize the contents of the Sample Matrix based on your own samples. For more information, refer to Importing and managing samples.
The Category selector contains the following menus and controls:
 |
Category Menu: Selects the sample category used for randomization. Clicking on the category name opens a drop-down menu for category selection. The sample category can be set globally, or individually per row, depending no the state of the Chain Menus button.
Chain Menus: Determines whether a single category is used for all samples in the Sample Matrix, or individual categories can be selected per row. When activated, only the bottom menu is visible and can be used select a category for all samples in the Sample Matrix.
Editing the Sample Matrix using keyboard shortcuts
Additional editing commands for the Sample Matrix can be accessed using keyboard shortcuts.
The following commands are available:
To randomize the sample in a single cube, press [command] + click on the respective cube in the Sample Matrix.
To copy and paste a sample from one cube to another, click a cube to select it, then press [shift] + click on another cube.
Two swap samples between two cubes, click a cube to select it, then press [alt] + click on another cube.