Traktor MX2 overview
Learn how to use every part and control element on the Traktor MX2.
This section introduces you to the Traktor MX2’s top panel and all its control elements.
Note
The elements on the front and rear panels of the controller are described in Setting up Traktor MX2.
The top panel of the Traktor MX2 controller provides the following areas:
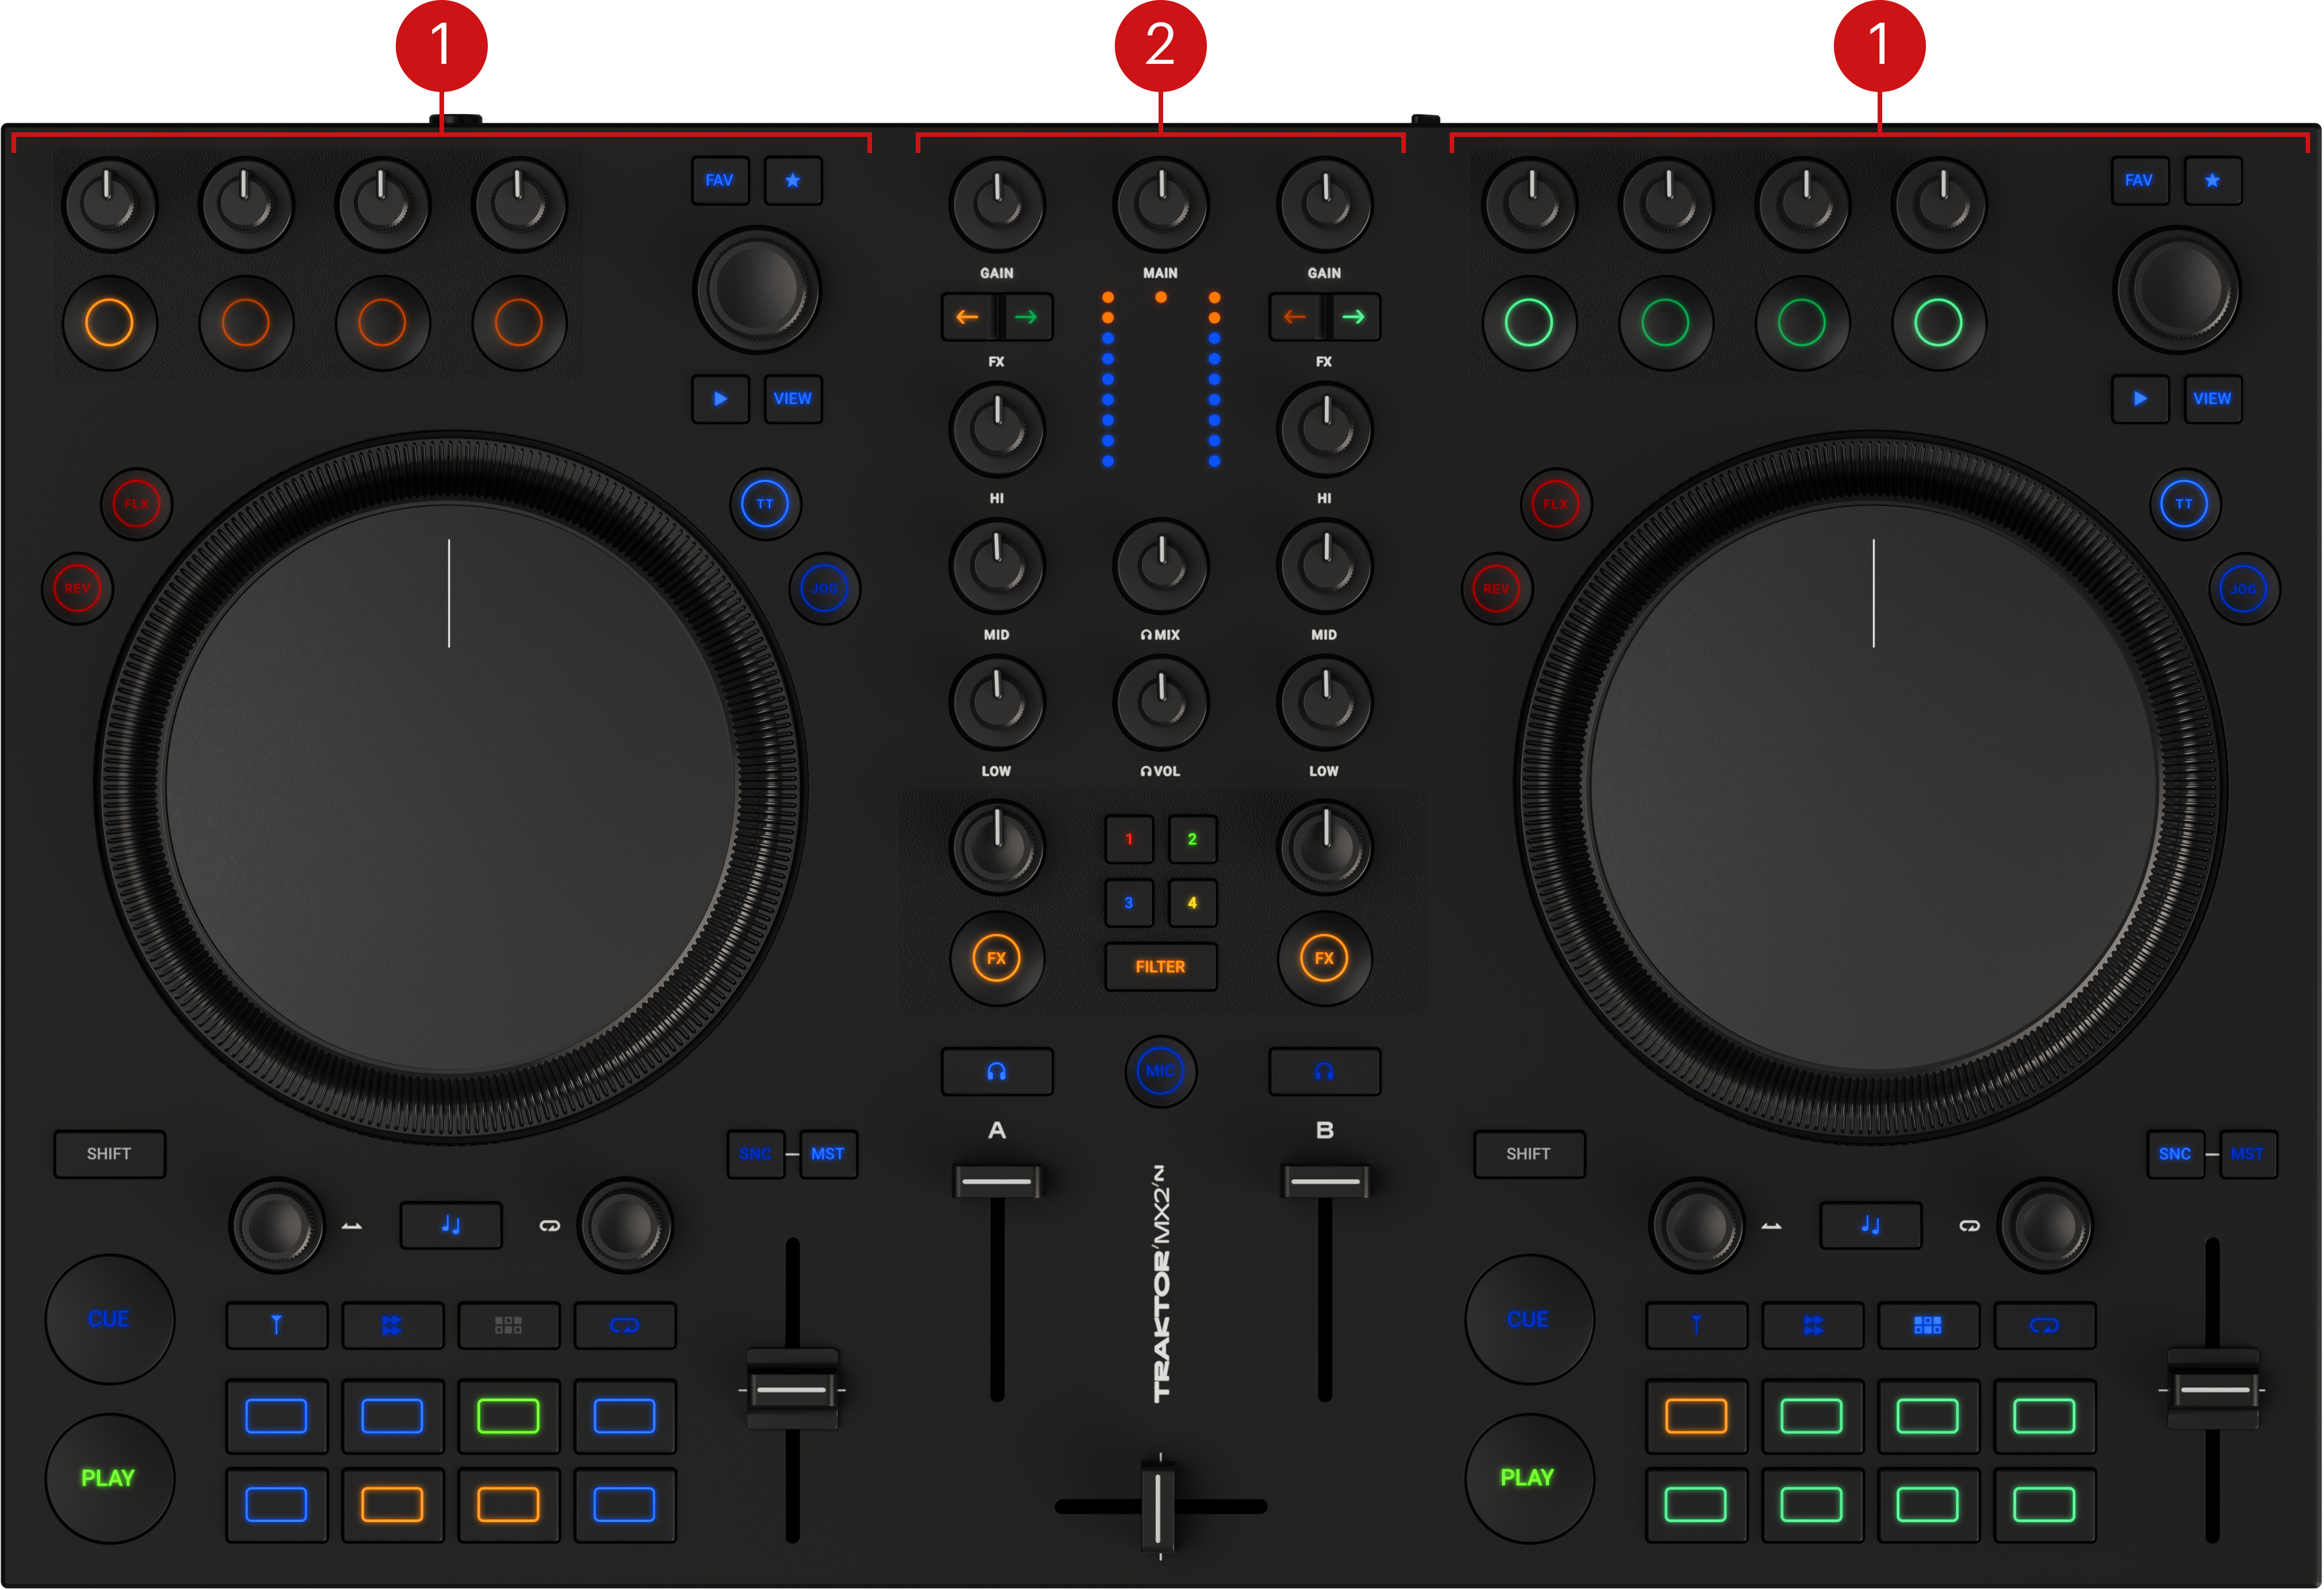
Decks: You can use the Decks to control tracks, similar to DJ turntables or CD players but with additional features. Traktor provides you with four virtual decks. The two Decks on your Traktor MX2 hardware controller allow you to control the two software Decks A and B in Traktor: The left Deck on your Traktor MX2 controls Deck A in the software, and the right Deck on your Traktor MX2 controls Deck B in the software. For more information about the Decks and their control elements, refer to Decks.
Mixer: You can use the Mixer to mix the audio signals coming from the Decks. The Mixer sits in the middle of the Traktor software as well as on your Traktor MX2 controller. On the Traktor MX2, the Mixer consists of two Mixer channels that receive the individual audio signals from the left and right Decks, respectively. Each Mixer channel contains controls to modulate the audio signal and to adjust the outgoing volume before the audio signal is sent to the MAIN output. Furthermore, the Mixer provides a crossfader to let you fade between the audio signals in the Mixer channels. For more information about the Mixer and its control elements, refer to Mixer.
Decks
Traktor MX2 provides you with two physical Decks to control the Traktor Decks. Each Deck provides the following control elements:
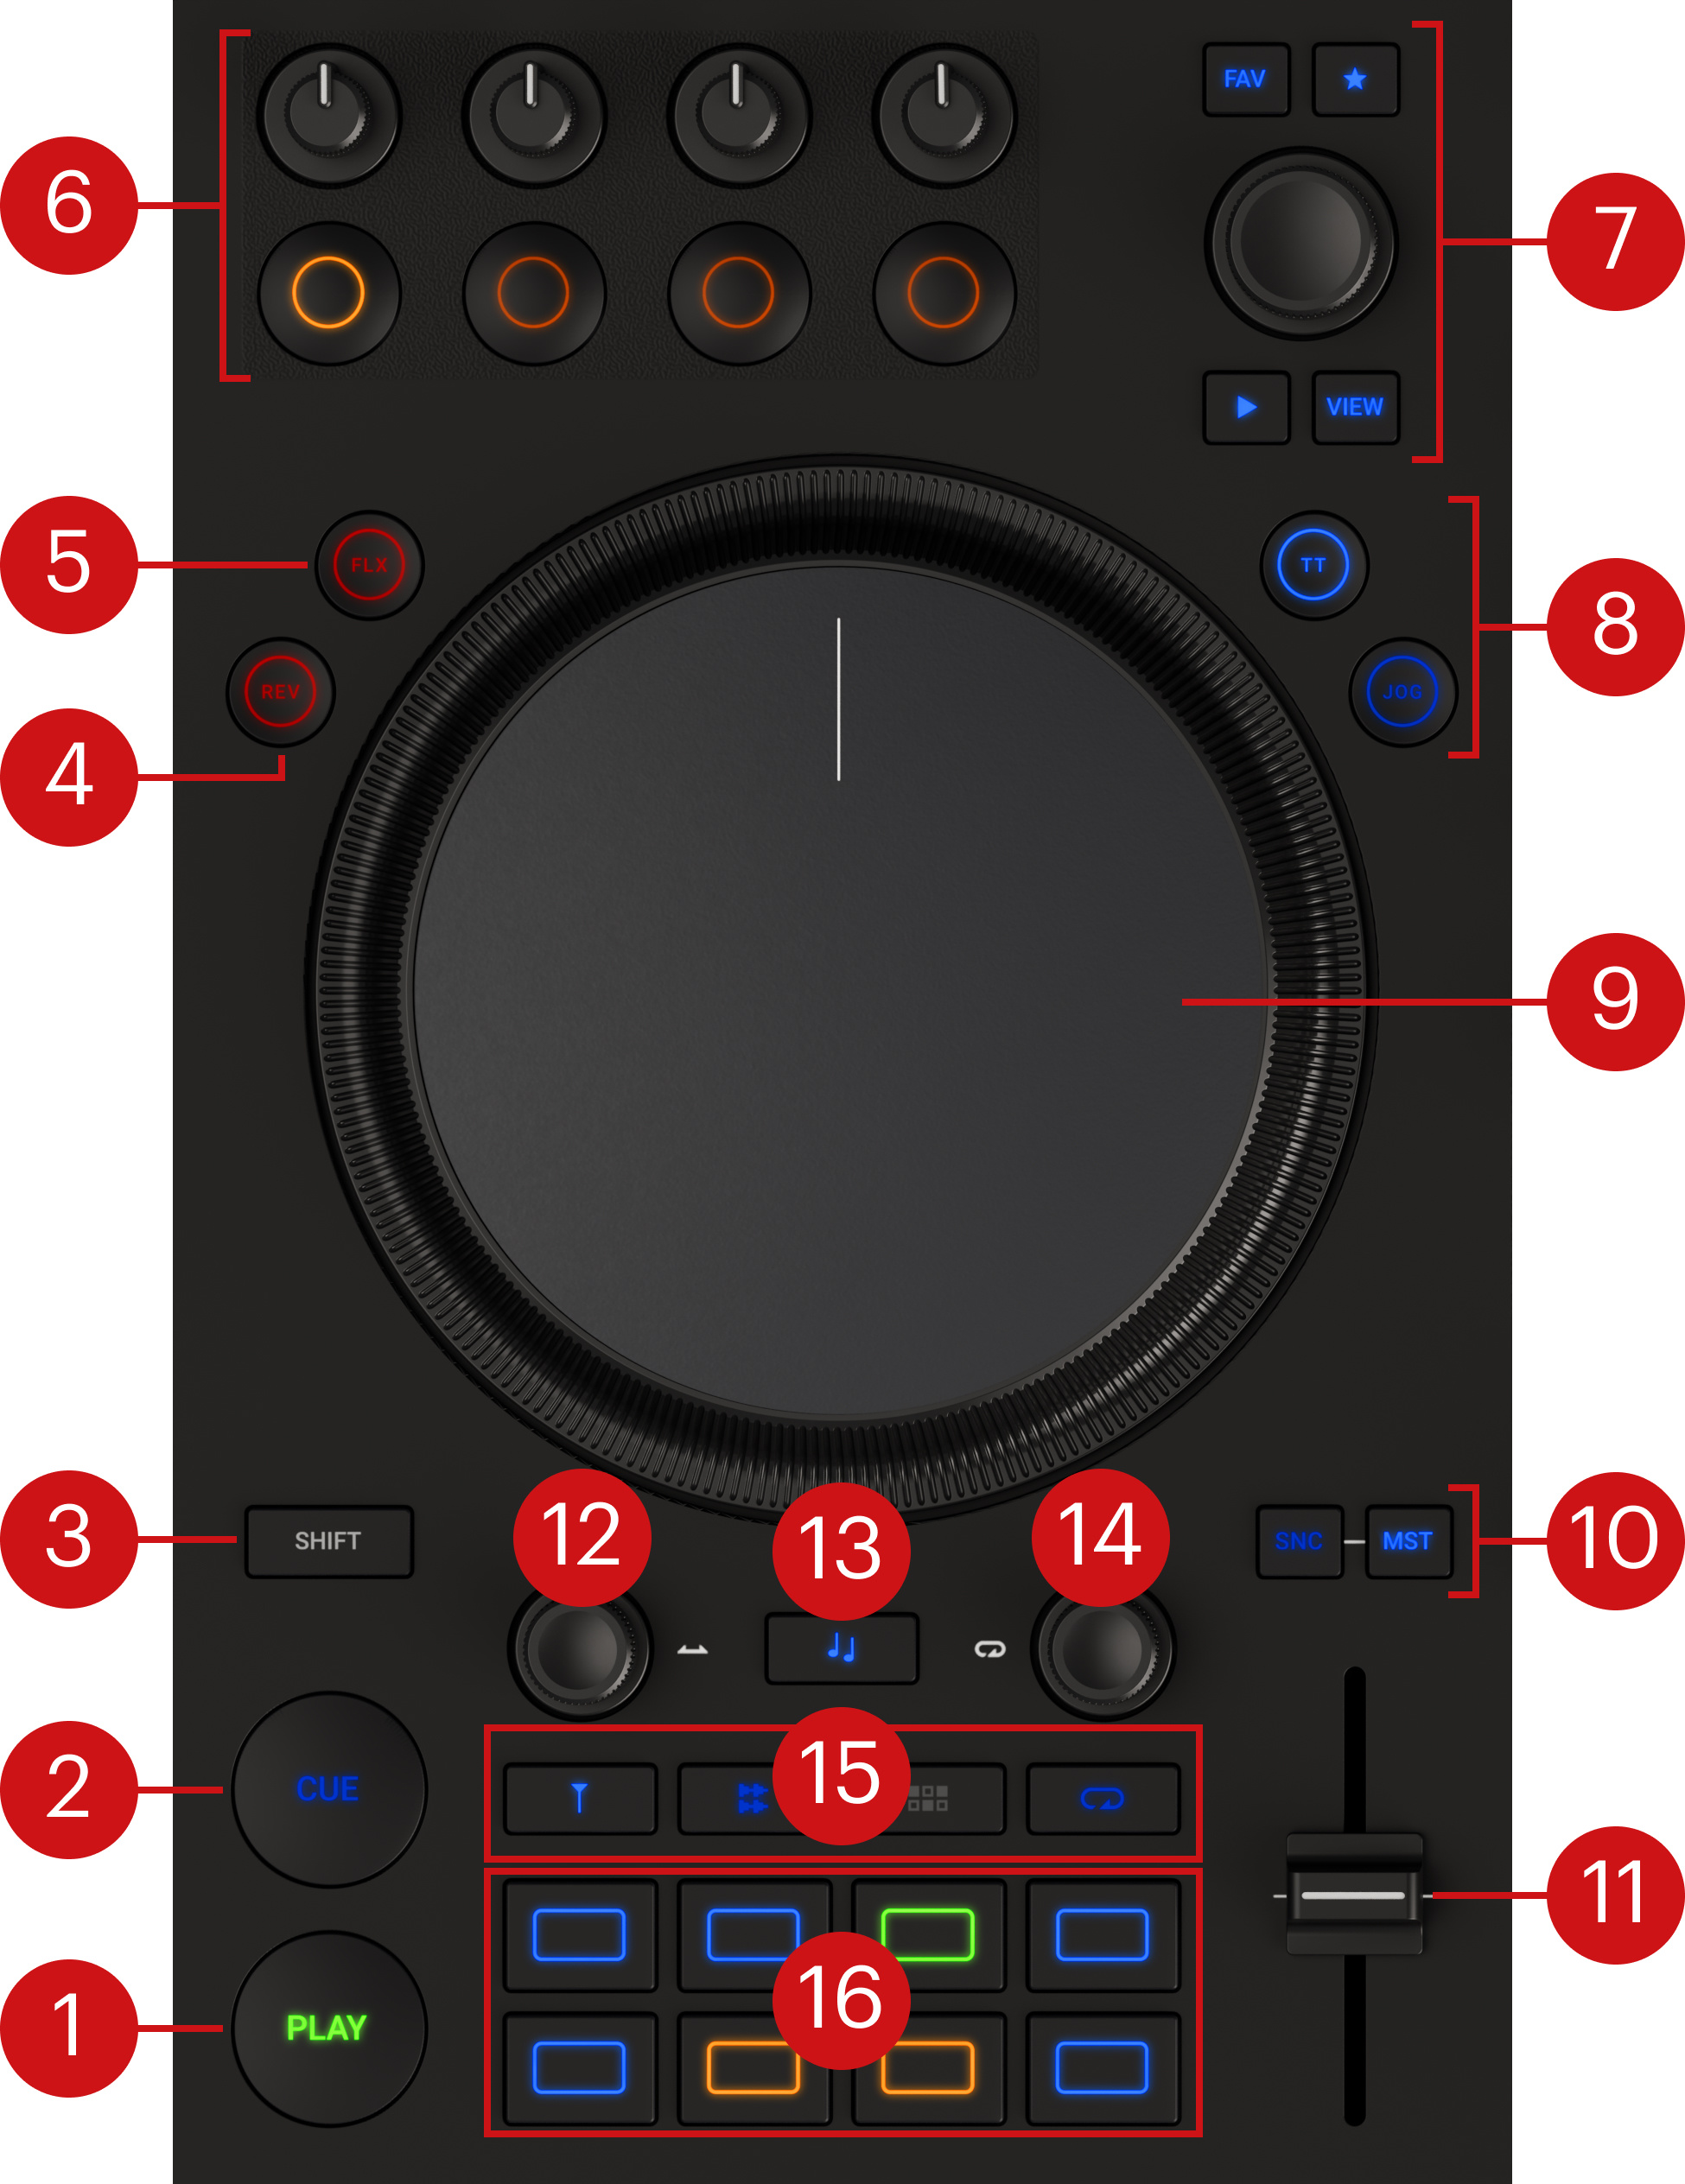 |
PLAY: Starts or pauses the track playback on that Deck. The button brightly lights up green during playback.
CUE: When the Deck is stopped, the CUE button starts the track playback from the Floating Cue Point. When the Deck is playing, it moves the playback position back to the Cue Point.
SHIFT: Holding SHIFT lets you access the secondary functions of other control elements on the MX2.
Reverse (REV): Holding REV temporarily activates Flux mode on the Deck and plays back the track in reverse. When you release REV, the playhead jumps back to where it would have been if you hadn’t held REV.
Flux (FLX): Activates or deactivates Flux mode on that Deck. The Flux mode lets you jump to Cue Points and Loops without loosing the phrasing of your tracks. The Traktor Pro manual provides more information about the Flux mode.
FX Unit: Lets you control one of Traktor’s FX Units. Refer to FX Unit.
Browse controls: This set of controls lets you scroll through the Track Collection to find, preview, and load tracks onto the Deck, as well as prepare playlists. Refer to Browse controls.
TT / JOG switch: Switches the jog wheel between Turntable mode (TT) and Jog mode (JOG). The features available in each mode are described in Jog wheel.
Jog wheel: Provides advanced control over the track transport. As with a conventional CD player or turntable, you can manually hold the playback, nudge and bend, and start scratching by touching and turning the jog wheel’s top plate and outer rim. The detailed features of the wheel are described in Jog wheel.
Sync (SNC) / Master (MST): Pressing SNC syncs the Deck to the current Tempo Master. When sync is on, the SNC button turns red in case the Deck gets out of sync. Pressing MST sets this Deck as the new Tempo Master. Pressing SNC and MST together lets you reset the software’s Tempo fader to the fader position on your controller: For example, this can be useful if the fader on your controller is in Relative mode and you want to match both faders again.
Tempo fader: Lets you manually adjust the track tempo on that Deck. If the Deck is synced to another Tempo Master, moving the Tempo fader will have no effect. By default the Tempo fader operates in Absolute mode: Whenever you move the fader, its position is transmitted 1:1 to the Tempo fader in the software. In the Traktor Preferences you can switch the Tempo fader to Relative mode, in which your fader actions are applied to the software fader relative to its current position.
Move encoder: Pressing the encoder activates or deactivates looping. If a loop is active, turning the encoder moves the loop forward and backward in the track. If no loop is active, turning the encoder jumps within the track.
Keylock button: Locks the current key value (or pitch) of the track. With Keylock active, moving the Tempo fader changes the track tempo but the track key remains at the locked value. When Keylock is on, holding Keylock and turning the Move or the Loop encoder lets you modify the track key in semitones without affecting its tempo.
Note
You can adjust the track key in finer increments using the KEY knob in the Mixer channel of the Traktor software.
Loop encoder: Pressing the encoder activates or deactivates looping. If a loop is active, turning the encoder lets you change the loop size, otherwise it changes the size of the next loop that you will activate.
Pad Mode buttons: These buttons select a mode for the pads below. Refer to Pads.
Pads: You can use the pads to store and trigger Cue Points and Loops, control Stem files, adjust the patterns of the Pattern Player, and set Flux Loops. The pads’ function depends on the selected Pad mode and the current Deck type. Refer to Pads.
FX Unit
At the top of either Deck, the FX Unit lets you control one of the FX Units available in the Traktor Pro software.
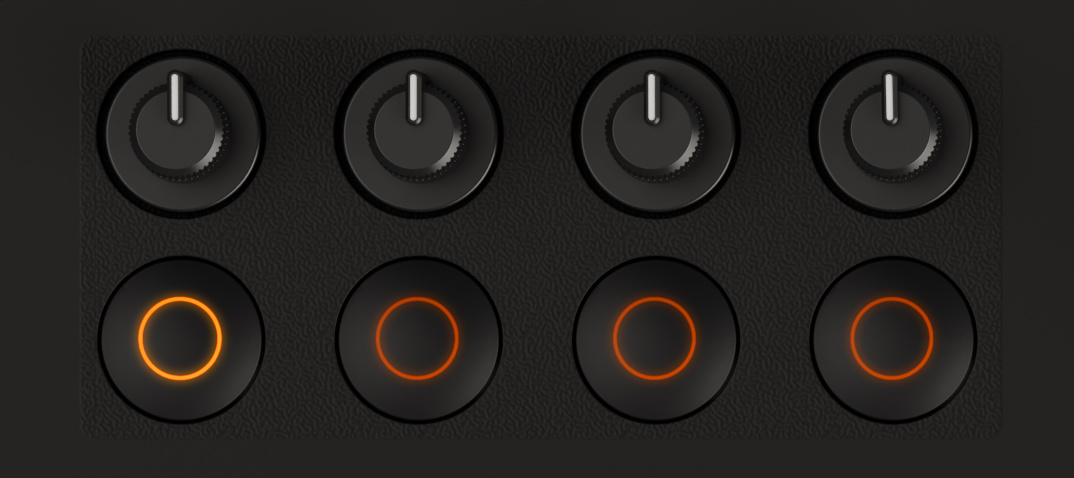 |
The four knobs and four buttons mirror the corresponding FX Unit elements in the software. As in the software, their function will depend on the FX Unit’s mode and on the loaded effect(s). The Traktor Pro manual describes in detail how to use the FX Units, and provides a comprehensive reference of all the available effects.
Note
The FX Unit is not bound to the Deck below: You can freely send the audio from the Deck to either FX Unit, or to both. This is done using the FX Assign buttons of the Mixer channels.
On your MX2, referring to the four buttons as button 1 to 4 (from left to right), you can use the following shortcuts to switch between FX Unit modes and to load other effects into the FX Unit:
You can press SHIFT + button 1 to cycle through the three available FX Unit modes: Group mode, Single mode, and Pattern Player mode.
When the FX Unit is in Group mode, you can press SHIFT + button 2, 3, or 4 to load the next effect from each effect selector, and compose your custom group of effects.
When the FX Unit is in Single mode, you can press SHIFT + button 2 or 3 to load the previous or next effect from the effect selector.
When the FX Unit is in Pattern Player mode, you can press button 2 or 3 to switch to the previous or next sample from the current kit, and press SHIFT + button 2 or 3 to load the previous or next kit from the kit selector.
Note
When the FX Unit is in Patter Player mode, you can also switch the pads at the bottom of the Deck to Pattern mode and edit the individual steps in the pattern.
Browse controls
The Browse controls let you browse the Track Collection to find and load tracks as well as preview tracks and prepare playlists.
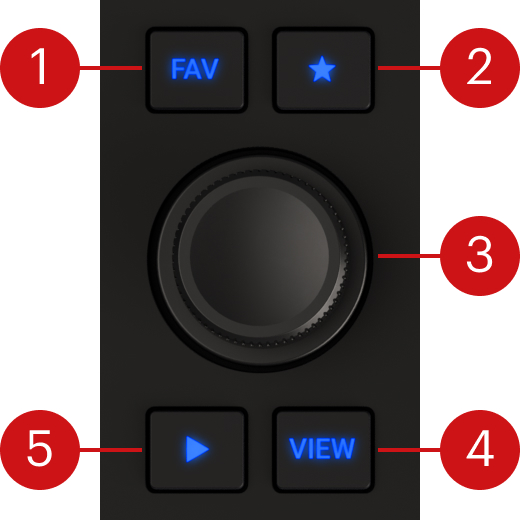 |
FAV button: When you hold this button the Browse encoder selects favorites.
Preparation List button: Assigns the selected track to the Preparation List.
Browse encoder: You can select tracks in the Track List by turning the Browse encoder, and load the selected track into the Deck by pressing the encoder. You can also use the Browse encoder to seek within the track that is playing in the Preview Player.
VIEW button: Maximizes or minimizes the Browser view in the Traktor software.
Preview Player button: Loads the selected track into the Preview Player of Traktor’s Browser and plays it back.
Jog wheel
The jog wheel provides various ways to manually control the transport of the Deck. The wheel includes two distinct control areas: its outer ring, and its top plate. Their features depend on the jog wheel mode, which is selected using the TT / JOG switch located at the top right of the wheel.
Pressing TT switches the jog wheel to Turntable mode. In this mode you can use the wheel as follows:
When the playback is stopped, turning the outer ring or the top plate lets you adjust the playhead position. For example, you can use it for scratching, or to cue the track onto the desired beat. Holding SHIFT and turning the top plate lets you fast seek through the track.
When the playback is running, turning the outer ring lets you temporarily bend the Deck tempo, whereas turning the top plate holds the playback and lets you adjust the playhead position. Holding SHIFT and turning the top plate lets you fast seek through the track.
Pressing JOG switches the jog wheel to Jog mode. In this mode the distinct features on the top plate are deactivated, the top plate now behaving like the outer ring. You can use the wheel as follows:
When the playback is stopped, turning the outer ring or the top plate lets you adjust the playhead position.
When the playback is running, turning the outer ring or the top plate lets you temporarily bend the Deck tempo.
Pads
The eight pads can be used to store and trigger Cue Points and Loops, to control stems, to turn steps on and off in the Pattern Player, or to trigger Flux Loops. The pads’ function depends on the selected pad mode and the selected Deck type. You can select the pad mode using the four buttons above the pads:
 |
Hotcue button: Switches the pads to Hotcue mode. In this mode you can store and trigger Cue Points and Loops within tracks using the pads. Pressing a colored pad jumps to the corresponding Cue Point in your track. Pressing an unlit pad stores a Cue Point (or the current Loop if looping is active) onto that pad for later use. You can press SHIFT + a colored pad to erase its contents and make the pad available for other Cue Points. The pads use the same color code as in the Traktor Pro software: They are off when empty, white for Grid markers, blue for Cue Points, green for Loops, orange for Fade-in/Fade-out Points, and yellow for Load Points.
Stem button: Switches the pads to Stem mode. In this mode the upper row of pads lets you mute and unmute individual stems (from left to right: drums, bass, other, and voice) in the loaded stem track. On the lower row of pads, you can press and hold a pad to select that stem, and adjust the stem’s volume and filter amount by turning the Move encoder and the Loop encoder, respectively.
Pattern button: This button can be pressed only if the FX Unit above is in Pattern Player mode. Pressing the button switches the pads to Pattern mode. In this mode you can press the pads to turn individual steps on or off for the selected sample of the pattern. By default, the Pattern button is blue and the eight pads represent the first eight steps of the pattern (the upper row of the step grid in Traktor Pro). If you press the Pattern button again, it turns white and the pads switch to the last eight steps (the lower row of the step grid in the software). Active steps are fully lit. The orange pad indicates the playhead position, all other steps are green. Pressing SHIFT + Pattern lets you quickly erase the step grid (all the steps are turned off).
Flux Loop button: Switches the pads to Flux Loop mode. In this mode, holding the pads automatically switches the Deck to Flux mode and triggers loops of different predefined sizes. When you release the pad, the playhead jumps back to where it would have been if you hadn’t held any pad.
Mixer
In the middle of the Traktor MX2 controller, the Mixer receives the audio signals from the Decks and generates the mix that is sent to your audience. The Mixer includes two channels on either side (one for each Deck), a crossfader, and the FX and output section in the center:
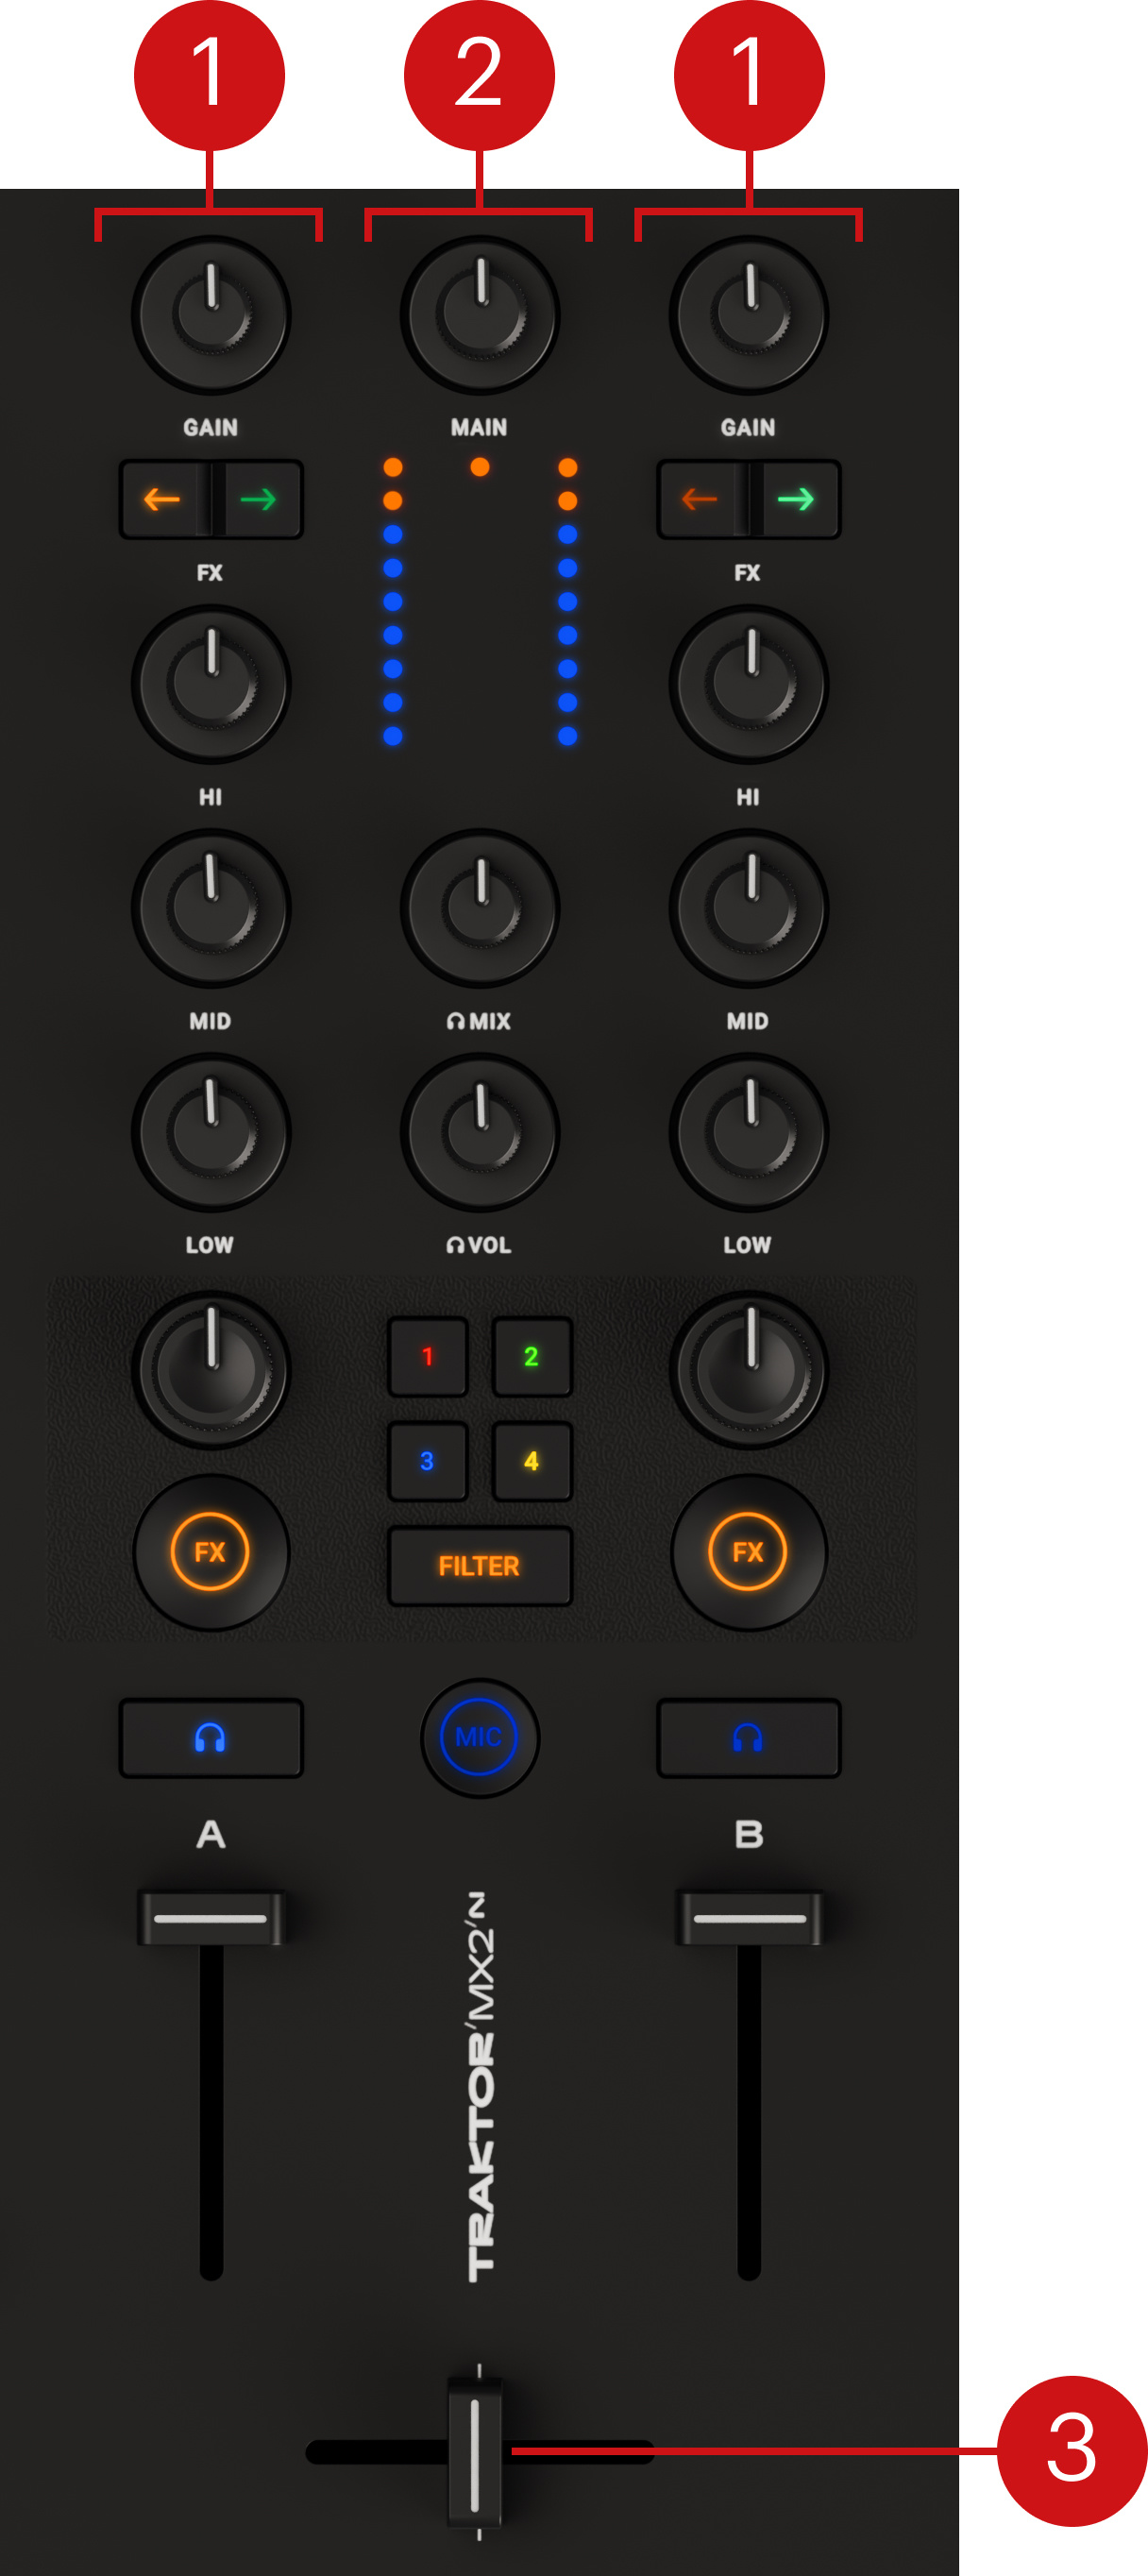 |
Mixer channels A and B: Each channel receives the audio signal from the Deck next to it. The channels contain controls adjusting the audio signal’s level, frequency content, and effect amount. Refer to Mixer channels.
Mixer FX and output section: Between the two channels, the FX and output section lets you select the Mixer FX used on either channel, control and adjust the level of the main mix, and select the signals sent to your headphones. Refer to Mixer FX and output section.
Crossfader: Controls the mix between the channels A and B. At each crossfader’s end, the opposite channel is totally silent. Moving the crossfader gradually fades in and fades out the relevant channels in the main output. At the center position, the signals from both sides are fully audible.
Note
By default, the left Deck and right Deck are respectively assigned to the left side and right side of the crossfader. You can change or extend this default setup by using the Crossfader Assign buttons in the Traktor software.
Mixer channels
The Mixer channels receive the individual audio signals from the Decks. On each channel the Deck signal goes from top to bottom. Each channel contains controls for the incoming and outgoing levels, the frequency content, the amount of Mixer FX applied, and the routing to the FX Units and to the cue channel.
Each Mixer channel provides the following control elements:
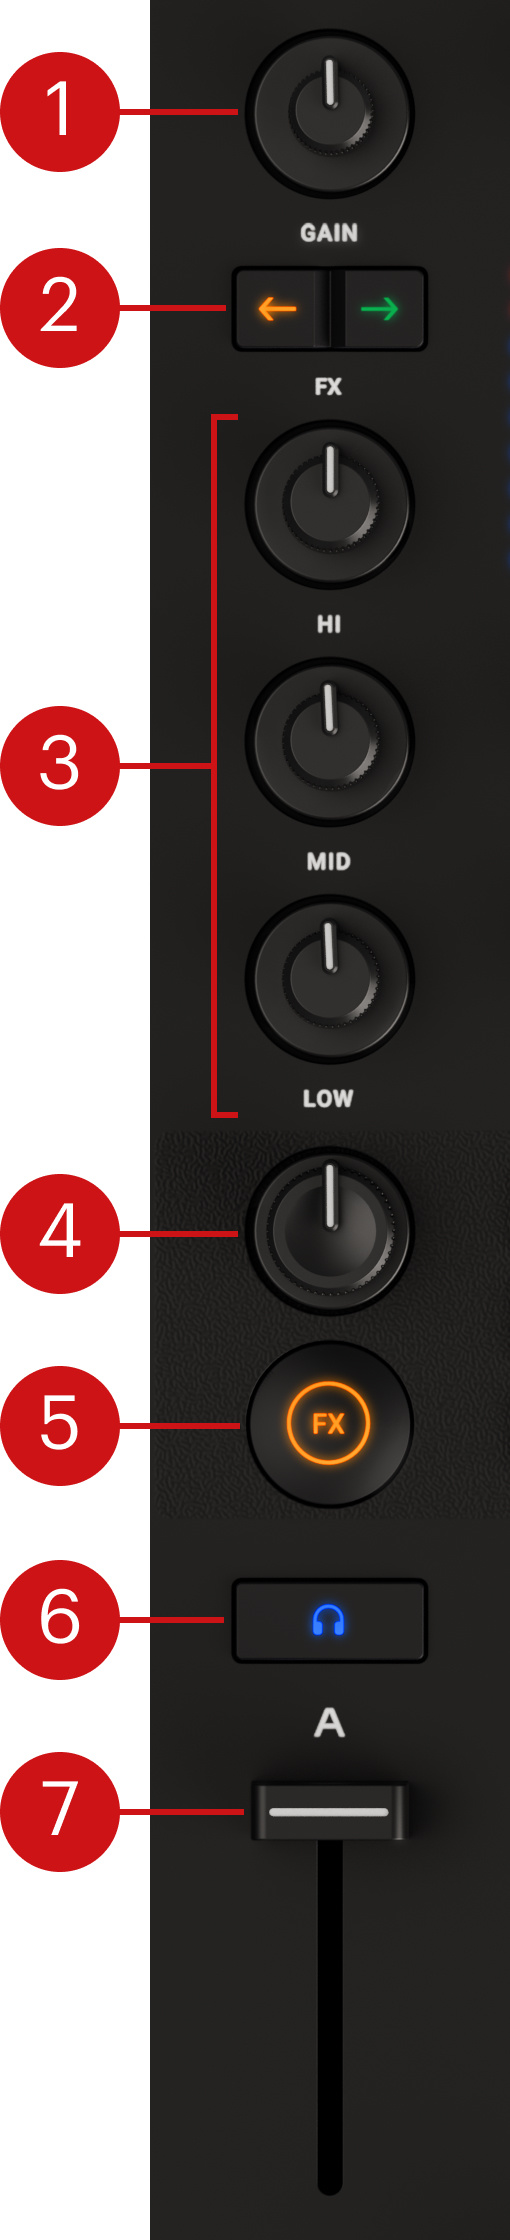 |
GAIN knob: Adjusts the input level of the signal from the Deck before it passes through the channel strip.
FX Assign buttons (left and right arrows): Activating the left or right Assign button sends the channel to the left or right FX Unit. The color of the Assign buttons quickly reminds you the mode of its FX Unit: orange for Group or Single mode, green for Pattern Player mode.
HI, MID, and LOW knobs: These knobs respectively adjust the level of the high-frequency, mid-frequency, and low-frequency contents in the audio signal. With a knob in the middle position the corresponding frequency band is left untouched. Pulling the knob to the right emphasizes its frequency band, while pulling it to the left attenuates its frequency band, up to complete removal with the knob at full left.
Mixer FX Amount knob: When the FX button is on below, this knob simultaneously filters the channel and controls the amount of Mixer FX applied to the remaining part. In center position the Mixer FX is deactivated on that channel. Turning the knob to the left progressively removes the high-frequency contents from the channel and applies the Mixer FX to the remaining low- and mid-frequency contents, while turning the knob to the right does the opposite, progressively removing the low-frequency contents and applying the Mixer FX to the remaining high- and mid-frequency contents.
Mixer FX On button (FX): Turns the Mixer FX on or off on that channel. On either channel there can be only one active Mixer FX at a time. The FX button color reminds you which Mixer FX is active for this channel. You can activate another Mixer FX by pressing the desired Mixer FX Select button (1–4 or FILTER) located nearby in the FX and output section.
Cue button (headphones symbol): Adds the channel to the Cue channel that is sent to your headphones. For example, this is useful to prepare your next track in your headphones before mixing it in.
Channel fader: Adjusts the channel level before the signal is sent to the crossfader.
Mixer FX and output section
The vertical strip of controls in the center of the Mixer is the FX and output section. It receives the signal blend from the crossfader and lets you adjust its final level before it is sent to your audience. It also lets you adjust the signal mix sent to your headphones, choose which Mixer FX is available on channel A and B, and activate the microphone input.
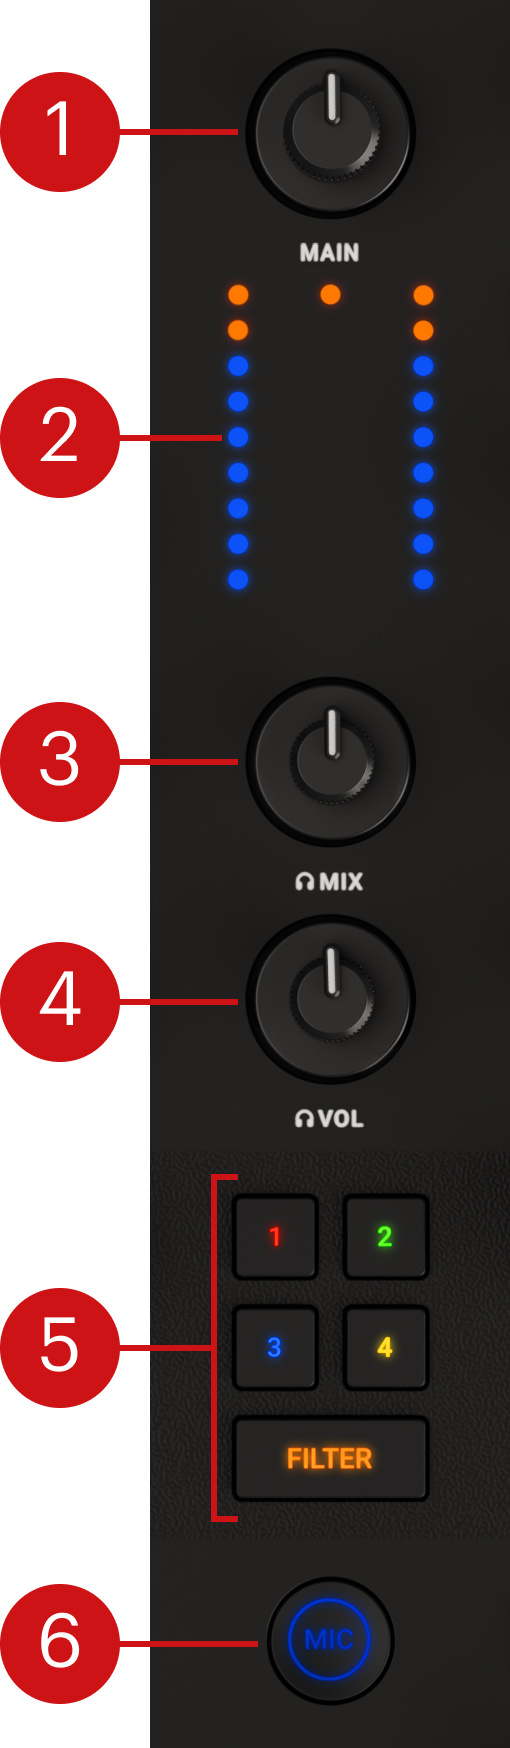 |
MAIN knob: Adjusts the level of the main signal sent to your audience. Under the knob, a clipping LED lights up orange if your main signal is too loud. In such a case, turn the MAIN knob to the left until the clipping light turns back off.
Channel Level meters: The left and right bar graph indicators show the pre-fader level of the signal on the left and right channels, respectively. If all the lights of an indicator are continuously on, the signal on that channel is too loud and you should attenuate it (for example, by turning the channel’s GAIN knob to the left). You can also use these indicators to visually balance both channel levels before mixing them.
Headphones MIX knob: Adjusts the mix in your headphones between the cue channel and the main signal: At full left you hear only the cue channel in the headphones, at full right only the main signal.
Headphones VOL knob: Adjusts the volume level of the headphones output.
Mixer FX Select buttons (1–4 and FILTER): These buttons let you activate one of four different Mixer FX or the Filter for use on the Mixer channels. Pressing either of the 1–4 or FILTER button will activate that Mixer FX on both channels. Pressing either button + the FX button on the left or right channel will activate the Mixer FX on that specific channel.
Note
You can change the particular Mixer FX loaded with button 1–4 in the Mixer page of the Preferences in the Traktor software.
MIC button: Mutes and unmutes the microphone input in the main mix.
Note
If needed, you can adjust the microphone input level using the MIC VOL knob on the rear panel of your controller.
Lights on the bottom panel
Under either Deck, the bottom panel of your controller features independent LED lights that provide further visual feedback for the Deck above.

By default, the light under either Deck is blue. This light changes to warn you in the following situations:
A green light indicates that a loop is active on that Deck.
A continuous red light indicates that the Deck is out of sync.
A blinking red light indicates that the track is nearing its end.
You can deactivate any of these color indicators, and modify the default color of the bottom lights in the Preferences of the Traktor Pro software, as described in Preferences – Traktor MX2 Colors page.