Preferences
The Preferences provides you with various options to customize specific parts of your Traktor setup.
The Preferences provides you with various options to customize specific parts of your Traktor setup. This section describes the Preferences dialog including all options in the corresponding pages in order of appearance.
Preferences Dialog Overview
Traktor provides various options to customize specific parts of your system. This section describes all options from the Preferences dialog in order of appearance.

Preferences dialog.
The Preferences dialog contains the following main elements:
Preferences Pages: The customization options are sorted by category and occur in several tabs in the left column of the Preferences dialog. When connecting an external Native Instruments controller to your computer (e.g. Traktor Kontrol S2/S4), an additional Preferences page will appear. You will find more information on these Preferences in the corresponding hardware controller manual.
Reset Settings to Default button: Sets all the Traktor settings (for example, the settings on the Preferences pages and the layout adjustments) back to their default values. This allows you to start with a fresh Traktor Pro setup if needed.
Import button: Allows you to import a Traktor configuration from a Traktor Settings Information file (.tsi). After selecting the configuration file an Import filter dialog will be displayed allowing you to choose which settings to be imported.
Export button: Allows you to save a Traktor configuration in a Traktor Settings Information file (.tsi). An Export filter dialog will be displayed allowing you to choose which settings to be exported.
Close button: Closes the Preferences dialog.
Export and Import Filters
When exporting or importing a Traktor configuration, you can select which settings of the configuration to be exported or imported in a dialog.

Export/import dialog.
Keyboard Mappings: Export / import settings for keyboard mappings as configured in Preferences > Controller Manager.
Controller Mappings: Export / import settings for Controller Mappings as configured in Preferences > Controller Manager.
GUI Layout: Export / import settings for GUI layouts as set in Preferences > Layout Manager.
File Load- And Write- paths: Export / import settings for file directories as configured in Preferences > File Management > Directories.
Favorites: Export / import favorite browser details as configured in Preferences > Browser Details.
Broadcasting: Export / import Proxy, Server and Metadata settings from Preferences > Broadcasting.
Audio Device Settings: Export / import audio setup device details from Preferences > Audio Setup.
MIDI Clock settings: Export / import MIDI clock setting from Preferences > MIDI Clock.
Effect Settings: Export / import effects setting including FX Unit routing, FX Unit mode and FX pre-selection as configured in Preferences > Effects.
Other Preferences and setting: Export / import all other preference and settings such as Global settings for example, Tooltips on or off, or if Traktor starts in Fullscreen mode etc.
Preferences – Audio Setup Page
This section describes the options in the Audio Setup page.
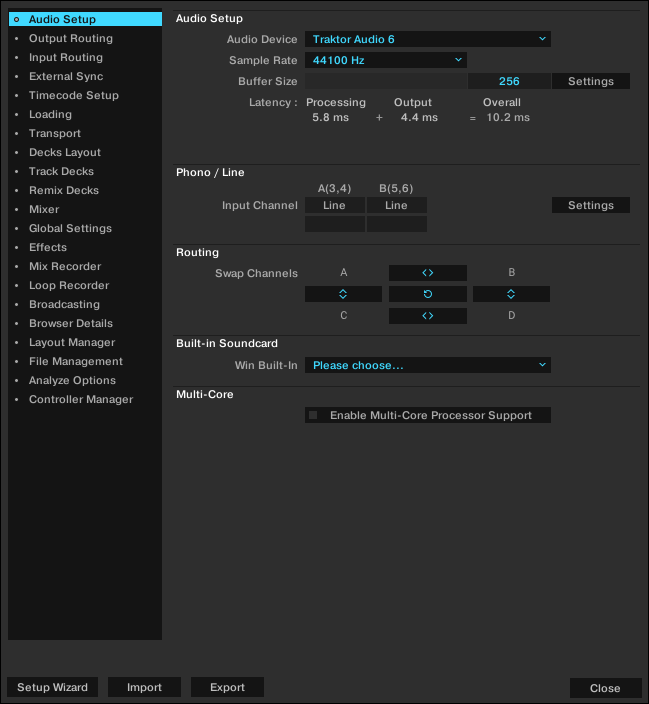
Preferences – Audio Setup page.
Audio Setup
Audio Device: Allows you to select the external audio interface. If no external audio interface is selected, you can always select the built-in sound card as the audio device.
Sample Rate: Allows you to select a sample rate according to the audio interface. Note that higher sample rates require more CPU load. The standard sample rate is at 44.1 kHz which is also used by audio by CDs.
Buffer Size: Determines the size of the audio data packages which are sent to and processed by the CPU. The higher the buffer size, the longer it takes for a signal to finally arrive at the output as audio. We recommend a value between 256 and 512.
Latency: Displays the calculated latency values determined by the Sample Rate and Buffer Size. Lower latency values are better but require more CPU load. A value too low can lead to audio dropouts, artifacts, or other unwanted behavior. Start with a latency setting of around 15 ms and adjust it according to your system. A value of between 5 ms and 10 ms is considered adequate.
On macOS, use the slider to set an audio latency that is suitable for your system. On Windows, use the Settings button to open your audio device’s control panel that lets you set the audio latency.
Phono / Line
Input Channel: Enables you to switch the Input channel from Phono to Line mode on a Native Instruments AUDIO 4 DJ and AUDIO 8 DJ Interface. This is necessary when switching from using from turntables to CD players.
Routing
Swap Channels: Enables you to reroute channels (swap channel pairs) from your audio interface within Traktor. This is useful for rerouting channels without physically swapping leads on your audio hardware.
Built-in Soundcard
Win Built-In: Allows you to select the internal soundcard as fallback. This will be the soundcard used by your system in case your Audio Device set in the Audio Setup section will be removed.
Multi-Core
Enable Multi-Core Processor Support: When activated, the CPU load can be brought down for demanding tasks such as running Key Lock on all Decks. The function must be deactivated, when running a second real-time application on the same computer.
Preferences – Output Routing Page
On this page you can configure the signal path from Traktor to your audio interface. The available options depend on the selected Mixing Mode. You can select either Internal or External Mixing Mode. The options for both Mixing Modes are explained in the following.
Note
The audio routing is usually automatically configured for all Traktor Kontrol controllers, certified controllers, and audio interfaces.
Internal Mixing Mode
If you use Traktor’s Internal Mixer select Internal. Internal mixing mode provides the following options:
Preferences – Output Routing page with Internal Mixing Mode selected.
Output Monitor: Selects the output pair to pre-listen to your tracks.
Using the Cue buttons on Traktor’s internal Mixer sends the audio signals of the internal Mixer channels to a separate output pair. In Internal Mixing Mode the Output Monitor channel is also the output channel of the Preview Player in the Browser.
Mono: Merges the channels into mono mode.
Output Master: Selects the output pair for the master output.
Mono: Merges the channels into mono mode.
Output Record: Selects the output pair for the recording output.
The recording outputs send the master output signal from Traktor to a separate mixer input or recording device for recording your mix.
External Mixing Mode
If you use an external mixer select External. External mixing mode provides the following options:
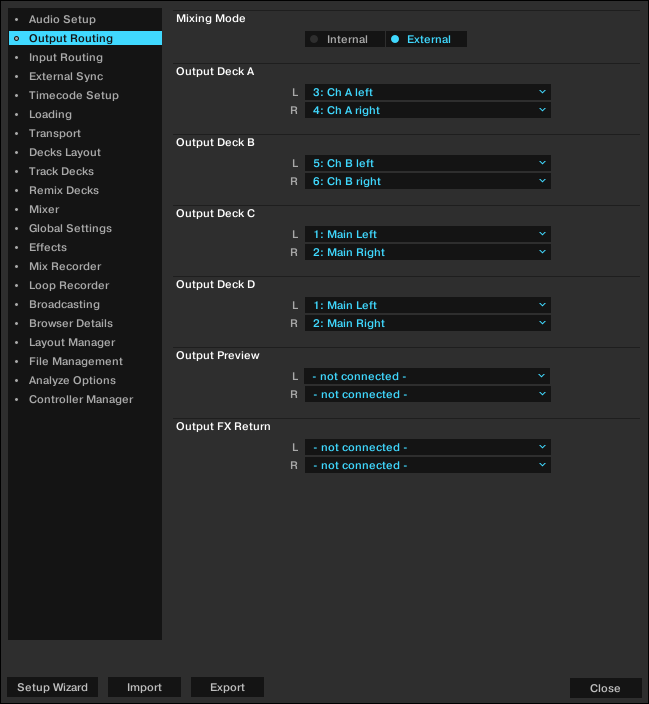
Preferences – Output Routing page with External Mixing Mode selected.
Output Deck A/B/C/D: Selects an output pair for each Deck.
The options depend on your audio interface. You may also sum Decks up to one output pair. This is useful if your audio interface has limited outputs.
Output Preview: Selects an output pair for the Preview Player.
Output FX Return: Selects an output pair for using send effects.
Preferences – Input Routing Page
Here you can configure how Traktor to use the various inputs of your audio interface for incorporating audio signals from external audio devices. The Volume Meters to the right of the input selections will display the signal level if a signal is present. You may also sum Decks up to one input pair.
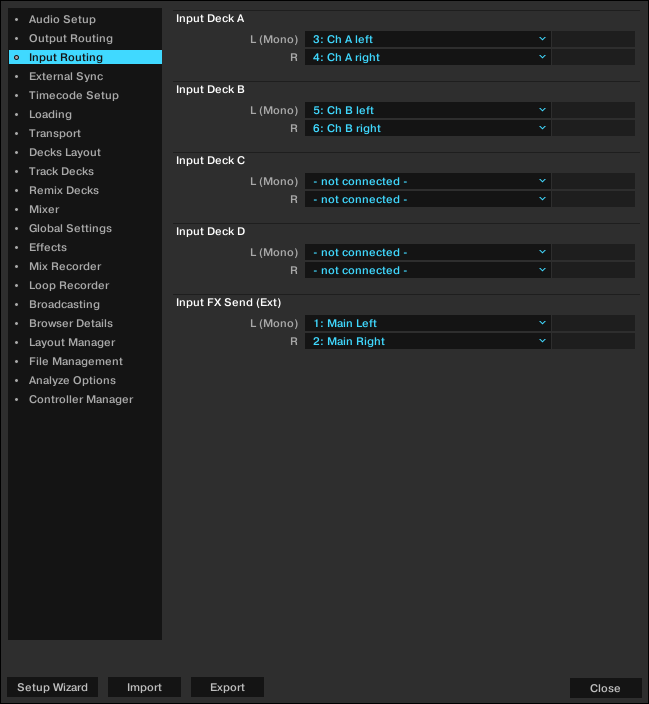
Preferences – Input Routing page.
Input Deck A / B / C / D: Selects an input pair for incorporating the audio signal from an external audio device.
Input FX Send (Ext): Selects an input pair for using send effects.
Input Aux: Selects an input pair for the auxiliary input. This is only available when Internal Mixing Mode is selected in the Output Routing page.
Preferences – External Sync Page
This section describes the options in the External Sync page.
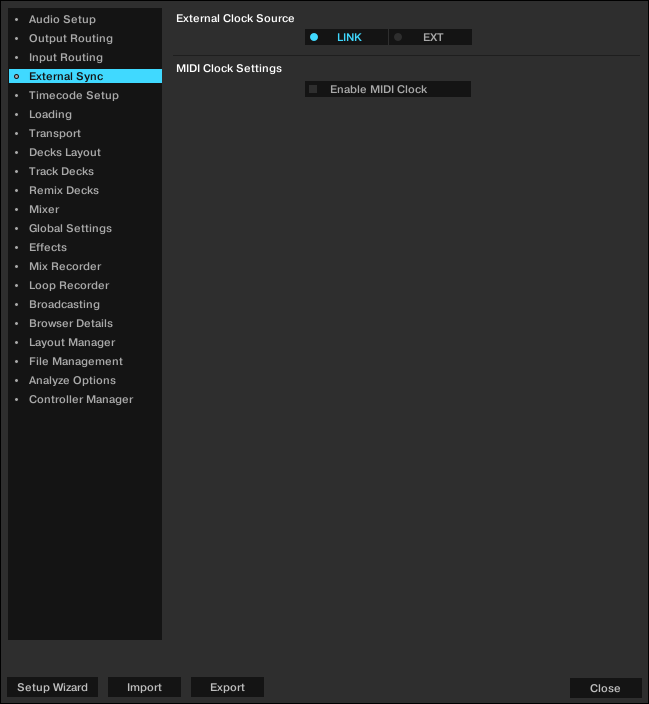
Preferences – External Sync page.
External Clock Source
LINK: if selected the LINK is displayed in the Master Control panel. Use this option for connecting to external devices using Ableton LINK connection.
EXT: If selected the LINK is replaced by the EXT. Use this option for connecting to external devices using MIDI connection.
MIDI Clock Settings
Enable MIDI Clock: If this option is checked, the Master Control panel extends providing you additional MIDI Clock controls.
Preferences – Timecode Setup Page
When using Timecode vinyls or Timecode CDs you can make special configurations in this page.

Preferences – Timecode Setup page.
Timecode Inputs
The control signal Scopes give you a visual idea of the quality of the Timecode Control signal.
Tracking
Track Start Position: Selects the start position of the tracking between 0 min and 10 min. This is useful if you want to sticker your record with a lead-in sticker, or the beginning of your control record is worn out or scratched.
Turntable Speed: Selects 45 RPM handling mode for the control record. This option requires to also select 45 RPM Playback on the connected turntable. When unchecked, 33 RPM is the default.
Tracking Alert: When selected Traktor gives visual feedback if the Timecode Control signal quality becomes bad. In this case the tracking buttons start flashing in red. While the red flashing is normal when you move the record back and forth, if the red flashing occurs during normal forward playback, you probably have dust under the needle.
Load next track when flipping record: With this option checked, you can load the next track of any Playlist by flipping the record.
Use playlist scrolling zone: With this option, you can enable Playlist Scrolling. For example, skipping to CD Track 3 allows you to scroll up and down through your Playlist by manually spinning the Jog Wheel on your CD player.
Switch to Absolute mode in lead-in: Check this option if you want the Tracking mode to switch to Absolute Mode when placing the needle in the Lead-In of the Timecode vinyl or skip to the first track of the Timecode CD.
Switch to Absolute mode when loading: Check this option if you want the Tracking mode always to switch to Absolute Mode when loading a track.
Preferences – Loading Page
This section describes the options in the Loading page.
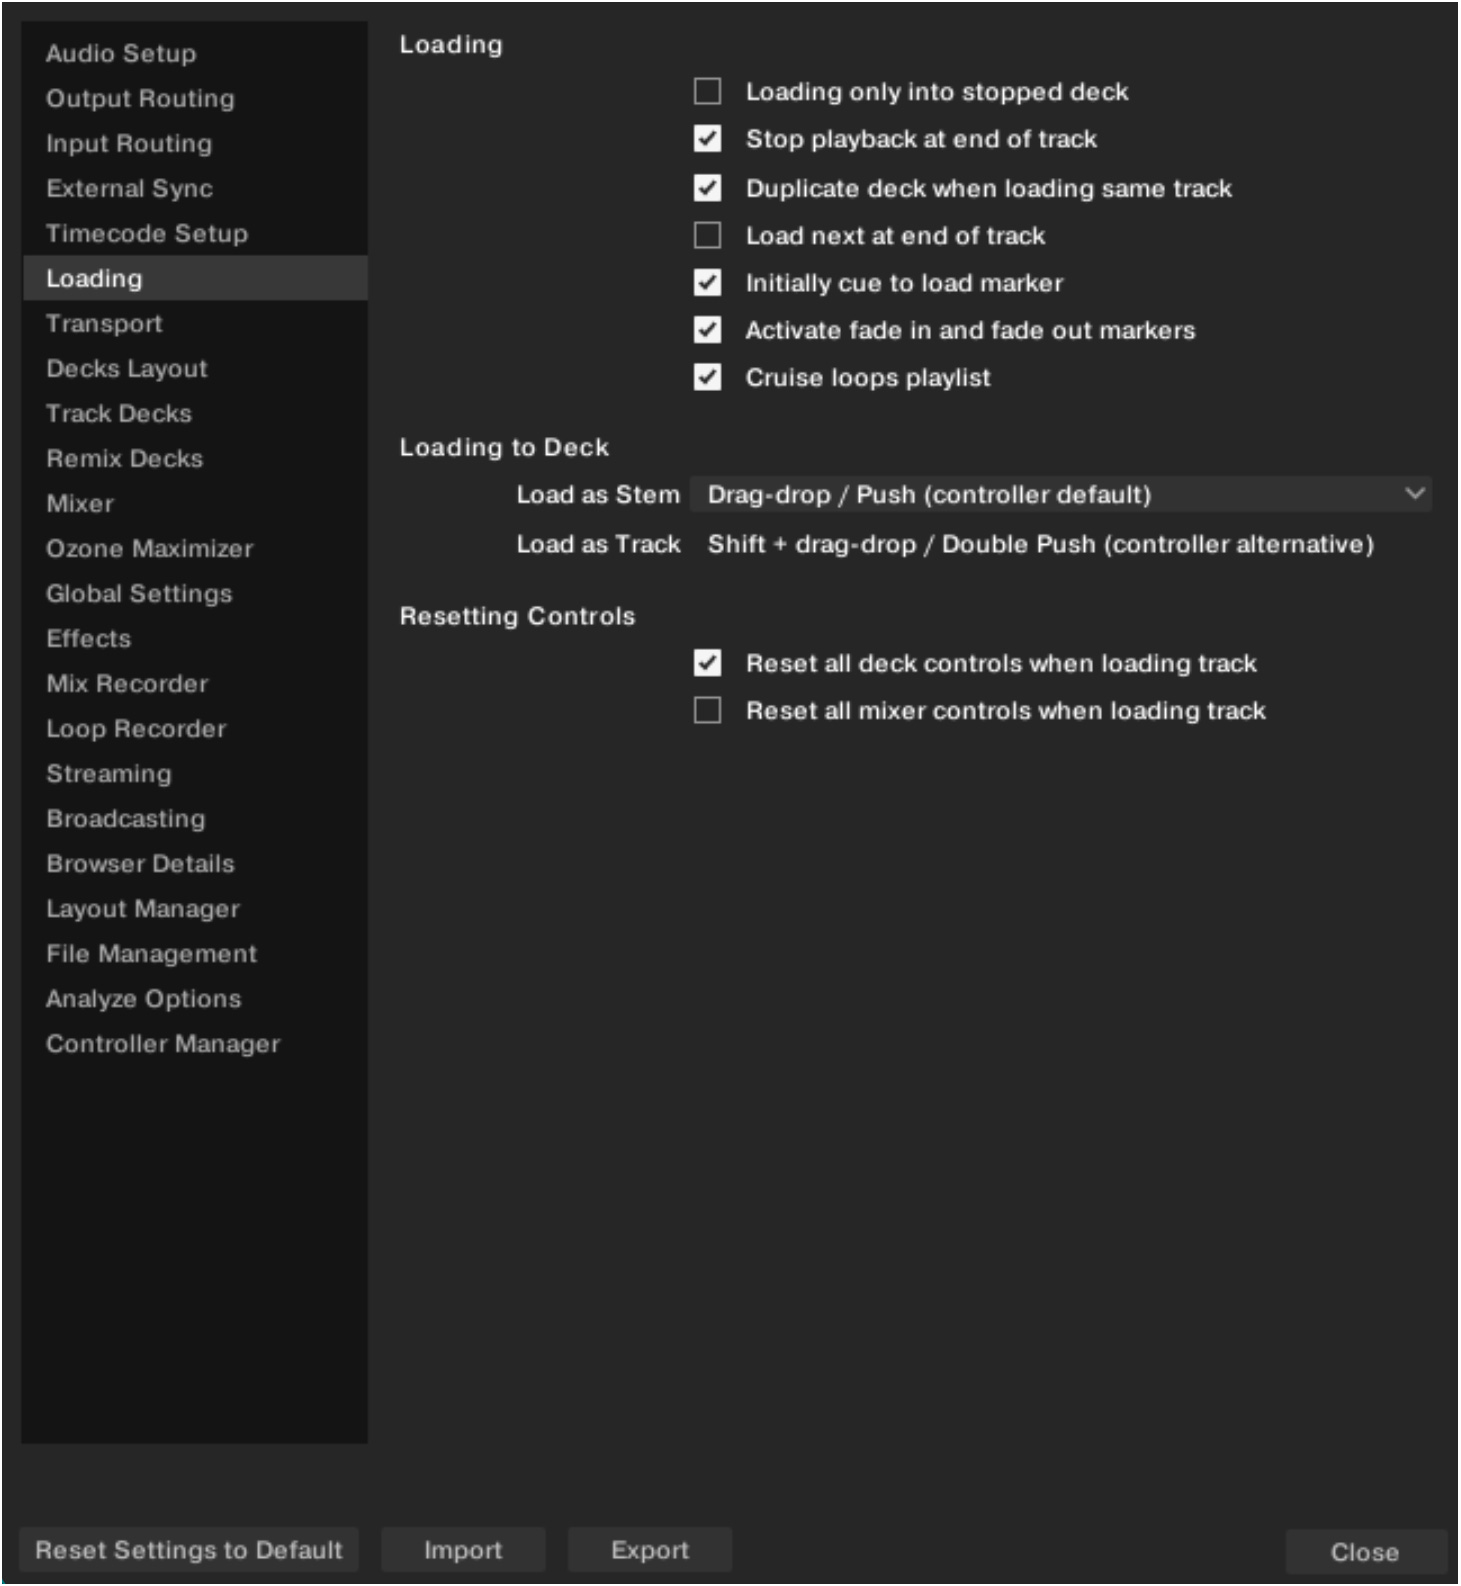
Preferences – Loading page.
Loading
Loading only into stopped Deck: Prevents loading into a playing Deck and therefore stops you from accidentally loading a track into the wrong Deck.
Stop playback at end of track: Stops the playback of a Deck when a track is at its end.
Duplicate Deck when loading same track: If a track is currently loaded into a Deck, you can directly copy the track and its playback position by using drag and drop from the Deck Heading to another Deck.
Load next at end of track: Enables Traktor to automatically load the next track from the current Playlist. Switching to another Playlist during playback does not activate another Playlist.
Initially Cue to Load Marker: With this activated, a track will automatically cue to an established Load Marker when it is loaded.
Activate Fade & Fade Out Markers: Allows the use of Fade In and Fade Out Markers for automatic crossfades between tracks.
Cruise Loops Playlist: This option affects the Cruise mode. With this option checked, Traktor will repeat the Playlist from the beginning when the end of the list is reached.
Loading to Deck
Both settings in this section affect the loading behavior for tracks with a Stem version available.
Load as Stem: Selects the action for loading the Stem version of the track. The options selected here and in Load as Track are mutually exclusive.
Load as Track: Selects the action for loading the original track. The options selected here and in Load as Stem are mutually exclusive.
These settings also affect the loading behavior on your hardware controller. For more information on the Stem versions of your tracks, refer to Working with Stems.
Resetting Controls
Reset all Deck controls when loading track: Resets all Deck controls to their default value when a track is loaded.
Reset all mixer controls when loading track: Resets all mixer controls to their default value when a track is loaded.
Preferences – Transport Page
This section describes the Transport page options.

Preferences – Transport page.
Tempo
Set Tempo Range To: Determines a global tempo range for all Tempo faders to define the maximum amount you can increase or decrease tempo. The available values are 2 %, 4 %, 6 %, 8 %, 10 %, 12 %, 14 %, 16 %, 18 %, 20 %, 25 %, 35 %, 50 % and 100 %. If you choose a range of 100 % you are able to perform a full stop of a track.
Current Tempo Range: Displays the current tempo range for the Tempo Fader of each Deck.
Tempo Bend
Sensitivity: Adjusts the sensitivity of the Tempo Bend function. The value range of the slider is 0–200%. By default the Sensitivity is set to 100%.
Tempo Bend Progressive Sensitivity: When unselected, using the Tempo bend buttons slightly increases or decreases the tempo as long as one of the Tempo bend buttons are used. When selected, using the Tempo bend buttons let the tempo progressively speed-up or slow-down as long as the Tempo bend buttons are used.
Sync Mode
There are two methods for synchronizing tracks: TempoSync and BeatSync.
TempoSync: Maintains tempo-only synchronization between the tracks. The phase of the Decks will be aligned when the SYNC button is used. If the phase of the Decks are shifted, SYNC will turn dim. The tempos will remain synced in this mode.
BeatSync: Forces tempo and phase synchronization between the tracks. The phase of the Decks will be aligned when the SYNC button is used. If the phase of the tracks are shifted manually, for example, by Scratching or holding a Deck in the stopped position, SYNC will turn dim, but Traktor will re-align the phase of the tracks when the Deck plays normally again, when you release the record or Jog Wheel.
This concept allows you, even if you are using Traktor Scratch, to keep your tracks tempo-matched, and also raise the tempo of two or more tracks simultaneously, even if their phases are shifted.
Auto Master Mode: There are two options for enabling Tempo Master for the Remix Deck, and for restricting assignment of the Tempo Master to Decks that are on air:
Remix Decks can be Tempo Master: With this option activated, Remix Decks will behave in a standard Deck manner, meaning, they can become your Tempo Master throughout a mix. If you wish for Remix Decks to never be the Tempo Master, disable this option.
Only On-Air Decks can be Tempo Master: When deactivated, a Deck can only become the Tempo Master automatically if it's loaded and playing. Therefore, if you stop the current Tempo Master, Traktor will find the next playing Deck and assign it as the Tempo Master.
When activated, it will be mandatory that the playing Deck is audible in the master output in order to become Tempo Master.
You might prefer having this option turned on as it will ensure that the Tempo Master is always a track that you can hear, so there is no risk of synced Decks following the tempo of a Deck that cannot be heard.
However, in some cases, especially when performing scratch routines, you will prefer to leave this preference turned off. This way, you can perform scratch routines (which includes turning the volume down on certain Decks without either the channel faders or the crossfader) with Traktor assigning the Tempo Master to a different Deck.
Key Lock
Mode: The Key Lock Modes determine the range in which the Key Lock function operates if activated in the Decks.
Scratch: Key Lock gets deactivated when playback speed is below -30 % or above +50 %. When doing scratch routines with Timecode media or Jog Wheels, this leads to a more natural scratch sound.
Appearance: With the checkbox Displaying resulting key and offset you can enable or disable the key and offset information to be displayed in Key Lock button. This checkbox is checked by default. When unchecked and you enable Key Lock, the Key Lock button in the Stripe will appear blue without providing key information.
Loops
Auto-Detect Size: Determines the size beneath which a track is automatically detected as a loop and therefore will be looped automatically. An automatically detected loop will show the green loop markers at the beginning and end in the Waveform/Stripe.
Play Count
Min. Playtime: Determines the time that must be exceeded until a track is marked as played and therefore is added to the history Playlist for this session. When the minimum playtime is reached, the track is displayed with the Checkmark icon, which marks it as played. Also, its Play Count is raised.
Beat Counter
Bars per Phrase: Determines how many bars a phrase shall contain. A bar consists of 4 beats. This setting directly influences the Beats and Beats to Cue options in Preferences > Decks > Deck Heading.
Mouse Control
The following options affect the behavior of the detailed waveform when clicking it with the mouse. The following modes are available:
Vinyl: When activated, clicking the waveform stops the track like putting your hand on a record on a turntable. Holding the mouse and dragging back and forth works like scratching or spinning a record.
Snap: When activated, the mouse arrow will always snap to the beat of the loaded track.
If you click inside the waveform the play position jumps to the beat next to where you clicked and the playback stops.
Clicking in the waveform and holding the mouse button while the Deck is paused works like the Cue button.
Right-clicking on the waveform works like the Deck Play button.
Cue Play (CUP Mode)
Instant: Instantly starts playback when clicking CUP.
On Release: Starts playback after releasing CUP button.
Preferences – Decks Layout Page
This section describes the options in the Decks Layout page.
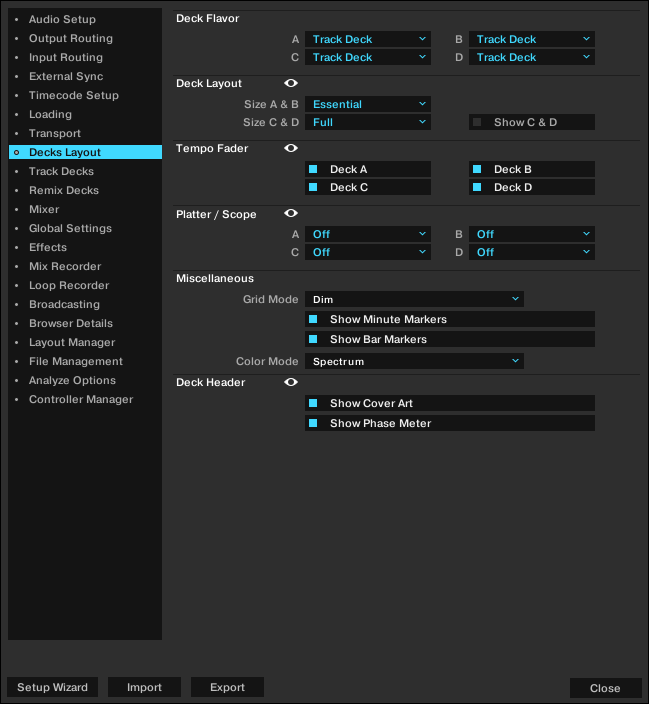
Preferences – Decks Layout page.
Deck Flavor
A, B, C, D: Selects the current Deck Type for each Deck. Track Deck, Remix Deck, Stem Deck, or Live Input.
Deck Layout
Size A & B, Size C & D: Switch between Micro, Small, Essential, Full or Advanced Decks to save screen space. Micro and Small Decks do not show the Waveform and Advanced Controls. Select Advanced Decks to make Advanced Controls visible.
Show Deck C & D: Displays Decks C and D. If unchecked, Decks C and D are hidden and muted, except for Live Input flavor which will stay live even if Decks C and D are hidden.
Tempo Fader
Here you can determine on which Decks the Tempo Fader is activated and visible.
Platter / Scope
Here you can switch between Minimized, Platter, and Scope panels to be visible in the Decks when using Traktor Scratch. You may also turn the panels off.
Notice
Scratch Panels are only available if Traktor Scratch and the required hardware are installed.
Miscellaneous
Grid Mode: Switches the view of the Beatmarker from Full, Dim, Ticks and Invisible.
Show Minute Markers: Switches the Minute Markers in the Stripes on or off.
Show Bar Markers: Switches the Bar Markers in the Waveforms on or off.
Color Mode: Select from four waveforms Ultraviolet, Infrared, X-Ray, and Spectrum.
Deck Header
Show Cover Art: Switches the Cover Art icon in the Deck Headers on or off.
Show Phase Meter: Switches the Phase Meters in the Decks on or off.
Preferences – Track Decks Page
This section describes the options available for the Track Deck page. These options also apply to the Stem Decks.
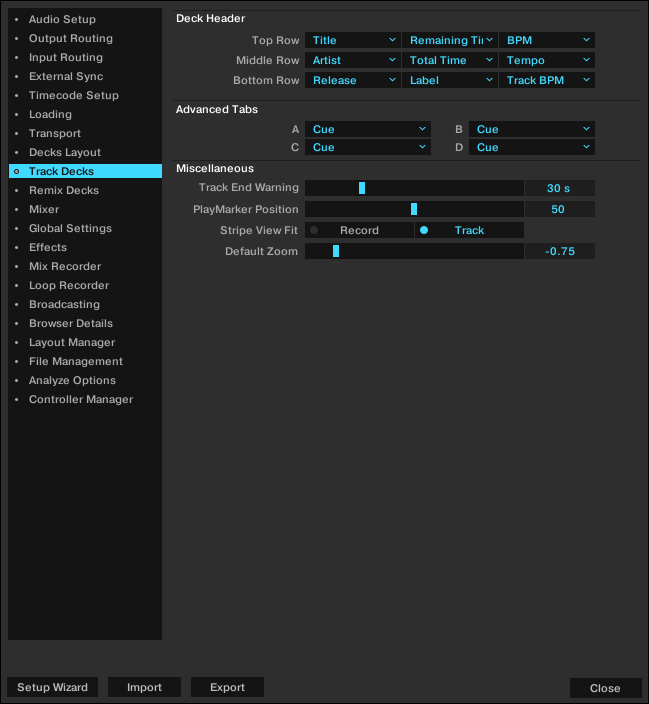
Preferences – Track Decks page.
Deck Header
Top Row / Middle Row / Bottom Row: Here you can choose what information is displayed in the Deck Header when a track is loaded. There are three fields available for each row. The top row is displayed larger and the bottom row smaller, so you can sort the information by importance.
Advanced Tabs
A, B, C, D: Select for each Deck which Advanced Panel page is displayed when opening the Advanced Panel.
Miscellaneous
Track End Warning: Determines the point in time when the track end warning will begin. When the playback position on the Track Deck reaches the set Track End Warning time the Stripe will flash red indicating the track is about to end. The timescale of the Track End Warning ranges from 0 to 120 seconds.
PlayMarker Position: Determines the playhead position in the Waveform. The playhead indicates the current playback position within a track. At value 0 the playhead position is at the far left, at value 50 it is in the middle (default position), and at value 100 it is at the far right.
Stripe View Fit: Determines the Stripe view either from the length of the Record (timecode media) or to the actual length of the loaded Track. The Record will represent the whole Stripe view even if the loaded track is shorter. Track is selected by default.
Default Zoom: Determines the default Zoom level of the Waveform view on the Track Decks. A value of -1.00 will zoom out as far possible and likewise a value of +1.00 will zoom in as close as possible. Once the default value is set the Track Decks will maintain this view each time they are used. Alternatively, you may use the + and - symbols on the waveform display itself to alter the zoom view.
Preferences – Remix Decks Page
This section describes the options in the Remix Decks page.
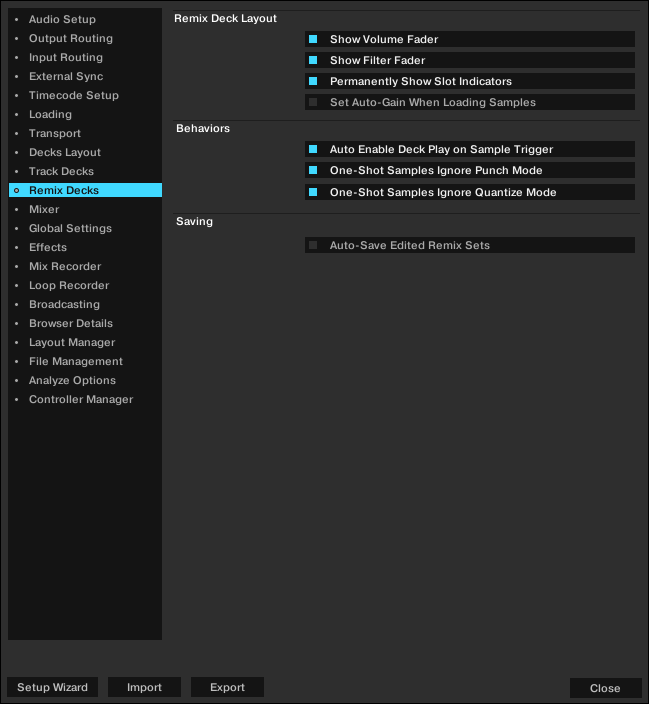
Preferences – Remix Decks page.
Remix Deck Layout
Show Volume Fader: Determines if the Slot Volume controls are visible or hidden in the Remix Deck.
Show Filter Fader: Determines if the Filter fader controls are visible or hidden in the Remix Deck.
Permanently Show Slot Indicators: Determines if the minimized Slot Parameter indicators are permanently visible or not in the Remix Deck. When checked, minimized Slot Parameter indicators are always visible in the Sample Slots. When unchecked, the minimized Slot Parameter indicators are hidden. In both cases, the Slot Parameter buttons will always appear when hovering the mouse pointer over the Sample Slots.
Set Auto-Gain When Loading Samples: Determines if Traktor should use the Auto-Gain value stored in a Sample when it is loaded into the Remix Deck. When this option is unchecked, Traktor will leave the Sample's gain at 0.0 dB, thus, playing the Sample at its original level. When checked, Traktor will adjust the gain level as specified by the Auto-Gain level in the Sample so that it plays at an almost maximum volume (matching the level of other Samples that were loaded with Auto-Gain).
Behaviors
Auto-Enable Deck Play on Sample Trigger: With this option activated, Traktor will force the Remix Deck's Play button to the on state whenever you trigger a Sample, even if the Deck had been previously stopped. When this option is deactivated, triggering Samples will have no effect on the Remix Deck's Play button, allowing you to select the Sample before starting playback of the entire Deck.
One-Shot Samples Ignore Punch Mode: With this option activated, Samples in One-shot mode will ignore the setting of Punch mode, they will always play starting from the beginning. When this option is deactivated, Samples in One-shot mode will follow the rules of Punch mode: they will start playing from a location corresponding to the phase/location of the previously playing Sample.
One-Shot Samples Ignore Quantize Mode: With this option activated, Samples in One-shot mode will ignore the setting of the Remix Deck's Quantize mode.
Saving
Auto-Save Edited Remix Sets: When this option is activated, Traktor will automatically save the current Remix Set when you initiate actions that will alter the current contents of the Remix Deck.
Notice
When initiating Auto-Save, you will not be presented with any dialogs. If the Remix Set already exists in the Track Collection, the older version will be automatically overwritten.
When this option is unchecked, Traktor will not attempt to save edited Remix Sets in the above conditions. Instead, Traktor will simply discard all changes made. This can be the preferred workflow if you want your Remix Sets to always start from the same state for each performance, regardless of what you did to them during a previous performance.
Preferences – Mixer Page
This section describes the options on the Mixer page.
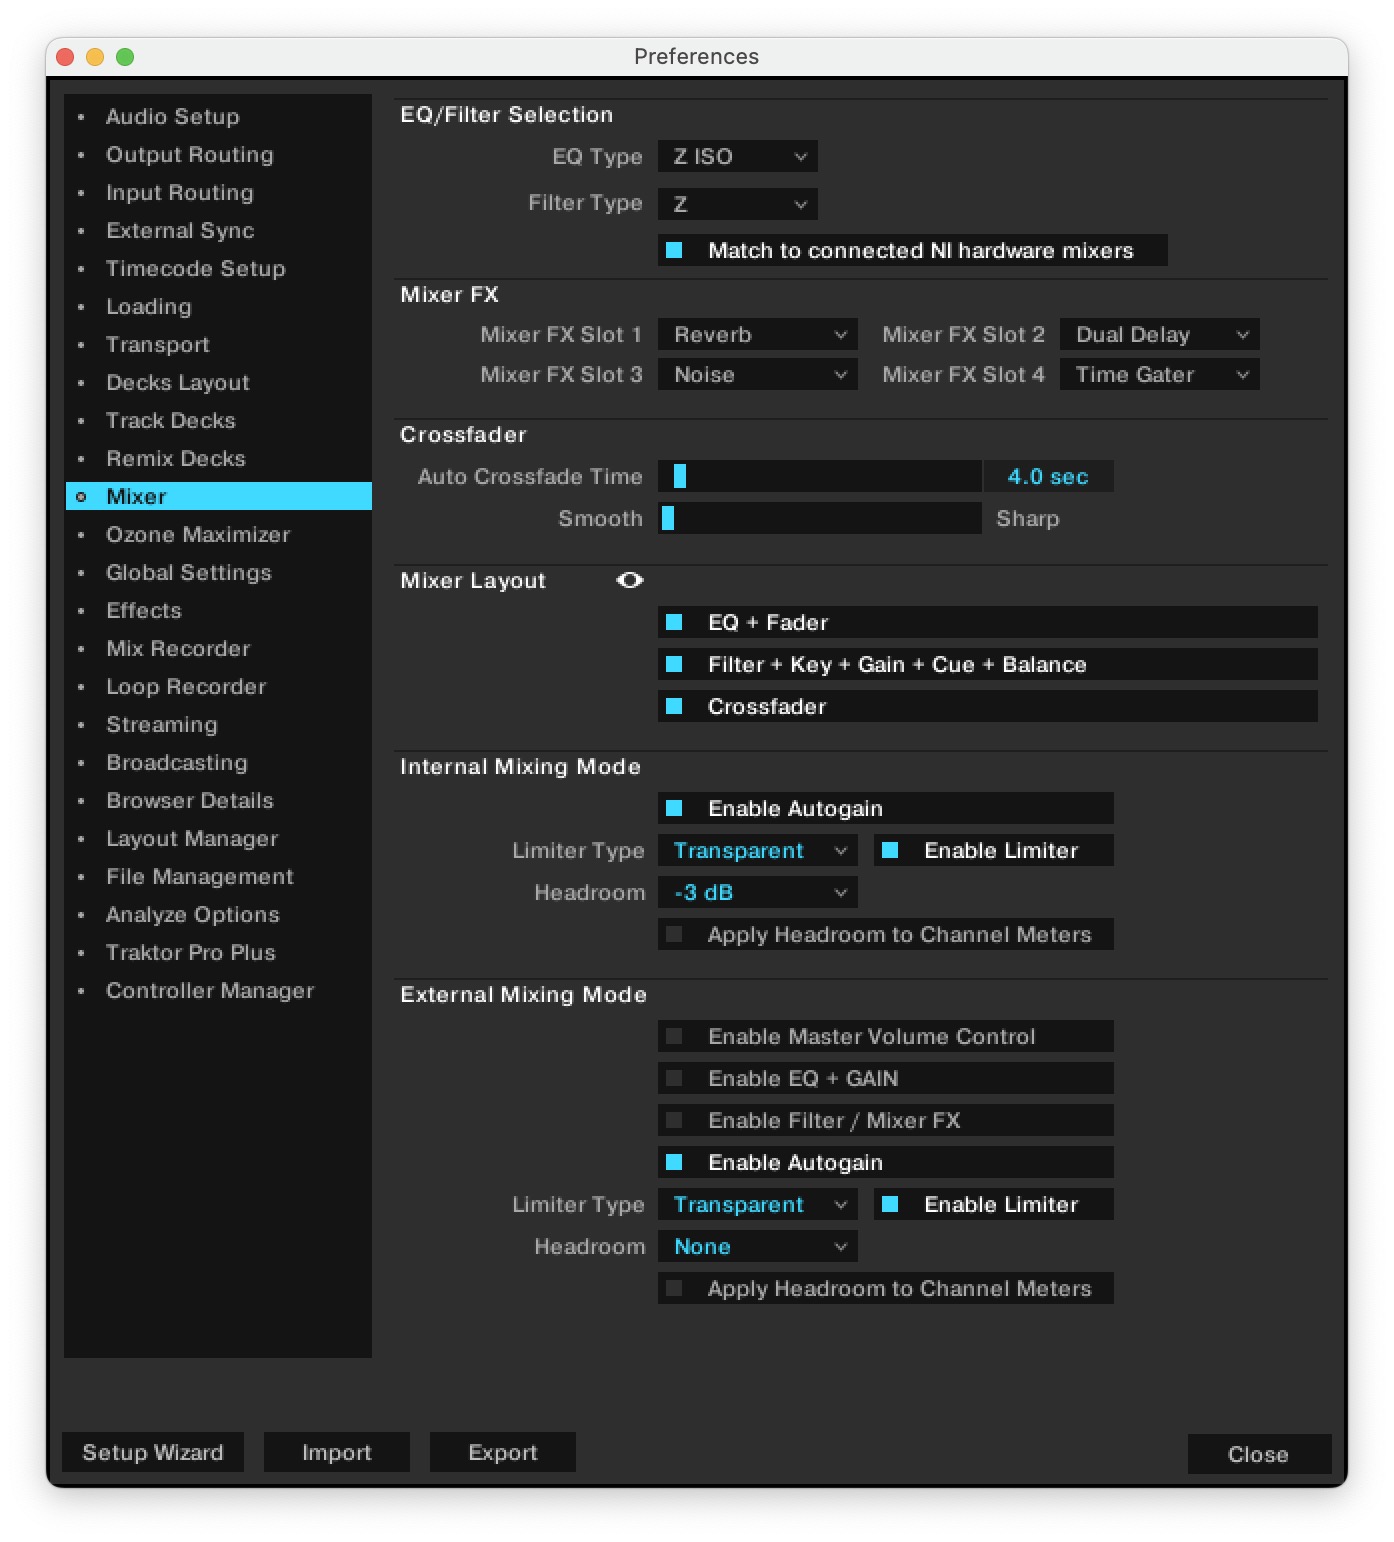 |
Preferences – Mixer page.
EQ / Filter Selection
EQ Type: Selects the EQ type to be controlled using the internal Mixer. You can choose between six alternative EQ Types, which differ from each other in their sound and features:
Classic: The standard three-band Traktor EQ.
P600: This three-band EQ model references older DJ mixers by a Japanese manufacturer.
NUO: This three-band EQ model references a line of DJ mixers by a Spanish manufacturer.
Xone: This EQ model references a line of DJ mixers by a British manufacturer. It adds an additional mid setting for a total of four EQ-bands. Note that this additional band may not be accessible from your controller.
Z ISO: This is the same three-band EQ as found in the new Traktor Kontrol Z2 DJ mixer. It is a full kill isolator EQ with a 24 db/octave slope, and sharply cuts the respective frequency band when turned fully counterclockwise.
P800: This three-band EQ model references more recent DJ mixers by a Japanese manufacturer.
Filter Type: Selects the Filter type to be controlled using the internal Mixer.
Ladder: The Ladder filter concept is commonly associated with classic synthesizers. It offers a steep response and a lot of resonance.
Xone: This filter is modeled after a line of DJ mixers by a British manufacturer. It has a more mellow slope and less resonance.
Z: This is the same filter model as found in the new Traktor Kontrol Z2 DJ-mixer. It is a steep filter, but it does not have as much resonance as the Ladder model.
Mixer FX
Mixer FX Slot 1, 2, 3, 4: Preselect one of seven available Mixer FX for each of the Mixer FX slots: Reverb, Dual Delay, Noise, Time Gater, Flanger, Shepard, and Barber Pole.
Crossfader
Auto Crossfade Time: Adjusts the amount of time for the auto crossfade function to crossfade between tracks.
Smooth/Sharp: Adjusts the crossfader curve from Smooth to Sharp.
Mixer Layout
EQ + Fader: Shows or hides the EQ controls and the Channel faders from the internal Mixer.
Filter + Key + Gain + Cue + Balance: Shows or hides the Filter, Key, Gain, Cue, and Balance controls from the internal Mixer.
Crossfader: Shows or hides the crossfader from the internal Mixer.
Internal Mixing Mode
The options in this section let you configure the Internal Mixing Mode.
Enable Autogain: When you enable this option, Traktor adjusts the gain for the incoming audio signals automatically.
Enabled: Activates the Limiter to prevent clipping of the outgoing audio signal. You can also access this option directly from the Master Control panel by clicking the LIMITER or BOOST label below the MAIN level knob.
Limiter/Boost Type: Selects the Limiter type Classic, Transparent, or Ozone from the drop-down menu.
Classic allows a slight digital distortion of the signal.
Transparent compresses the signal in a less audible way.
Ozone activates the Ozone Maximizer. The Ozone Maximizer is a powerful tool that will prevent your master from clipping while dramatically lifting the perceived overall audio level for more loudness, all without sacrificing crisp detail. For more information on using the Ozone Maximizer, refer to Ozone Maximizer.
Headroom: Here you can define the size of the headroom by selecting one of the values from the drop-down menu. Select from None, -3dB, -6dB, -9dB, or -12dB. When None is selected, there is no additional headroom before the audio signal starts clipping. When a specific value is selected, there is additional headroom in the relevant size before the signal starts clipping.
Apply Headroom to Channel Meters: When this setting is activated the current headroom setting is visually reflected by the Channel Meter LEDs in the Mixer channels.
External Mixing Mode
When you enable the External Mixing Mode on the Output Routing page in the Preferences, then the audio signals bypass the internal Mixer. The audio signals are directly sent to the outputs of the audio interface. The options in this section let you configure the External Mixing Mode. This enables you to additionally use the internal Mixer controls. The following options are available:
Enable Master Volume Control: Enables the Master Volume control in the software. When you use the MAIN knob in the software, then you can adjust the levels for all outgoing audio signals at once.
Enable EQ + GAIN: Enables the EQ and GAIN controls in the Mixer channels in the software. When you use the EQ and GAIN controls, then you can individually adjust the EQ and GAIN values for the outgoing audio signals.
Enable Mixer FX: Enables the Mixer FX controls in the software. You can then apply Traktor's Mixer FX to the outgoing audio signals.
Enable Autogain: When you enable this option, Traktor adjusts the gain for the incoming audio signals automatically.
Limiter/Boost Type: Selects the Limiter type Classic, Transparent, or Ozone from the drop-down menu.
Classic allows a slight digital distortion of the signal.
Transparent compresses the signal in a less audible way.
Ozone activates the Ozone Maximizer. The Ozone Maximizer is a powerful tool that will prevent your master from clipping while dramatically lifting the perceived overall audio level for more loudness, all without sacrificing crisp detail. For more information on using the Ozone Maximizer, refer to Ozone Maximizer.
Enabled: Activates the Limiter to prevent clipping of the outgoing audio signal. You can also access this option directly from the Master Control panel by clicking the LIMITER or BOOST label below the MAIN level knob.
Headroom: Here you can define the size of the headroom by selecting one of the values from the drop-down menu. Select from None, -3dB, -6dB, -9dB, or -12dB. When None is selected, there is no additional headroom before the audio signal starts clipping. When a specific value is selected, there is additional headroom in the relevant size before the signal starts clipping.
Apply Headroom to Channel Meters: When this setting is activated the current headroom setting is visually reflected by the Channel Meter LEDs in the Mixer channels.
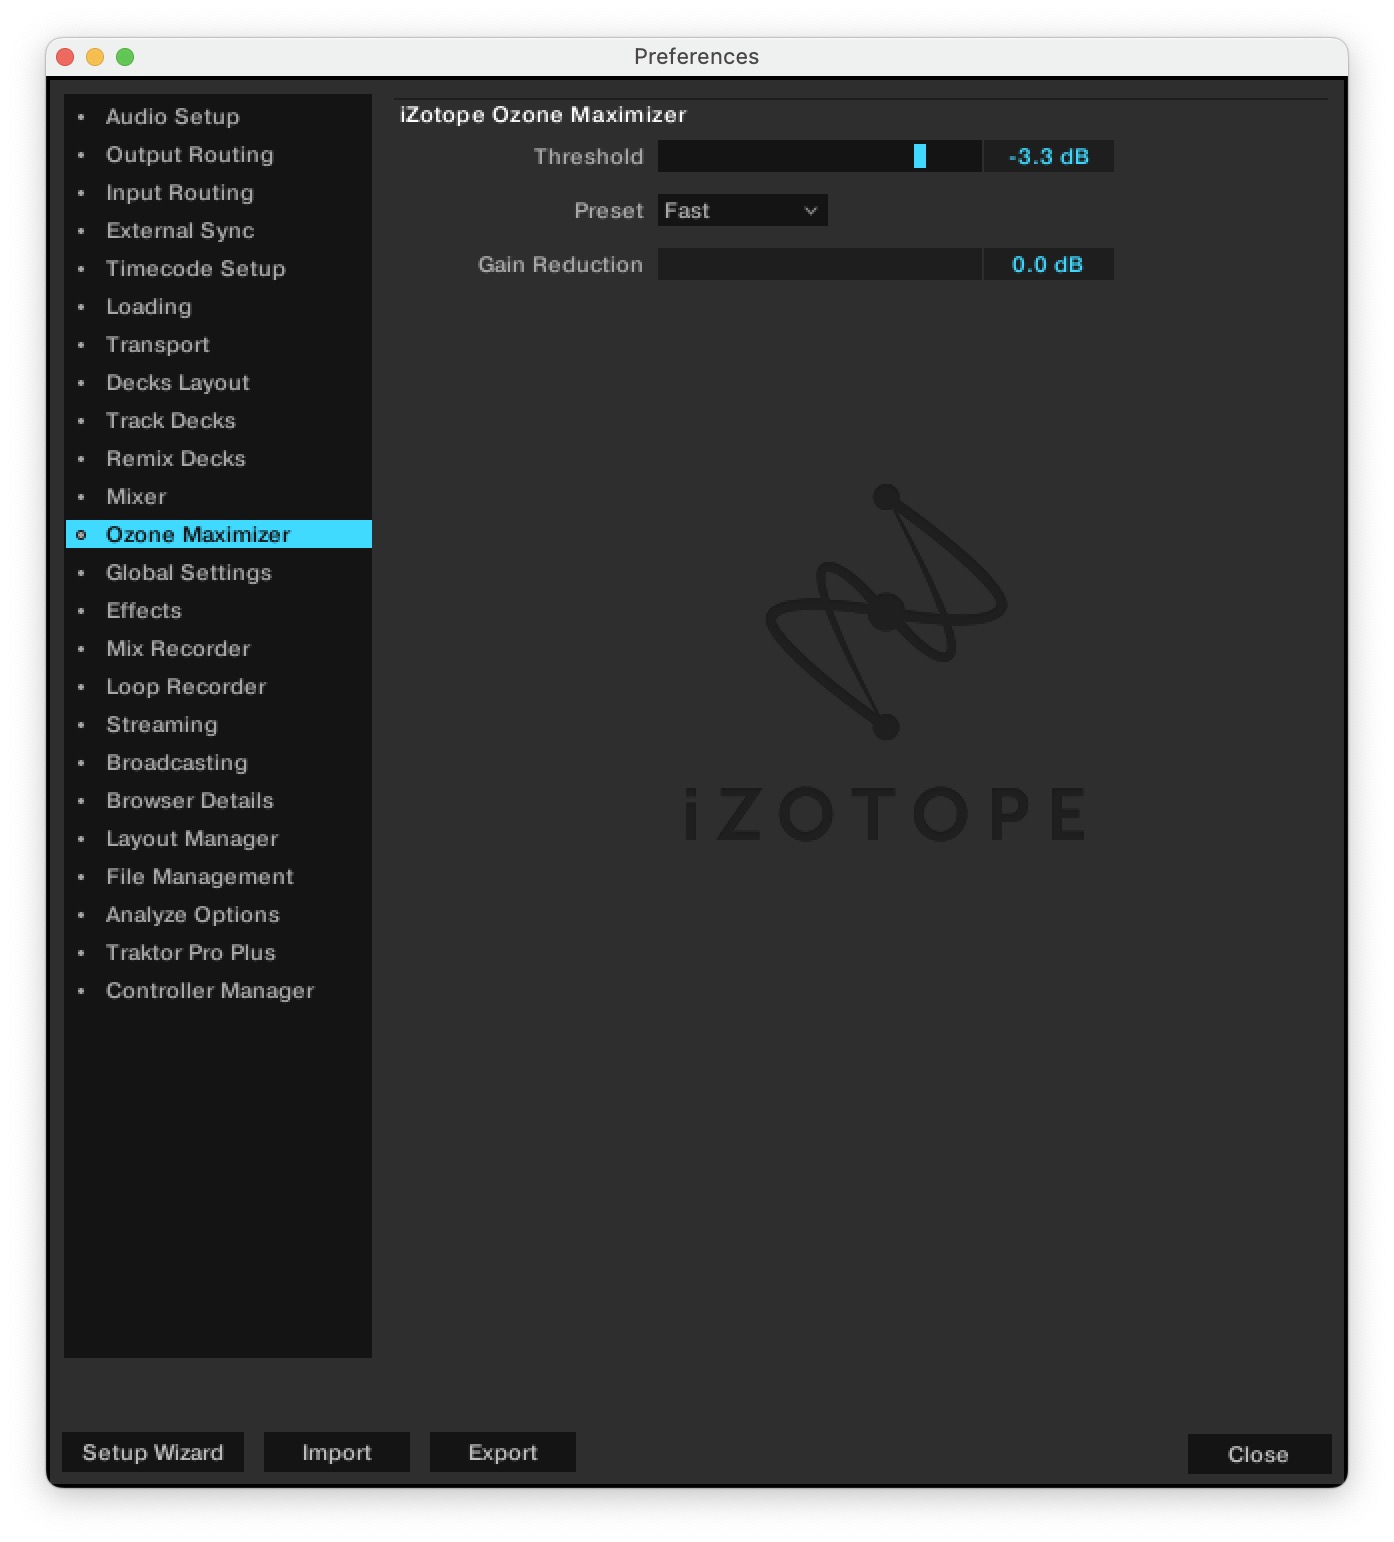
Preferences – Ozone Maximizer page
To use this special limiter on your master output, check on the Mixer page of the Preferences to make sure that limiting is activated in the mixing mode that you are using, then select Ozone as the limiter type. When Ozone is selected, the settings in the Ozone Maximizer page become available and can be used to adjust the Ozone Maximizer’s behavior. For more information, refer to Ozone Maximizer.
 |
Preferences – Global Settings Page
This section describes the options in the Global Setings page.
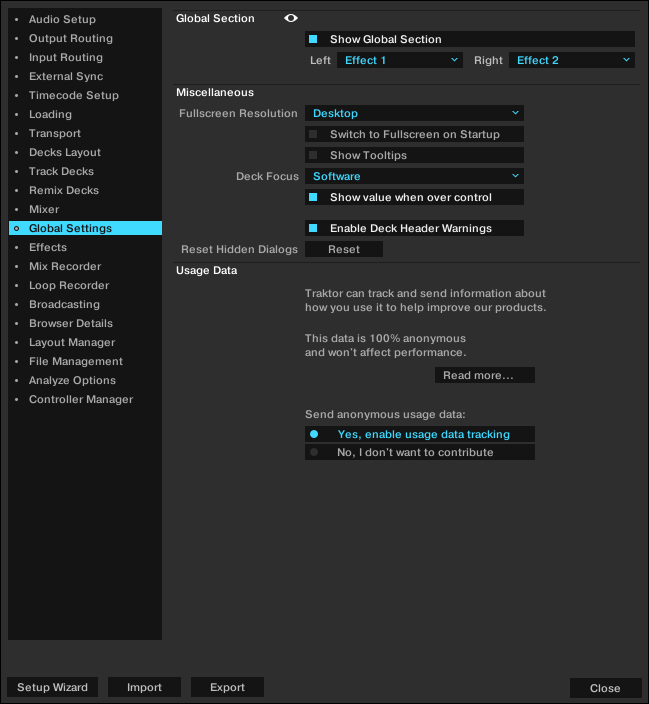
Preferences – Global Settings page.
Global Section
Show Global Section: Shows or hides the Global section.
Left: Determines if FX Unit 1 or LOOP RECORDER to be displayed by default on the left-hand side of the Global section.
Right: Determines if FX Unit 2 or AUDIO RECORDER to be displayed by default on the right-hand side of the Global section.
Miscellaneous
Fullscreen Resolution: Determines the zoom factor of Traktor’s fullscreen view. If set to Desktop, Traktor uses the native resolution of your computer 1:1. When choosing another option, the full screen view appears larger (zoomed in) because Traktor assumes a lower screen resolution. The available options depend on your hardware.
Switch to Fullscreen on Startup: With this selected, Traktor will open in full screen mode (maximizing the Traktor window) each time it is started.
Show Tooltips: Enable or disable Tools Tips. If you would like to familiarize yourself with Traktor we recommend you enable Tool Tips as they provide a short descriptions of interface.
Deck Focus: Select control of the visual Deck Focus from the following menu:
Software: Enable Software control of Deck Focus.
Hardware: Enable Hardware control of Deck Focus.
None: Disable Deck Focus.
Show value when over control: With this option checked, knobs like Gain, Master Volume, or the Effects’ knobs show their actual value when hovering over it.
Enable Deck Header Warnings: When activated, Traktor informs you of important deck related warning messages directly through the Deck Headers. With the Deck Header Warnings deactivated, Traktor's status bar will still display warnings.
Reset Hidden Dialogs: Resets all dialogs that have been hidden by clicking on the “Don’t Show This Again” checkbox.
Usage Data
Usage Data Tracking can be deactivated / activated at any time, allowing you to decide exactly when you wish to share anonymous data.
Read more...: Opens your web browser and directs you to more information about Usage Data Tracking on the Native Instruments website.
Yes, enable Usage Data Tracking: This checkbox enables Usage Data tracking.
No, I don't want to contribute: This checkbox disables Usage Data tracking.
For more information on Usage Data Tracking, refer to the knowledge-base https://support.native-instruments.com/hc/en-us/articles/209545029.
Notice
Usage Data Tracking technology is activated / deactivated on each computer individually. This means that if you use Traktor on more than one computer, disabling / enabling Usage Data Tracking will not automatically disable / enable Usage Data Tracking on the other computer.
Preferences – Effects Page
This section describes the options in the Effects page.

Effects page.
FX Unit Routing
FX1, FX2, FX3, FX4: The values in the drop-down menus determine if the FX Unit is routed as Insert, Send, or Post Fader effect.
Insert: In Insert mode, the FX Unit is inserted into the signal chain right before the channel filter. The balance of the direct signal (Dry) and effect signal (Wet) is controlled by the D/W-knob in the FX Unit.
Send: In Send mode, the FX Unit becomes independent from Traktor’s internal signal flow. The FX Unit receives input externally from one of the inputs of the audio interface as selected in Preferences > Input Routing. The FX Unit sends its output to one of the Outputs of the audio interface, as selected in Preferences > Output Routing. Only one audio interface input and output is supported. If you use more than one send effect, they are chained in the order 1-2-3-4.
Post Fader: In Post Fader mode, the FX Unit is inserted into the signal chain after the channel's volume fader so it will still be audible when turning down the volume on a channel. The balance of the direct signal (Dry) and effect signal (Wet) is controlled by the D/W-knob in the FX Unit. Post Fader effects are not available in External Mixer mode.
2 FX Units / 4 FX Units: Switches between 2 FX Units or 4 FX Units to be available in the Global Section.
Restore parameters when switching FX: When this option is checked, the FX Units parameters are restored to their default settings when switching FX in FX Units.
FX Panel Mode
FX1, FX2, FX3, FX4: The values in the drop-down menus determine the FX Mode for the FX Unit.
Single: The Single FX mode provides a more detailed control over one selected effect.
Group: The Group FX mode gives you control of up to three selected effects in one FX Unit.
Pattern Player: The Pattern Player is a new Traktor performance tool that allows you to add rhythmic samples on top of your tracks to bring in more variations.
FX Pre-Selection
Traktor provides a vast range of FX. You can create a personal selection of all available effects to narrow down the FX appearing in the Effect Selector of the FX Units.
Add: You can add the selected FX from the Pre-Selected Effects column to the Available Effects column with a click on Add.
Remove: You can remove the selected FX from the Available Effects column to the Pre-Selected Effects column with a click on Remove.
Up / Down: Let you move the selected FX in the Pre-Selected Effects column up or down.
Preferences – Mix Recorder Page
This section describes the options in the Mix Recorder page.
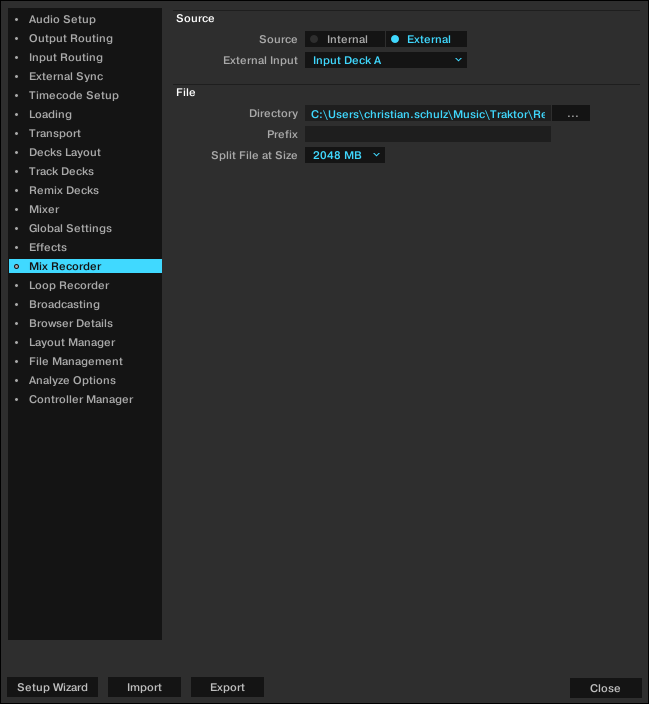
Preferences – Mix Recorder page.
Source
Source: Selects the recording source, either the Internal source to record from Traktor’s internal Master output or the Extenal to record an external audio source like a turntable, microphone, or from your external hardware mixer.
External Input: Selects the input channel from which Traktor will record external audio.
File
Directory: Determines the file path in which your audio recordings are stored.
Prefix: Here you can enter a prefix to be added to the filename of each recording.
Split File at Size: With a file size selected, your audio recordings will be split each time the file size is reached. The maximum file size is 2048 MB.
Preferences – Loop Recorder Page
This section describes the options in the Loop Recorder page.
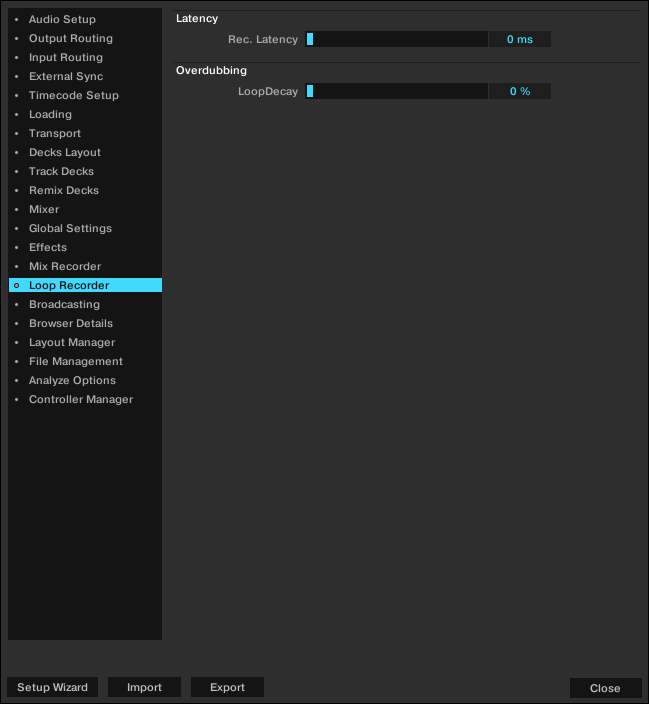
Preferences – Loop Recorder page.
Latency
Rec. Latency: Adjust the recording latency of the Loop Recorder if in External mixer mode.
Overdubbing
LoopDecay: Adjust the percentage of how long it takes for recorded audio to fade out when overdubbing.
Preferences - Streaming Page
Traktor is fully integrated with Beatport and Beatsource LINK, giving you access to a catalogue of millions of tracks which can be streamed live into your sets or stored locally on your device. A paid subscription is required for these services, or you can sign up for a free trial if you want to test it out. Once signed up and logged in, Beatport options become available in your Browser.
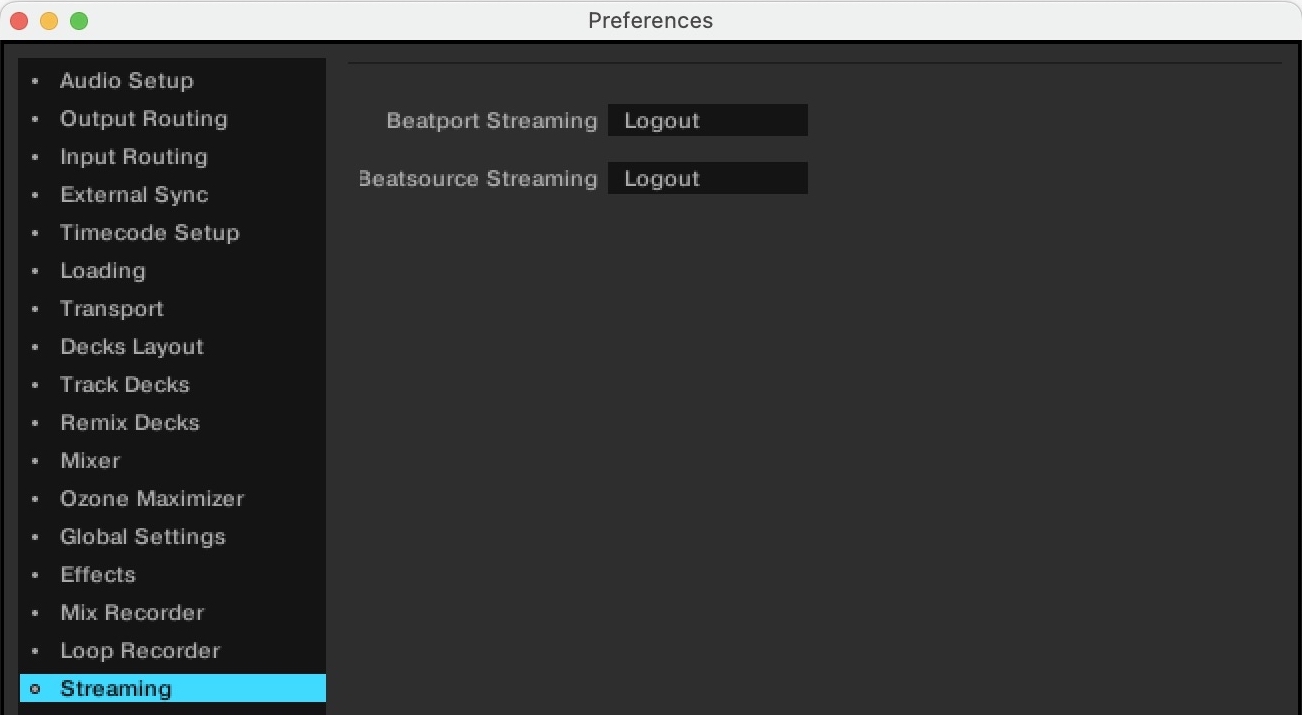 |
Use the Beatport Streaming and Beatsource Streaming buttons in the Streaming Preferences page to open the Beatport website to sign up or log in. The website will return you to Traktor where you will see your login status. You can log out from here if required. A free trial option is available for users who have not yet signed up. Your login status is remembered by Traktor so there is no need to log in or out between sessions.
Preferences – Broadcasting Page
Broadcasting allows you to stream your DJ set live over the Internet. To do this you must first setup a 'client and server' configuration. You can do this by installing a server on your computer that will provide a stream of the source (Traktor) to clients connected to your server.
You must have a server configured correctly and running before you can begin your broadcast. For more information on setting up a server and Broadcasting please refer to Broadcasting Your Mix.
A description of the Broadcasting preferences page follows:
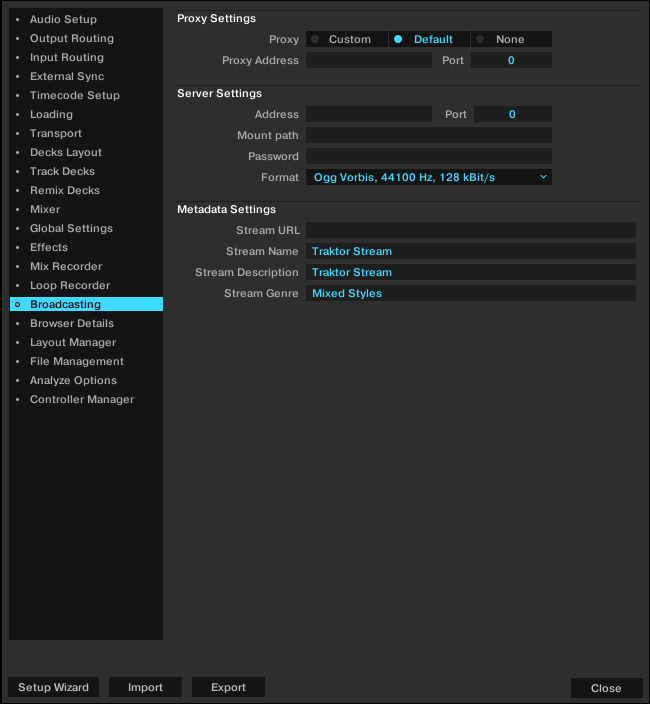
Preferences – Broadcasting page.
Proxy Settings
If connecting to the Internet through a Proxy, you can configure Traktor to use your Proxy settings:
Custom: Use this option if you want to add your own custom Proxy Settings.
Default: Select this option to use the same Proxy Settings from your computer as the Proxy in Traktor.
None: Select this option if you do not want to use a Proxy.
Proxy Address: Manually enter the IP (Internet Protocol) address of your custom proxy server.
Port: Enter the port number of your custom proxy server. Most servers use the default port number setting of 8000.
Server Settings
Use this menu to configure Traktor to use your server.
Address: Manually enter the IP (Internet Protocol) address of your computer.
Tip
Refer to the help section of your operating system for information on how to find your computer's IP address.
Port: Enter the Port number. Most servers use the default port number setting of 8000.
Mount Path: Enter the mount path (a specific directory) you want your listeners to connect to. This is useful when broadcasting two events on the same server.
Password: Enter the password of your server.
Format: Select the sound quality you want to broadcast. Higher resolutions will require more bandwidth. Use an appropriate setting for your connection.
Metadata Settings
In this section you can configure metadata for your broadcasting stream. This is the information your listeners will see.
Stream URL: Represents the URL (Uniform Resource Locator) you are broadcasting on and the URL you should give to your listeners.
Stream Name: Represents the title of your broadcast to be displayed.
Stream Description: Represents a description for your broadcast to be displayed.
Stream Genre: Represents the genre of music you broadcast.
Preferences – Browser Details Page
This section describes the options in the Browser Details page.
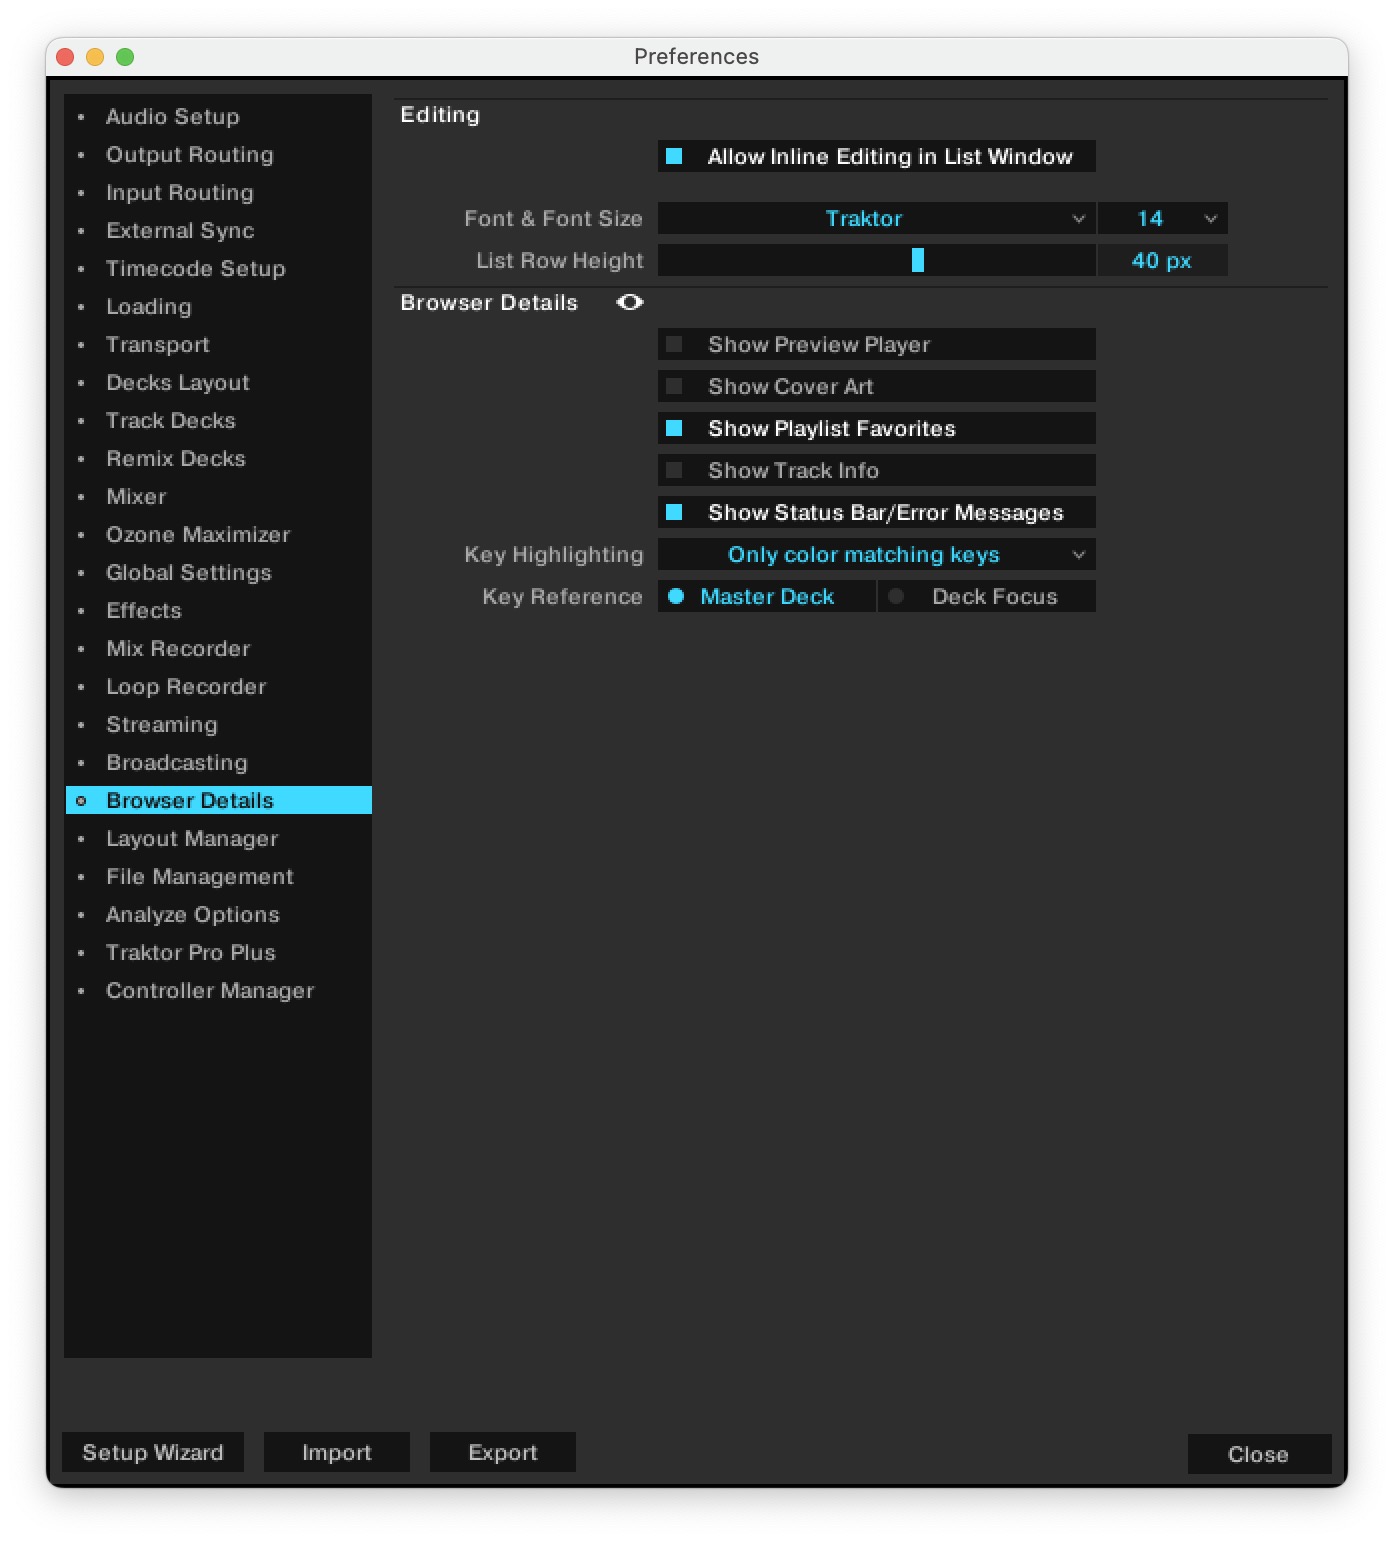 |
Preferences – Browser Details page.
Editing
Allow Inline Editing in List Window: If checked, you can edit metadata of your music files by double-clicking them in the Track List. With this option unchecked, editing track tags in the Track List is not allowed to prevent unwanted changes, for example, during a live situation.
Font & Font Size: Selects the font and the font size for the Browser.
List Row Height: Determines the list row height of the Track List.
Browser Details
Show Preview Player: Shows or hides the Preview Player.
Show Cover Art: Shows or hides the cover art window.
Show Playlist Favorites: Shows or hides the Browser Favorites on top of the Track List.
Show Track Info: Shows or hides the track info bar.
Show Status Bar/Error Messages: Shows or hides the Status Bar. This area also displays error messages.
Key Highlighting: Select how the Browser highlights the key information when using Key Lock. You can use the key highlighting function to set the reference of the key on the currently focused deck, allowing you to use it in combination with the Master Clock functionality. Use this when you want to find a key match for a track on a deck you have selected (in Focus) that isn’t currently playing, i.e. not the current Master track. This can help you get prepared for subsequent mixes further in advance.
Do not color any keys: When selected, the Browser will not color any key.
Only color matching keys: When selected, the browser will color only matching keys. This is the default setting.
Also color adjacent keys: When selected, the Browser will color matching keys and the immediate upper and lower semitone in its respective color.
Color all keys: When selected, the Browser will highlight all keys in their respective color.
Preferences – Layout Manager Page
In the Layout Manager page you can customize Traktor’s Layouts.
Preferences – Layout Manager page.
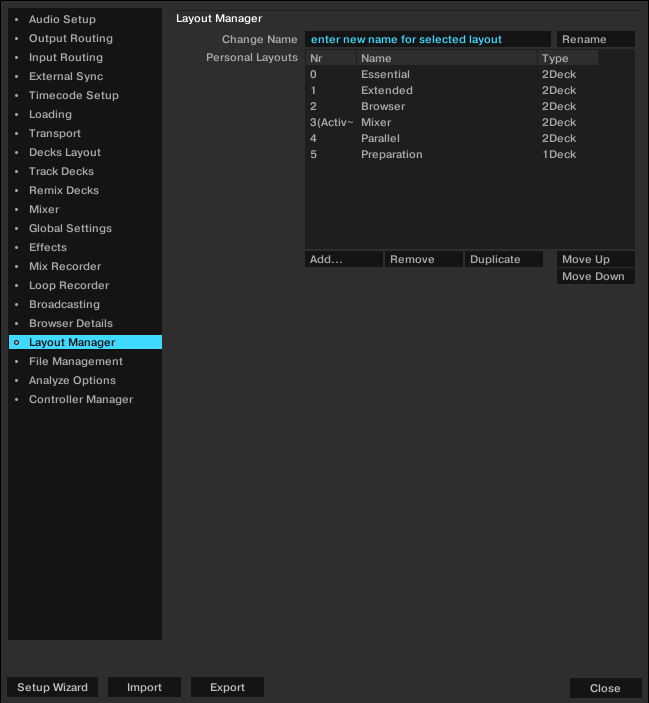
Layout Manager
Change Name: Here you can type in a name for the selected Layout.
Rename: Verifies your entry.
Personal Layouts: Lists all stored Layouts. A click on the Layout activates it. The active layout is marked with Active in the first column. The order in this list also defines the order of layouts in the Layout Selector of Traktor’s Header.
Add: Creates a new layout.
Remove: Deletes the selected layout.
Duplicate: Duplicates the selected layout.
Move Up/Down: Changes the position of the selected layout in the layout dropdown of Traktor’s header section.
Preferences – File Management Page
This section describes the options in the File Management page.
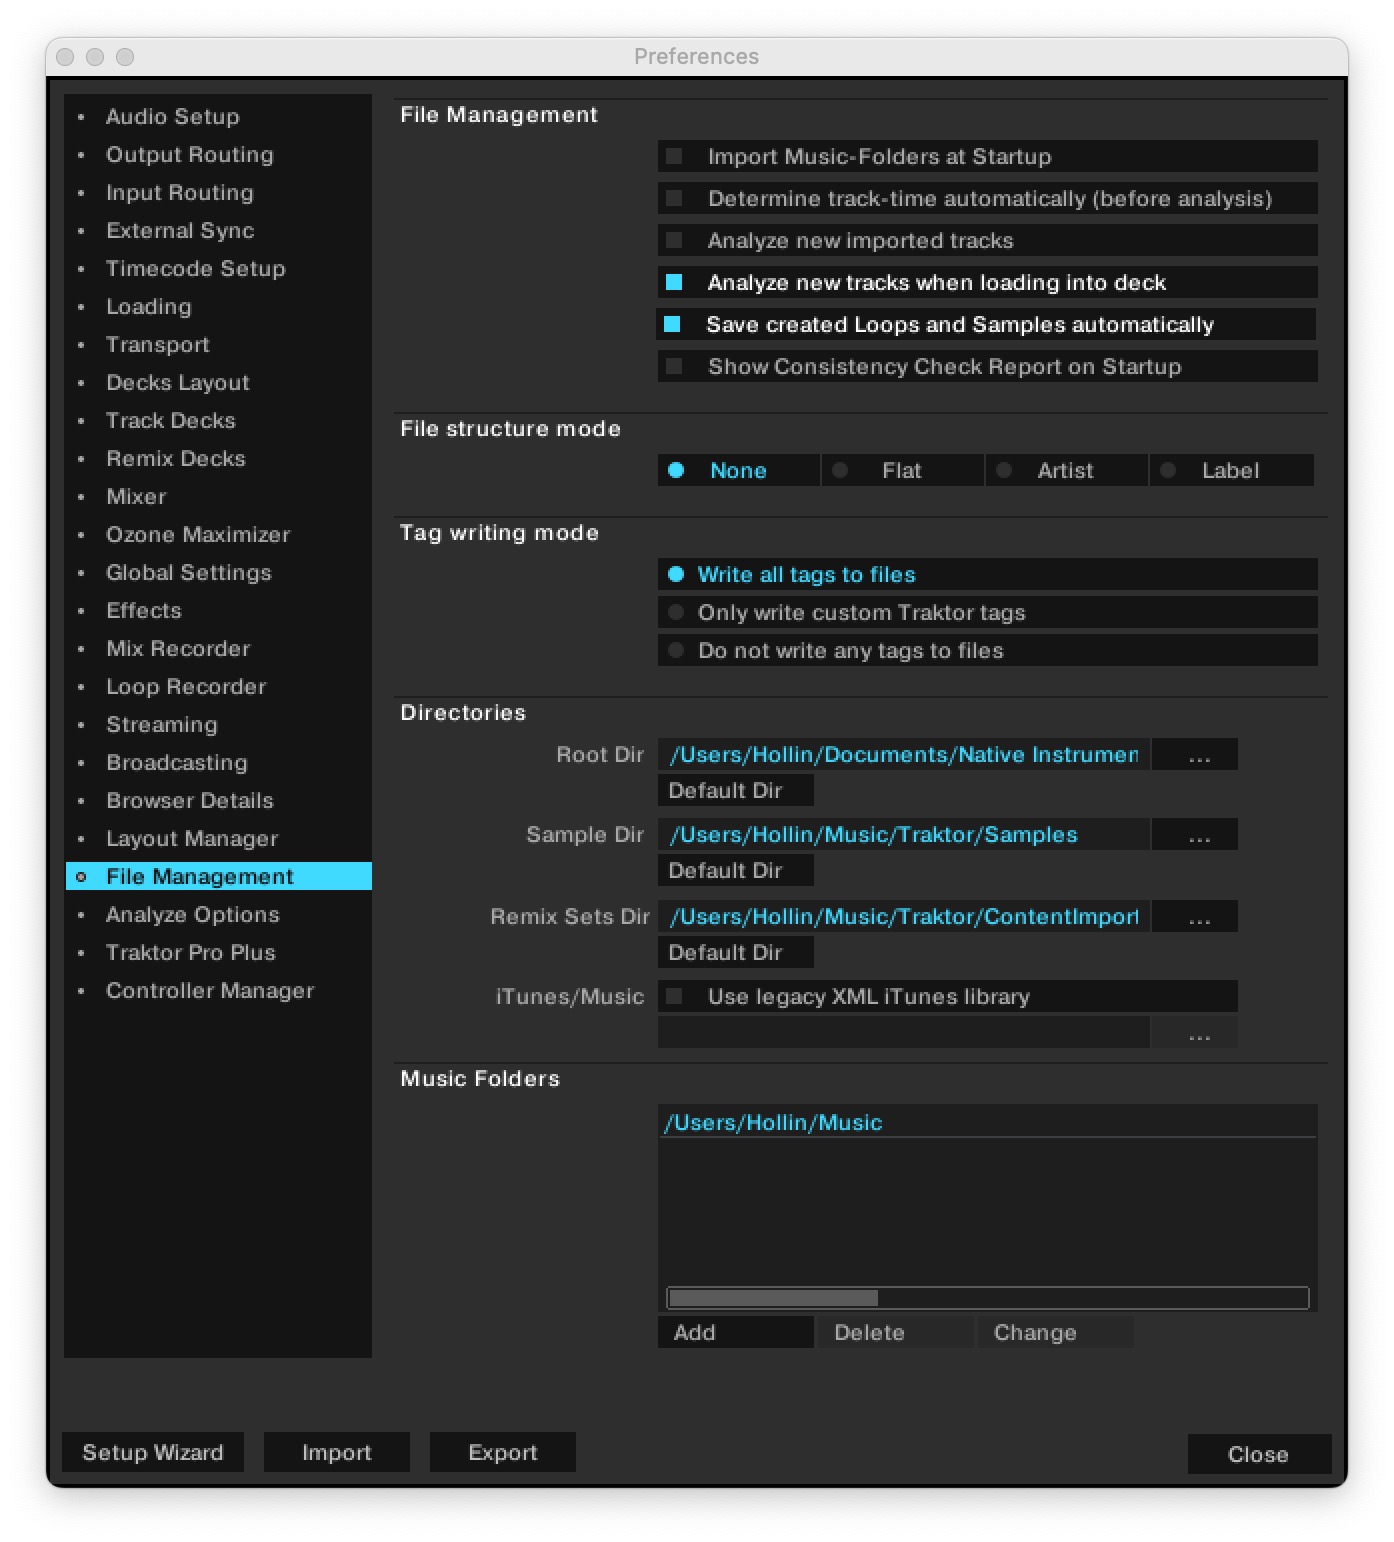 |
Preferences – File Management page.
File Management
Import Music-Folders at Startup: With this selected, each time Traktor is started, it will automatically import all tracks in your Music Folder that have not already been imported.
Determine track-time automatically (before analysis): With this option checked Traktor estimates the track-time before analyzing it.
Analyze new imported tracks: Performs an automatic analysis of all new tracks when imported into the Track Collection.
Analyze new tracks when loading into deck: Triggers the analysis only when loading a track into a Deck. The Status bar at the bottom of Traktor will provide visual feedback on analysis progress and alert you if there is a problem. Analyzing the tracks on demand possibly avoids CPU load problems with a permanent background analysis.
Notice
Analysis generates high CPU load. Due to lower prioritization of the analysis process there is no risk of slowdowns for Traktor itself, but when using additional software along with Traktor, you may note that the software performs slower than usual.
Save created Loops and Samples automatically: Automatically saves the Loops and Samples you created in Traktor for later use.
Show Consistency Check Report on Startup: With this selected, the Consistency Check Report will be displayed each time you start Traktor. This report displays information about your Track Collection and gives options to manage it.
File structure mode
The following File Structure modes determine the file structure when exporting a Playlist.
None: File names will not be changed during export.
Flat: File names will be changed into a 01 Artist - Title format during export.
Artist: During export, sub-folders with the artist names will be created.
Label: During export, sub-folders with the label names will be created.
Tag writing mode
The Tag writing mode determines the tags Traktor will write to the files.
Do not write any tags to files: When selected Traktor does not write any tags to the files.
Only write custom Traktor tags: When selected Traktor only writes custom tags to the files.
Write all tags to files: When selected Traktor writes all tags into files.
Directories
These settings define Traktor’s directories. The directories can be changed by using the …! button and selecting the path of the preferred folder. Using the reset buttons set the directories back to the defaults.
Root Dir: This is the path to your Track Collection/Playlists/Settings/History/Mappings files.
Sample Dir: This is the path to your Sample files used in Remix Decks.
Remix Sets Dir: This is the path to your Remix Sets used in Remix Decks.
iTunes/Apple Music Integration: By default Traktor links to Apple Music automatically via Apple Music's API. For legacy versions of iTunes, Traktor needs to create the link via iTunes' XML file, which can be enabled here alongside specifying the path to the XML file on your computer.
Music Folders
If you want to use your own music folder structure you can add your music folders in this list. Traktor can automatically import all music files stored within this Music Folder. Traktor can play tracks from any folder. Music folders that you specify here mainly serve the purpose of supporting the function "Import Music Folders on Startup". This way you can add new purchased files to specific folders on your computer which will then be automatically imported into the Collection when launching Traktor.
Add…: Lets you add folders as Music Folders.
Delete: Deletes the selected Music Folder from the list.
Change…: If you changed the directory or the name of a Music Folder in your system use this button to change the path of the directory also in Traktor.
Preferences – Analyze Options Page
This page provides options concerning the default settings of the Analysis function when importing/analyzing audio files.
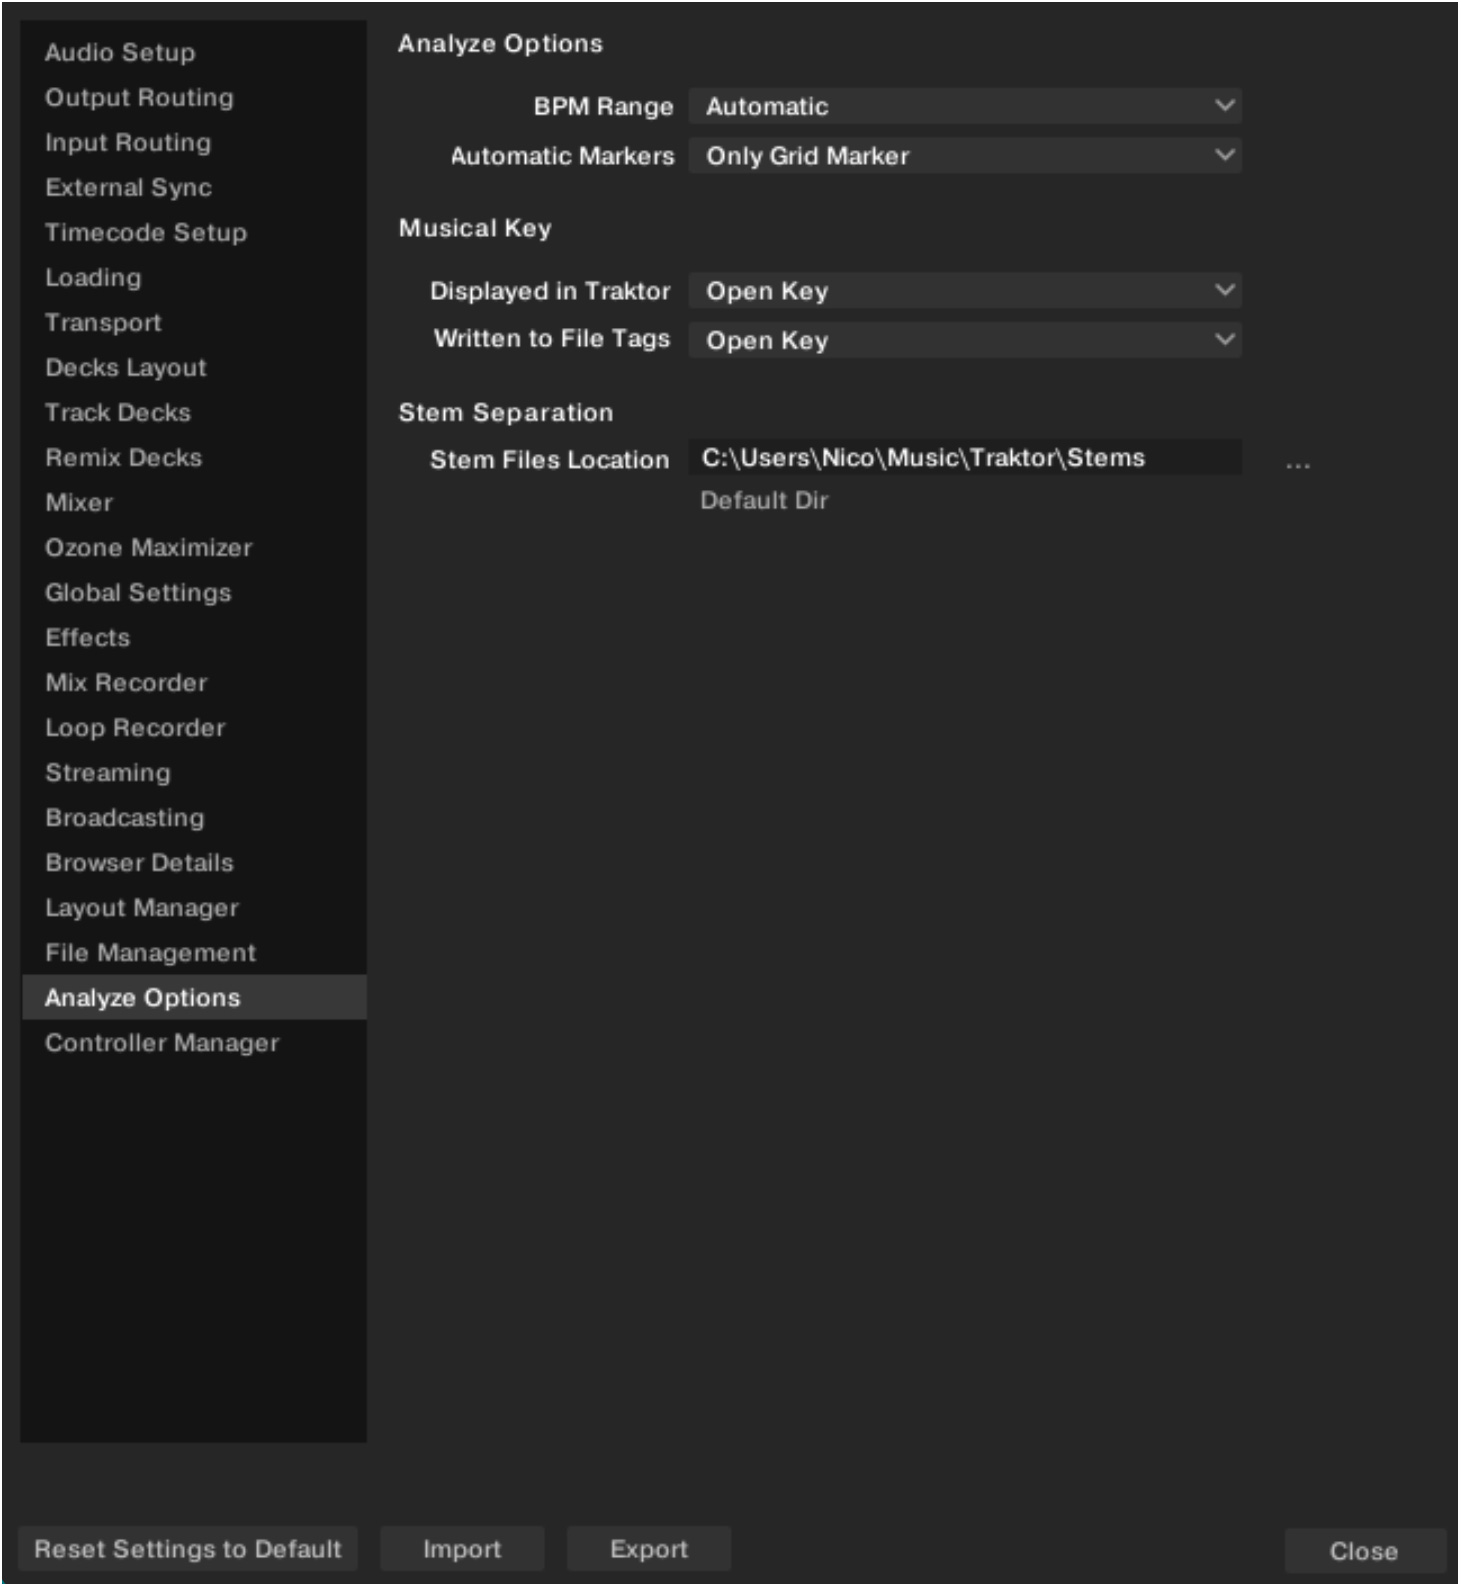
Preferences – Analyze Options page.
Analyze Options
BPM Range: Selects the minimum and maximum beats per minute (BPM) values of the tracks you are going to analyze.
This will help Traktor’s BPM-analysis find the correct BPM value when analyzing. The Automatic setting uses artificial intelligence techniques to help improve the tempo and downbeat results. For example, Drum and Bass tracks will have tempos in the 170BPM range instead of 85BPM.
Tip
We recommend to use this setting if your collection contains a wide variety of genres which you want to analyze together.
Automatic Markers: Defines which markers should be automatically set when the track is analyzed. The following settings are available:
No Markers: Traktor does not set any markers during analysis.
Only Grid Marker (default setting): Traktor will place a Beatgrid on the track and will align it to the nearest downbeat by setting a Grid Marker onto that position. If the track already contains a Beatgrid, Traktor will move it, if necessary, to make it start on the Grid Marker.
Grid Marker and Cue Point: Traktor will place a Beatgrid on the track and will align it to the nearest downbeat by setting a Grid Marker onto that position. If the track already contains a Beatgrid, Traktor will move it, if necessary, to make it start on the Grid Marker. Additionally, Traktor will set a Cue Point at the Grid Marker position. Note that removing this Cue Point at a later time will not affect the Grid Marker.
Musical Key
Traktor automatically detects a track’s key which can be displayed in Traktor as well as be written into the metadata of the track. The following settings are available:
Displayed in Traktor: Selects the notation to be displayed in the Key column of the Browser. This option can be changed at any time and will change the way all Keys are displayed in Traktor. Available notations are: Musical, Musical (all sharps), Open Key.
Written to File Tags: Selects the notation to be written into the metadata of a track file itself so that the notation information can be used in third party software applications. Available notations are: Musical, Musical (all sharps), Open Key, Key Text.
Stem Separation
The Stem Files Location setting lets you choose the directory in which Traktor will store the Stem versions of your tracks, which are generated when you trigger the Generate Stems command in the Track Collection. By default, this directory is the Stems subfolder in your Traktor user folder. By clicking the three little dots on the right, you can choose another location for storing the Stem versions of your tracks. For example, this allows you to store your stems on an external hard drive. At any time, you can click the Default Dir button below to reset the location to the default Stems folder.
Note
Stem versions of your tracks are not stored using their original track’s file name but a hashed name serving the fast association to the original track. It is not recommended to load and play the stems from the folder defined here, because they would miss most of their associated metadata. Instead, load the corresponding track from your Track Collection onto the Deck. For more information on using Stems, refer to Working with Stems.
You can store your original tracks and their generated Stems on different drives. You can also play your original tracks even if the drive containing their Stems is not connected.
Preferences – Controller Manager Page
The Controller Manager page unifies all of Traktor's MIDI and Keyboard Mappings, as well as MIDI setup in one preference page. Settings and mappings can be imported, exported, and customized all from this one Preferences page. For more information on configuring a MIDI controller, refer to Configuring MIDI Controller for Controlling Traktor.
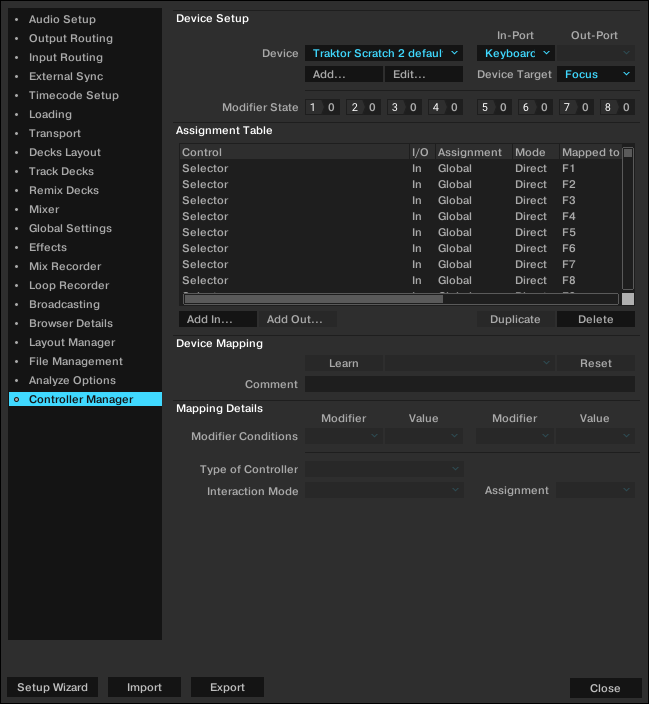
Preferences – Controller Manager page.
Device Setup: Allows you to create multiple mappings for your computer keyboard, MIDI controllers, and some HID devices.
Assignment Table: Lists all assignments for the mapping that is selected in Device. All mapped devices are active at the same time, not just the selected mapping.
Device Mapping: Allows you to map Traktor controls to desired control elements of a MIDI device.
Mapping Details: allows to make customization to mapped Traktor controls i.e the Modifier Conditions and the Interactions Mode.
Preferences – Pioneer CDJ-3000 Page
The Pioneer CDJ-3000 page is available in the Preferences when a Pioneer CDJ-3000 is connected to the computer using USB. It consists of the CDJ Rumble Filter that lets you adjust the CDJ-3000's jogwheel sensitivity. By reducing its sensitivity, the jogwheel will be less likely to show erratic sync behavior in response to heavy rumble induced by bass frequencies.
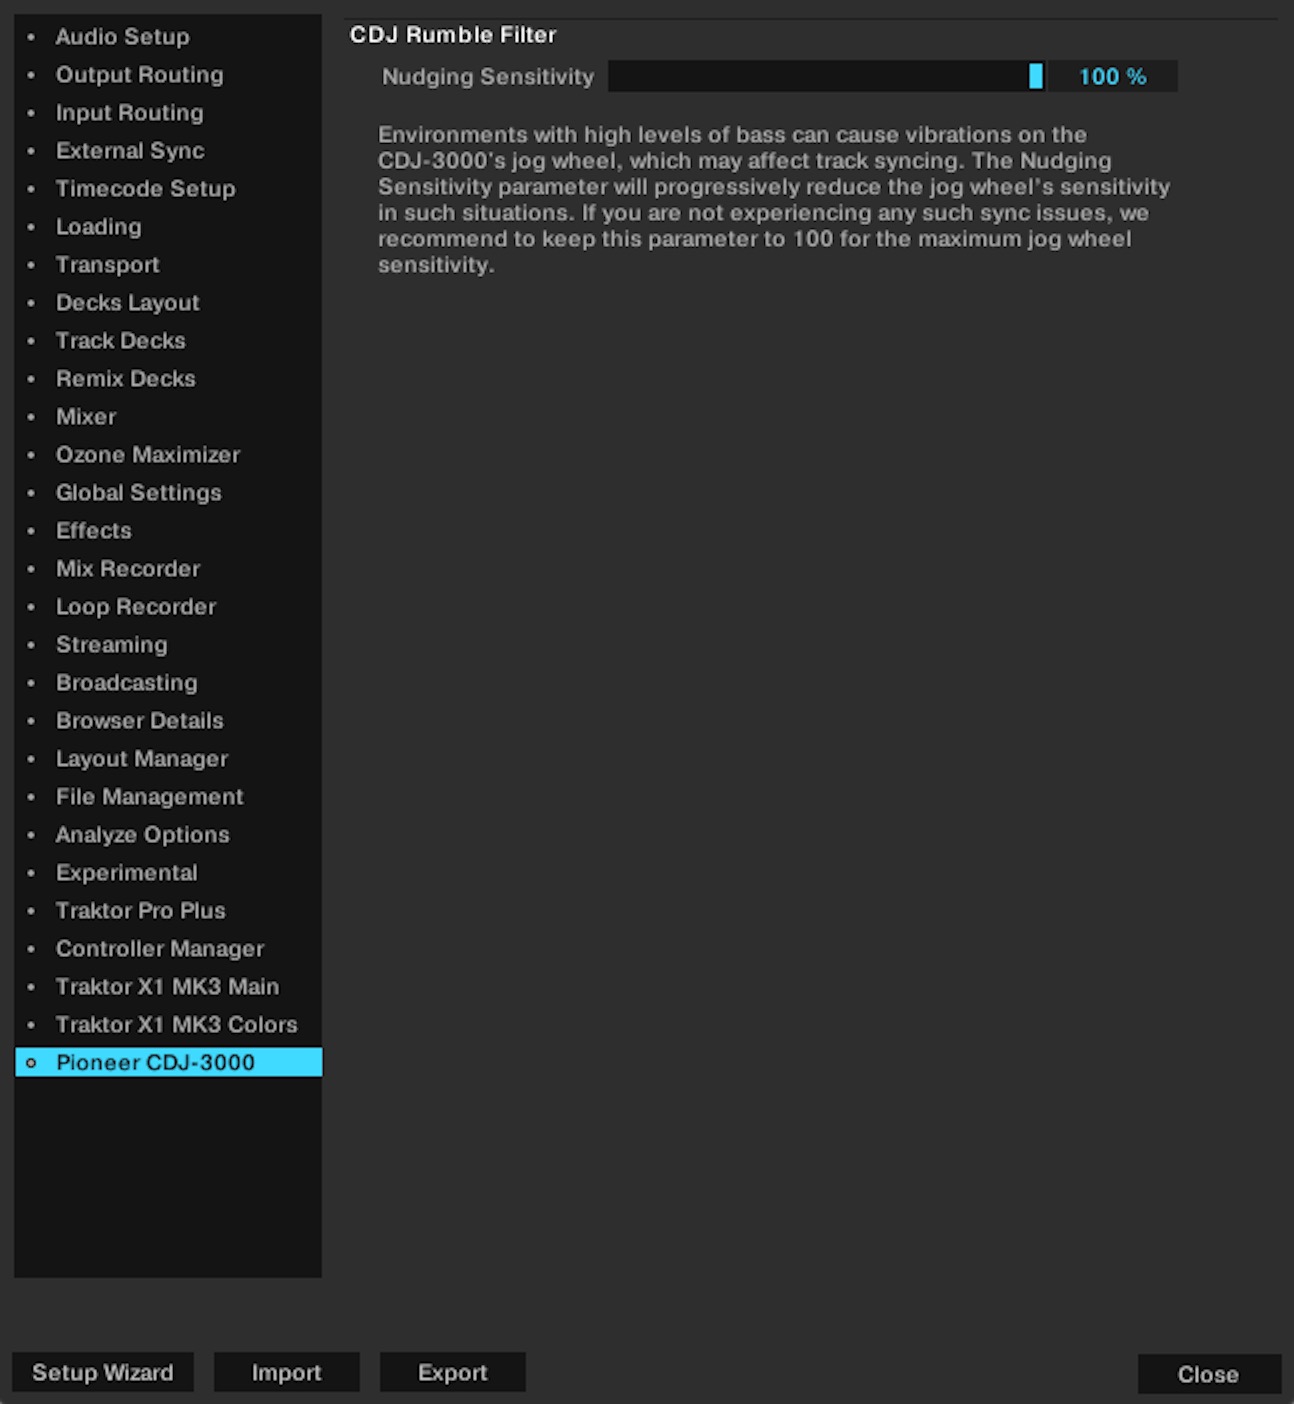
Preferences – Pioneer CDJ-3000 page.
Nudging Sensitivity: Adjusts the the CDJ-3000's jogwheel sensitivity to compensate for vibrations in environments with high levels of bass frequencies, which can lead to sync issues. If you are not experiencing sync issues, we recommended to set the control to 100%.
Setting Nudging Sensitivity
We recommend to test the effect of the slider in a rehearsal situation that allows for a calm environment. Nudging Sensitivity is set to 100% by default, which means that the jogwheel is operating at full sensitivity. Set the slider to the lowest position where nudging the jogwheel still feels responsive enough for your personal needs. This should be your default setting that will protect you against sync issues caused by low-frequency rumble in most cases. If you are playing under extreme circumstances that cause erratic sync behavior, move the slider all the way down to 0%.