Setting Up Traktor
Traktor can be used in different setups and for various use cases, allowing you to set it up for your preferred workflow.
This section assumes you have already installed Traktor Pro using NATIVE ACCESS, and that you can start to configure Traktor for its first use. If this is not the case, follow the instructions using this link Registering and Installing a Native Instruments Product using NATIVE ACCESS.
Traktor can be used in various setups. Besides using Traktor with a dedicated Traktor Kontrol hardware controller, it can also be used with an external audio interface (with or without an external DJ Mixer).
It can also be used with a MIDI controller of another manufacturer. In this case, you need to load the specific controller mapping file or you create a custom controller mapping yourself.
Traktor with External Audio Interface
This section and so this documentation assumes you are using Traktor with at least an external audio interface with one stereo output and a stereo headphone output. This way we can make sure the workflows explained also apply to Traktor setups using any other external audio equipment or controller with an integrated audio interface.
Note
Of course you can use Traktor with your the built-in sound card. However, you are then only using the stereo output.
The steps in this section will guide you through the process of configuring Traktor using an external audio interface.
Traktor Configuration Steps
When starting Traktor for the first time, you need to configure Traktor so that it works in your specific setup. The following steps for configuring Traktor are required:
Importing Data from previous installations: If you have installed a previous Traktor installation, Traktor asks you to import the data. For more information, refer to Importing Your Data from a Previous Traktor Version.
Configuring Traktor for using the external audio interface: When connecting an external audio interface, Traktor automatically sets the Mixing Mode to External Mixing. For more information on setting up Traktor with an external audio interface, refer to Configuring Traktor to Use with an External Audio Interface.
Traktor Layouts and Layout Switching: Traktor provides several Layouts that display more or less elements, depending on use case. For more information, refer to Traktor Layouts and Layout Switching.
Importing Your Data from a Previous Traktor Version
When you start Traktor for the first time, Traktor will ask if you want to import your previous data by copying the existing user content to a new folder in your user folder. Your previous data will not be altered if you copy it to the new default folder.
Configuring Traktor to Use with an External Audio Interface
To use Traktor’s preview feature, you need to have an audio interface with two independent stereo outputs, one for the Master Out and one for the Headphones CUE channel. Refer to the manufacturer’s manual for installing and connecting your external audio interface.
In Traktor, do the following:
Click the Preferences button in the Header to open the Preferences.
Select the Audio Setup page.
Select your external audio interface from the Audio Device drop-down menu.
Open the Output Routing page.
Select Internal under Mixing Mode.
Select an output pair for Output Master and one output pair for Output Monitor.
If your audio device provides another output, you can assign this to the Output Record.
Close the Preferences.
Traktor is now configured.
Selecting Traktor Layouts
Traktor provides a set of user interface layouts to organize its graphical user interface. These are called Traktor Layouts. Each Traktor Layout is appropriate for a particular use case where certain user interface elements are displayed while others remain hidden. In this section you will learn how to select another Traktor Layout. In addition, you are introduced to the various Traktor Layouts.
You can select different Traktor layouts directly in the header:
Click the Traktor layout drop-down menu in the header.
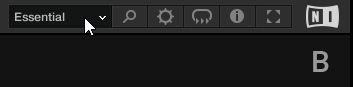
Select a Traktor layout from the list.
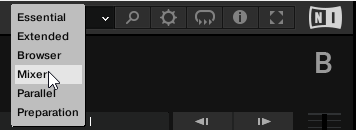
The appearance of the user interface changes according to the selected Traktor layout.
Default Traktor Layouts
You can choose between the following standard Traktor Layouts:
Essential, Extended, Browser, Mixer, Parallel, and Preparation
Additionally, you can create your own Traktor layouts to customize the user interface to your needs. For more information, refer to Managing Traktor Layouts.
Traktor Layout – Essential
The Essential layout shows the most important control elements for basic mixing. The decks show the waveforms, stripes and the transport controls. The Essential layout is optimized for using an external controller as the internal mixer is not shown.
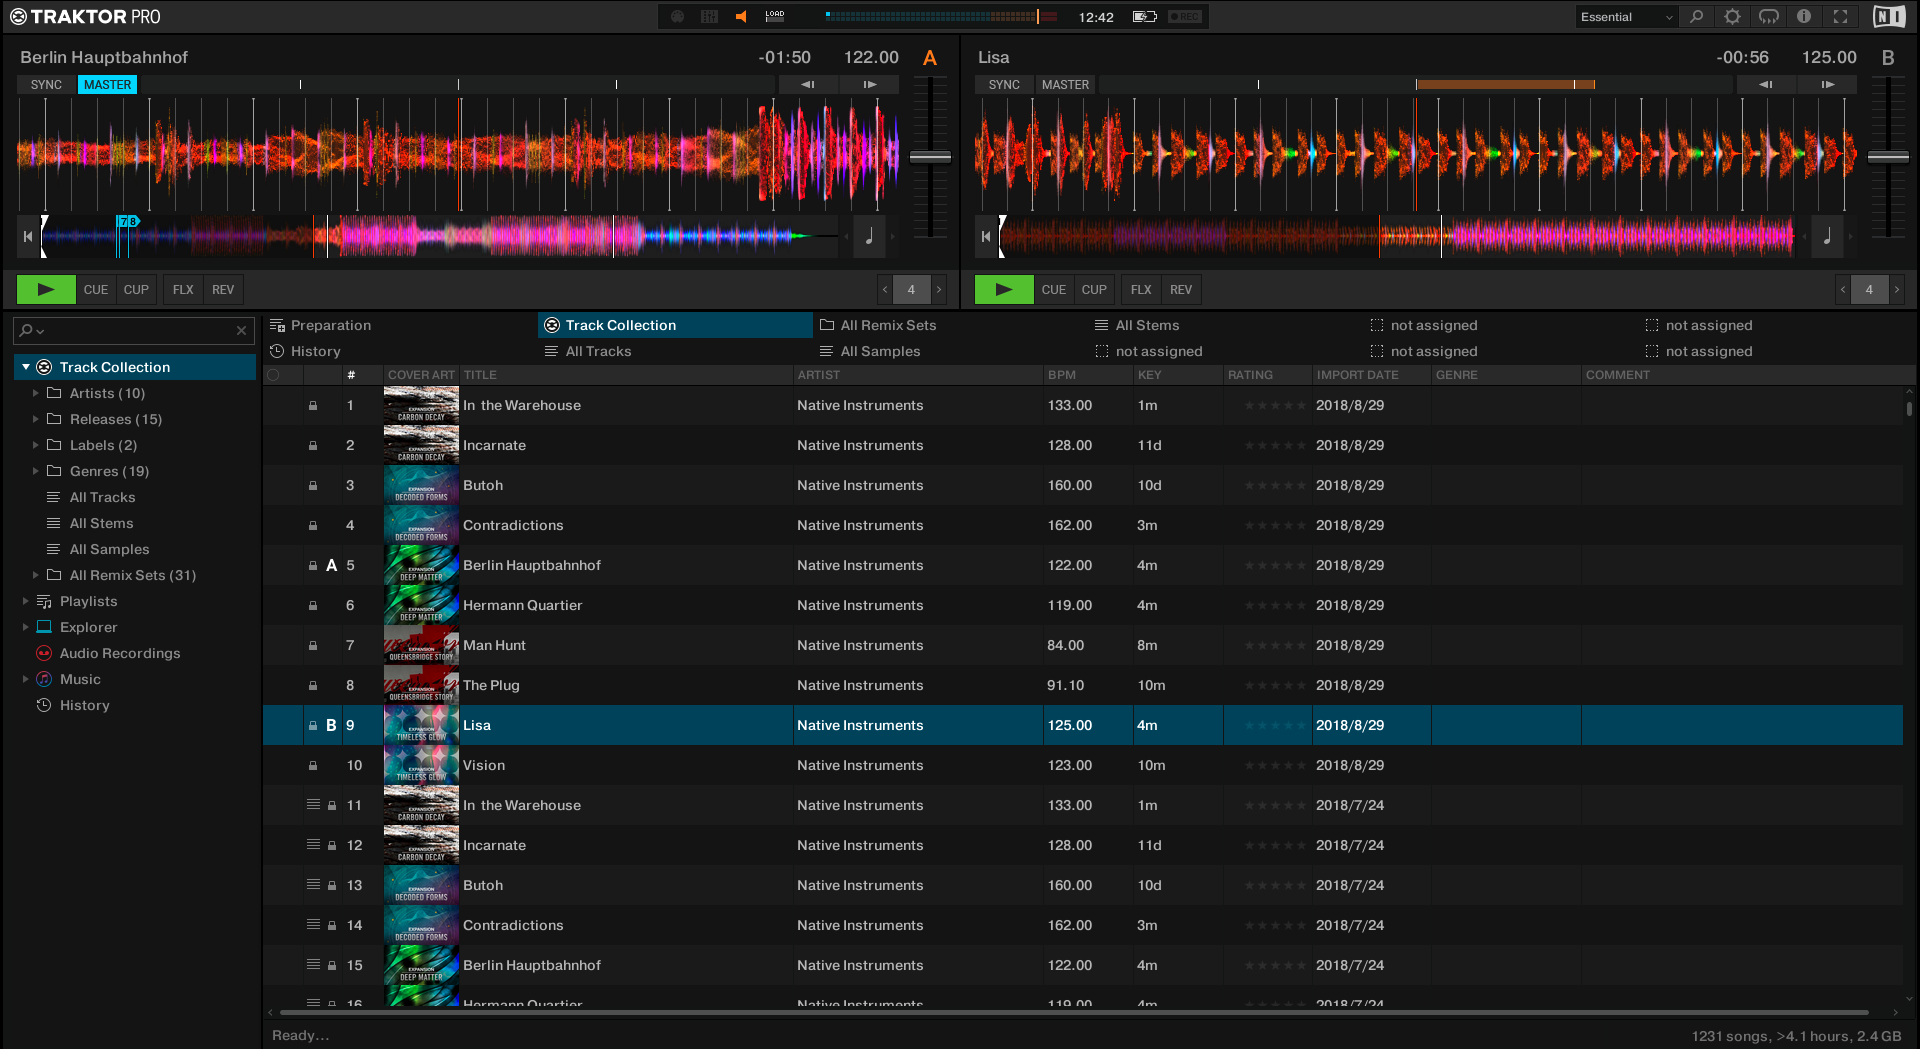 |
Traktor layout – Essential.
Traktor Layout – Extended
The Extended layout shows Hotcue and effect controls. The decks are extended and show the advanced panels with Hotcue and loop controls. The mixer shows the panorama control for each channel and provide controls for applying Mixer FX and FX Units. The global section shows the FX Units.
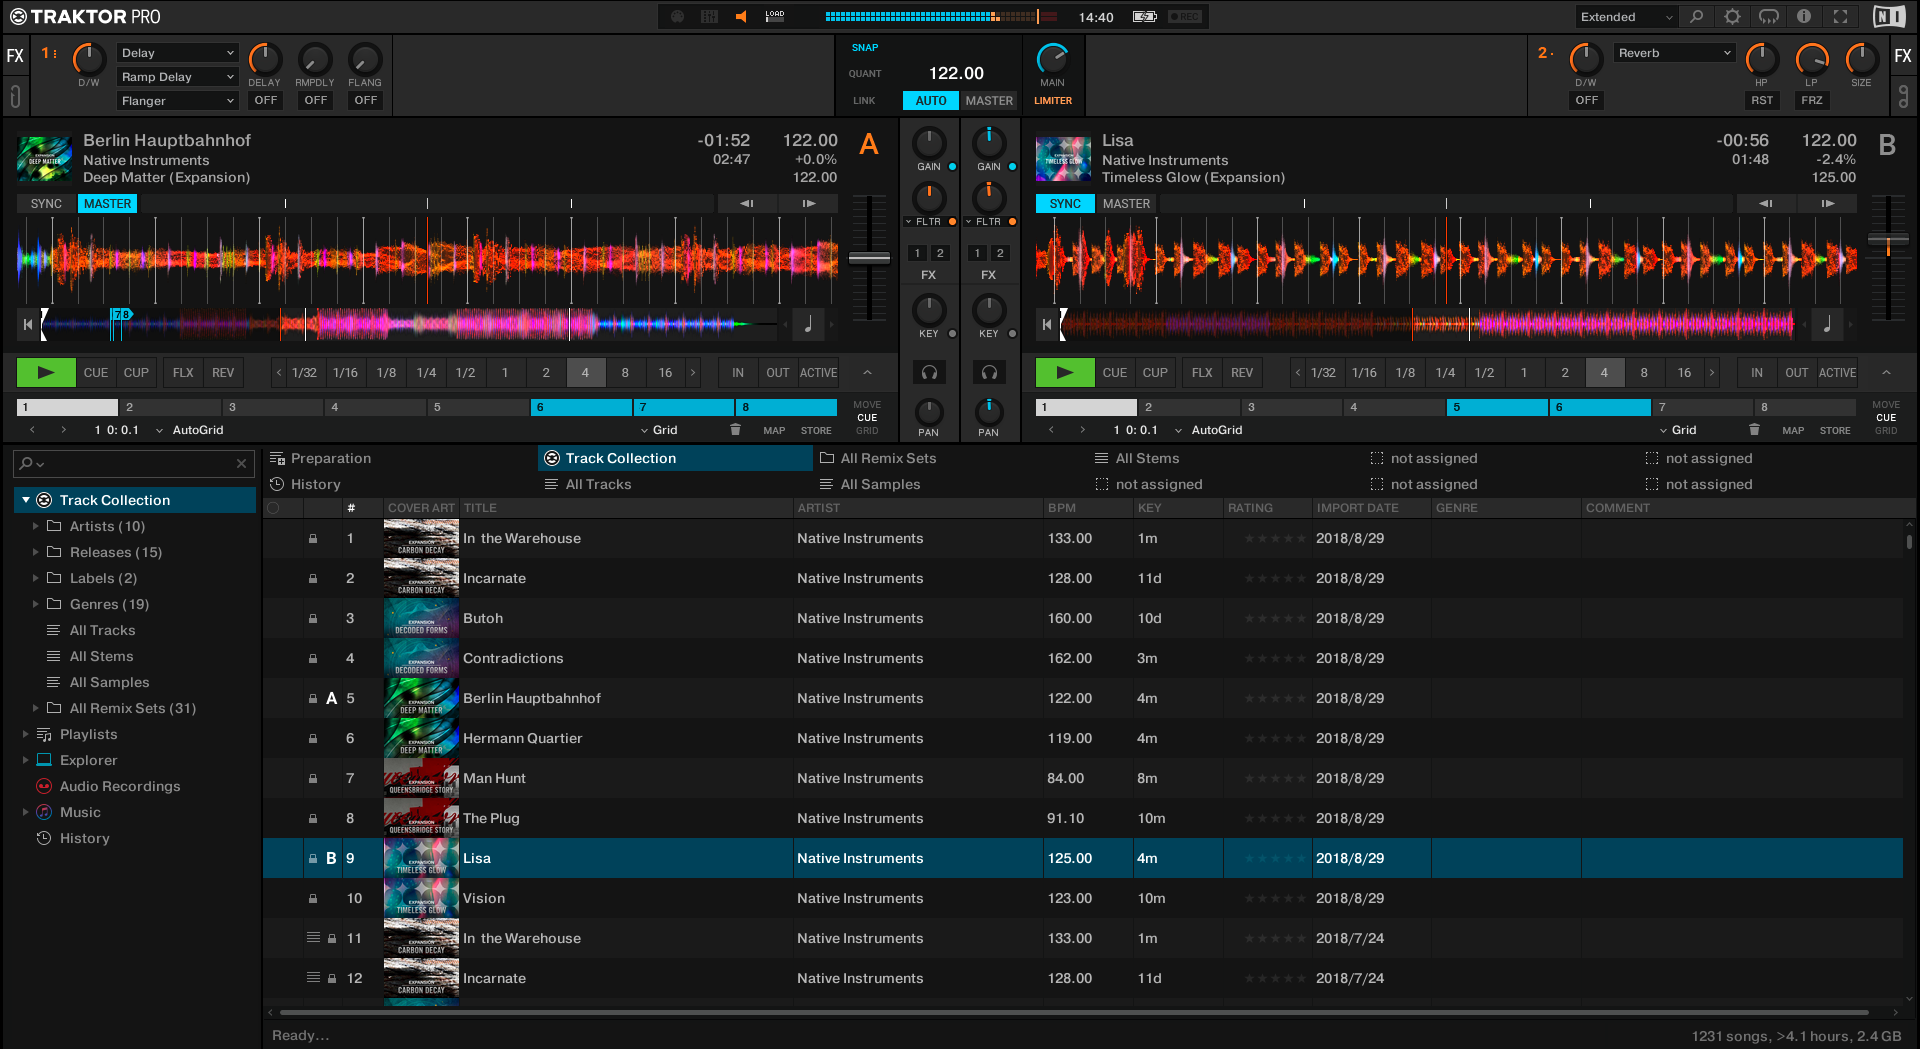 |
Traktor layout – Extended.
Traktor Layout – Browser
The Browser layout shows a maximized view on the browser and a minimized view on the decks. The mixer is not visible in the this Traktor layout. This arrangement gives you the best view on your browser and the track list to prepare playlists and to maintain your track collection.
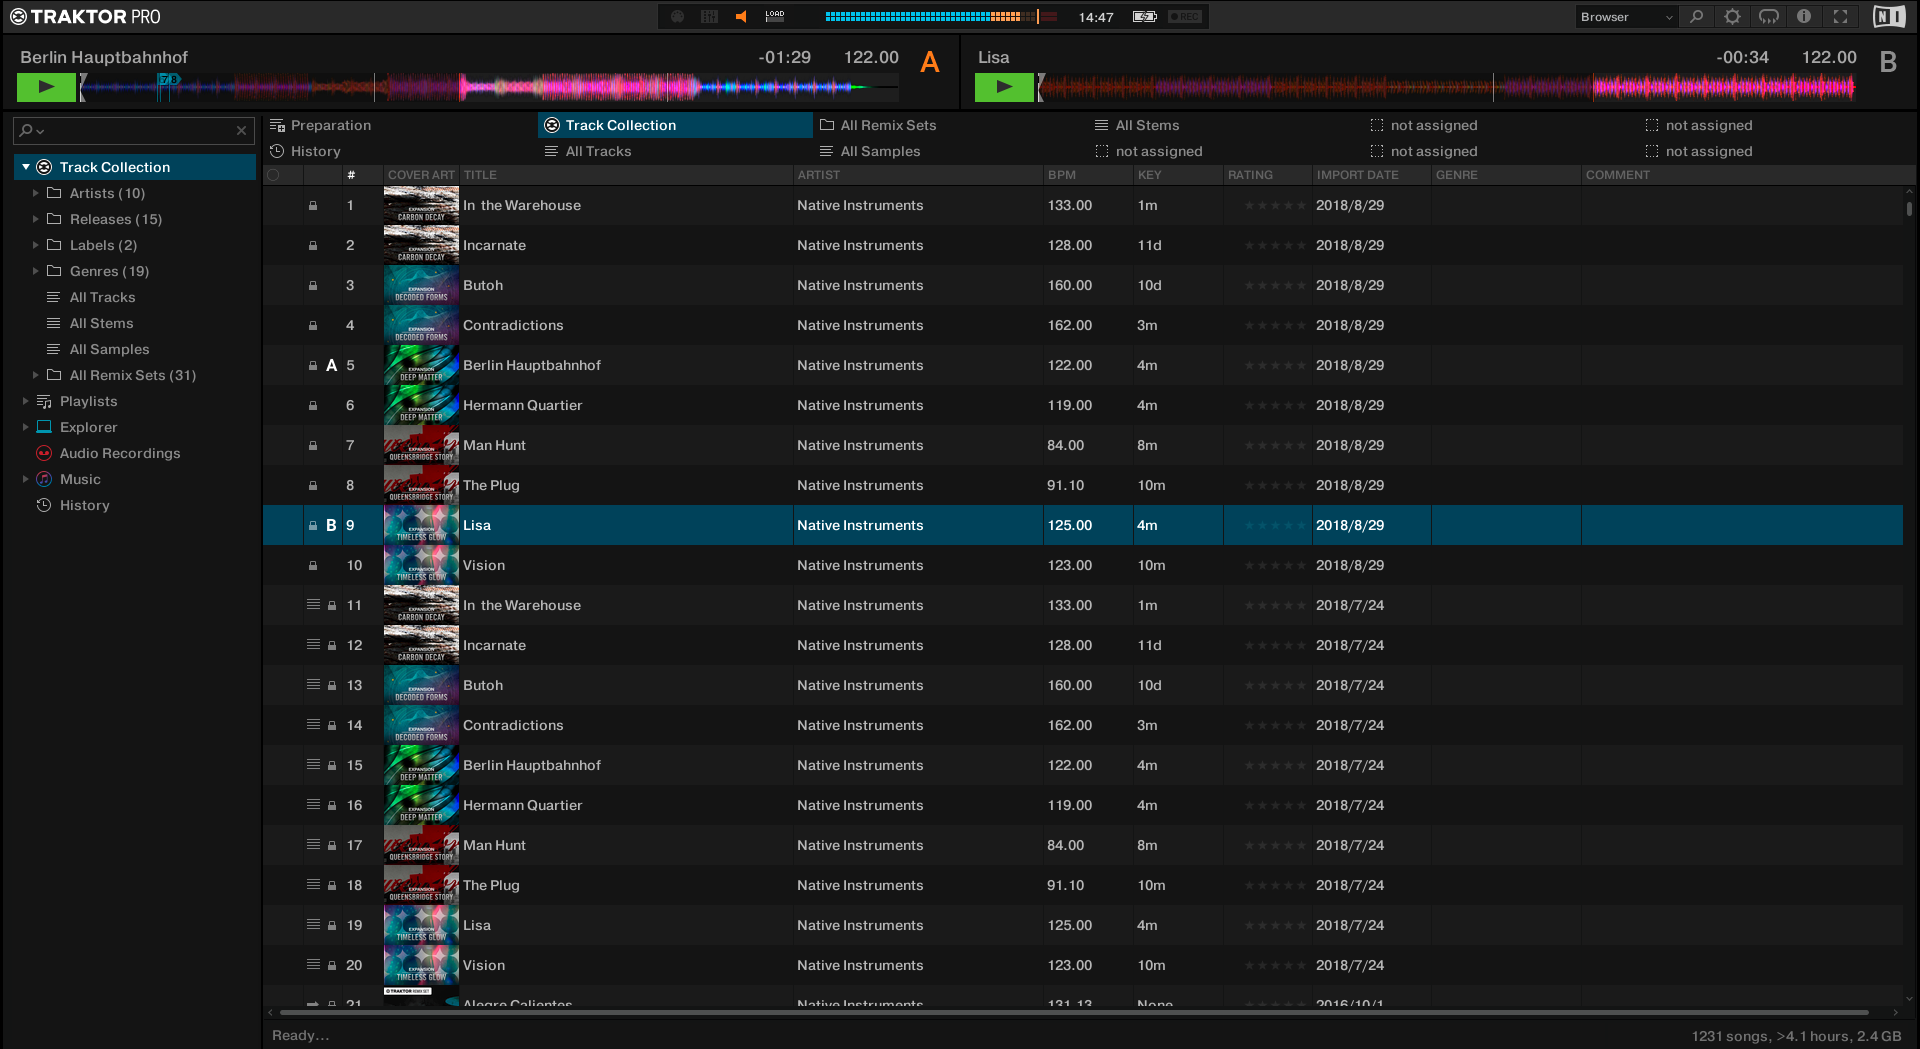 |
Traktor layout – Browser.
Traktor Layout – Parallel
The Parallel layout shows the waveforms stacked above the decks to support you on mixing tracks visually even without using SYNC and prelistening. The waveforms reach over the entire application window to give you a wider view on the tracks. This lets you quickly switch between the tracks. The parallel beatgrids indicate to what degree the tracks are in or out of sync without relying on prelistening. The Parallel layout also works for mixing with four decks.
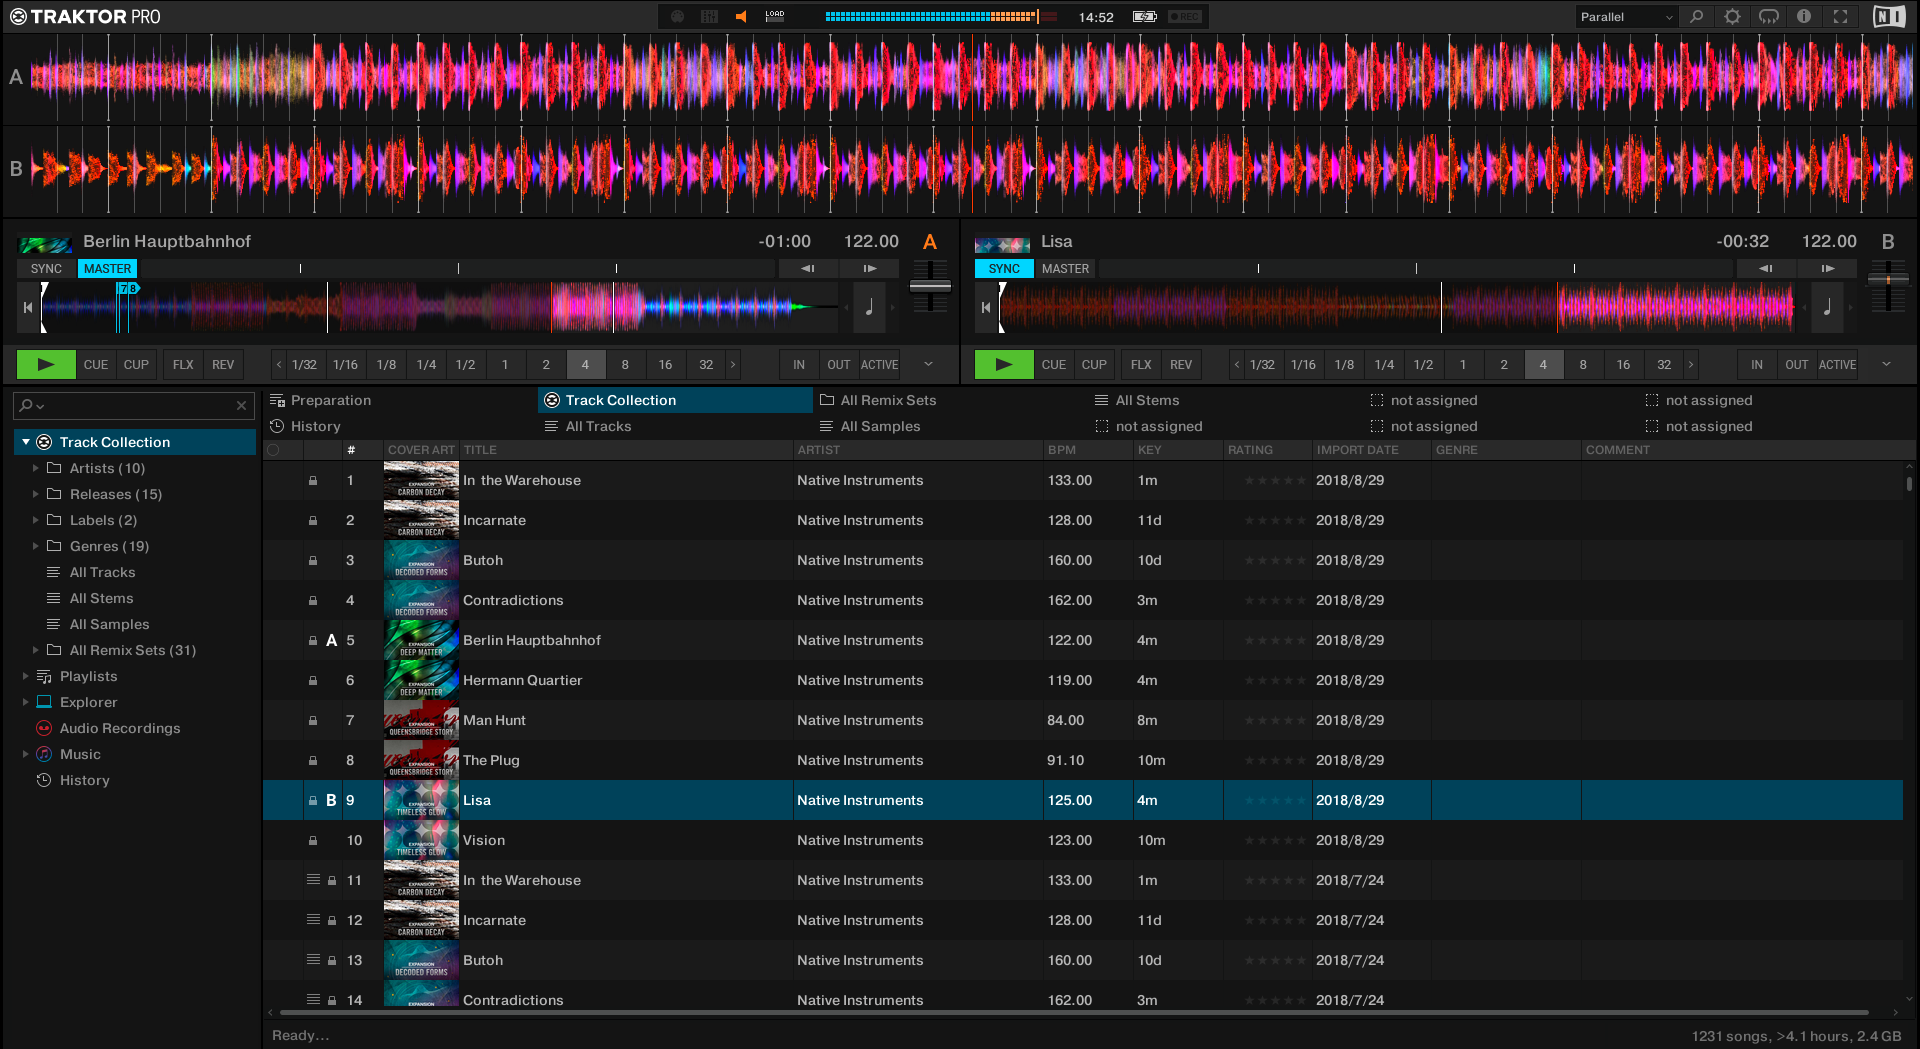 |
Traktor layout – Parallel.
Traktor Layout – Preparation
The Preparation layout shows only deck A that is enlarged across the entire application window, and the maximized browser. The wider view of the waveform and stripe help you to precisely organize your cue points and loops. The other decks and the mixer are not visible in this Traktor layout.
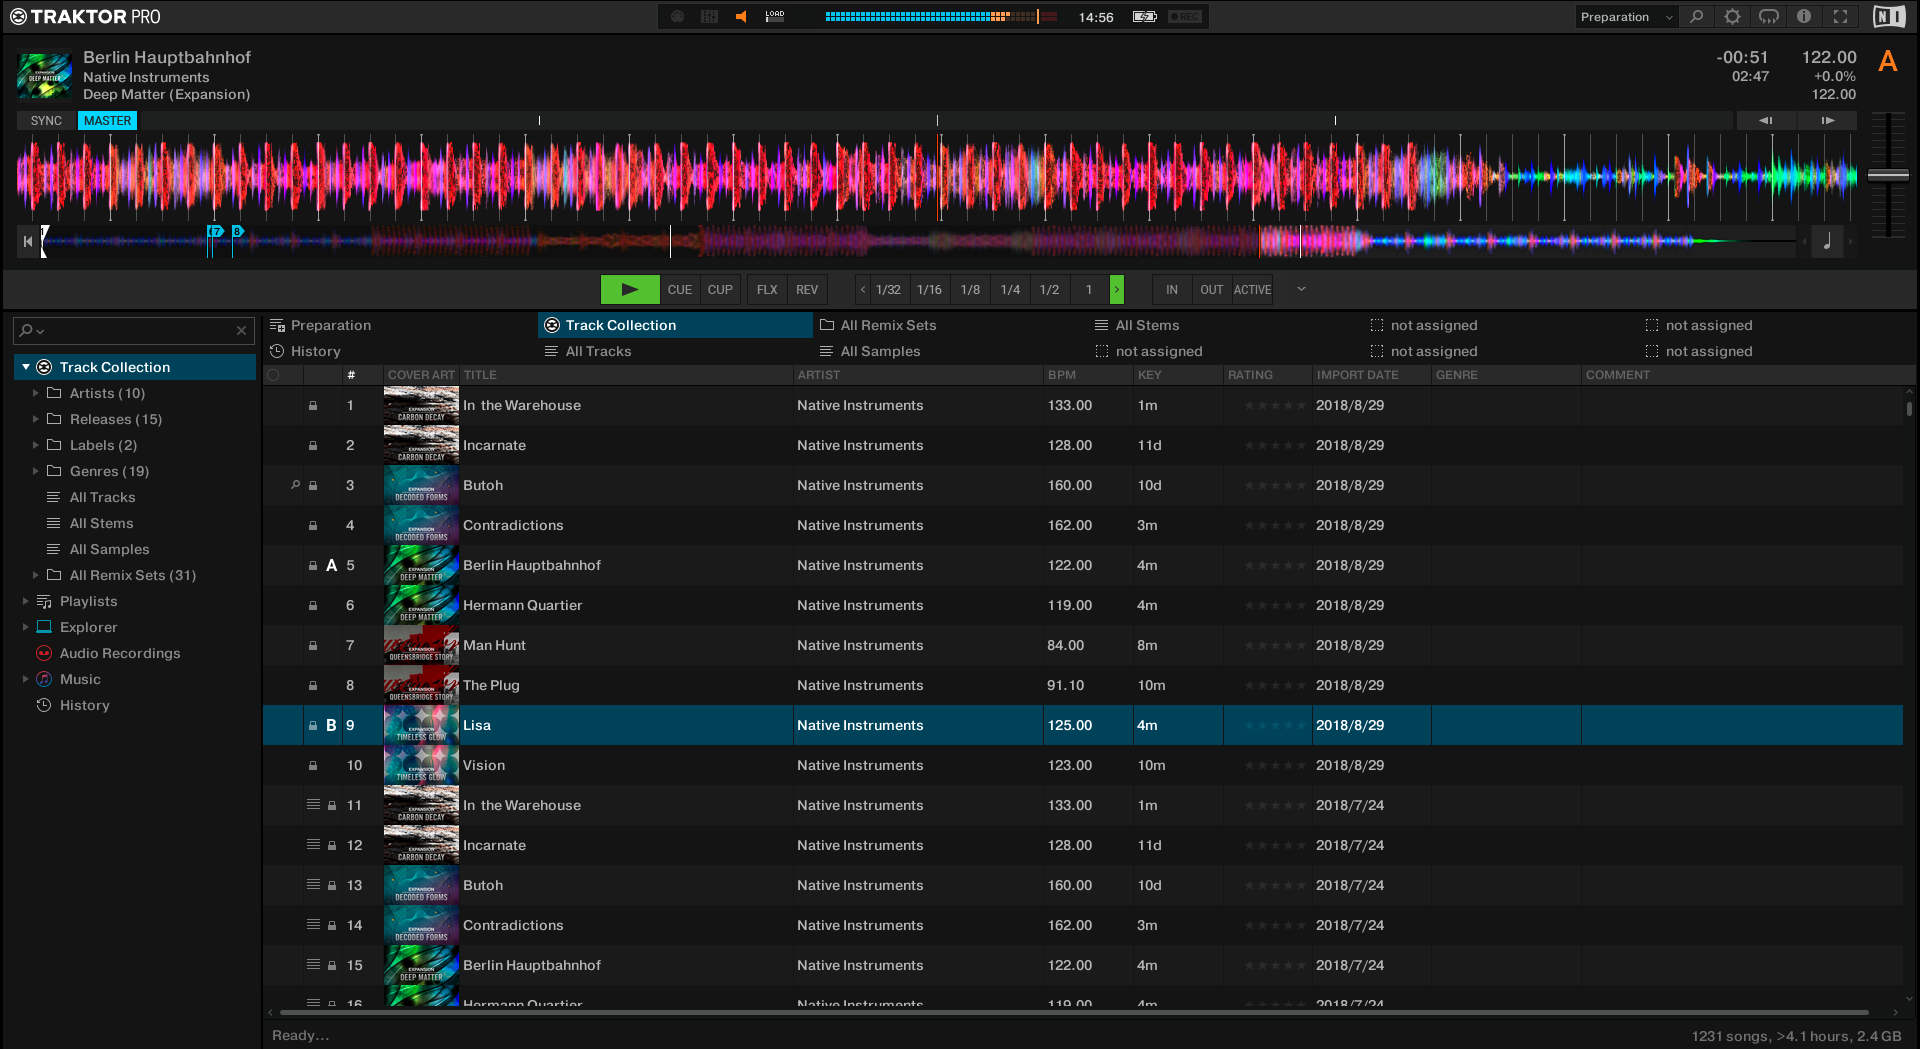 |
Traktor layout – Preparation.
Switching Deck Layouts
You can switch the decks between various deck layouts. There are seven deck layouts available from providing least controls up to most controls with stacked waveforms directly above the decks. In this section you will learn how to change the deck layout. In addition, you will be introduced with the different deck layouts.
Switching the Deck Layout
To switch the deck layout:
Perform a double-click in the deck header.

The deck layout switches. Each double-click in the deck header switches to the next deck layout.
Traktor automatically saves the deck layout for the current Traktor layout. You can also select the Deck layout in the Decks Layout page in the Preferences.
Available Deck Layouts
The following deck layouts are available:
Micro, Small, Essential, Full, Advanced, Parallel Slim, and Parallel Full
Note
Switching the deck layout with a double-click in the deck header will change it persistently for the currently selected Traktor layout.
Deck Layout – Micro
When using deck layout Micro, you will see the following information and deck controls:
Stripe
Play button
Deck header showing the first row with the information track title, remaining track time, and current track tempo

Deck layout – Micro.
Deck Layout – Small
When using the deck layout Small, you will see the following information and deck controls:
Stripe
Transport controls
Key Lock button
Tempo bend controls
Tempo fader
Phase meter
SYNC and MASTER buttons
Deck header showing the first row with the information cover art, track title, remaining track time, and current track tempo

Deck layout – Small.
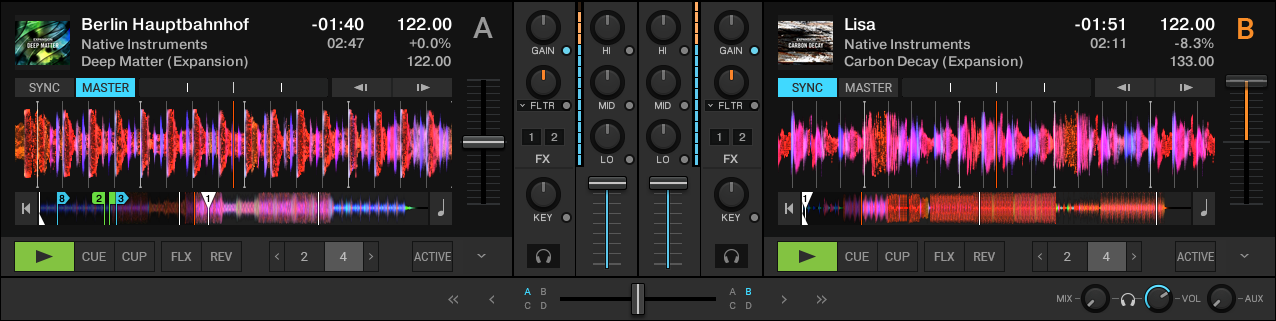
Deck Layout – Essential
When using the deck layout Essential, you will see the following information and deck controls:
Waveform
Stripe
Transport controls
Key Lock button
Tempo bend controls
Tempo fader
Phase meter
SYNC and MASTER buttons
Deck header showing the first row with track the information track title, remaining track time, and current track temp
Deck layout – Essential.
Deck Layout – Full
When using the deck layout Full, you will see the following information and Deck controls:
Waveform
Stripe
Transport controls
Key Lock button
Tempo bend controls
Tempo fader
Phase meter
SYNC and MASTER buttons
Full deck header with all track information
Deck layout – Full.
Deck Layout – Advanced
When using the deck layout Advanced, you will see the following information and deck controls:
Waveform
Stripe
Advanced Panel
Transport controls
Key Lock button
Pitch bend controls
Tempo fader
Phase meter
SYNC and MASTER buttons
Full deck header with all track information
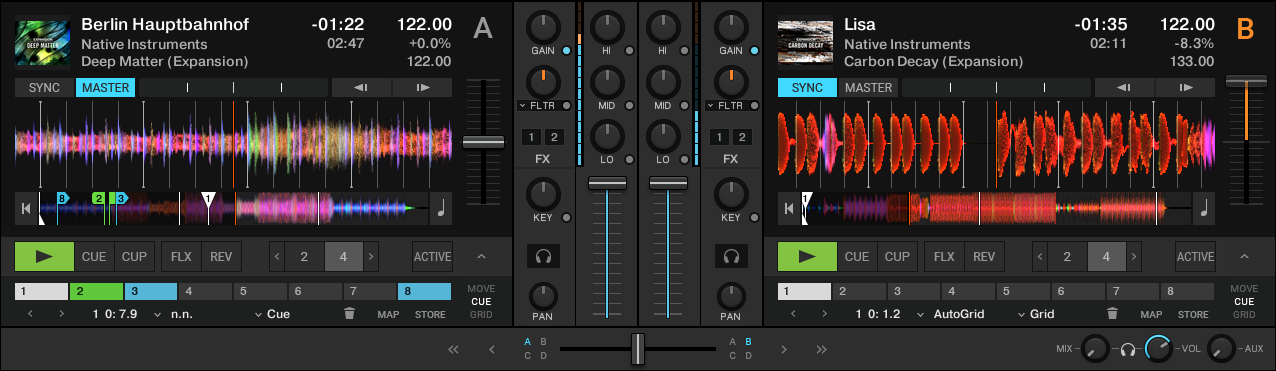
Deck layout – Advanced.
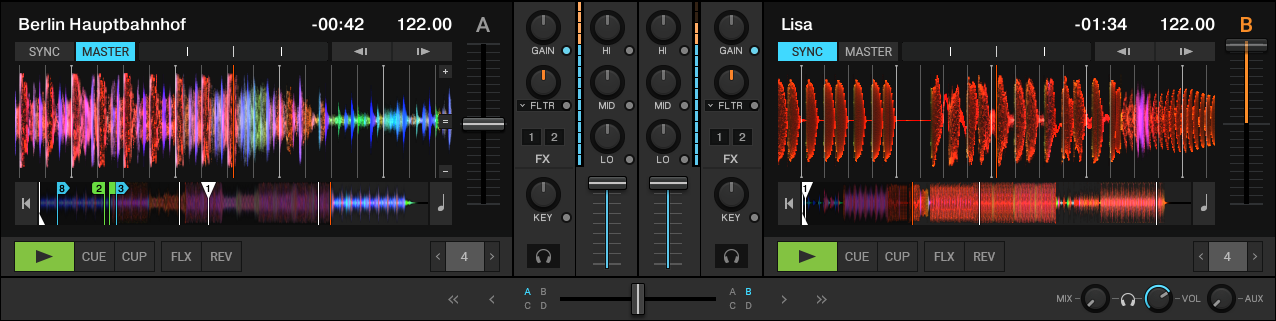
Deck Layout – Parallel Slim
When using the deck layout Parallel Slim, you will see the following information and deck controls:
Stacked waveforms of deck A and B above the decks.
Stripe
Transport controls
Key Lock button
Tempo bend controls
Tempo fader
Phase meter
SYNC and MASTER buttons
Deck header showing the first row with the track information cover art, track title, remaining track time, and current track tempo
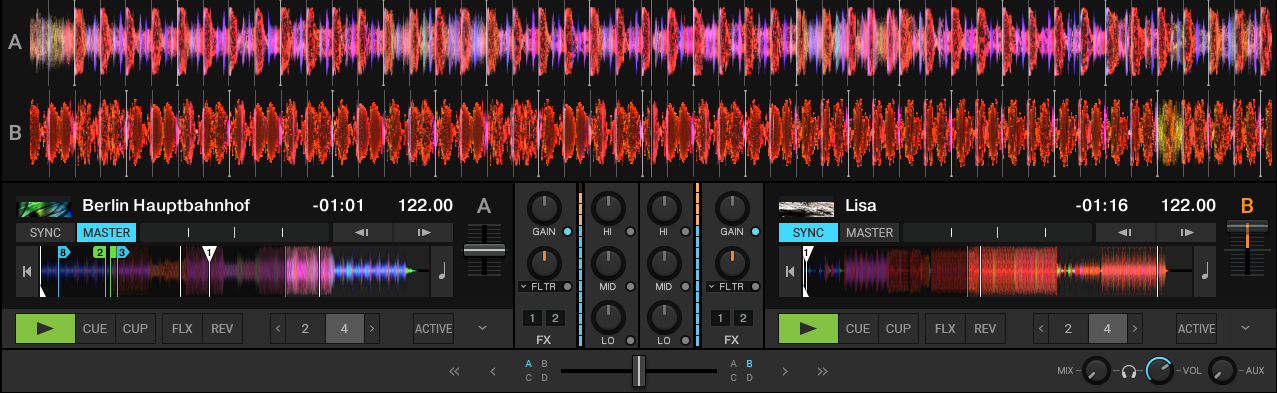
Deck layout – Parallel Slim.
Deck Layout – Parallel Full
When using deck layout Parallel Full, you will see the following information and deck controls:
Stacked waveforms of deck A and B above the decks
Stripe
Transport controls
Advanced Panel
Key Lock button
Tempo bend controls
Tempo fader
Phase meter
SYNC and MASTER buttons
Full deck header with all track information
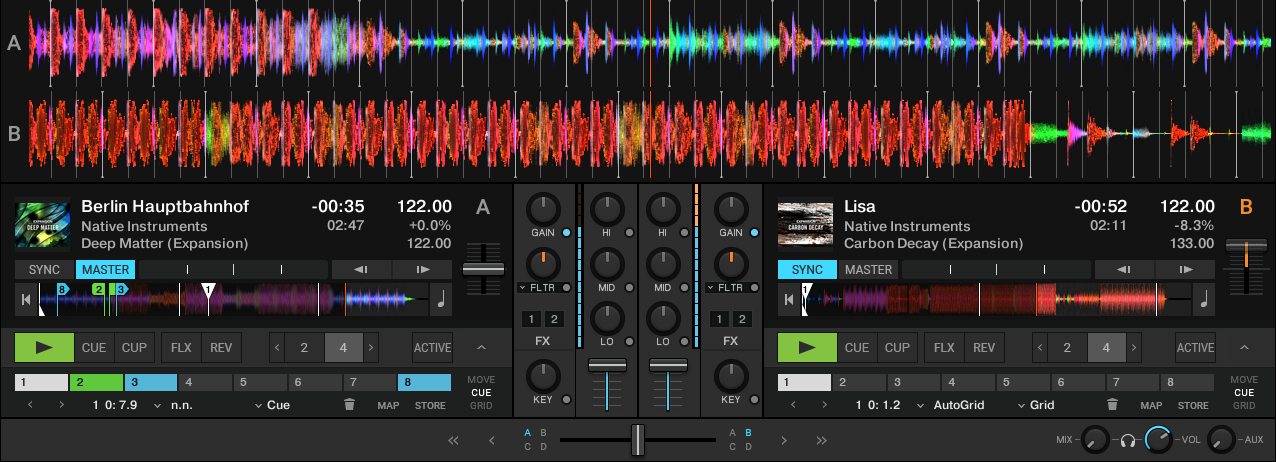
Deck layout – Parallel Full.