Traktor Overview
This section introduces you to the main areas and elements in Traktor.
Traktor consists of the following main areas and elements:
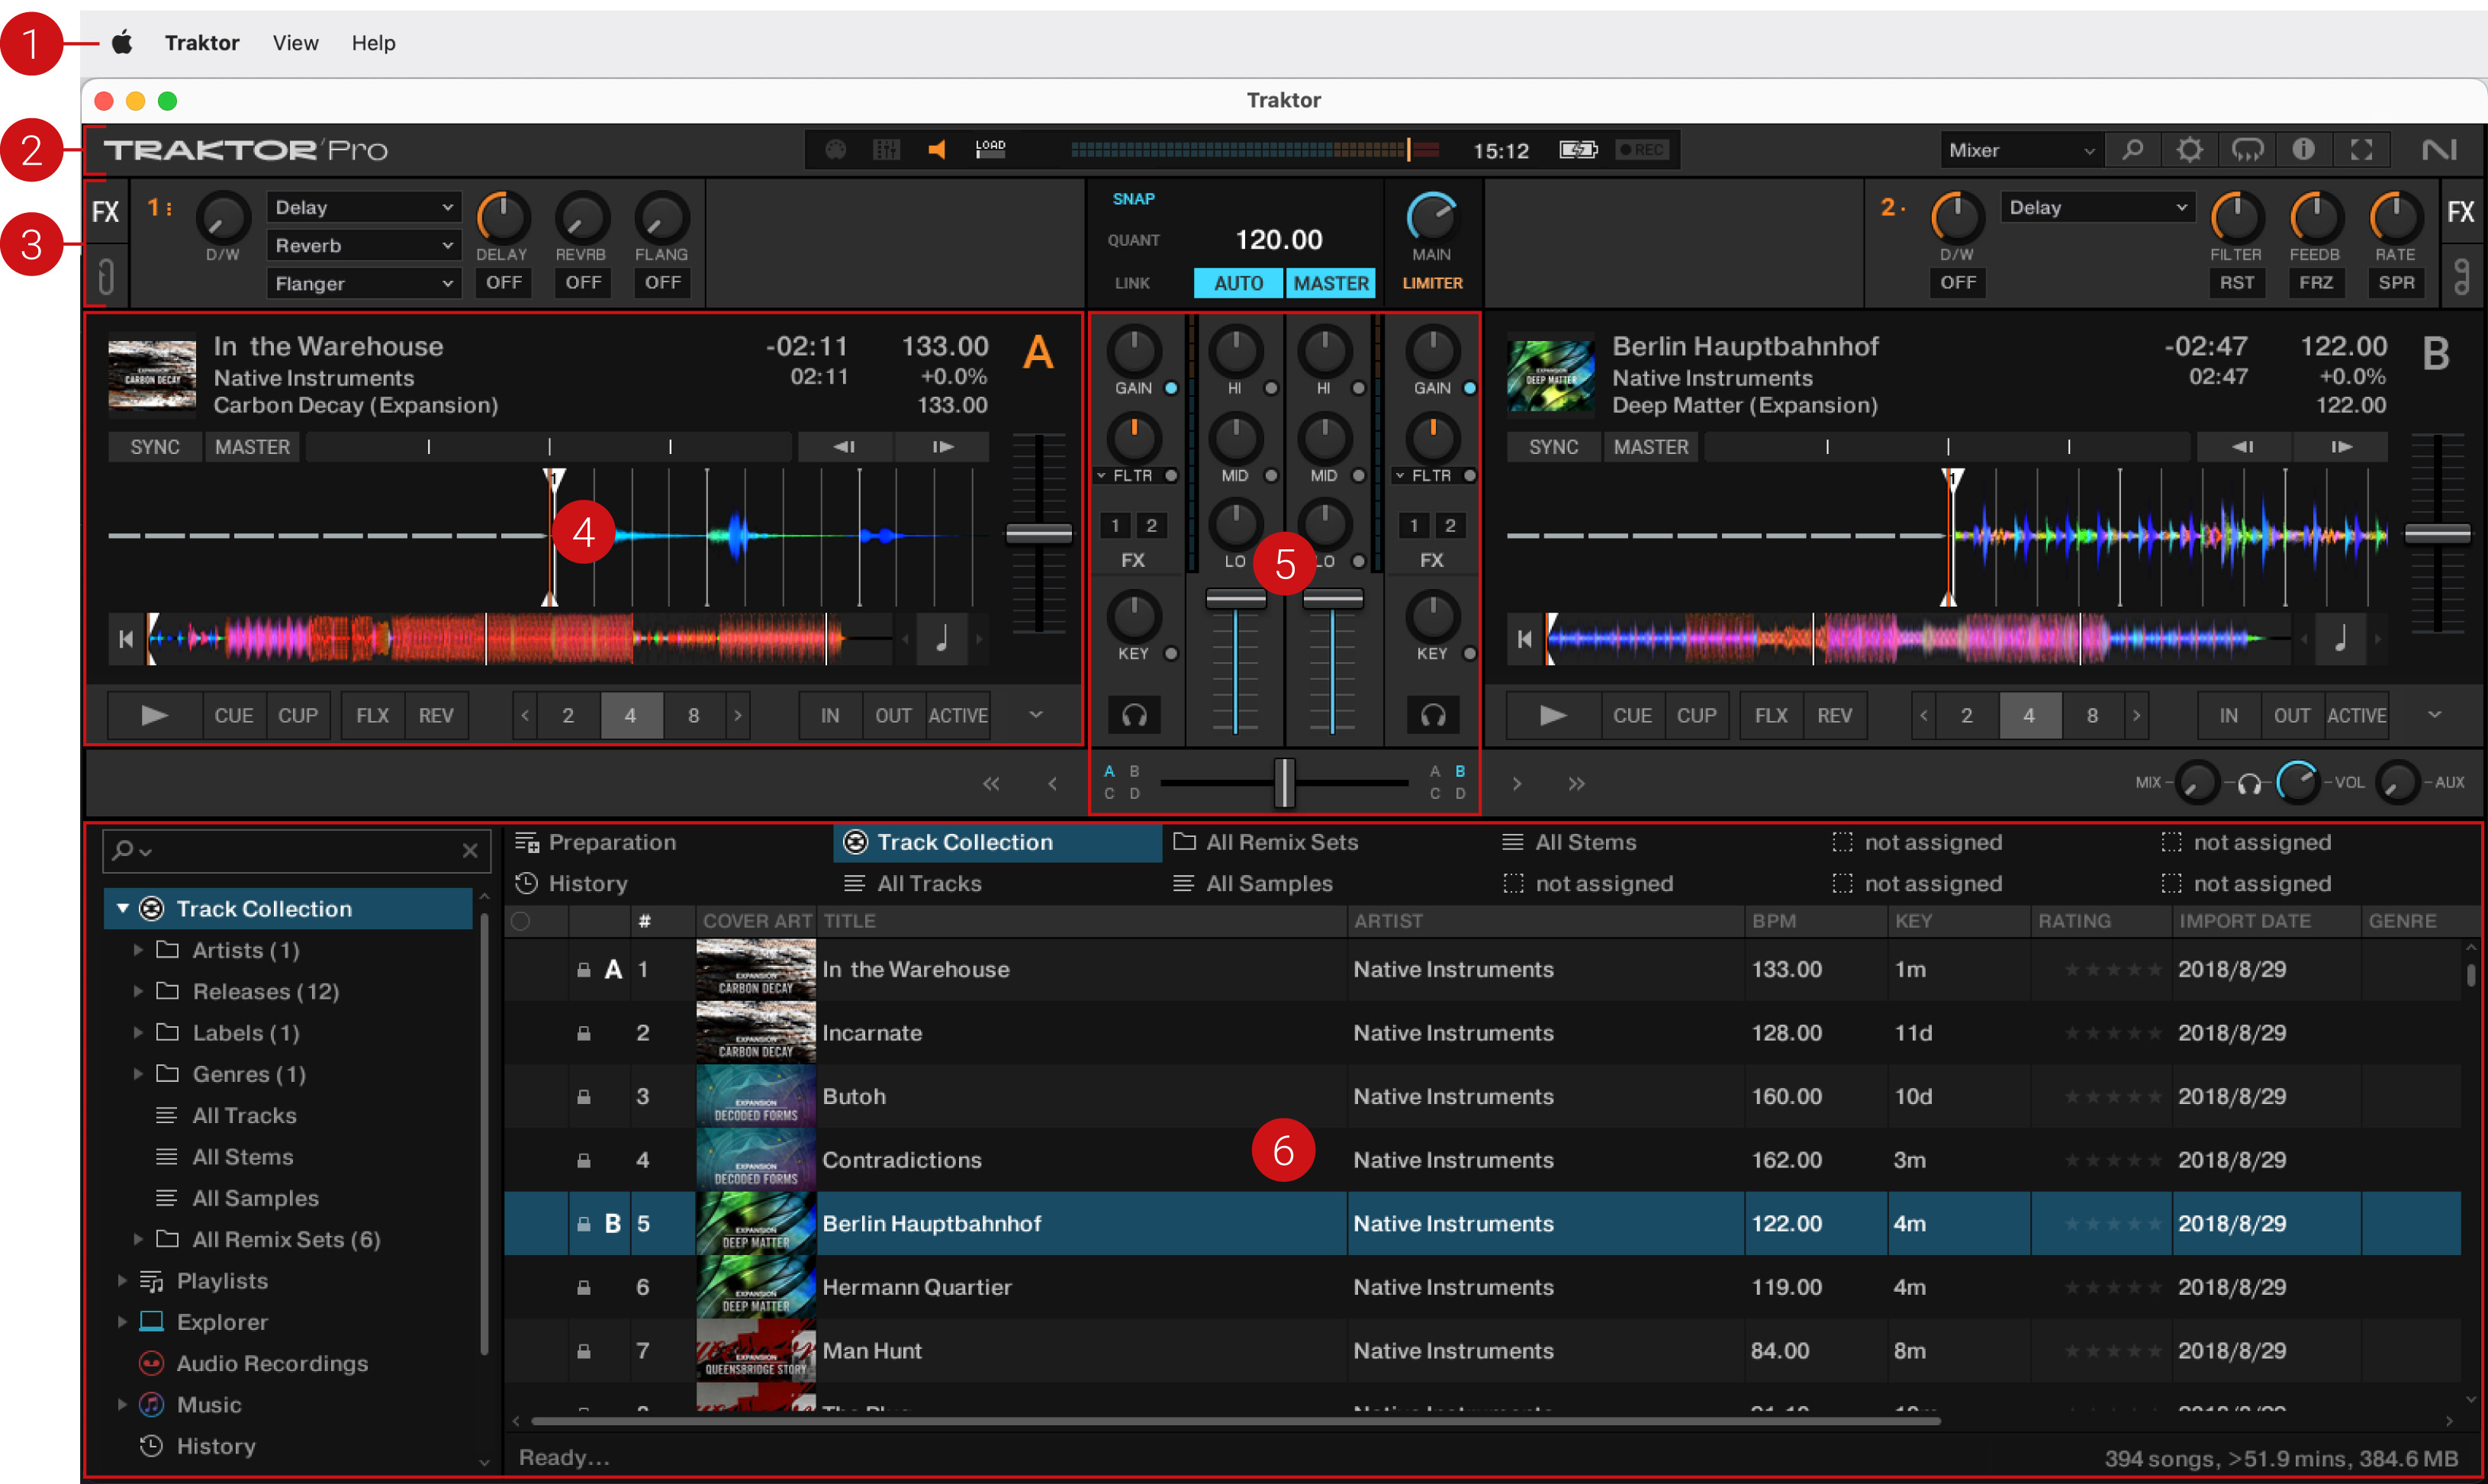
Application menu bar: Provides access to basic functions and information about the software. For more information, refer to Application Menu Bar.
Header: Here you can find various status indicators and useful functions and buttons, e.g., the Preferences button. For more information, refer to Header.
Global section: The Global section contains the FX Units, the Master Control panel, the AUDIO RECORDER, and the LOOP RECORDER. For more information, refer to Global Section.
Decks: Traktor provides you with the four virtual Decks A, B, C, and D. The Decks are where tracks, Stem files, and Samples are played back. If you previously selected to use only two Decks A and B, you can enable the lower Decks C and D in the Preferences. For more information, refer to Decks and Deck Types.
Mixer: The Mixer receives audio signals on its four Mixer channels, coming from the four Decks. The Mixer’s basic purpose is to adjust the relative level of each Mixer channel, to control the channels’ frequency content, possibly routing them into the FX Units, before sending the overall result to the master output. For more information, refer to Mixer.
Browser: Lets you manage all your tracks in the Track Collection. You can group tracks in Playlists, sort them according to various attributes, and search within Playlists as well as in the entire Track Collection. For more information, refer to Browser.
Application Menu Bar
The Application menu bar provides access to the Traktor (macOS) / File (Windows), View , and Help menus, which contain the following entries:
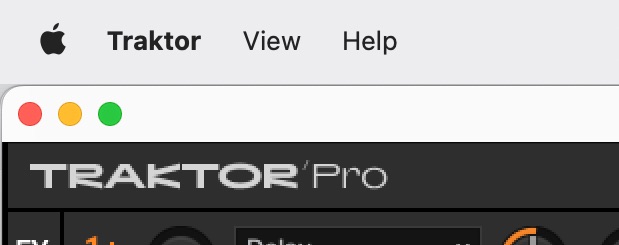 |
Traktor (macOS) / File (Windows): Contains options for setting up Traktor.
Preferences: Opens the Preferences dialog.
View: Contains options for the Traktor Layout.
Layouts: Shows the list of available Traktor layouts you can select.
Fullscreen: Switches the Traktor application into fullscreen view.
Help: Contains options for updating Traktor and getting help.
Check for Updates on Native Access: Calls up the Native Access application that is checking for available software updates.
Downloads: Opens the web browser on your computer and directs you to the download page on the Native Instruments website.
Get Started with Traktor: Opens the web browser on your computer and directs you to the Traktor video tutorials page on the Native Instruments website.
Online Traktor Documentation: Opens the web browser on your computer and directs you to the Traktor downloads page including links to the manuals on the Native Instruments website.
Reset Settings to Default: Sets all the Traktor settings (for example, the settings on the Preferences pages and the layout adjustments) back to their default values. This allows you to start with a fresh Traktor Pro setup if needed.
Buy Upgrades and Accessories: Opens the web browser on your computer and directs you to the Traktor products page on the Native Instruments website.
Header
The Header is located at the very top of Traktor’s user interface and contains various status indicators, and useful functions and buttons.

Header.
(1) Traktor Logo: Clicking the Traktor logo displays the about screen with the current version number of the Traktor software, the credits, and some additional information.
(2) MIDI indicator: Indicates the incoming MIDI and Native (NHL) signals. The indicator lights blue while a signal is received.
(3) Connection indicator: Indicates if all listed controllers are connected. The indicator lights blue if all controllers are connected, orange if some controllers are connected, unlit if no controller is connected.
(4) Audio indicator: Indicates the connection to your audio interface. It lights up blue if an audio interface is connected, red if no audio interface is connected, orange if the internal soundcard selected. For more information, refer to Preferences Audio setup.
(5) LOAD indicator: Indicates how much computing time available per audio buffer is currently used by Traktor to process audio data contained in one buffer. This value shows how much CPU load the audio processing requires and how much headroom is left before audio starts dropping out. The system should be kept at values below the LOAD indicator turning red.
(6) Master Output level meter: Displays the Master Output level.
(7) System Clock: Displays the time of day derived from the system time of your computer.
(8) Battery indicator: Indicates how much power remains in your computer's battery. It lights up blue if a power supply is connected and red when running out of battery power.
(9) Recording indicator: Indicates the status of the AUDIO RECORDER. It lights up red when recording. For more information, refer to Recording Your Mix with the AUDIO RECORDER.
(10) Layout selector: Provides you with a list of default Traktor Layouts. For more information, refer to Traktor Layouts and Layout Switching.
(11) Maximize Browser button: Maximizes the Browser view by minimizing the sizes of the Decks, the Mixer, and the Global section.
(12) Preferences button: Opens the Preferences dialog. All Traktor settings are made here. For more information, refer to Preferences.
(13) Cruise Mode button: Enables Cruise mode allowing you to automatically play one track after the other from a Playlist or your Track Collection. Cruise mode seamlessly takes over playback control. For more information, refer to Using Cruise Mode for Automatic Mixing.
(14) Tooltip button: Enables the tooltips in Traktor.
(15) Fullscreen button: Enables Fullscreen mode. When activated, none of the operating system’s controls are visible.
(16) NI Logo: Displays the about screen with the current version number of the Traktor software, the credits, and some additional information.
Global Section
The Global section contains five distinct panels with global controls and recording functions: FX Unit 1 and FX Unit 2, AUDIO RECORDER, LOOP RECORDER, and the Master Control panel. Not all of the panels can be displayed at once. The Master Control panel is always visible. In the left panel you can display FX Unit 1 or the LOOP RECORDER, and on the right side you can display either FX Unit 2 or the AUDIO RECORDER. The panels can be selected using the corresponding buttons at the far left and right of the Global section.

Global Section with FX Unit 1 and 2 displayed.
(1) FX Unit 1 and FX Unit 2: Traktor offers four FX Units for tweaking the audio signals in the Mixer. By default, only FX Unit 1 and FX Unit 2 are activated. All FX Units can be freely assigned to any of the Mixer channels A - D. For more information, refer to FX Units.
(2) Master Control panel: The Master Control panel is a central component of Traktor. It lets you control the MAIN volume, and defines the behavior for setting Cue Points and Loops as well as enabling and disabling the Master Limiter. It also contains the Master Clock and works as a tempo reference for the Sync function and the effects. Here you can also join or start network sessions via Ableton Link, or send a MIDI Clock signal to external hardware and software. For more information, refer to Master Control Panel.

Global Section with the LOOP RECORDER and AUDIO RECORDER displayed.
(1) LOOP RECORDER: The LOOP RECORDER allows you to instantly create Loops from the Mixer’s main output signal, from a particular Deck, or from an external audio input. For more information, refer to LOOP RECORDER.
(2) AUDIO RECORDER: The AUDIO RECORDER enables you to record your mix from the main output as well as from other physical audio inputs. For more information, refer to Audio Recorder.
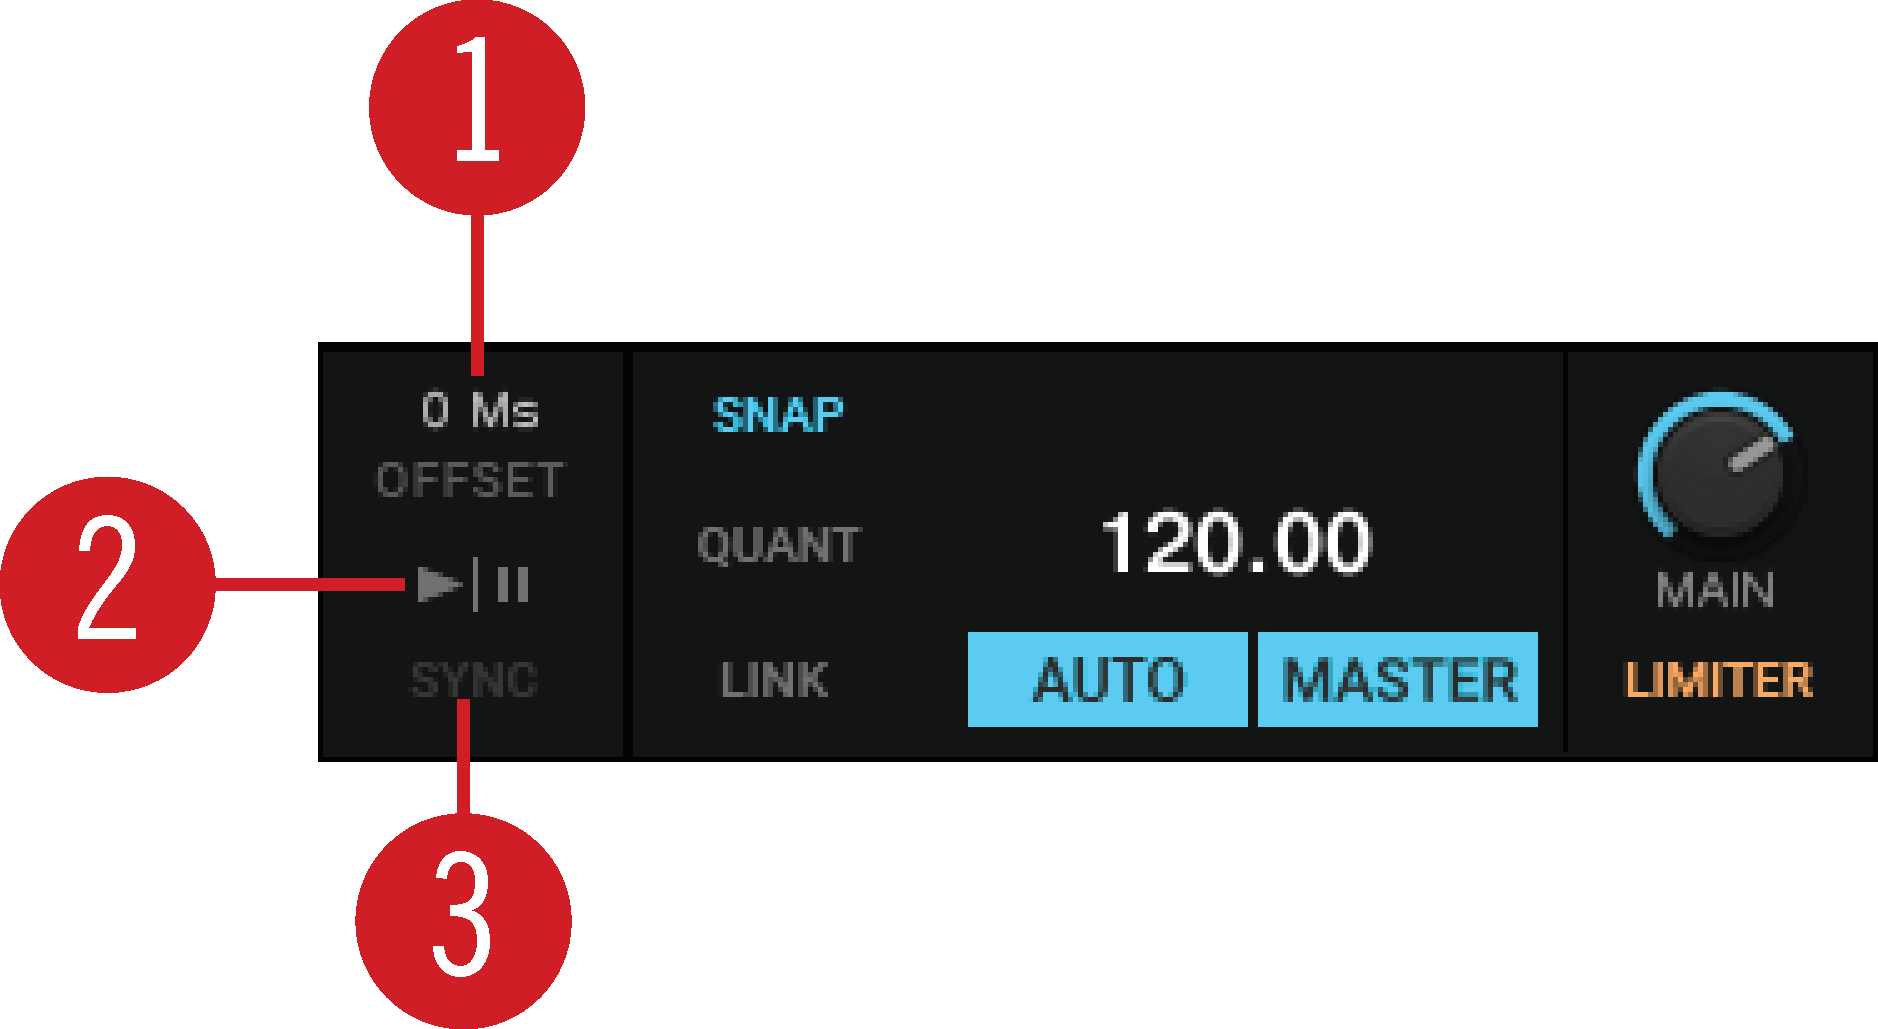
Master Control Panel
The Master Control panel is a central component of Traktor. It allows you control the MAIN volume, and defines the behavior for setting Cue Points and Loops. It also contains the Master Clock and works as a tempo reference for the Sync function and for the effects. Here you can also join or start network sessions via Ableton Link, or send a MIDI Clock signal to external hardware and software.
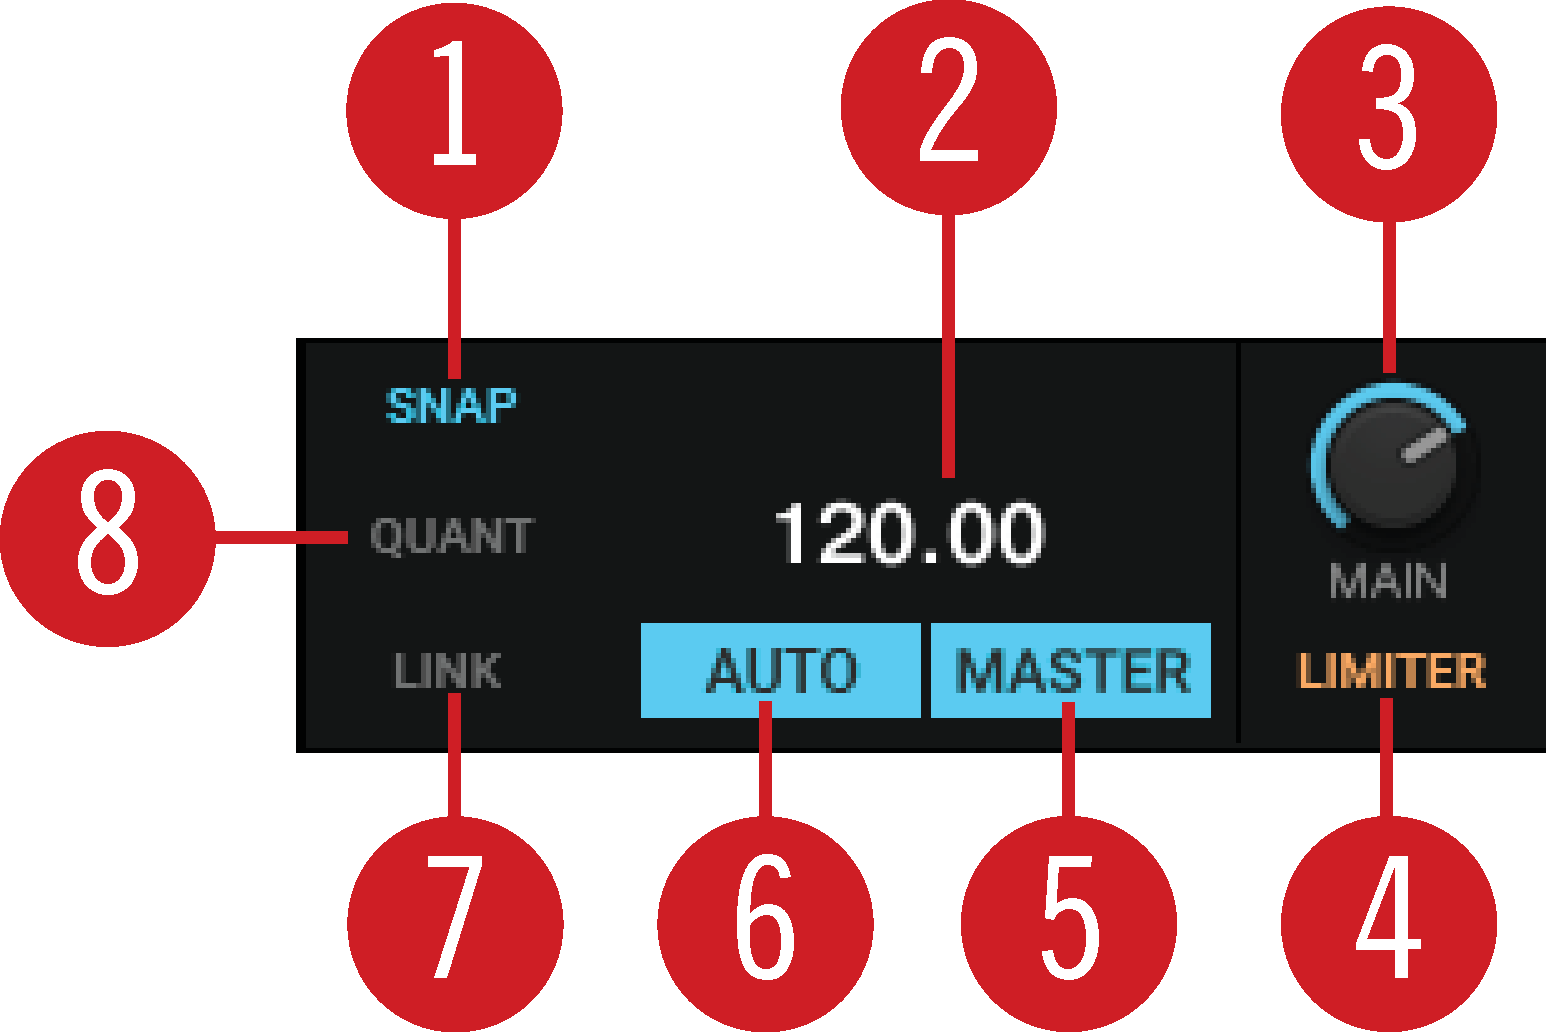 |
Master Control panel.
(1) SNAP: Activates SNAP mode. When SNAP mode is activated, Cue Points or Loops are always set to the closest beat. The button lights up blue when activated.
(2) MASTER CLOCK TEMPO display: Displays the current tempo and offset of the Master Clock. You can enter a new tempo with a double-click.
(3) MAIN knob: Controls the main output volume.
(4) LIMITER / BOOST: Activates or deactivates the limiter for the main output signal. When activated, the main output level meter shows the limiter position right before the red LEDs. If you have selected the Ozone Maximizer in the Mixer page of the Preferences, the label reads BOOST instead of LIMITER. For more information, refer to Optimizing Gain and Output Levels.
(5) MASTER: When activated you can play on four Decks with a stable tempo reference. It is also the mode to be used when Traktor is sending out the master tempo via MIDI Clock messages to another application or hardware being synced to Traktor.
(6) AUTO: When activated Traktor automatically selects one of the Decks as Tempo Master. The Master Clock then automatically syncs to the Master Deck.
(7) LINK: Syncs Traktor to an Ableton Link session and gives additional status information. For more information, refer to Synchronization using Ableton Link. When the Enable MIDI Clock setting is activated in the External Sync page in the Preferences, LINK is replaced by EXT. For more information, refer to Syncing Traktor via MIDI Clock.
(8) QUANT: Activates Quantize mode. Quantize mode lets you jump between Cue Points and Stored Loops seamlessly, without losing sync. Skipping in the track in Quantize mode brings the playhead position to the next destination without losing sync. The button lights up blue when activated.
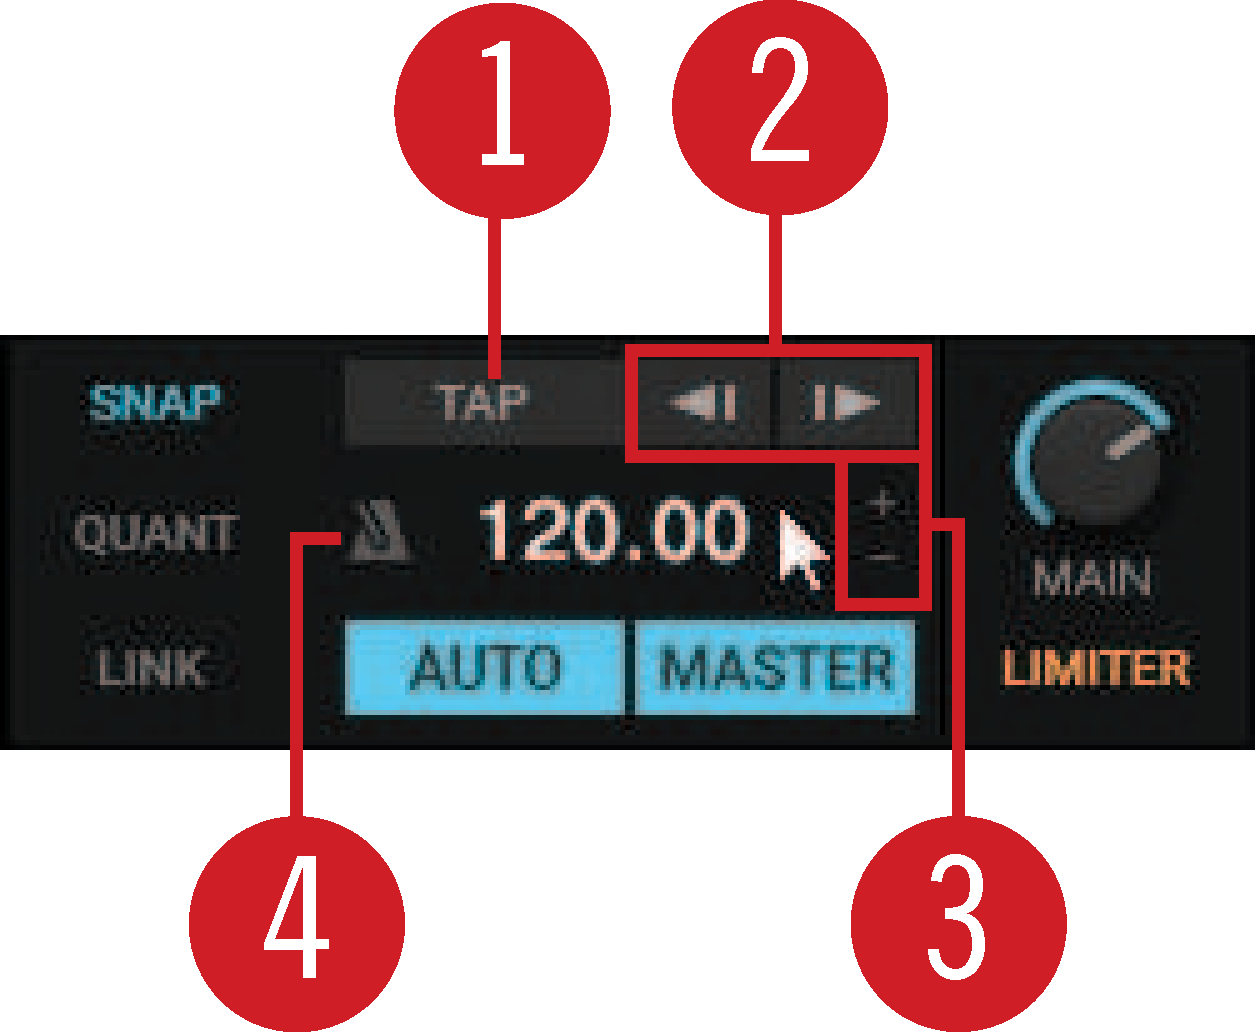
Further Master Clock Controls
When hovering the mouse over the MASTER CLOCK display you are provided with additional Master Clock controls.
 |
Master Control panel.
(1) TAP button: With this button you can tap in the desired Master Clock tempo.
(2) Master Clock Bend buttons: Slows down or speeds up the Master Tempo momentarily.
(3) MASTER CLOCK Tempo Up / Down buttons: Decreases or Increases the Master Tempo step-wise.
(4) Metronome (Master Clock Tick): Toggles an audible metronome beat tick with the Master Clock as source on or off.
Further MIDI Clock Sync Controls
When the MIDI Clock is activated in the Preferences, the Master Control panel expands providing further MIDI Clock controls. For more information, refer to Preferences – External Sync Page.
 |
Master Control panel.
(1) Offset display: Indicates the offset for the synchronization.
(2) MASTER CLOCK START: Enables or disables MIDI Clock for external synchronization.
(3) MASTER CLOCK SYNC: Resets the external devices (receives) connected via MIDI clock.
FX Units
Traktor offers four FX Units which give you the control of adding FX to your mix. By default there are only two FX Units activated - FX Unit 1 and FX Unit 2. Each FX Unit can be assigned to any Mixer channel individually or to more than one Mixer channel at a time. The FX Units are located on the left and the right side in the Global section. A click on the FX Unit buttons labeled FX on either end of the Global section shows the corresponding FX Unit.
The FX Units are used as insert effects by default, but you can also use them as post-fader effects and as Send effects. The FX Units are freely configurable.
Additionally, you can choose from three different FX Unit modes in Traktor: Either Single FX mode, where four buttons and four knobs control one effect, Group FX mode, where you can use chain of three effects or Pattern Player mode, enabling you to add sequenced samples to the playing deck. For more Information on using the FX Units, refer to Working with FX Units.
FX Units in Single FX Mode
In Single FX mode you get full control over all parameters of a single effect.
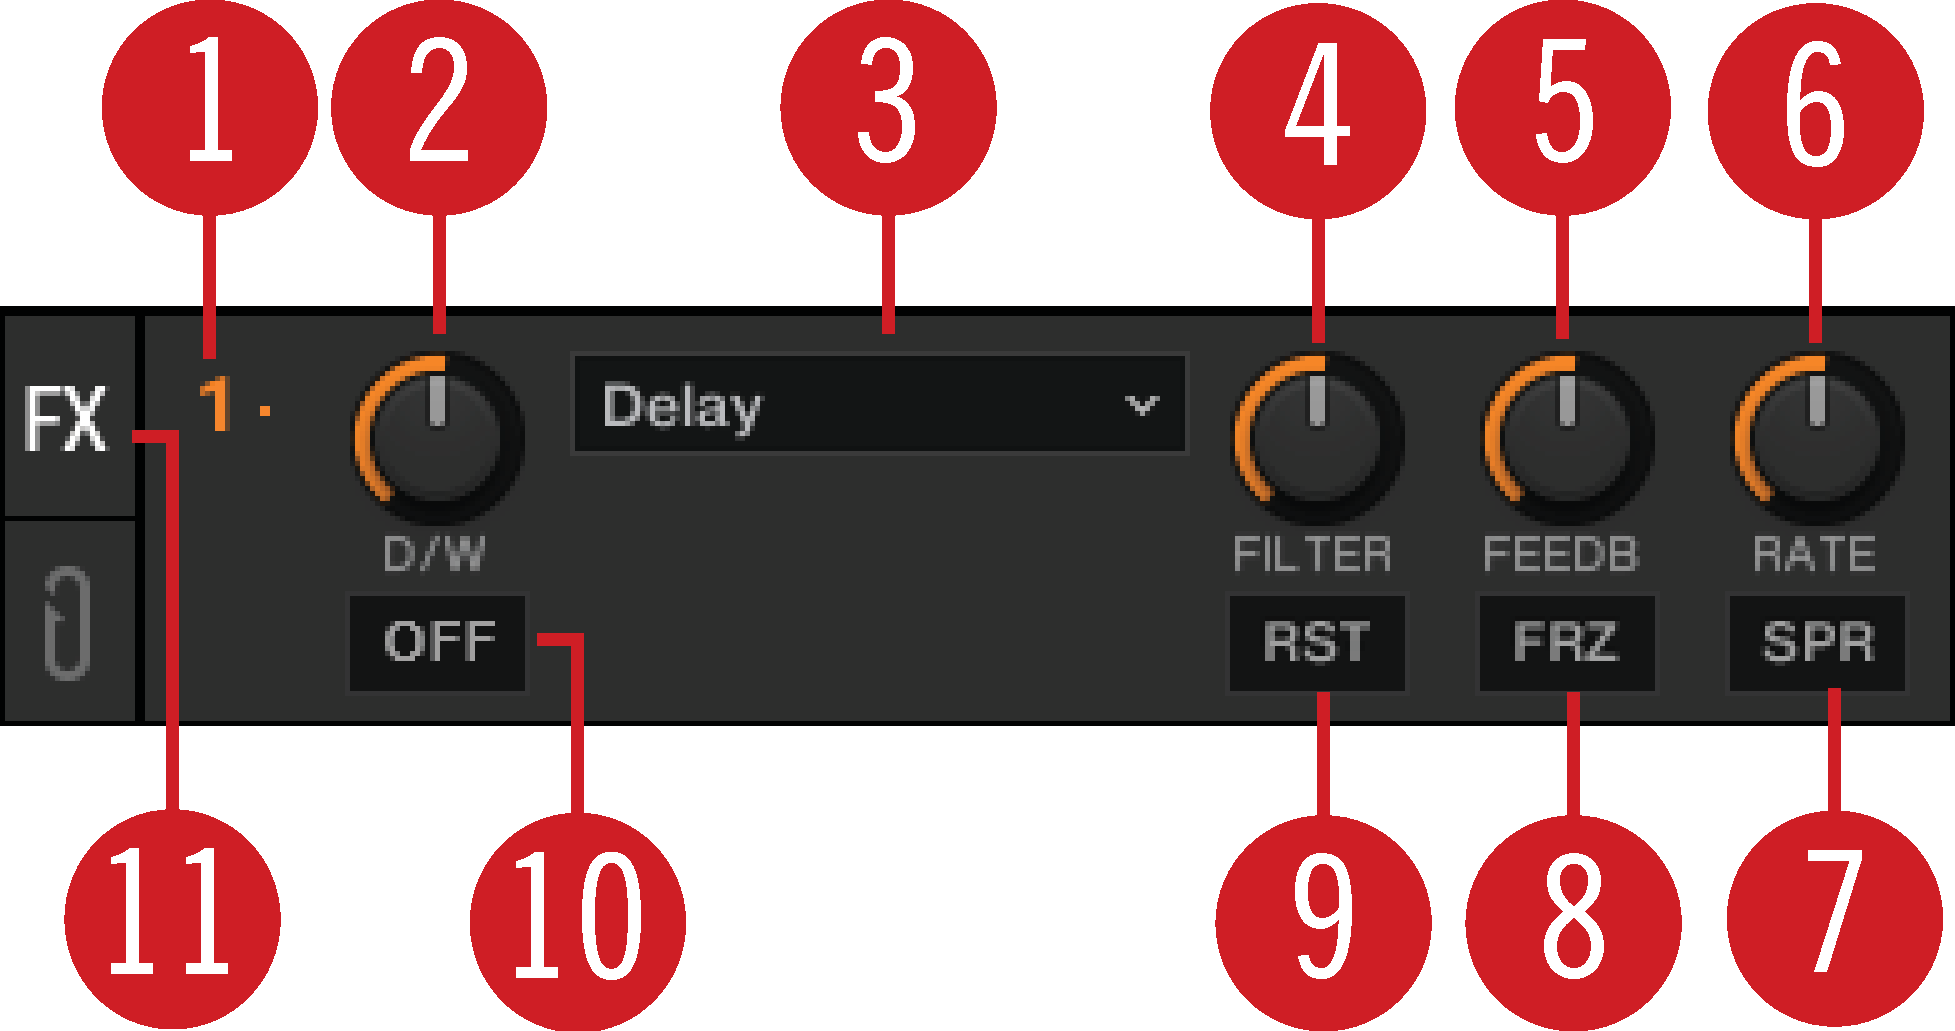 |
FX Unit Config drop-down menu: Opens a drop-down menu for configuring the FX Unit and taking snapshots. Additionally, the number identifies the FX Unit and the selected FX mode.
D/W knob: Controls the direct-to-processed signal mix.
FX Selector: Selects the effect to be controlled in the FX Unit.
FX Parameter control 1: Modulates the parameters for the selected effect.
FX Parameter control 2: Modulates the parameters for the selected effect.
FX Parameter control 3: Modulates the parameters for the selected effect.
FX button 1: Controls the selected effect. The exact function depends on the selected effect.
FX button 2: Controls the selected effect. The exact function depends on the selected effect.
FX button 3: Controls the selected effect. The exact function depends on the selected effect.
RST button: Resets all parameters for the selected effect. This button is not available for all effects.
FX On button: Switches the effect on and off. If on, the buttons light up yellow.
FX Unit 1 in Group FX Mode
In Group FX mode you can control up to three FX at once in one FX Unit.
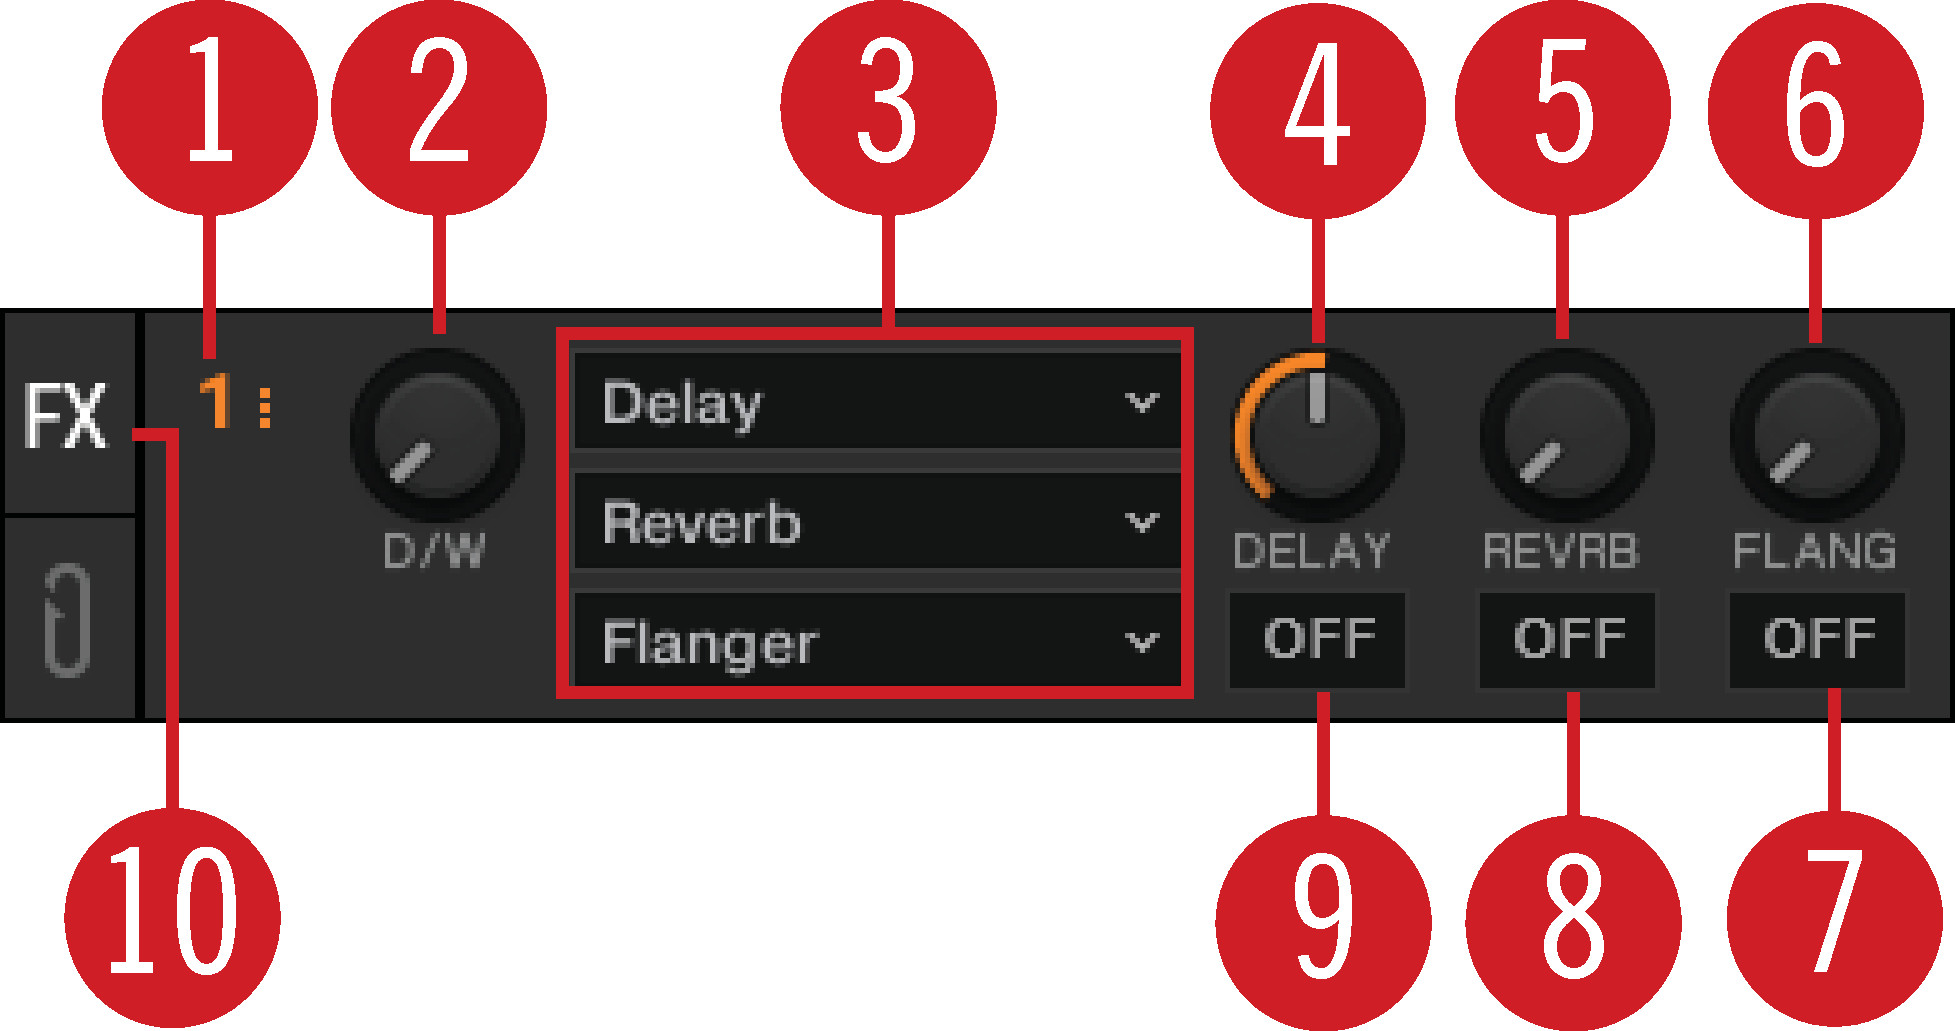 |
FX Unit Config drop-down menu: Opens a drop-down menu for configuring the FX Unit and taking snapshots. Additionally, the number identifies the FX Unit and the selected FX mode.
D/W knob: Controls the direct-to-processed signal mix for the entire effect chain.
FX Selector 1-3: Selects the effect to be controlled in the FX Unit.
Effect Amount knob 1: Controls the individual effect amount.
Effect Amount knob 2: Controls the individual effect amount.
Effect Amount knob 3: Controls the individual effect amount.
Effect On buttons 1: Switches every effect in the effect chain on and off.
Effect On buttons 2: Switches every effect in the effect chain on and off.
Effect On buttons 3: Switches every effect in the effect chain on and off.
FX On button: Switches the effect on and off.
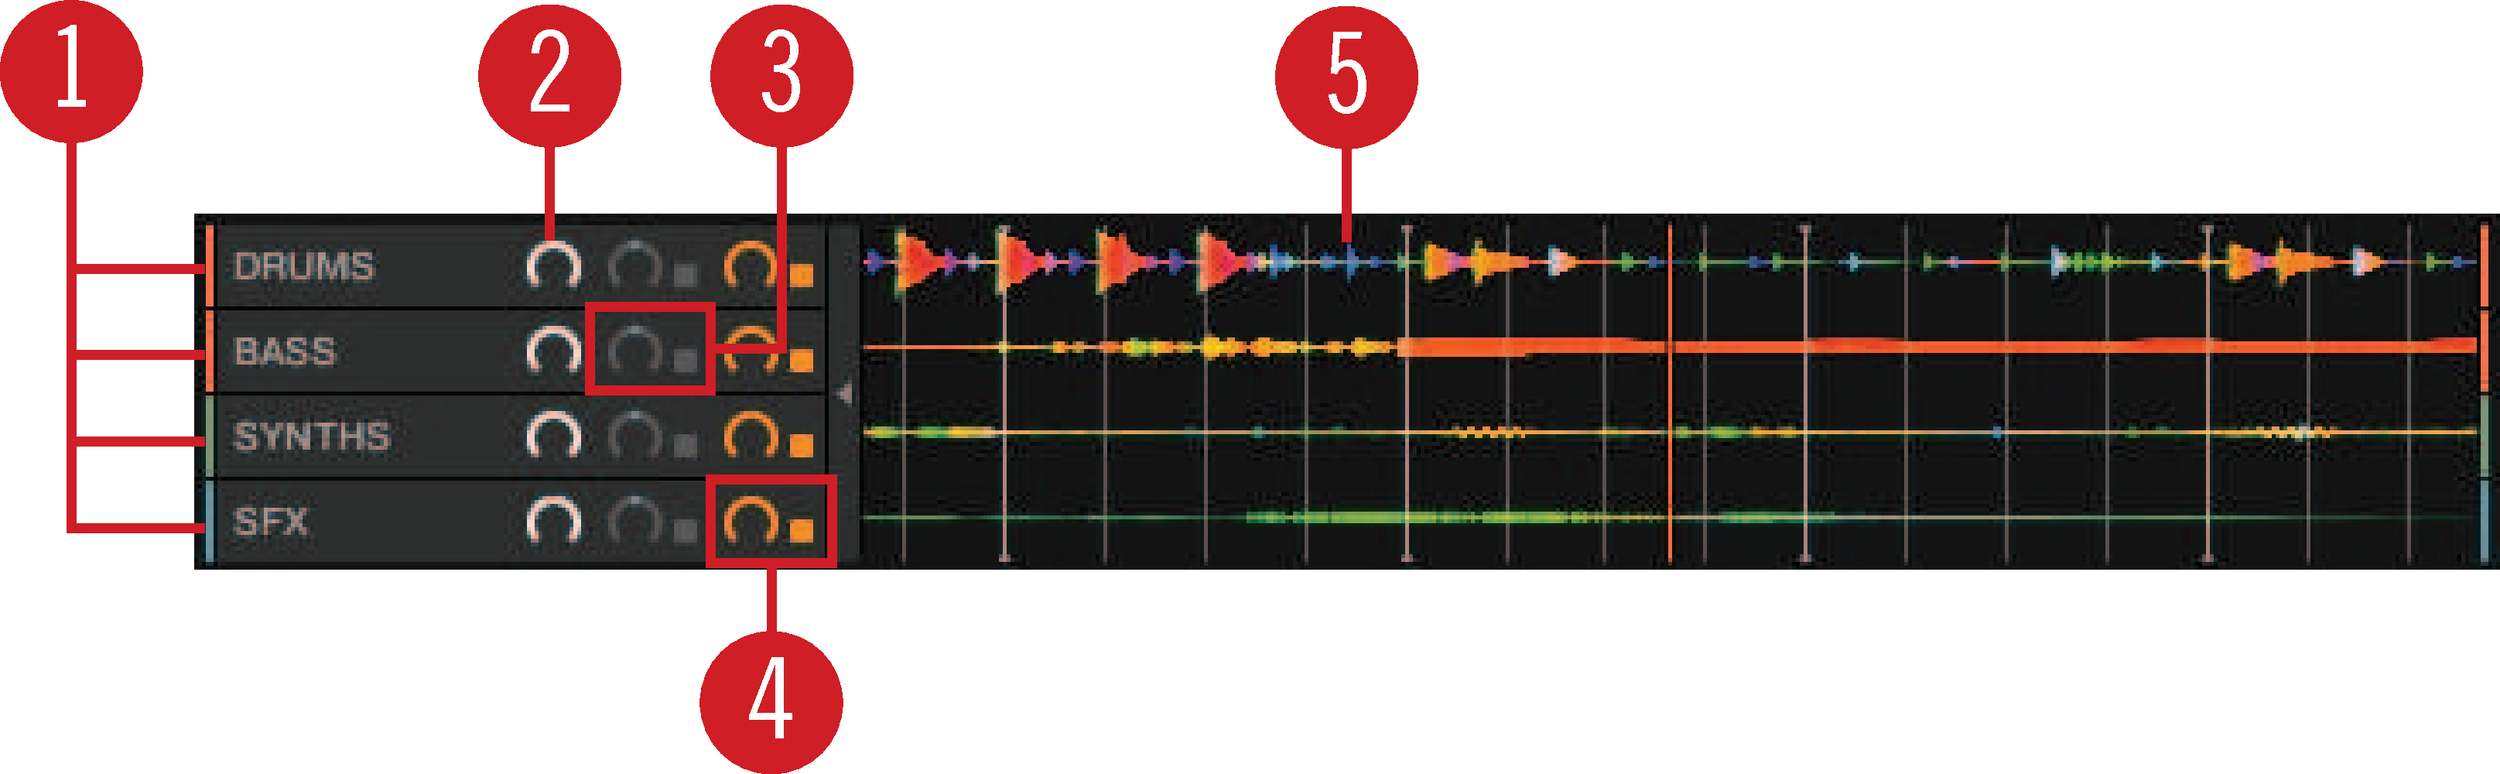
Pattern Player Mode
The Pattern Player can be used to play rhythmical patterns within Traktor.
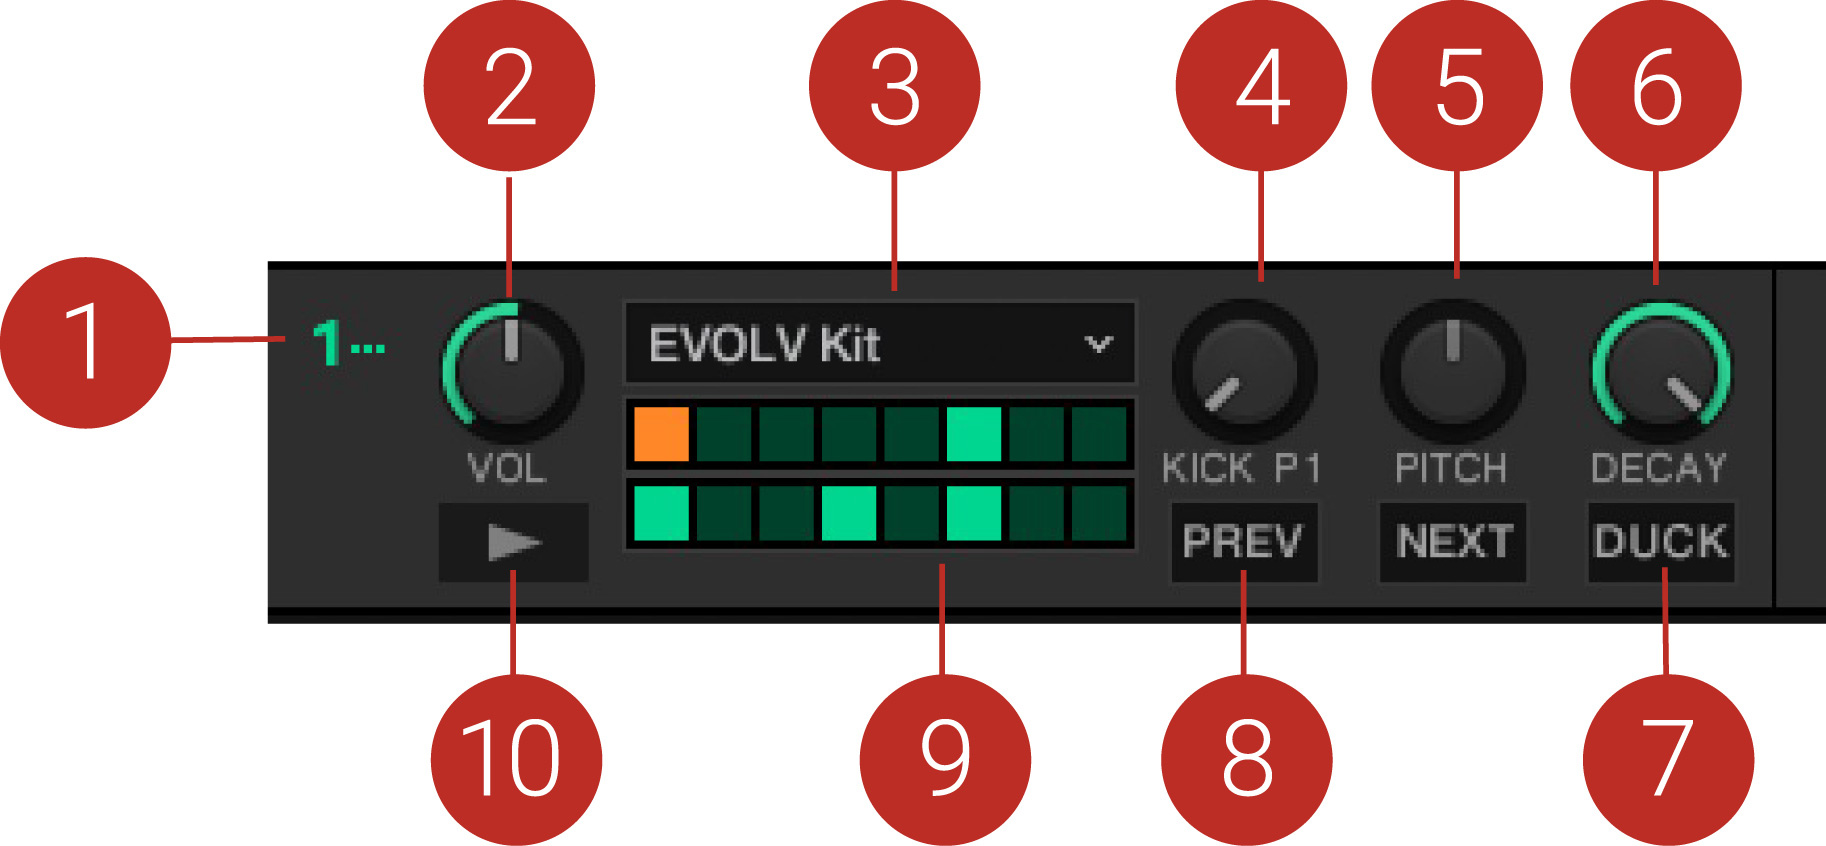 |
Mode Selection: The Pattern Player is a new effect unit mode, as are “single” and “group” modes. It can be used in send, post fader and insert mode like any other effect. The Pattern Player is enabled by selecting it via the FX Mode selection. For more information, refer to Using the FX Unit in Pattern Player Mode
Volume knob: Adjust the volume of the sample and the sidechain depth if ducking is enabled.
Kit Display: Choose between different sample and pattern collections.
Pattern Selection knob: Select from among the different patterns. They are sorted by increasing activity to get the most intuitive feeling.
Pitch knob: Repitch continuously each sample from -12 semitones to +12 semitones. Note that there is no time-stretching algorithm involved to keep the sample best audio quality. This implies that up-pitching a sample shortens it and down-pitching a sample makes it longer.
Decay knob: Set the decay of the sample. Decay time is relative to the sample length and goes from almost-instant decay to full sample length. It also adjusts the release time of the ducking envelope from 200ms to 500ms.
Ducking on/off: When ducking is enabled, the track affected by the effect is sidechained to the Pattern Player sample. This is very useful if you want to push the Pattern Player sound forward. The amount of sidechain is modulated by the sample volume and its decay by the sample decay.
Sample selection: Switch to the next or previous sample in the list. There’s a kick, clave, snare, clap, closed hi-hat, open hi-hat, shaker and ride in the default 808 kit. Each sample has its own pattern bank that has been designed to be as musical as possible.
Pattern visualization: Thanks to the visualization you always know what the selected pattern looks like, where the play marker is and if the Pattern Player is running correctly.
Play/Stop: Starting the pattern restarts the pattern on the first beat and syncs it with Traktor’s master clock. Note that the first beat of the Pattern Player will always fall on the nearest beat to allow intuitive syncing.
Audio Recorder
The Audio Recorder in Traktor is used for recording your mixes or audio from an external source e.g. your mix with an external mixer, a microphone, or a turntable. It is also used for broadcasting your mix. A click on the Tape icon displays the AUDIO RECORDER in the Global Section.
 |
AUDIO RECORDER.
(1) Broadcast button: Starts broadcasting your mix once a server has been installed and configured.
(2) Display: Shows the actual file size and recorded time.
(3) CUT button: Saves the recording until the current recording time and seamlessly starts a new file for recording.
(4) AUDIO RECORDER button: Opens the AUDIO RECORDER.
(5) Recording meter: Indicates the current recording level.
(6) Record GAIN knob: Adjusts the level for the incoming audio signal.
(7) Record button: Starts and stops recording and saves the recorded file in the Recordings folder.
LOOP RECORDER
The LOOP RECORDER allows you to record Loops from several sources on the fly. A click on the LOOP RECORDER button on the left side of the Global section displays the LOOP RECORDER.
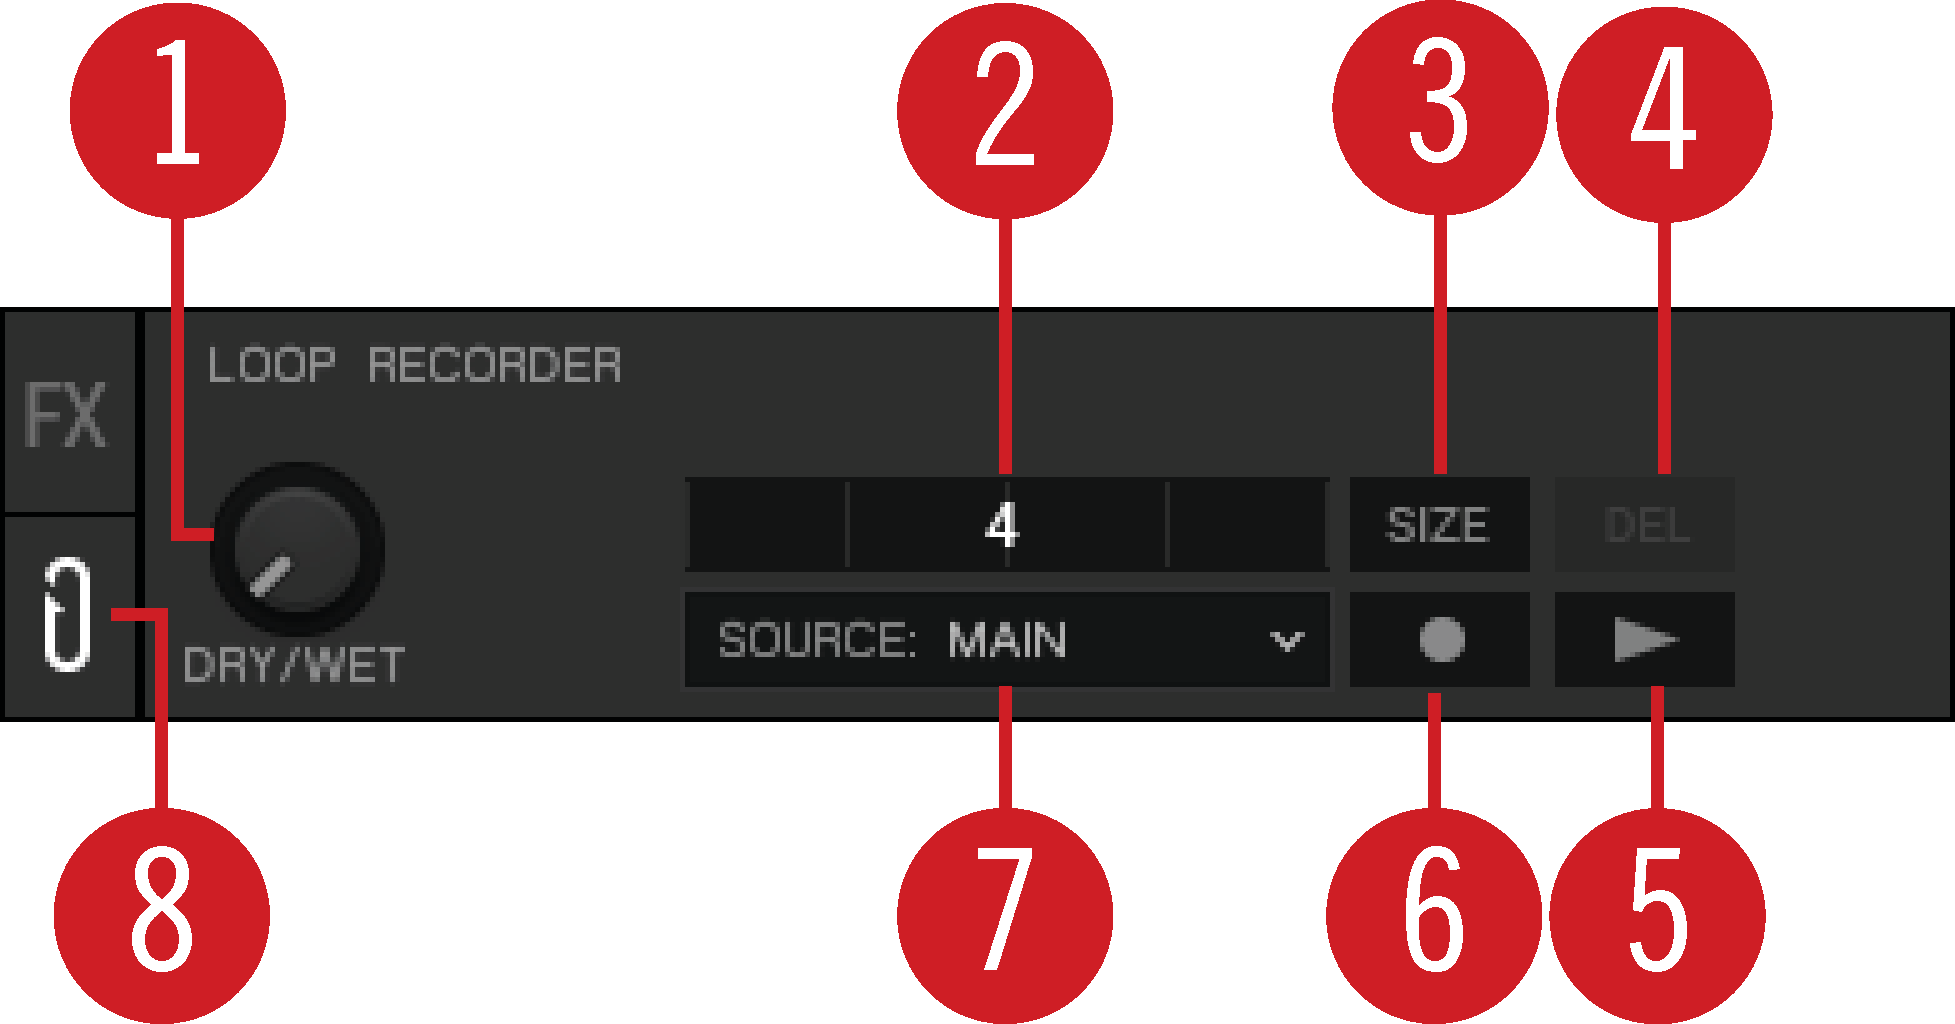 |
LOOP RECORDER.
(1) DRY/WET knob: Adjusts the ratio of main-to-recorded signal.
(2) Progress bar: Displays the current length of the recording.
(3) SIZE button: Determines the initial length of the recording.
(4) Delete / Undo / Redo: Deletes the recorded Loop, undoes the last overdubbing, and restores last undo.
(5) Play button: Starts and stops playback of the recording.
(6) Record button: Starts and stops the recording and the overdubbing.
(7) Source drop-down menu: Selects the source for the recording.
(8) LOOP RECORDER button: Opens the LOOP RECORDER.
Note
If you’re using Traktor with the Scratch feature and are therefore in External Mixing mode, the only available recording source to select is EXT.
Decks and Deck Types
Traktor provides you with four virtual Decks. These Decks can be operated in different Deck Types which are Track Deck, Stem Deck, Remix Deck, and Live Input:
The Decks contain common Deck elements as well as Deck elements specific to their Deck Type. For more information on common Deck elements, refer to ???.
Track Deck: The Track Deck in Traktor represents the equivalent of a turntable or a CD player used to play back conventional tracks in a classic mixing setup. For more information, refer to Track Deck.
Stem Deck: The Stem Deck is capable of playing back and remixing Stem Files. When loading a Stem File into a deck, the deck type automatically switches to Stem Deck. The functionality is basically identical to the Track Deck, but features additional sub-mix controls for the four Slot Volumes, Filters, and FX Sends for the Stem Parts. For more information, refer to Stem Deck.
Note
For Stem Files created with third party tools outside Traktor or purchased from a music store it is mandatory that Stem Files have to be analyzed before loading them into a Stem Deck. Stem Files generated by Traktor are already analyzed and can directly be loaded into the decks.
Remix Deck: The Remix Deck provides you with four Sample Slots, for adding Samples and loops to your mix. You can load, create and save complex Remix Sets, and arrange Samples live in your mix. The Remix Deck comes with a variety of Sample-related features. For more information, refer to Remix Deck.
Live Input: The Live Input is not a Deck, but it allows you to include live audio from an external source in your mix. This can be from any audio input, i.e. a turntable, a microphone, or a synthesizer. For more information, refer to Live Input.
Common Deck Controls
Besides the Live Input, any Deck provides the same synchronization, trigger, and track modification controls. The following image shows a full Deck:

Common Deck controls.
(1) Deck Header: Displays information about the loaded track, like the artist name or track title. By double-clicking the Deck Header, you can switch the Deck layout between five different views from minimized to full layout. For more information, refer to Deck Header.
(2) Deck Tempo display: Contains information about the track tempo. Depending on Deck Type, the contained elements and controls slightly differ. For more information, refer to Deck Tempo Display on the Remix Deck.
(3) Deck Focus: Identifies the Deck and holds a menu for selecting the Deck Flavor and the playback mode for the Deck. Each Deck is named by a letter A, B, C and D. The letter of the focused Deck is highlighted in orange.
(4) Synchronization and Tempo controls: Define if the Deck is the Tempo Master or if it is synced to the Tempo Master. The controls visualize if the track is out of sync, and they contain tempo bend controls. For more information, refer to Synchronization and Tempo Controls.
(4) Deck center: Hosts the elements and controls the characteristic of the selected Deck Flavor. For more Information, refer to Track Deck,Stem Deck,Remix Deck, and Live Input.
(5) Loop controls: Activate looping and define the loop size. For more information, refer to Loop Controls.
(6) Advanced panel: On the Track Deck and on the Stem Deck, the Advanced panel contains advanced control options for Cue Point and Loop management. On the Remix Deck the Advanced panel gives you access to the parameter settings of the individual Sample Cells. For more information, refer to ??? and Advanced Panel on the Remix Deck.
(7) Advanced panel button: Shows and hides the Advanced panel below the Loop controls for Deck A and B, and for Deck C and D, respectively. It also shows and hides the Panorama controls in the Mixer for Deck A and B, and for Deck C and D, respectively.
(8) Transport controls: Contain the usual transport controls Play/Pause and CUE as well as the Flux mode and Reverse mode buttons. For more information, refer to Transport Controls.
(9) Waveform Display and Stripe: On the track Deck and on the Stem deck, the Waveform Display shows the zoomed waveform at the current playhead position. The Stripe shows the waveform of the entire track. For more information on the Waveform Display and Stripe on the track deck, refer to Track Deck and Stem Deck.
Deck Header
The Deck Header displays information about the loaded track, Remix Set, or Stem File such as the artist name, track title and tempo. The displayed information can be customized in the Preferences.

Deck Header.
(1) Track Cover Artwork: Displays the cover artwork of the track.
(2) Track title: Displays the track title.
(3) Artist name: Displays the artist name.
(4) Album title: Displays the album title.
(5) Track time: Displays the track time.
(6) Remaining track time: Displays the time remaining until the track ends.
(8) Current tempo: Displays the current tempo value in BPM, determined by the Tempo Fader position.
(7) Tempo fader position: Reflects the current Tempo fader position as a percentage.
Deck Tempo Display on the Remix Deck
The Deck Tempo display in the Remix Deck's Header contains further controls for the Remix Deck.
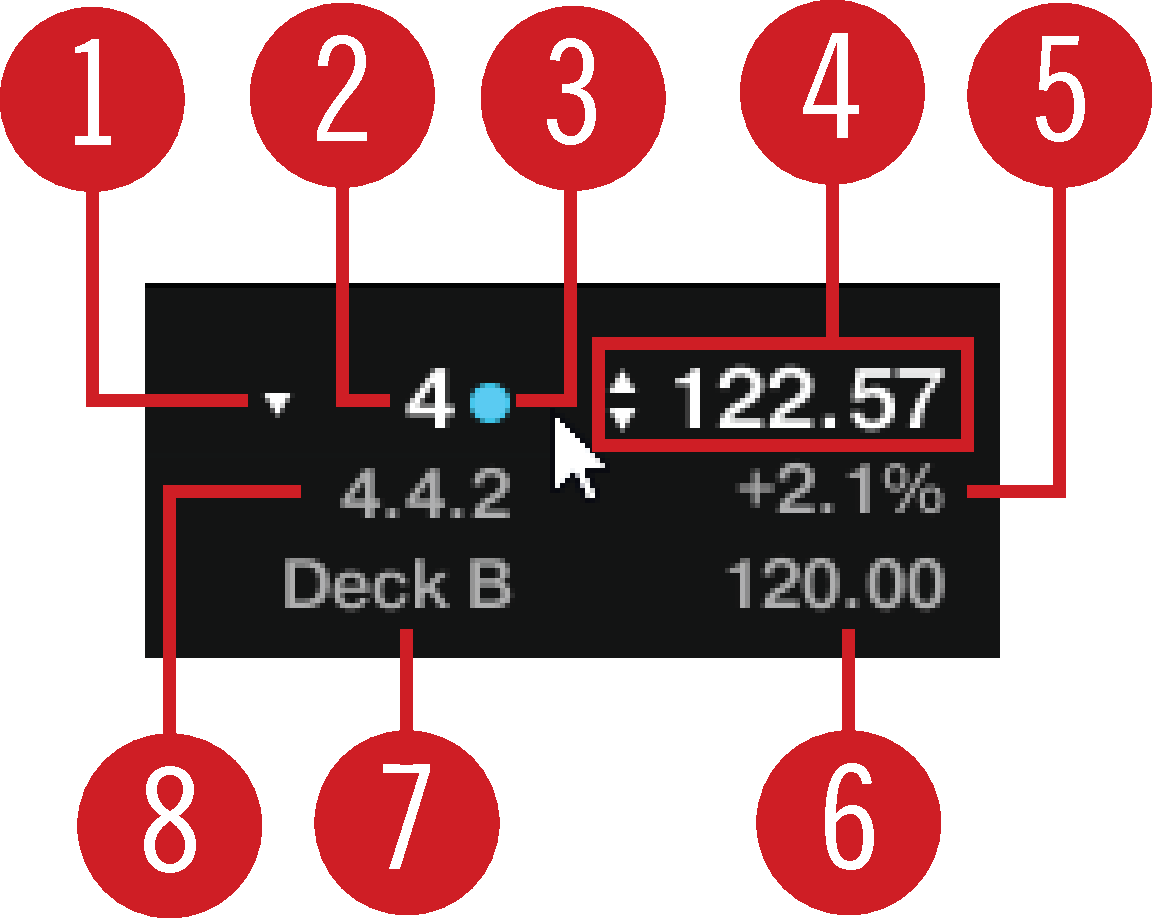 |
Deck Tempo display on the Remix Deck.
(1) Quantize value drop-down menu: Selects the quantize value.
(2) Quantize value: Shows current quantize value for the Remix Deck.
(3) Quantize enable: The dot enables or disables Quantize mode on the Remix Deck. Quantize is activated when the dot is lit blue.
(4) Remix Deck Tempo: Shows the current tempo of the Deck. Dragging this value up and down changes the tempo. A double-click resets it to the base tempo.
(5) Tempo fader position: Represents the current Tempo fader position.
(6) Base tempo: Represents the original Remix Deck tempo. You can enter a new value by double-clicking.
(7) Capture source: Represents the selected source for capturing Samples when using hardware controllers. The triangle that appears when hovering with the mouse, opens a drop-down menu where you can select the source.
(8) Beat Count: Represents the current internal Beat Count position of the Remix Deck. Synchronization and quantize functions are based on this value.
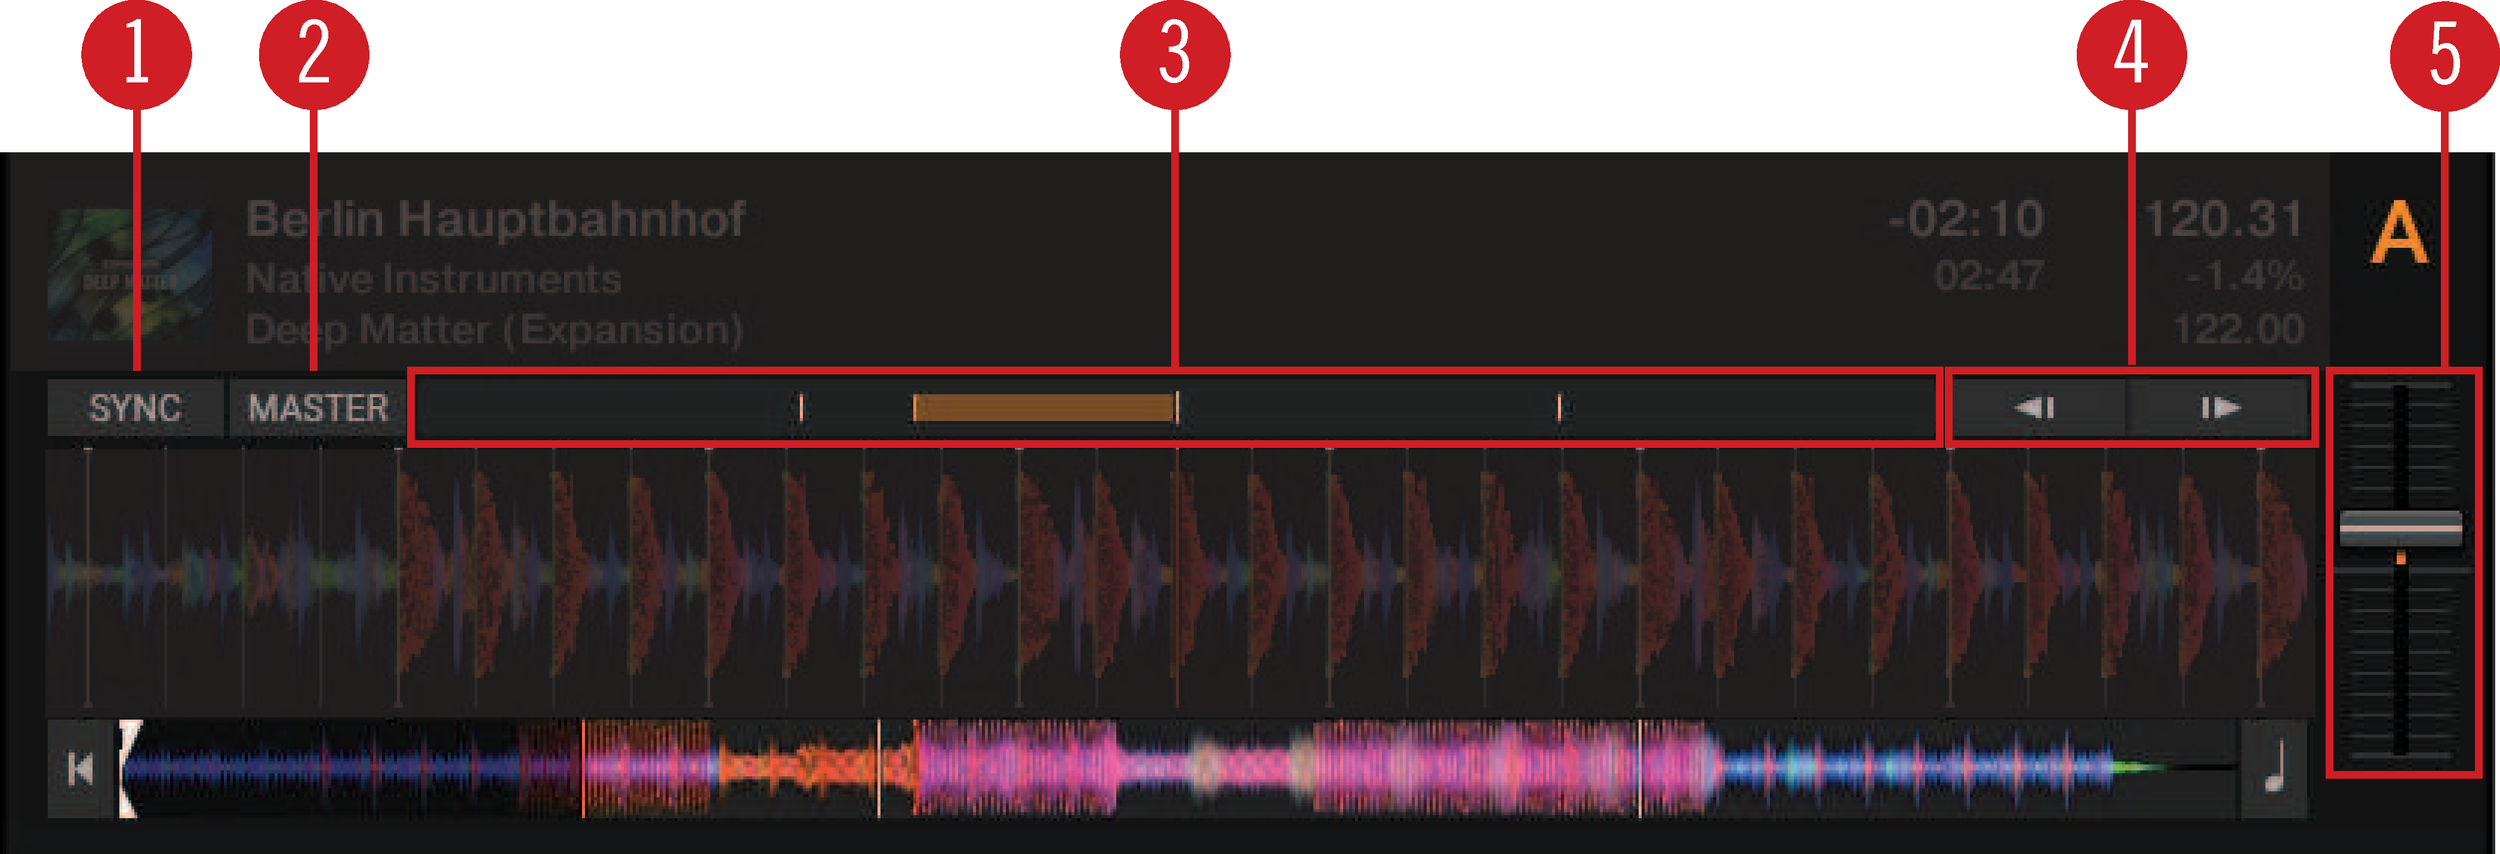
Synchronization and Tempo Controls
Any Deck Type contains the same controls for syncing and for adjusting the tempo manually.
Synchronization and Tempo controls.
(1) SYNC button: Synchronizes the current track to the Tempo Master.
(2) MASTER button: Sets the Deck as the Tempo Master.
(3) Phase meter: Visually indicates the offset of the beats when manually syncing a track to the Tempo Master or the Master Clock.
(4) Tempo bend buttons: Correct the offset of the beats when manually syncing a track to the Tempo Master or the Master Clock. The left arrow slightly slows down the tempo and the right arrow speeds it up.
(5) Tempo fader: Decreases or increases the tempo of the playing track, Remix Set, or Stem file in the respective Deck.
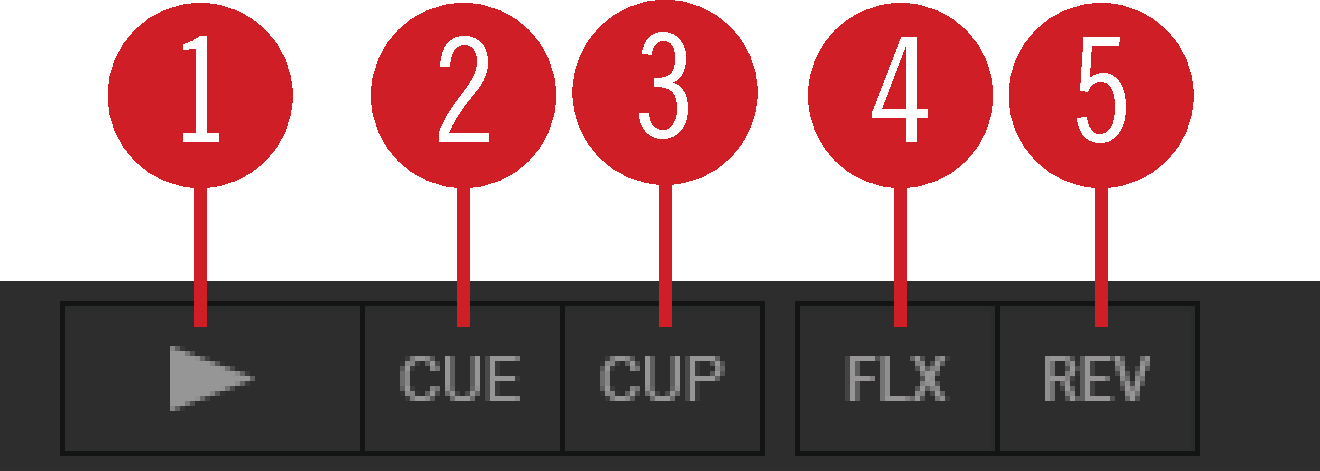
Transport Controls
All Deck Types contain the same transport controls, which are used for playing back tracks with Traktor’s internal playback mode.
 |
Transport controls.
(1) Play/Pause button: Starts or pauses playback of the Deck.
(2) CUE button: Depending on the playback state, this button either sets a new Floating Cue Point or jumps to the previously set Floating Cue Point.
(3) CUP button (CUE/Play): Jumps to the current cue point and starts playback upon release.
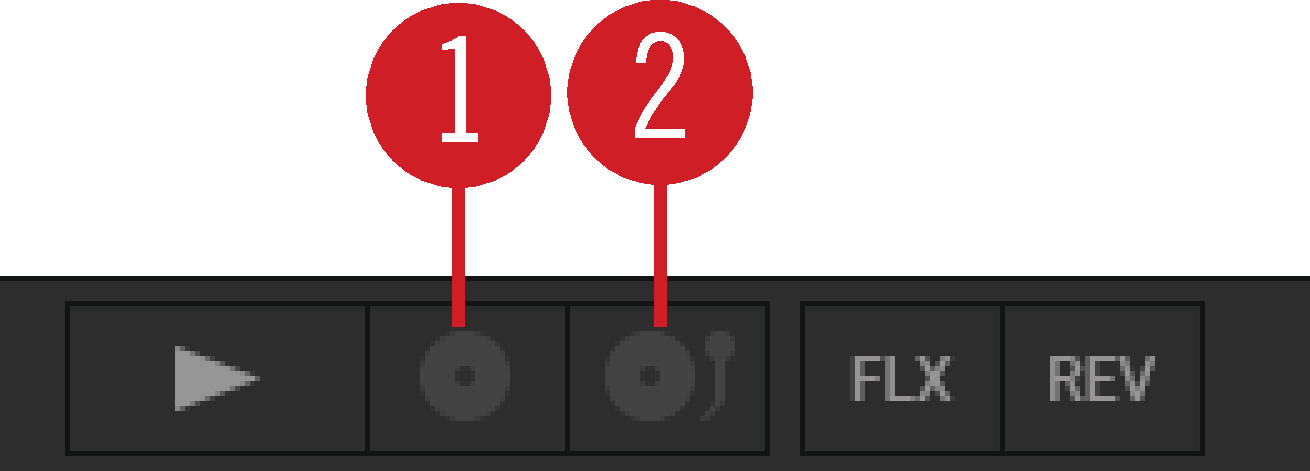
(4) Flux Mode button: Enables Flux mode for the Deck. For more information on Flux mode, refer to Working with Hotcue buttons and Flux Mode.
(5) Reverse Mode button: Enables Reverse mode and Flux Mode for the Deck. For more information on Reverse mode, refer to Working with Hotcue buttons and Flux Mode.
Scratch Controls
When setting the Deck’s playback mode to Scratch Control, the CUE and CUP buttons are replaced by the Absolute Mode button and the Relative Mode button.
 |
Transport controls in Scratch Playback mode.
(1) Relative Mode button: Enables Relative mode for controlling the Deck with Timecode vinyl or CD.
(2) Absolute Mode button: Enables Absolute mode for controlling the Deck with Timecode vinyl or CD.
Loop Controls
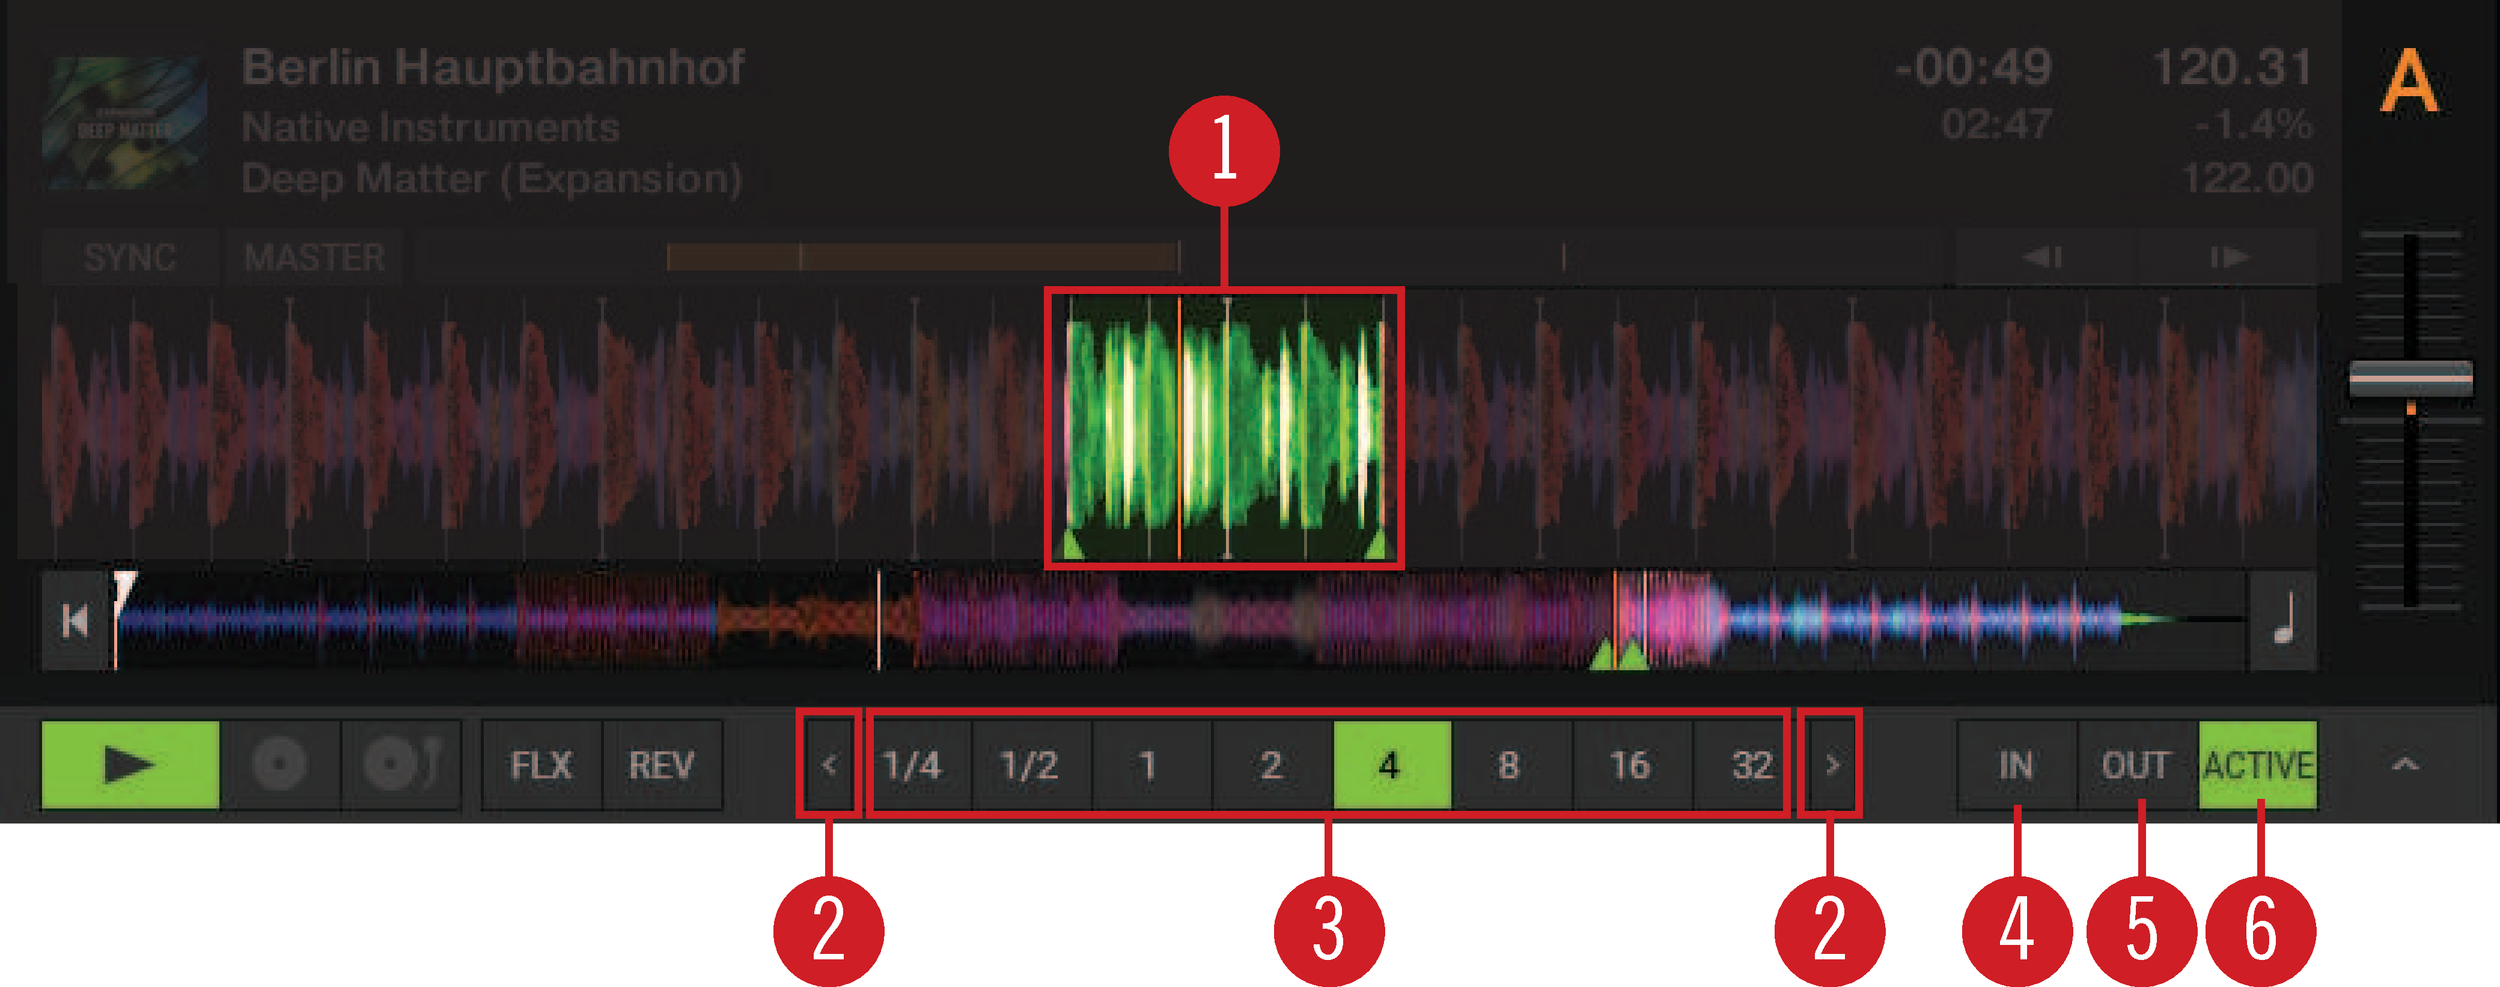
The Loop controls offer the functions required for the creative usage of Loops in your mix.
Loop controls.
(1) Active Loop: When a Loop is activated it is highlighted in green in the Waveform display and in the Stripe view.
(2) Arrow buttons: Clicking the left and right arrows of the Loop Size control will scroll through the list of Loop values. The Arrow buttons flash if the selected size is out of range.
(3) Loop size control: Determine the size of the activated or deactivated Loop.
(4) Loop In button: Sets the start point for the Loop.
(5) Loop Out button: Sets the end point for the Loop. The Loop will be activated when the playback position reaches these two points and the ACTIVE button will be highlighted.
(6) ACTIVE button: Enables/disables Looping. The button lights up green when Looping is activated.
Track Deck
The Track Deck in Traktor is the equivalent to a turntable or a CD player in a classic mixing setup, used to play back conventional tracks. Besides the Common Deck controls, the Track Deck's center contains the following elements:
Track Deck.
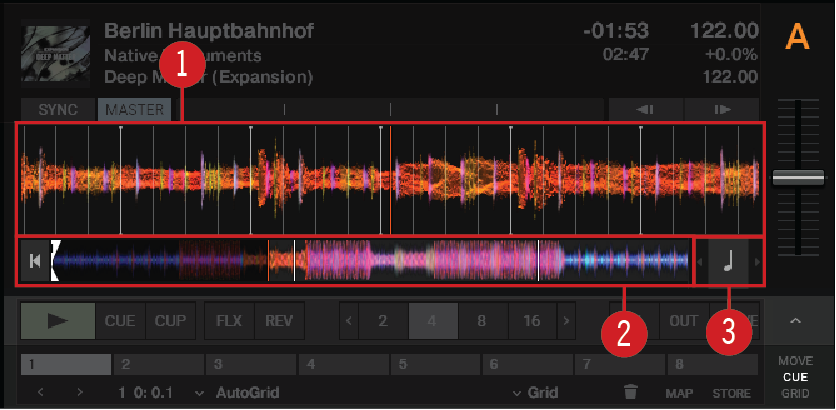
(1) Waveform display: Visually represents a localized view of the loaded track. The brighter color shade represents higher frequencies, while the darker color shade represents lower frequencies. It also shows the Beatgrid markers, and shows zoom controls when hovering the mouse over the Waveform display.
(2) Stripe view: The Stripe view shows the entire waveform of the track including all Cue Point markers and Loop markers. You can jump back to the start of the track or directly jump within the track by clicking inside the Stripe view.
(3) Key Lock controls: Here you can lock the original key for the track and transpose it by semitones. For more information on Key Lock, refer to Harmonic Mixing and Working with Key Lock.
Stem Deck
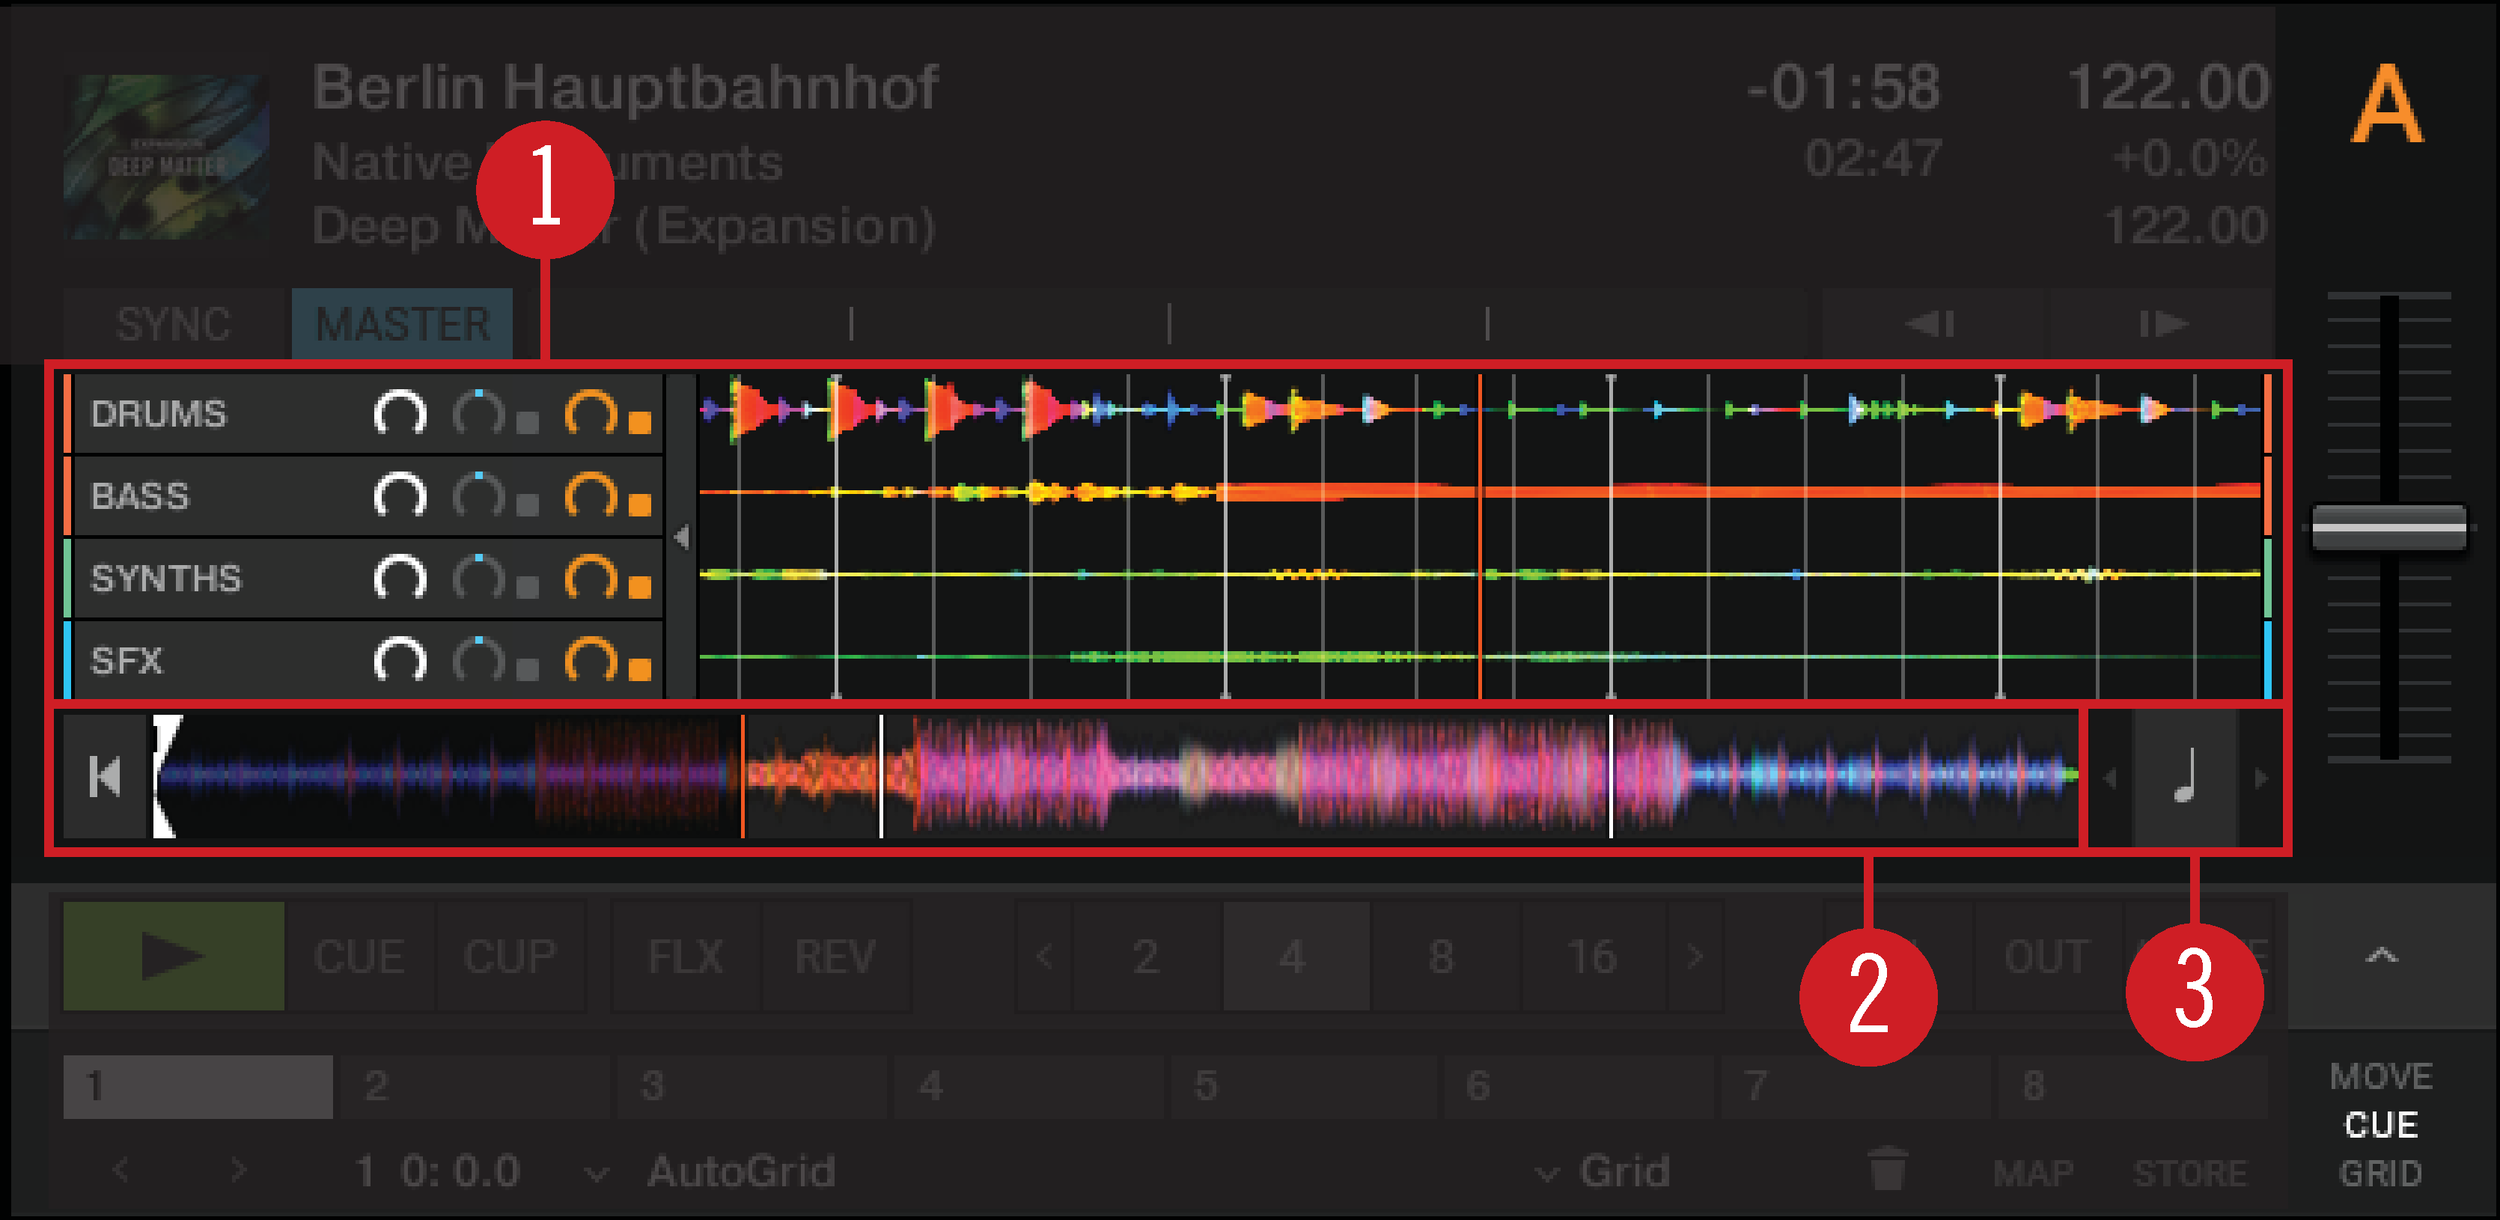
The Stem Deck operates in a similar way to the Track Deck, however instead of the Waveform display it provides the Multi-Track Waveform:
Stem Deck.
(1) Multi-Track Waveform: The Multi-Track Waveform shows the waveforms of the individual Stems, and provides controls to adjust their volumes and apply effects to each of them separately. The brighter color shade represents higher frequencies, while the darker color shade represents lower frequencies.
For more information on the Multi-Track Waveform, refer to section Multi-Track Waveform.
(2) Stripe view: Shows the entire Waveform of the Stem file including all Cue Points and Loop Markers. You can jump back to the start of the track or directly jump within the track by clicking inside the Stripe view. You can also activate Key Lock for the Stem file.
(3) Key Lock controls: Here you can lock the original key for the track and transpose it by semitones. For more information on Key Lock, refer to Harmonic Mixing and Working with Key Lock.
Multi-Track Waveform
The Multi-Track Waveform shows the waveforms of the individual Stems, and provides controls to adjust their volumes and apply effects to each of them separately..
Multi-Track Waveform.
(1) Stem channel 1 – 4: Each of the four rows represents the channel for one Stem, including the individual Stem name on the left.
(2) Volume and Mute controls: Every Stem channel provides a Volume knob and Mute button for adjusting the volume and muting that channel.
(3) Filter controls: Every Stem channel provides Filter controls. The Filter button enables the Filter, whereby the Filter knob determines the amount and type of filtering.
(4) FX Send controls: Every Stem channel provides FX Send controls. The FX Send button enables FX Send mode for the individual channel, whereby the FX Send knob determines the FX Send amount.
(5) Waveform: Each Stem channel displays the waveform of the contained Stem in a different color, as well as the Beatgrid common to all Stems.
(6) Show/hide Stem Controls: The Stem controls can be hidden or shown all together by clicking the small arrow button.
Remix Deck
Besides the Common Deck controls, the Remix Deck's center contains the following elements:
Remix Deck.
(1) Sample Slot: The Remix Deck shows four Samples Slots containing the Samples, trigger controls and other elements. For more information, refer to Sample Slot.
(2) Advanced panel: The Advanced panel on the Remix Deck contains options for i.e. adjusting Sample Grids. For more information, refer to Advanced Panel on the Remix Deck.
Sample Slot
A Sample Slot contains the following elements:
 |
Sample Slot.
(1) Sample name: Displays the name of the Sample loaded in the Slot Player.
(2) Slot Player: Displays the waveform of the Sample currently loaded. A moving red playhead indicates the current playback position within the Sample. Hovering the mouse over the Slot Player shows a Mute button, which mutes/unmutes the Sample.
(3) Volume control: Controls the Sample Slot's volume. This control is applied after the individual Gain control of a Sample Cell, which is accessible from the Advanced panel.
(4) Filter control: Applies a low-pass or high-pass filter to the Sample Slot by moving the bar downwards or upwards, respectively.
(5) Sample Cell: Represents the container for Samples in the Sample Slot.
(6) Play Type indicator: Indicates whether the Sample Cell is set to Loop or One-shot mode. Clicking this symbol also triggers the Sample.
(7) Page Selector: Selects the current Page with Samples for the Remix Set.
 |
Sample Slot hovered.
(1) Sample Slot parameters: Each Sample Slot has a set of parameters. Hovering the mouse over the Sample Slot Player or Sample title displays the relevant parameters:
Key Lock button: Separates the playback key from the playback speed. This control needs to be activated to adjust the Sample Cell's pitch in the Advanced panel. Otherwise, the Sample Cell's pitch directly relates to the Remix Deck's tempo.
FX button: Routes the Sample Slot through the FX Unit(s) currently assigned to the Mixer channel for the Remix Deck.
Monitor button: Routes the Sample Slot to the Mixer’s Monitor Output (which can be monitored in headphones).
Punch mode: When a Sample is triggered, the position of that Sample is fixed to the Remix Deck's internal timeline.
(2) Sample Mute: Mutes/un-mutes the Sample Slot.
Live Input
When selecting the Deck Flavor Live Input, you can route the audio signal from an external audio source into Traktor and add it to your mix. The Live Input does not provide any control elements apart from the Deck focus.
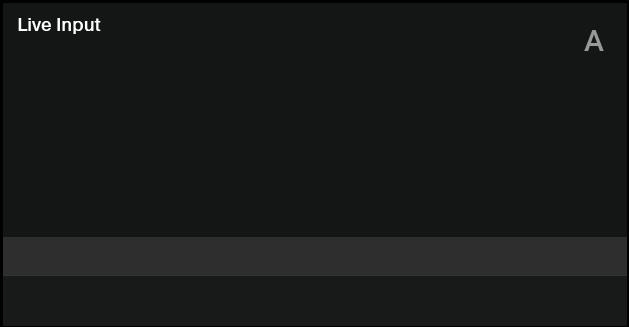
Live Input.
Advanced Panel
On the Track Deck and on the Stem Deck, the Advanced panel contains advanced control options for Cue Point and Loop management, and for correcting the Beatgrids for your tracks. On the Remix Deck, the Advanced panel gives you access to the parameter settings of the individual Sample Cells. For more information on the Advanced panel on the Remix Deck, refer to Advanced Panel on the Remix Deck.

Advanced panel.
(1) Advanced panel button: Shows and hides the Advanced panel below the Loop controls for Deck A and B, and for Deck C and D, respectively. It also shows and hides the Panorama controls in the Mixer for Deck A and B, and for Deck C and D, respectively.
Note
The Advanced panel can only be displayed when the Deck is displayed in full Deck layout and in advanced Deck layout.
(2) Advanced panel page selector: Selects one of three Advanced panel pages; MOVE, CUE, and GRID containing individual control and editing elements.
CUE: Provides direct access to 8 user-definable Cue/Loop In Points per track, as well as further Cue Point management controls. For more information, refer to Working with Cue Points.
MOVE: Provides options for moving the active Loop within the track as well as jumping the current playhead position within the track by beats. For more information, refer to Working with Loops.
GRID: Provides control over the Grid Markers, the Beatgrid, and the stored tempo of a track. For more information, refer to Adjusting Beatgrids.
Advanced Panel – CUE Page
The CUE page provides direct access to eight user-definable Cue/Loop In Points per track, as well as further Cue Point management controls. For more information, refer to Working with Hotcue buttons and Flux Mode, Working with Cue Points, and Working with Loops.
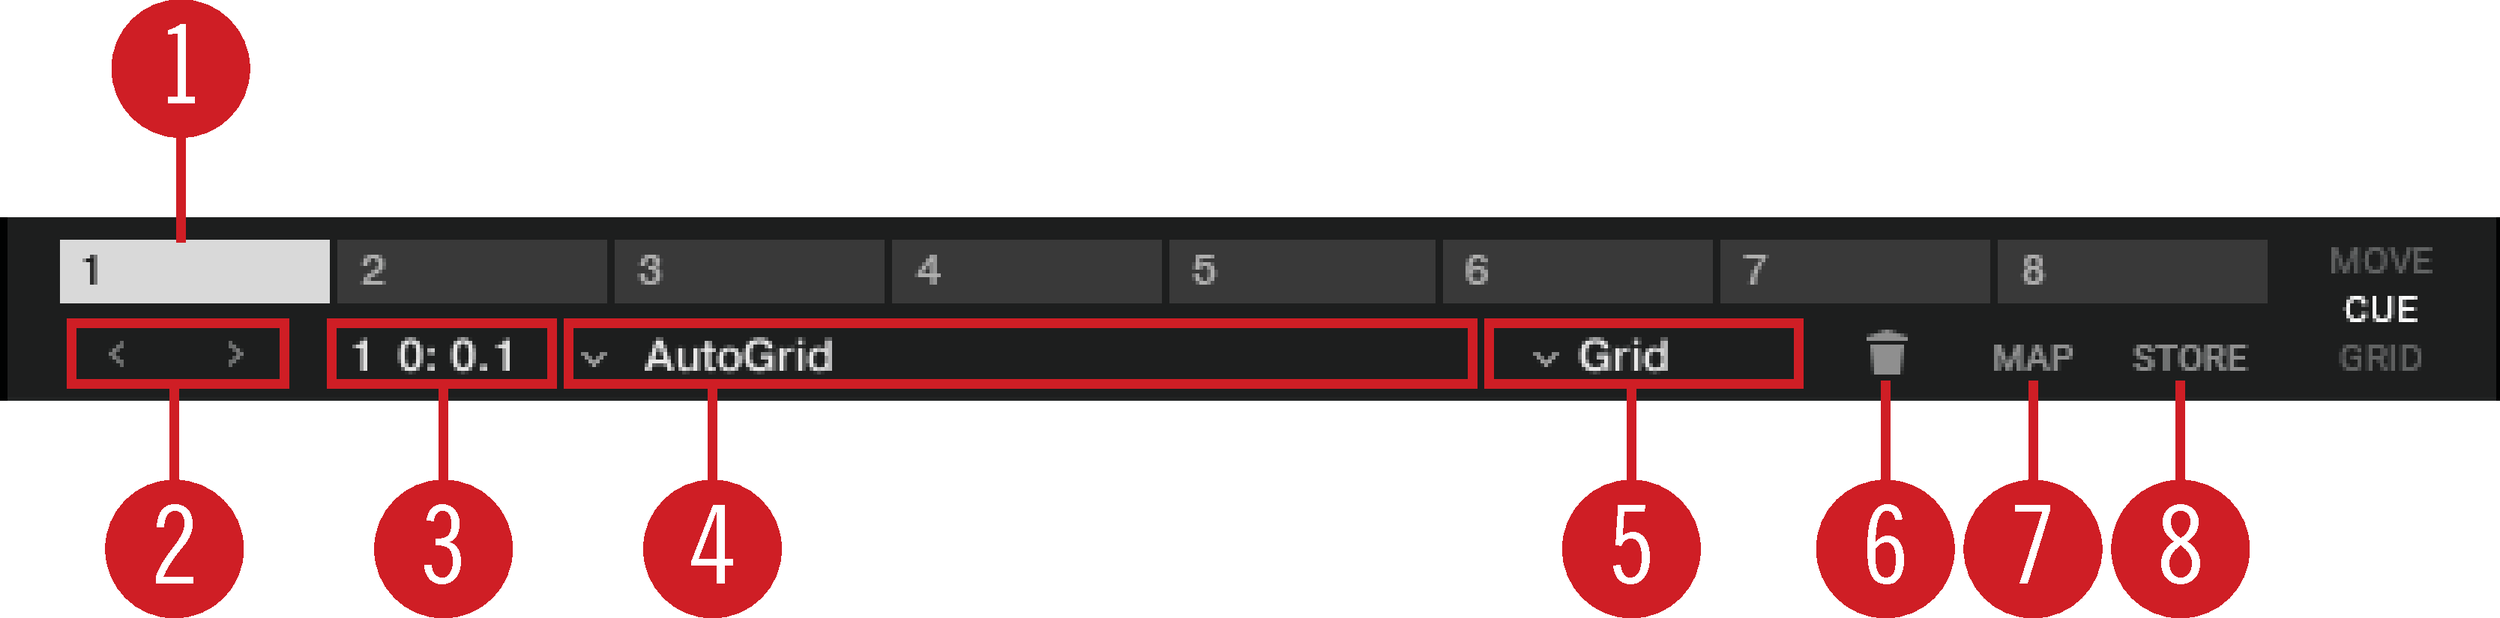
Advanced Panel – CUE page.
(1) Hotcue 1 – 8: Allows you to directly set or access eight Hotcue or Loop In Points per track.
(2) Prev Cue / Next Cue: Skips backward or forward to the previous or next stored Cue Point in the track.
(3) Cue Point Position: Displays the position of the selected Cue Point or Loop in minutes : seconds : milliseconds.
(4) Cue Point List: Selects the Cue Point.
(5) Cue Point Type menu: Provides a list of several Cue Point Types.
(6) Delete Cue Point: Deletes the selected Cue Point or Loop In Point.
(7) MAP: Enables Hotcue Mapping mode. When activated, pressing a Hotcue button will map the displayed Cue Point or Loop In Point to it.
(8) STORE: Stores the selected Cue Point and maps it to the next free Hotcue button.
Advanced Panel – MOVE Page
The MOVE page provides options for moving the active Loop within the track, as well as for jumping the current playhead position within the track by beats. For more information, refer to Working with Loops.
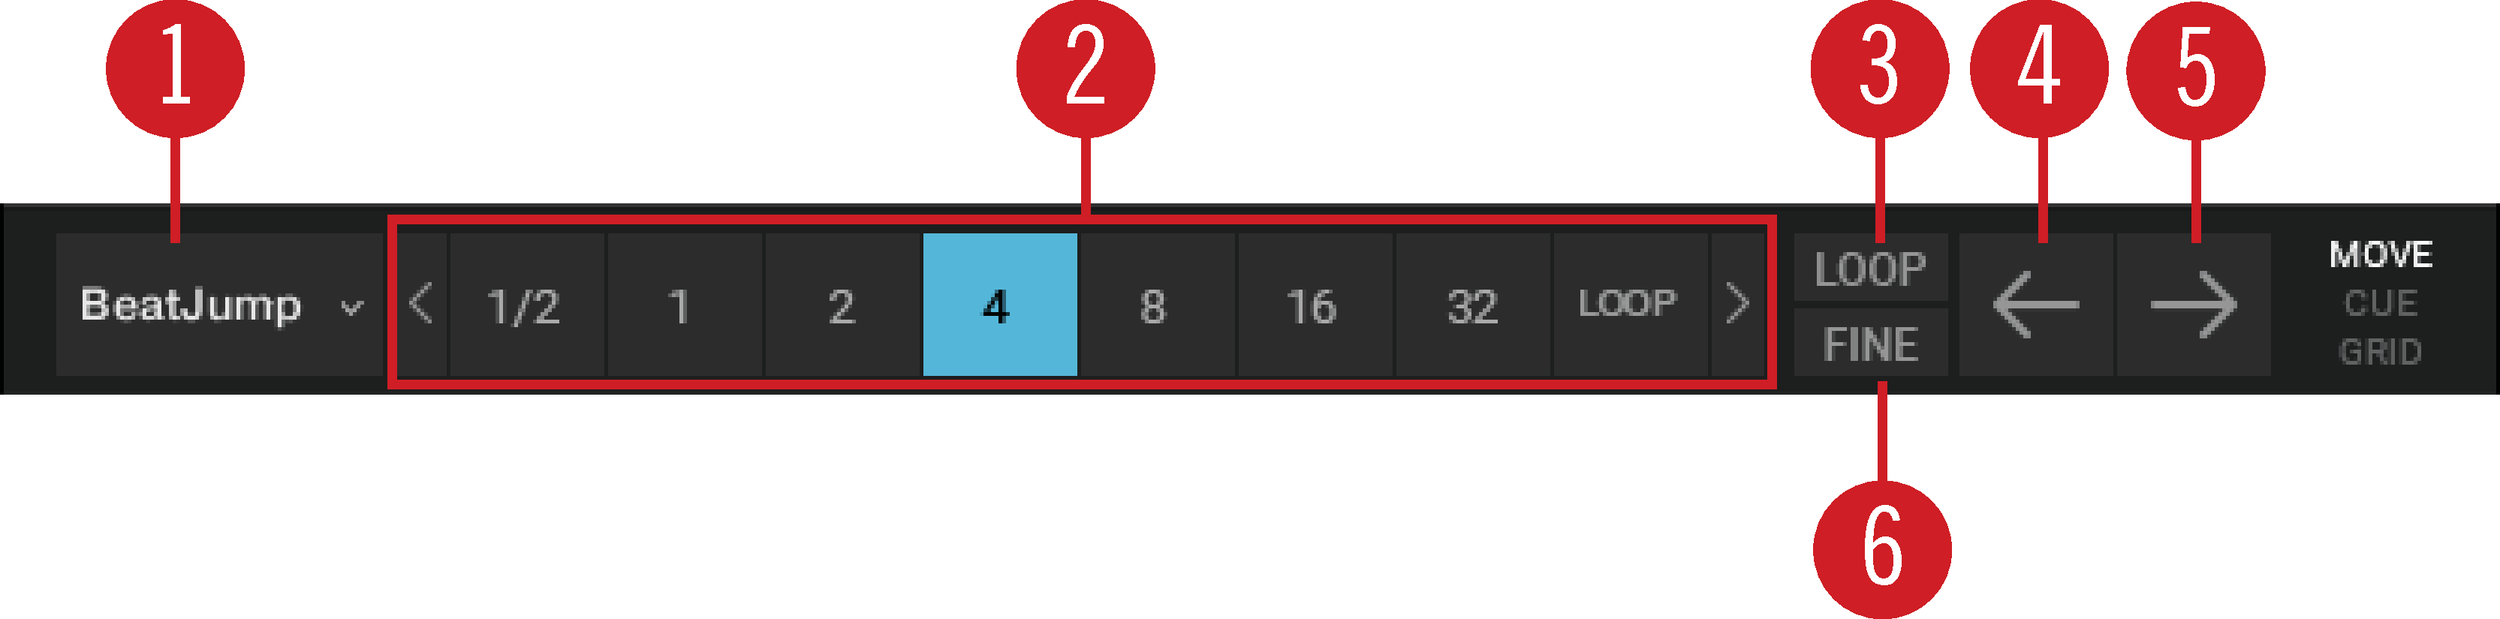
Advanced Panel – MOVE page.
(1) Move Mode menu: Selects one of the Move modes BeatJump, Loop, Loop In, and Loop Out.
(2) Move Size control: Selects the step size in beats.
(3) LOOP mode: Selects a step size that is based on the current Loop size for the movement.
(4) Cue Move BWD: Depending on the selected Move mode, the selected Cue Point or Loop is moved backwards at the selected step size.
(5) Cue Move FWD: Depending on the selected Move mode, the selected Cue Point or Loop is moved forward at the selected step size.
(6) FINE mode: Selects a fine step size for the movement. Use this for fine adjustments.
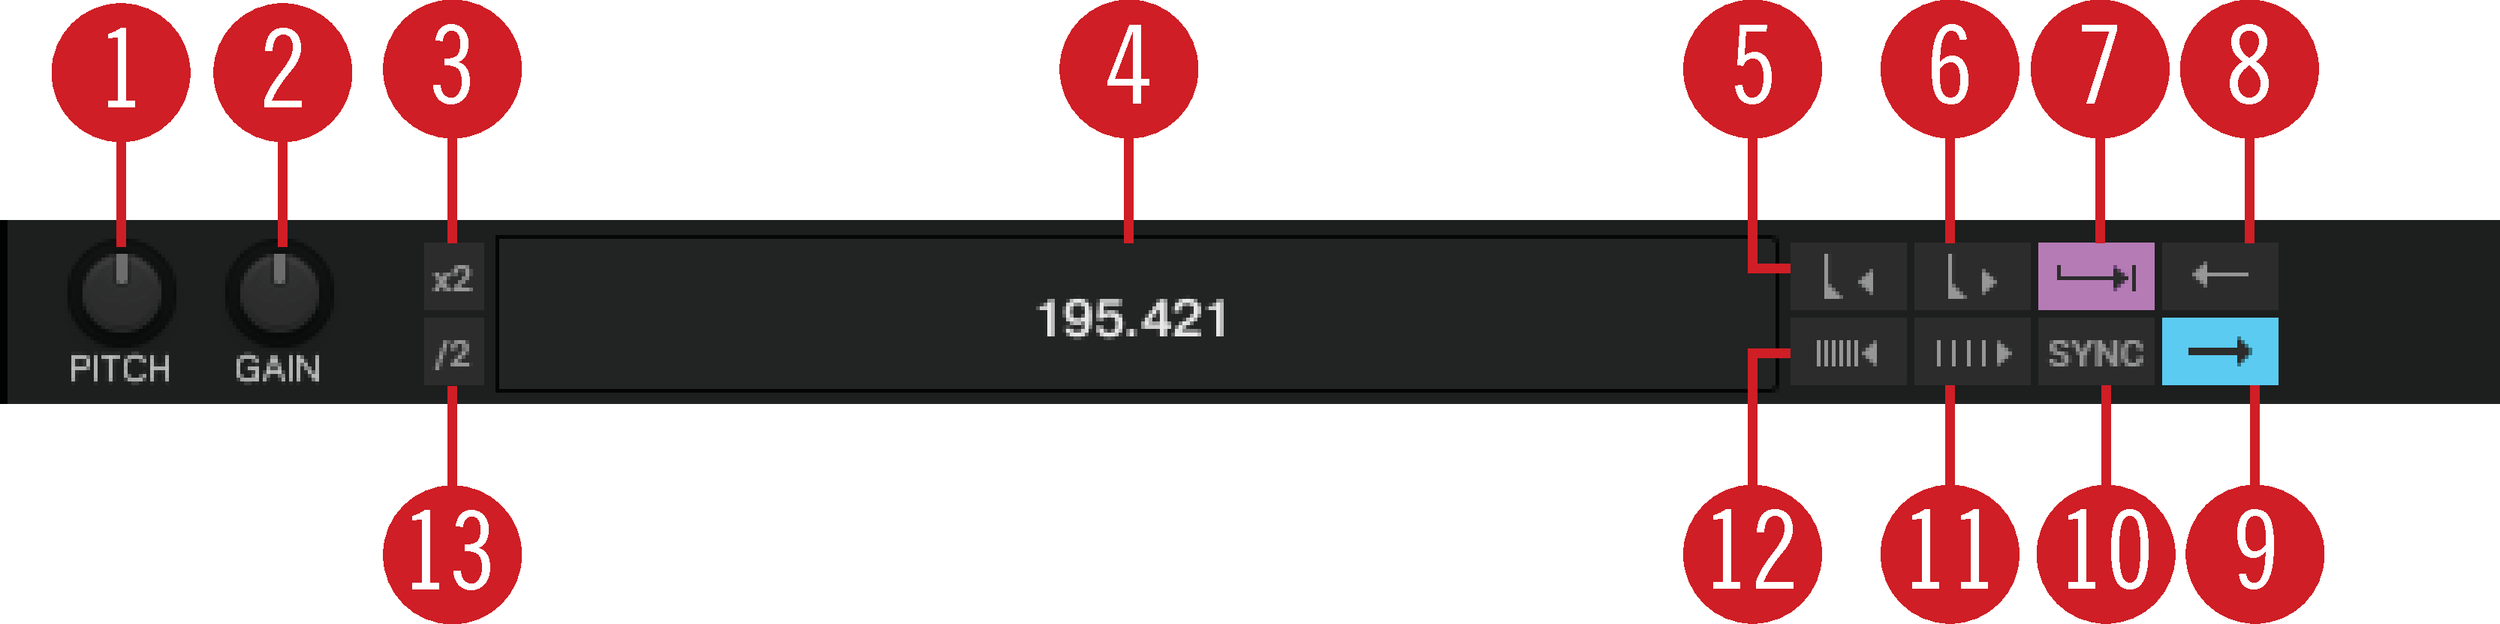
Advanced Panel – GRID Page
The GRID page provides control over the Grid Markers, the Beatgrid, and the stored tempo of a track. For more information, refer to Adjusting Beatgrids.
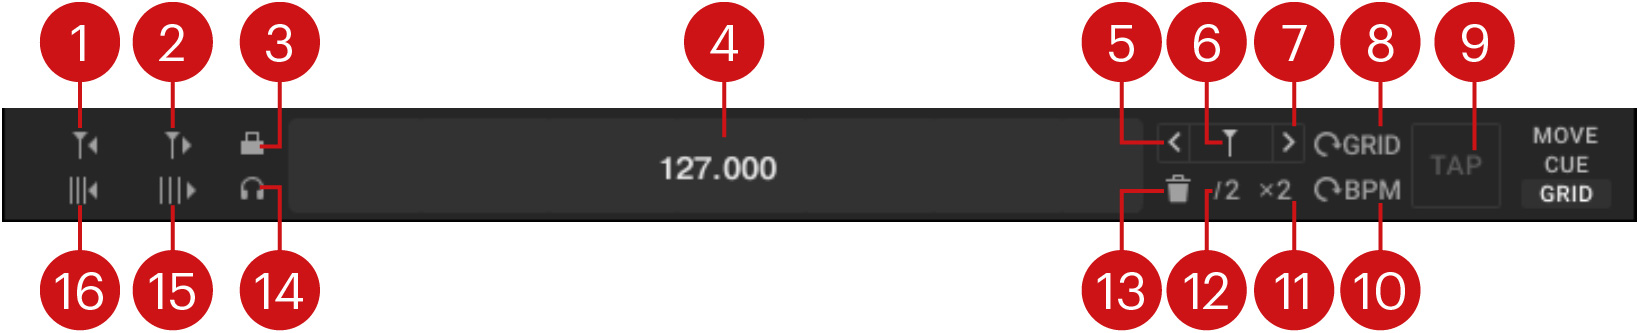
(1) Move Grid Marker BWD: Moves the selected Grid Marker to the left of the current play position backward.
(2) Move Grid Marker FWD: Moves the selected Grid Marker to the right of the current play position forward.
(3) Analysis Lock button: Locks all values against future changes by the track analysis and by the user.
(4) BPM Edit Display: Shows the current tempo of the track. A double-click enables manual tempo adjustment. The value can also be dragged up and down with the mouse.
(5) Select previous Grid Marker: Sets the playback position to Grid Marker on the left side of the current playback position.
(6) Set Grid Marker: Sets a Grid Marker at the current playback position.
(7) Select next Grid Marker: Sets the playback position to Grid Marker on the right side of the current playback position.
(8) Reset GRID: Re-triggers the automatic BPM and Grid analysis of the loaded track and removes all manually set Grid Markers.
(9) TAP: Refines the BPM based on tapped speed. The BPM will be updated after the fourth tap.
(10) Reset BPM: Resets the BPM of current tempo zone to the automatically analyzed value without changing the Grid Markers position.
(11) BPM x2: Doubles the BPM of the current tempo zone.
(12) BPM /2: Halves the BPM of the current tempo zone.
(13) Delete current Grid Marker: Deletes the Grid Marker on or to the left of the playback position.
(14) Beat Tick: Enables an audible beat tick (metronome) to help align the Beatgrid during playback. In Internal Mixer mode, the Beat Tick is only audible on the headphone channel. In External Mixer mode, the tick is always audible on the Deck's Mixer channel signal, when enabled.
Caution
In External Mixer mode only use the Audible Beat Tick when pre-listening tracks in your headphones because the tick will remain audible when playing the track on the main output.
(15) BPM Decrease: Decreases the BPM of the current tempo zone. As a result the Beatgrid gets expanded. Right-click changes in larger increments.
(16) BPM Increase: Increases the BPM of the current tempo zone. As a result the Beatgrid gets narrower. Right-click changes in larger increments.
Note
In a tempo zone between two Grid Markers the tempo can not be adjusted continuously and can only be set to values compatible with the length of the tempo zone.
Advanced Panel on the Remix Deck
Each Sample Cell has a set of individual parameters, which are accessible from the Remix Deck's Advanced Panel. The Advanced panel can only be displayed when in Full Deck Layout or Advanced Deck Layout.
Advanced Panel on the Remix Deck.
(1) SAMPLE PITCH control: Sets the pitch for the selected Sample in semitone steps.
(2) SAMPLE GAIN control: Sets the gain level for the selected Sample.
(3) BPM x2: Doubles the tempo of the Sample.
(4) BPM Edit Display: Shows the current BPM value for the Sample. A double-click enables manual tempo adjustment.
(5) Move Grid Left: Moves the Sample Cell's Beatgrid to the left.
(6) Move Grid Right: Moves the Sample Cell's Beatrgid to the right.
(7) Trigger Type: When activated (Latch mode), a Sample will continue to play after you release the mouse button, either until the end of the Sample is reached (for One-shot Samples) or until it is stopped by some other method (like triggering a new Sample in the same Slot).
The alternative Type is Gate mode, where a Sample will only play while you’re holding down on the mouse button. Upon releasing the mouse button, the Sample will stop playing.
(8) Reverse Playback: Enables reverse playback for the Sample Cell currently being played in the Slot Player.
(9) Play Type: This property determines whether a Sample stops after reaching its end or if it continuously loops. When set to One-Shot (arrow symbol), a Sample will stop playing when it gets to its end. When set to Loop (ellipse symbol), the Sample will automatically return to its start and continue playing indefinitely.
(10) Sync Type: This property determines if the Sample should be synchronized to the Remix Deck’s Tempo or not. When SYNC is on, the Sample’s BPM will match the Remix Deck’s BPM. When SYNC is off, the Sample will play at its original speed.
(11) BPM Increase: Precisely increases the BPM in minor steps. As a result the Beatgrid is expanded.
(12) BPM Decrease: Precisely decreases the BPM in minor steps. As a result the Beatgrid becomes narrower.
(13) BPM /2: Halves the tempo of the Sample.
Mixer
The Mixer is the center of Traktor, used to control and modulate the audio signals coming from the Decks before they are sent to the master output.
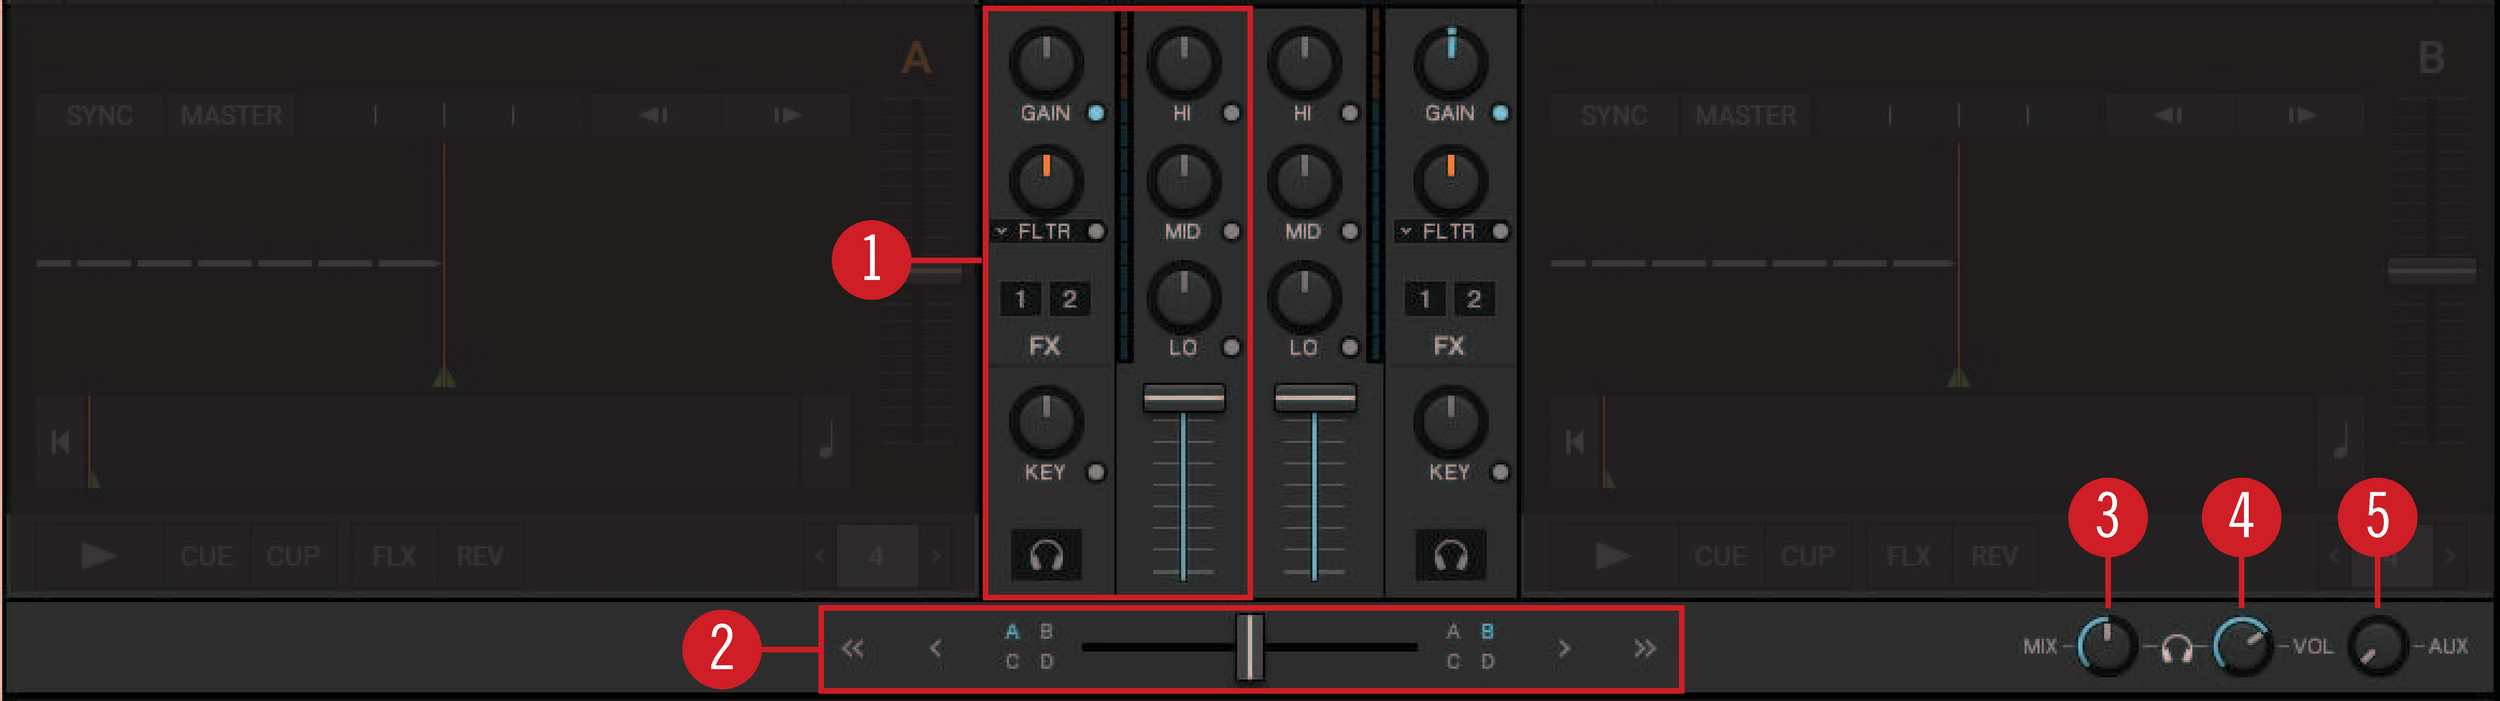
Mixer.
(1) Mixer channel: Contains the controls to adjust the Mixer channels’ volume and to modulate the audio signals’ frequency. Furthermore, you can assign the FX Units to the Mixer channel and route the audio signal to the Headphone Cue channel. For more information, refer to Mixer Channel.
(2) Crossfade controls: These controls allow you to make seamless transitions between various Mixer channels. For more information, refer to Crossfade Controls
(3) Headphone Cue Vol: Determine the ratio of the cue-signal-to-master-signal in your headphones.
(4) Headphone Cue Mix: Let you adjust the Headphone Cue volume.
(5) AUX control: Controls the volume of the AUX input, which can be fed by an external signal like a microphone. For more information, refer to AUX Control.
Notice
The available Mixer controls differ depending on the current Mixing mode and the selected Traktor Layout. If Traktor is used in External Mixing mode, the channel faders, the crossfader, as well as Heaphone Cue controls are deactivated.
Mixer Channel
The Mixer channel contains the controls to adjust the Mixer channels’ volume and to modulate the audio signals’ frequency. Furthermore, you can assign the Mixer channel to the FX Units and route the audio signal to the Headphone Cue channel.
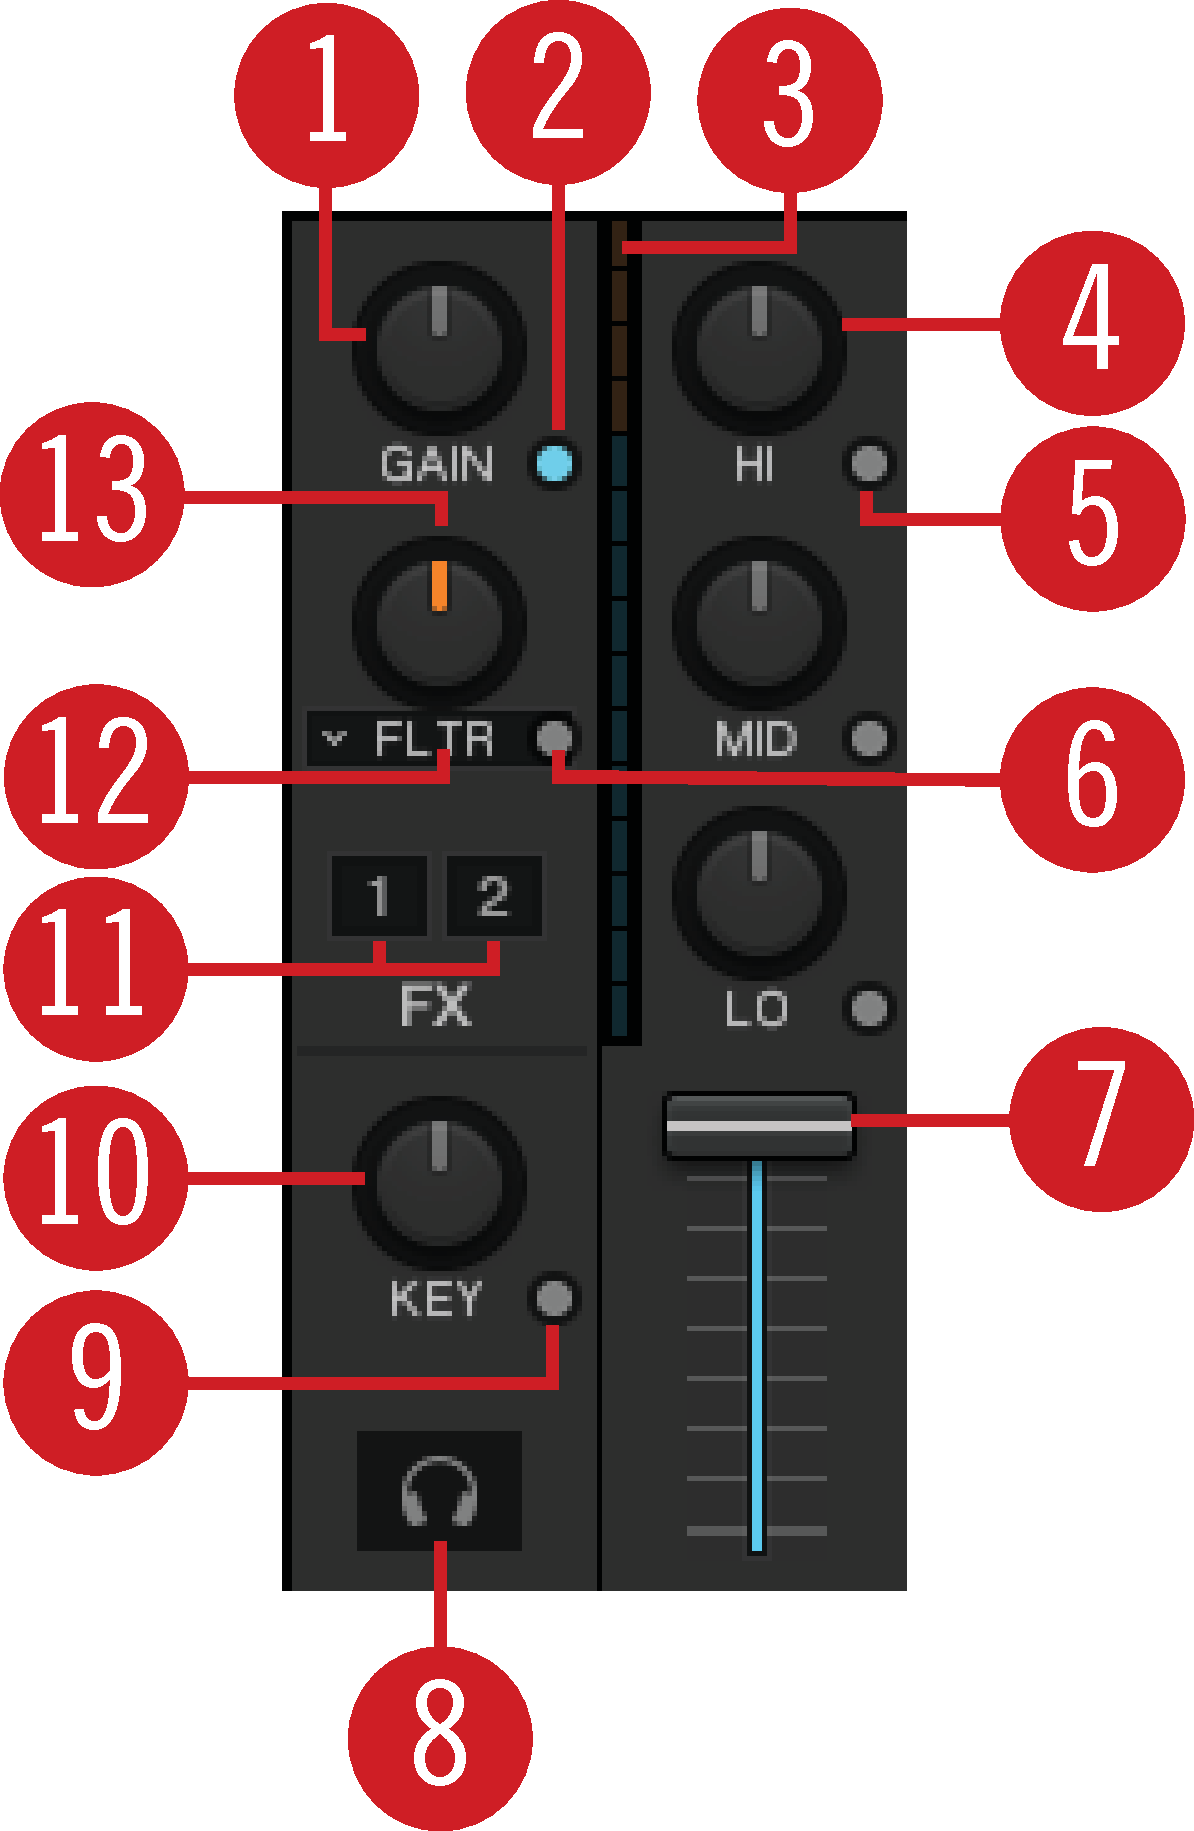 |
Mixer channel.
(1) GAIN knob: Controls the pre-fader input level. GAIN is only visible when full size Deck Layouts are activated.
(2) GAIN View button: Enables/disables visibility of the GAIN button. When deactivated, the the pre-fader input level cannot be adjusted manually.
(3) Channel Level Meter: Indicates the current volume of the audio signal in the Mixer channel. It also indicates if the signal is clipping.
(4) HI, MID, LOW EQ knobs: Adjusts the high, middle, and lower frequencies in the audio signal.
(5) HI, MID, LOW Kill buttons: Complete takes out (kills) high, middle, and lower frequencies from the audio signal.
(6) Mixer FX On button: Enables/disables the Mixer FX.
(7) Channel fader: Adjusts the channel volume to be send to the Master output.
(8) CUE channel button: Sends the audio signal to the Headphone Cue channel for preview. For using the Cue function a multi-channel audio device is required. The Cue channel button is only visible when full size Decks Layout is activated. For more information, refer to Using the Cue Channel for Mixing.
(9) Key Lock (Preserve Pitch) button: Locks the current key of the track.
(10) Key knob: When Key Lock is activated the Key Knob controls the key of a playing track without affecting its tempo.
(11) FX Assign buttons: Assigns the individual FX Unit to the Mixer channel.
(12) Mixer FX drop-down menu: Here you can select the Mixer FX.
(13) Mixer FX Amount knob: Controls the selected Mixer FX.
(14) PAN knob: Controls the balance between the left and right stereo channel for any Mixer channel individually. The PAN knobs are only visible when the Advanced Panels are opened.
Crossfade Controls
These controls allow you to make seamless transitions between various Mixer channels.
 |
Crossfade controls.
(1) Crossfader: Enables transitions between Decks by dragging it from one side to the other. The crossfader curve can be adjusted individually in the Preferences.
(2) Crossfader assign buttons: Allow to assign the Mixer channels to be audible either on the left or right crossfader position.
(3) Fade left / right buttons: Let the crossfader move to the dedicated direction step by step.
(4) Auto fade left / right button: Let the crossfader automatically move from one side to the other.
Browser
Traktor’s Browser lets you load tracks into Decks and provides you with tools to organize your Track Collection .
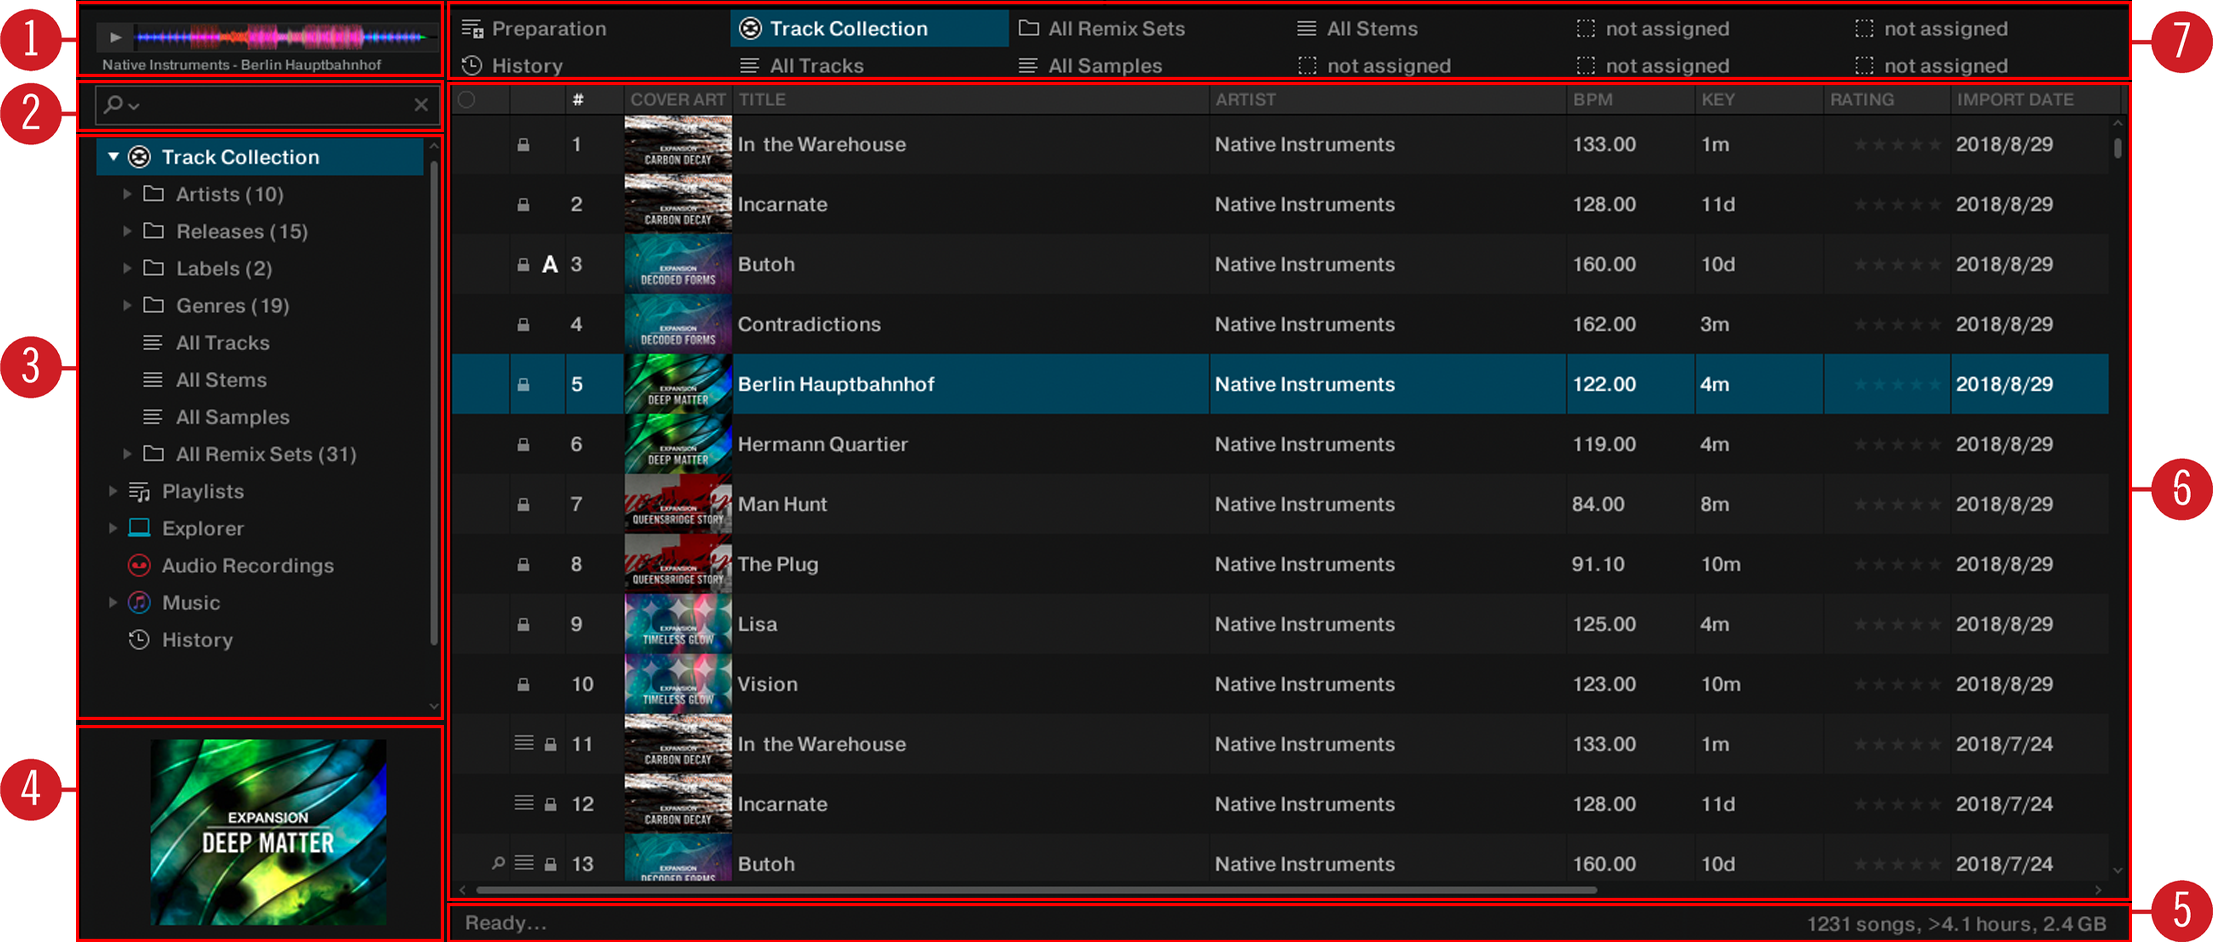
Browser.
(1) Preview Player: Allows you to preview tracks before loading them into a Deck. For more information, refer to Previewing Tracks in the Browser.
(2) Search field: Provides a live search based on the tags of the tracks in the Collection. For more information, refer to Browsing for Music.
(3) Browser Tree: Displays the content of the selected folder:
Track Collection: Contains all tracks imported to your Track Collection. They are automatically sorted by Artist, Release, Label or Genre.
Explorer: Lets you browse your hard drives for tracks. It also contains an Archive folder containing History Playlists.
Audio Recordings: Contains all recordings created with the AUDIO RECORDER.
iTunes: Provides direct access to your iTunes Library including all iTunes Playlists.
History: Contains latest history playlists.
Each History Playlist is time-stamped and contains the additional columns Start-Time, Duration, Deck for more information about when and how you have played the tracks.
(4) Cover Artwork: Displays the Cover Artwork of the selected track in the Track List.
(5) Status bar: Displays the progress of track analysis, error messages, and the overall status of Traktor.
(6) Track List: Shows tracks depending on the source that is selected (folder, Playlist, search results or tag-based).
(7) Favorites: Provides direct access to favorite Playlists and favorite folders.