Configuring MIDI Controller for Controlling Traktor
In this section you will learn how to import controller configuration files in Traktor's Controller Manager, and find the required information to configure your MIDI controller.
This section gives you an overview of the Controller Manager page in the Preferences. You will learn how to import controller configuration files and find the required information to configure Traktor for your MIDI controller.
Importing Controller Mapping
To import a controller mapping file (.tsi) you can do it using the Import dialog in the Preferences:
Click on Import in the Preferences.
Locate the *.tsi file on your local drive.
Confirm.
In the dialog select the categories to be imported.
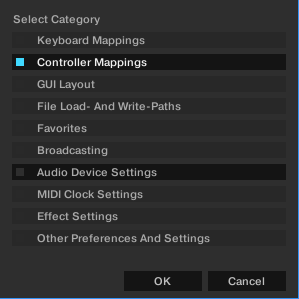
Click OK.
The Preferences dialog shows the Controller Manager page.
Select your controller mapping from the Device drop-down menu.
Controller Manager Overview
This section provides an overview of the Controller Manager. The Controller Manager is located in the Controller Manager page in the Preferences.
The Controller Manager unifies all of Traktor's MIDI and keyboard mappings, as well as MIDI setup on one page in the Preferences. Settings and mappings can be imported, exported, and customized all from this one Preferences page.
For the purposes of this document, a "Control" can be considered a Traktor mapping as MIDI channels, controls, and controlled parameters correspond to each other.
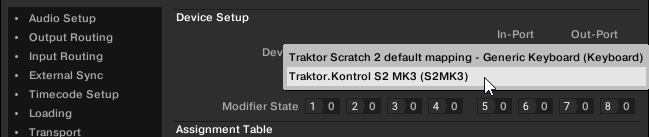
Device Setup Section
Device Setup allows you to create multiple mappings for your computer keyboard, MIDI controllers, and some HID devices.
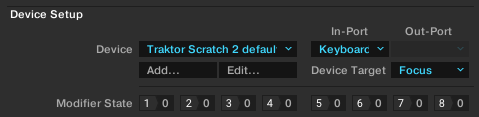
Device Setup section on the Controller Manager page in the Preferences.
By default, all MIDI In- and Out-Ports are active per mapping. This can cause unintended behavior of your whole MIDI setup. The first thing to do is to select the appropriate MIDI device for each MIDI mapping instead of leaving it on All Ports.
All mappings are concurrently active! If unintended behavior is observed for certain Controls, try to isolate the problem by disabling all other mappings, which can be done by setting the In- and Out-Ports to "None."
Device: Selects a mapping to edit. The selection does not define the active mapping because all mappings are always active unless you set the In- and Out-Ports to None.
In-Port: Defines the MIDI In port for the selected mapping. It is set to All by default and should be changed to your physical MIDI in-port or to a virtual MIDI port.
Tip
A virtual MIDI connection can be used to send MIDI data between two applications on the same computer.
Out-Port: This defines the MIDI Out port for the selected mapping. It is set to All by default and should be set to your physical MIDI out-port or to a virtual MIDI port.
Add...: Opens a drop-down menu with the following options:
Generic Keyboard: Creates a mapping for assigning computer keyboard keys to Traktor Controls.
Generic MIDI: Creates a mapping for assigning MIDI controls to Traktor Controls.
Import: Here you can add a mapping to the Device list from your local drive. Mappings that are already loaded will not be overwritten or deleted. Since this function always creates a new device, you need to delete the other devices in the list if you do not want to use them at the same time.
The Add... menu includes all mappings for the devices natively supported by this version of Traktor.
Edit...: Opens a drop-down menu with the following options:
Edit Comment: Adds a comment to the Mapping name. This will appear at the beginning of the mapping name in the Device drop-down list.
Duplicate: Makes a copy of the selected mapping.
Export: Allows you to store the selected mapping as a file on your local drive.
Delete: Deletes the selected mapping.
Show Version: Shows the version of the underlying TSI file.
Device Target: Selects the device you want to control. Available options are Decks A – D, or Deck Focus.
Modifier State: Displays the current value for each of the eight modifiers within the selected mapping, and is mainly used as a debugging tool for complex mappings. If you work with modifiers, it is important to know what value is assigned to a modifier, particularly if something is not working as intended.
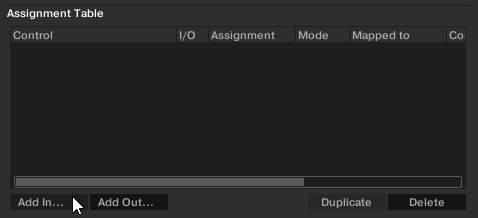
Assignment Table Section
The Assignment Table lists all assignments for the mapping that is selected in the Device drop-down menu under Device Setup. Remember that all mapped devices are active at the same time, not just the currently selected mapping.
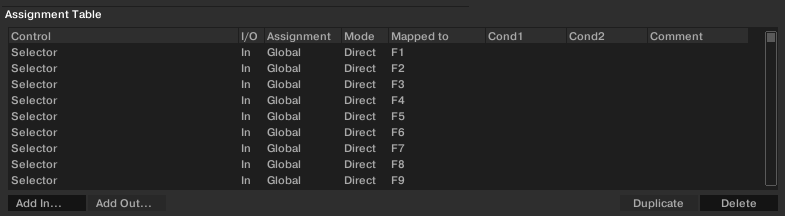
Assignment Table section on the Controller Manager page in the Preferences.
Tip
You can sort the Assignment Table by any column if you click on the header of the column, which is very useful for large mappings. Also adding descriptive comments for each Control assignment can be very helpful allowing you to sort by the comment column.
Control: This is the name of the function assignment. You can add Controls via the Add in... and Add Out... buttons. A complete list of all Controls and their meaning can be found in section Available Controller Types.
I/O: States if a Control will be used as a MIDI input (from a knob, button, or encoder) or a MIDI output (to an LED or level meter).
Use MIDI input Control (In) when you want to assign a Traktor element to an external MIDI controller element (like a knob on a MIDI controller).
MIDI output Controls (Out) are mostly used when your controller has the ability to receive feedback, such as LED output, to show the current state of the software user interface.
Assignment: Shows the target you have specified in the Assignment drop-down menu under Mapping Details. This can be Deck A to D or Device Target for Deck controls, and Global for other Controls and modifiers. These settings are explained in the Mapping Details section Mapping Details Section.
Mode: Shows the interaction mode you have set for a Control under Mapping Details. The available modes depend on the type of Control (e.g. button, fader/knob, encoder). Interaction modes are explained in section Mapping Details Section.
Mapped to: Shows either the source for the Control (input devices) or the target (output devices).
Cond1 and Cond2: Display the values of the first and second conditions as set under Mapping Details. Modifiers are explained in section Mapping Details Section.
Comment: You can enter a comment in this field, which is stored with the Control assignment.
The currently selected Control in the list is highlighted in yellow. If there is another Control in the list and it has the same Control source assigned in the Mapped to column as the selected Control, this will be highlighted in a darker yellow. This feature is especially useful for debugging large mapping lists.
Device Mapping Section
The Device Mapping area allows you to map Traktor controls to desired control elements of a MIDI device.

Device Mapping section on the Controller Manager page in the Preferences.
Learn: Allows you to map the control to the desired knob/button/key by simply turning/pressing/hitting the relevant input parameter.
The Learn function is available for MIDI Input controllers and HID controls (keyboard, mouse etc.).
Learn stays activated until you press this button again. This allows you to assign several controls in one go.
Do not forget to disable Learn when you are finished in order to avoid undesired assignments.
Assignment Drop-Down menu: Here you can manually assign a control.
This is the only way to assign a MIDI output controller or HID (keyboard, mouse etc.). On the first level of the drop-down list you choose the MIDI channel (1-16). If no assignment is working, check which MIDI channel your MIDI controller or HID is set to for sending and receiving MIDI.
Reset: Deletes the current assignment.
Comment: You can enter a comment in this field, which is stored with the Control assignment.
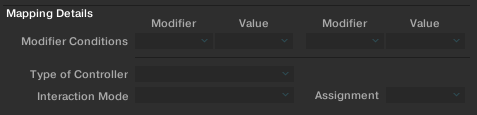
Mapping Details Section
The Mapping Details area allows to make customization to mapped Traktor controls i.e the Modifier Conditions and the Interactions Mode.
Mapping Details section on the Controller Manager page in the Preferences.
Modifier Conditions: A Modifier allows you to define a Control, either a MIDI message or keyboard key (depending on the mapping), to operate another Control depending on one or even two condition(s).
Each Modifier functions as an If command. In order to execute the Control, each Modifier's Value condition must be met, and those Modifiers and Value conditions are set here. Once they have been set, they will appear for that Control in the Assignment Table under the columns Cond1 and Cond2 (e.g. M1=0).
A Modifier is always restricted to the mapping it is part of. You cannot use a Modifier for anything outside of a mapping. Each mapping can have up to eight Modifiers (M1 to M8).
Type of Controller: The controller types available here depend on the Control target you have added to the mapping. For example:
While a Deck's Play/Pause only allows to be mapped to a button, other parameters (like the Filter Mixer FX Amount knob) can be assigned to knobs and faders. The Interaction Mode and the Button Options below the Mapping Details section depend on the selected Controller Type.
Assignment: The available options are Deck A to Deck D and Device Target for Deck control, and Global for other Controls and Modifiers.
If you select one of the Decks here, the Control is always routed to this Deck. If you select Device Target, you can specify the actual target under Device Setup at the top of the Controller Manager page.
Available Controller Types
The available Controller Types depend on the Control target.
Button
Available Interaction modes for buttons:
Toggle: When you press and release the MIDI button or Key, the Traktor button is activated, when you press and release it again, it is deactivated.
Hold: This is the default setting for buttons. The Traktor button will stay pressed as long as your MIDI button or keyboard key is pressed. If you release the MIDI button/key, the Traktor button will also be released.
Invert: Inverts the action. For an input controller this means that the Traktor button is pressed when you release the MIDI button or keyboard key and vice versa.
Direct: When selecting this, you can specify either 0 or 1 in the Button options below. This can be used if you want a specific MIDI button or Key to always set a certain Traktor button status, independently of the current Traktor status. For example: Define a Play/Pause controller for Deck A, set the Interaction mode to Direct and the Value for the Direct mode to 1. Now assign a MIDI note or keyboard key to it using MIDI learn. Whatever the current state of the Deck A Start button is (pressed or not pressed), hitting the defined MIDI button or Key will always playback the track in Deck A, so if the Start button is not pressed yet, the playback will start, if it is already playing, nothing will happen.
Button Options
The elements appearing in the Button options are dependent on the Interaction Mode you have set and in some cases on the actual parameter you edit.
Value (Direct mode): The available range of numbers can differ and is dependent on the Control you are editing. Some Controls only allow integers while others allow fractions.
Invert (Toggle and Hold modes): Inverts the movement of your external Control. For an input controller this means that the Traktor button is pressed when you release the MIDI button or keyboard key and vice versa.
Auto Repeat: Holding down the button will auto repeat that input. This is only available for specific Controls.
Resolution: Allows you to adjust (fine or coarse) the increment or decrement of the input. This is only available for specific Controls such as the buttons below the Deck TEMPO fader.
There are other parameters available in this section. Remember that all parameters appearing here are pre-defined for each available Control.
Fader/Knob
Faders or knobs can have one of the following Interaction Modes:
Direct: The position of the external Control always matches the position of the Traktor parameter.
Relative: The position of the Traktor parameter can be shifted compared to the external Control. Relative mode is best suited for incremental knobs (which send -1 and +1 instead of absolute values). Here are some examples of Relative Interaction mode applications:
When you can only control a certain portion of the entire range of a parameter, such as the filter.
Tempo fader at high resolution. This allows you to press Sync and then fine-control the tempo fader at the synched position.
When you can only control a certain portion of the entire range of a parameter, such as the filter.
Relative mode can be used when a knob or fader is shared between different parameters to avoid skips when switching to the other assignment.
Fader/Knob Options
Soft Takeover (Direct mode): Enable this to avoid parameter jumps when starting controlling a parameter.
Invert (Direct and Relative mode): Inverts the action of your external Control. High fader/knob values become low values in the Traktor and vice versa.
Encoder
Enc.-Mode: You can switch between two types of encoders. 7Fh/01h is standard for most controllers. However if your encoder mapping does not behave as intended (e.g. inverted) or the mapped parameter reacts too coarsely, it is most likely due to the wrong encoder mode and we recommend trying the alternate mode (3Fh/41h).
Encoder Options
Rotary Sensitivity (Relative mode): This defines the speed of the Traktor Control movement. A higher value will make a Traktor fader or knob move faster.
Rotary Acceleration (Relative mode): It is recommended to set this to 0% for most applications. We recommend experimenting with this after you have tried the Sensitivity parameter.
The Traktor Control position is influenced by the speed of the external Control movement. As a side effect, this results in a different value of the Traktor Control if for example you move a fader up fast and then slowly down to its original position.
Invert (Direct and Relative mode): Inverts the action of your external Control. High fader/knob values become low values in Traktor and vice versa.
Assigning MIDI Controls
This section outlines the workflow of assigning MIDI controls to your MIDI controller using Traktor's Controller Manager. To begin, you need to select your MIDI controller. Then you will start to assign the MIDI controls to the individual controller types, like buttons or knobs, on your MIDI controller.
For an overview of all assignable MIDI controls, refer to Assignable MIDI Controls.
Procedure
To assign MIDI controls to your MIDI controller:
Open the Preferences.
Select the Controller Manager page.
Select your controller from the Device drop-down menu, for example, Traktor.Kontrol S2 MK3 (S2MK3).
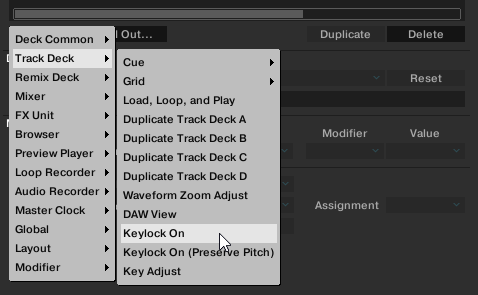
Click Add In... below the Assignment Table to open the drop-down menu.
Select the MIDI Input control from that drop-down menu, for example, Track Deck > Keylock On.
The MIDI input control Keylock On is now listed in the Assignment Table.
Click Learn to arm the Controller Manager to receive the command of MIDI control type from the MIDI controller.

Use the individual control on your MIDI controller, for example, press Pad 4 on the left S2 Deck.
The MIDI control Keylock On is assigned to Pad 4 on the Left Deck.

Select Override factory map to disable the original function of that control type. If you unselect that option, then the control type triggers both the original function and the newly mapped function.

Repeat the aforementioned steps to assign further MIDI controls to other control types on the controller.
When you are finish, click Learn again to disarm the Controller Manager.
The MIDI controls are assigned to your controller.
Assignable MIDI Controls
In this section, you will find a list of all MIDI controls that you can assign to external MIDI controllers with the Controller Manager in Traktor's Preferences. For more information on mapping MIDI controls to external controllers, refer to Configuring MIDI Controller for Controlling Traktor.
About Input and Output Controls
There are two types of assignable controls:
Input controls: Input controls can receive MIDI signals from an external MIDI controller such as a slider or a knob. For example, you can assign the Play/Pause control to a button on a MIDI controller and trigger this command with that button. Every Input control also has an Output control counterpart, which can send LED states to a controller for visual feedback. Input controls are available via the Add In... button in the Assignment Table.
Output controls: Output controls can send LED states to external hardware for visual feedback. For example, you can assign the "Track End Warning" control from the Track Deck controls to a controller LED. This way the controller LED lights up when a track in a Track Deck is nearby reaching its end. Output controls are available via the Add Out... button in the Assignment Table.
In the screenshot below, you see a Traktor control mapped to a controller both as an input, receiving signal, and as an output, sending signal. In this example, Traktor's Deck Play/Pause control receives a MIDI signal from a button on the controller, and it also sends an on-state to the button's LED when Play/Pause is initiated.
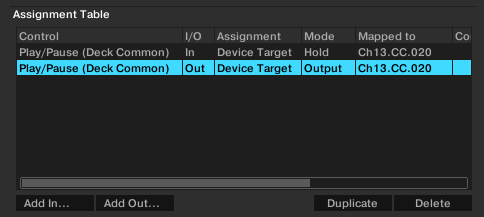
The Play/Pause control added to the mapping both as an input and as an output control.
AUDIO RECORDER
The following table lists the assignable MIDI controls of the AUDIO RECORDER.
Name | Description | Input/Output |
|---|---|---|
Record/Stop | Starts/stops the recording of the AUDIO RECORDER | In/Out |
Cut | Cuts the audio of the AUDIO RECORDER at the current position and begins a new file | In/Out |
Gain Adjust | Adjusts the gain of the AUDIO RECORDER | In/Out |
Load Last Recording | Loads the last audio recording into a Deck | In/Out |
Browser
The following table lists the assignable MIDI controls of the Browser.
Name | Description | Input/Output |
|---|---|---|
List > Delete | Deletes a file from the Track Collection | In/Out |
List > Reset Played-State | Resets the played-state for the selected file | In/Out |
List > Analyze | Analyses the selected file | In/Out |
List > Restore Auto-Gain | Restores the auto-gain value for the selected file | In/Out |
List > Detect BPM | Detects the BPM for the selected file | In/Out |
List > BPM Unlock | Unlocks the BPM for the selected file | In/Out |
List > BPM Lock | Locks the BPM for the selected file | In/Out |
List > Edit | Shows the editable metadata for the selected file | In/Out |
List > Relocate | Relocates the selected file | In/Out |
List > Add as Track To Collection | Adds the selected file(s) to the Trak Collection and sets type as track | In/Out |
List > Add as One-Shot Sample To Collection | Adds the selected file(s) to the Track Collection and sets type as One-shot Sample | In/Out |
List > Add as Loop To Collection | Adds the selected file(s) to the Track Collection and sets type as Loop Sample | In/Out |
List > Set to One-Shot Sample | Sets the type of the selected file to One-shot Sample | In/Out |
List > Set to Looped Sample | Sets the type of the selected file to looped Sample | In/Out |
List > Set to Track | Sets the type of the selected file to track | In/Out |
List > Select Up/Down | Scrolls up/down one file in the Track List | In/Out |
List > Select Page Up/Down | Scrolls up/down one page in the Track List | In/Out |
List > Select Top/Bottom | Scrolls to the first/last file in the Track List | In/Out |
List > Select Extend Up/Down | Extends the selection by one file upwards/downwards | In/Out |
List > Select Extend Page Up/Down | Extends the selection by one page upwards/downwards | In/Out |
List > Select Extend Top/Bottom | Extends the selection by all files upwards/downwards | In/Out |
List > Select All | Select all files in the Track List | In/Out |
List > Consolidate | Renumbers the playlist according to the current order | In/Out |
List > Search | Moves the cursor in the search field, so a search can be started by typing in the search criteria | In/Out |
List > Search Clear | Clears the current search | In/Out |
List > Search in Playlists | Displays a popup with all playlists that contain the selected file | In/Out |
List > Show In Explorer | Navigates the file explorer to the physical path of the selected file | In/Out |
List > Clear | In/Out | |
List > Expand Content Set | Shows the content of the selected Remix Set | In/Out |
List > Jump To Current Track | Jumps to the last loaded track | In/Out |
List > Append To Preparation List | Appends the selected track to the Preparation List | In/Out |
List > Add As Next To Preparation List | Adds the selected track to the Preparation List right after the position of the last loaded track | In/Out |
List > Export as Remix Set | Exports a Remix Set file | In/Out |
Tree > Save Collection | Saves the collection to your hard disk | In/Out |
Tree > Delete | In/Out | |
Tree > Reset Played-State | Resets the played-state for the selected playlist | In/Out |
Tree > Analyze | Analyses the contents of the selected playlist | In/Out |
Tree > Restore AutoGain | Restores auto-gain for the contents of the selected playlist | In/Out |
Tree > Edit | Shows the editable metadata for the selected playlist | In/Out |
Tree > Relocate | Relocates the selected playlist | In/Out |
Tree > Import Collection | Imports another Track Collection | In/Out |
Tree > Import Music Folders | Imports new files from the music folders | In/Out |
Tree > Export | Exports the selected playlist | In/Out |
Tree > Export Printable | Exports the selected playlist as a web page | In/Out |
Tree > Rename Playlist or Folder | Rename the selected playlist or folder | In/Out |
Tree > Select Up/Down | Navigate up/down one folder in the Browser Tree | In/Out |
Tree > Select Expand/Collapse | Expands/collapses the selected folder in the Browser Tree | In/Out |
Tree > Create Playlist | Creates a new playlist in the selected playlist folder | In/Out |
Tree > Delete Playlist | Deletes the selected playlist | In/Out |
Tree > Create Playlist Folder | Creates a new playlist folder | In/Out |
Tree > Delete Playlist Folder | Deletes the selected playlist folder | In/Out |
Tree > Refresh Explorer Folder Content | Refreshes the folder content of the Explorer folder | In/Out |
Tree > Check Consistency | Checks the consistency of the Track Collection and shows a report | In/Out |
Tree > Add Folder To Music Folders | Adds a music folder to the Explorer folder | In/Out |
Favorites > Selector | Selects one of the favorite playlists | In/Out |
Favorites > Add Selected Tracks To Favorite | Adds the selected tracks to the mapped favorites list | In/Out |
Deck Common
The following table lists the assignable MIDI controls of the controls that are common to Track Decks, Stem Decks, and Remix Decks.
Name | Description | Input/Output |
|---|---|---|
Load Next | Loads the next track in the current list into the Deck | In/Out |
Load Previous | Loads the previous track in the current list into the Deck | In/Out |
Load Selected | Loads the selected track into the Deck | In/Out |
Unload | Unload the track from the Deck | In/Out |
Play/Pause | Play/pause Deck playback | In/Out |
Cue | Cue to the current Floating Cue Point | In/Out |
CUP (Cue Play) | Cue to the current Floating Cue Point and start playing immediately | In/Out |
Seek Position | Seek back/forth in the track | In/Out |
Jog Touch On | Map Jog Wheel's top plate. When track is playing, this will stop the track and start Scratch mode (in cooperation with Jog Turn) | In/Out |
Jog Turn | Map Jog Wheel to pitch bend track. In cooperation with Jog Touch On this starts scratching when the track is playing | In/Out |
Set as Tempo Master | Sets a Deck as the Tempo Master | In/Out |
Sync On | Activates Sync for a Deck | In/Out |
Phase Sync | Syncs a Deck's phase | In/Out |
Tempo Sync | Syncs a Deck's tempo | In/Out |
Tempo Bend | Increases/decreases playback speed temporarily in steps | In/Out |
Tempo Bend (stepless) | Increases/decreases playback speed temporarily | In/Out |
Tempo Adjust | Adjusts the tempo for a Deck | In/Out |
Tempo Range Selector | Sets the tempo range for a Deck | In/Out |
Keylock On | Activates/deactivates Keylock for a Deck | In/Out |
Keylock On (Preserve Pitch) | Activates/deactivates Key Lock for a Deck with preserving the current pitch | In/Out |
Key Adjust | Adjusts the key for a Deck | In/Out |
Analyze Loaded Track | Initiates the Analysis for the track loaded in a Deck | In/Out |
Deck Flavor Selector | Sets the Deck Type to Track Deck, Remix Deck, Stem Deck, or Live Input for a Deck | In/Out |
Deck Size Selector | Sets the Deck Size to Micro, Small, Essential, Full or Advanced for two corresponding Decks | In/Out |
Advanced Panel Toggle | Shows/hides the Advanced Panel for two corresponding Decks | In/Out |
Advanced Panel Tab Selector | Selects the MOVE, CUE or GRID tab in the Advanced Panel | In/Out |
Timecode > Scratch Control On | Activates/deactivates Scratch control for a Deck | In/Out |
Timecode > Playback Mode Int/Rel/Abs | Sets the playback mode for a scratch controlled Deck to Internal, Relative or Absolute | In/Out |
Timecode > Platter/Scope View Selector | Sets the Platter/Scope view to Off, Minimized, Platter or Scope | In/Out |
Timecode > Calibrate | Initiates the calibration for the timecode signal of a Deck | In/Out |
Timecode > Reset Tempo Offset | Resets the tempo offset for a Deck in scratch control mode | In/Out |
Move > Size Selector | Sets the move size | In/Out |
Move > Mode Selector | Sets the move mode to beatjump, loop, loop in or loop out | In/Out |
Move > Move | Initiates a forward or backward move | In/Out |
Move > Beatjump | Sets the beatjump length and intitiates the beatjump directly | In/Out |
Loop > Loop In/Set Cue | Sets the loop In/floating cue point | In/Out |
Loop > Loop Out | Sets the Loop Out point and activates the Loop | In/Out |
Loop > Loop Size Selector | Sets the auto Loop size | In/Out |
Loop > Loop Set | Sets an auto Loop with the current Loop size at the playback position and activates it | In/Out |
Loop > Loop Size Select + Set | Sets the auto Loop size and sets an active auto Loop with the current loop size at the playback position | In/Out |
Loop > Backward Loop Size Select + Set | Sets the auto Loop size and sets an active backward auto Loop with the current loop size at the playback position | In/Out |
Loop > Loop Active On | Activates/deactivates all Loops | In/Out |
Phase | Outputs the value of the phase meter as it is visible on a Deck (output value is 0 when the phase of the decks match) | Out |
Beat Phase | Outputs the Distance to the next gridline (output value is 0 when playback marker hits gridline) | Out |
Deck is Loaded | Outputs if a track is loaded in a Deck | Out |
Is In Active Loop | Outputs 1 if the track is in a loop and 0 otherwise | Out |
Freeze Mode > Freeze Mode On | Enables/Disables Freeze Mode | In/Out |
Freeze Mode > Freeze Slice Size Adjust | Sets the Slice Size | In/Out |
Freeze Mode > Freeze Slice Count Adjust | Set this to the number of Slices you will map to your controller | In/Out |
Freeze Mode > Slice Trigger (1 - 16) | List of individual Slice triggers (1 -16) that can potentially be assigned to a controller. | In/Out |
FX Unit
The following table lists the assignable MIDI controls of the FX Unit.
Name | Description | Input/Output |
|---|---|---|
Unit On | Enables/Disables an FX unit | In/Out |
Dry/Wet Adjust | Adjusts the amount between dry/wet of an FX unit | In/Out |
Knob 1 | Controls knob 1 of an FX unit | In/Out |
Knob 2 | Controls knob 2 of an FX unit | In/Out |
Knob 3 | Controls knob 3 of an FX unit | In/Out |
Button 1 | Enables/Disables button 1 of an FX unit | In/Out |
Button 2 | Enables/Disables button 2 of an FX unit | In/Out |
Button 3 | Enables/Disables button 3 of an FX unit | In/Out |
Effect 1 Selector | Selects the effect 1 of an FX Unit in Group FX mode or in Single FX mode) | In/Out |
Effect 2 Selector | Selects the effect 2 of an FX Unit in Group FX mode | In/Out |
Effect 3 Selector | Selects the effect 3 of an FX Unit in Group FX mode | In/Out |
FX Unit Mode Selector | Sets an FX Unit in to Group FX mode or to Single FX mode | In/Out |
FX Store Preset | Stores an FX Unit's current parameters as a preset | In/Out |
Effect LFO Reset | Resets an FX Unit's LFO | In/Out |
Global
The following table lists the assignable MIDI controls for global functions.
Name | Description | Input/Output |
|---|---|---|
Snap On | Enables/disables the snap mode | In/Out |
Quant On | Enables/disables the Quantize mode | In/Out |
Broadcasting On | Enables/disables broadcasting | In/Out |
Cruise Mode On | Enables/disables Cruise mode | In/Out |
Show Slider Values On | Enables/disables showing the values of each slider | In/Out |
Tool Tips On | Enables/disables tooltips | In/Out |
Send Monitor State | Sends the current state to all LED buttons | In/Out |
Layout
The following table lists the assignable MIDI controls of the user interface layout controls.
Name | Description | Input/Output |
|---|---|---|
Only Browser On | Maximizes the Browser | In/Out |
Layout Selector | Selects one of the Traktor Layouts | In/Out |
Fullscreen On | Enables/disables fullscreen mode | In/Out |
Deck Focus Selector | Switches the Deck Focus Sets the Deck focused Deck | In/Out |
Toggle Last Focus | Switches the Deck focus between the last Deck and the current Deck | In/Out |
LOOP RECORDER
The following table lists the assignable MIDI controls of the LOOP RECORDER.
Name | Description | Input/Output |
|---|---|---|
Record | Starts/stops the recording of the LOOP RECORDER | In/Out |
Size | Sets the recording size of the LOOP RECORDER | In/Out |
Dry/Wet Adjust | Adjusts the dry/wet ratio of the LOOP RECORDER | In/Out |
Play/Pause | Starts/stops playback of the recorded LOOP | In/Out |
Delete | Deletes the recorded Loop | In/Out |
Undo/Redo | Undoes/redoes the last action performed in the LOOP RECORDER | In/Out |
Playback Position | Outputs the playback position of the LOOP RECORDER (range: 0 to 1) | Out |
Undo State | Outputs the undo state of the LOOP RECORDER | Out |
State | Outputs the state of the LOOP RECORDER | Out |
Master Clock
The following table lists the assignable MIDI controls of the Master Clock.
Name | Description | Input/Output |
|---|---|---|
Ableton Link > Reset Downbeat | Syncs to the next downbeat | In/Out |
Auto Master Mode | Sets the Master Clock to Auto mode | In/Out |
Master Tempo Selector | Sets the Tempo Master source to Clock, Deck A, Deck B, Deck C or Deck D | In/Out |
Set Tempo Master | Adjusts the Master Clock's tempo | In/Out |
Tempo Bend Up | Increases the tempo temporarily | In/Out |
Tempo Bend Down | Decreases the tempo temporarily | In/Out |
Beat Tap | Sets the tempo by tapping it in | In/Out |
Tick On | Enables/disables the Master Clock's metronome tick | In/Out |
Clock Int/Ext | Switches the Master Clock between internal and external | In/Out |
Clock Send | Enables/disables sending of the MIDI clock | In/Out |
Clock Trigger MIDI Sync | Triggers the MIDI clock synchronization (MIDI Start) | In/Out |
Mixer
The following table lists the assignable MIDI controls of the Mixer.
Name | Description | Input/Output |
|---|---|---|
Gain Adjust | Adjusts the Gain for a Mixer channel | In/Out |
Auto-Gain Adjust | Enables/disables Auto-Gain | In/Out |
Auto-Gain View On | Enables/disables the Gain function for the Mixer channel | In/Out |
FX Unit 1 On | Engages/disengages FX Unit 1 to a Deck | In/Out |
FX Unit 2 On | Engages/disengages FX Unit 2 to a Deck | In/Out |
FX Unit 3 On | Engages/disengages FX Unit 3 to a Deck | In/Out |
FX Unit 4 On | Engages/disengages FX Unit 4 to a Deck | In/Out |
Deck Effect On | Assigns/unassigns the corresponding FX Unit to a Deck (for example, FX Unit 1 for Deck A) | In/Out |
Mixer FX Adjust | Adjusts the amount for the Mixer FX for a Mixer channel | In/Out |
Mixer FX On | Enables/disables the Mixer FX for a Mixer channel | In/Out |
Mixer FX Selector | Selects the Mixer FX | In/Out |
Balance Adjust | Adjusts the balance for a Mixer channel | In/Out |
Monitor Cue On | Enables/Disables sending the audio of a Mixer channel to the CUE channel | In/Out |
Volume Adjust | Adjusts the volume for a Mixer channel | In/Out |
Master Volume Adjust | Adjusts the Master output volume | In/Out |
Limiter On | Enables/Disables the Limiter | In/Out |
Monitor Volume Adjust | Adjusts the volume for the CUE channel | In/Out |
Monitor Mix Adjust | Adjusts the mix of the the Master signal and the CUE signal | In/Out |
Microphone Gain Adjust | Adjusts the Gain of the microphone | In/Out |
EQ > High Adjust | Adjusts the high frequencies for a Mixer channel | In/Out |
EQ > High Kill | Enable/Disable kill the high frequencies for a Mixer channel | In/Out |
EQ > Mid Adjust | Adjusts the mid frequencies for a Mixer channel | In/Out |
EQ > Mid Kill | Enable/Disable kill the mid frequencies for a Mixer channel | In/Out |
EQ > MidLow Adjust | Adjusts the midlow frequencies for a Mixer channel | In/Out |
EQ > MidLow Kill | Enable/Disable kill the midlow frequencies for a Mixer channel | In/Out |
EQ > Low Adjust | Adjusts the low frequencies for a Mixer channel | In/Out |
EQ > Low Kill | Enable/Disable kill the low frequencies for a Mixer channel | In/Out |
X-Fader > Position | Sets the crossfaders position | In/Out |
X-Fader > Curve Adjust | Adjusts the crossfader's curve between soft and sharp | In/Out |
X-Fader > Assign Left | Assigns/unassigns a Deck to the crossfader's left side | In/Out |
X-Fader > Assign Right | Assigns/unassigns a Deck to the crossfader's right side | In/Out |
X-Fader > Auto X-Fade Left | Auto crossfades to the left side | In/Out |
X-Fader > Auto X-Fade Right | Auto crossfades to the right side | In/Out |
Modifier
The following table lists the assignable MIDI controls of modifiers.
Name | Description | Input/Output |
|---|---|---|
Modifier #1 | Sets modifier #1 | In/Out |
Modifier #2 | Sets modifier #2 | In/Out |
Modifier #3 | Sets modifier #3 | In/Out |
Modifier #4 | Sets modifier #4 | In/Out |
Modifier #5 | Sets modifier #5 | In/Out |
Modifier #6 | Sets modifier #6 | In/Out |
Modifier #7 | Sets modifier #7 | In/Out |
Modifier #8 | Sets modifier #8 | In/Out |
Preview Player
The following table lists the assignable MIDI controls of the Preview Player.
Name | Description | Input/Output |
|---|---|---|
Load Selected | Loads the selected track into the Preview Player | In/Out |
Play/Pause | Starts/Stops playback of the Preview Player | In/Out |
Seek Position | Seeks the position in the Preview Player | In/Out |
Unload | Unloads the Preview Player | In/Out |
Remix Deck
The following table lists the assignable MIDI controls that are specific to the Remix Deck.
Name | Description | Input/Output |
|---|---|---|
Save Remix Set | Saves the contents of a Remix Deck as a Remix Set | In/Out |
Load Set from List | Loads a Remix Set from the Track List in the Browser | In/Out |
Slot Volume Adjust | Adjusts the volume of a Sample Slot | In/Out |
Slot Filter On | Enables/Disables the filter for a Sample Slot | In/Out |
Slot Filter Adjust | Adjusts the filter for a Sample Slot | In/Out |
Slot Capture/Trigger/Mute | Captures a Sample from a Track Deck or LOOP RECORDER, triggers it, then toggles between mute and unmute | In/Out |
Slot Mute On | Mutes/Unmutes a Sample Slot | In/Out |
Slot Stop/Delete/Load from List | Stops Sample Slot playback if playing, unloads Sample Slot if stopped and loads into Sample Slot from Track List if Sample Slot is empty | In/Out |
Slot Retrigger | Retriggers the playback of a Sample Slot | In/Out |
Slot Play Mode | Sets the Sample Slot Play Mode to looped or one-shot | In/Out |
Slot Key Lock On | Enables/disables the keylock of a Sample Slot | In/Out |
Slot State | Outputs the state of a Sample Slot | Out |
Slot FX On | Engages/disengages the Sample Slot to the FX Unit assigned to the Mixer channel | In/Out |
Slot Monitor On | Enables/disables sending the audio of a Sample Slot to the CUE channel | In/Out |
Slot Punch On | Enables/Disables Punch Mode for a Sample Slot | In/Out |
Quantize Selector | Selects the Quantize value of the Remix Deck | In/Out |
Quantize On | Enables/Disables Quantize mode for the Remix Deck | In/Out |
Capture Source Selector | Selects the source (a Track Deck or LOOP Recorder) when capturing new Samples into the Remix Deck | In/Out |
Sample Page Selector | Toggles between the four Sample pages iof the Remix Set | In/Out |
Legacy > Play All Slots | Starts/Stops playback of all Slots for a Remix Deck | In/Out |
Legacy > Trigger All Slots | Triggers all Sample Slots for a Remix Deck | In/Out |
Legacy > Slot Retrigger Play | Starts playback of a Sample Slot from the beginning | In/Out |
Legacy > Slot Load from List | Loads the selected Sample into a Sample Slot | In/Out |
Legacy > Slot Unload | Unloads a Sample Slot | In/Out |
Legacy > Slot Capture from Deck | Captures the audio from a Track Deck and puts it in a Sample Slot | In/Out |
Legacy > Slot Capture from Loop Recorder | Captures the audio from the Loop Recorder and puts it in a Sample Slot | In/Out |
Legacy > Slot Copy from Slot | Copies the the sample from one Sample Slot to another | In/Out |
Legacy > Play Mode All Slots | Switches the Play Mode between looped and one-shot for all Slots in a Remix Deck | In/Out |
Legacy > Slot Size x2 | Doubles the size of a Sample Slot | In/Out |
Legacy > Slot Size /2 | Halves the size of a Sample Slot | In/Out |
Legacy > Slot Size Reset | Resets the size of a Sample Slot | In/Out |
Legacy > Slot Size Adjust | Adjusts the size of a Sample Slot | In/Out |
Direct Mapping > Slot X > Slot X Cell Y Trigger | Triggers the specified Sample Cell. The Sample will behave based on its current playback parameters and playstate, or in conjunction with one of the Direct Mapping modifiers | In |
Direct Mapping > Slot X > Slot X Cell Y State | Outputs the current playback state of the Sample Cell such as Empty, Loaded, or Playing | Out |
Direct Mapping > Cell Load Modifier | Hold this modifier while triggering a sample cell in order to load the selected Sample from the Browser into the Sample Cell | In/Out |
Direct Mapping > Cell Delete Modifier | Hold this modifier while triggering a sample cell in order to delete the Sample from the Sample Cell | In/Out |
Direct Mapping > Cell Reverse Modifier | To reverse the playback direction of a Sample Cell, hold this modifier and hold a Sample Cell trigger. If this modifier is released before the Sample trigger is released, the Sample will stay locked in reverse playback mode | In/Out |
Direct Mapping > Capture Modifier | Hold this modifier while triggering a Sample Cell in order to capture a Sample from the current Capture Source into the Sample Cell. The length of the captured Sample will match the Auto-Loop Size of the Capture Source | In/Out |
Meters > Slot Pre-Fader Level (L) | Outputs the pre-fader level (L) of a Sample Slot | Out |
Meters > Slot Pre-Fader Level (R) | Outputs the pre-fader level (R) of a Sample Slot | Out |
Meters > Slot Pre-Fader Level (L+R) | Outputs the pre-fader level (L+R) of a Sample Slot | Out |
Step Sequencer > Sequencer On | Enables the Pattern Recorder | In/Out |
Step Sequencer > Swing Amount | Hold this modifier and turn the encoder in order to adjust the Pattern Length | In/Out |
Step Sequencer > Selected Sample | Hold this modifier to select another Sample. | In/Out |
Step Sequencer > Pattern Length | Defines the Pattern Length of the selected Sample. | In/Out |
Step Sequencer > Enable Step 1 to 16 | Enables or disables step 1 to step 16 | In/Out |
Track Deck
The following table lists the assignable MIDI controls that are specific to the Track Deck and the Stem Deck.
Name | Description | Input/Output |
|---|---|---|
Load into Next Stopped Deck | Loads selected track into the first available stopped Deck | In/Out |
Load, Loop, and Play | Loads the selected track, cue to Load Marker, set Auto Loop with current Loop length, and play Deck | In/Out |
Duplicate Track Deck A | Duplicates the loaded track from Deck A into a Deck | In/Out |
Duplicate Track Deck B | Duplicates the loaded track from Deck B into a Deck | In/Out |
Duplicate Track Deck C | Duplicates the loaded track from Deck C into a Deck | In/Out |
Duplicate Track Deck D | Duplicates the loaded track from Deck D into a Deck | In/Out |
Waveform Zoom Adjust | Adjusts the zoom of the waveform for a Deck | In/Out |
DAW View | Shows/hides the DAW view on a Stem Deck | In/Out |
Key Lock On | Enables/disables Key Lock | In/Out |
Key Lock On (Preserve Pitch) | Enables/disables Key Lock and preserves the pitch | In/Out |
Key Adjust | Adjusts the key value | In/Out |
Semitone Up/Down | Shifts the locked key in semitones up or down | In/Out |
Cue > Set Cue and Store as next Hotcue | Sets a cue point and stores it as the next available Hotcue | In/Out |
Cue > Store Floating Cue/Loop as next Hotcue | Stores the floating cue/loop as the next available Hotcue | In/Out |
Cue > Delete current Hotcue | Deletes the current Hotcue | In/Out |
Cue > Move current Hotcue | Nudges the current Hotcue | In/Out |
Cue > Jump to Next/Prev Cue/Loop | Jumps to the previous/next cue point or Loop | In/Out |
Cue > Map Hotcue | Maps the floating cue point to a Hotcue | In/Out |
Cue > Select/Set+Store Hotcue | Sets and stores a Hotcue at the playback position or jumps to the Hotcue if it already exists | In/Out |
Cue > Delete Hotcue | Deletes a Hotcue | In/Out |
Cue > Cue Type Selector | Sets the cue type (cue, fade-in, fade-out, load, grid or loop) for a Hotcue | In/Out |
Hotcue 1 Type | Outputs the type of hotcue 1 | Out |
Hotcue 2 Type | Outputs the type of Hotcue 2 | Out |
Hotcue 3 Type | Outputs the type of Hotcue 3 | Out |
Hotcue 4 Type | Outputs the type of Hotcue 4 | Out |
Hotcue 5 Type | Outputs the type of Hotcue 5 | Out |
Hotcue 6 Type | Outputs the type of Hotcue 6 | Out |
Hotcue 7 Type | Outputs the type of Hotcue 7 | Out |
Hotcue 8 Type | Outputs the type of Hotcue 8 | Out |
Grid > Autogrid | Initiates the track analysis and sets the BPM and a Beatgrid marker after analysis | In/Out |
Grid > Reset BPM | Initiates the recalculation of the BPM | In/Out |
Grid > Copy Phase from Tempo Master | Copies the phase from the Tempo Master | In/Out |
Grid > Set Grid Marker | Sets a Beatgrid marker at the current playback position | In/Out |
Grid > Delete Grid Marker | Deletes the last Beatgrid marker | In/Out |
Grid > Move Grid Marker | Moves a Beatgrid marker | In/Out |
Grid > BPM Adjust | Adjusts the BPM of the track | In/Out |
Grid > BPM Lock On | Prevents changing the BPM of a track when activated | In/Out |
Grid > BPM x2 | Doubles the BPM value of the track | In/Out |
Grid > BPM /2 | Halves the BPM of the track | In/Out |
Grid > Beat Tap | Sets the BPM of the track by tapping it in | In/Out |
Grid >Tick On | Enables/disables the tick sound in beat | In/Out |