Mixer View
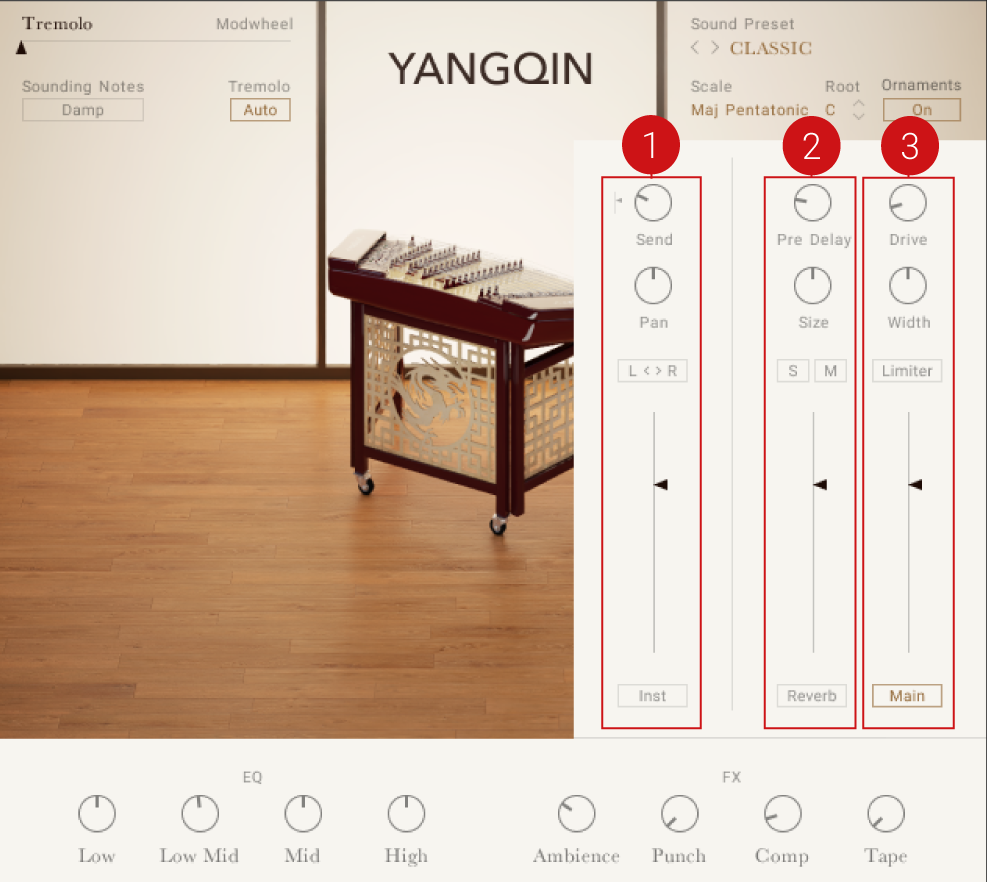
The Mixer page includes the controls for altering the sound of the instrument via volume levels, effect parameters, and other controls.
 |
The Mixer View
The Mixer View has three main sections:
Instrument Channel Controls: Consists of two main sections: the Channel Strip and Channel Effects. For more information, refer to Instrument Channel.
Reverb Control: Contains a convolution-based reverb effect. For more information, refer to Reverb.
Main Channel Controls: Controls consist of two main sections: The Main Channel Bus and Main Bus Effects. For more information, refer to Main Channel.
Tip
Use the Sound Preset selector to quickly change the sound of the instrument, including the Mixer settings.
Instrument Channel
The Instrument Channel controls consist of two main sections: Channel Strip and Channel Effects. The Channel Strip controls are used for adjusting the loudness and positioning of the instrument. The Channel Effects section features a 4-band equalizer used for cutting or boosting the frequencies of the instrument.
Channel Strip
The Channel Strip controls are used to change the loudness and positioning of the instrument using reverb send, panning, stereo image inversion, and volume controls.
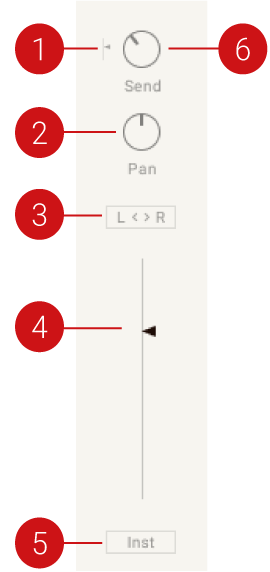
The Channel Strip controls.
YANGQIN’s Channel Strip contains the following controls:
Pre-Post: When activated, the send FX is positioned after the volume fader, for instance reducing the volume will also reduce the reverb signal.
Pan: Controls the position of the instruments in the stereo field.
L < > R: Inverts the left and right channels of the instrument. This can be used to swap the instrument's stereo image and the listening position from the player's position to that of the audience.
Level Fader: Controls the output level of the Instrument Channel.
Inst: Opens the Channel Effects controls.
Send: Controls the auxiliary send level to the reverb effect.
Channel Effects
The Channel Effect features a four-band EQ, which allows you to control the Low, Low Mid, High Mid, and High frequencies of the instrument.
Click the Inst button below the Channel Strip’s Level Fader to show the effect controls.

The Channel Effect controls
Each band contains the following controls:
Gain: Cuts or boosts the chosen frequency of the band.
Freq: Adjusts the frequency of the respective band.
Reverb
The Reverb effect simulates the natural reverberation that occurs when a sound source is placed in an acoustic environment, thus adding a feeling of spaciousness to the sound.
The Reverb page consists of two main sections: the Reverb Channel section includes the controls for adjusting the volume level, size, and pre-delay of the Reverb, and the Reverb Effect section is for selecting the Reverb type, for instance, the convolution-based acoustic environment in which the instrument is placed. For more information, refer to Reverb Channel and Reverb Effect.
Reverb Channel
The Reverb Channel controls are used to adjust the size, volume, and pre-delay of the reverb. The controls for soloing and muting the Reverb Channel are also included.
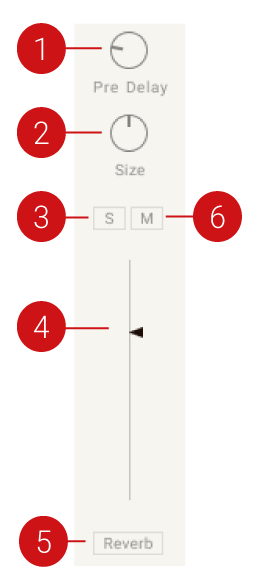
The Reverb Channel controls.
The Reverb Channel contains the following controls:
Pre Delay: Defines the timing of the reverb's onset by adding an initial delay to the reverb signal.
Size: Adjusts the size of the reverb.
Solo: Solos the Reverb Channel so only the Reverb signal is heard.
Reverb Volume: Sets the reverb return level.
Reverb: Opens the Reverb Effect controls.
Mute: Mutes the Reverb Channel, meaning the Reverb is removed.
Reverb Effect
YANGQIN's convolution-based reverb allows you to place the instrument into a real-life acoustic space. The Reverb Effect section allows you to choose your desired reverb type from a selection of realistic acoustic environments.
Click on the Reverb button to display the Reverb selection options.

The Reverb Effect controls
The lower section of the Mixer will display a series of images, each representing a different reverb type.
For the YANGQIN library, there are five different spaces available: Room, Studio, Club, Theatre, and Temple.
Click on an image to select the respective reverb.
The reverb character will change to the selected space.
Main Channel
The Main Channel controls are used for adjusting the drive, warmth, limiter, level, and effect settings of the Main Channel. The Main Channel controls consist of two main sections: The Main Channel Bus and Main Bus Effects.
Main Channel Bus
The channel strip on the far right is the Main Channel Bus. It is the final stage of the mixer before the sound reaches the main Instrument output. The Main Channel Bus strip controls can be used to control the Drive, Width, Limiter, and Level parameters of the channel.
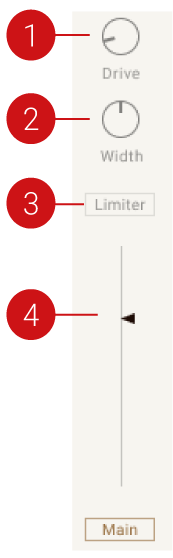
The Main Channel Bus
The Main Channel Bus strip contains the following controls:
Drive: Controls the saturation amount applied to the main signal, making the signal slightly distorted.
Width: Controls the stereo width of the Main Bus. In the middle position, the stereo width is as originally recorded. Turn the Width control right to increase the width of the instrument in the stereo field. When the control is turned all the way to the left, the signal becomes mono.
Limiter: The Limiter ensures the output signal coming through the Main Bus level stays below 0 dB, thus preventing digital clipping.
Level Fader: Controls the output level of the instrument.
Main: Displays the Main Bus effects. For more information see, Main Bus Effects
Main Bus Effects
The Main Bus Effects can be used to control the EQ, Ambience, Punch, Compression, and Tape settings applied to the main signal.
Click the Main button below the Main Channel Bus’ Level Fader to display the Main Bus Effects controls.
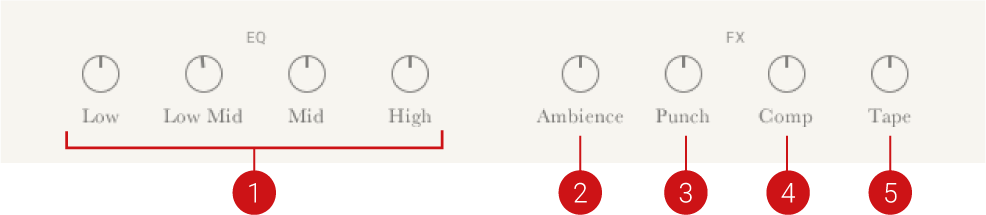
The Main Bus Effects
The Main Bus Effects contains the following controls:
EQ: A 4-band fixed EQ that can be used to boost or cut frequencies from the main signal. The 4 available knobs set the gain for each band.
Ambience: Controls the level of a very small reverb effect, this can be used to add distance to the sound but without making it sound like it is in as large a space as the Reverb effect.
Punch: Turning this knob to the right will emphasize the transient peaks in the sound, making it more percussive and punchy.
Comp: Controls the amount of compression applied to the Main Bus. Higher values reduce the distance between the loudest and quietest parts of the signal.
Tape: Controls the amount of analog tape saturation applied to the Main Bus, making the signal warmer and slightly compressed.