Automation and MIDI Control
Komplete Kontrol offers MIDI control and DAW automation features for easy integration with your MIDI environment. This section provides general information about MIDI communication and DAW automation, describes how to map third-party controllers to Komplete Kontrol, and explains the MIDI Assignment Editor in detail.
DAW Automation
When you load Komplete Kontrol as a plug-in in a daw, the parameters of the loaded Instrument, the Scale parameters, and the Arpeggiator parameters can be automated from the DAW.
Recording Automation
Once your host is set up to record automation you can perform the following actions in the software as well as from the keyboard:
You can activate or deactivate Scale and Arpeggiator functions by clicking individual buttons in the software or by pressing the corresponding buttons on the keyboard.
You can select values of parameters by turning individual knobs in the software or on the keyboard.
Tip
For detailed information about recording automation in your host, refer to the documentation of your host software.
Some hosts allow you to handle automation by using automation IDs that are mapped to specific parameters of the plug-in. Komplete Kontrol comes with a predefined list of automation IDs which allows the host find them automatically.
Automation IDs for the Perform Panel
The following automation IDs are reserved for parameters in Komplete Kontrol’s Perform panel:
| Automation ID | Parameter |
|---|---|
| 000 | Reserved for Instance Recognition and Automatic Focus Follow |
| 001 | Scale On / Off |
| 002 | Root Note (Scale) |
| 003 | Scale Type (Scale) |
| 004 | Key Mode (Scale) |
| 006 | Chord Mode (Scale) |
| 007 | Chord Type (Scale) |
| 026 | Arp On / Off |
| 027 | Mode (Arp) |
| 028 | Type (Arp) |
| 029 | Rate (Arp) |
| 030 | Sequence (Arp) |
| 031 | Swing (Arp) |
| 032 | Octaves (Arp) |
| 033 | Dynamic (Arp) |
| 034 | Gate (Arp) |
| 035 | Retrigger (Arp) |
| 036 | Repeat (Arp) |
| 037 | Offset (Arp) |
| 038 | Inversion (Arp) |
| 039 | Min. Key (Arp) |
| 040 | Max. Key (Arp) |
| 041 | Hold (Arp) |
Mapping MIDI Controls to Third-Party Controllers
MIDI Mapping enhances the user experience and provides more control over sound, workflows and performance. Komplete Kontrol keyboards are ready-mapped to the software. Third-party keyboards and controllers can also be used to control some of the parameters in the Komplete Kontrol software. These parameters include the eight knobs of the Native Map, parameter page switching, preset switching and plug-in switching.
Setting up a Third-Party Controller
To map a third-party controller to the Komplete Kontrol software:
Connect your third-party controller to your computer.
Start Komplete Kontrol.
Open the Preferences dialog, and select the MIDI tab.
Click the checkbox next to the corresponding name of the third-party controller.
The third-party controller is now ready to be used.
Assigning Knobs to a Third-Party Controller
To map a knob on your third party controller to Komplete Kontrol:
Click MIDI in the panel header of the software, to open the MIDI Learn panel.
Select a MIDI Learn knob in the software and then turn a knob on your keyboard.
It is now connected and the knobs should move in line with each other.
To map the remaining knobs, repeat this process.
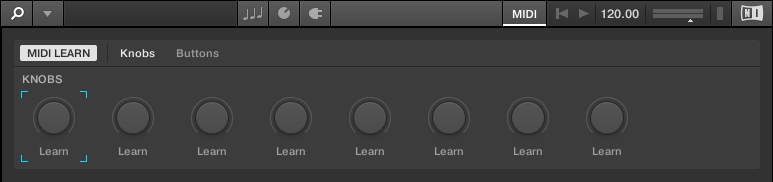
MIDI Learn – Knobs page.
Assigning Buttons to a Third-Party Controller
You can also map buttons on your third-party controller to the software. This will allow you to select another page of eight control knobs in the software using your keyboard. You can assign MIDI CCs to move between parameter pages and switch between presets. To map a button to your keyboard:
Click MIDI in the panel header of the software.
Select the Buttons tab.
Select a button in the software and then press and button on you keyboard.
It is now connected and the button should act in accordance with the software.
To map the remaining buttons, repeat these steps.

MIDI Learn – Buttons page.
Enabling Takeover Mode Pickup for Knobs to prevent Parameter Jumps
When switching parameter pages, it can happen that knob positions in the software do not match with the knob positions on your third party MIDI controller. To prevent potential parameter jumps, you can enable the Takeover mode Pickup in the Preferences page MIDI.
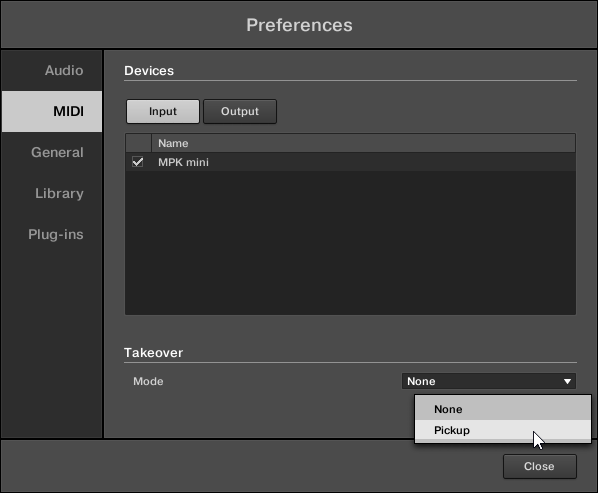
Takeover mode option on the MIDI page in the Preferences.
When Pickup is activated, turning the knobs on your third party MIDI controller will only change the value of the corresponding parameter, when the knob pointer reaches (picks up) the respective value in the software. Komplete Kontrol highlights the difference between the knob positions using white circles around the knobs in the Plug-in panel. The white circle indicates the knob position in the software. The knob pointer indicates the position on the hardware.

Differences between knob positions in the software and on the hardware.
Hardware Configuration for MIDI Mapping
When using the MIDI mapping feature in Komplete Kontrol, a MIDI button can be configured to send a CC message on push and also on release. This mode is referred to as ‘Toggle’ mode. A MIDI button can also be configured to send a single message when it is clicked, as opposed to the two that are sent in Toggle mode. This mode is referred to as ‘Trigger’ mode. To use the MIDI mapping functionality with a third-party controller, you must configure your third-party controller to use Trigger mode.
Share Mapping Across Instances
You need to map your keyboard to Komplete Kontrol only once and you can then instantiate new instances of the software, and the mapping will continue working across all of them.
Notice
Instances that are already open as the mapping is changed, will not receive the new mapping automatically; for them to be updated to the new mapping you must close your DAW and reopen it.
Setting up a Third-Party Controller
To map a third-party controller to the Komplete Kontrol software:
Connect your third-party controller to your computer.
Start Komplete Kontrol.
Open the Preferences dialog, and select the MIDI tab.
Click the checkbox next to the corresponding name of the third-party controller.
The third-party controller is now ready to be used.
Assigning Knobs to a Third-Party Controller
To map a knob on your third-party controller to Komplete Kontrol:
Click MIDI in the panel header of the software, to open the MIDI Learn panel.
Select a MIDI Learn knob in the software and then turn a knob on your keyboard.
It is now connected and the knobs should move in line with each other.
To map the remaining knobs, repeat this process.
MIDI Learn – Knobs page.
Assigning Buttons to a Third-Party Controller
You can also map buttons on your third-party controller to the software. This will allow you to select another page of eight control knobs in the software using your keyboard. You can assign MIDI CCs to move between parameter pages and switch between presets. To map a button to your keyboard:
Click MIDI in the panel header of the software.
Select the Buttons tab.
Select a button in the software and then press and button on you keyboard.
It is now connected and the button should act in accordance with the software.
To map the remaining buttons, repeat these steps.
MIDI Learn – Buttons page.
Activating Takeover Mode
When you switch parameter pages, it can happen that knob positions in the software mismatch with the knob positions on your third-party MIDI controller.
To prevent parameter jumps when turning the knobs, activate Takeover mode by selecting Pickup on the MIDI page of the Preferences.
When the Takeover mode is activated, turning the knobs on your third-party MIDI controller will only change the value of the corresponding parameter when the knob pointer reaches the respective value in the software.
The controls in the Plug-in panel highlight the differences between the knob positions. White circles indicate the knob positions in the software, while the knob pointer indicates the position on the hardware.
Differences between knob positions in the software and on the hardware
Hardware Configuration for MIDI Mapping
When using the MIDI mapping feature in Komplete Kontrol, a MIDI button can be configured to send a CC message on push and also on release. This mode is referred to as ‘Toggle’ mode. A MIDI button can also be configured to send a single message when it is clicked, as opposed to the two that are sent in Toggle mode. This mode is referred to as ‘Trigger’ mode. To use the MIDI mapping functionality with a third-party controller, you must configure your third-party controller to use Trigger mode.
Using the MIDI Assignment Editor
The MIDI Assignment editor enables you to define what kind of MIDI messages are assigned to the controls on the Komplete Kontrol keyboard in MIDI mode, making it possible to use the keyboard with MIDI applications or MIDI devices that require specific MIDI messages to be sent.
Multiple templates can be configured for quick recall, so you can prepare controller assignments for different applications and devices. You can change the assignments for the knobs, buttons, the Touch Strip in the keyboard’s Control section, and for connected pedals.
Note
The MIDI Assignment Editor is available for the following keyboards: Komplete Kontrol S-Series MK2, Komplete Kontrol A-Series, Komplete Kontrol M32.
The MIDI Assignment Editor consists of the following elements and controls:
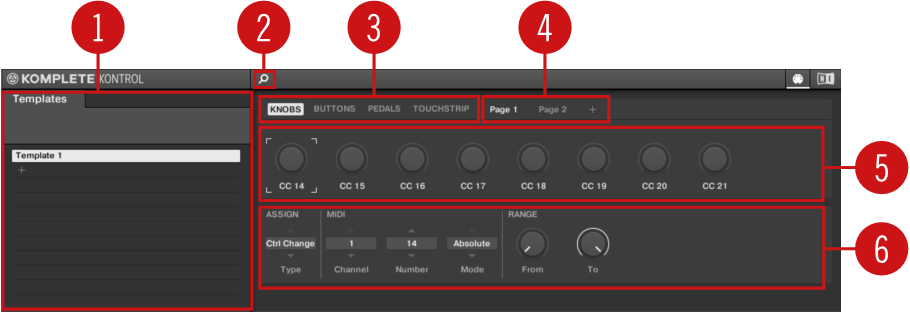
Templates pane: Allows you to create and manage your Templates for MIDI assignments.
Templates pane button: Shows/hides the Templates pane.
Knobs, Buttons, Pedals, Touch Strip: Here you can select the type of control element to which you can make MIDI assignments.
Pages, Pedal A and Pedal B: For the knobs and buttons you can have multiple assignments, organized in pages. Here you can select and manage up to four pages. Pedal Assignments are global and not distinct per Template. Pedals A and B can be independently configured. For the pedals it is not possible to have multiple assignments.
Control elements: Here you can select the control element for a MIDI assignment.
Definition area: Defines the MIDI assignment properties for the selected control element.
The Mapping System
Whatever you do on the keyboard, the MIDI Assignment editor translates it into a MIDI message that is then sent to your computer via USB connection. This is what the MIDI Assignment editor is all about: mapping human actions to MIDI events.
The MIDI Assignment editor’s mapping system is structured in a way that allows you to efficiently organize your assignments. This makes the entire mapping process a lot easier and informs you about what will happen whenever you actuate a control element on the keyboard. The next paragraphs will introduce you to some basic concepts.
Assignable Controls Elements
Assignable control elements are knobs, buttons, keys, pedals, and the Touch Strip. All other controls and buttons are not assignable.
Assignments
An assignment defines which MIDI event is triggered by a particular control element. Available MIDI event types are MIDI messages such as Control Change and Program Change. Every action on a control element is translated into one MIDI event, the corresponding assignment defines the rules of that translation.
Depending on the type of control element (buttons, knobs, keys, pedals, and Touch Strip), the available assignments differ. For more information, refer to MIDI Message Types and Assignments.
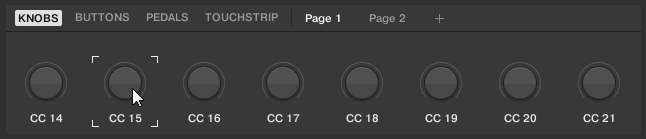
Pages
You can have multiple assignments, organized within Pages. A Page contains eight knobs and eight buttons, and corresponds to the hardware. One Page can be selected and loaded at a time. You can have up to four Pages which can be directly selected in the MIDI Assignment editor and from the keyboard.
When you select another Page, all assignments for the control elements in the Page area are updated accordingly.
MIDI Templates
A MIDI Template holds a mapping configuration for knobs, buttons, and keys on the keyboard, including all Pages that might exist. One MIDI Template can be selected at a time. Switching between different MIDI Templates can be used, for example, to address different applications on your computer or different MIDI instruments.
Caution
The configuration of the Touch Strips and the Pedals are saved globally and not per Template. This means all settings made under TOUCHSTRIP and PEDALS remain the same when switching between Templates.
Opening the MIDI Assignment Editor
You can open the MIDI Assignment editor from the Header
Click on the MIDI Assignment editor button in the Header.

The MIDI Assignment editor opens. Now you have access to all the settings related to the keyboard’s MIDI mode.
Notice
The MIDI Assignment editor button is only visible when a Komplete Kontrol S-Series MK2 keyboard is connected to your computer and switched on.
Assigning MIDI Messages to Control Elements
This tutorial covers the workflow of assigning MIDI messages to the knobs, buttons, pedals, and the Touch Strip. If you intend to create new Key Zones, refer to section Creating Key Zones.
In order to assign MIDI messages to control elements:
Click on the MIDI Assignment editor button to open the MIDI Assignment editor.

Select a MIDI Template in the Templates pane.

Select the type of control element.

Select the control element you want to assign a MIDI message to.
Select the MIDI message using the drop-down menus and options in the Definition area.
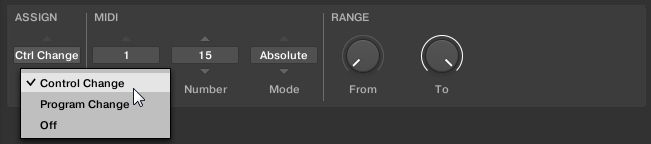
The available drop-down menus and options in the Definition area vary depending on the selected type of control element as well as from the selections in the Definition area itself.
If required select or create another page for making multiple assignments.

When you have finished assigning MIDI messages, close the MIDI Assignment editor.
Your edits are saved to the MIDI Template.
For more information on MIDI message types and assignments, refer to MIDI Message Types and Assignments.
Renaming Control Elements
As the default names do not reveal which parameters they are assigned to, you can rename them:
Double-click the name of the control element.
Enter the desired name with a maximum length of seven characters.

Press the enter key to confirm.
The name of the control element has changed.
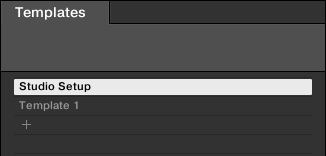
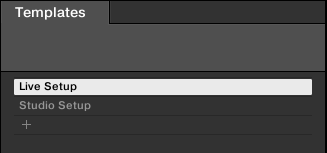
Creating a New MIDI Template
When using the keyboard in different situations, e.g., in a studio or live on stage, you can create a different MIDI Template for each setup.
To create a new Template:
In the Templates pane click the + icon.
The Add Template dialog appears.
Enter a name for the new MIDI Template.
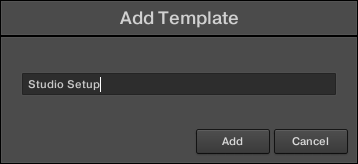
Click Add.
The new MIDI Template is created. The MIDI Templates are arranged in alphabetical order.
Renaming MIDI Templates
If you want to change the name of an existing MIDI Template, proceed as follows:
Right-click the MIDI Template and select Rename from the context menu.
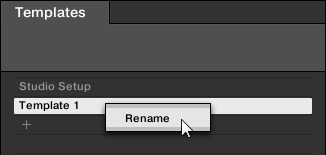
The Rename Template dialog with the current MIDI Template name appears.
Enter the desired MIDI Template name.
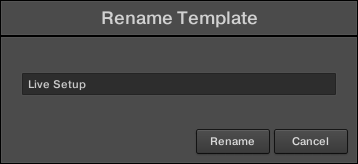
Click Rename to confirm.
The MIDI Template name has changed.
Creating Key Zones
The MIDI Assignment editor allows you to manage Key Zones. Key Zones can be used to assign different MIDI channels to certain keys. In this section you learn about Key Zones, how you can create them, how you select another MIDI channel and set the Light Guide color, and how you transpose key pitches.
About Key Zones
A Key Zone is a group of contiguous keys to which you can assign a particular MIDI channel. Key Zones are a flexible and handy tool that allows you to quickly set up advanced key mappings.
You do not have to assign each key individually. Instead, assigning a key range to the Key Zone will automatically set the correct assignments to all included keys.
Each Key Zone can have its own MIDI channel, and color setting. These settings are applied to all of the keys in a Key Zone.
Key Zones span the entire range of MIDI notes. You can have between 1 and 16 Key Zones. Key Zones cannot overlap (i.e. each key can only belong to one single Key Zone), and they cannot have gaps between them (i.e. each key must belong to a Key Zone). You can disable particular Key Zones: in this case their keys will not send any MIDI Note message (dead keys).
Key Zone assignments are valid per MIDI Template.
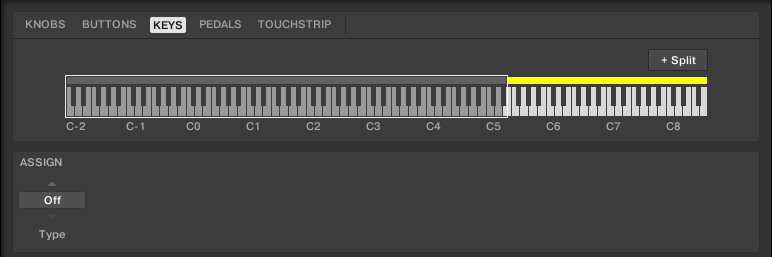
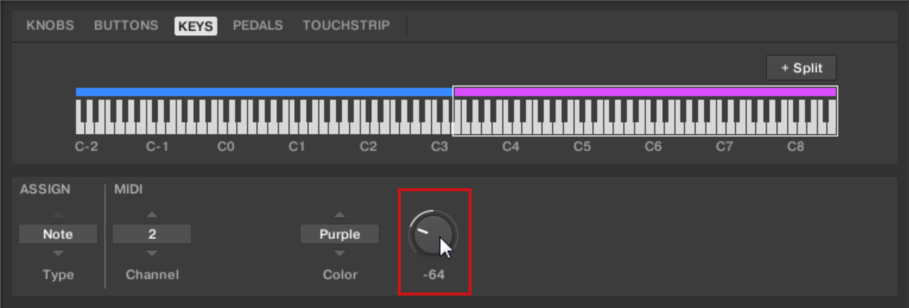
Key Zones in the KEYS Tab
At the top of the KEYS tab, the depicted Keybed area allows you to define and manage your Key Zones over the full range of notes:
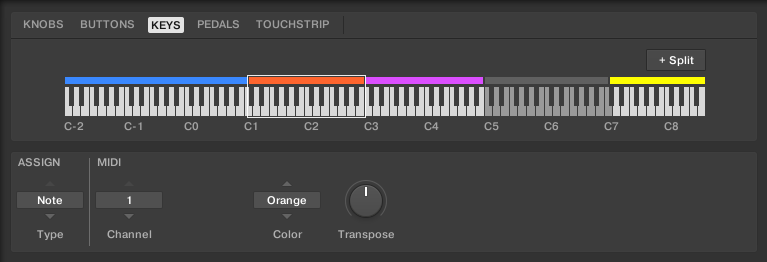
The Keybed area lets you easily create and modify your Key Zones.
The Keybed area shows 128 keys along with a few additional elements:
Each existing Key Zone is shown with its color and borders on the keybed.
The octave markers under the keybed indicates the beginning of each octave.
The white frame indicates the selected Key Zone.
Disabled Key Zones are grayed out.
Splitting Key Zones
The process of creating a new Key Zone is straight-forward, and can be achieved by selecting and splitting an existing Key Zone.
In order to split a Key Zone:
Select an existing Key Zone. If there is only one Key Zone it is always selected by default.

Click the +Split button to the right above the keybed area.

The Key Zone is split into two halves. The right half appears in a different color but has the same MIDI channel of the left half.

Notice
If you already have 16 Key Zones, the +Split button is deactivated.
Notice
If the selected Key Zone is only one-key-wide, the +Split button is deactivated.
Selecting MIDI Channels for Key Zones
After creating a new Key Zone you can select another MIDI channel for the Key Zone so that it can be used to control another instrument.
To select another MIDI channel for a Key Zone:
Select the Key Zone for which you want to select another MIDI channel.
Select a MIDI channel from the Channel drop-down menu.
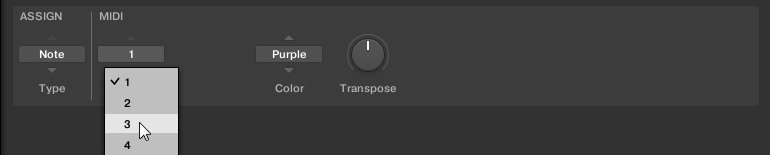
The Key Zone’s MIDI channel has changed.
Recoloring Key Zones
When splitting Key Zones the newly created Key Zone automatically gets one of 16 different colors assigned. If you want to recolor a Key Zone, proceed as follows:
Select the Key Zone you want to recolor.
Select a color from the Color drop-down menu.

The Key Zone’s color has changed and is reflected by the Light Guide. Repeat the aforementioned steps if you want to change the colors for other Key Zones.

Resizing Key Zones
To resize a Key Zone:
Select the Key Zone you want to resize.
Hover the mouse over the selected Key Zone’s lower or upper border.

Click and drag your mouse horizontally to the position of your liking and release.

The Key Zone is resized. Since Key Zones cannot overlap, dragging the border of a Key Zone simultaneously resizes the neighbouring Key Zone so that both Key Zones stay “in contact”.
When resizing Key Zones the lower border of the leftmost Key Zone as well as the upper border of the rightmost Key Zone are fixed and cannot be dragged. You cannot resize a Key Zone to less than one key, this is also true for the neighbouring Key Zone that is simultaneously resized.
Disabling Key Zones
Disabling a Key Zone disables the assignments for all included keys: from then on, these keys will no longer trigger any notes. For example, this can be useful when you want to avoid triggering unwanted MIDI messages by mistake as you play keys in the neighboring Key Zones, or simply to have a clean, better organized keybed.
To disable a Key Zone:
Select the Key Zone you want to disable.

Select the value Off from the Type drop-down menu.
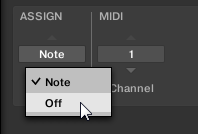
The Key Zone and its MIDI assignment are deactivated and grayed out in the Keybed area. Repeat the aforementioned steps if you want to disable other Key Zones.
You can re-enable a Key Zone at any time.
To re-enable a Key Zone:
Select the Key Zone you want to re-enable.
Select the value Note from the Type drop-down menu.
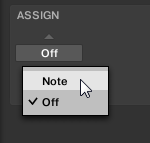
The Key Zone with its MIDI assignment is reactivated. Repeat the aforementioned steps if you want to re-enable other Key Zones.
Deleting a Key Zone
You can delete a Key Zone as follows:
Hover the mouse over the Key Zone you want to delete.
Click the little cross icon that appears when hovering the mouse over a Key Zone.

The Key Zone is deleted and its keys are incorporated into the next Key Zone to the left. If you delete the leftmost Key Zone, its keys are incorporated into the next Key Zone to its right.
Notice
If you only have one Key Zone set up, the cross icon is not available when hovering the mouse the Key Zone.
Transposing Key Zones
By transposing a Key Zone you raise or lower the MIDI notes assigned to all keys included in a Key Zone by the same interval, for example, this is useful if you want the keys in separate Key Zones to trigger the same MIDI notes. Using the Transpose knob you can transpose any Key Zone within the range from -127 to 127 MIDI notes. The Transpose knob is set to the default value 0 if a Key Zone is not transposed.
To transpose a Key Zone, proceed as follows:
Select the Key Zone you want to transpose.

Turn the Transpose knob to raise or lower the MIDI notes by the desired value.
The Key Zone is transposed.
When splitting a transposed Key Zone, the original transpose value is also applied to the newly created Key Zone.

The original transpose value also is applied to the newly created Key Zone.
Tip
If you transpose one-key wide Key Zones, you can specify the pitch for one-shot samples.
MIDI Message Types and Assignments
In this section you find reference information about the MIDI message types provided in the Type menu and about the several assignments for control elements and for Key Zones.
Assignments for Knobs
For the knobs, the Type menu offers the entries Control Change and Program Change. Depending on the selected entry, a different set of additional parameters is available:
Type | Mode | RANGE | Number | Step |
|---|---|---|---|---|
Control Change | Absolute | From 0-126 / To 1-127 | 0-127 | |
Relative | -32 to 31 | |||
Relative (Offset) | -32 to 31 | |||
Program Change | From 0-126 / To 1-127 |
Mode Menu Values for Knobs
For the type Control Change, a Mode menu allows you to select between three operating modes:
Absolute: In this mode the control element sends absolute values. The From and To parameters are the same as for the other message types (refer to above).
Relative: In this mode the sent message is in a +1/-1 fashion — actually 1/127, which is then understood by the target software as +1/-1 in that case. This allows the control element to set the new Control Change value relative to its current value. Two parameters are available:
Step: Defines the increment to use. Increase the Step value to trigger greater jumps in the target parameter value. If you choose a negative value for Step, the control will be inverted.
Relative (Offset): This mode is similar to the Relative mode explained above, with the difference that here the values sent for the “+1” and “-1” messages are 65 and 63, respectively — in other terms, they are centered around 64 instead of 0. This is well suited for some particular software implementations. As in Relative mode, a Step parameter defines the increment to use.
Assignments for Buttons
For the buttons, the Type menu offers the entries Control Change, Program Change, and Note. Depending on the selected entry, a different set of additional parameters is available:
Type | Mode | Value | Number | Note |
|---|---|---|---|---|
Control Change | Toggle | Off/On 0-127 | 0-127 | |
Trigger | 0 - 127 | |||
Program Change | Toggle | Off/On 0-127 | ||
Trigger | 0 - 127 | |||
Note | Toggle | 0 - 127 | C-2 – G8 | |
Gate | 0 - 127 | C-2 – G8 |
Mode Menu Values for Buttons
For the buttons control elements listed in the above table, and only for some of the MIDI message types available for these control elements, you can choose from different behaviors for the way the data is sent. This is controlled by the Mode menu. This menu can have up to four entries, depending on the message type that you have selected in the Type menu. Here is the list of all possible entries:
Toggle: In this mode, the control element has two states, on and off. When you press once, it switches to the on state — when you press again, it switches to the off state. This can be useful for enabling and disabling an effect to check how it affects the original sound. In this mode, there are two VALUE settings: Off defines the value for the off state (from 0 to 127, 0 by default), and On defines the value for the on state (0 to 127, 127 by default). For the Note message type, since the off state is predefined (it’s the MIDI Note Off message), you find instead a single VALUE setting defining the velocity of the MIDI Note On message.
Trigger: In this mode, only one message is sent when you hit the control element. For instance, this can be useful for switching to another program (preset, patch…) or for triggering one-shot samples (e.g., drum sounds or any other envelope-controlled sounds). In this mode, you thus find only one VALUE setting, defining the value to be sent when you hit the control element. It goes from 0 to 127 (127 by default).
Gate: In this mode, which is only available for the Note message type, the control element sends MIDI Note messages. When you press a control element, it sends a MIDI Note On message — when you release the control element, it sends a MIDI Note Off message. For instance, this can be useful to temporarily enable an effect while playing. Since the off state is predefined (it’s the MIDI Note Off message), you find instead a single VALUE setting defining the velocity of the MIDI Note On message.
Assignments for Key Zones
The assignments described here are valid for the Key Zones.
Type
For Key Zones, the Type menu offers the following entries: Note and Off.
Note: Sends MIDI Note On/Off messages. These messages are sent over a specific MIDI channel set by the Channel parameter. It tells your target to play/stop the note corresponding to the key you press/release on your keyboard.
Off: Disables a Key Zone including the MIDI assignment. When a Key Zone gets reactivated the previous MIDI assignment is recalled.
Channel
The selected value in the Channel menu determines the MIDI channel for the selected Key Zone.
Values range from 1 to 16.
Value 1 is always set by default.
Color
The Color setting defines which color should be used in the Light Guide (the LEDs above the keys on your keyboard) for the selected Key Zone:
Red, Orange, Light Orange, Warm Yellow, Yellow, Lime, Green, Mint, Turquoise, Cyan, Blue, Plum, Violet, Purple, Magenta, and Fuchsia.
Transpose
The Transpose knob lowers or raises MIDI notes of a Key Zone.
Value range from -127 to 127.
Value 0 is always set by default.
Assignments for the Touch Strip
For the Touch Strip, the Type menu offers the entries Control Change and Pitchbend. Depending on the selected entry, a different set of additional parameters is available:
Type | Range | Number | Strength |
|---|---|---|---|
Control Change | From 0-126/To 1-127 | 0-127 | |
Pitchbend | 0-100% |
Notice
Selecting a Type also changes the behavior of Touch Strip. When Control Change is selected, the Touch Strip can be used like a fader that retains its position even after you have removed your finger. When Pitchbend is selected, the Touch Strip behaves like a spring that returns to zero position after you have removed your finger.
For Control Change, you can set the Range of values that is sent when swiping the Touch Strip, and the Number of the Control Change message. For Pitchbend, you can set the Strength of the Touch Strip’s spring behavior. As you increase this value, the Touch Strip returns to the zero position more quickly.
Caution
The configuration of the Touch Strips and the Pedals are saved globally and not per Template. This means all settings made under TOUCHSTRIP and PEDALS remain the same when switching between Templates.
Assignments for Switch Pedals
For Pedals used as switch, the Type menu offers the entries Control Change and Program Change. Depending on the selected entry, a different set of additional parameters is available:
Type Value | Mode Value | Range | Value | Number | Step | Wrap |
|---|---|---|---|---|---|---|
Control Change | Toggle/Gate | Off/On 0-127 | 0-127 | |||
Trigger | 0 - 127 | 0-127 | ||||
Inc | Min/Max (0-127) | -128 to 127 | On/Off | |||
Program Change | Toggle/Gate | Off/On 0-127 | ||||
Trigger | 0 - 127 | |||||
Inc | Min/Max 0-127 | -128 to 127 | On/Off |
Mode Menu Values for Pedals (Switch)
For the button-like control elements listed in the above table, and only for some of the MIDI message types available for these control elements, you can choose from different behaviors for the way the data is sent. This is controlled by the Mode menu. This menu can have up to four entries, depending on the message type that you have selected in the Type menu. Here is the list of all possible entries:
Toggle: In this mode, the control element has two states, On and Off. If you press once, it switches to the On state — if you press again, it switches to the Off state. This can be useful for example for activating some effect, then deactivating it later. This is usually the default mode. In this mode, you find two numeric fields: Off Value defines the value for the Off state (from 0 to 127, 0 by default), and On Value defines the value for the On state (0 to 127, 127 by default). For the Note message type, since the Off state is predefined (it’s the MIDI Note Off message), you find instead a single Value parameter defining the velocity of the MIDI Note On message.
Gate: This mode is equal to Toggle with the difference that the state is active for the time the Pedal is held depressed. In Toggle mode the state is activated until the next time the Pedal is pressed again.
Trigger: In this mode, only one message is sent when you hit the control element. There are no On or Off states. For example, this can be useful for switching to another program (preset, patch…) or for triggering one-shot samples (e.g., drum sounds or any other envelope-controlled sounds). In this mode, you thus find only one numeric field called Value, defining the value to be sent when you hit the control element. It goes from 0 to 127 (127 by default).
Inc: In this mode you can configure the press of a pedal to step through a list of values by choosing the size of the jump (e.g., 1-2-3-4-5, 2-4-6-8-10 or 3-6-9-12-15), and whether or not the values wrap around back to the beginning, or stop when they reach their minimum or maximum.
Assignments for Continuous Pedals
For Pedals used as continuous control, the Type menu offers the entries Control Change and Program Change. Depending on the selected entry, a different set of additional parameters is available:
Type | Mode | Range | Number |
|---|---|---|---|
Control Change | From 0-126 / To 1-127 | 0-127 | |
Program Change | From 0-126 / To 1-127 |
For Control Change, you can set the Range of values that is sent when pressing the pedal, and the Number of the Control Change message. For Program Change, you can set the Range of values that is sent when pressing the pedal.