Preferences
In the Preferences you can specify various settings for Komplete Kontrol.
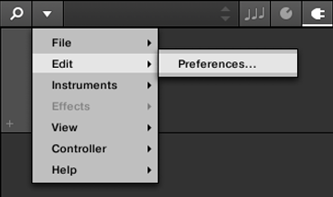
To open the Preferences:
Click Edit > Preferences in the Komplete Kontrol menu:
Preferences – Audio Page
The Audio page holds settings related to your audio interface when Komplete Kontrol is running as a stand-alone application.
Notice
When using Komplete Kontrol as a plug-in, the audio configuration is managed by the host, and the Audio page is not available.
The Routings section allows you to configure the connections between the virtual outputs of Komplete Kontrol and the physical outputs of your audio interface.
Setting | Description |
|---|---|
Driver | Here you can select the audio driver. |
Device | This allows you to choose from the available devices if you have connected more than one audio interface. |
Status | This shows you whether your audio interface is currently running. |
Sample Rate | This displays the selected sample rate of your audio interface. Please restart Komplete Kontrol after changing the sample rate. |
Buffer Size | macOS: This slider allows you to adjust the buffer size of your audio interface in samples. Lower values result in a more immediate playing response but increase the CPU load, and may result in audible clicks and pops. Larger values decrease the CPU load but introduce a larger latency (a small delay between hitting a pad and hearing it). It is recommended to find the lowest value that does not cause clicks and pops even when playing more demanding Products. Windows: When using an ASIO driver, the Audio page shows an ASIO Config button instead of the Buffer Size slider. Click this button to open the settings window of the selected ASIO driver. |
Latency | This shows the delays introduced by the current Buffer Size setting. |
Routings | Under Routings, you will be presented with a list of the 16 stereo outputs from Komplete Kontrol: In the right column, you can assign them to the outputs of your audio interface. Click the fields in the right column to select the desired outputs via a drop-down menu. |
Preferences – MIDI Page
The MIDI page allows you to set up the MIDI input and output ports that you want to use when Komplete Kontrol is running as a stand-alone application.
Notice
When using Komplete Kontrol as a plug-in, the MIDI configuration is managed by the host, and the MIDI page is not available.
Element | Description |
|---|---|
Input | Clicking Input displays a list of all the available MIDI inputs of your system. You can activate/deactivate each input by clicking the checkbox next to its name. |
Output | Clicking Output displays a list of all the available MIDI outputs of your system. You can activate/deactivate each input by clicking the checkbox next to its name. |
Takeover Mode | When using third-party controllers, you can select Pickup from the Takeover mode drop-down menu to prevent potential parameter jumps caused by mismatching knob positions between software and hardware. For more information, refer to Activating Takeover Mode. |
The MIDI Output settings are required for using Komplete Kontrol’s Smart Play features with other MIDI instruments.
Preferences – General Page
The General page holds Usage Data Tracking settings. Usage Data Tracking technology enables Komplete Kontrol to automatically track anonymous usage data that you can choose to share with us.
Usage Data Tracking can be activated or deactivated in the General page of the Preferences in the Komplete Kontrol software. However, we encourage all users to keep Data Tracking activated as it provides a valuable tool for understanding the performance of Native Instruments applications when they are used in real life situations. The data sent to Native Instruments is one hundred percent anonymous and will not affect performance.
For more detailed information about Usage Data Tracking, please refer to the following Knowledge Base article on the Native Instruments website: https://support.native-instruments.com/hc/en-us/articles/209545029
Enabling or Disabling Usage Data Tracking
To enable or disable Usage Data Tracking:
Open the General page of the Preferences by clicking Preferences… in the Komplete Kontrol menu.
Click the Allow usage data tracking checkbox to enable or disable user data tracking.
Preferences – Library Page
The Library page allows you to edit the locations of all Komplete Kontrol Library files (both Factory and User) that appear in the Library pane of the Browser.
At the top of the page, the Factory and User buttons allow you to switch between the Factory pane and the User pane.
Factory Pane
The Factory pane shows all factory libraries available. These libraries will appear in the Factory view of the Browser’s Library pane.
Element | Description |
|---|---|
Location column | Shows the path of each library. If you have moved any library to another location on your computer, click the folder icon on the left of that library and select its new path. |
Product column | Shows the name of each product. These names cannot be edited. |
Rescan button | If you have made any change to a library (e.g., changed its location), select it in the list and click the Rescan button to rescan that library. |
User Pane
The User pane shows all user libraries currently used. These include Komplete Kontrol’s standard user directory as well as any other user directory you might have defined. These libraries will appear in the User view of the Browser’s Library pane.
Element | Description |
|---|---|
Location column | Shows the path of each library. If you have moved any library to another location on your computer, click the folder icon on the left of that library and select its new path. |
Alias column | Shows the alias stored for each library. Click an alias to edit it. Defining aliases for your user folders is not mandatory, but it can be of great help when working on different computers (see description below). After adding a location (see Add below), click the field in the new row and in the Alias column to set the alias for that new location. The alias of the default user folder, Native Instruments User Directory, cannot be edited — this is the location where all your user files will be stored by default. |
Scan user content for changes at start-up | Enabled by default, this option automatically detects any new added user content when starting Komplete Kontrol. |
Add button | Click Add to manually add directories to the user library. See below for more details. |
Remove button | Click Remove to remove the selected user library. Files will only be removed from the Komplete Kontrol Browser, not from your hard disk. |
Rescan button | If you have made any change to a library (e.g., added/removed files), select it in the list and click the Rescan button to rescan that library. |
Tip
You can resize the Preferences panel at your convenience using the usual method on your operating system. You can also resize each column by clicking and dragging the limit between both column headers.
Adding Folders to the User Library
In the User pane of the Library page, you can add other folders to the user content of your Komplete Kontrol Library. To do this:
Click Add at the bottom of the pane. A folder selection dialog opens up.
In the dialog, navigate to the desired folder on your computer and click OK (Choose on macOS).
All Komplete Kontrol-compatible files found in the selected folder are added to your user content in Komplete Kontrol.
Tip
Komplete Kontrol-compatible files include ens, rkplr, nrkt, nksn, nfm8, nabs, nki, nmsv, nbkt, nis.
Furthermore, the attributes (Instrument/Bank/Sub-Bank, Type/Sub-Type/Characters tags, as well as properties) of all imported files will be retained.
By adding a folder to the user content of your Komplete Kontrol Library, you make their files available in the Browser’s Library pane for quick searching and loading.
Notice
Paths to folders added via the IMPORT button in the Browser’s Files pane will also show up here. The only difference between adding folders via the Add button in Preferences panel described here, and via the IMPORT button in the Files pane of the Browser is that the latter allows you to directly tag the files as they are imported.
Note that the selected folder cannot contain, or be contained within, a folder already listed in the User or Factory pane. If Komplete Kontrol detects such a folder as you press OK (Choose on macOS) in the folder selection dialog, a Duplicate Location message appears: Click OK to return to the folder selection dialog and select another folder on your computer.
Removing Folders from the User Library
You can also remove any user folder from your library—except the default user content directory Native Instruments User Content.
Preferences – Plug-ins Page
The Plug-ins page allows you to manage your VST plug-ins in Komplete Kontrol.
At the top of the page, the Manager and Locations buttons allow you to switch between the Manager pane and the Locations pane.
Manager Pane
The Manager Pane allows you to view and manage all VST plug-ins available in Komplete Kontrol. By default, all available plug-ins are activated for use in Komplete Kontrol.
To deactivate a plug-in for use in Komplete Kontrol, click on the checkbox icon next to its name so it is unchecked.
The option to Always use latest version of NI Plug-ins selects whether or not your Library content is always loaded with the latest version of the associated plug-in. If this option is deactivated, your Library content is loaded with the lowest required version of the associated plug-in found on the computer.
Tip
For example, this option is required if you have installed both the full version of Reaktor 5 as well as a Komplete Instrument that came with Reaktor 6 Player. By disabling the option, the Reaktor 5 Factory Library will be loaded with the full version of Reaktor 5, while the Komplete Instrument will be loaded with Reaktor 6 Player. This is necessary since the Reaktor 5 Factory Library is not authorized for use with Reaktor 6 Player.
Element | Description |
|---|---|
Checkbox column | Activates or deactivates a plug-in for use in Komplete Kontrol. |
Plug-in column | Lists all available VST plug-ins in Komplete Kontrol. |
Always use latest version of NI Plug-ins | If this option is activated (default), Library content is loaded with the latest version of the associated plug-in. If this option is deactivated, Library content is loaded with the lowest required version of the associated plug-in. |
Locations Pane
The Locations pane allows you manage the folders containing your plug-ins on the hard drive. Komplete Kontrol scans these folders for VST plug-ins and adds them to the Manager pane. You can Add and Remove folders from the list, as well as use the Rescan function to update the available plug-ins in Komplete Kontrol according to any changes made to the folders or their contents.
To display the Locations pane, click the Locations button at the top of the Plug-ins page.
Setting | Description |
|---|---|
Plug-in column | Lists all folders that Komplete Kontrol scans for VST plug-ins. |
Add | Opens a file dialogue that lets you add another folder to the list. |
Remove | Removes the selected folder from the list. |
Rescan | Scans all folders in the list for compatible plug-ins and updates the Manager pane accordingly. |
Preferences - Features Page
Using the Features page, you can enable different configurations of Komplete Kontrol. Whenever a feature toggle is activated or deactivated, the software must be restarted for the changes to take effect.
Element | Description |
|---|---|
Browser Tag Remapping | Remaps the tags found in the Browser |