Using Plug-ins
This sections describes how to use plug-ins in Komplete Kontrol, from instruments to loops, one-shots, and effects. Plug-ins can be loaded and organized in the Plug-in chain.
The Plug-in chain enables you to load instruments and effect plug-ins. You can change the order, however only an instrument or a sample can be loaded in to the first Plug-in slot.
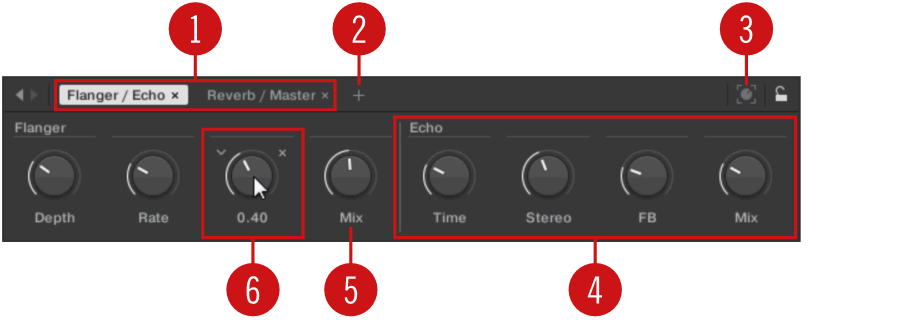
The Plug-in chain consists of the following elements:
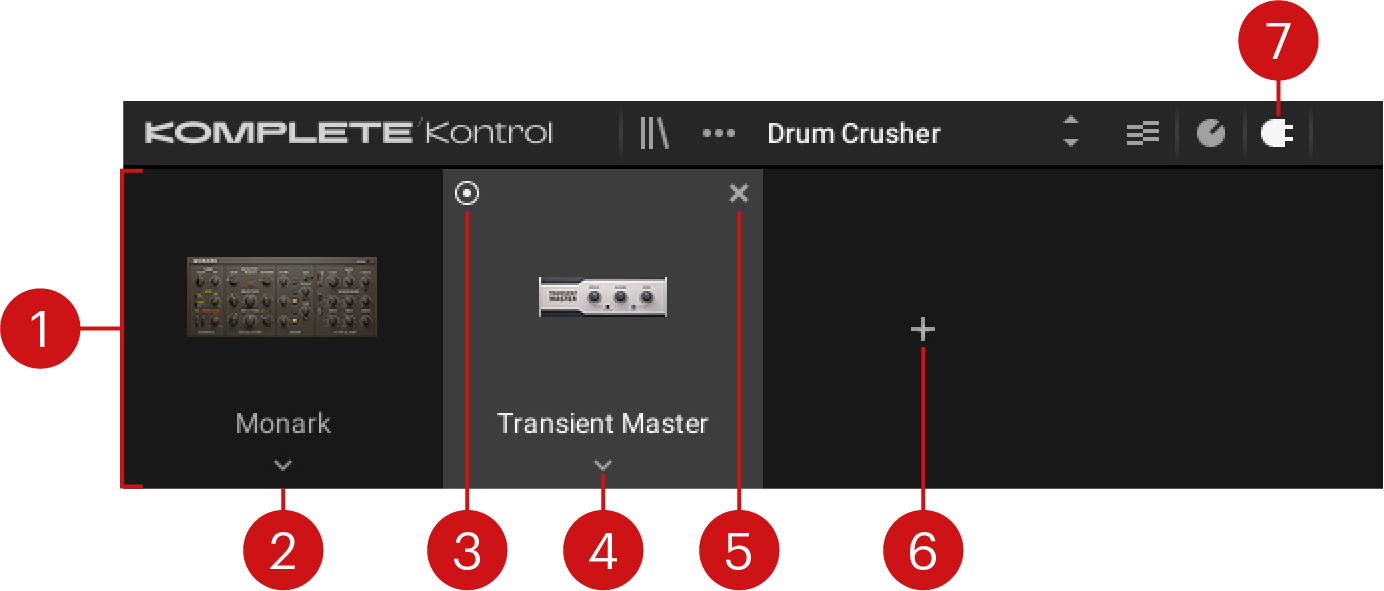 |
Plug-in chain: Displays the loaded Instruments and effects. The signal flow is from left to right.
Plug-in slot: Each Plug-in slot represents a plug-in and displays the product’s name and image. Clicking on a Plug-in slot selects it. When selected, you can use the Browser to load a new plug-in into the Plug-in slot by opening a preset.
On/off: Activates or deactivates the Plug-in slot and bypasses the loaded plug-in.
Replace plug-in: Loads another plug-in and replaces the loaded plug-in.
Clear: Removes the loaded plug-in from the respective Plug-in slot.
Add plug-in: Loads another plug-in and places it at the end of the Plug-in chain. In the first Plug-in slot, this button loads an instrument.
Plug-in chain button: Opens or closes the Plug-in chain.
Loading Plug-ins
Plug-ins supporting the Native Kontrol Standard (NKS) are automatically loaded when you open a Preset from the Browser. However, you can also load any plug-in directly and benefit from features like Play Assist and unified preset management.
To load a plug-in in Komplete Kontrol:
Open the Plug-in chain using the button in the Header.

Click the + button to open the context menu and select a plug-in from the list. You can only load instruments in the first slot, and only effects in the following slots.
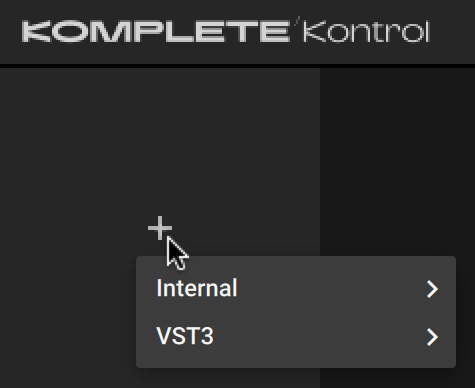
The plug-in is loaded in its default state.
To replace a plug-in that is already loaded in the Plug-in chain with another plug-in:
Click the arrow button at the bottom of the respective slot in the Plug-in chain and select a plug-in from the list.
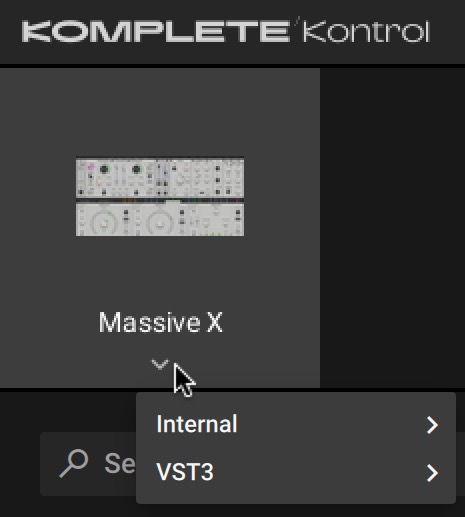
The plug-in is loaded in its default state.
Alternatively, you can use the Main menu to load plug-ins. If you load an instrument from the Main menu, an already loaded instrument will be replaced. If you load an effect from the main menu, it will be added in a new slot at the end of the Plug-in chain.
Go to the Main menu and select a plug-in from the Instruments or the Effects submenu.
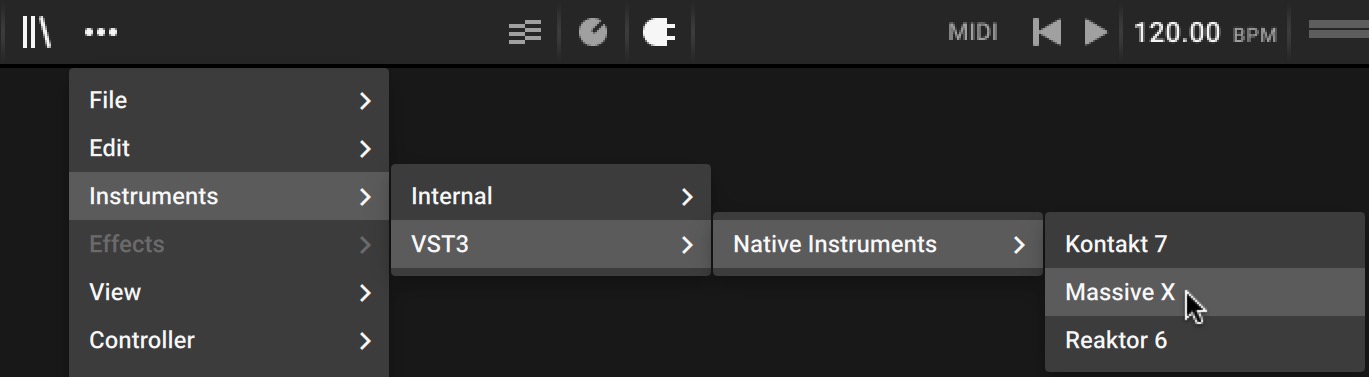
The plug-in is loaded in its default state.
Notice
If your plug-ins do not show up in the Instruments or the Effects submenu, check if the plug-in folders on your hard drive are correctly added to the Locations pane on the Preferences’ Plug-ins page.
Controlling Instrument and Effect Parameters
This section introduces you to controlling instrument, loop and one-shot, and effect parameters. All NKS instruments are pre-mapped, which means that the controls on your Kontrol keyboard are automatically assigned to key parameters as soon as you load an instrument in Komplete Kontrol. The same applies to your third-party keyboard if you have mapped its controls in Komplete Kontrol. For more information about MIDI learn, refer to Mapping MIDI Controls to Third-Party Controllers.
Once you have loaded an instrument, the knobs on the keyboard are automatically assigned to eight instrument parameters. Whenever you turn a knob on the keyboard, the mapped parameter visually reflects the movement in the Komplete Kontrol software.
Customizing Parameter Mappings using the Plug-in Panel
You can customize the parameter mapping for each preset in the Plug-in panel of the Komplete Kontrol software by activating Edit mode.
Caution
To make your changes permanent, save the preset to the Komplete Kontrol User Library. For more information, refer to Saving a User preset.
Activating Edit Mode
To activate or deactivate Edit mode, click on the Edit mode button in the upper right corner of the Plug-in panel.
Using Edit Mode
Edit mode enables you to add, remove, and rename parameters, pages, or page sections in the mapping, as well as learn parameters to controls.
Each page of the Control section on the Komplete Kontrol keyboard shows up as a label at the top of the Plug-in panel.
Click on a label to view and edit the controls on this page. The current page is highlighted.
To delete a page, click on the cross icon next to its label.
The Add Page button allows you to add more pages to the Control section for the current preset.
The Learn button enables Learn mode for the Plug-in panel.
In Learn mode, select a control in the Plug-in panel and move any parameter on the Instrument’s panel to learn this parameter to the selected control (highlighted in blue).
Controls can be grouped to sections to show related parameters in a coherent manner.
Double-click on the empty space above a parameter, enter a name, and then press [enter] or click elsewhere to create a new section starting with the chosen parameter.
To rename an existing section, double-click on it and enter a new name. Press [enter] or click elsewhere to confirm the changes.
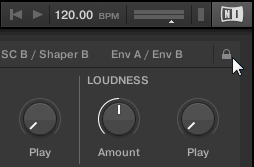
The name of each control is shown below the corresponding knob in the Plug-in panel.
To change the name of a control, double-click on it and enter a new name. Press [enter] or click elsewhere to confirm the changes.
If you place the mouse over a control in Edit mode, additional options allow for changing the parameter mapping of this control.
Click on the arrow icon at the left of the control’s knob and select a parameter from the drop-down menu to map it to this control.
Click on the cross icon at the right of the control’s knob to delete this control from the current page.
Using Effects
You can add effects to your instrument in the Plug-in chain. By combining different types of effects and changing their order it is possible to achieve refined and complex sounds directly in Komplete Kontrol.
Opening the Plug-in Chain
Click on the Plug-in chain button in the Header.
The Plug-in chain and the loaded instrument are displayed. You can now add effects to the Plug-in chain.
Adding Effects
Once an Instrument, Loop or One-shot has been loaded into the first Plug-in slot, you can then add Effects to the Plug-in chain. To add an Effect to the Plug-in chain:
Click on the empty Plug-in slot to select it.
The Product Type icon in the Browser changes to Effects.
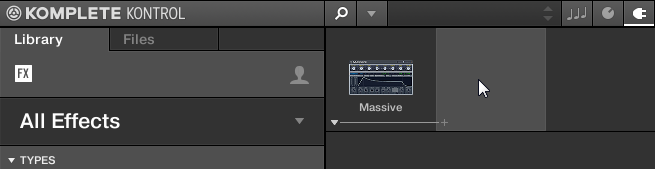
The Product selector provides you with a list of the available Effects.
Browse for an Effect to your liking.
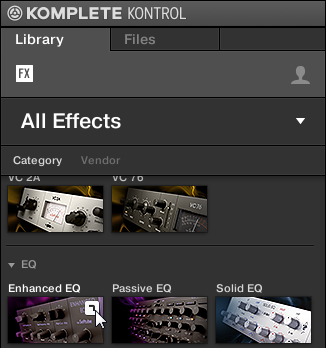
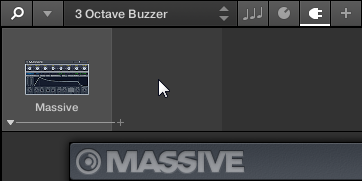
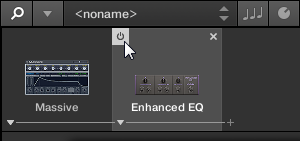
The Effect is loaded. Its image (or a generic icon for non-NKS Plug-ins) and name are shown in the second Plug-in slot. To add more Effects to the Plug-in chain, repeat the aforementioned steps.
Selecting Plug-in Slots
When you have several Effects added to the Plug-in chain you can directly jump to a Plug-in slot in order for adjusting the included Effect.
In order to jump to another Plug-in slot and display the Effect’s controls:
Click on the Plug-in slot you want to select.
Reordering Effects
If you want to reorder your Effects in the Plug-in chain you can easily move them by drag and drop.
In order to move an Effect in the Plug-in chain:
Hover the mouse over the Plug-in slot you want to move.
Click and hold the left mouse button and move the mouse pointer to the desired position in the Plug-in chain.
The white line between the borders of the Plug-in slots is the current position for dropping the Plug-in slot.

Drop the Effect into a new position in the effects chain.
The Plug-in slot now sits at another position in the Plug-in chain and the other Plug-in slots have moved accordingly.

Scrolling the Plug-in Chain
Theoretically, it is possible to add an unlimited amount of Effects to the Plug-in chain. If the Plug-in chain exceeds the space on the GUI due to numerous Effects loaded, big scroll arrows appear on the left and/or on the right border.

Right scroll arrow.
In order to scroll through the Plug-in chain:
Click the scroll arrow for the respective direction.
Bypassing Effects
If you temporarily want to listen to the Instrument without a specific Effect for an A/B comparison but do not want to delete it from the Plug-in chain, you can bypass Effects.
In order to bypass an Effect:
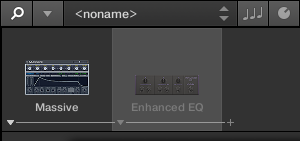
Hover the mouse over the Plug-in slot containing the Effect you want to bypass.
Additional controls are displayed.
Click the Bypass button at the top left of the Plug-in slot.
The Effect is now bypassed and the image is grayed out.
Removing Effects
In order to remove an Effect from the Plug-in chain:
Hover the mouse over the Plug-in slot containing the Effect you want to remove.
Additional controls are displayed.
Click the Remove button at the top right of the Plug-in slot.
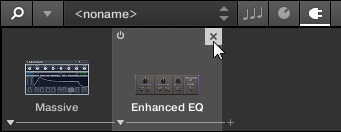
The Effect is now removed from the Plug-in chain.
Using Loops and One-Shot Samples
In Komplete Kontrol you can also work with loops and One-shot samples using the Sampler plug-in or the Audio plug-in. In this section you will learn about the different use cases of the Sampler plug-in and the Audio plug-in, how you load samples, how you open the Sampler plug-in and the Audio plug-in, and how to switch between the Sampler plug-in and the Audio plug-in.
Audio Plug-In
When you load a sample of content type Loop from the Browser, the sample is automatically loaded into the Audio plug-in so you can play it immediately. The Audio plug-in specializes in keeping audio loops playing in-sync with the project in your host software and has the optional ability to do so without influencing the key of the loop. Furthermore, you can transpose the loop while it plays so that it fits the key of your song. Important parameters can be accessed via the GUI, but all parameters for the Audio plug-in can be accessed via the Plug-in panel or a connected keyboard. As for any Instrument or the Sampler plug-in, the Audio plug-in uses the first Plug-in slot in the Plug-in chain.
For more information on using the Audio plug-in, refer to Using Loops and One-Shot Samples.
The Audio plug-in provides you with the following elements and parameters:
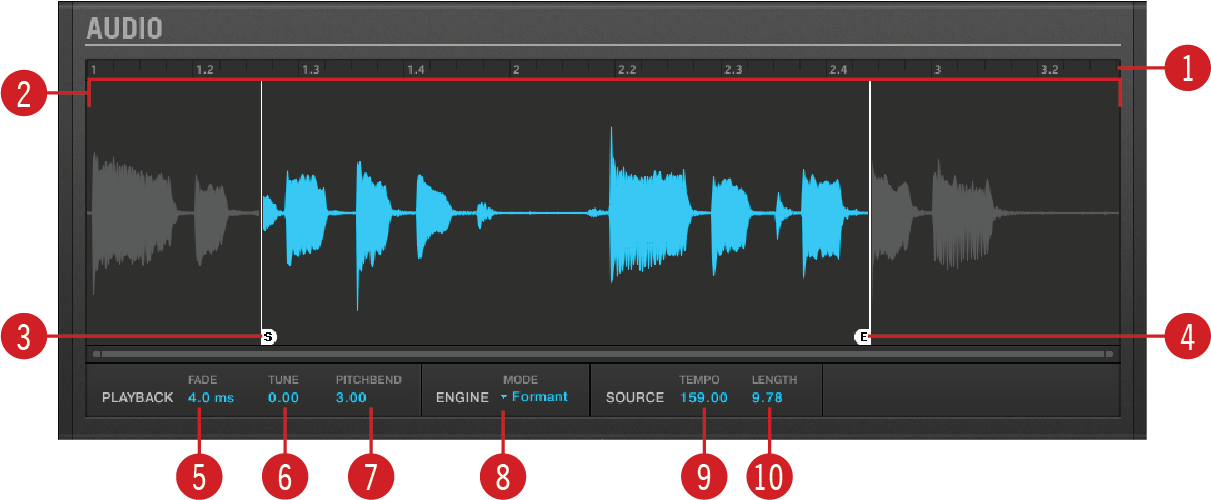
Audio plug-in.
Timeline: Shows the timeline of the loop in musical units, including bars and beats.
Waveform display: Shows the waveform of the loaded loop. When a sample is played back, a playhead is shown in the waveform display. With the scroll wheel of your mouse, you can zoom in and out the waveform display. Right-clicking on the waveform display opens a context menu for finding the loop on your computer.
Start Marker: Determines the start point of the loop by moving it left or right. You can adjust the Start Marker only from within the software.
End Marker: Determines the end point of the loop by moving it left or right. You can adjust the End Marker only from within the software.
Fade: Sets a simple fade-in/fade-out amount to avoid pops or clicks that may occur when playing loops with the Audio Plug-in.
Tune: Transposes the tune of the loop within the range of -36 to +36 semitones. You can use this control to set the playback pitch of the loop to 'C', and then the loop's pitch will match the pitch of notes programmed into the host sequencer. This parameter is only available in Stretch and Formant Engine mode (8).
Pitchbend: Sets the Pitchbend range of the loop from -12 to +12 which is relative to the Tune parameter. This parameter controls the effect of the Pitch Wheel/Slider on your MIDI controller. This parameter is only available in Stretch and Formant Engine mode (8).
Engine: Here you can choose from three different playback engine modes from the drop-down menu:
Re-pitch: This playback engine mode matches the tempo of the loop to the host sequencer's tempo by changing the playback rate of the loop, and playback rate changes will result in pitch changes to the loop. Like a vinyl record, playing it faster will also cause the pitch of the loop to rise, whereas slowing it down causes the overall pitch to drop. This mode is therefore more suitable for non-pitched material, like drums and percussion, and has the benefit that the transients of sounds remain sharp and also uses significantly less CPU than the other Engine modes. Since tempo and pitch are not independently adjustable with this Engine, any pitch automation you may have done via Events entered will be ignored, only the rhythm of the Events will be used to gate the Loop on and off.
Stretch: This playback engine mode provides complete independence between tempo and pitch. With this engine, you can change the tempo of a loop without changing its pitch, you can change its pitch without changing its tempo, or you can change both the tempo and pitch simultaneously. This mode even allows you to automate pitch changes by entering notes into the host sequencer. As this mode provides complete tempo and pitch independence, and also works on polyphonic material, it requires more CPU power than other Engines.
Formant: This playback engine mode is best suited to pitched (tonal) audio as it preserves the formant of the sound. By preserving the formant, it retains the intrinsic character and avoids any shifts in pitch that would normally result in the undesirable cartoon-like effects on vocals when they are pitched upwards or downwards.
Tempo: Sets the original tempo of your loop so that the Audio plug-in can accurately play it in sync, no matter what tempo you choose in your host sequencer. This is useful if your host software has miscalculated the tempo while importing the loop. However, be aware that changing Tempo during playback could affect the synchronization of your loop.
Length: Sets the original length of your loop so that the Audio plug-in can accurately play it in sync, no matter what tempo you choose in your host sequencer. This is useful if your host software has miscalculated the length while importing the loop. However, be aware that changing Length during playback could affect the synchronization of your loop.
All parameters of the Audio plug-in can be adjusted by clicking the parameter and dragging the mouse upwards or downwards. Pressing the [SHIFT] key on your computer keyboard while dragging sets finer increments.
Sampler Plug-In
When loading a sample from the One-shots tab in the Browser, the sample will be automatically loaded into the Sampler plug-in so it can be played immediately. Important parameters can be accessed via the GUI, but all parameters for the Sampler plug-in can be accessed via the Plug-in Panel or a connected keyboard.
For more information on using the Sampler plug-in, refer to Using Loops and One-Shot Samples.
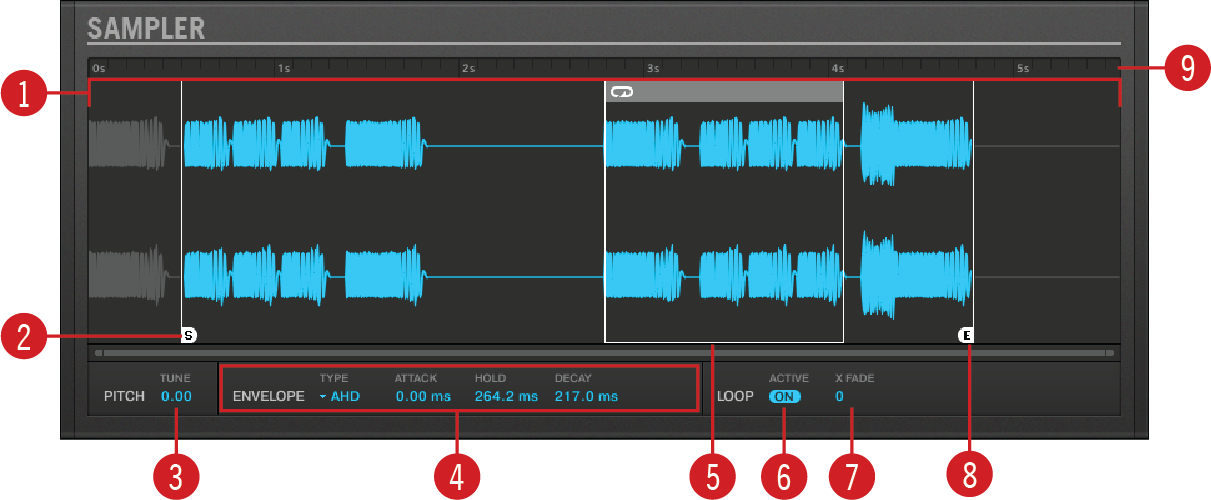
Sampler plug-in.
Waveform display: Shows the waveform of the Sample.
Start: Determines the Start point of the sample. When Loop is active, the Loop Point determines the start of the loop.
PITCH: Defines the pitch of your sample and adjusts the pitch within three octaves up or down. As this is a traditional sampler.
ENVELOPE: Selects one of three envelope types (One-shot, AHD and ADSR). For more information, refer to Envelopes.
Loop Point: Sets the point at which the loop will start playing. The Loop Point can be set independently of the Start Point.
LOOP: When the ON button is activated, the sample will loop at a length determined by the Loop Point and End Point.
X FADE: Determines the type of fade between the loop points.
End Point: Sets the End point of the sample. When Loop is active, the End Point determines the length of the loop.
Timeline: Shows the time scale in seconds.
Envelopes
An envelope allows you to modify the shape and timing of your sample, so you can create more expressive and dynamic sounds. There are three Envelope types available in the Sampler plug-in; One Shot, AHD and ADSR. Each Envelope will affect the playback and behavior of the sample.
One-shot
One-shot operates like a typical vintage drum machine; the sample is played in its entirety from beginning to end, with no envelope. When this type is selected, no parameters are displayed.

The One-shot Envelope.
AHD
AHD disables the Sustain and Release controls of the ADSR envelope and replaces them with the Hold parameter. AHD mode is ideal for triggering a sample for a certain amount of time, regardless of how long the pad is held.

The AHD Envelope.
ATTACK: Attack determines how quickly the sample reaches full volume after being triggered.
HOLD: Hold determines how long the envelope will stay at its maximum level.
DECAY: Decay is used to adjust how fast the sample takes to fade to out.
ADSR
The ADSR Envelope is generally used for longer, sustained samples that require complex dynamic control.

The ADSR Envelope.
ATTACK: Attack determines how quickly the sample reaches full volume after being triggered.
DECAY: Decay determines how fast the envelope drops to the Sustain level.
SUSTAIN: Sustain determines the constant level being kept after Decay until the note ends.
RELEASE: Release determines how long the sound takes to fade out after the note has ended.
Sampler Plug-In and Audio Plug-In Use Cases
The Sampler plug-in and the Audio plug-in have different use cases and provide different parameters for adjustments:
With the Sampler plug-in you can define the start point and end point of the loaded sample, and modify the shape and timing. For more information on the parameters of the Sampler plug-in, refer to Sampler Plug-In.
The Audio plug-in specializes in keeping audio loops playing in-sync with the sequencer in your host software and has the optional ability to do so without influencing the key of the loop. Furthermore, you can transpose the loop while it plays so that it fits the key of your song. For more information on the parameters of the Audio plug-in, refer to Audio Plug-In.
Loading One-shot Samples and Loops
When you load a sample of the content type One-shot from the Browser, the sample will be automatically loaded into the Sampler plug-in. When you load a sample of the content type Loop from the Browser, the sample will be automatically loaded into the Audio plug-in. However, once the Sampler plug-in or the Audio plug-in are opened, you can load loops and one-shot samples into either of them.
To load a loop or one-shot sample from the Browser:
Select the first Plug-in slot in the Plug-in chain.
Select the content type Loop or One-shot sample in the Browser.
Refine your search using Sound Type and Character tags.
Double-click the loop or one-shot sample in the Results list.
The loop or one-shot sample is loaded in the corresponding plug-in. You can now play and edit it using the parameters.
Note
It is not possible to save Presets for the Audio plug-in. The Save and Save As… entries in the Komplete Kontrol menu are grayed out when the Audio plug-in is opened.
Opening the Audio Plug-In or Sampler Plug-In
You can open an empty Audio plug-in or Sampler plug-in using the Komplete Kontrol menu in the header. This enables you to load samples of each content type into the Audio plug-in or Sampler plug-in.
To open the Audio plug-in or Sampler empty:
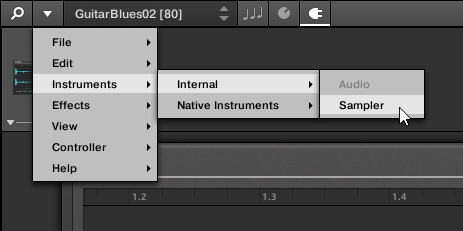
Open the Komplete Kontrol menu in the header.
Select Instruments > Internal > Audio to open the Audio-plug-in, or select Instruments > Internal > Sampler to open the Sampler plug-in.

The Audio plug-in or Sampler plug-in has opened. It uses the first Plug-in slot in the Plug-in chain. You can now load loops or One-shot samples from the Browser via drag and drop.
Switching between the Audio Plug-In and the Sampler Plug-In
When you intend to use the loaded loop in the Audio plug-in with the Sampler plug-in instead, you can switch from Audio plug-in to Sampler plug-in. Switching from Audio plug-in to Sampler plug-in retains the loaded loop and vice versa.
To switch from the Audio plug-in to the Sampler plug-in or vice versa:
Select the first Plug-in slot in the Plug-in chain.
Open the Komplete Kontrol menu in the header and select Instruments > Internal > Sampler, or Instruments > Internal > Audio.
The Audio plug-in has switched to Sampler plug-in. The loop retains loaded.
Playback Behavior of Audio Plug-In in Host Software
When you start playback in your host software, the loop will be triggered and play continuously. However, the loop will only be audible in locations where you placed notes in the host sequencer. Furthermore, when you use the playback engine mode Stretch, the pitch of the loop will be transposed based on the pitch of the note used. For example, note C3 will play the sample at its original pitch, while C4 will play the sample at one octave higher.
You can also play loops with the keyboard in your host software:
When the transport is not running, you can trigger the loop by pressing a key.
When the transport is running and you press a key, a gate will open at the positions where notes are placed in the host sequencer.
For more information on playback engine mode, refer to Audio Plug-In.