Audio routing, remote control, and Macro Controls
Maschine comprises a very flexible and powerful routing system. Learn about creative audio routing, sending and receiving MIDI, and creating powerful Macro Controls.
This chapter describes a few important topics and features of Maschine’s routing and assignment system. Understanding these will be of great help in numerous Maschine workflows:
We will explain how Maschine’s audio routing works and how to take advantage of its flexibility: Audio routing in Maschine.
We will describe how to route MIDI signals to and from your Sounds and Groups, and how to control Maschine parameters via MIDI and host automation: Using MIDI control and host automation.
We will show how to use the powerful Macro Controls to greatly improve your live experience by putting the desired parameters at your fingertips: Creating custom sets of parameters with the Macro Controls.
The Channel properties
Most of routing and assignment features can be accessed via the Channel properties. Channel properties are global settings that apply to a particular Sound, Group, or to the Master independently of which Plug-ins are loaded in it.
Channel properties are organized into four sets. Similar sets of properties are available for all channels (Sounds, Groups, and Master): Input properties (unavailable for the Master), Output properties, Groove properties, and Macro properties.
You can access Channel properties and their parameters via the same procedure as for Plug-ins, both in the software and from your controller. Please refer to section Navigating Channel properties, Plug-ins, and Parameter pages for a detailed description.
The Input properties, Output properties, and Macro properties are covered in the following sections. For more information on the Groove properties, please refer to section Groove.
Audio routing in Maschine
Maschine offers a powerful audio routing system that you can finely customize to fit your specific needs.
To make it short, by default the various channels of Maschine are structured in a simple, hierarchical way:
At the bottom level, each Sound has its own audio channel. The output of the Sound’s channel is sent to its parent Group.
At the mid-level, each Group has its own audio channel, which sums all channels of the included Sounds. The output of the Group’s channel is sent to the Master.
At the top level, the Master has its own channel, which sums the channels of all Groups and ends up at the main output of Maschine. The output of the Master’s channel is sent to your amplification system (in stand-alone mode) or to your host application (in plug-in mode).
This default routing configuration can be customized in numerous ways. Using the audio settings available in the Input and Output properties of each Sound, each Group, and the Master, you can build complex routings that cover a wide range of situations, as you will see in the next sections:
Feed external audio into the input of your Sounds: Sending external audio to Sounds.
Adjust the main output of your Sounds and Groups, and route it to various destinations: Configuring the main output of Sounds and Groups.
Send auxiliary outputs of your Sounds and Groups to other destinations: Setting up auxiliary outputs for Sounds and Groups.
Choose the destination and settings for the Master output (Maschine’s main output) as well as for the Cue bus used for pre-listening: Configuring the Master and Cue outputs of Maschine.
Mix view or arrange View?
When it comes to adjusting audio and MIDI routings, the Mix view can sometimes be the most efficient view to use: The familiar mixing desk layout allows you to quickly find the parameters you are looking for and adjust the routing on the fly. Hence, in the following sections we describe the procedures in both Arrange view and Mix view. For more details on the Mix view, refer to Controlling your mix.
You will also find useful examples of the various routings described here in Using effects.
Sending external audio to Sounds
Each Sound can be configured to receive external audio signals. These audio signals can be coming from the following sources:
Outside Maschine (from your audio interface if Maschine is used in stand-alone mode, or from your host if Maschine is used in plug-in mode).
Additional outputs of multiple-output Plug-ins that might be loaded somewhere else in your Project.
Each Sound can use one external mono or stereo input. The same external signal can be fed into any number of Sounds.
For example, this allows you to have an external audio signal processed by the Plug-ins loaded in a Sound, and more generally, to integrate external audio signals into the Maschine routing and processing system. See also section Applying effects to external audio for an example of use and step-by-step instructions.
Configuring external audio inputs for a Sound is done on the Audio page of the Sound’s Input properties.
Notice
The Audio page of the Input properties is available for Sounds only.
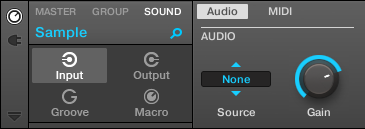
The Audio page of the Input properties for a Sound in the software.
Notice
Refer to Navigating Channel properties, Plug-ins, and Parameter pages to know how to access the Audio page of the Input properties.
Control | Description |
|---|---|
Audio section | |
Source | Selects an external audio input to be routed to the Sound. The available entries are None (no external input), the 16 stereo inputs In 1 L+R – In 16 L+R of Maschine, the 32 corresponding left or right mono inputs, as well as any additional outputs of multiple-output Plug-ins loaded in other Sounds of the same Group. |
Gain | Adjusts the gain of the incoming signal. |
If Maschine is running as a stand-alone application, the external stereo inputs In 1–8 available in the Source selector of the Audio section will correspond to the physical inputs of your audio interface that you have selected in the Audio page of the Preferences panel. Refer to Preferences – Audio page for more information.
If Maschine is running as a plug-in in a DAW, the external stereo inputs In 1–8 available in the Source selector of the Audio section will correspond to virtual inputs in your DAW. This allows you to send mixer channels from your DAW to individual Sounds within Maschine, for example. Refer to your DAW documentation to know how to route signals to the virtual audio inputs of the Maschine plug-in.
Configuring external audio inputs for Sounds in Mix view
You can also easily send external audio to Sounds in Maschine’s Mixer:
Click the Mix View button on the left of the Arranger to switch from Arrange view to Mix view:

Open the extended view of the Mixer by clicking the down-pointing arrow on the left of the Mixer:

Check that the IO button is active on the left of the Mixer — if not, click it to enable it and display the input/output settings of each channel strip.
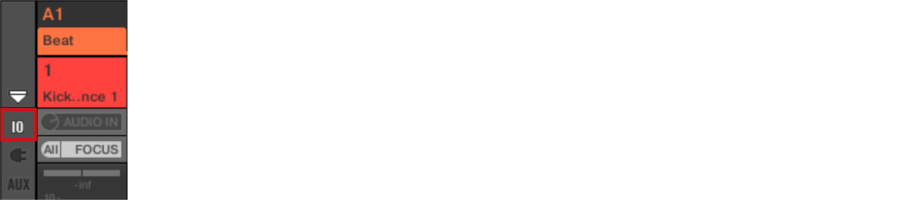
If the Mixer currently displays the Group channels, in the top row of the Mixer double-click the header of the Group containing the Sound you want to configure. If the Mixer currently displays the Sound channels, single-click the header of the desired Group.

The Mixer displays the channel strips of all Sounds in the selected Group.
At the top of the channel strip of the Sound you want to configure, click the first field under the Sound name and select the desired external input in the menu.
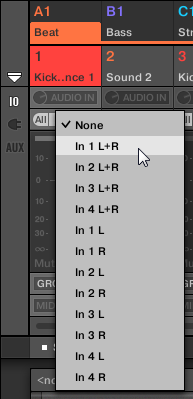
This is equivalent to setting the Source parameter described above.
Turn the little knob on its left to adjust the input gain.

This is equivalent to setting the Gain parameter described above.
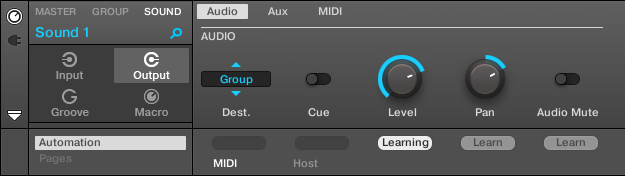
Configuring the main output of Sounds and Groups
By default the outputs of all Sounds in a Group are sent to this Group, where they are mixed together and processed by the Plug-ins loaded in the Group, if any. Similarly, by default the outputs of all Groups are sent to the Master, where they are mixed together and processed by the Plug-ins loaded in the Master, if any.
This default behavior can be customized to your liking: You can adjust the level and panoramic position of the channel output, or send it to the Cue bus for pre-listening. Furthermore, you can send individual Sounds or whole Groups to another pair of outputs on your audio interface in order to process them separately at a later stage. The output routing configuration is done on the Audio page of the Output properties for Sounds and Groups.
Notice
We describe here the Audio page of the Output properties for Sounds and Groups only. The equivalent page for the Master is described in Configuring the Master and Cue outputs of Maschine.
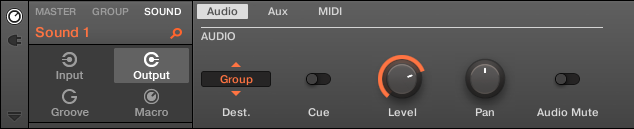
The Audio page of the Output properties (here for a Sound) in the software.
Notice
Refer to Navigating Channel properties, Plug-ins, and Parameter pages to know how to access the Audio page of the Output properties.
Control | Description |
|---|---|
Audio section | |
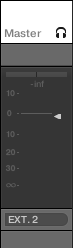
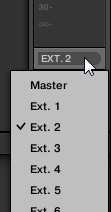
Dest. | Selects where you want to send the main audio output of your channel.
The available bussing points are labeled as described below. |
Cue | When Cue is activated, the main output of the channel is sent to the Cue bus instead of its normal target (defined in Dest., refer to above). For example, this is very useful to pre-listen a channel before you mix it in your performance. See also section Using the Cue bus for more information. Note that when Cue is activated, the channel’s Aux 1 and Aux 2 outputs are muted as well — but they are not sent to the Cue bus (refer to Setting up auxiliary outputs for Sounds and Groups). |
Level | Adjusts the overall volume level of the channel. |
Pan | Defines the pan position of the channel in the stereo field. |
Audio Mute (Sounds only) | If you enable Audio Mute, muting this Sound will not only bypass its events but also mute its audio output, thereby muting any audio tails from notes already played. See section Mute and Solo for more information. |
If Maschine is running as a stand-alone application, the external stereo outputs Ext. 1–16 available in the Dest. selector of the Audio section will correspond to the physical outputs of your audio interface that you have selected in the Audio page of the Preferences panel. Refer to Preferences – Audio page for more information.
If Maschine is running as a plug-in in a DAW, the external stereo outputs Ext. 1–16 available in the Dest. selector of the Audio section will correspond to virtual outputs in your DAW. This allows you to send individual Sounds or Groups from Maschine to their own mixer channels within your DAW, for example. Refer to your DAW documentation to know how to route signals from the virtual audio outputs of the Maschine plug-in.
Labels for bussing points in the Dest. selector
The various bussing points available in the Dest. selector (see table above) are labeled differently in the drop-down menu and in the display of the selector:
In the drop-down menu they are labeled as follows:
For Groups: [Group name] (e.g., Drums).
For Sounds: [Group name]: [Sound name]-[input number] (e.g., Drums: Kick-1).
In the selector display they are labeled as follows:
For Groups: [Group letter+number] (e.g., A2).
For Sounds: [Group letter+number]:S[Sound number]-[input number] (e.g., A2:S4-1 for the first input of the Sound 4 of Group A2).
Setting up auxiliary outputs for Sounds and Groups
Each Sound or Group of your Project provides two auxiliary outputs that you can route to additional targets. For example, you can send a definable amount of the channel’s audio output to other channels for further processing. This is notably used in send effects (refer to Creating a send effect to learn how to set up a classic send effect).
The auxiliary outputs of a Sound/Group are configured on the Aux page of the Output properties.
Notice
There is no Aux page in the Output properties of the Master.

The Aux page of the Output properties (here for a Group) in the software.
Notice
Refer to section Navigating Channel properties, Plug-ins, and Parameter pages to know how to access the Aux page of the Output properties.
Control | Description |
|---|---|
Aux 1 / Aux 2 section | |
Dest. | Selects where you want to send the Aux 1 or Aux 2 output of your channel. The available options are the same as for the Dest. selector of the Audio page (see Configuring the main output of Sounds and Groups), except that for Aux 1 and Aux 2 the default destination is None, in other terms there are no auxiliary sends defined by default. |
Level | Adjusts the level of the signal sent to the Aux 1 or Aux 2 output. |
Order | If Order is set to Pre, the channel will be fed into Aux 1 or Aux 2 before the Level and Pan settings in the Audio section of the Audio page are applied. If Order is set to Post (default setting), the Level and Pan settings of the main output also affect the signals sent to the auxiliary outputs. |
If Maschine is running as a stand-alone application, the external stereo outputs Ext. 1–16 available in the Dest. selector of the Aux 1 and Aux 2 sections will correspond to the physical outputs of your audio interface that you have selected in the Audio page of the Preferences panel. Refer to Preferences – Audio page for more information.
If Maschine is running as a plug-in in a DAW, the external stereo outputs Ext. 1–16 available in the Dest. selector of the Aux 1 and Aux 2 sections will correspond to virtual outputs in your DAW. This allows you to send auxiliary outputs of individual Sounds or Groups from Maschine to their own mixer channels within your DAW, for example. Please refer to your DAW documentation to know how to route signals from the virtual audio outputs of the Maschine plug-in.
Setting up the auxiliary outputs for Sounds and Groups in Mix view
You can also easily set up auxiliary outputs for your Sounds and Groups in Maschine’s Mixer:
Click the Mix View button on the left of the Arranger to switch from Arrange view to Mix view:
Open the extended view of the Mixer by clicking the down-pointing arrow on the left of the Mixer:
Check that the AUX button is active on the left of the Mixer — if not, click it to enable it and display the settings for the auxiliary outputs of each channel strip.
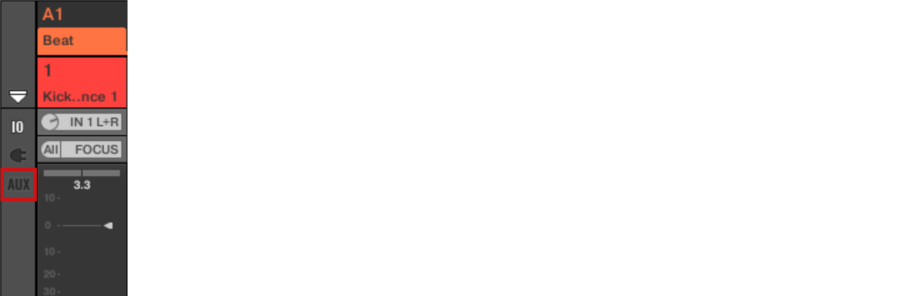
Navigate to the channel of which you want to configure an auxiliary output: for a Sound click the header of its parent Group (or double-click it if the Mixer currently displays the Group channel strips), and for a Group simply ensure that its channel strip is visible (double-click the Group header if the Mixer currently displays the Sound channel strips).
In the channel strip of the desired Sound or Group, click the AUX 1 or AUX 2 label (default labels) at the bottom of the strip and select the desired destination in the menu.
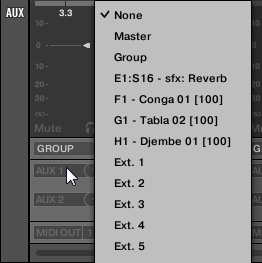
This is equivalent to setting the Dest. parameter described above.
Adjust the level for that auxiliary output via the little knob at the right of the menu.

This is equivalent to setting the Level parameter described above.
Set the pre/post state of the auxiliary output by clicking the Post (or Pre) label right under the menu.

This is equivalent to setting the Order parameter described above.
Configuring the Master and Cue outputs of Maschine
All channels routed to the Master are mixed together and processed by the Plug-ins loaded in the Master, if any. The result is then sent to the Master output, that is, Maschine’s main output.
Besides, all channels currently routed to the Cue bus for pre-listening are mixed together and sent to the Cue output.
Notice
For more information on the Cue bus, refer to section Using the Cue bus.
You can choose to which outputs (on your audio interface or in your DAW) both the Master and the Cue outputs should be sent, and adjust their respective levels and panoramic positions. This is done on the Audio page of the Output properties for the Master.

The Audio page of the Output properties for the Master in the software.
Notice
Refer to section Navigating Channel properties, Plug-ins, and Parameter pages to know how to access the Audio page of the Master’s Output properties.
Control | Description |
|---|---|
Audio section | |
Output | Selects where you want to send the main stereo output of your Maschine Project. The available options are the 16 external stereo outputs Ext. 1–16. |
Level | Adjusts the overall volume level of the master output. This control is the same as the Master Volume slider in the Header, at the top right corner of Maschine’s window. |
Pan | Defines the panoramic position of the master output in the stereo field. |
Cue section | |
Output | Selects where you want to send the Cue bus of your Maschine Project. The available options are the 16 external stereo outputs Ext. 1–16. By selecting a different output from the one used for the main stereo output, you can effectively pre-listen on this additional output (e.g., on your headphones) any channels sent to this Cue bus. To send a channel to the Cue bus, enable the Cue switch in the Audio page of its Output properties (refer to Configuring the main output of Sounds and Groups). |
Level | Adjusts the level of the Cue output. |
Pan | Defines the panoramic position of the Cue output in the stereo field. |
If Maschine is running as a stand-alone application, the external stereo outputs Ext. 1–16 available in the Output selector of the Audio and Cue sections will correspond to the physical outputs of your audio interface that you have selected in the Audio page of the Preferences panel. Refer to Preferences – Audio page for more information.
If Maschine is running as a plug-in in a DAW, the external stereo outputs Ext. 1–16 available in the Output selector of the Audio and Cue sections will correspond to virtual outputs in your DAW. Refer to your DAW documentation to know how to route signals from the virtual audio outputs of the Maschine plug-in.
Configuring the Master and Cue outputs in Mix view
You can also easily configure the Master and Cue outputs of Maschine in the Mixer. Both share the same channel strip at the far right of the Mixer.
To display the Master/Cue channel strip, do the following:
Click the Mix View button on the left of the Arranger to switch from Arrange view to Mix view:
Open the extended view of the Mixer by clicking the down-pointing arrow on the left of the Mixer:
Click the background of the last header in the top right corner of the Mixer.

The Master/Cue channel strip appears underneath.
In this Master/Cue channel strip, do the following to configure the output of the Master channel:
Click Master in the strip’s header to show the controls for the Master channel.

To adjust the level and panoramic position of the main output, use the channel’s fader and balance control (above the fader), respectively.
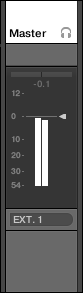
This is equivalent to setting the Level or Pan parameters in the Audio section of the Master’s Output properties, respectively (refer to above).
To select another destination for the Master output, click the first area under the level meter and select the desired destination in the menu.
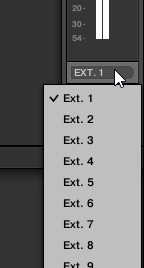
This is equivalent to setting the Output parameter in the Audio section of the Master’s Output properties (refer to above).
In this Master/Cue channel strip, do the following to configure the output of the Cue channel:
Click the headphone icon in the strip’s header to show the controls for the Cue channel.

To adjust the level and panoramic position of the Cue output, use the channel’s fader and balance control (above the fader), respectively.
This is equivalent to setting the Level or Pan parameters in the Cue section of the Master’s Output properties, respectively (refer to above).
To select another destination for the Cue output, click the first area under the level meter and select the desired destination in the menu.
This is equivalent to setting the Output parameter in the Cue section of the Master’s Output properties (refer to above).
Using MIDI control and host automation
Maschine provides you with flexible MIDI remote control and host automation facilities that can be used in many situations.
Incoming MIDI and host automation
Maschine’s Master, Groups and Sounds can be controlled via MIDI and from the DAW (when Maschine is running as a plug-in), both globally and individually:
By default, all MIDI data incoming on the activated MIDI input port(s) will be received by the focused Sound of the focused Group. See Preferences – MIDI page to find information on how to enable/disable MIDI input ports in Maschine.
Triggering Sounds via MIDI notes: By default, incoming MIDI notes will trigger the focused Sound. You can change this default behavior and map incoming MIDI notes differently in order to adapt Maschine to your requirements. The appropriate MIDI settings can be configured in the MIDI page of the Input properties, both for individual Sounds and for entire Groups. These are described in section Triggering Sounds via MIDI notes.
Controlling parameters via MIDI messages and host automation: You can control parameters of Channel properties and Plug-ins in your channels (Sounds, Groups, and Master) via MIDI messages and host automation (when Maschine is running as a plug-in). This is described in section Controlling parameters via MIDI and host automation.
Switching Plug-in Patches via MIDI Program Change messages: You can use MIDI Program Change messages to recall particular patches (or programs, presets, etc.) for Native Instruments and External Plug-ins loaded at the Sound level. This is described in section Selecting VST/AU plug-in presets via MIDI Program Change.
Notice
When Maschine is running as a plug-in in a host, you can also trigger your Scenes and Sections using MIDI notes or MIDI Program Change messages. Refer to section Triggering Sections or Scenes via MIDI for more information.
Outgoing MIDI
You can also sending MIDI data from Sounds. For example, when Maschine is running as a plug-in in a DAW, this allows you to record your performance on the pads as a MIDI pattern in your DAW. This is described in Sending MIDI from Sounds.
Triggering Sounds via MIDI notes
Maschine allows you play your Sound(s) via MIDI (for example, from a MIDI keyboard).
By default and without any configuration, incoming MIDI notes on any MIDI port and any MIDI channel will trigger different pitches of the Sound slot currently under focus.
To play one or more Sounds via MIDI notes independently of the Sound currently under focus, you need to configure the MIDI input settings of your Sound(s) or of their Group, i.e. define how the Sound(s) or the Group should react to incoming MIDI notes. This is done in the MIDI page of the Group or the Sound Input properties.
Notice
There is no MIDI page in the Input properties of the Master.
When configuring these MIDI input settings, keep in mind the following:
MIDI input settings for a Group affect all Sounds in the Group: Each Sound will be triggered by a different MIDI note. Typically, this allows you to quickly set up a MIDI remote control for an entire drum kit.
MIDI input settings for a Sound affect only that Sound: Incoming MIDI notes will trigger different notes of this Sound. Typically, this allows you to control a melodic instrument via MIDI. More precisely, the incoming MIDI notes will be routed to the first Plug-in slot of the Sound.
Tip
If the Sound has no Plug-ins, incoming MIDI notes will be forwarded to the Sound’s MIDI output, if activated (refer to Sending MIDI from Sounds).
MIDI input settings of a Sound and its parent Group are merged: For example, if you configure a Group to react to incoming notes on MIDI channel 1, but one Sound is setup to react to incoming notes on MIDI channel 2, then this Sound will react to one incoming note on MIDI channel 1 and all incoming notes on channel 2.
The MIDI input settings described here also affect other Maschine features:
The preset selection via MIDI Program Change for Native Instruments and External Plug-ins. See section Selecting VST/AU plug-in presets via MIDI Program Change for more information.
The way MIDI files are imported to Sounds and Groups. See section Importing MIDI to Patterns for more information.
The way the MIDI dragger in the Pattern editor places Sounds when they are dragged to host software.
MIDI automation (i.e. controlling Maschine parameters via MIDI) is not affected by the settings described here. For more information on MIDI automation, please refer to section Controlling parameters via MIDI and host automation.
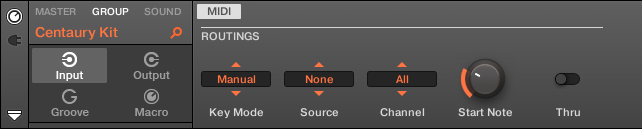
The MIDI page of the Input properties (here for a Group) in the software.
Notice
Please refer to section Navigating Channel properties, Plug-ins, and Parameter pages to know how to access the MIDI page of the Input properties in the software and from your controller.
The MIDI input settings for Sounds and Groups provide following parameters:
Control | Description |
|---|---|
MIDI ROUTING Section | |
Key Mode (Group mode only) | Enables the MIDI note input for the selected Group (deactivated by default). Please refer to your host documentation to find out how to route MIDI signals to your Maschine plug-in. Key Mode offers the following options: Off: Select this option to disable MIDI note input for the selected Group. Drumkit: Select this option to conveniently configure the MIDI note input for the selected Group and place each Sound on a specific key chromatically across the keyboard starting from C2 upwards. If nothing is loaded on a Sound nothing can be triggered, and if you use a Native Instruments Komplete Kontrol S-series keyboard the Light Guide will remain white to indicate that nothing loaded. Additionally, Komplete Kontrol S-series keyboards have a dedicated KEY MODE button to quickly active the Drumkit option for the selected Group in Maschine. By selecting Drumkit you also affect how MIDI is exported from Maschine to another host sequencer when using the MIDI dragger in the Pattern editor, for more information on the how to drag and drop MIDI from your Patterns to your desktop or host software please read: Importing/exporting audio and MIDI to/from Patterns. Manual: This option allows you to configure the MIDI note input based on your own preferences, including the Source, Channel, Start Note and Thru settings. |
Source (stand-alone and in Manual mode only) | Select the MIDI port on which the Sound or Group will receive MIDI notes. Available entries are None (MIDI note input deactivated, default setting), All (MIDI notes are received on all activated input ports), and each activated MIDI input port. You can enable the desired MIDI input ports of your MIDI interfaces in the MIDI page of the Audio and MIDI Settings panel (refer to Preferences – MIDI page). Note that when None is selected for both a Sound and its parent Group, if the Sound is focused it will receive MIDI notes from all MIDI ports and on all MIDI channels. |
Channel (Manual mode only) | Select the MIDI channel on which the Sound or Group will receive MIDI notes. If you select All (default setting), the Sound or Group will receive MIDI notes from all channels. The Channel parameter of a Sound is also used when importing a multi-channel MIDI file to its Group — see section Importing MIDI to Patterns for more on this. |
Start Note (Manual mode only) | Define the MIDI root note for that Group (C1 by default). The MIDI root note and the upper 15 MIDI notes (from [Root Note] until [Root Note + 15]) will trigger the root note of Sound slot 1–16, respectively. Incoming MIDI notes outside this range will be ignored by the Group. The Start Note parameter is also used when importing a single-channel MIDI file to the Group — see section Importing MIDI to Patterns for more on this. |
Thru (Manual mode only) | Switch this parameter on to send incoming events through to the MIDI outputs. This can be useful if you want to record notes played from Maschine into your host sequencer, and then play them back from there, using Maschine as the sound source. Switch this parameter off to stop incoming events from being routed to the outputs. |
Tip
Some of these parameters also affect MIDI file import: The Channel parameter of a Sound will be used when importing a multi-channel MIDI file to its Group, while the Root Note parameter will be used when importing a single-channel MIDI file to the Group. For more information on MIDI file import please refer to section Importing MIDI to Patterns.
Notice
If Maschine is running as a plug-in in a host and you have configured your Scenes to be triggered via MIDI notes, the Scene trigger has priority over any Sound trigger set to the same MIDI channel. To configure MIDI control for Scenes, please refer to section Triggering Sections or Scenes via MIDI.
Configuring MIDI note input for Sounds and Groups in Mix view
You can also easily configure the MIDI note input of your Sounds and Groups in Maschine’s Mixer:
Click the Mix View button on the left of the Arranger to switch from Arrange view to Mix view:
Open the extended view of the Mixer by clicking the down-pointing arrow on the left of the Mixer:
Check that the IO button is active on the left of the Mixer — if not, click it to enable it and display the input/output settings of each channel strip.

Above the fader area in the channel strip of the Sound or Group you want to configure, click the bigger field on the right (labeled MIDI IN by default) and select the desired MIDI port in the menu.

This is equivalent to setting the Source parameter described above.If Maschine is running as a plug-in you see a MIDI IN button instead. Click it to enable the MIDI input from the host.
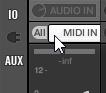
This is equivalent to enabling the Active button described above.
Click the little field on its left to select a MIDI channel.
This is equivalent to the Channel parameter described above.
Triggering Scenes via MIDI
The Maschine hardware SCENE mode can be configured to send out MIDI (Notes/Program Changes) which can be used to trigger scenes. When Maschine runs as a Plug-in this MIDI data is sent to the host application. When Maschine runs as a stand-alone application this MIDI data is sent out to all activated MIDI output devices.
MIDI Scene Change program change messages can be used to record a Scene performance to a host application, and all recorded Scene performances can be then be saved within your host and sent back to Maschine for playback and trigger Scenes in the recorded order.
Sending MIDI Scene Change Messages
To enable or disable the MIDI Scene Change feature, do the following:
Click Edit > MIDI Change.
This opens the following dialog:
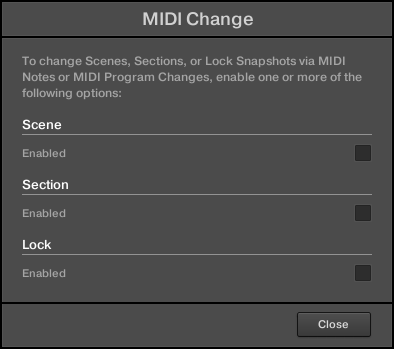
Click Scene Enabled from the dialog.
In the submenu that opens, select the source you want to use for changing the MIDI Program Change messages. A list of connected controller names appear in the drop-down menu, or you can select None to disable the feature.
Then from the drop-down menu select MIDI Note to trigger your Scenes via MIDI notes, or Program Change to trigger your Scenes via MIDI Program Change messages.
If necessary, reopen the same submenu and select the MIDI channel the Scene changes should receive MIDI messages from (channel 1 by default).
Notice
MIDI Scene change has priority over Lock change. If you select the same MIDI Source and Channel for Lock and Scene changes, only Scenes will be triggered by the corresponding events coming from the MIDI source. Corresponding Lock snapshots will not be recalled.
Controlling parameters via MIDI and host automation
You can assign many parameters of the Channel properties and Plug-ins of your Sounds, your Groups, and your Master to MIDI messages in order to control and automate them via MIDI.
In addition, when Maschine is running as a plug-in, you can assign these parameters to automation IDs in order to control and automate them via host automation tracks in your DAW.
Notice
Configuring MIDI and host automation is possible in the software only.
In Maschine, automation means the control of Maschine parameters from an external source (MIDI or host application). Value changes are:
Permanent: The new parameter value stays valid until a new value is defined (via MIDI/host or manually), even when the playback is looped or restarted.
Absolute: The new parameter value is defined regardless of its current value.
Automation vs. Modulation
Although both deal with automatic change of Maschine parameters, automation and modulation have to be distinguished. The following table summarizes the main differences:
Modulation | Automation | |
|---|---|---|
Source of control | Internal (e.g., changes recorded via Auto-write) | External (e.g., an external MIDI sequencer or an automation track in your host) |
Duration of the change | Temporary (until the end of the Clip) | Permanent |
Target parameters | At the Sound and Group levels only | At all levels (Sound, Group, and Master) |
Nature of the change (continuous parameters only) | Relative (defines a deviation to the non-modulated value) | Absolute (defines a new value regardless of the non-automated value) |
This section describes how to use automation in Maschine — for more information on using modulation, please refer to section Recording and editing modulation.
Please note that modulation and automation are not mutually exclusive: You can modulate a parameter in Maschine and automate it (e.g., from your host) simultaneously! As a result, the parameter value will deviate (according to the recorded modulation) from its moving value defined by the automation.
Using the Automation pane in the Assignment area
MIDI and host control can be configured in the Automation pane of the Assignment area:

The Automation pane of the Assignment area.
Click the down-pointing arrow in the bottom left corner of the Control area to reveal the Assignment area underneath:
In the left part of the Assignment area, click the Automation tab:

The Automation tab lights up and the Automation pane appears on its right. You are now ready to configure MIDI and host automation for the parameters in the current Parameter page.
Tip
Once the Assignment area is open, when you switch to other Parameter pages the Assignment area follows your selection: it always shows the assignments for the page currently displayed above.
Notice
Maschine 1.x owners: In previous Maschine versions MIDI/host automation was only possible via the Macro Controls. Now MIDI/host automation and Macro Controls are unrelated: MIDI/host automation can be configured directly on parameters, independently of your Macro Control assignments. Macro Controls now specifically serve as shortcuts (or “aliases”) for parameters — see section Creating custom sets of parameters with the Macro Controls for more information.
The Automation pane holds two tabs:
MIDI tab: Click the MIDI tab to assign MIDI messages to automatable parameters. You can then remote control and automate Maschine parameters from any MIDI-capable device or software. Possible MIDI messages are Pitch wheel, Program Change, and MIDI CC 0–127.
Host tab: Click the Host tab to assign automation IDs to automatable parameters if Maschine is running as a plug-in. You can then remote control and automate Maschine parameters from your host application.
Under each automatable parameter of the current Parameter page, the Automation pane shows an Assignment field showing the current assignment for this parameter, if any. If the parameter has no assignment yet, the Assignment field reads Learn (MIDI tab) or Enable (Host tab). If the parameter cannot be automated, its Assignment field is grayed out and inactive (refer to below to know which parameters can be automated).

A MIDI CC assignment for the current Parameter page.

A few host automation assignments for the current Parameter page.
The following paragraphs describe in more details how to assign MIDI controls and host automation IDs to Maschine parameters.
Which Maschine parameters are automatable?
All the automatable parameters are found in Plug-ins or Channel properties (e.g., you cannot automate the Pattern Length or the color of a Scene). In the software in Mix view, this means that all automatable parameters are found in some Parameter page of the Control area.
In order to be automatable, parameters of Plug-ins and Channel properties have to meet one single requirement:
In order to be automatable, a parameter must be controlled by a knob or a button in the software — most parameters controlled by selectors (e.g., for selecting an operating mode or a filter type) cannot be automated.
Almost all parameters meeting this requirement are automatable, the only exceptions being:
Plug-ins:
Saturator: in Tube mode, the Bass Overload button (MAIN section) and Bypass button (EQ section).
Percussion (Drum Synth): in Fractal mode, the Tune Hold button in the Main page.
Channel properties:
Sound’s and Group’s Output properties: the Cue button in the Audio page.
Group’s Input properties: the Root Note knob in the MIDI page.
Master’s Groove properties: the Amount knob and Invert toggle in the Swing page.
Notice
You will notice that the rules for automatable parameters are the same as for modulatable parameters except that modulatable parameters can only be found in Sounds and Groups (not in the Master). In other words, at the Sound and Group level the same parameters are both automatable and modulatable. For more information on modulation please refer to section Recording and editing modulation.
Also note that your Macro Controls will be automatable if, and only if, the parameters they are controlling are themselves automatable. For more information on Macro Controls please refer to section Creating custom sets of parameters with the Macro Controls.
Assigning host automation IDs to parameters (Maschine as plug-in)
Click the down-pointing arrow in the bottom left corner of the Control area to open the Assignment area underneath.
On the left of the Assignment area, click the Automation tab to show the Automation pane, then in this pane click the Host tab.
Click the Enable label in the Assignment field under any unassigned parameter to automatically assign that parameter to the next free automation ID.
The Assignment field displays the automation ID for that parameter. The parameter is ready to be controlled from your host.
Removing an automation ID is also straightforward:
Click the non-empty Assignment field under any assigned parameter to remove the automation ID currently assigned to that parameter.
The previous automation ID is removed from the Assignment field and the parameter is not available anymore for host automation.
Notice
For more information on how to automate VST/AU plug-in parameters from your host, please refer to your host documentation.
Assigning MIDI controls to parameters
Assigning a MIDI control to a parameter in Maschine is done via an intuitive Learn mode:
Click the down-pointing arrow in the bottom left corner of the Control area to open the Assignment area underneath.
On the left of the area, click the Automation tab to show the Automation pane, then in this pane click the MIDI tab.
In this tab, the Assignment fields for automatable parameters read Learn.
Click Learn in the Assignment field of a parameter to enter Learn mode for that parameter.The Assignment field shows a blinking Learning.
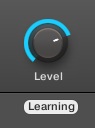
Move the desired control element (knob, button, etc.) on your MIDI controller.
The Assignment field automatically displays the MIDI message type received (CC number, PC for Program Change, or PW for Pitchbend). The parameter is ready to be controlled via MIDI.
Note that the assignments you create will receive MIDI messages on all channels of all activated MIDI ports.
Notice
For the Learn mode and the resulting MIDI control to work, MIDI must be correctly configured in Maschine. If Maschine is running as stand-alone application this is done in the MIDI page of the Preferences panel — for more details please refer to section Preferences – MIDI page. If Maschine is running as a plug-in in a host application the MIDI configuration is done in the host — see section Stand-alone and plug-in operation.
If there is already a MIDI assignment for the parameter, the new MIDI assignment will replace the previous one. If you change your mind and don’t want to assign any new MIDI control, while Learn is blinking click the Assignment field again or press [Esc] on your computer keyboard.
Notice
You cannot assign the same MIDI control to more than one parameter in Maschine: If a MIDI control is already assigned to a parameter, when you assign it to another parameter its first assignment is automatically deleted.
If you want to simply remove a MIDI assignment without recording a new one, do the following:
Right-click ([Ctrl]-click on macOS) the non-empty Assignment field under a parameter and select Unlearn in the menu to remove the MIDI assignment for that parameter.
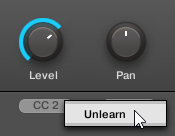
The MIDI assignment is removed from the Assignment field and the parameter is not controllable via MIDI anymore.
Of course, this procedure also works for Native Instruments and External Plug-ins loaded in Maschine.
Selecting VST/AU plug-in presets via MIDI Program Change
If you have a Native Instruments or third-party VST/AU plug-in loaded in a Sound, you can remotely switch presets (or patches, programs, etc.) in your plug-in via MIDI Program Change messages.
For this to work, your plug-in must expose its presets or a particular set of presets to the host (here Maschine). Each VST/AU instrument or effect might handle its presets (or patches, programs…) differently. Please refer to the plug-in documentation to know how to make its presets available to the host.
Tip
For example, in Massive, ABSYNTH 5, and FM8, you need to enable the Program List and fill it up with the desired patches in order to expose these to Maschine and switch between them via MIDI Program Change messages.
The Native Instruments or third-party VST/AU plug-in will listen to Program Change messages according to the Source and Channel settings you have defined on the MIDI page of the Input properties for the respective Sound — this page is described in detail in section Triggering Sounds via MIDI notes above.
Sending MIDI from Sounds
Your Sounds can output MIDI notes and automation data to the outside world, allowing you to control any MIDI-capable application and/or external MIDI gear from Maschine’s sequencer.
With its MIDI output activated, a Sound will send:
MIDI notes corresponding to the notes played by that Sound in the current Pattern.
MIDI notes corresponding to your hits on the pads.
All events of the MIDI tracks you might have created in the MIDI Automation pane of the Control Lane, at the bottom of the Pattern Editor. See section Creating MIDI tracks from scratch in Maschine for more on this.
Tip
A Sound without any Plug-in loaded can still send the MIDI data listed above! Furthermore, if the Sound has no Plug-in it will forward any incoming MIDI notes to its MIDI output. To know how to configure the MIDI note input of Sounds, please refer to section Triggering Sounds via MIDI notes.
The MIDI output of Sounds is configured on the MIDI page of their Output properties.
Notice
The MIDI page of the Output properties is available for Sounds only.
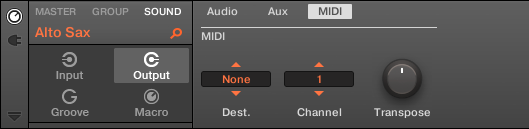
The MIDI page of the Output properties for a Sound in the software.
Notice
Refer to section Navigating Channel properties, Plug-ins, and Parameter pages to know how to access the MIDI page of the Output properties.
Control | Description |
|---|---|
MIDI section | |
Dest. | Selects the MIDI port on which the Sound will send MIDI data. If Maschine is running in stand-alone mode, available entries are None (MIDI output deactivated, default setting), every activated MIDI output port, as well as any Sound in the same Group containing a Plug-in that can receive MIDI (multitimbral Plug-in). Check the MIDI page of the Preferences panel to enable the desired MIDI output ports on your MIDI interfaces (see Preferences – MIDI page). If Maschine is running as a plug-in in a host application, the entries for the activated MIDI output ports are None (MIDI output deactivated, default setting) and Host. If Host is selected, Maschine will forward the MIDI data from the Sound to the host application. This notably allows you to record what you play on the pads as MIDI files in your host — e.g., for further editing, controlling other instruments, etc. |
Channel | Selects the MIDI channel on which the Sound will send MIDI data. By default Sound slot 1 will send MIDI data on channel 1, Sound slot 2 on channel 2, etc. |
Transpose | Applies an offset to the MIDI note numbers before the notes are sent. Values range from -48 (downward transposition by 48 semitones, i.e. four octaves) to +48 (upward transposition by 48 semitones, i.e. four octaves). The default value is 0. |
Configuring the MIDI output for Sounds in Mix view
You can also easily configure the MIDI output of your Sounds in Maschine’s Mixer:
Click the Mix View button on the left of the Arranger to switch from Arrange view to Mix view:
Open the extended view of the Mixer by clicking the down-pointing arrow on the left of the Mixer:
Check that the IO button is active on the left of the Mixer — if not, click it to enable it and display the input/output settings of each channel strip.
If the Mixer currently displays the Group channels, in the top row of the Mixer double-click the header of the Group containing the Sound you want to configure. If the Mixer currently displays the Sound channels, single-click the header of the desired Group.
The Mixer displays the channel strips of all Sounds in the selected Group.
At the bottom of the channel strip of the Sound you want to configure, click the bigger field left and select the desired MIDI port in the menu.
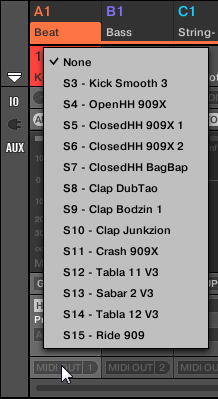
This is equivalent to setting the Dest. parameter described above.
Click the little field on its right to select a MIDI channel.

This is equivalent to the Channel parameter described above.
Creating custom sets of parameters with the Macro Controls
Macro Controls enable you to control in one same location a selection of parameters coming from different sources. Available in every channel (Sounds, Groups, and Master), Macro Controls are very useful for playing live since you can choose a set of parameters from various sources to manipulate on one screen without having to switch screens.
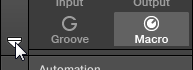
The Macro Controls are available in the Macro properties.

The Macro properties (here for a Sound) in the software.
Notice
Refer to section Navigating Channel properties, Plug-ins, and Parameter pages to know how to access the Macro properties.
Macro Control overview
Each Macro Control can be assigned to one destination with the full range of the selected parameter. On the other hand, the same parameter can be the destination of more than one Macro Control.
To know which parameters you can assign to a Macro Control, consider this single rule:
A Macro Control of a channel can control any parameter located in the properties or Plug-ins of that channel or of any underlying channel. In other words:
For Sounds: You can assign the Macro Controls of a Sound to any parameters in its properties or Plug-ins. It is also possible to assign MIDI Control Change messages, Pitchbend and Program Changes to Macro Controls in order to control external MIDI devices.
For Groups: You can assign the Macro Controls of a Group to any parameters in its properties or Plug-ins as well as any parameters in any Sound inside the Group.
For the Master: You can assign the Macro Controls to any parameters found in the properties or Plug-ins of any channel in your Project.
Notice
The Macro properties themselves (even from a different channel) are not available as targets for any Macro Control.
Tip
Linking the same parameter to more than one Macro Control can be useful in the following example: If a parameter of a Sound is particularly important, you can link it to the same knob in the Macro Controls of that Sound, of its parent Group, and of the Master. By doing this, you ensure that the parameter is always available on the same knob when you switch between the Master, Group, and Sound levels (but not if you switch to another Sound or Group).
Assigning Macro Controls in the software
Macro Controls can be assigned in two different ways in the software. The quickest and easiest way is to create a Macro Control directly from a parameter. The other more elaborate method is to use the Pages pane in the Assignment area.
Assigning Macro Controls from parameters
Assigning a parameter to a Macro from a Channel or Plug-in properties is quick and easy. You can simply right-click ([Ctrl]-click on macOS) a parameter name and select which Macro level you want to assign it to.
To assign a Macro Control directly from a parameter:
Click the Channel or Plug-in icon depending on where the parameter you want to assign is located.
Select the level where the parameter is, this can be on the MASTER, GROUP or SOUND level.
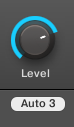
Right-click ([Ctrl]-click on macOS) the name of the parameter (the text below the knob, switch, or menu) you want to assign and select either Create Master Macro, Create Group Macro, or Create Sound Macro depending on the options available, and to which level you want to assign the parameter as a Macro Control.
The parameter is assigned as a Macro and you can see your assignments by selecting Macro in the Channel properties and selecting the Macro level (MASTER, GROUP or SOUND) where you assigned the Macro Control.
You can remove the Macro by using the same procedure:
To remove a Macro, right-click the parameter and select Remove Macro.
The selected Macro is removed.
Assigning Macro Controls using the Pages pane
Assigning Macro Controls is done in the Pages pane of the Assignment area when the Macro properties are selected. The procedure is similar to the procedure used when assigning parameters of VST/AU plug-ins to Parameter pages in Maschine (refer to Setting up your own Parameter pages).
Opening the Pages pane in the Assignment area
First of all, you need to open the Pages pane of the Assignment area for Macro properties. To do this:
Select the Macro properties of the desired channel (Sound, Group, or Master) as described in section Navigating Channel properties, Plug-ins, and Parameter pages.
Click the down-pointing arrow in the bottom left corner of the Control area to reveal the Assignment area underneath:
Click the Pages tab in the left part of the Assignment area:
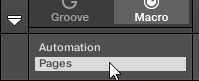
The Pages tab lights up and the Pages pane appears on its right. You are now ready to assign Macro Controls to parameters.
Tip
Once the Assignment area is open, when you switch to other Parameter pages the Assignment area follows your selection: it always shows the assignments for the page currently displayed above.
Notice
The Pages tab can be clicked only for Native Instruments or External Plug-ins, and for the Macro properties. For all Internal Plug-ins and for Channel properties, the parameters and Parameter pages are not editable, and the Pages tab is grayed out and inactive. For more information on how to assign parameters of Native Instruments or External Plug-ins to Parameter pages, refer to Setting up your own Parameter pages.
When the Pages pane of the Assignment area is open, you also notice a few changes in the Control area above.
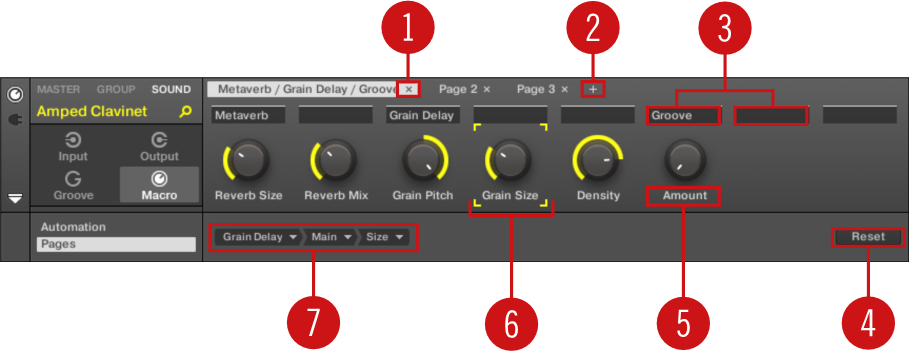
The Control area with Macro Properties displayed and the Pages pane active in the Assignment area underneath.
(1) Delete Page button (“x” symbol): Click the little “x” after a page name to delete this Parameter page.
(2) Add Page button (“+” symbol): Click the little “+” after the last page label to append a new page. By default, pages are labeled “Page 1,” “Page 2,” etc. You can change page labels by defining sections within your pages via the Section Label fields (3).
(3) Section Label fields: These fields allow you to define sections of parameters within the displayed page. Double-click the field above the first parameter you want to include in the section, type the desired name for the section, and press [Enter] to confirm. The new section will include all following parameters until the next section starts (this can be seen only after you have closed the Assignment area). Moreover, the Parameter page will mirror the label(s) of its section(s) — if there are more than one section, the page label will mirror all of them, separated by slashes.
(4) Reset button: Click Reset to remove the Macro Control assignment for the selected knob.
(5) Parameter Label fields: Double-click these fields to enter custom labels for your parameters (press [Enter] to confirm). These labels will be mirrored everywhere in Maschine for the corresponding parameters.
(6) Focus frame: Indicates the Macro Control being assigned. Click any Macro Control to display and edit its assignment in the Target selector below (4).
(7) Target selector: Displays and selects the target parameter of the selected Macro Control indicated by the Focus frame (5). This multi-level drop-down widget allows you to quickly navigate through the structure of the channel to the desired parameter. The detailed procedure is explained in the next paragraph.
Selecting a parameter in the Target selector
The Target selector (see picture above) allows you to choose from all available parameters for each Macro Control.
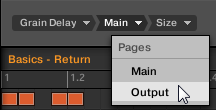
The Target selector allows you to quickly select the desired parameter.
This tool is similar to a menu containing several levels of submenus—with the notable difference that every intermediary selection stays visible for faster switching.
When assigning a new, unassigned Macro Control, do the following:
Click the Select menu (for now the only menu of the Target selector).The menu is organized into subcategories: Settings (listing the properties of the current channel), Slots (listing the Plug-ins loaded in the current channel), and possibly a third category listing the channels included at the next level: if you’re editing the Macro properties of the Master you will see the Groups subcategory listing all Groups of your Project, and if you are editing the Macros of a Group you will see the Sounds subcategory listing all Sounds in that Group, and if you are editing the Macro properties of a Sound you will see the MIDI menu item which upon selection lists all available Control Change messages that can be assigned to a Macro Control.
Tip
The Macro Control menu item Select > MIDI lists the full range of MIDI Control Change messages from 0-127 which can be individually assigned to a Macro Control in order to control parameters on an external MIDI device. If you are unsure which MIDI Control Change message can be used to control a particular parameter, please check the documentation that came with your MIDI device for details.
Upon your selection in the previous menu, the menu takes the name of your selection, and another menu may appear to the right which allows you to refine your search (e.g., by listing all Parameter pages of the selected Plug-in or Channel properties). This continues until a parameter is reached and you select it.
Upon the selection of a parameter, the Macro Control is assigned to this parameter.
Note that the whole path to this parameter stays visible in the Target selector: this lets you modify a single selection without starting from the topmost channel and going through the entire selection process again:
To modify a particular item in the selection shown by the Target selector, click it and select another item for that level.
Items on the left of the selected item (i.e. at a higher level) stay untouched, while items on its right (i.e. at a lower level) are reset.
Macro – context menu
When the Assignment area is opened and the Pages tab is selected, right-clicking an assigned or unassigned Macro slot opens a context menu.
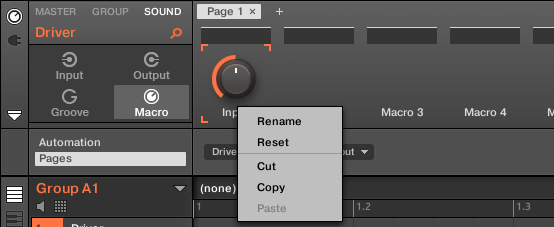
The context menu for Macro properties.
The context menu contains following items:
Menu item | Description | Keyboard shortcut |
|---|---|---|
Rename | Rename the Macro. | Ctrl + R / Cmd + R |
Reset | Reset the Macro. | |
Cut | Cut the Macro to paste it in another position. | Ctrl + X / Cmd + X |
Copy | Copy the Macro. | Ctrl + C / Cmd + C |
Paste | Paste a cut or copied Macro to a new position. | Ctrl + V / Cmd + V |
Assignment area pages – Context Menu
When the Assignment area is opened and the Pages tab is selected, right-clicking a page name opens a context menu.
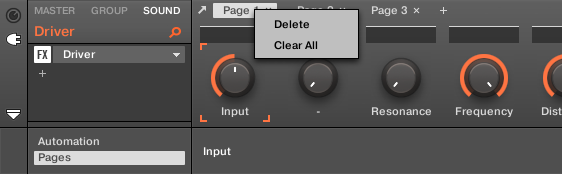
The context menu for pages.
The context menu contains the following items:
Menu item | Description | Keyboard shortcut |
|---|---|---|
Delete | Deletes current page with all assignments. | |
Clear All | Clears all the assignments, and deletes all of the pages. |