Working with the Arranger
Arranging patterns and scenes into a full fledged song can be done via Maschine’s Song view. This chapter guides you through it.
The Arranger is the big area located in the upper part of the Maschine window, right under the Header.
The Maschine Arranger has two different views: Ideas view and Song view, which are also reflected on your controller. Each view has a specific purpose in the workflow of creating a song, but essentially they represent the same content. The Ideas view allows you to experiment with your musical ideas without being tied to a timeline or any kind of arrangement. Here you can create Patterns for each Group and combine them into a Scene. Alternatively, the Song view allows you to structure your song by allowing you to assign the Scenes you created in the Ideas view to Sections on the Timeline, and move them around to quickly create a larger musical structure.
Arranger basics
The Arranger has two different views: Ideas view and Song view. Each view has a specific purpose in the workflow of creating a song, but essentially they represent the same content.
Switching between Ideas view and Song view

The Arranger View button.
The Ideas view
The Ideas view allows you to experiment with your musical ideas without being tied to a timeline or any kind of arrangement. Here you can create Patterns for each Group and combine them into a Scene.
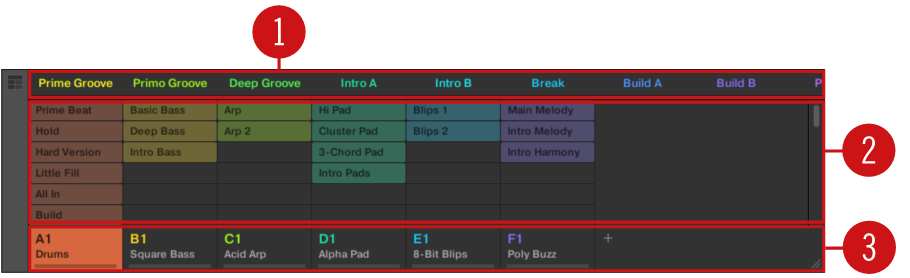
The Ideas view for creating and experimenting with musical ideas free from the Timeline.
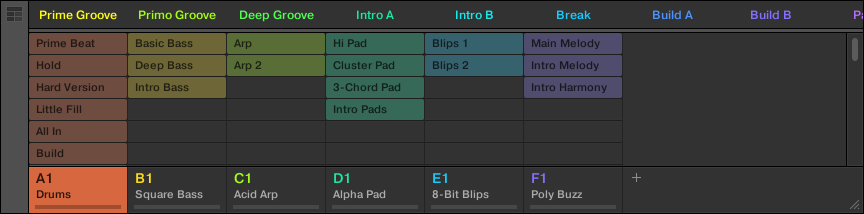
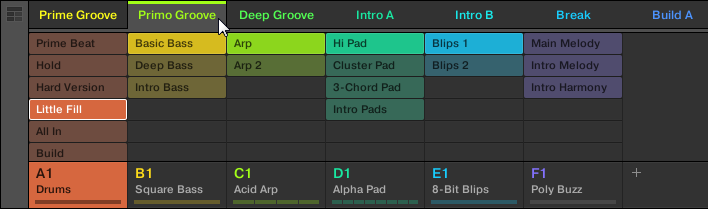
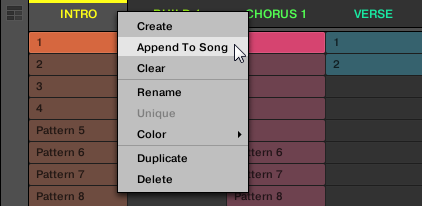
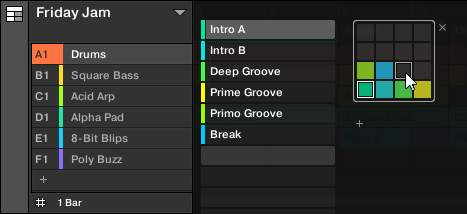
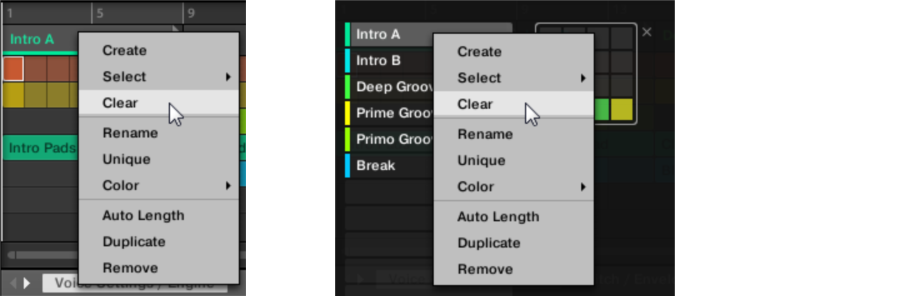
Scenes: This area displays all the current Scenes in your Project. After creating a Scene by clicking the + symbol, you can build the Scene by selecting a Pattern from each Group. By clicking each Scene name (Scene slot) you can switch between Scenes to see how your musical ideas work together. Using your mouse you can right-click ([Ctrl] + click on macOS) on the Scene slot and select to Append to Song from the menu and then arrange your song in the Song view. You can also use the right-click menu to Clear, Duplicate, or Delete Scenes, as well as organize your Scenes by selecting the Rename or Color options.
Pattern area: All Patterns in your Song are represented here. You can double-click a blank slot to create and new Pattern or click an existing Pattern to assign it to the selected Scene. Once assigned, a Pattern will become highlighted, click it again to remove it from the selected Scene. Using your mouse you can right-click ([Ctrl] + click on macOS) on the name of a Pattern and select to Clear, Duplicate, or Delete a Pattern. You can also organize your Patterns by selecting the Rename or Color options.
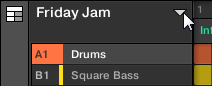
Groups: The Group slots can hold one Group each. Select the desired slot to load a Group into it and display the Group’s content (Sounds, Patterns…) in the Pattern Editor (refer to Pattern Editor) and the Group’s Channel properties and Plug-in parameters in the Control area (refer to Control area). To mute a Group click the Group letter, for example A1, and right-click ([Ctrl] + click on macOS) on the letter to solo the Group. Using your mouse you can also right-click ([Ctrl] + click on macOS) on the name of a Group to access the many options available to manage them.
The Song view
The Song view allows you to structure your song by allowing you to assign the Scenes you created in the Ideas view to Sections, and move them around to quickly create a larger musical structure.
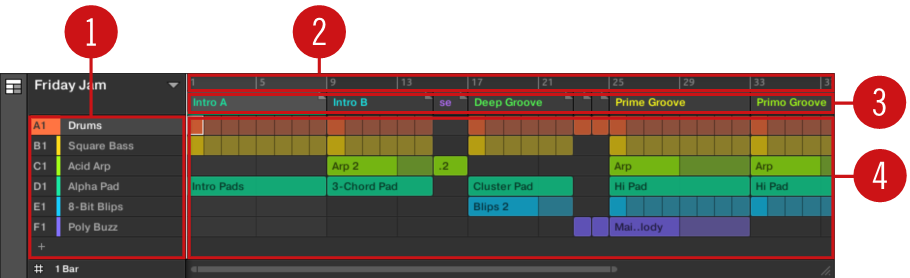
The Song view for organizing your musical ideas into a song on the Timeline.
Groups : The Group slots can hold one Group each. Select the desired slot to load a Group into it and display the Group’s content (Sounds, Patterns…) in the Pattern Editor (refer to Pattern Editor) and the Group’s Channel properties and Plug-in parameters in the Control area (refer to Control area).
Song timeline: This area displays the current position within the track and allows you to set the loop range.
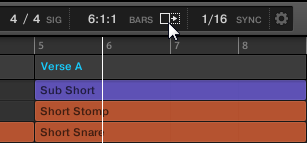
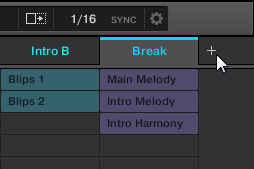
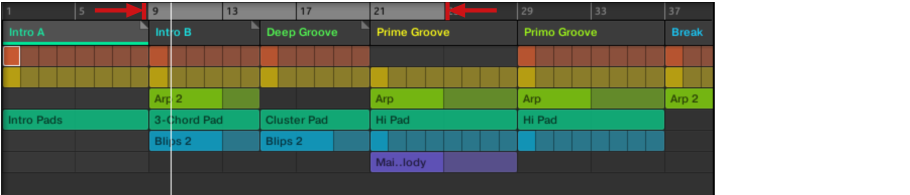
Section slots: This area displays Section slots. A Section is a container for a Scene placed on the Timeline. A Section can be reordered by clicking the name of the Section and dragging and dropping it into place. You can change the length of a Section by dragging the Section end marker to the left to shorten it, or to the right to lengthen it. Using your mouse you can right-click ([Ctrl] + click on macOS) a Section and use Select in the menu to assign a Scene to a Section. It is also possible to use the menu to Insert, Duplicate, Delete, Clear or Remove Sections as well as organize them by selecting the Rename or Color options.
Pattern area: In each Section of the Arrangement, you can see the name of the Scene assigned to the Section along with the Scene's Patterns stacked vertically for each Group in the Project. The Patterns seen here are the same as those seen when viewing the same Scene in the Ideas view.
Navigating the Song view
Navigating the Song view horizontally
Song view can be scrolled and zoomed in or out to fit your current needs.
A zooming scroll bar is available at the bottom of the Arranger in Song view. This tool allows you to scroll and zoom in/out horizontally in the Event area and the Control Lane on the time axis:

The zooming scroll bar at the bottom of Song view in the Arranger.
Use the horizontal zooming scroll bar as follows:
Click the main part (1) of the scroll bar and hold the mouse button, then:
Drag your mouse horizontally to scroll through Song view on the time axis (common scroll bar behavior).
Drag your mouse vertically to zoom in or out of Song view on the time axis.
Click the left handle (2) of the scroll bar, hold the mouse button, and drag your mouse horizontally to zoom in or out of Song view while keeping the right border of the display at a fixed position in the song.
Similarly, click the right handle (3) of the scroll bar, hold the mouse button, and drag your mouse horizontally to zoom in or out of Song view while keeping the left border of the display at a fixed position in the song.
Double-click the main part (1) to reset the zoom and display all of the Sections in your arrangement.
Navigating the Arranger vertically
A classic scroll bar is available right of the Arranger. It allows you to scroll to view hidden Groups if they do not fit in the Arranger.
The classic scroll bar right of the Arranger.
You can also adjust the height of the Arranger in order to display more/less Groups at once by dragging its bottom right corner vertically with your mouse.
Drag the handle to adjust the Arranger’s height.
Following the playback position in your Project
If the Arranger doesn’t display the entire Loop Range, at some point the playhead will go beyond the portion of your Project currently displayed in the Arranger and you might loose track of the playback position. To prevent this, you can force the Arranger to follow the playhead:
Activate the Follow button to keep following the playhead in the Arranger.
To follow the playhead position in the Arranger during playback, click the Follow button in the Maschine Header.
The Follow button lights up in the Maschine Header. The Arranger will now switch to the next portion of your Project (with the same zoom factor) as soon as the playhead reaches the end of the portion currently displayed. This way, you always see the portion of your Project that is currently played.
Notice
The Follow function will be automatically deactivated as soon as you manually scroll in the Arranger or the Pattern Editor (in the software or from your controller).
The Follow function affects both the Pattern Editor and the Arranger simultaneously. For more information, refer to Following the playback position in the Pattern.
Performing with Scenes and Sections using the pads
Maschine provides you with settings to fine-tune the timing of the jump between the Scenes and Sections:
The Perform Grid lets you quantize the Scene transitions: You can choose the point at which the playback will leave the current Scene (Ideas view) or Section (Song view). For example, you might not want a newly selected loop to fire off immediately — you might want it to wait until the next bar line. The available quantization values are: one bar, one half note, one quarter note, one eighth note, one sixteenth note, the whole Scene/Section, and Off. If you choose Off, the Scene/Section change will be performed immediately after you select the next loop.
The Retrigger setting lets you decide where the next loop will start:
If Retrigger is activated, the next Section (Ideas view) or Section (Song view) that is selected will be forced to play from the start. This is useful if you always want your Scenes or Sections to play from the beginning regardless of what’s happening elsewhere in the music.
If Retrigger is deactivated (default setting),the next Scene or Section that is selected will play from the same offset to the beginning: for example, leaving the current Section on beat 3 will cause the new Section to start playing on its beat 3. This ensures that the global groove of your track is not interrupted.
Jumping between Scenes or Sections in the software
In the software, the Perform Grid and the Retrigger setting can be adjusted in the Maschine Header.
In Ideas view the Perform Grid and the Retrigger controls the setting for jump between Scenes and in Song view it sets the grid for the jump between Sections.
To set the Perform Grid and the Retrigger settings:
Click the Arranger View button to access Ideas view for Scenes or Song view for Sections.
When the Arranger View button is illuminated, Song view is active.
To adjust the Perform Grid, click the Performance Grid menu in the Header and select the desired division from the menu:
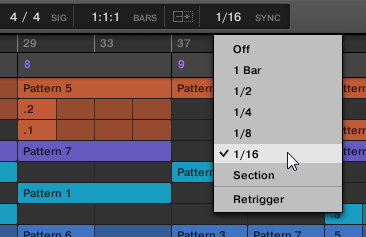
The next time you select a new Scene/Section or group of Scenes/Sections for looping, the switch will happen on the next division selected here.
To enable/disable the Retrigger setting, click the Performance Grid menu in the Header and select Retrigger from the menu.
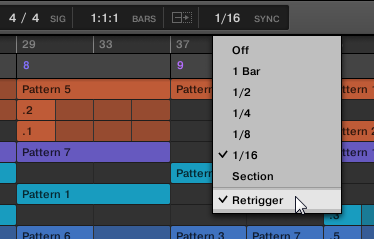
The next time you select a new Scene/Section or group of Scenes/Sections for looping, the new loop will start from the beginning of the first Scene/Section (Retrigger activated) or from the same position as where it left the current Scene/Section (Retrigger deactivated).
Using the Ideas view
The Ideas view allows you to experiment with your musical ideas without being tied to a timeline or any arrangement. Here you can create Patterns for each Group and combine them into Scenes.
In Ideas view, Maschine provides a perfect overview of all your Scenes, Patterns, and Groups. Here you can create a Scene by selecting a Pattern for each Group, duplicate your Scenes, clear a Scene and, more importantly, trigger your Scenes so you can hear how they sound when played in a particular order.
Scene overview
In the software, all Scenes can be managed from the Ideas view:
To open Ideas view, click the Arranger View button on the left of the Arranger.

When the button is unlit Ideas view is active, when the button is lit Song view is active.
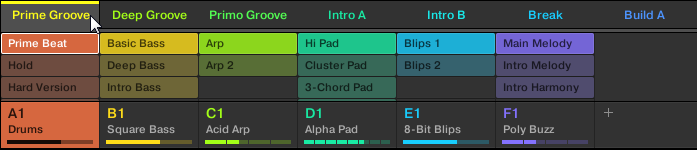
The Ideas view.
At the top you can see Scene slots. The selected Scene is highlighted.
The selected Scene displays the selected Patterns for the current Scene.
Creating Scenes
You can create a new Scene directly in the Ideas view.
Creating a Scene in Ideas view
To create a new Scene, click the “+” button located after all existing Scene names in the top row of the Ideas view.
Click the “+” button to create a new Scene.
A new empty Scene is created after all existing Scenes.
Assigning and removing Patterns
Each Pattern placed in the Arranger (Ideas view or Song view) references one of the Patterns available in the corresponding Group.
In the Ideas view, each column represents a Group. After selecting a Scene it is possible to assign and remove Patterns by clicking the Pattern slots.
Any changes made in the Ideas view or Song view are one and the same.
Assigning a Pattern in Ideas view
To assign a Pattern to a Scene in Ideas view:
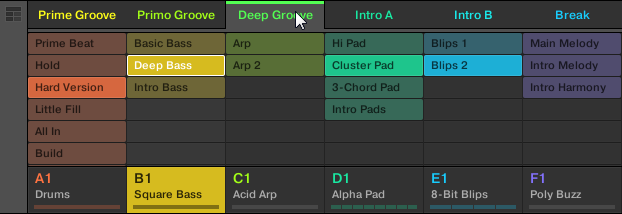
Select a Scene slot in the upper row.
Each column below shows the Patterns available for a particular Group (one column for each Group). The highlighted Patterns are played in that Scene. In each column, only one Pattern can be highlighted.
Click an unlit Pattern slot that you want to play in the Scene.
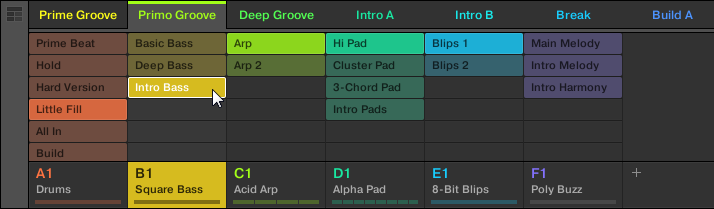
The selected Pattern is assigned to the Scene and replaces any previous Pattern for that Group in the Scene. Additionally, this Pattern is loaded in the Pattern Editor, ready to be modified.
Notice
Patterns and the Pattern Editor are described in Working with Patterns and Clips.
Creating a new Pattern in Ideas view
To create a new empty Pattern in Ideas view:
In the Ideas view, double-click an empty Pattern slot in the column of the desired Group.
A new empty Pattern is created in that slot. The Pattern is automatically assigned to the Scene and it is loaded in the Pattern Editor, ready to be filled with notes/events.
Removing a Pattern in Ideas view
To remove a Pattern from a Scene in Ideas view:
Click the highlighted Pattern for any Group to remove it from the Scene.
The Pattern is removed from the Scene and will not be played by that Scene anymore. The Pattern itself is left untouched.
Selecting Scenes
You can select the desired Scene in the Ideas view.
Selecting a Scene in the Ideas view
To select a Scene in the Ideas view, do the following:
Select the desired Scene by clicking its name at the top of the Ideas View:
The Scene name is now highlighted to indicate that this Scene is selected.
Once a Scene has been selected…
Once you have selected a Scene, the following happens:
The selected Patterns slots for the focused Scene are highlighted. The highlighted Pattern slot for the selected Group has a white frame and is displayed in the Pattern Editor. Unselected Pattern slots are dimmed. If there are no Patterns slots selected for the Scene in focus, or if there are no Patterns at all, the Pattern Editor is empty.
If playback is off the playhead immediately jumps to the beginning of the selected Scene. If playback is on the playhead jumps according to the Perform Grid settings.
Deleting Scenes
To delete a Scene in the Ideas view:
In the top row of the Ideas view, right-click ([Ctrl]-click on macOS) the name of the Scene you want to delete and select Delete from the context menu:
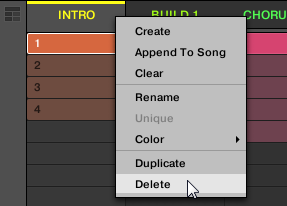
The Scene is deleted with all its Patterns. Scenes to the right shift to fill the gap.
Notice
Instead of deleting the Scene, which removes it entirely, you can also clear the Scene: This will only remove its content, the Scene itself will stay in your arrangement, but empty. For more information on clearing Scenes, refer to section Clearing Scenes.
Creating and deleting Scene banks
A new Scene bank is automatically created once you fill an entire bank with Scenes.
Clearing Scenes
Clearing a Scene allows you to remove all its Patterns, leaving the Scene empty. Clearing Scenes is only available from within the software.
Notice
While deleting a Scene removes it entirely from your arrangement, clearing it only removes its content: The Scene stays in your arrangement, but empty. For information on deleting Scenes, refer to Deleting Scenes.
To clear a Scene:
Right-click ([Ctrl]-click on macOS) the name of the Scene you want to clear, and select Clear from the context menu.
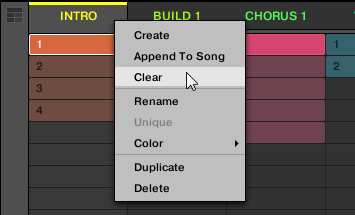
All Patterns are removed from the Scene.
Duplicating Scenes
The Ideas view allows you to duplicate Scenes. Duplicating a Scene has a different result depending on the Duplicate setting available in the Scene / Section section on the Default page of the Preferences panel. Refer to Preferences – Default page for more information.
Duplicating a Scene in the software
To duplicate a Scene in the software:
Right-click ([Ctrl]-click on macOS) a Scene in the top row of the Ideas view, and select Duplicate from the context menu.
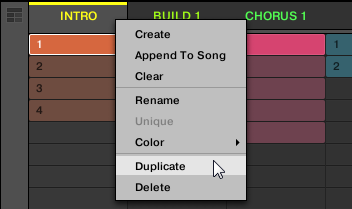
The selected Scene is duplicated. The duplicate contains references to the same Patterns or to independent copies of the Patterns, depending on the setting chosen in the Preferences panel.
Tip
You can also duplicate a Scene by clicking the Scene slot header while holding [Alt] key (or [Ctrl] on Windows), and dragging the mouse. After the mouse is released a duplicate copy of the Scene is created.
Reordering Scenes
Reordering Scenes in Ideas view allows you to visually organize your ideas and also place each idea on a specific pad of your controller. The reordering of Scenes will not affect your arrangement.
In the software you can reorder Scenes in the Ideas view.
To reorder Scenes:
Click and hold the Scene name in the Ideas view.
While holding the mouse button, drag your mouse horizontally to the desired location. As the mouse cursor moves, an insertion line appears at the potential places where you can drop the Scene.
When the insertion line appears at the desired location, release the mouse button.
The Scene takes its new place. On your controller in Scene mode, you can now select this Scene via the pad corresponding to its new location.
Changing the Scene tempo
By default, all Scenes play at the tempo of the Project. You can set a custom tempo for specific Scenes, which allows you to create tracks with varying tempo.
Note
To know how to adjust the tempo of your Project, refer to Adjusting the volume, swing and tempo.
Changing the Scene tempo in the software
In the top row of the Arranger, right-click the name of the desired Scene or Section and select Scene Tempo from the context menu:
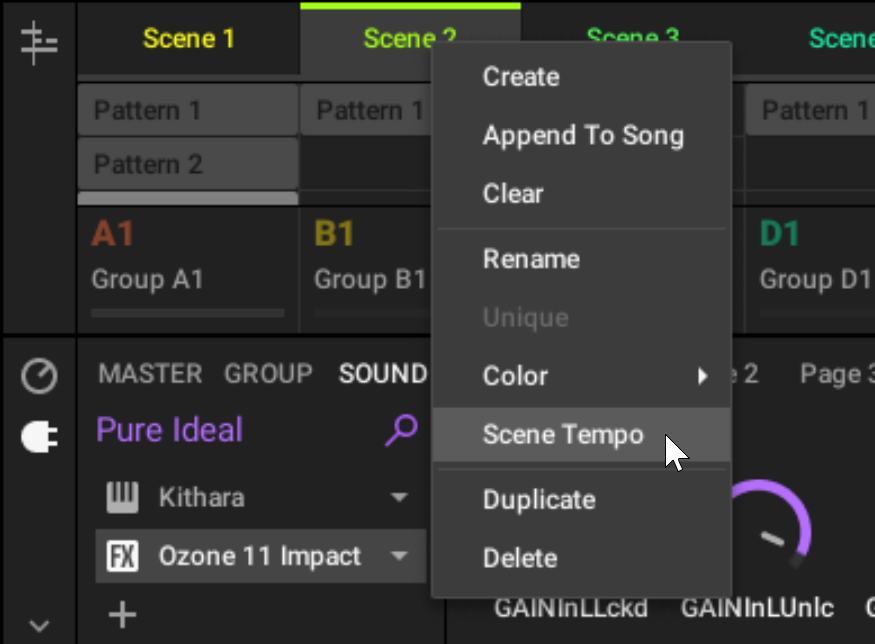
This activates a custom tempo for the Scene. In the Maschine header, the BPM control takes the color of the Scene and a horizontal segment appears above. This BPM control now displays and adjusts the tempo value for that particular Scene.
Adjust the BPM control in the Maschine header as you would do for the Project tempo: You can double-click the BPM value, enter the desired tempo value, and press [Enter] to confirm, or you can click the BPM value and drag your mouse vertically (hold [Shift] on your computer keyboard to adjust the value in finer increments).

The new tempo value will be used only for that Scene.
You can remove the custom tempo for a Scene by right-clicking its name and deselecting Scene Tempo from the context menu. The Scene will then use the default tempo of your Project.
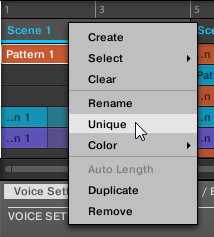
Making Scenes unique
If a Scene is referencing the same Patterns you can make a separate (unique) copy of the Scene and its Patterns by selecting Unique. This allows you to work on a new separate copy of the Scene and its Pattern in isolation. Use Unique in combination with the Duplicate option. For more information on the Duplicate option, read: Duplicating Scenes.
To make a Scene unique in the Ideas view:
In the top row of the Ideas view, right-click ([Ctrl]-click on macOS) the name of the Scene you want to make unique and select Unique from the context menu:
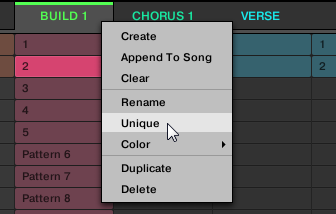
A unique copy of the Scene and its Patterns are created.
Notice
This option is only available if the selected Scene is referencing the same Patterns as another Scene.
Appending Scenes to the arrangement
Once you are satisfied with a Scene you can append it directly to your arrangement in the Song view.
To append a Scene to the Arrangement in the software:
In the top row of the Ideas view, right-click ([Ctrl]-click on macOS) the name of the Scene you want to append to the arrangement and select Append To Arrangement from the context menu:
A Section containing the appended Scene is created and added to the end of your arrangement. You can then click and drag the Section slot (containing the Scene) to an appropriate place on the Timeline of the Arranger.
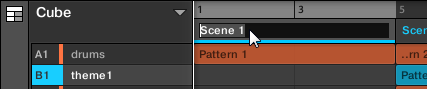
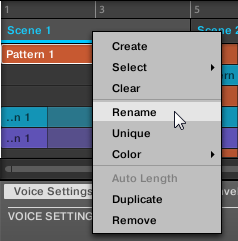
Naming Scenes
By default, Scenes are named Scene 1, Scene 2, Scene 3, etc. You can rename Scenes and use custom names of your own.
Renaming Scenes in the Ideas view
To rename a Scene in the Ideas view:
Double-click the Scene name at the top of the Ideas view:
You can also right-click ([Ctrl]-click on macOS) the Scene slot or the corresponding cell in the pad grid and select Rename from the context menu:
The Scene name gets highlighted and editable.
Type a name and press [Enter] on your computer keyboard to confirm (or press [Esc] to cancel you change).
The Scene is renamed.
Notice
If you use Maschine as a plug-in, some hosts will utilize the [Enter] key, as it is mapped to some function of the host software. In this case, click anywhere else in the Maschine plug-in window to confirm the name you have entered.
Changing the color of a Scene
You can change the color of your Scenes.
To change the color of a Scene:
Right-click ([Ctrl]-click on macOS) the name of the desired Scene in the Arranger or in the Scene Manager, and select Color from the context menu.A Color Palette appears. In the Palette, the current color of the Scene is highlighted.
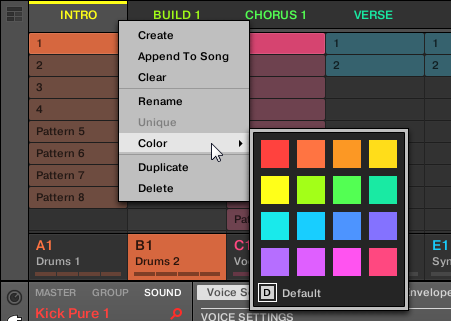
Select the desired color in the Palette. You can also choose to set the Scene back to its default color by selecting Default at the bottom of the Color Palette.
The Scene slot takes the new color you select.
Notice
You can change the default color for Scenes in Preferences > Colors > Scene. Refer to Preferences – Colors page for more information.
Tip
Once you have set a custom color for a Scene as described above, the Scene will retain its color when you move it in the Ideas view, and the color will be stored with the Scene when you save your Project. Note that you can select the same color as the one used by default: In this case the color (even unchanged) will be considered as a custom color and will follow the Scene as you move it.
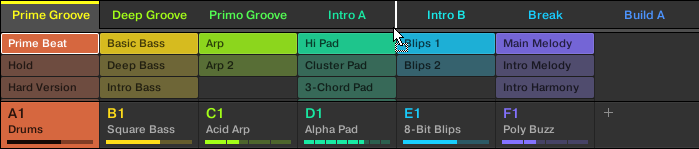
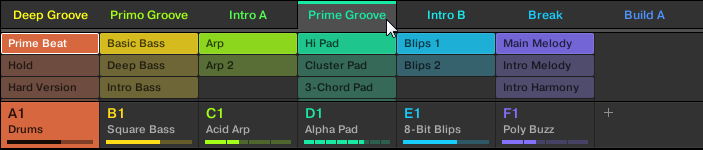
Using the Song view
In Maschine, a song is made of a variable number of Scenes, which represent the different parts of the song, for example, intro, verse, chorus, break, another verse. By assigning your Scenes to Sections through the timeline of the Song view, you can organize your arrangement.
The Song view is where you can sequence Scenes to create your final arrangement. This process involves creating Sections on the timeline and assigning a Scene to each Section. Any Scene that exists in the Ideas view can be assigned to a Section in the Song view. You can change the length of the Section (determining the playback length of the Scene) or re-order the Sections as you see fit. You can also re-use the same Scene in multiple Sections in the timeline, or you can choose to assign no Scene to the Section at all.
One powerful aspect of the relationship between the Ideas view and Song view is that the content in these two areas are actually one-in-the-same. This means that if you make a change to a Scene it will affect all other instances of that Scene automatically. If you place a Scene in three different Sections of the Timeline and then proceed to change the Patterns assigned to that Scene, the other two instances of that Scene also play the newly-assigned Patterns. It’s therefore very easy to make changes to individual Patterns and Scenes after the arrangement has been made and immediately hear the results in the context of the arrangement, and those changes can be made in either Ideas or Song view.
Section management overview
In the software, all Sections can be managed using the Section Manager of the Song view.
To open the Section Manager:
To open Song view, click the Arranger View button on the left of the Arranger.
The Song view appears on the right.
To open the Section Manager, click the drop-down menu on the left of the arrangement.
The Section Manager appears on the right.
Use the Section Manager to manage your Sections.
On the left you can see the list of the 16 Section slots in the selected Section bank. Slots containing a Section show a colored or white bar on the left along with the Section name. The other slots contain no Section. The selected Section is highlighted (Intro A in the image above).
On the right you can see the various Section banks in form of pad grids, a pad grid is a square of 4x4 cells representing the pads of your controller. In each Section bank the colored cells indicate Section slots containing a Section, while unlit cells indicate empty Section slots. The selected Section bank is surrounded by a white border (bank 2 in the picture above). If there are too many Section banks to fit into the Section Manager’s height, use the scroll wheel of your mouse to display the other banks.
The Section slots on the left and the cells in the selected pad grid on the right are strictly equivalent: you can use either the slots or the corresponding cells to execute all the management commands described in the next sections.
Closing the Section Manager
To close the Section Manager, click anywhere outside it.
Section Manager vs. Arranger’s top row
If all Section operations can be done in the Section Manager, most of them can also be done in the top row of the Arranger:

The top row of the Arranger.
The only difference between the Section Manager and the Arranger’s top row is that the Section Manager allows you to manage your Section banks, which is impossible in the Arranger’s top row. Apart from this, actions in the Arranger’s top row and in the Section Manager are strictly equivalent.
Creating Sections
You can create a new Section directly in the Song view.
Creating a Section in the software
To create a new Section, click the “+” button located after all existing Section names in the top row of the Song view.
A new empty Section is created after all existing Sections. You can then assign a Scene to it. Refer to Assigning a Scene to a Section for more information.
Assigning a Scene to a Section
When you have created an empty Section on the timeline of the Arranger, you can now add a Scene from the Ideas view to the Song view.
To assign a Scene to a Section on the timeline of the Arranger:
Right-click ([Cmd] + click on macOS) a Section slot and choose Select from the context menu, and select the desired Scene from the submenu.
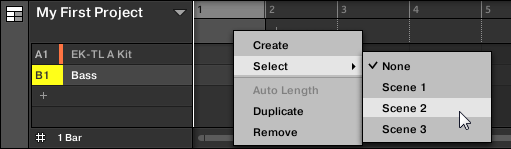
The selected Scene is assigned to the Section.
By repeating this for each new Section, you can quickly add Scenes to the Arranger timeline.
Selecting Sections and Section banks
You can select the desired Section via the Section Manager or directly in the Song view.
Selecting a Section in the Song view
To select a Section in the Song view, do the following:
Select the desired Section by clicking its name at the top of the Song view:

The Section name is now highlighted and underlined to indicate that this Section is selected.
Selecting a Section and a Section bank in the Section Manager
To select a Section in the Section Manager, do the following:
Open the Section Manager (see Section management overview).
If it is not already selected, select the Section bank containing the desired Section by clicking its pad grid on the right.
The selected Section bank is surrounded by a white border, and the left part of the Section Manager displays the Section slots in that bank.
Select the desired Section by clicking the slot with its name in the list on the left or by clicking its cell in the selected pad grid on the right.
The Section slot and the corresponding cell on the right are now highlighted to indicate that this Section is selected.
Once a Section has been selected…
Once you have selected a Section using either of the methods described above, the following happens:
The Pattern Editor displays the Pattern corresponding to the focused Group in this Section. If there is no Pattern for the focused Group in the Section you have just selected, the Pattern Editor is empty.
Additionally, if the selected Section is outside the current Loop Range:
The Loop Range is set to the selected Section.
If playback is off the playhead immediately jumps to the beginning of the selected Section. If playback is on the playhead jumps according to the Perform Grid settings.
Notice
For more info on the Loop Range see section Section management overview. For more info on the Perform Grid settings see section Section management overview.
Reordering Sections
Reordering Sections is essential to organize your Sections and arrange your song.
Reordering Sections in the software
In the software you can reorganize sections both in the Arranger and in the Section Manager.
To move a Section:
Click and hold the Section name in the Arranger.

While holding the mouse button, drag your mouse horizontally in the Arranger to the desired location.As the mouse cursor moves, an insertion line appears at the potential places where you can drop the Section.
When the insertion line appears at the desired location, release the mouse button.

The Section takes its new place. On your controller in Section mode, you can now select this Section via the pad corresponding to its new location.

Adjusting the length of a Section
Here are a few rules on how Sections, Scenes and Patterns are displayed within the Arranger:
By default the length of a Section is automatically set to the longest Pattern used within the referenced Scene (Auto Length), unless the length of the Section is manually set to a specific bar range (Manual Length).
Auto Length: By default, the length of a Section corresponds to the longest Pattern used in the referenced Scene. Inserting a new Pattern that is longer than the Section automatically extends the Section. Removing the longest Pattern from the Section automatically shrinks the Section. Extending/shrinking the longest Pattern automatically extends/shrinks the Section accordingly.
Manual Length: A Section can be manually adjusted to a particular length. This can be shorter or longer than the Pattern contained within the referenced Scene. Inserting or removing Patterns from the Scene will not alter the length of the Section, however the length of a Section can be altered by dragging the mouse directly in the timeline or from your controller.
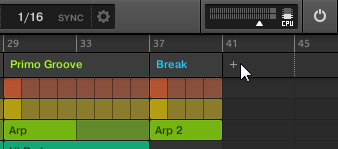
If a Pattern is shorter than the Section it is placed in, it is automatically repeated until the end of the Section (the last repetition might be shortened). These repetitions are automatically generated and cannot be edited. They reference the same Pattern placed at the beginning of the Section. Repetitions of a Pattern are indicated by darker blocks in the Arranger, and a Truncated Pattern marker will appear on the right-hand side of the Section to indicate that a section of the Pattern is hidden:
If a Section has been manually shortened, only the visible part of the Pattern within the set length will be audible.
Scenes always start at the beginning of the Section.
Adjusting the length of a Section in the software
Variable Section length allows you to lengthen or shorten a Scene on the Timeline of the Arranger without altering the referenced Patterns. This is particularly useful as it avoids the need to create a new version of a Scene when you only want to extend or truncate a Scene to make it fit an arrangement.
When the right end marker of a Section is extended beyond the length of a Scene, the referenced Patterns are repeated. When the right end marker of a Section is dragged so it is shorter than the referenced Scene, only the visible part of the Patterns is played.
To lengthen a Section:
Click and drag the end marker of the Section to the right.

The Scene will be repeated if the adjustment is longer than the referenced Pattern.
To shorten a Section:
Click and drag the end marker of the Section to the left.

The Scene will be shortened, and if the adjustment is shorter than the referenced Pattern a small Truncated Pattern marker will appear on the right-hand side of the Section to indicate that a part of the Scene is hidden. Only the visible part of the Scene will be played back.
When adjusting the size of a Section the following rules apply:
The value set in the Arrange Grid is used for length increments. For more information on Arrange Grid, read: The Arrange Grid.
When [Shift] is pressed while changing the length, the value set in the Step Grid is used. For more information on Step Grid, read: Adjusting the Step Grid and the Nudge Grid.
The minimum length a Section marker can be dragged without modifier is one Arrange Grid increment.
When [Shift] is pressed, the minimum length a Section marker can be dragged is one Step Grid increment.
The minimum length of a Section equals the minimum Scene length. This can only be achieved if Arrange Grid or Step Grid is set to Off.
Duplicating Sections
The Song view allows you to duplicate a Section. Duplicating a Section has a different result depending on the Link when duplicating Sections setting available in the Scene / Section section on the Default page of the Preferences panel. Refer to Preferences – Default page for more information.
Duplicating a Section in the software
To duplicate a Section in the software:
Right-click ([Ctrl]-click on macOS) a Section header in the top row of the Song view, and select Duplicate from the context menu.
The selected Section is duplicated. The duplicate is an independent copy or a linked copy of the original Section, depending on the setting chosen in the Preferences panel.
Making Sections unique
At any time, you can make a linked Section totally unique. This will create a new Section in the same location, and will also create new Patterns. You are then free to edit the Patterns in the Section, or the data in the Patterns, without affecting any of the original Sections. This is great for when you want to introduce variations into a song structure that’s been made with linked Sections.
To make a Section unique in the Maschine software:
Right-click (or ([Ctrl]-click on OS X) the Section you want to make unique in the Timeline. The context menu will open.
Click Unique.
The Section will become independent of any Sections it was linked to and the Patterns can be edited without affecting any the original Sections.
Deleting Sections
To delete (remove) a Section from the arrangement:
In the top row of the Song view, right-click ([Ctrl]-click on macOS) the name of the Section you want to remove and select Delete from the context menu:
The Section is removed from the arrangement. The next Sections shift ahead to fill the gap.
Notice
When you delete a Section, the referenced Scene is not deleted from the Ideas view. You can insert the Scene back into your arrangement at a later time.
Renaming Sections
Sections are displayed in the software using the name of the Scene that they reference, they do not have separate names from the Scene they represent. While you are organizing your arrangement, you can rename Scenes to your liking directly from the Song view.
Renaming Scenes in the Song view
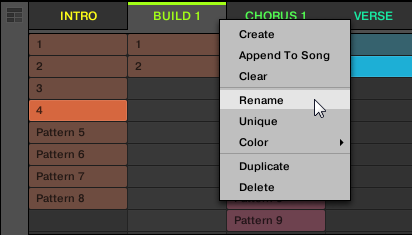
To rename a Scene in the Song view:
Double-click the Scene name at the top of the Song view.
You can also right-click ([Ctrl]-click on macOS) the Scene slot or the corresponding cell in the pad grid and select Rename from the context menu.
The Scene name is highlighted and editable.
Type a name and press [Enter] on your computer keyboard to confirm (or press [Esc] to cancel you change).
The Scene is renamed.
Notice
If you use Maschine as a plug-in, some hosts will utilize the [Enter] key, as it is mapped to some function of the host software. In this case, click anywhere else in the Maschine plug-in window to confirm the name you have entered.
Clearing Sections
Clearing a Section has the same effect as clearing the referenced Scene: It removes the content from the referenced Scene, leaving the Scene (and the Section) empty. Clearing Sections is only available from within the software.
To clear a Section:
Right-click ([Ctrl]-click on macOS) the name of the desired Section in the Song view, and select Clear from the context menu.
Both the Section and its referenced Section are cleared.
For more information on clearing Scenes, refer to Clearing Scenes.
Working with Patterns in Song view
By right-clicking on a Pattern in the Song view of the Arranger you can access the context menu with many useful options for arranging and interacting with Patterns.
Creating a Pattern in Song view
In Song view use the right-click context menu to create a new Pattern within a Section.
To create a new Pattern in Song view:
Right-click ([Ctrl]-click on macOS) an empty cell the Section where you want to create a new Pattern, and click Create in the menu.
A new empty Pattern is created within the selected Section.
Selecting a Pattern in Song ciew
In Song view you can use the right-click context menu to select an alternative Pattern for a Section.
To select another Pattern in Song view:
Right-click ([Ctrl]-click on macOS) the Pattern you want to replace, click Select in the menu, and click the desired Pattern from the list that appears.
The new Pattern is selected for this Section and the referenced Scene, and it will appear in each Section where the Scene is used.
Clearing a Pattern in Song view
In Song view use the right-click context menu to clear the contents of a Pattern. Clearing the contents will remove all events and audio loops from the Pattern.
To clear the contents of a Pattern in Song view:
Right-click ([Ctrl]-click on macOS) the Pattern you want to clear, and click Clear in the menu.
All contents of the selected Pattern are cleared.
Renaming a Pattern in Song view
In Song view use the right-click context menu to rename a Pattern within a Section.
To rename a Pattern in Song view:
Right-click ([Ctrl]-click on macOS) the name of the Pattern you want to rename, and click Rename in the menu.
The Pattern is renamed. Its new name appears in every Scene and Section referencing the Pattern.
Coloring a Pattern in Song view
In Song view use the right-click context menu to change the color of a Pattern within a Section.
To recolor a Pattern in Song view:
Right-click ([Ctrl]-click on macOS) the Pattern you want to recolor, and select Color in the menu.
Select a new color.
The selected Pattern is recolored.
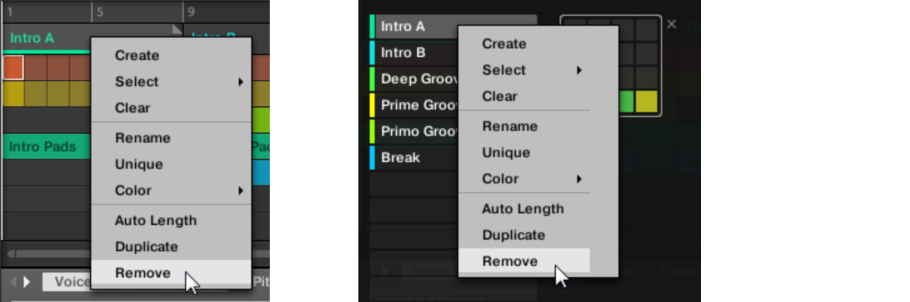
Removing a Pattern in Song view
In Song view use the right-click context menu to remove a Pattern from a Section.
To remove a Pattern from a Section in Song view:
Right-click ([Ctrl]-click on macOS) the name of the Pattern you want to remove, and click Remove in the menu.
The Pattern is removed from the Section and from the referenced Scene, but not deleted. You can add the Pattern back to the Scene by using Select in the right-click menu.
For more information on Select see Selecting a Pattern in Song ciew.
Duplicating a Pattern in Song view
In Song view use the right-click context menu to duplicate a Pattern within the selected Scene.
To duplicate a Pattern in Song view:
Right-click ([Ctrl]-click on macOS) the Pattern you want to duplicate, and click Duplicate in the menu.
The selected Pattern is duplicated. The duplicate Pattern will take the place of the existing Pattern in the Scene and appear in each Section where the Scene is used in the arrangement.
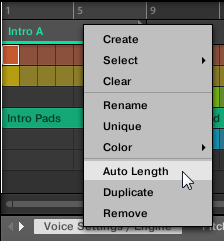
Activating Auto Length
By default a Section is set to Auto Length, allowing it to resize automatically to the content within the Section. If you manually adjust the length of a Section by truncating or lengthening the Section end marker, Auto Length is deactivated and the Section automatically set to Manual Length.
You can quickly reset a Section back to Auto Length in order to return the Section to its default behavior and reveal any truncated (hidden) content. Your previous manual length adjustments are discarded and the Section is resized according to the Patterns in the assigned Scene, and will continue to resize with the content until you manually adjust its length again.
Activating Auto Length in the software
To enable Auto Length for a Section in the software:
Right-click ([Ctrl]+click on macOS) on the Section.
Click Auto Length in the menu.
Auto Length is activated and the selected Section is automatically resized to fit the content of the Patterns within the assigned Scene. Any manual adjustments that were previously made are discarded.
Looping
Activate a Loop to repeatedly play a portion of your track. Once a loop is activated the Sections within the Loop Range play until the loop is deactivated. This can be good for composing, practicing a part before recording, recording multiple takes, etc. The Loop Range is always visible (even when inactive) and you can adjust it at any time by moving its left and right end points.
Setting the Loop Range in the software
Set the start, end and position of the loop using the dedicated Loop Range in the timeline. The value set in the Arrange Grid is used for Loop Range increments and movement of the Loop Range itself.
To adjust the Loop Range in the software:
Drag the left or right end of the Loop marker to make it longer.
The Loop range is elongated.
To move the Loop using the software:
Click and drag the Loop range left or right.

The whole Loop range is moved.
Activating or deactivating a loop in the software
To activate a Loop using the software:
Click the Loop button in the header to activate or deactivate the loop.

When the Loop is activated the Sections within the Loop range are repeated.
Playing with Sections
Maschine provides you with various tools to precisely control which Section has to be played, and when.
Studio track or live performance?
If you are composing a studio track that you plan to export as is, you can arrange your Sections so that your whole track can be played in one go from the very first Section to the very last one.
Tip
For more information on exporting audio, refer to Exporting audio .
Alternatively, if you are preparing a track for performing live, you might prefer to switch back and forth between different Scenes in Ideas view during your performance.
This may also be necessary if you are composing a studio track in your DAW and want to control which Scenes or Sections the Maschine plug-in has to play. This is where the Maschine tools described in the following sections come in handy.
Jumping to another playback position in your Project
You can use the timeline above the Sections headers in the Song view to set the playback to the desired position.
In the timeline and across the entire height of the Song view, the playhead (a white vertical line) indicates the current play position in your Project.

The playhead shows you the current play position.
At any time you can jump to another position in your Project:
Click anywhere in the timeline to move the playhead to that position in the Project.
Depending on the playback state, the following will happen:
If playback is off, the playhead jumps to the closest Perform Grid division. If the Perform Grid is set to Off (for instance deactivated), the playhead jumps to the exact position you have clicked. If the Perform Grid is set to Quick, the playhead jumps to the beginning of the bar you have clicked in.
If playback is on, the playhead jumps to the closest position near your mouse cursor and retains the playhead position relative to the Perform Grid division. This allows seamless jumps that don’t break the rhythm of your music. If the Perform Grid is set to Off (i.e. deactivated) or Quick, the playhead position is retained relative to the current bar.
Tip
You can also change the playback position by switching to another Scene. The moment at which the jump will occur depends on the Perform Grid setting. For more information, refer to Adjusting the Arrange Grid and the Pattern Length.
Triggering Sections or Scenes via MIDI
You can trigger and change Sections and Scenes using MIDI Note or MIDI Program Change messages sent from your DAW to the Maschine plug-in or from a MIDI controller.
When this feature is activated, MIDI notes or Program Change messages are linked to the first 128 Section slots or Scenes (depending on your settings), whether they are empty or not:
Section/Scene slot | MIDI Note number | Program Change number |
|---|---|---|
1 | 0 | 1 |
2 | 1 | 2 |
3 | 2 | 3 |
… | … | … |
128 | 127 | 128 |
Notice
MIDI Note numbers: Host applications use various conventions to name MIDI notes. For example, in Maschine, MIDI note number 0 is referred to as C-2 and MIDI note number 60 (middle C) as C3. Please refer to the documentation of your host to know which convention is used.
Notice
Program Change numbers: Some host applications send Program Change numbers in the range [0–127] instead of [1–128]. In that case, the PC number 0 will trigger Section/Scene slot 1, PC 1 will trigger Section/Scene slot 2, etc. Please refer to the documentation of your host to know in which range it sends Program Change numbers.
To enable or disable Section/Scene MIDI Change feature, do the following:
Click Edit > MIDI Change from the menu.
The MIDI Change dialog appears.
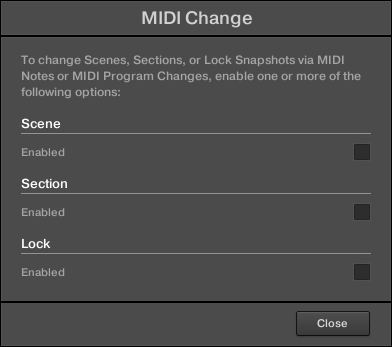
In the MIDI Change dialog:
In Scene option click the Enabled checkbox to enable Scenes in the Ideas view to be triggered. In Section option, click the Enabled checkbox to enable Sections in the Song view to be triggered.
In the Source submenu, select the name of your controller.
In the Trigger submenu for Scene and Section, select MIDI Note to trigger via MIDI notes, Program Change to trigger via MIDI Program Change messages, or None (default setting) to disable MIDI Change completely.
In the Channel submenu, select the MIDI channel the Scenes or Sections should receive MIDI messages from.
The Arrange Grid
The Arrange Grid is used to quantize most modifications related to the timeline. The Arrange Grid division is used for the following features:
Loop start / length
Loop position
Pattern length
Scene length
Song Clip start / length
Playhead relocation
Adjusting the Arrange Grid in the software
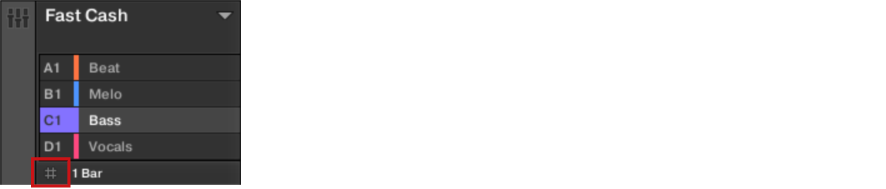
The Arrange Grid setting is located at the bottom left corner of the Arranger area and can be activated/deactivated by toggling the Grid symbol.
Click the Grid symbol next to the value to enable the Arrange Grid.
Click the current Arrange Grid value to open the drop-down menu.
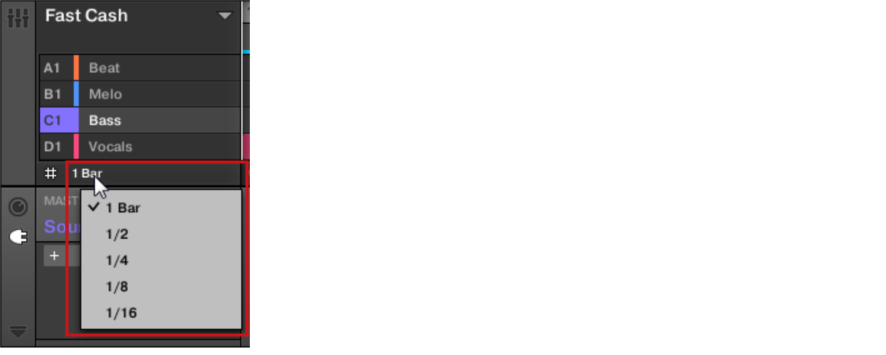
Select a new value for the Arrange Grid.
The selected Arrange Grid value is applied.