Browser
The Browser is the central access point for all files of Maschine Software. Learn about its filters, how to load and save content, and how to access user content.
The Browser is the place where you can organize and categorize all of your Projects, Groups, Sounds, Plug-in presets, and Samples. This is done by tagging them, which means categorizing them by using keywords. Given that the Maschine software has some advantages over the hardware in this case, such as a very big screen and a QWERTY-keyboard, we will start with the software first.
Browser basics
This section describes some general concepts about the Browser.
The Maschine Library
To organize, find, keep track of, and provide you thousands of files at any time ready for loading, Maschine makes use of a Library. The Maschine Library not only contains the factory content included with Maschine, but also any other factory content (e.g., from Maschine Expansions or other Native Instruments products) as well as your own user content.
To help you find the right file quickly and efficiently, the Library implements various techniques that go far beyond the classic folder structure of your operating system. For example, each file included in the Library can be described according to following aspects:
The file type: Project, Group, Sound, etc.
The content type of the file, i.e. whether it originates from a product’s factory library or if it was created by a user.
The product which the files comes from — this can include, e.g., a hierarchical structure with a product category, a particular product, and possibly a bank and sub-bank of this product.
A variable amount of tags used to describe various characteristics of the file, for example, the type of effect, the sonic character, the context in which it is used — in a word, anything that might help you find the file.
Notice
Note that the Library is the only other way to display and access your files: You could also navigate to the same files in your file system. The (substantial) difference lies in the fact that the Library organizes your files in a musically relevant way.
Which Files are Included in the Maschine Library?
The files included in the Maschine Library are all Maschine-relevant files found in the folders whose paths are listed in the Library page of the Preferences panel. For more information on how to manage these library folders, please refer to Preferences – Default page.
Browsing the Library vs. browsing your hard disks
The Browser is your interface to the Maschine Library. It provides all the necessary tools to search for the files you require — and suggest other files you might not have thought of. Besides this, the Browser also allows you to navigate your file system in a classic way. Both are described in the next section.
The Browser provides two operation modes, each of them providing its own tools:
The Library pane allows you to browse the Maschine Library. This is the preferred way to search for files meeting particular musical requirements. This pane also allows you to tag your own files to your liking.
The Files pane allows you to browse your hard disks by using the hierarchical folder structure of your operating system. For example, you can use it to navigate files that have not been imported into the Maschine Library — and you can import them from there!
Switching between Library and Files pane
To show the Library pane or the Files pane of the Browser, click the corresponding tab at the top of the Browser.

Click the desired tab to show the corresponding pane of the Browser.
The Library pane is described in section Searching and loading files from the Library, and the Files tab is described in section Loading and importing files from your file system.
Searching and loading files from the Library
The Browser’s Library pane allows you to search for any file in the Maschine Library.
To display the Library pane, click the Library tab in the top left corner of the Browser.
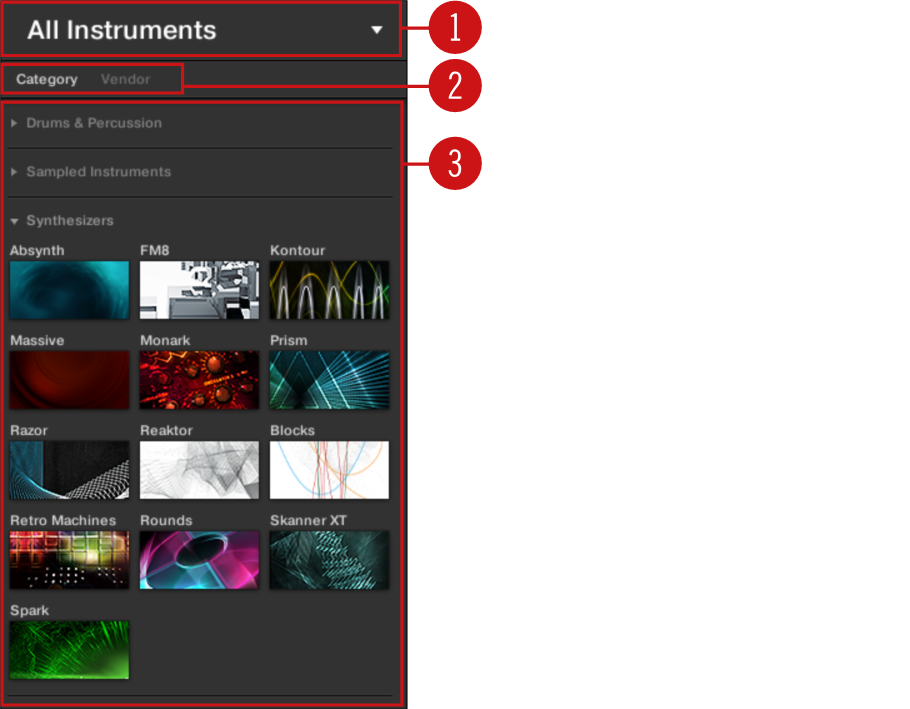
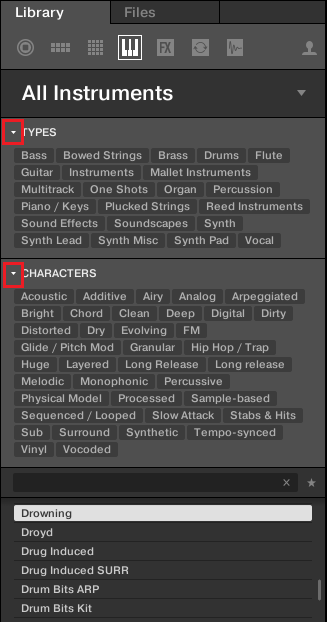
Overview of the Library pane
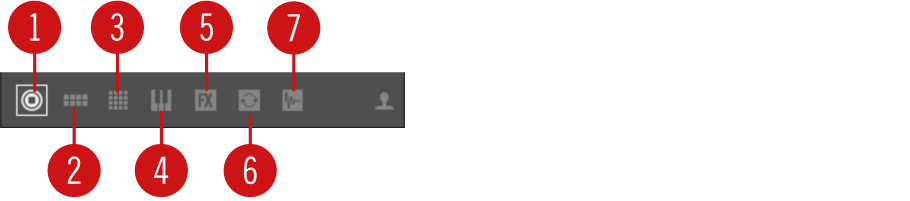
The Library pane contains the following elements:
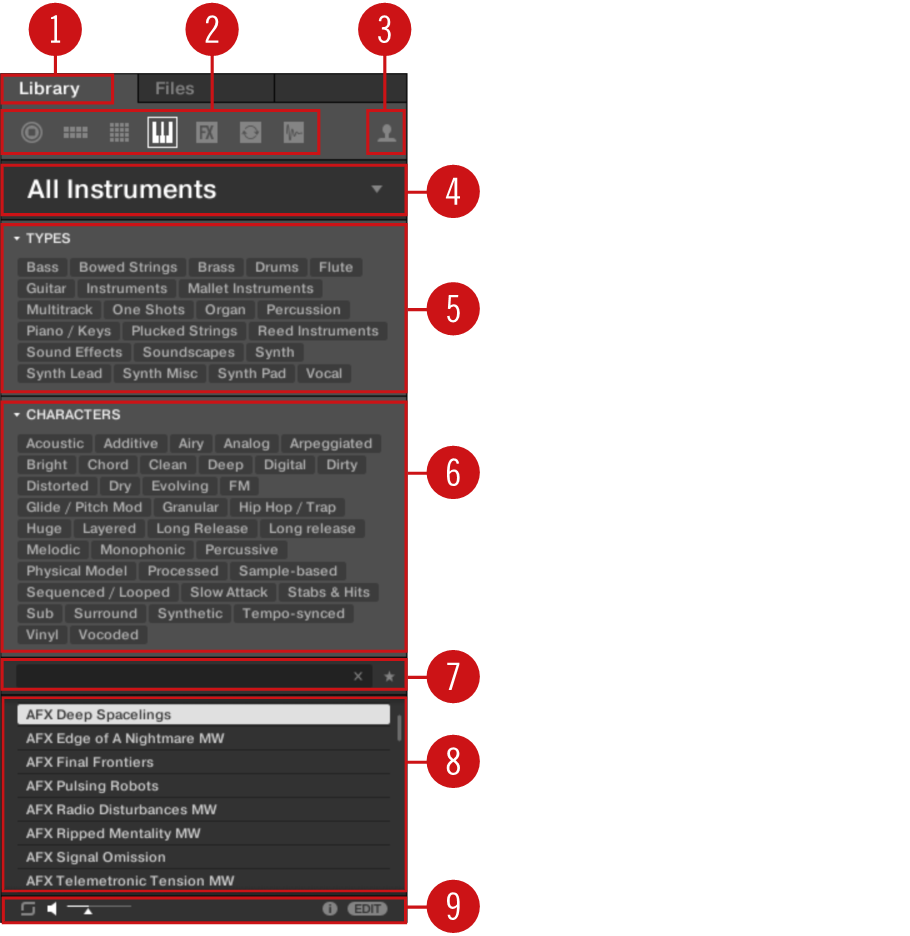
The elements of the Library pane.
(1) Library tab: Click the Library tab to open the Library pane described here.
(2) File Type selector: This contains seven icons, each representing the different files types of Maschine. From the left to right the file types are Project, Group, Sound, Instrument presets, Effect presets, Loops, and One-Shots. Only the selected file type is displayed in the Result list (8). See section Selecting a file type.
(3) Content selector: Select the User icon to display user content. When the User icon is lit only user content is shown in the Result list. When the User icon is unlit only factory content is shown in the Results list. (8). See section Choosing between factory and user content.
(4) Product selector: In the drop-down menu you can select a particular product, product category, and sometimes the bank and sub-bank of the selected product. Again, only the files matching your selection will be displayed in the Result list (8). See section Selecting a Product Category, a Product, a Bank, and a Sub-Bank.
(5) TYPES filter: allows you to search for files based on applied Type and Sub-Type tags. See section Selecting Type and Character tags.
(6) CHARACTERS filter (Instrument/Effect presets only): allows you to search for files based on applied Character tags. See section Selecting Type and Character tags.
(7) Search field: Enter any character string into the Search field to limit the search results to the files containing this string. See section Performing a text search.
(8) Result list: The Result list displays all files that match your query, as specified via the various tools above. See section Loading a file from the result list.
(9) Control bar: At the bottom of the Browser, the Control bar provides a few useful tools when browsing the Maschine Library, some of them depending on your selection in the File Type selector (2):
For all file types except Projects, click the Autoload button at the far left of the Control bar to automatically load the selected file in order to hear it in context with the rest of your Project while it is playing. See section Loading the selected files automatically.
For Instruments presets and Samples, enable the Audition button and adjust the volume fader next to it in order to hear the selected items directly from the Browser. See section Auditioning Samples and Auditioning Instrument presets.
For Groups, enable the Load Patterns checkbox to load the Group’s Patterns together with the Group. See section Loading Groups with Patterns.
For all files, click the Information button (showing a little “i”) to display more information on the selected file(s). See section Displaying file information.
For all files, click the EDIT button to open the Attribute Editor and modify the tags and properties assigned to the selected file(s). See section Editing the files’ tags and properties.
Overview of the search workflow in the Library pane
When searching for files via the Library pane, you can progressively refine your search by following this typical top-to-bottom workflow.
The first two steps are mandatory:
Choose a file type in the File Type selector (2).
Select between factory content and user content in the Content selector (3).
The next steps are optional. They can be useful to further refine your search and limit the number of search results to a reasonable amount:
Choose a product category or a product in the Product selector (4). If you have selected a product you can further choose a particular bank and sub-bank of this product, if any.
Select tags in the TYPES filter (5) and the CHARACTER filter (6) for Instrument and Effect presets to describe what you are looking for.
At any time in the procedure described above, you can use the Search field (7) to quickly perform a text search among the entries in the Result list (8).
The above steps are described in detail in the following sections.
Selecting or loading a product and selecting a bank from the Browser
The Product selector allows you to limit your search to a certain product category, a particular product, or a specific bank of the product. You can also load a product along with its default preset file directly from the Product selector (see below).
By default there is no particular selection in the Product selector; it reads All Instruments:
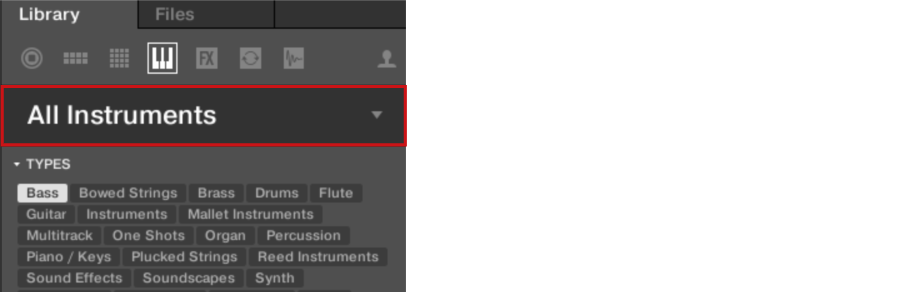
The closed Product selector header.
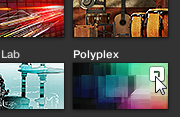
Selecting a product category
Click on the Product selector header to open it.
The Product selector opens up, showing you all products available in your Maschine Library.
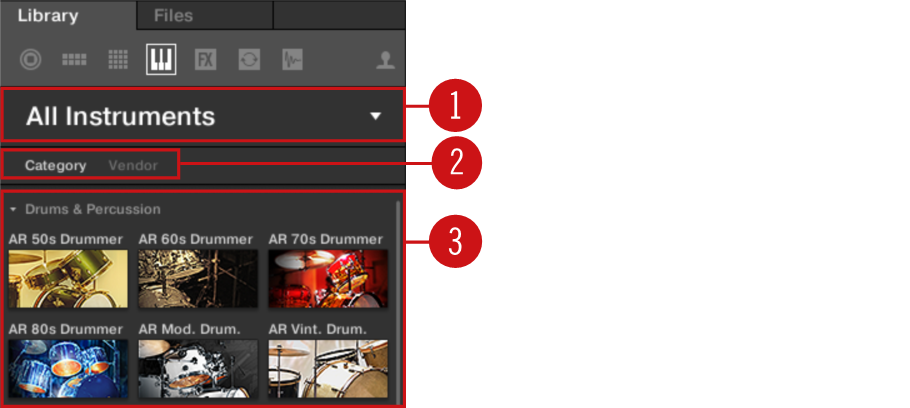
The opened Product selector.
(1) Product selector header: The header shows the selected product. If nothing has been selected, a generic label (All Instruments) is shown. Click on the header to close the Product selector.
(2) Category/Vendor selector: Allows you to sort the Product list by Category or by Vendor.
(3) Product list: Shows all products that are available in your Maschine Library.
If Category is selected in the Category/Vendor selector, the Product list is sorted by the following categories:
Drums & Percussion
Sampled Instruments
Synthesizers
Other
If Vendor is selected in the Category / Vendor selector, the Product list is sorted by the names of the manufacturers.
To select a product and show only the preset files associated with it, click on the product in the list.
Upon your selection, the Product selector automatically closes, the product name and icon appear in the header, and the tag filter and results list below will be filtered accordingly.
Notice
Products are shown in the Product selector only if the Library contains files for them. If a particular product does not show up, make sure that you have installed the latest updates using Native Access.
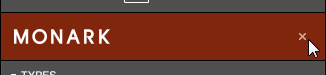
Resetting the product selection
To reset the selection made in the Product selector, click the little cross at the right of the product name:
The product selection is cancelled. The Product selector displays the generic label All Instruments. The tag filter and the results list under the Product selector now include files for all products.
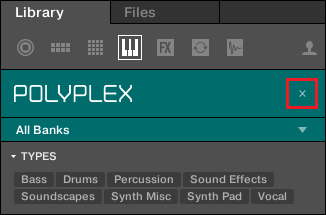
Selecting a bank
When you select specific products in the Product list (see description above), an additional Bank menu appears under the closed Product selector:

The Bank menu showing All Banks for POLYPLEX
The Bank menu allows you to select a particular bank of files for the selected product (POLYPLEX in the picture above).
Banks can be additional Libraries (for example Massive Expansions), different versions of the original Factory Library (for example FM7 Legacy and FM8 Factory Library), or any other content categorization specific to a particular product (for example different sets of drum sounds for POLYPLEX).
To select a particular bank for the selected product, click the Bank menu under the product icon, and choose a bank from the available entries.
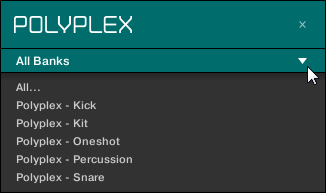
Upon your selection, the Bank menu closes and displays the selected bank. The tag filter and results list underneath further narrow their content accordingly.
As with the product selection, you can remove the selected bank by clicking the little cross next to the bank name in the closed menu.
Loading a product from the Product selector
If you wish to not only filter the results list by selecting a product but also load the product along with its default preset file, you can do so directly from the Product selector.
To load a product with its default preset file, place the mouse over the product entry in the Product selector, and click on the arrow symbol that appears in the upper right corner of the product entry.
The product and the first preset from the results list for this product are loaded, and the result list only displays preset files only associated with this product.
Selecting a Product Category, a Product, a Bank, and a Sub-Bank
The Product selector allows you to limit your search to a certain product category, a particular product, a specific bank of the product, or even a sub-bank in this bank.
By default there is no particular selection in the Product selector: It reads All Projects, All Groups, All Sounds, All Instruments, All Effects or All Samples according to the type of file selected in the File Type selector above (refer to Selecting a file type):

The closed Product selector without any Instrument selected.
Selecting a Product or a Product Category
Click the Product selector to open it.
The Product selector opens up and displays the following:
The opened Product selector (for Instrument presets).
(1) Product selector header: The header shows the product or the selected product category — if there is no selection it shows a generic label (All Instruments in the picture above) corresponding to the type of file selected in the File Type selector above. Click the header to close the Product selector.
(2) Product Category filter: Shows the categories of the products that have files available in the Maschine Library. Click a category of a product to select/deselect it. Selecting a category limits the number of products shown in the Product list below (3). Only one category can be selected at a time. You can also select a category and close the Product selector by clicking its header (1) again: The header (1) will display the category that you have just selected, and the TYPES filter (and CHARACTER filter, if present) along with the Result list will be filtered by that category.
(3) Product list: Shows the products for which files are available in the Maschine Library. Click the desired product in the list. Upon your selection the Product selector automatically closes, the product name and icon appear in the header, and the tag filter and Result list below will be filtered accordingly.
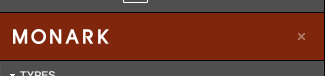
The closed Product selector with an Instrument selected.
Notice
Product categories and products are shown in the Product selector only if the Maschine Library contains files for them. For example, if a Native Instruments effect from the Komplete family is installed on your computer but you haven’t saved any user presets for it in Maschine yet, its product icon will not be available in the Product selector when the user content is selected in the Content selector. Similarly, if you haven’t updated a particular Native Instruments effect/instrument, the icon for that product might not be available in the Product selector when the factory content is selected in the Content selector — to prevent this, make sure that all your Native Instruments products are up to date.
Resetting the Product Selection
To reset the selection made in the Product selector, click the little cross at the right of the product name:
The product selection is cancelled. The Product selector displays the generic label corresponding to the selected file type (Project, Group, Sound, Instrument preset, Effect preset or Sample). The tag filter and the Result list under the Product selector now include files for all products.
Selecting a Bank and a Sub-Bank
When you select specific products in the Product list (see description above), an additional Bank menu appears under the closed Product selector:
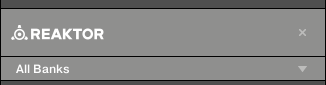
The Bank menu showing All Banks for Reaktor Effects.
This Bank menu allows you to select a particular bank of files for the selected product (Maschine in the picture above).
To select a particular bank for the selected product, click the Bank menu under the product icon and choose a bank from the available entries.
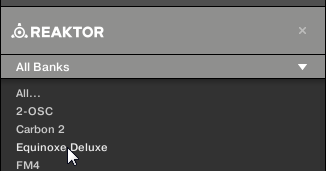
Upon your selection the Bank menu closes and displays the selected bank. The tag filter and Result list underneath further narrow their content accordingly.
Notice
Banks can be, e.g., additional libraries (e.g., Massive EXPANSIONS), different versions of the original Factory Library (e.g., FM7 Legacy and FM8 Factory Library), or any other content categorization specific to a particular product.
Similarly, some banks are split into several sub-banks. In that case a Sub-Bank menu appears under the Bank menu and allows you to select a particular sub-bank. As with the product above, you can remove the selected bank and sub-bank by clicking the little cross at the right of the bank or sub-bank name in the closed menu.
Products and Banks for User Content
When you save your own Maschine files, they are automatically assigned to products, banks, and sub-banks as follows:
When you save Projects, Groups or Sounds, they are automatically set to the Maschine product.
When you save Instrument or Effect presets:
Presets for Internal Plug-ins: The product is set to Maschine, while the bank is set to the particular Internal Plug-in for which the preset has been saved (e.g., Sampler, Kick, Flanger, etc.).
Presets for Native Instruments Plug-ins: The product is set to the particular Native Instruments effect or instrument. The bank and sub-bank will vary with each Native Instruments product.
Presets for External Plug-ins: The product is set to the manufacturer of the VST/AU plug-in, and the bank is set to the particular VST/AU plug-in for which the preset has been saved. The sub-bank is left empty. In addition, the preset is assigned to the External Plug-ins product category.
Selecting a file type
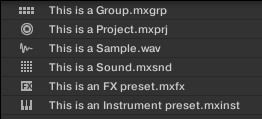
The File Type selector shows six icons representing the different file types of Maschine:
The File Type selector.
(1) Project: (.mxprj)
(2) Groups: (.mxgrp)
(3) Sounds: (.mxsnd)
(4) Instrument Plug-in presets: (.mxinst)
(5) Effect Plug-in presets: (.mxfx)
(6) Loops: (.wav, .aiff, .flac, .mp3, .mp4, .ogg)
(7) One-Shots: (.wav, .aiff, .flac, .mp3, .mp4, .ogg)
Click the desired icon in the File Type selector to display only the files of that type in the Result list.
The selected icon is highlighted and the files are filtered accordingly.
Choosing between factory and user content
The Content selector represents the factory content and the user content:

The Content selector.
Selecting Type and Character tags
The tag filter that appears under the Product selector allows you to search for files according to particular characteristics, effect type, sonic character, etc.
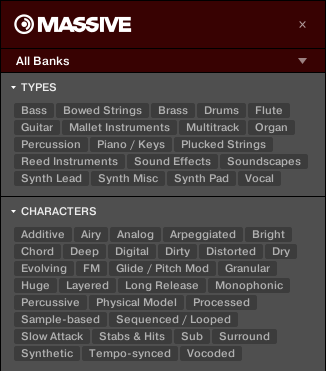
TYPES and CHARACTERS filters for the Massive Massive Plug-in.
Click tags to filter files based on the selected type and character tags. Click the selected tags again to deselect them and broaden the search.
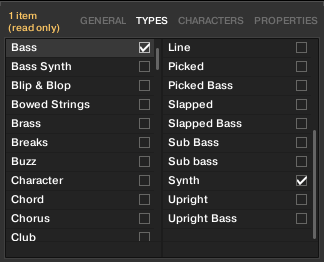
Tags for Projects, Groups and Sounds: 3 Type Levels
For Projects, Groups and Sounds tags are structured into three hierarchical levels globally called Types. You can select them via the TYPES filter:
At first the TYPES filter displays the available top-level tags only.
As soon as you select a tag at the top level, the second level appears underneath with sub-tags of the selected tag.
The hierarchical structure means that the sets of sub-tags are specific to each tag of the level above.
Example: Imagine that you are looking for a bass synth
You have already selected the Maschine product in the Product selector, and the Maschine 2.0 Library bank of this product (for more information on this, refer to section Selecting a Product Category, a Product, a Bank, and a Sub-Bank). For now the TYPES filter shows only top-level tags.
In order to find a bass, you first select the Instruments Type from the TYPES filter.
In the second level, you select the Bass Sub-Type.
Now the third level appears with Sub-Types like Acoustic, Electric, etc.
By selecting any of these tags, say, Electric, you will narrow your search to this particular Sub-Type of basses.
This allows you to quickly find various Samples (even for different instruments) with similar characteristics — here, an acoustic sound.
Tags for Instrument, Effect, and Sample Presets: 2 Type Levels and 1 Character Level
For Instrument, Effect and Sample presets, tags can be of two kinds: Type or Character. You can select them via the TYPES and CHARACTERS filter, respectively:
The TYPES filter works as described above for all other file types, except that only two hierarchical levels are available. See above for a detailed description.
The CHARACTERS filter provides an additional level that is independent from the Type levels:
In general, Character tags will rather refer to technical terms (e.g., Arpeggiated, Percussive, Synthetic, etc.).
The CHARACTERS filter is always displayed. You can start your search with the CHARACTERS filter before (or even without) using the TYPES filter.
However, the list of tags available in the CHARACTERS filter will vary depending on the tags selected in the TYPES filter. If no file contains both the Type and Character tags that you have selected, the Type tags will prevail and the Character tags will be deselected.
Notice
If you don’t select any tag in the TYPES or the CHARACTERS filter, the Result list will include all files satisfying any of their tags.
Selecting Multiple Tags from the Same Level
In both TYPES and CHARACTERS filter you can select multiple tags from the same level:
Hold [Shift] on your computer keyboard and click two tags at a particular level to select these tags and all tags in-between.
Hold [Ctrl] ([Cmd] on macOS) on your computer keyboard and click any number of tags at a particular level to select these particular tags.
The Result list will include all files satisfying at least one of the selected tags.
Opening and Collapsing the Attributes Sections
The Attributes sections (TYPES and CHARACTERS) in the Browser Library can be collapsed to make more room for the results list on smaller display resolutions.
To collapse the Attributes sections:
Click the small triangle located to the left of the Attributes (TYPES or CHARACTERS).
The Attribute sections will collapse results will be shown depending on the amount of space available. Click the triangle again to reopen the sections.
Highlighted triangle next to the Attributes (TYPES and CHARACTERS).
Performing a text search
In the Search field you can enter your search query.

The Search field.
Click in the Search field and type the desired text to limit the results to files containing this text.
The search will be performed on the file paths, the file names, the products/banks/sub-banks, the tags, and the properties directly as you type. If you want to search for a combination of two words (e.g. “bass” and “analog”) just enter both words in the Search field with a space in between. As you start typing, the list of matches will start narrowing in the Result list below.
On the right of the Search field, click the Reset button (showing a little cross) to reset both text search and tag search. The Product selection is not affected.
Loading a file from the result list
The Result list shows all the files that match your query:
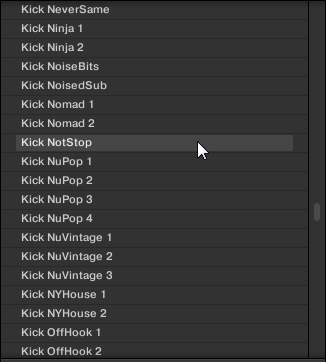
The Result list showing kicks from the Maschine Library.
If the list is too long to fit in the display, use your mouse wheel or drag the scroll bar on the right to show the remaining items.
The Result list allows you to:
Select the desired file(s).
Load the selected file(s) into your Project (or load another Project).
Delete the selected file(s) from your hard disk and from the Library.
Navigate to the selected file(s) in your operating system.
See, and possibly edit, the attributes of the selected file(s) by clicking the EDIT button at the bottom right of the Browser. For more information on this, please refer to section Editing the files’ tags and properties.
Selecting files in the Result list
To select a single file in the Result list, click its entry.
You can also select multiple files in the Result list in order to process them all at once.
To select adjacent files in the list, do the following:
Hold [Shift] on your computer keyboard and click two files in the Result list to select these files and all files in-between.
To select distant files in the list, do the following:
Hold [Ctrl] ([Cmd] on macOS) and click all the files you want to select.
Loading files via double-click
Double-clicking one of the matches will load the respective file. Depending on what file type you have selected, the file will be loaded to different locations within Maschine:
If it is a Project it will load all associated files replacing all files currently in memory. If your current Project contains unsaved changes a dialog will appear asking you if you want to save them. This is to prevent you from losing changes by accidentally loading a new Project without saving the old one.
If it is a Group, it will be loaded into the Group currently in focus.
If it is a Sound, it will be loaded into the Sound slot currently in focus.
If it is an Instrument preset, it will be loaded into the first Plug-in slot of the Sound slot currently in focus.
If it is an Effect preset, it will be loaded into the selected Plug-in slot.
If it is a Sample, it will be loaded into the Sound slot currently in focus. The Sampler Plug-in will be automatically loaded in the first Plug-in slot in order to play the Sample. The Sample will spread over the entire velocity and note range.
Notice
The file loaded will replace the object previously at that position or in this slot, if any! If needed, you can undo/redo your action via the shortcuts [Ctrl] + [Z]/[Y] (Windows) or [Cmd] + [Z]/[Y] (macOS).
Loading files via drag and drop
Except for Projects, you can also load files from the Result list into the desired location via drag and drop. This notably has the following benefits:
You can load the file into a Group or a Sound slot that is not currently focused, or into a Plug-in slot that is not selected.
You can load a Sample into its own Zone in the Zone page of the Sample Editor: A new Zone will be created for that Sample. See section Adding Samples to the Sample Map for more information.
Notice
Drag and drop of Groups and Sounds is possible only in Arrange view.
Loading multiple files at once via drag and drop
Once you have selected multiple files from the Result list (see description above), you can drag and drop them to the relevant locations in Maschine. By doing this, please keep in mind the following:
When dragging several Groups onto the Group List, you have following options:
If you drop the Groups between two existing Groups (where the insertion line appears), the dropped Groups will be inserted between these two Groups.
If you drop the Groups onto an existing Group, the dropped Groups will replace that Group and the following ones.
If you drop the Groups onto the “+” at the end of the Group List, the Groups will be appended to the existing Groups in the Group List.
When dragging several Sounds, you have following options:
If you drop the Sounds onto an existing Group, the Sounds will be loaded in the empty Sound slots of that Group — if there are not enough empty Sound slots, the Sounds will be loaded in the first Sound slots of the Group, replacing the Sounds previously loaded in these slots.
If you drop the Sounds onto the “+” at the end of the Group List, the Sounds will be loaded in a new Group appended to the existing Groups.
If you drop the Sounds onto the Sound List, the Sounds will be loaded in adjacent Sound slots, starting from the slot onto which you dropped them.
When dragging several Instrument presets, you have the same options as when dragging several Sounds (see above). Each Instrument preset will be loaded into in its own Sound, and the Sound will take the name of the preset.
When dragging several Effect presets, you have following options:
If you drop the Effect presets onto a Group in the Group List or onto a Sound in the Sound List, they will be appended to the existing Plug-ins in the Plug-in List of that Group or Sound.
If you drop the Effect presets between two existing Plug-ins in the Plug-in List of any channel, they will be inserted between these two Plug-ins.
If you drop the Effect presets onto an existing Plug-in in the Plug-in List of any channel, they will replace that Plug-in and the following ones.
When dragging several Samples, you have following options:
If you drop the Samples onto an existing Group, onto the “+” at the end of the Group List, or onto the Sound List, you have the same options as when dragging several Sounds (see above). Each Sample will be loaded in its own Sound with a Sampler Plug-in in the first Plug-in slot in order to play the Sample. The Sample will spread over the entire velocity and note range.
You can also drop the Samples onto the Zone page of the Sample Editor. In that case all Samples will be loaded in the focused Sound and a Zone will be created for each Sample. For more details, refer to section Adding Samples to the Sample Map.
Notice
You cannot load multiple Projects at once.
Notice
Drag and drop of Groups and Sounds is possible only in Arrange view.
Deleting files in the Result list
You can delete user files directly from the Result list:
Right-click ([Ctrl]-click on macOS) the desired user file and select Delete from the context menu. If you want to delete several files at once, first select them as described above, and right-click ([Ctrl]-click on macOS) ([Ctrl]-click on macOS) any of them.A warning dialog opens to inform you that the file will be not only removed from the Maschine Library but also deleted from your hard disk.
Click OK to confirm the deletion (or Cancel to keep the file).
The file is deleted from the Maschine Library and from your hard disk.
Notice
When browsing factory content, the Delete entry is not available in the context menu.
Navigating to the files in your operating system
If you want to find out the location of a particular file shown in the Result list, do the following:
Right-click ([Ctrl]-click on macOS) any file shown in the Result list and select Find in Explorer (Find in Finder on macOS) from the context menu to open an Explorer/Finder window pointing to the folder containing that file on your operating system.
Additional browsing tools
At the bottom of the Browser, the Control bar provides various useful tools that will help you quickly find and check the files you need.

The Control bar at the bottom of the Browser.
Some of the tools are available only for specific file types. The next sections describe each of these tools.
Notice
The EDIT button (Library pane) or IMPORT button (Files pane) at the far right of the Control bar allows you to edit the attributes of the files selected in the Result list above (in the Files pane, these are the files being imported to the Library, whereas in the Library pane these are files already in the Library). Please refer to section Editing the files’ tags and properties for more information!
Loading the selected files automatically

The Autoload button.
When Autoload is activated, any item that you select in the result list of the Library pane or Files pane is automatically loaded into the focused Group or Sound slot or into the selected Plug-in slot, replacing any content currently in that location. This allows you to listen to this item in context with the rest of your Project while it is playing.
Notice
Autoload is not available when browsing Projects.
Notice
Autoload is not available when browsing Samples with Audition activated. For more information, refer to Auditioning Samples.
Tip
Autoload is not only helpful when looking for an appropriate Sound, Group, Plug-in preset or Sample, but can also be very inspiring: With a Pattern playing, browse through your Library with Autoload activated and listen to Sounds and Samples you usually would not use in that context.
Auditioning Instrument presets
When you are browsing Instrument presets, a Audition button and Audition Volume slider appear next to the Autoload button.

The Audition controls.
Click the Audition button (showing a little speaker icon) to enable/disable Audition.
When Audition is activated, you can directly hear Instrument presets as you select them in the Result list of the Library pane or Files pane.
Drag the Audition Volume slider next to the Audition button to adjust the volume of the Instrument presets you are pre-listening to.
The Audition signal is sent to the Cue bus of Maschine. This allows you to pre-listen to Instrument presets on a distinct output pair (e.g., in your headphones) without affecting Maschine’s main output. For more information on the Cue bus, refer to section Using the Cue bus.
Auditioning Samples
When you are browsing Samples, a Audition button and Audition Volume slider appear next to the Autoload button.
The Audition controls
Click the Audition button (showing a little speaker icon) to activate/deactivate Audition.
When Audition is activated, you can directly hear Samples as you select them in the Result list of the Library pane or Files pane.
Drag the Audition Volume slider next to the Audition button to adjust the volume of the Samples you are pre-listening to.
The Audition signal is sent to the Cue bus of Maschine. This allows you to pre-listen to Samples on a distinct output pair (for example, in your headphones) without affecting Maschine’s main output! For more information on the Cue bus, refer to section Using the Cue bus.
Notice
Audition and Autoload are mutually exclusive: only one of them can be active at a time. For more information on the Autoload feature, refer to section Loading the selected files automatically.
Loading Groups with Patterns
Every Group from the factory library includes a set of Patterns that illustrate possible uses of that Group. Similarly, when you save a Group of your own to the Library for later use, all Patterns you have created for that Group will be saved with the Group.
When browsing Groups, you can choose to load each Group with or without its Patterns. This is done by clicking the + PATTERNS button at the bottom of the Browser:
+ PATTERNS button activated: Groups will be loaded together with their Patterns. This allows you to use the Patterns you have saved with the Groups. Upon loading, all Patterns of the focused Group will be replaced, and a Clip referencing the first Pattern will be created in the selected Scene.
+ PATTERNS button deactivated: Groups will be loaded without their Patterns. This allows you to load another set of Sounds while keeping your current Patterns. Notably, this can be very useful to try another drum kit with your current Patterns.
Notice
+PATTERNS is only available when browsing Groups.
Loading Groups with routing
When the file type Groups is selected, the +ROUTING button is available in the Control bar of the Browser. When the +ROUTING button is activated the audio and MIDI routings stored in the Group are also loaded (potentially overwriting previous routings in the selected Group). When the +ROUTING button is off, any audio and MIDI routings saved in the Group will not be loaded, thus preserving any existing routings in the active Group.
Displaying file information

The Information button
Click the Information button (showing a little “i”) next to the EDIT button in the right part of the Control bar to display information on the file(s) selected in the Result list.
A box appears above with various information on the selected file(s): File Format, Date modified, File Size, Type, as well as the Author and Vendor properties, if any (refer to Editing the files’ tags and properties).
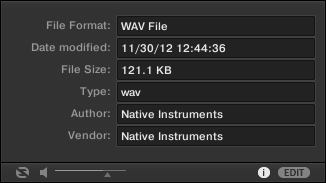
The Information box provides various information on the selected file(s)
If the selected files have different characteristics, the corresponding fields in the Information box will read multi.
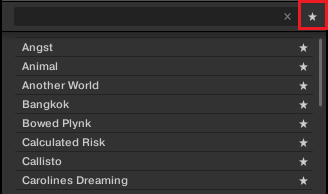
Using Favorites
Favorites in the Maschine Browser allow you to quickly view and browse your most frequently used items. This includes Projects, Groups, Sounds, Instrument presets, Effect presets, Loops and One-shots. You can assign any of these items as Favorites. The Favorites serve as an additional filter in the Browser: When activated, the Result list will only show items that have been marked as Favorites and also match all other selected filters, including the search query entered into the search field. Favorites are available for both the factory content and the user content.
Here are some important notes regarding Favorites:
Favorites are automatically shared across Maschine and Komplete Kontrol browser databases on one computer.
Favorites are independent of the file’s location: If a file is moved, it retains its Favorite tag.
Favorites are persistent: If a file location is rescanned or deleted and later added again to the database, all files retain their Favorite tag.
Editing the files’ tags and properties
The Attribute Editor allows you to assign or edit tags and properties to your Maschine files to make them easier to find when browsing the Maschine Library (refer to Searching and loading files from the Library).
Attribute Editor basics
The Attribute Editor is used in the following situations:
At any time you can edit the tags and properties of user files already in the Library by selecting them in the Result list of the Library pane and clicking the EDIT button at the bottom right of the Browser. After you have finished editing, click APPLY to apply your changes to the selected files, or click the lit EDIT button again to cancel your changes and close the Attribute Editor. See section Searching and loading files from the Library for more information on the Library pane.
When importing folders to the Maschine Library using the Browser’s Files pane, clicking IMPORT at the bottom right of the Browser automatically opens the Attribute Editor so you can tag the files being imported. After you have finished tagging, click OK to import the files to the Library and apply the selected tags, or click CANCEL to cancel the import. See section Loading and importing files from your file system for more information on the Files pane.
The Attribute Editor (here showing the TYPES page).
The Attribute Editor affects the files selected in the Result list of the Library pane (refer to Loading a file from the result list) or the files within the folders selected for import in the Files pane (refer to Loading and importing files from your file system).
The Attribute Editor is organized into various pages:
In the Library pane of the Browser, all pages are available: BANK, TYPES, CHARACTERS (Instrument/Effect presets only), and PROPERTIES.
In the Files pane of the Browser, only the TYPES and CHARACTERS pages are available.
Click the desired tab at the top right of the Attribute Editor to show the corresponding page.
Tip
You can adjust the overall height of the Attribute Editor by dragging its upper border.
The number of items selected appears in yellow in the upper left corner of the Attribute Editor.
Displaying attributes of factory files
When browsing in the Library pane, if the files selected in the Result list are factory files (i.e. files from any factory content) this will be indicated by a yellow (read-only) label.
The Attribute Editor will display the various attributes for these files but you won’t be able to modify them.
BANK page
The BANK page is only available when opening the Attribute Editor from the Library pane.
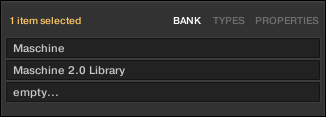
The BANK page of the Attribute Editor.
The BANK page shows you (from top to bottom) the product, bank, and sub-bank(s) of the file(s) selected in the Result list above. If any of these attributes are not set the corresponding fields read empty….
You cannot modify the attributes shown on the BANK page as they are automatically assigned by Maschine.
TYPES and CHARACTERS pages
The TYPES and CHARACTERS pages display and let you modify the tags assigned to the file(s) selected in the Result list above.
The TYPES page is available for all file types when opening the Attribute Editor both from the Library pane and the Files pane. Various columns are displayed, depending on the file type selected (refer to Selecting Type and Character tags):
The CHARACTERS page is available when opening the Attribute Editor from the Library pane to edit the tags of Instrument and Effect presets. When opening the Attribute Editor from the Files pane to import new files, the CHARACTERS page is always available, however, it will be taken into account only if Instrument or Effect presets are imported. The CHARACTERS page shows only one column:
Displaying tags
On both TYPES and CHARACTERS pages, tags assigned to the selected files are marked with a checkmark right of their name.
On the TYPES page, click the name of a tag to select it and display its Sub-Types in the next column to the right. Only one tag can be selected in each column.
Assigning tags
Additionally, when you check a tag on the TYPES page:
If another column is available on the right the tag you check is automatically selected and its Sub-Types appear in the next column (if any), allowing you to directly refine your description by checking the desired Sub-Types in this next column.
If you check a Sub-Type tag whose parent tag was not checked in the previous column on the left, this parent tag will be automatically checked as well.
Notice
Be as precise as possible when tagging your files in order to be able to find what you are looking for later.
Unassigning tags
Click the checkmark right of the desired tag to unassign this tag from the selected files.
The checkmark disappears.
Tip
In the TYPES page, if you uncheck a tag for which some Sub-Type tags were selected in the columns on the right, these will automatically unassigned as you unassign their parent tag.
Creating new tags
You can also create your own tags both in the TYPES and CHARACTERS pages:
To create a new tag in any column, click the “+” symbol at the bottom of the column, enter the desired tag name with your computer keyboard, and press [Enter] to confirm.
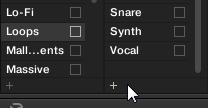
Adding a new Sub-Type for the Loops Type.
Deleting tags
Tags in the TYPES and CHARACTERS pages cannot be deleted manually. However, if a tag is not assigned to any file anymore, it will be automatically removed from its column.
PROPERTIES page
The PROPERTIES page is only available when opening the Attribute Editor from the Library pane.
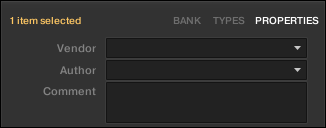
The PROPERTIES page of the Attribute Editor.
The PROPERTIES page displays three additional attributes of the selected files:
Vendor: Use this field to indicate the manufacturer of the selected files. Click the down-pointing arrow on the right to quickly select any Vendor attribute already in use in other files of the Library.
Author: Use this field to indicate the author of the selected files. Click the down-pointing arrow on the right to quickly select any Author attribute already in use in other files of the Library.
Comment: Use this field to add any other information about the selected files.
Notice
As with the other pages of the Attribute Editor, the fields in the PROPERTIES page can be modified only if you have selected user files in the Result list. The attributes of factory files cannot be edited.
Loading and importing files from your file system
The Browser’s Files pane allows you to browse your file system and import the desired folders to your Maschine Library, making them available in the Library pane.
To display the Files pane, click the Files tab at the top of the Browser.
Overview of the Files pane
The Files pane contains the following elements:
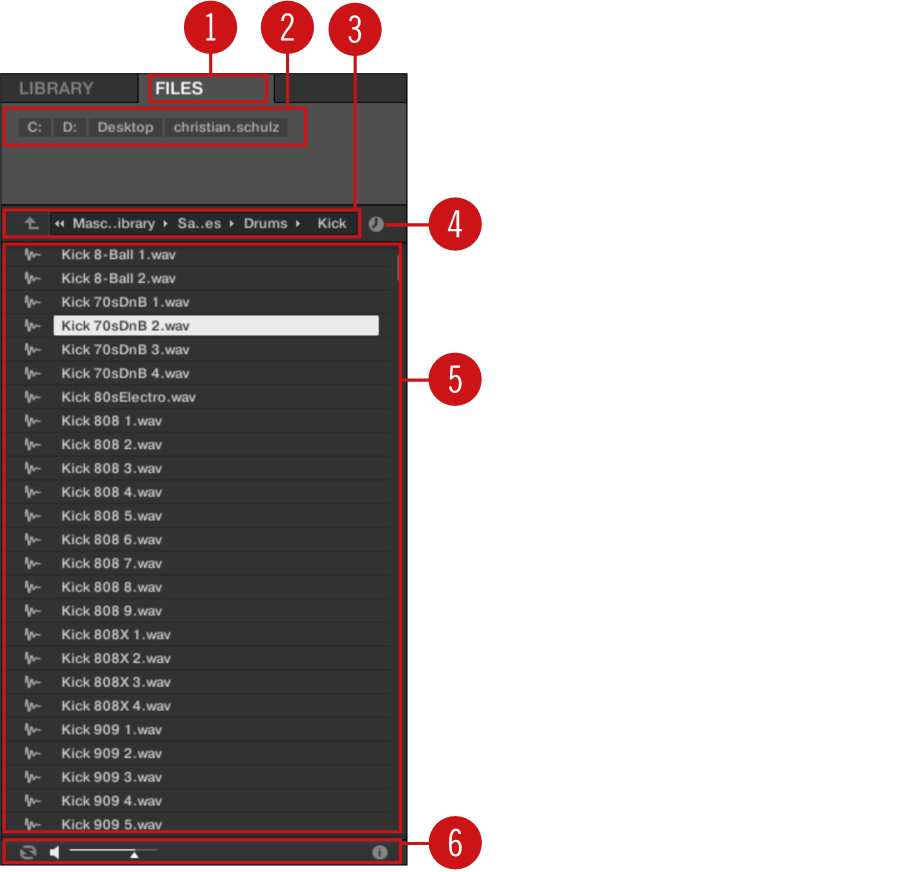
The elements of the Files pane.
(1) Files tab: Click the Files tab to open the Files pane described here.
(2) Favorite bar: Displays all your Favorites. Click any Favorite to directly jump to that particular path and display its content in the Result list (5). See section Using Favorites.
(3) Location bar: Displays the selected path. The Location bar provides various tools to quickly navigate your file system. See section Using the Location bar.
(4) Recent Locations button: Click this button to see a list of the last visited locations and quickly jump to any of them. See section Navigating to recent locations.
(5) Result list: The Result list displays the content (files and folders) of the folder loaded in the Location bar (3). Only Maschine-compatible files are displayed. See section Using the Result list.
(6) Control bar: At the bottom of the Browser, the Control bar provides a few useful tools when browsing your file system, some of them depending on the type of files selected in the Result list:
For all file types except Projects, click the Autoload button at the far left of the Control bar to automatically load the selected file in order to hear it in context with the rest of your Project while it is playing. See section Loading the selected files automatically.
For Samples, enable the Audition button and adjust the volume fader next to it in order to hear the selected Samples directly from the Browser. See section Auditioning Samples.
For Groups, enable the Load Patterns checkbox to load the Group’s Patterns together with the Group. See section Loading Groups with Patterns.
For all files, click the Information button (showing a little “i”) to display more information on the selected file(s). See section Displaying file information.
When a folder is selected, click the IMPORT button to import the selected folder to the Maschine Library. Clicking the IMPORT button will open the Attribute Editor so you can assign tags to the selected files about to be imported. See section Editing the files’ tags and properties.
Using Favorites
Located at the top of the Files pane, the Favorite bar displays all your Favorites.

The Favorite bar, at the top of the Files pane.
Favorites are shortcuts to specific locations in your file system.
Click any Favorite in the Favorite bar to jump to that location.
The selected location is loaded in the Location bar and its content appears in the Result list.
Favorites can be useful if you often return to the same location while browsing your file system in the Files pane: Save this location as a Favorite, and at any time you will be only one click away from that location!
The default Favorites are the roots of each of your hard disks, your desktop folder, and your user folder.
Adding and removing Favorites
You can add your own Favorites to the Favorite bar. This is done in the Result list:
Navigate to the parent folder containing the folder you want to add as a Favorite, so that this folder appears in the Result list.
In the Result list, right-click ([Ctrl]-click on macOS) the desired folder and select Add to Favorites from the context menu.
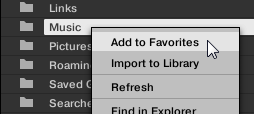
You can also remove any Favorite from the Favorite bar:
To remove a Favorite, right-click it ([Ctrl]-click it on macOS) in the Favorite bar and select Remove from Favorites.
Using the Location bar
The Location bar shows and lets you modify the selected path. At any time the Result list will display the content of the path shown here.

The Location bar.
The Location bar provides the following tools:
Up arrow: Click the Up arrow on the left to go one level up in your file system.
Selected path: Within the path displayed, you can:
Click any folder name to jump to that folder.
Click any right-pointing arrow after a folder name to open a list of its sub-folders, and select any entry in the list to jump to that folder.
If all the levels cannot be displayed in the path, click the double left-pointing arrow left of the path to display a list of the remaining higher levels (up to the Workspace, which represents the highest level in your file system), and select any entry from the list to jump to that location.
Navigating to recent locations
The Recent Locations button shows a clock icon at the right of the Location bar:

The Recent Location button.
The last 10 locations that you have visited are stored by Maschine and available here:
Click the Recent Locations button and select any recently visited location from the list.
This location is loaded in the Location bar and its content displayed in the Result list.
Clicking Clear at the bottom of the Recent Locations list will remove all entries from the list.
Using the Result list
The Result list of the Files pane shows the files and folders found in the path loaded in the Location bar above (refer to Using the Location bar).
Notice
Only Maschine-compatible files are shown in the Result list.
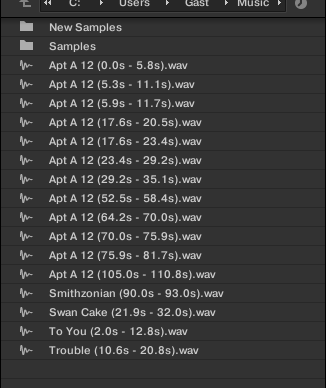
The Result list of the Files pane.
If the list is too long to fit in the display, use your mouse wheel or drag the scroll bar on the right to show the remaining items.
In front of each file, an icon indicates the type of the file:
Icons for various file types.
Navigating your file system in the Result list
You can further browse your file system in the Result list by opening any of the displayed folders:
Double-click a folder to display its content.
To return to the previous folder or to select any folder outside the folder currently displayed, use the various tools located above the Result list:
Favorites: Using Favorites.
Location bar: Using the Location bar.
Recent Locations button: Navigating to recent locations.
Selecting files and folders in the Result list
To select a single file or folder in the Result list, click its entry.
You can also select multiple files and folders in the Result list in order to process them all at once.
To select adjacent files in the list, do the following:
Hold [Shift] on your computer keyboard and click two files in the Result list to select these files and all files inbetween.
To select distant files in the list, do the following:
Hold [Ctrl] ([Cmd] on macOS) and click all the files you want to select.
Loading files from the Result list
You can load files from the Result list using the same methods as in the Result list of the Library pane: via double-click or via drag-and-drop. For all details, please refer to section Loading a file from the result list.
Additional features in the Result list
Right-click ([Ctrl]-click on macOS) any entry in the Result list to open a context menu with additional commands.
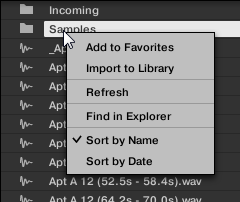
The context menu in the Result list of the Files pane (Windows depicted).
Following commands are available:
Command | Description |
|---|---|
Add to Favorites (folders only) | Adds the selected folder to your Favorites. See section Using Favorites for more information. |
Import to Library (folders only) | Imports the selected folder(s) into the Library. See section Using the Result list for more information. |
Refresh | Refreshes the display of the list, in case items have been modified in that folder. |
Find in Explorer / Find in Finder | Opens an Explorer/Finder window pointing to the selected folder. |
Sort by Name | Sorts the Result list according to the item names. |
Sort by Date | Sorts the Result list according to the item dates. |
Importing files to the Maschine Library
Apart from the huge Maschine factory library, you might want to use your own samples or any Maschine files you received from other users. As described previously, you can load them directly from the Files pane. If this can come in handy, e.g., to quickly check received files in a Maschine context, it can get tedious when using the files on a regular basis. Furthermore, you won’t be able to find and load them from your controller nor from the Library pane (refer to Searching and loading files from the Library). For this, you have to import the files into the Maschine Library first.
Importing files does not mean they will be moved from their current directory, they will only be referenced by the Browser. That’s why whenever you move files, make sure to update the paths to their respective directories in the Library page of the Preferences panel, as described in section Preferences – Library page.
Tip
This section describes how to import files into the Maschine Library. When working on a Project, you can also save individual objects (Project, Groups, Sounds, Plug-in presets, or Samples) of the Project to the Library for later use. This will be described in each object-specific section, later in this manual.
Notice
Maschine supports .wav, .aiff, .flac, .mp3, .mp4, and .ogg sample formats at a sample rate of 44.1 kHz or greater and a bit depth of 16 bits, 24 bits or 32 bits float. When you load these formats into your Sound slots, the audio is kept in its original format until you modify the Sample using the audio editing functions in the Edit page of the Sample Editor, in which case the audio material is converted to the .wav format.
The Files pane allows you to import whole folders. All Maschine-compatible files found in the selected folder(s) will be imported.
To import a folder, do the following:
Click the Files tab at the top of the Browser to open the Files pane.
In the Files pane, navigate to the folder containing the folder you want to import. To do this, use the various tools described in the previous sections.
Right-click the desired folder and select Import to Library from the context menu, or select the desired folder and click the IMPORT button at the bottom right of the Browser.
You will be presented with the Attribute Editor.
In the Attribute Editor, tag the files you are about to import to the Library as described in section Editing the files’ tags and properties.
When you are done, click OK at the bottom right of the Browser to import the files to the Library.
All Maschine-compatible files found in the selected folder(s) are imported to your Library. They are added as user content (User icon selected in the Content selector of the Library pane, refer to section Choosing between factory and user content). Furthermore, the paths of the imported folders are added to the list of user libraries in the User pane of the Library page in the Preferences panel, refer to section Preferences – Default page for more information on this.
Notice
If the folder(s) you are importing contain different types of files (e.g., Samples, Sounds, and Groups), the various imported files will be available by selecting the corresponding types in the File Type selector (refer to Selecting a file type).
Notice
You can also edit the files’ tags at any time after the folder have been imported. However, it may be best to tag files on import, since it will make it easier to find them later.
Other attributes set during import
In addition to the Type (and possibly) Mode tags that you can manually assign to the files being imported as described above, other attributes are automatically set as follows:
For all file types, any attributes already assigned to the files will be retained.
For Samples, if the product/bank/sub-bank attributes are empty, they will be set to the folders in which the Samples are located:
The product will be set to the name of the folder you have selected.
If Samples reside in a subfolder of this folder, the subfolder name will be used as a bank.
If Samples reside in a subfolder of this subfolder, the name of the lower subfolder will be used as a sub-bank.
Locating missing samples
If you are loading a Maschine Project and one or more referenced Sample(s) cannot be found for any reason, a dialog will appear in which you can locate the missing Samples .
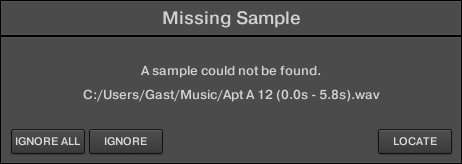
The Missing Sample dialog allows you to locate missing Samples.
Sounds referencing missing Samples are marked with an exclamation mark. Additionally, their Groups are also marked with an exclamation mark when selected.
The Missing Sample dialog shows you which Sample cannot be found. Three buttons at the bottom of the dialog let you choose between the following actions:
IGNORE: Click this button to continue loading your Project without locating the missing Sample. You will be able to locate it at a later time (refer to below).
IGNORE ALL: Click this button to ignore the missing Sample as well as all other missing Samples, if any. You will be able to locate them at a later time (refer to below).
LOCATE: Clicking this button opens a Locate selection dialog in which you can manually locate the missing Sample. Navigate to the desired Sample in your file system and click Open. Consequently, your Project uses the newly selected Sample in place of the missing one. If other Samples are missing, Maschine tries to trace their path starting from the path you just indicated.
Locating or purging missing samples at a later time
When Sample references cannot be resolved, two additional Purge Missing Samples and Find Missing Samples appear in the context menu of the affected Sound(s) in the Sound List.

The Purge Missing Samples and Find Missing Samples entries in the context menu of a Sound whose Sample is missing.
Select Purge Missing Samples from the Sound slot’s context menu to remove the missing Sample(s) from that Sound.
Select Find Missing Samples from the Sound slot’s context menu to open the Missing Sample dialog again and locate missing Samples for that Sound.
The same commands also appear in the context menu of the parent Group in the Group List, as well as in the File submenu of the Maschine menu (in the Maschine Header):
In the context menu of the parent Group, these commands will affect all Sounds with missing Samples in that Group.
In the File submenu of the Maschine menu, these commands will affect all Sounds with missing Samples in your Project.
Using Quick Browse
Quick Browse is a feature that allows you to quickly recall a search query you performed to get to a given file. Let’s say you have loaded a kick Sample after browsing the Library, then loaded a snare Sample to another Sound slot and now you realize you are not satisfied with that kick Sample, but you heard a nice kick Sample just before you chose the current one. Normally you would now have to try to remember the name or the tags you used to find it, or browse all kick Samples (given that the Maschine Library already has several hundreds of kick Samples, this may take a considerable amount of time). With Quick Browse you can restore the query with just one click.
Quick Browse is available for Samples, Plug-in presets (Instruments and Effects), Sounds, and Groups.