Quick reference
Gain a basic understanding of your Maschine Software hardware controller and the Maschine software.
This chapter introduces you to the main areas and concepts of Maschine. In the following sections, you will find:
An overview of a Maschine Project and a description of both its structure and content: Maschine Project overview.
A basic reference of the Maschine software (Maschine software overview).
Maschine Project overview
A Maschine Project contains all the information stored with a Maschine-produced piece of music.
The Project references all the sound content: the instruments, sounds and samples, and all the effects that you apply to them.
The Project also contains the arrangement of your song: how Patterns are built from events that trigger Sounds, and how they are arranged into a song structure using Scenes and Sections.
The following section will explain these two aspects in detail.
Sound content
The sound content aspect of a Maschine Project includes all the instruments and effects contained in your Project file, and how these are structured.
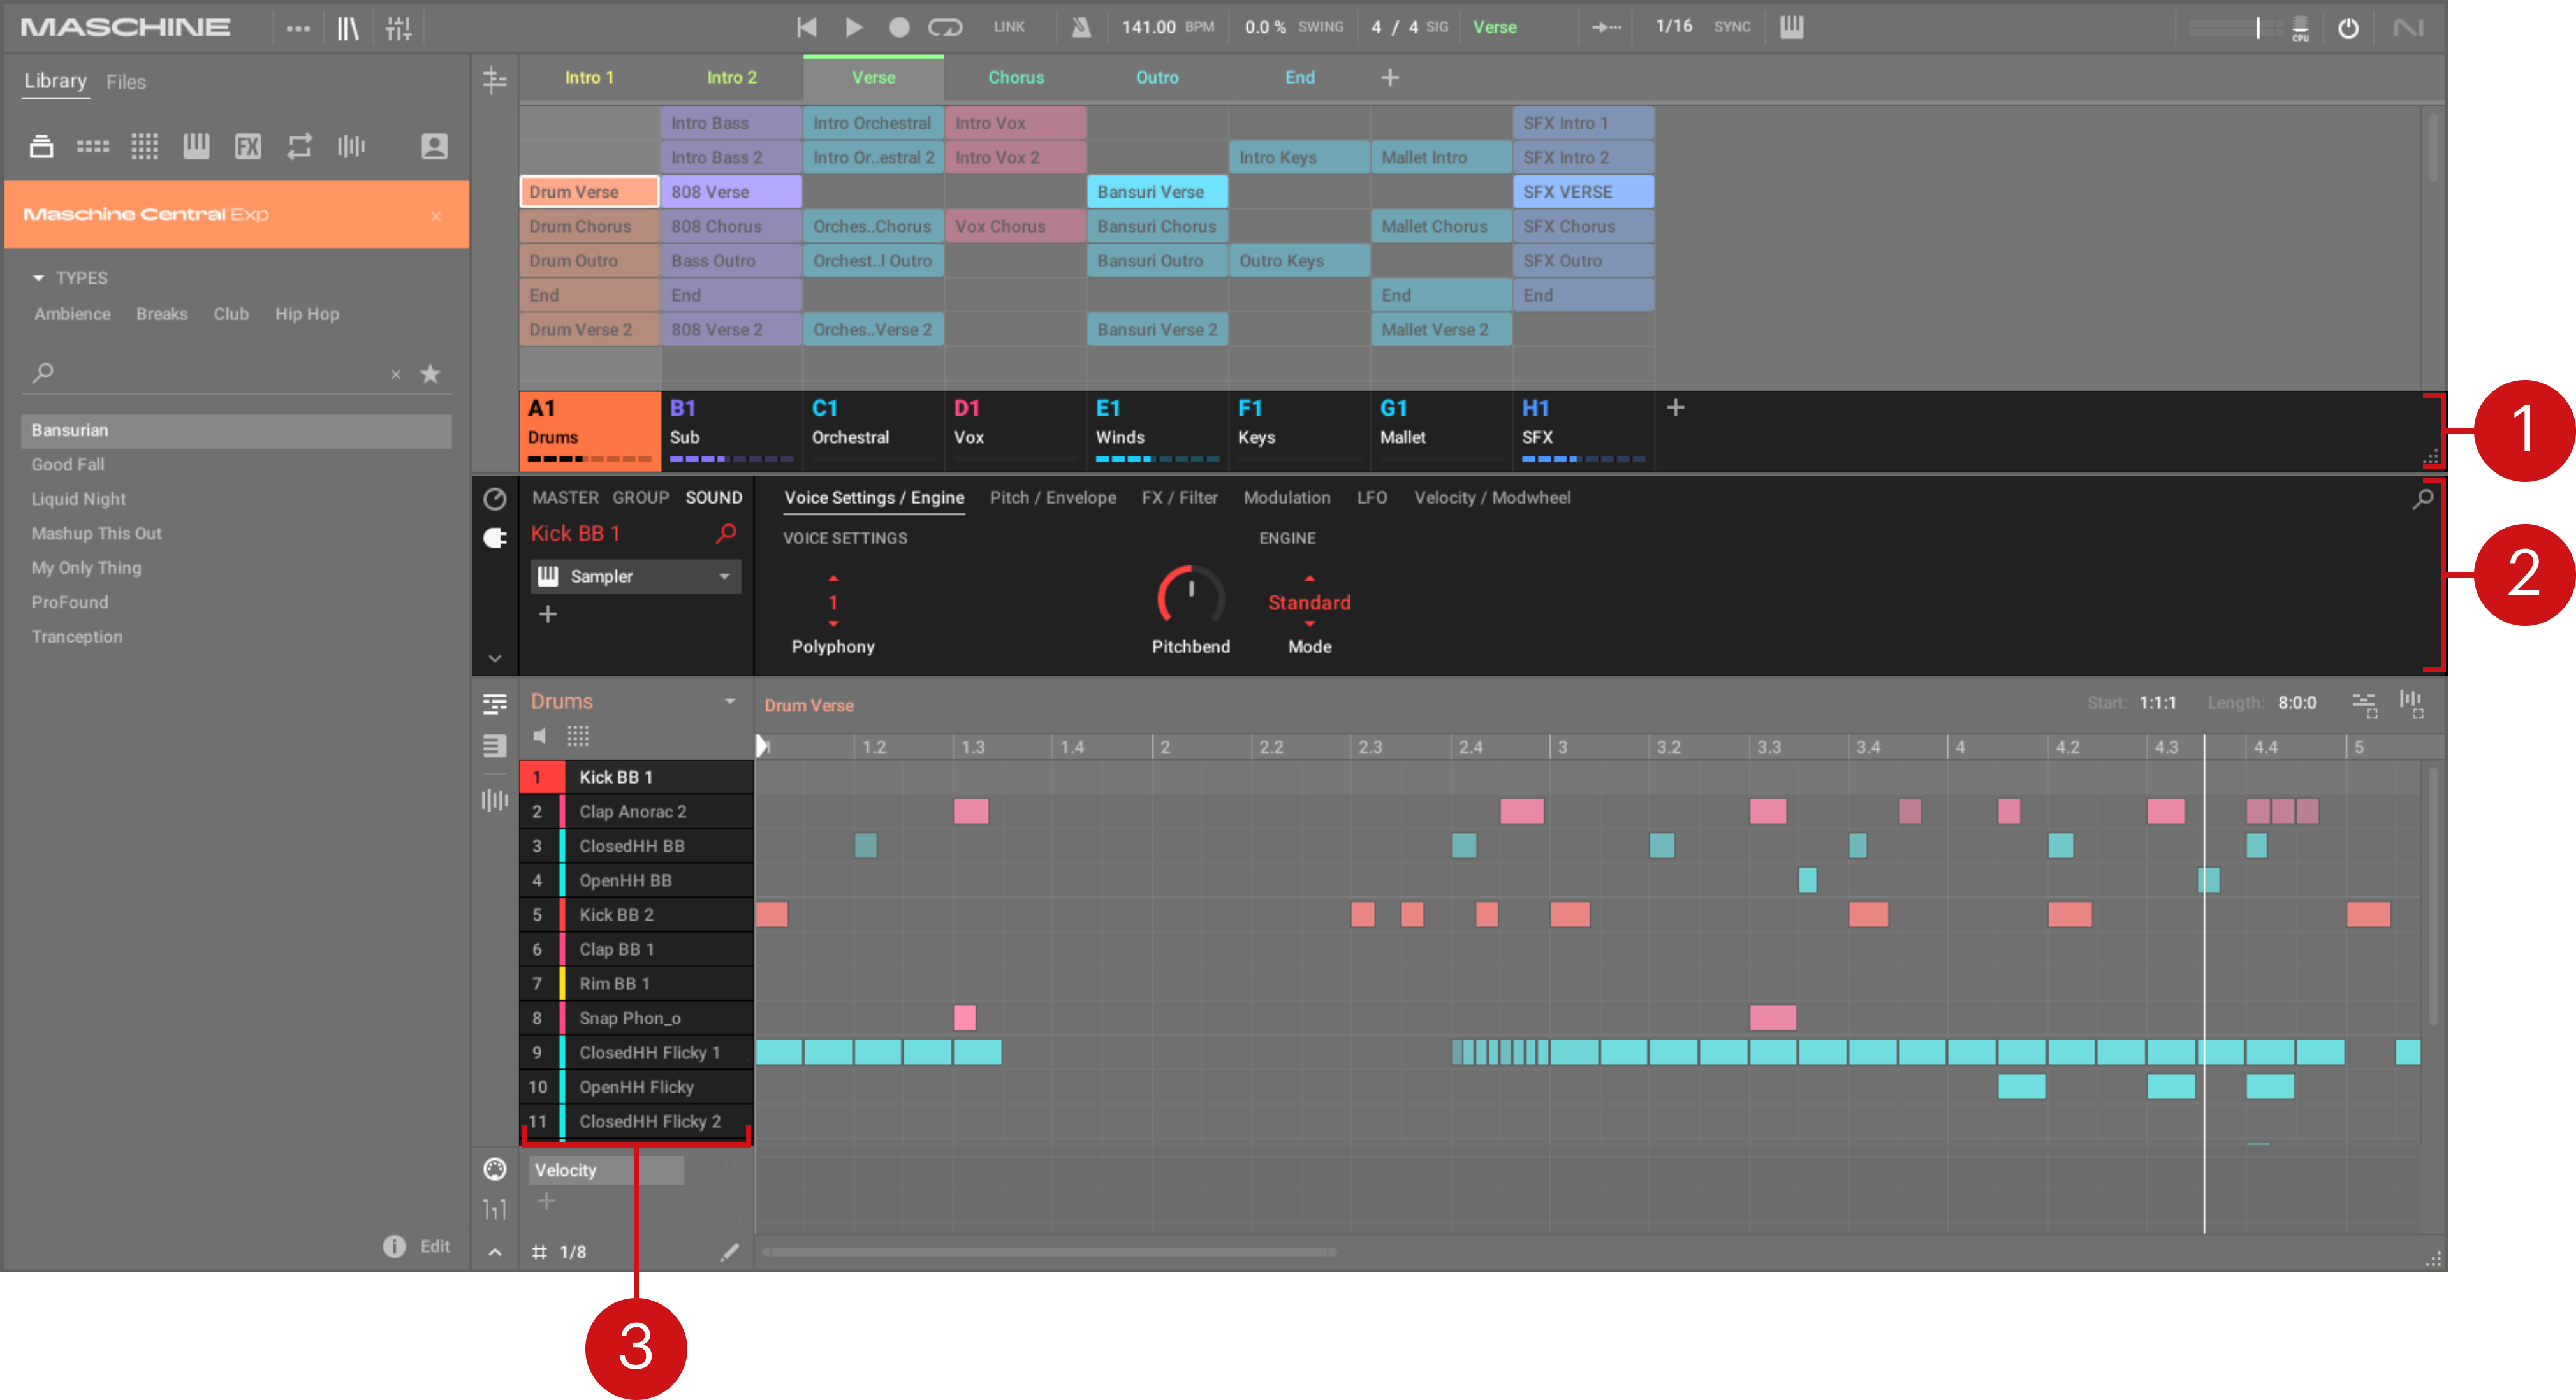
The sound content aspect of a Maschine Project with Ideas view selected.
Groups (1) are available in Banks. Each Bank contains up to eight Groups (A–H) and each Group contains sixteen Sound slots (3). Each Sound slot can be filled with samples or plug-ins.
You can influence the sound on these three channels: the Project (or Master) channel, the Group channel, and the Sound channel. The relevant controls are situated in the Control area (2), which can be used for accessing Plug-in parameters or Channel properties.
The Control area has three tabbed sections corresponding to each channel: MASTER, GROUP, and SOUND.
The controls in the SOUND section affect the sound of the selected Sound (1–16).
The controls in the GROUP section affect the sound of the selected Group (A–H), i.e. the sound of all its Sound slots.
The controls in the MASTER section affect the sound at the main outputs of Maschine, that is, the sound of all Groups and all Sounds.
Arrangement
The Maschine Project is about building patterns and putting those patterns into a loop or a song structure. In Maschine, the process of creating ideas is separated from the process of arrangement to provide a more flexible and creative approach. To reflect this the Arranger is split into two views: Ideas view and Song view which you can easily switch between using your controller. The two views reflect the same content but in different ways.
Ideas view
The Ideas view is best equipped to help you develop your Patterns and Scenes. Here you create and record your Patterns and then combine them by assigning them to Scenes. Once you have created a number of Scenes that are ready to be arranged you can add them to the Song view.
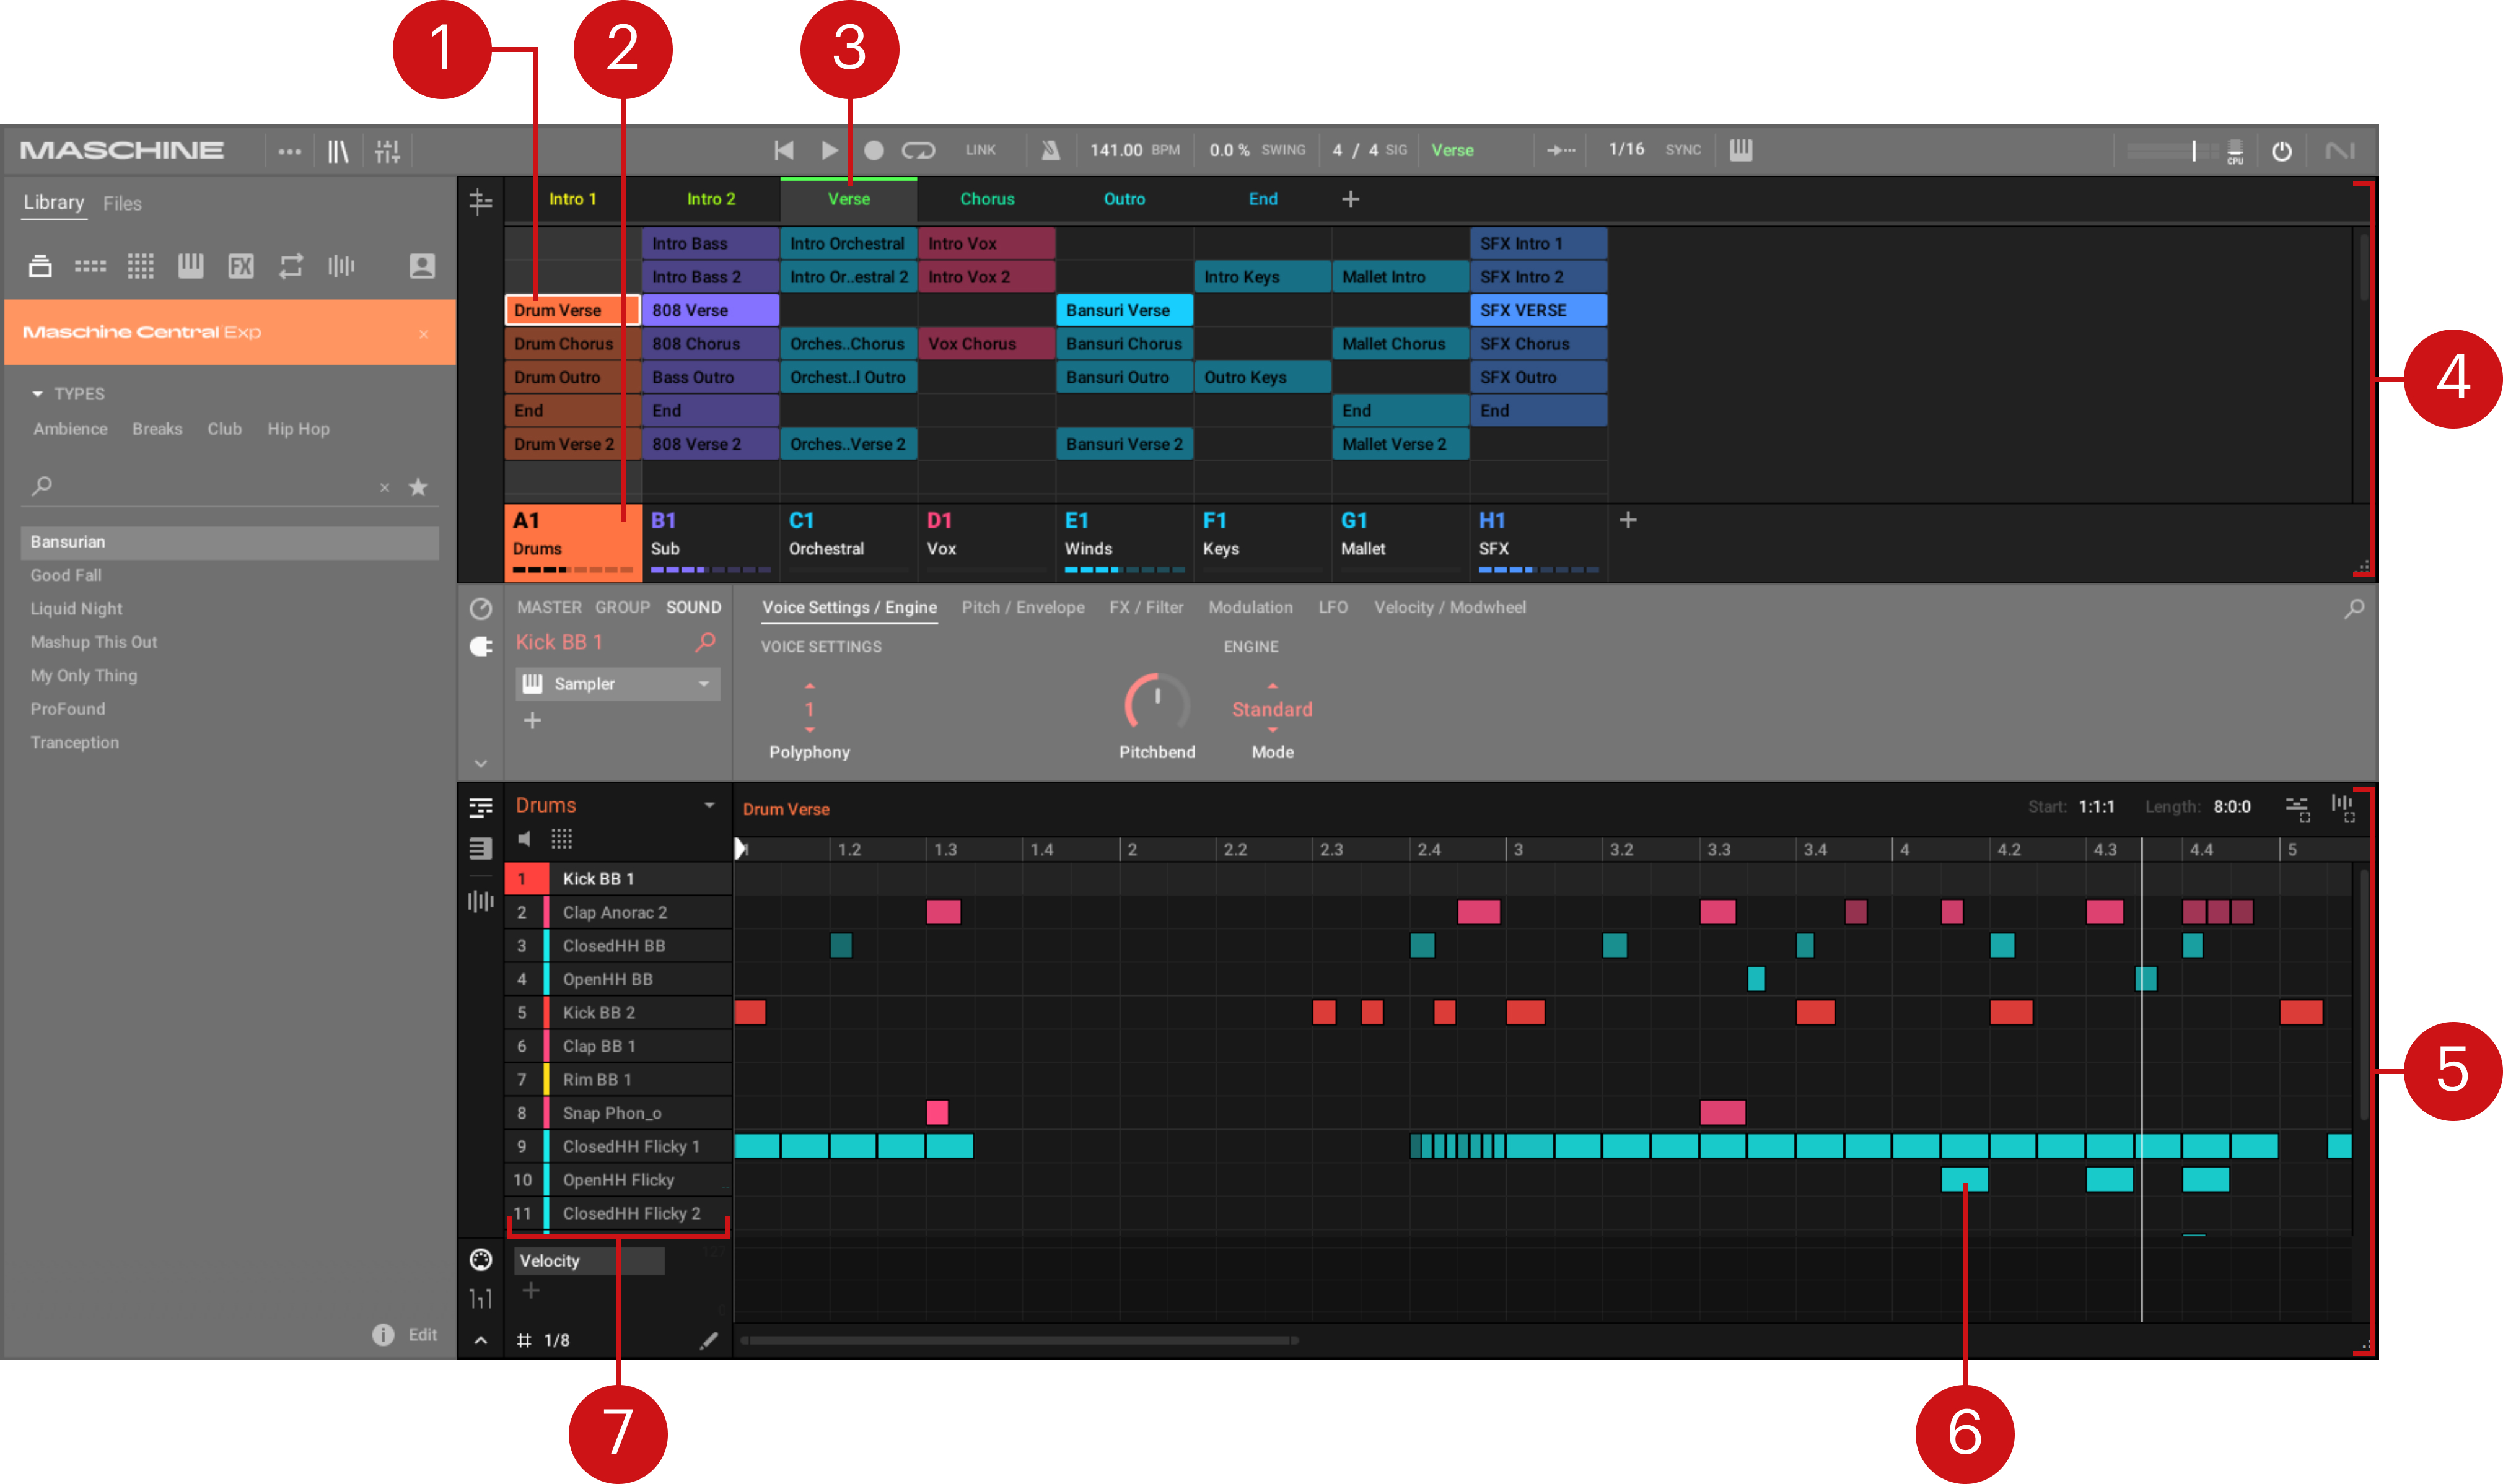
The Ideas view of a Maschine Project optimized for creating Patterns and building Scenes.
The workflow of creating ideas in Maschine is as follows:
You load samples or plug-ins into the Sound slots (7) of the selected Group (2).
You record instances of your Sounds by playing the pads. A recorded instance of a Sound is called an event (6).
Together, the events add up to a Pattern (1) for the selected Group (2).
Pattern details are shown in the Pattern Editor (5), where you can create several Patterns for each of your Groups.
In the upper half of the software, the Ideas view of the Arranger (4) allows you to combine your Patterns (1) from each Group into Scenes (3).
Song view
In the Song view, Scenes are assigned to Sections and placed on the Timeline of the Arranger, where you can move them around to develop an arrangement.
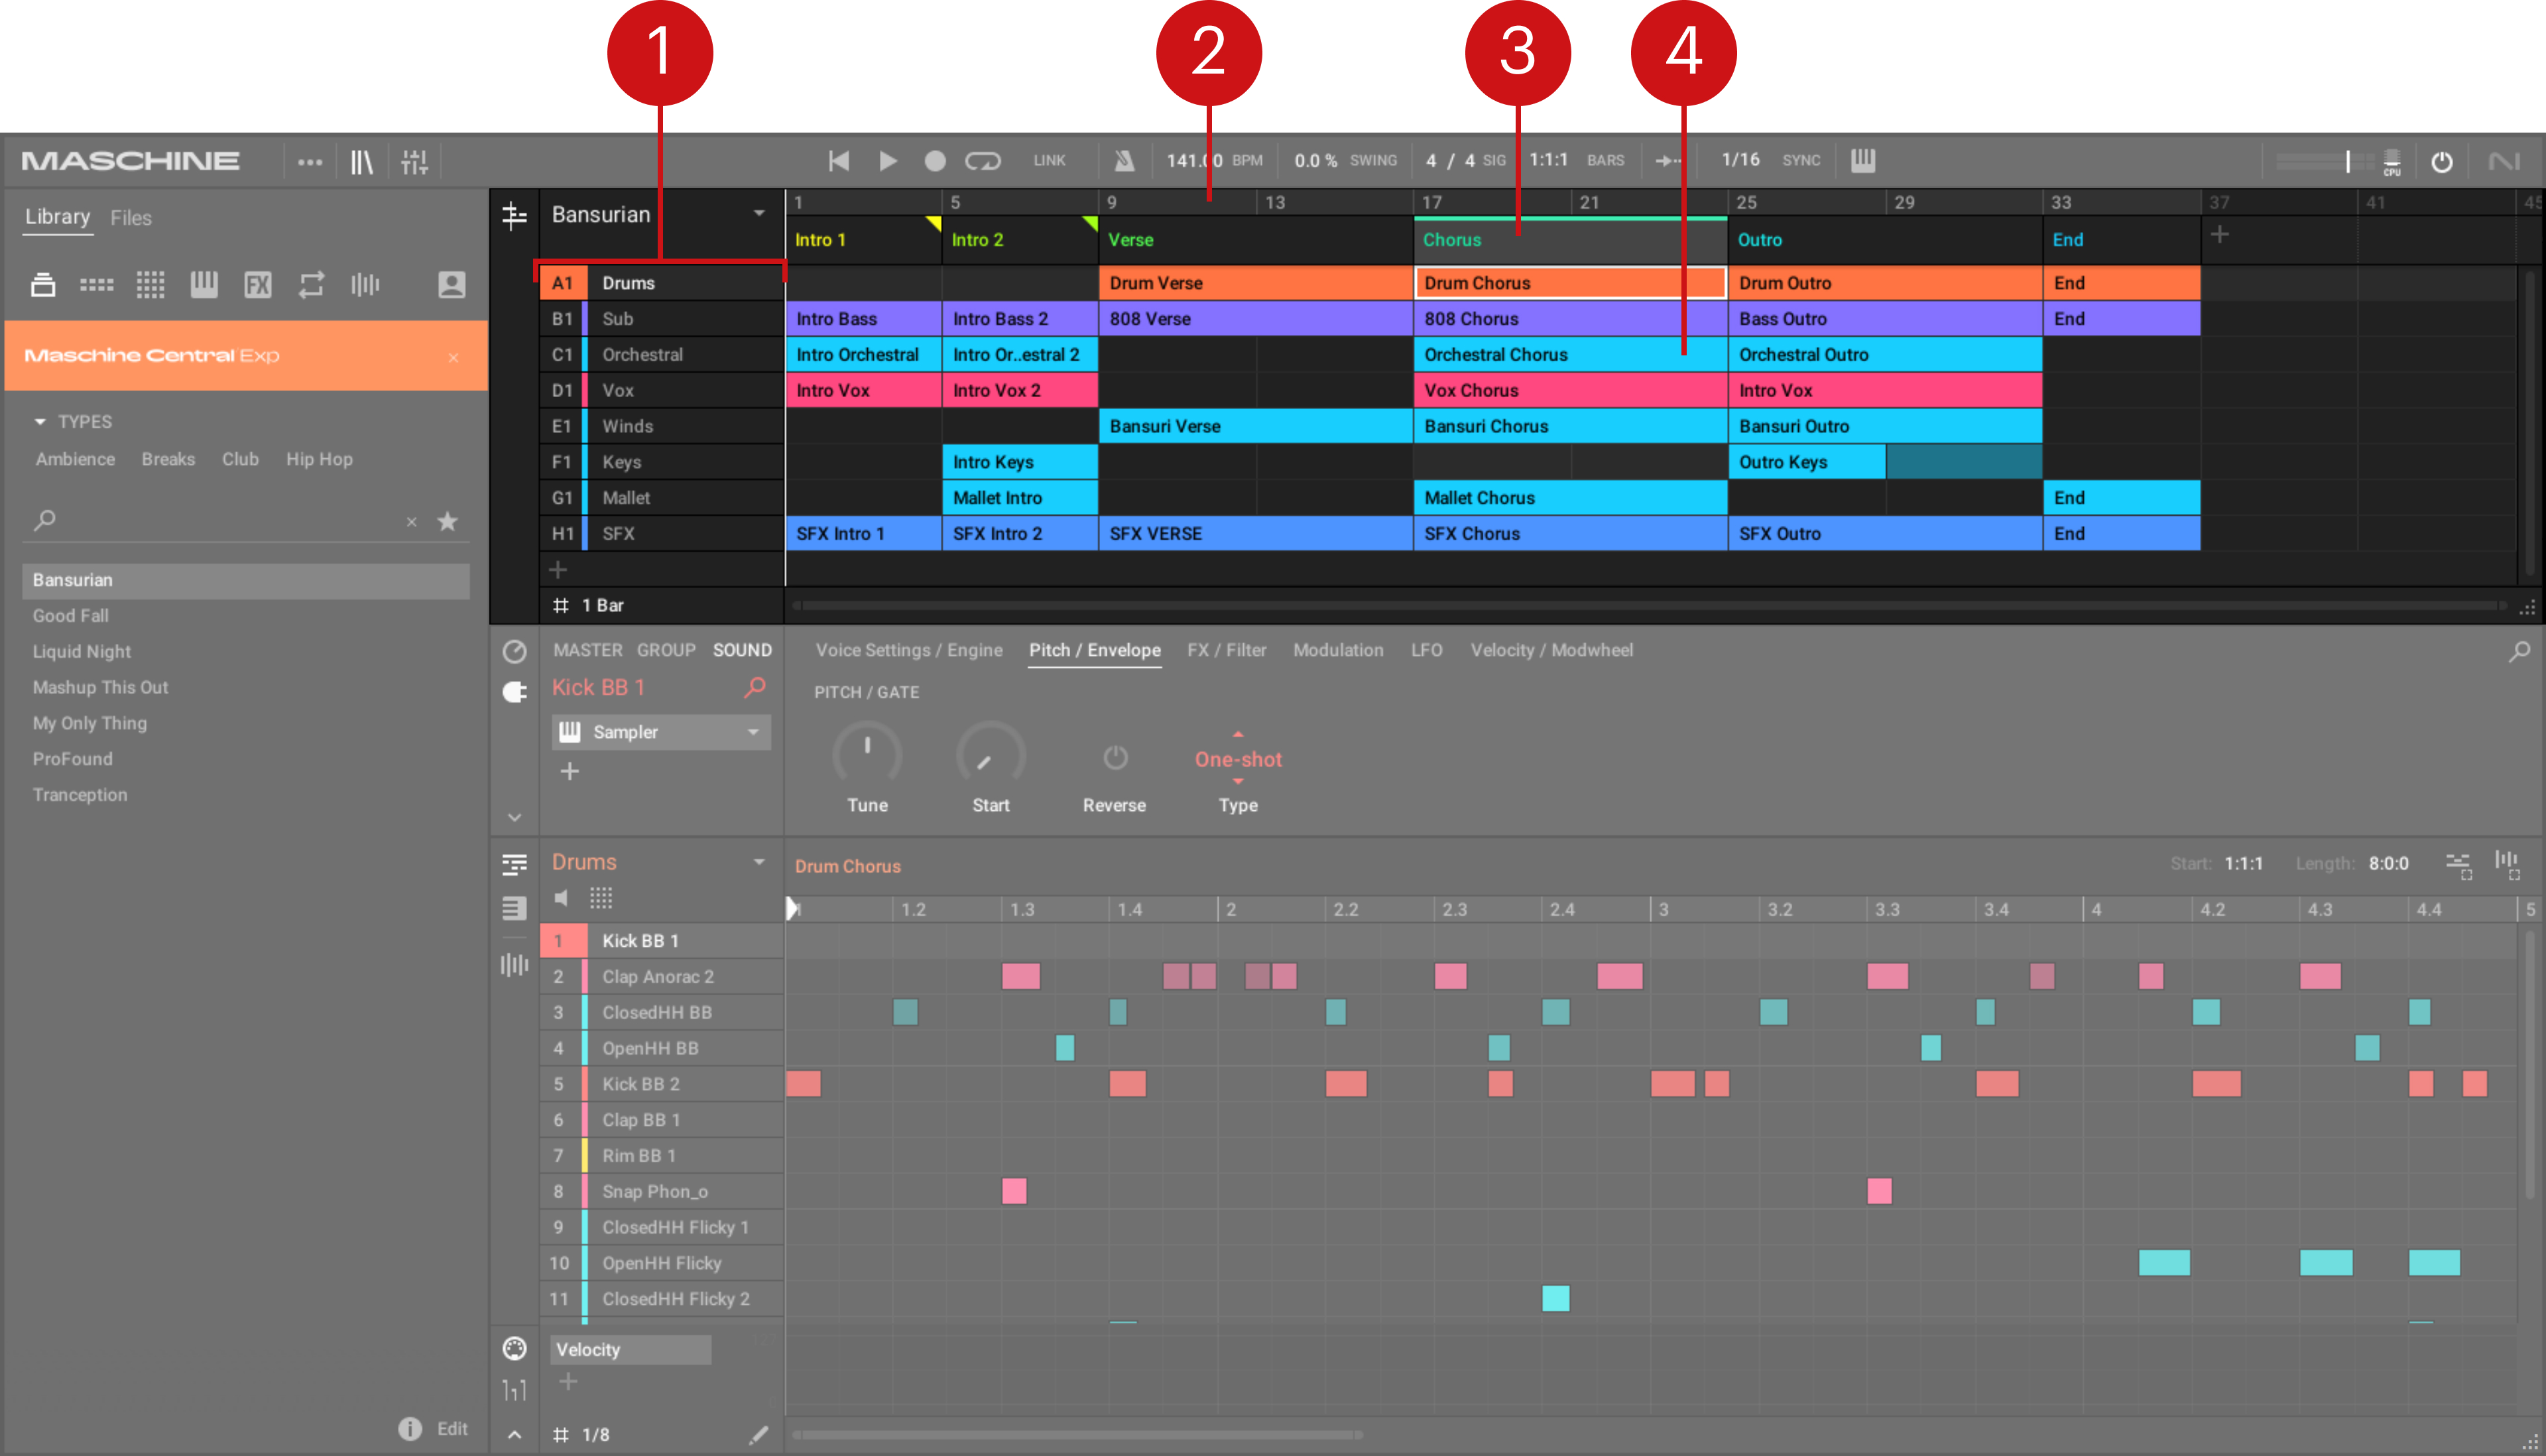
The Song view of a Maschine Project.
The workflow of creating an arrangement in Maschine is as follows:
Create Sections on the Timeline of the Arranger (2).
Assign a Scene to each Section (3). The column below the Scene name shows the Patterns (4) that will be played by the various Groups (1).
Change the position of a Section by dragging the Section slot.
Maschine software overview
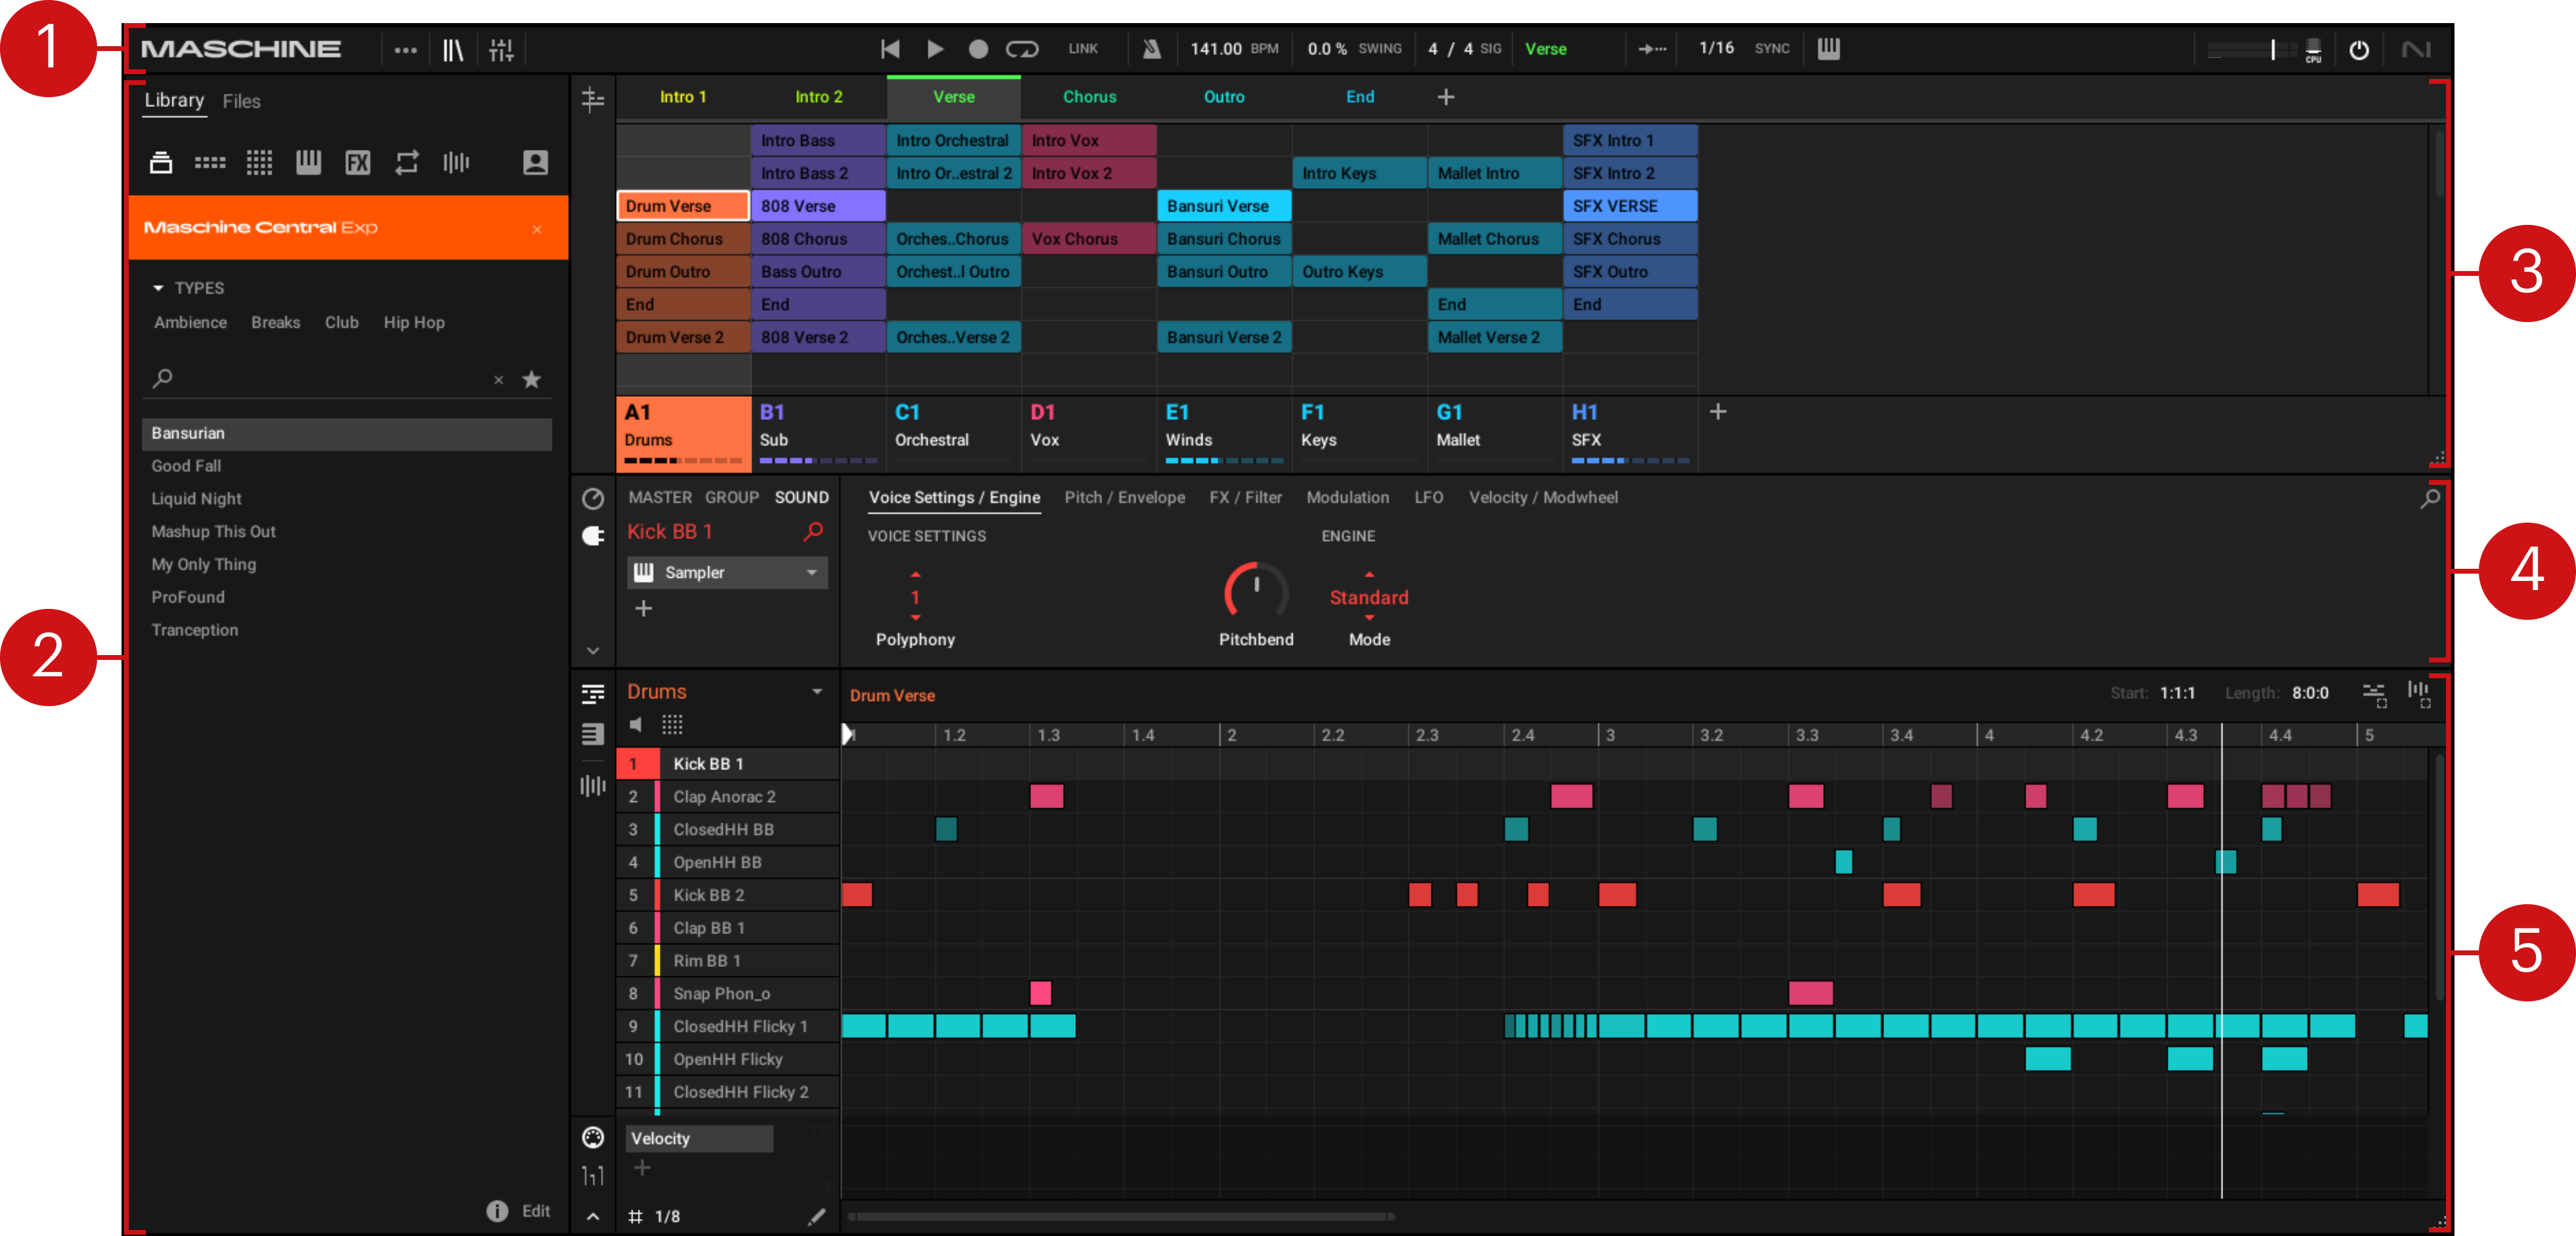
The Maschine software.
Header: The Header contains the main controls for the Maschine software including the Display area, the Transport controls, and the Master Volume slider. You can also use this area to toggle the Browser, toggle the Mixer view, connect to your hardware controller and monitor the CPU usage of your computer.
Browser: The Browser is your tool for managing, finding, tagging, and categorizing Projects, Groups, Sounds, Instruments, Effects, and Samples. Using the search facility you can quickly find things and audition Samples.
Arranger: This area has two views: Ideas view and Song view. Ideas view is for creating and experimenting with musical ideas free from the timeline. Song view is for organizing your musical ideas into a song on the Timeline.
Control area: The Control area allows you to control parameters and settings for each of the Plug-in slots at each Project level (Sound, Group, and Master). This area can hold settings for Groups, Sounds, Plug-ins (internal or VST/AU plug-ins), MIDI, routing.
Pattern Editor: The Pattern Editor features both step programming and real-time recording and is the basis for each Pattern. Patterns for each Group can be created here and then assigned to Scenes in the Arranger. The Pattern Editor also lets you edit modulation for the Sound, Group, and Plug-in (Internal or External) parameters.
Header

The Header
Maschine logo: The Maschine logo and NI logo open the About screen, which displays the version number and edition of your Maschine software.
Maschine menu: Click the Maschine menu to access the software menus. This menu is particularly useful when Maschine is used as a plug-in in a host application.
Browser button: Use the Browser button to toggle the Browser. The Browser is your tool for managing, finding, tagging, and categorizing Projects, Groups, Sounds, Instruments, Effects, and Samples. From the Browser, you can directly search your computer or an external drive to add new files. You may also audition Samples directly from the Browser and apply new tags.
Mix view button: Click the Mix view button to access the Mix view. The Mix view provides you with quick access to the level and routing settings of all your Sounds, Groups, and the Master. In addition, it provides you with an intuitive interface for adjusting the parameters of all your Plug-ins.
Transport controls: The Transport controls contain buttons such as Play, Restart, Record, and Loop.
Display area: The Display area provides controls for Ableton Link, the metronome, the tempo, the global swing, the time signature, the Follow feature, the Performance Grid and the Retrigger feature, and the use of your computer keyboard as MIDI keyboard.
Controller icon: This area displays an icon for each Maschine controller connected to your computer.
Master Volume slider: Shows and adjusts the level of the Maschine audio output.
CPU meter: The CPU meter represents the current load on your computer’s processor and is constantly measured; it should not go above 70% to avoid clicks and interruptions. You can save CPU power by sampling the audio output of Maschine if necessary using export.
Audio Engine button: Click the Audio Engine button to disable the entire sound processing of Maschine.
NI logo: The NI logo and Maschine logo open the About screen, which displays the version number and edition of your Maschine software.
Browser
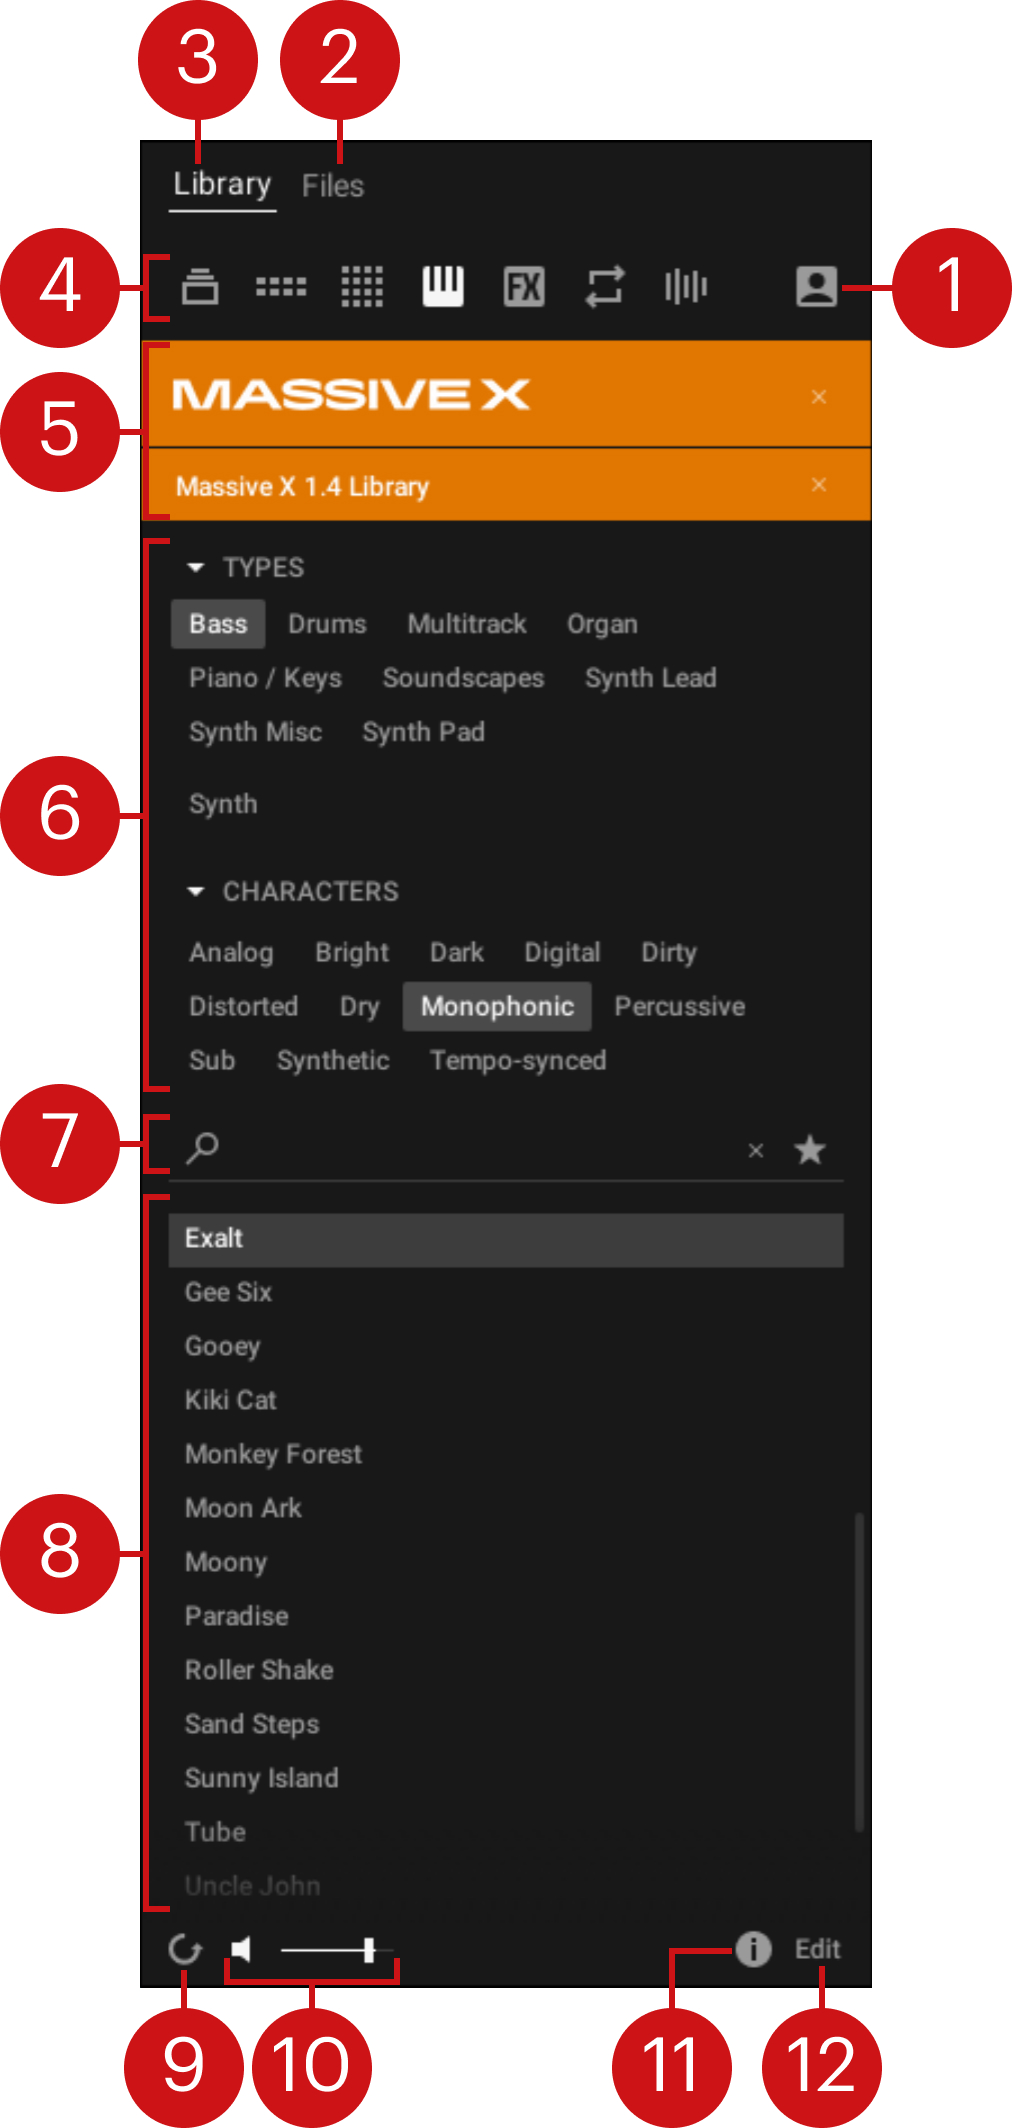 |
The Browser
Library tab: Use the Library tab to access your computer's hard drives via Maschine's selectors and filters.
Files tab: Use the Files tab to access your computer’s hard drives.
File Type selector: This contains seven icons representing the different file types of Maschine. From left to right the file types are Projects, Groups, Sounds, Instruments, Effects, Loops , and One-shots. Clicking one of them causes only the files of the selected type to be displayed.
Content selector: Use the Content selector to switch between Factory Content (button off) and User Content (button on).
Product selector: The Product selector allows you to browse and select any content of the same File Type as is selected in the File Type selector above.
Tag Filter: The Tag Filter allows you to search based on tags. You can quickly find files based on the Types and Characters categories by clicking the tags.
Search field: Use the search field to quickly find files based on their name or tagged attribute. Select the type of file you are looking for from the File Type selector and enter the name or category of a file into the search field to perform a search. Results are displayed in the Results list below.
Results list: The Results list displays all files that match your query.
Autoload: This button automatically loads the selected loop or one-shot in the Results list so you can listen in context and in tempo with your Project while it is playing.
Audition button (speaker icon): Allows you to quickly audition the item selected in the Results list when Preview files have been downloaded and installed using Native Access. The volume level of the file being auditioned is set by the slider. When browsing Groups, the +PATTERNS and +ROUTING buttons appear in the Control bar of the Browser.

Use the +ROUTING button to load the audio and MIDI routings stored in the Group (potentially overwriting previous routings in the selected Group). When the +ROUTING button is off, any audio and MIDI routings saved in the Group will not be loaded, preserving any existing routings in the active Group.
Use the +PATTERNS button to load a Group with its saved Pattern. When +PATTERNS is selected the Sounds and Patterns of the selected Group are loaded. When +PATTERNS is deselected, only the Sounds of the selected Group are loaded so you can try them with your existing pattern.
Information: Click the Information icon to view the details of the selected file.
Tag Editor: Use the Tag Editor to edit Tags applied to files and to add Tags to new files. Native Instruments content is read-only, however, Types and Characters properties can be edited in User content. You can show/hide the Tag Editor by clicking the EDIT button at the bottom right.
Arranger
The Arranger has two views: Ideas view and Song view. Each view has a specific purpose in the workflow of creating a song, but essentially they represent the same content. The Ideas view allows you to experiment with your musical ideas without being tied to a timeline or any kind of arrangement. Here you can create Patterns for each Group and combine them into a Scene. The Song view allows you to structure your song by allowing you to assign the Scenes you created in the Ideas view to Sections, and move them around to quickly create a larger musical structure.
Switching between Ideas view and Song view
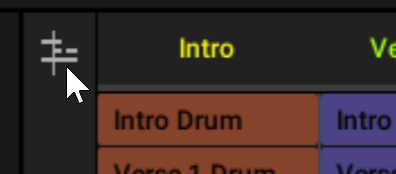 |
The Arranger View button
The Ideas view
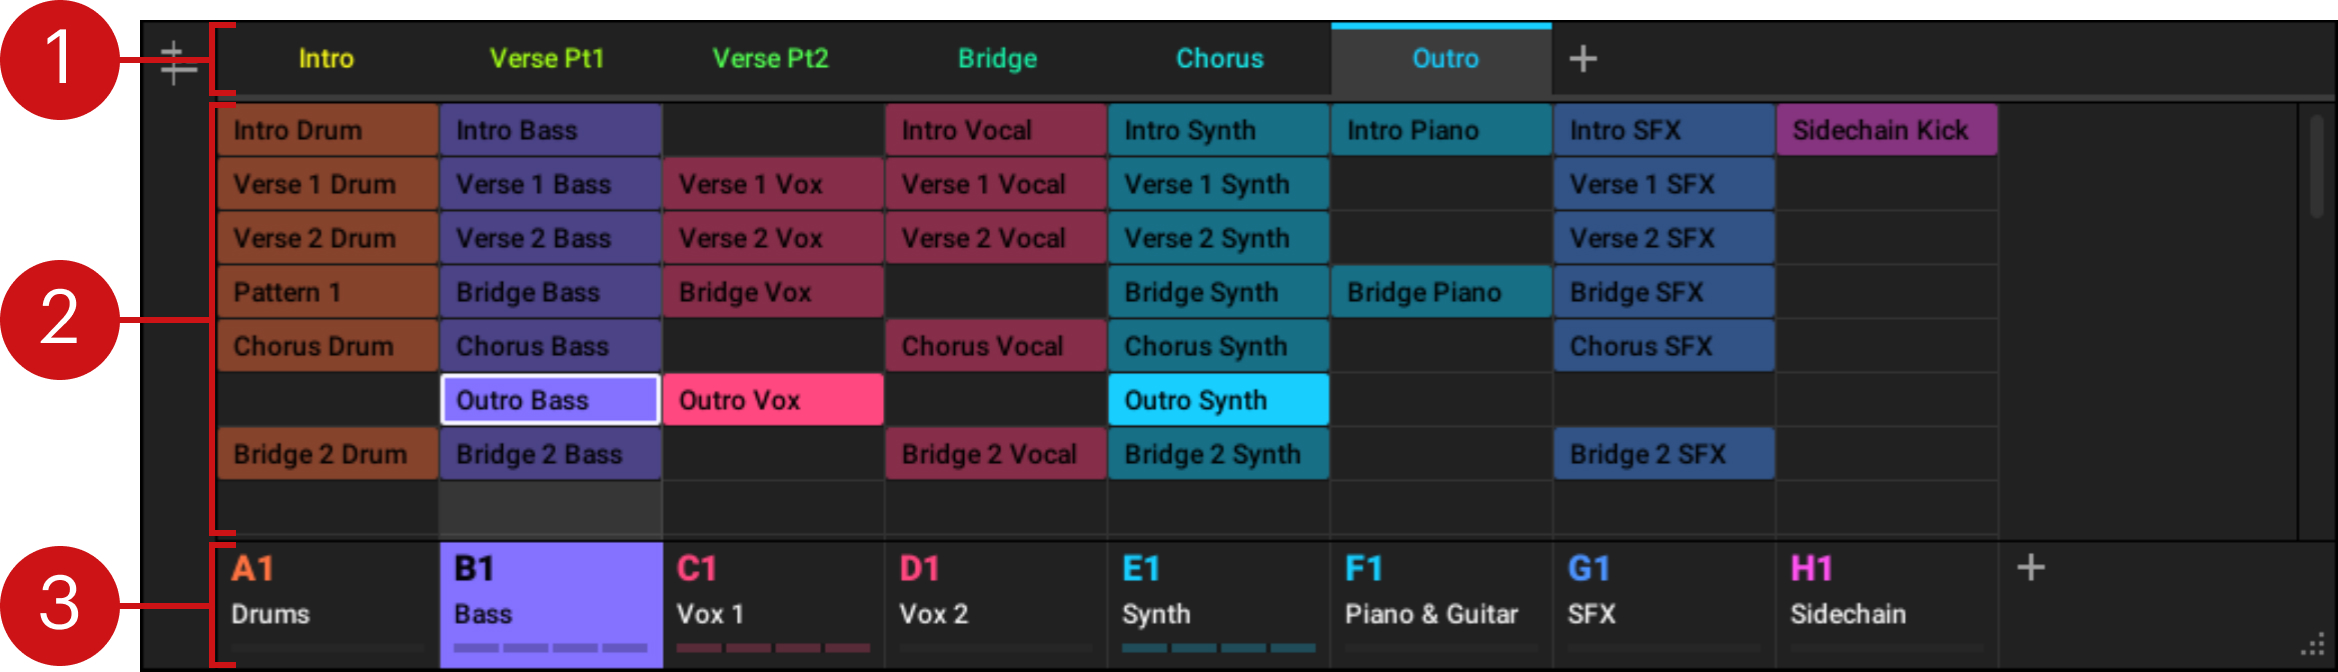
The Ideas view for creating and experimenting with musical ideas free from the Timeline.
Scenes: This area displays all the current Scenes in your project. After creating a Scene by clicking the + symbol, you can build the Scene by selecting a Pattern from each Group. By clicking each Scene name (Scene slot) you can switch between Scenes to see how your musical ideas work together. Using your mouse you can right-click the Scene slot and select to Append to Arrangement from the menu and then arrange your song in the Song view. You can also use the right-click menu to Clear, Duplicate, or Delete Scenes, as well as organize your Scenes by selecting the Rename or Color options
Pattern area: All Patterns in your Song are represented here. You can double-click a blank slot to create and new Pattern or click an existing Pattern to assign it to the selected Scene. Once assigned, a Pattern will become highlighted, click it again to remove it from the selected Scene. Using your mouse you can right-click the name of a Pattern and select to Clear, Duplicate, or Delete a Pattern. You can also organize your Patterns by selecting the Rename or Color options.
Groups: Select the desired Group slot to display the Group’s contents (Sounds, Patterns…) in the Pattern Editor (refer to Pattern Editor) and the Group’s Channel properties and Plug-in parameters in the Control area (refer to Control area). To mute a Group click the Group letter, for example, A1, and right-click on the letter to solo the Group. Using your mouse you can also right-click the name of a Group to access the many options available to manage them.
The Song view
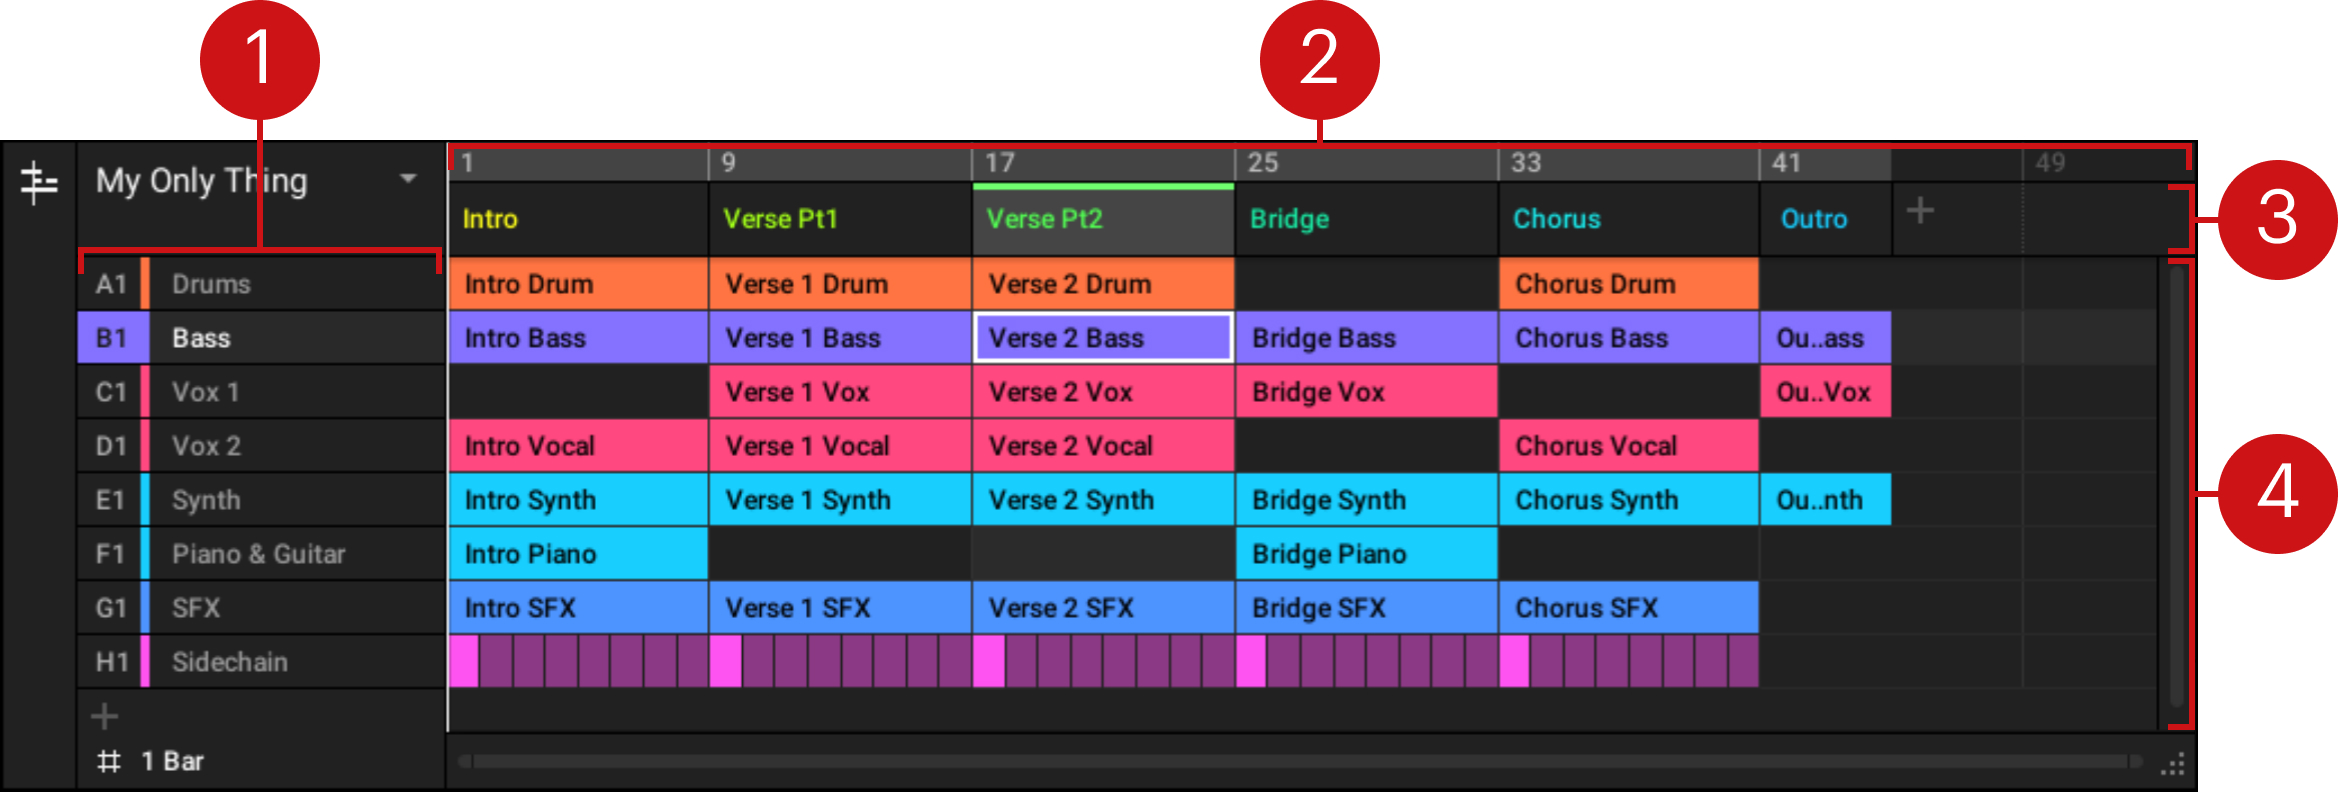
The Song view for organizing your musical ideas into a song on the Timeline.
Groups: Select the desired Group slot to display the Group’s content (Sounds, Patterns…) in the Pattern Editor (refer to Pattern Editor) and the Group’s Channel properties and Plug-in parameters in the Control area (refer to Control area).
Arranger timeline: This area displays the current position within the track and allows you to set the loop range.
Section slots: This area displays Section slots. A Section is a container for Scenes placed on the Timeline. A Section can be moved freely by clicking the name of the Section and dragging and dropping it into place. You can change the length of a Section by dragging the Section end marker to the left to shorten it, or to the right to lengthen it. Using your mouse you can right-click a Section and use Select in the menu to assign a Scene to a Section. It is also possible to use the menu to Insert, Duplicate, Delete, Clear or Remove Sections as well as organize them by selecting the Rename or Color options.
Pattern area: In each Section of the Arrangement, you can see the name of the Scene assigned to the Section along with the Scene’s Patterns stacked vertically for each Group in the Project. The Patterns seen here are the same as those seen when viewing the same Scene in the Ideas view.
Control area
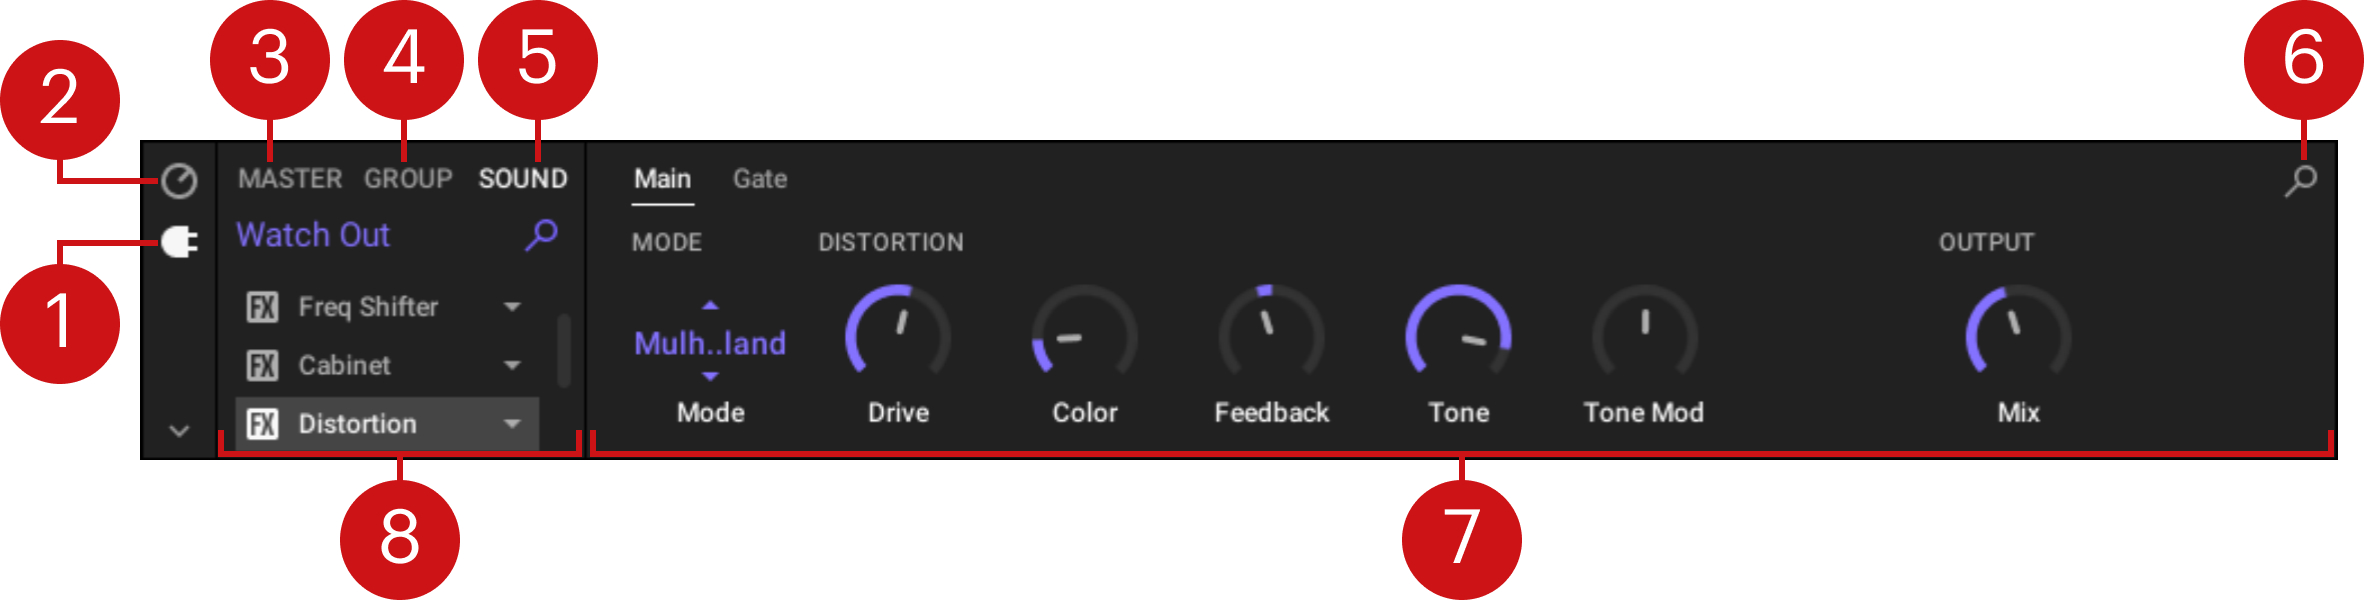
The Control area
Plug-in icon: Click the Plug-in icon to access Plug-ins and their parameters.
Channel icon: Click the Channel icon to access Channel properties where you can display and adjust various properties for the selected Sound/Group or Master channel in the Parameter area.
MASTER tab: Click the MASTER tab to control sound at the main outputs of Maschine (including all Groups and Sounds).
GROUP tab: Click the GROUP tab to gain access to Plug-ins and Channel properties of the Group loaded in the selected Group slot (A–H).
SOUND tab: Click the SOUND tab to gain access to Plug-ins and Channel properties of the Sound in the selected Sound slot (1–16).
Quick Browse icon: Use the Quick Browse icon to recall the search query you performed to find the currently loaded file/preset.
Parameter area: Displays the parameters for the selected Plug-in or Channel properties. Depending on the number of parameters to display, these can be split into several parameter pages. In this case, click the page name in the top row to display its parameters.
Plug-in list: There are Plug-in slots on each channel level (Sound, Group, and Master). Each of them can hold one effect Plug-in. The first Plug-in slot of the Sound level can also hold a plug-in instrument. Select the desired Plug-in to display its parameters in the Parameter area.
Pattern Editor
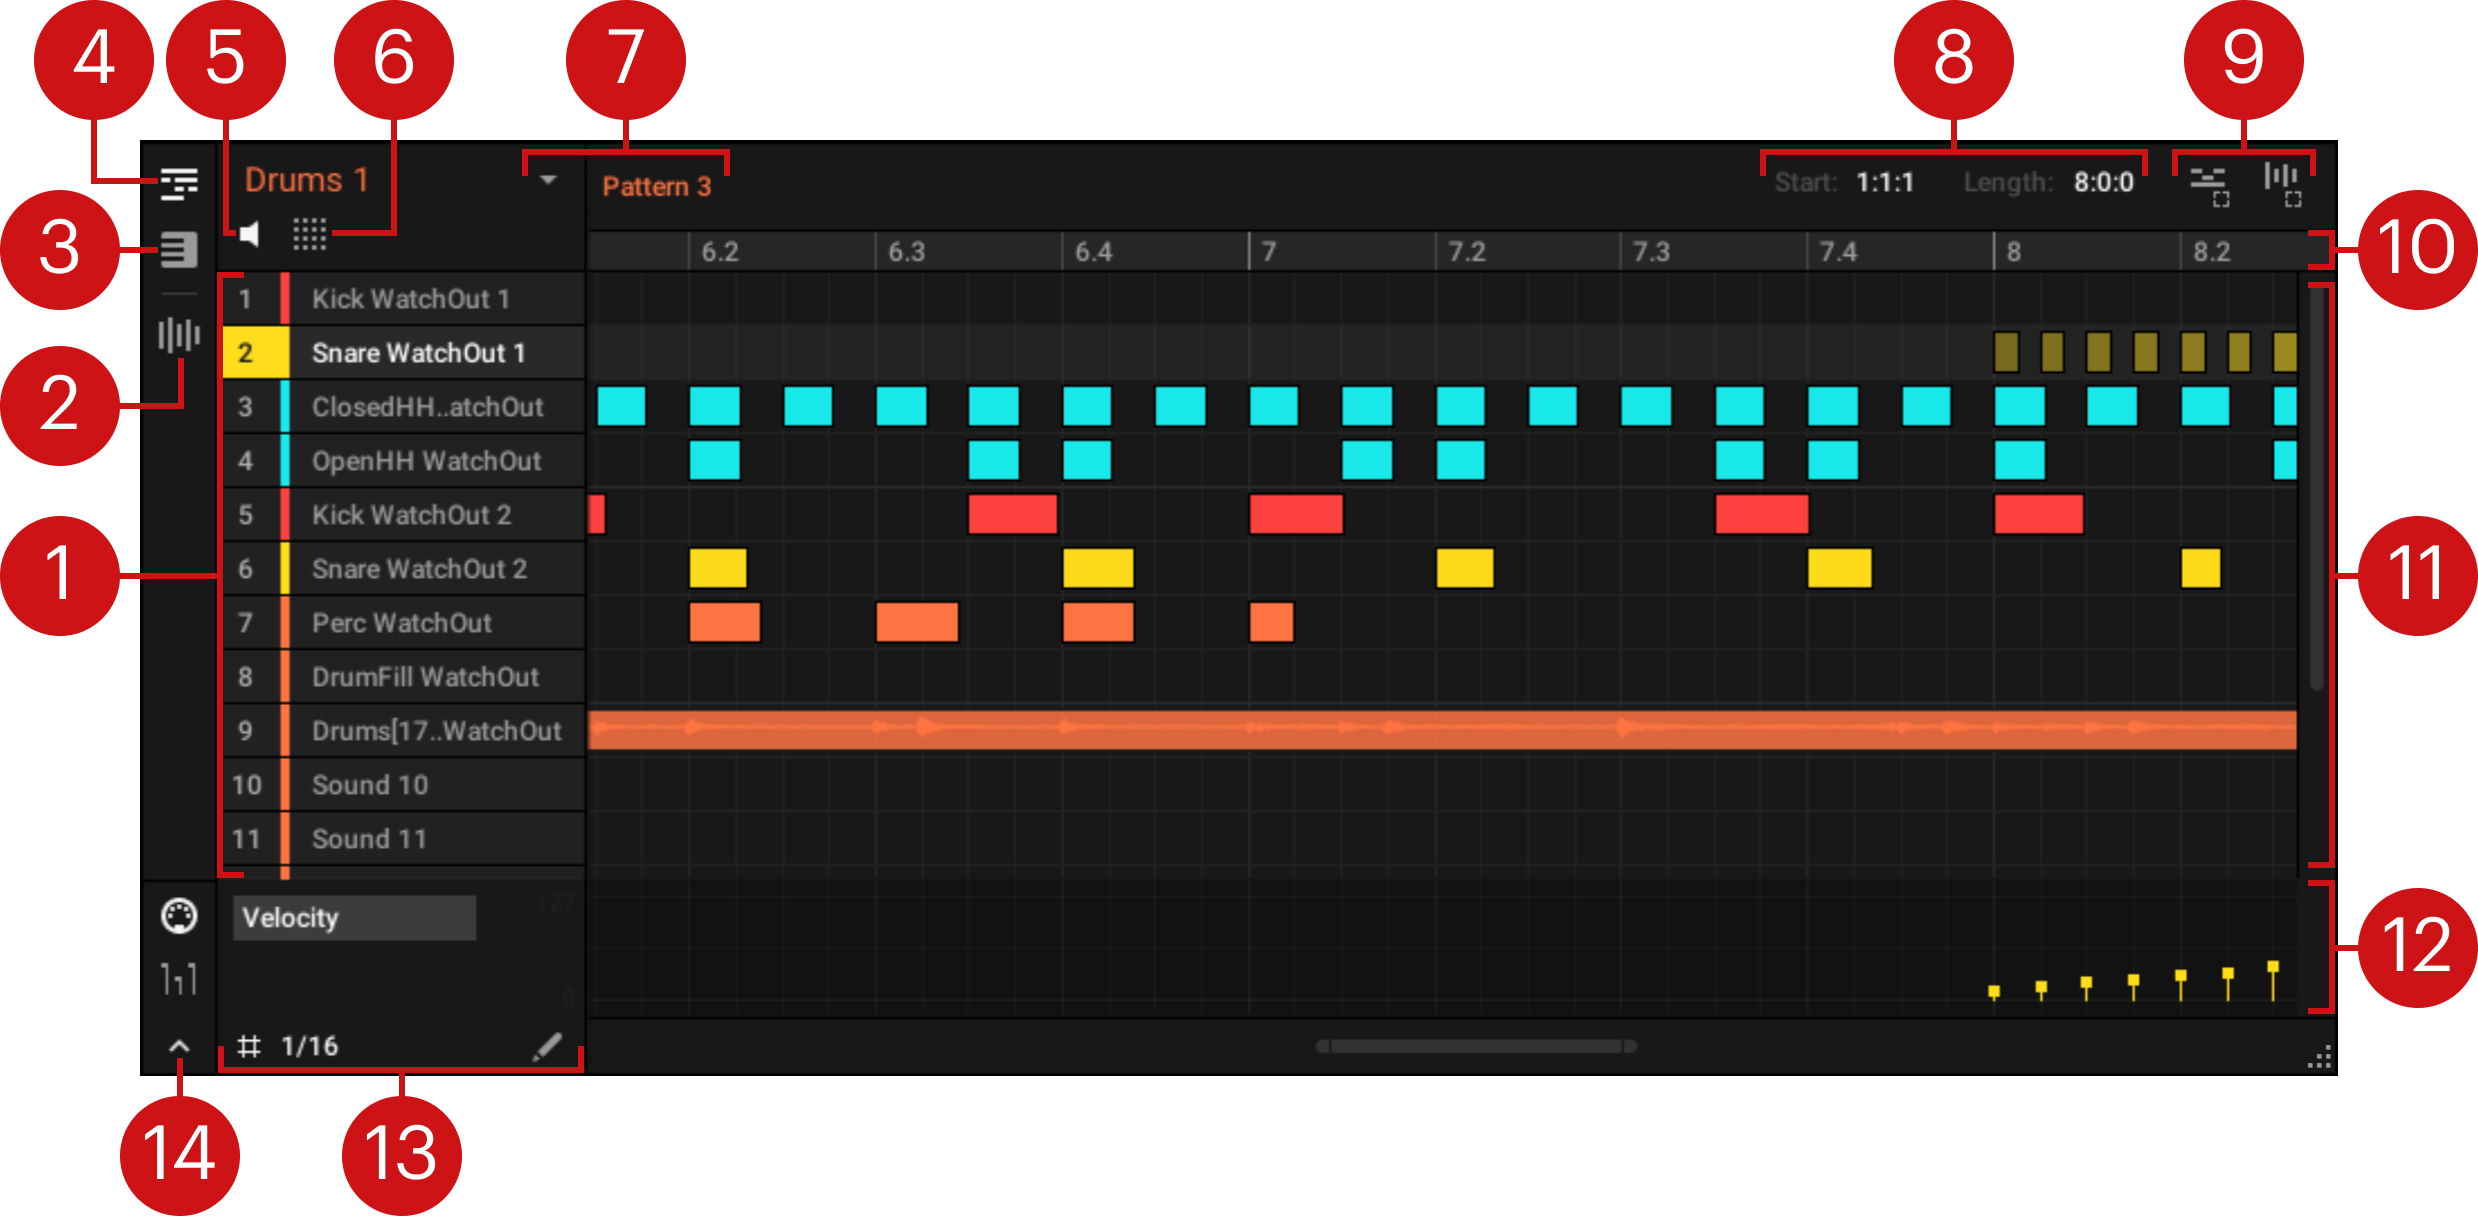
The Pattern Editor
Sound slots: Sound slots 1–16 of the selected Group are listed here. Click a Sound slot to bring it into focus and display its Plug-ins and Channel properties in the Control area (refer to Control area). In Keyboard view (3), click a Sound slot to display its events in the Event area (11).
Sample Editor button: Click this button to open/close the Sample Editor. Refer to Sampling and sample mapping for more information.
Keyboard View button: Click this button to switch the Event area (11) to Keyboard view.
Group View button: Click this button to switch the Event area (11) to Group view.
Audition button: Click this button to audition a Sound when when you select it from the Sound slots (1). When this is on, you can also audition single events when you click them in the Event area (11).
Pad View button: Click this button to manage the pad assignments and access the Key, Choke, and Link settings for the selected Sound.
Pattern Manager: Each Group has an unlimited number of Patterns available. Each Pattern slot can hold one Pattern. A Pattern contains the events that make up a groove or a musical phrase for the selected Group. Click the drop-down arrow to open the Pattern Manager and select a Pattern slot to display and edit its Pattern. Upon slot selection, this Pattern is also referenced for that Group in the selected Scene in the Arranger (see Arranger). Select various Patterns from each Group to form an arrangement.
Pattern Start and Length controls: Adjust the start point and the length of the Pattern, both measured in bars:beats:steps.
Dragger icons: Allow you to conveniently drag and drop audio or MIDI from your Patterns to your desktop or to your DAW.
Pattern timeline: The timeline at the top of the Event area (11) displays musical time units, including bars and beats. Drag the white start and end markers in the timeline to resize the Pattern, or click between the markers and drag your mouse horizontally to move the Pattern in the timeline.
Event area: Displays the content of the selected Pattern slot (7). Here you can see your recorded events as rectangular blocks. In Group view (3) these represent the Sounds of your Group. In Keyboard view (2) they represent musical notes of the selected Sound. The events can be edited using your mouse; they can be dragged to a new position, elongated, shortened, or deleted.
Control Lane: The Control Lane provides a visual overview and editing tools for the MIDI automation and parameter modulation.
Edit controls: Use the Step Grid controls on the left to turn the Step Grid on or off and adjust its resolution (the step size in which events can be moved/resized), and click the pencil icon on the right to toggle the Draw mode on or off when editing events with your mouse in the Event area (11).
Control Lane button: Shows or hides the Control Lane (12).