Controlling your mix
Maschine includes a dedicated Mix view for quick access to level and routing settings of all your Sounds, Groups, and Master channels.
The default view of the Maschine software is the Arrange view, which contains the Arranger at the top, the Control area in the middle, and the Pattern Editor or the Sample Editor at the bottom. The Arrange view is best suited to organize your melodies and rhythms in the timeline: With it you can for example finely tailor your Patterns for each of your Groups in the Pattern Editor, and put them together as Clips in the Arranger to build a complete song.
The Mix view is the other main view of Maschine. Instead of focusing on the time-dependent aspects of your Project, it gives you quick access to the level and routing settings of all your Sounds, all your Groups, and the Master. In addition, it provides you with an intuitive interface for adjusting the parameters of all your Plug-ins.
The Mix view can come in handy at various stages of your work, for example, when building custom drum kits, setting up send effects, creating advanced routings, or last but not least, during live performances.
Mix view basics
This section describes the basic operation of the Mix view.
Mix view vs. Arrange view
It is important to note that the Mix view does not provide any additional settings that are not available in Arrange view. In other words, every action done in Mix view can also be done in the Arrange view (Ideas view and Song view). The purpose of the Mix view is rather to organize the information and settings in a different way that is better suited for particular workflows, notably those involving levels and routings.
In the rest of the chapter, for each procedure in Mix view we will quickly mention the equivalent procedure in Arrange view or point to the corresponding description in this manual.
Switching between Arrange view and Mix view
You can switch the Maschine software at any time between the Arrange view and the Mix view:
The Mix View button.
Click the Mix View button in the Maschine Header to switch between the Arrange view and the Mix view.
Mix view elements
When you switch the Maschine software to Mix view, the Arranger, the Control area, and the Pattern Editor disappear and are replaced with the following three elements:
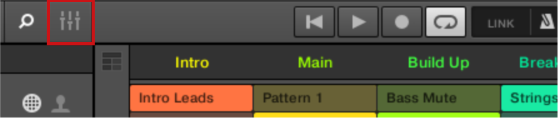
The Mix view, with the Mixer in the upper part and the Plug-in Strip below.
Mixer: In the upper part, the Mixer shows you at a glance the level and routing settings for all Sounds of the focused Group, or all Groups in your Project. You can change these settings on the fly, select or put the focus on any channel, etc. At the far right you can control the settings for the parent channel — the Group channel if the Mixer displays Sound channels, or the Master/Cue channel if the Mixer displays Group channels. See section The Mixer for a detailed description.
Plug-in Strip: In the lower part, the Plug-in Strip displays the series of Plug-ins loaded in the focused channel (Sound, Group, or Master). You can adjust the parameters of each Plug-in in its own interface. See section The Plug-in Strip for a detailed description.
The Mixer
Sitting in the top part of the Mix view, the Mixer is ideal to quickly see and adjust the level and routing settings of different channels in one go.
The Mixer in the Maschine software.
The Mixer provides a classic mixing desk layout containing a certain number of channel strips. The particular channel strips displayed along with their precise layout depend on the following:
Which of the Sound or Group level is selected for displaying: Displaying Groups or Sounds.
Whether the Mixer is minimized or not, and which sections are activated for display: Adjusting the Mixer layout.
Displaying Groups or Sounds
The Mixer provides two display modes, allowing you to focus on the current context:
Group level: The Mixer shows channel strips for all Groups in your Project.
Sound level: The Mixer shows channel strips for all Sound slots in the focused Group.
Both display modes are described in the following paragraphs.
If the Maschine window is too small to display all channel strips, an horizontal scroll bar appears at the bottom of the Mixer to navigate to the hidden channels.

If necessary, use the scroll bar to show hidden channels.
Notice
Whether the scroll bar appears or not, the output strip at the far right of the Mixer is always visible.
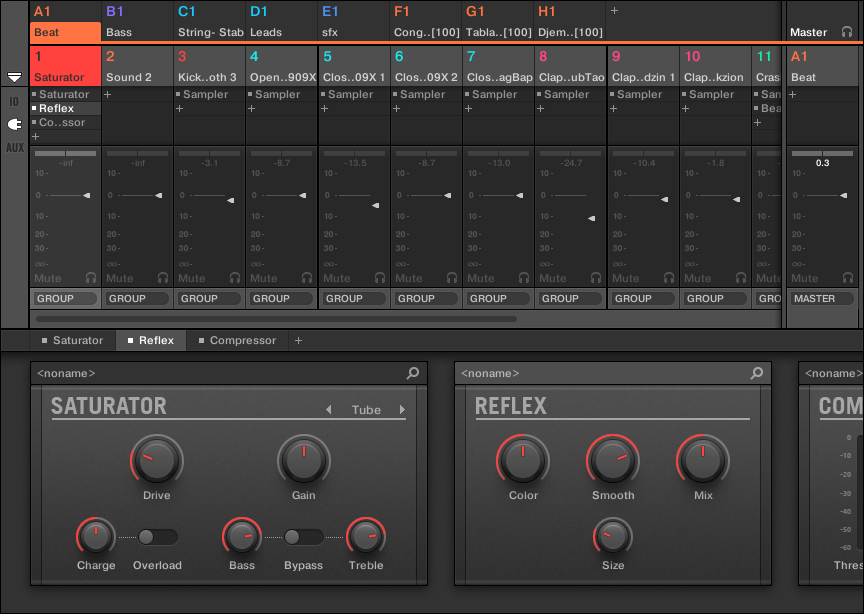
Mixer displaying the Group level
The Mixer can display all Groups at once:
In this mode the desk’s input strips (1) represent all Groups of your Project, while the output strip at the far right (2) represents the Master/Cue channel. At the top of the Mixer you see the headers of all your Groups and of the Master/Cue channel (3). The focused channel is highlighted.
Mixer displaying the Sound level
The Mixer can alternatively display the Sounds slots of a particular Group:

In this mode the desk’s input strips (1) represent all Sounds of the focused Group, while the output strip at the far right (2) represents that focused Group. At the top of the Mixer you see two rows:
The first row (3) contains the headers of all your Groups and of the Master/Cue channel. The header of the focused Group (or of the Master/Cue at the far right) is highlighted.
The second row (4) contains the headers of the Sound slots in the focused Group. The header of the focused Sound slot (or of the parent Group at the far right) is highlighted.
Switching the Mixer between the Group and Sound levels
At any time you can switch between both display modes:
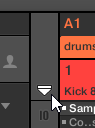
To switch the Mixer display between all Groups of your Project and all Sound slots in a particular Group, double-click the background of any Group header at the top of the Mixer.
If the Mixer was displaying Sound strips beforehand, it will display all Group strips instead, and the Group you have double-clicked will be focused. If the Mixer was displaying Group strips beforehand, it will instead display all Sound strips of the Group that you have double-clicked. The last focused Sound slot in that Group will be focused again.
Tip
Make sure that you double-click in the header background and not on the number or letter+number in the top left corner of the header — instead of switching the Mixer between both views this would mute/unmute the Group channel in question.
Adjusting the Mixer layout
No matter which of the Group or Sound levels is currently displayed in the Mixer, you can adjust its layout as described below in order to concentrate on your current task.
Maximizing/minimizing the Mixer
You can minimize/maximize the Mixer so that it shows only the Group and Sound headers or the entire channel strips:
Click the arrow button at the bottom left of the Mixer to show or hide the channel details in the Mixer.
Minimizing/maximizing the Mixer.
When the Mixer is minimized, the channel strips only show their headers:

A channel strip in the minimized Mixer.
Showing/hiding particular sections of the strips
Both when displaying all Group channels or all Sound channels of a particular Group, the Mixer allows you to select which sections you want to show or hide in the channel strips. This is done by using the three buttons on the left of the Mixer, under the arrow expanding the Mixer:

Choosing what to display in the channels.
From top to bottom:
IO button: Click it to show/hide the input and output settings (both MIDI and audio) in the channel strips.
Plug-in icon: Click it to show/hide the Plug-in Lists in the channel strips.
AUX button: Click it to show/hide the auxiliary output settings in the channel strips.
Notice
The settings for the main audio output are always visible, even if the IO button is deactivated.
For a detailed description of the settings available in the channel strips, refer to section Adjusting settings in the channel strips.
Selecting channel strips
Since the Mix view is just another way of displaying and accessing Maschine channels, selection and focus work similarly in the Mixer view and in the Arrange view:
You can set the focus onto a particular channel (Sound or Group) by clicking the background of its header in the top two rows of the Mixer (upper row for Groups and the Master/Cue, lower row for Sounds, if visible), and you can use the usual commands on your controller (refer to Focusing on a Group or a Sound). The header of the channel in focus is highlighted.
Setting the focus onto a particular channel strip in the Mixer will automatically set the focus onto the corresponding Sound, the corresponding Group, or the Master in Arrange view, and inversely.
When the Mixer displays the Sound strips of a Group, if you click another Group header in the top row the Mixer will stay at the Sound level and switch to the Sound strips of this other Group.
You can select more than one channel strip among the strips displayed. The strip in focus is always selected. The multiple selection follows the same rules as in Arrange view (refer to Selecting multiple Sounds or Groups).
Notice
Whichever channel strip is in focus, the Plug-in Strip at the bottom of the Mix view shows the Plug-ins loaded in that channel (refer to The Plug-in Strip).
Managing your channels in the Mixer
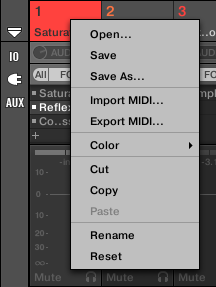
The Mixer provides the same Sound and Group management commands as in Arrange view, with similar procedures. Most of them are available via the channel’s context menu:
To open the channel’s context menu, right-click ([Ctrl]-click on macOS) the background of the channel header:
Notice
Opening the context menu of a channel automatically sets the focus onto that channel.
The channel’s context menu provides the exact same entries as in Arrange view.
Following management commands are available in the Mixer:
Management command | Action |
|---|---|
Renaming channels | Double-click the channel name in the header, type the desired name on your computer keyboard, and press [Enter] to confirm (or [Esc] to cancel). You can also open the channel’s context menu and select Rename. See Renaming Sound slots and Renaming Groups. |
Changing the channel’s color | Open the channel’s context menu and select Color. |
Copying/pasting channels | Open the channel’s context menu and select Copy or Paste. See Copying and pasting Sounds and Copying and pasting Groups. |
Resetting Sound channels | Open the Sound channel’s context menu and select Reset. |
Deleting Group channels | Open the Group channel’s context menu and select Delete. See Deleting Groups. |
Saving channels | Open the channel’s context menu and select Save As…. See Saving Sounds and Saving Groups. |
Notice
You cannot move Sounds and Groups via drag and drop in the Mixer. This is only possible in Arrange view. Refer to Moving Sounds and Reordering Groups for more information.
Adjusting settings in the channel strips
The layout of Sound and Group strips is close to that of a classical mixing desk. The signal travels from top to bottom: from the input routing settings at the top, it passes through the various Plug-ins loaded in the channel, then goes through the pan and level controls, and finally arrives to the output routing settings at the bottom.
The settings available in each channel strip mirror most of the parameters found in the Channel properties displayed in the Control area of the Arrange view, allowing you to adjust them in a more intuitive and visual way (refer to the list of available parameters at the end of this section).
Adjusting settings on the fly
The Mixer provides an interesting feature not available in Arrange view: You can quickly change the settings in any channel strip currently displayed without having to put the channel under focus beforehand: Simply click the desired setting in any of the displayed channel strips to modify it — the current selection/focus will stay untouched.
Tip: Use the parent channel strip at the far right
In both display modes of the Mixer, the rightmost channel strip (the “output” strip of the mixing desk) represents the parent channel:
If the Mixer currently shows all Groups, the rightmost strip represents the Master (or Cue) channel.
If the Mixer currently shows the Sounds of the focused Group, the rightmost strip represents that Group.
In particular, at the Sound level, this allows you to quickly check the level and adjust the settings of the parent Group without having to switch the Mixer display to the Group level.
Tip
For example, if a kick drum is too loud in a drum kit, while decreasing its level you can check at the far right how your change affects the overall Group level, and you can quickly adjust this Group level if needed.
Available settings in Sound/Group channel strips
All the elements available in a full channel strip are listed here. For each element, the basic operation and the corresponding parameter in Arrange view are indicated.
Notice
If some of the settings are not visible, check that the Mixer is not minimized and that the relevant button is activated at the left of the Mixer. For more information, refer to Adjusting the Mixer layout.
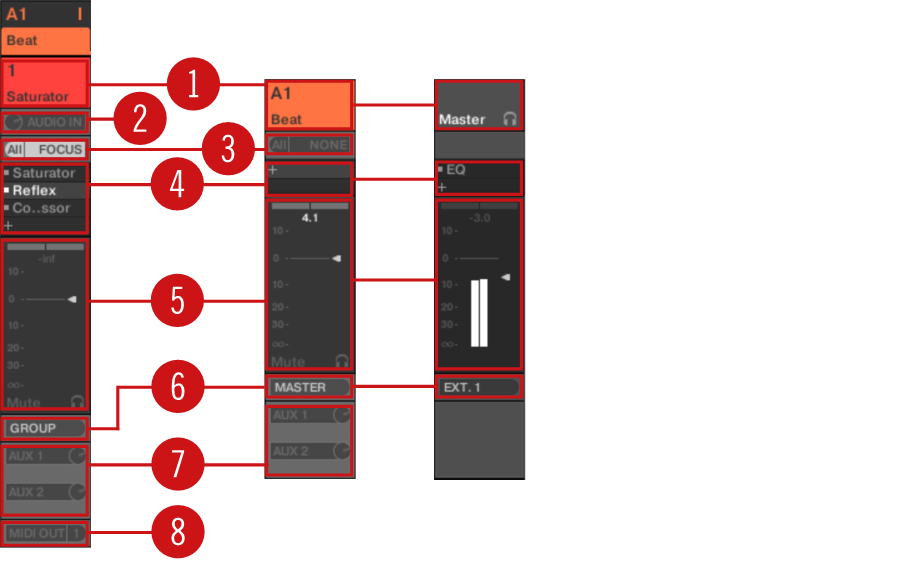
A complete channel strip in the Mixer (Sound on the left, Group and Master on the right).
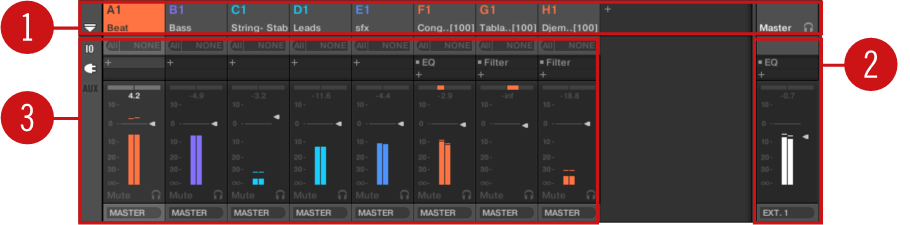
(1) Header: Displays the name and index (letter + number) of the Group or number of the Sound. Headers in the Mixer’s top row are for Groups, headers in the second row (Sound level only) are for Sounds. If the rest of a channel strip is currently not visible, its header additionally shows a mini level indicator in its top-right corner. Following actions are available:
Switch the Mixer display between Sounds and Groups (refer to Displaying Groups or Sounds).
Focus/select particular channels (refer to Selecting channel strips).
Rename the channel: Double-click its current name, type a new name on your computer keyboard, and press [Enter] to confirm (or [Esc] to cancel). You can also use the Rename entry in the channel’s context menu.
Other management commands: Right-click ([Ctrl]-click on macOS) the header background to open the channel’s context menu (refer to Managing your channels in the Mixer).
(2) Audio input settings (Sound strips only): Allows you to adjust the audio input routing. Visible only if the IO button is activated on the left of the Mixer. Click the AUDIO IN label to select an audio input, and adjust its level via the little knob on the left. These controls are equivalent to the Source and Gain parameters in the Audio page of the Sound’s Input properties. For more information, refer to Sending external audio to Sounds.
(3) MIDI input settings: Allows you to adjust the MIDI input routing. Visible only if the IO button is activated on the left of the Mixer. Click the MIDI IN label to select a MIDI input port, then select a channel via the little menu on its right. These controls are equivalent to the Source and Channel selectors in the MIDI page of the Sound’s and Group’s Input properties, respectively. For more information, refer to Triggering Sounds via MIDI notes.
(4) Plug-in List: Shows the Plug-ins loaded in the channel. Visible only if the Plug-in icon is activated on the left of the Mixer. Following actions are available:
Click the little “+” symbol to open the Plug-in menu and load a new Plug-in at the end of the list.
Right-click (macOS: [Ctrl]-click) an existing Plug-in to replace it with another Plug-in or to remove it (to do this, select None in the menu).
Click a Plug-in name to select it. If this Plug-in is currently hidden in the Plug-in Strip under the Mixer, it automatically scrolls to show the interface of that Plug-in. For more information, refer to The Plug-in Strip).
Click the little square left of a Plug-in to bypass it (the bypassed Plug-in is grayed out) or re-insert it in the signal chain.
Drag and drop Plug-ins to move them across the list.
This Plug-in List is the exact equivalent of the Plug-in List in the Control area of the Arrange view. For more information, refer to Plug-in overview.
(5) Fader section: Allows you to adjust the channel’s level, panoramic position, Mute and Cue state. Following actions are available:
Drag the fader vertically to adjust the level of the channel. This is equivalent to the Level parameter in the Audio page of the channel’s Output properties (refer to Configuring the main output of Sounds and Groups). Additionally, the level meter shows you at any time the level of the channel. The peak level value appears in gray above the level meter and fader. If this peak value exceeds zero, it turns white to indicate clipping; click the value to reset it.
Drag the little horizontal slider at the top to adjust the panoramic position of the channel in the stereo field. This is equivalent to the Pan parameter in the Audio page of the channel’s Output properties. For more information, refer to Configuring the main output of Sounds and Groups).
Click the Mute button to mute the channel, or right-click ([Ctrl]-click on macOS) it to mute all other channels (Solo function). For more information, refer to Mute and Solo.
Click the little headphones button to send the channel to / remove it from the Cue bus. This is equivalent to the Cue parameter in the Audio page of the channel’s Output properties. For more information, refer to Using the Cue bus).
(6) Main audio output menu: Selects the destination of the channel’s main audio output. By default Sound channels are output to their parent Group, Group channels are output to the Master, and the Master is output to the first stereo pair of outputs. Click the label to select another destination. This control is equivalent to the Dest. selector in the Audio page of the Output properties for the Sounds and Groups (refer to Configuring the main output of Sounds and Groups) and for the Master. For more information, refer to Configuring the Master and Cue outputs of Maschine).
(7) Aux routing settings: Allows you to adjust the routing for both auxiliary outputs. Visible only if the AUX button is activated on the left of the Mixer. Click the AUX 1 or AUX 2 label to select a destination for this aux output, adjust its level via the little knob on the right, and choose its pre/post tapping point by clicking the Post or Pre label. These controls are equivalent to the Dest., Level, and Order parameters in the Aux page of the Sound’s and Group’s Output properties, respectively. For more information, refer to Setting up auxiliary outputs for Sounds and Groups).
(8) MIDI output settings (Sound strips only): Allows you to select a MIDI output. Visible only if the IO button is activated on the left of the Mixer. Click the MIDI OUT label to select a MIDI output port, then select a channel via the additional menu on the right. These controls are equivalent to the Dest. and Channel selectors in the MIDI page of the Sound’s Output properties. For more information, refer to Sending MIDI from Sounds).
Notice
Parameter modulation is not indicated in the Mixer. As a consequence, the value of modulated parameters might change even if their control elements stay at a fixed position in the Mixer. For example, if the fader of a channel strip is fully down but the channel level is being modulated, the channel’s actual level might temporarily exceed the fader position, leading to an audible signal (and visible meter activity!) although the fader is fully down. In Arrange view, on the other hand, the Control area indicates the modulation of continuous parameters via the ring around their knob. For more information, refer to Recording and editing modulation.
Available settings in the Master and Cue channel strips
The Master and the Cue channel strips are similar to the Sound/Group channel strips described above, except for the following elements (numbers refer to the picture in the previous paragraph):
The Mute button in the Fader section (5) is not available.
The audio input settings (2) and MIDI input settings (3) are not available.
The aux routing settings (7) and MIDI output settings (8) are not available.
There is no Plug-in List (4) in the Cue channel strip.
Using the Cue bus
Maschine provides a dedicated Cue bus. This Cue bus allows you to route any channel (Sound or Group) on a separate output while leaving the main Maschine output untouched. For example, you can use it to prepare any Sound or Group in your headphones during a live session: first send the empty channel to the Cue bus, then load the desired Sound or Group from the Browser (or create one from scratch), add any Plug-ins, adjust any parameters in that channel, record Patterns for that Group as you see fit, and when you are ready, insert it back into your performance!
The Cue bus is also used for following features:
Pre-listening to Samples in the Browser (refer to Auditioning Samples).
Metronome (refer to Using the metronome).
Pre-listening functions in the Sample Editor when recording (refer to Selecting the source and the recording mode) or slicing Samples (refer to Slicing a Sample).
Sending Sound and Group channels to the Cue bus
In any channel strip, click the little headphones button to send this channel to the Cue bus.
The headphones button lights on. The channel is not sent to its defined destination anymore but instead to the Cue bus.
To remove the channel from the Cue bus and send it back to its normal destination as defined in its output settings, click the headphones button again to turn it off.
You can send any number of Sound and Group channels to the Cue bus simultaneously.
Notice
In Arrange view, the equivalent of the headphones button is the Cue switch found on the Audio page of the Sound’s and Group’s Output properties (refer to Configuring the main output of Sounds and Groups).
Tip
The mute and solo of channels don’t apply when these channels are sent to the Cue bus: What is sent to the Cue bus is always played back via the Cue channel, regardless of the original channel being muted or not.
Adjusting the Cue channel in the mixer
All signals on the Cue bus arrive on the Cue channel strip. You can display the Cue channel strip in the Mixer as follows:
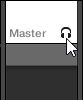
Click the header of the Master/Cue strip in the top right corner of the Mixer.

If the Mixer was showing Sound channels, it switches to the Group level. The Master/Cue channel strip appears and is put under focus.
Click the headphone icon in the Master header.
The Master channel strip switches to the Cue channel strip. Here you can adjust the Cue channel’s level and panoramic position, along with the destination you want to send the Cue channel to. As destination, choose for example another output pair into which you will have plugged your headphones. These settings are described in section Configuring the Master and Cue outputs of Maschine.
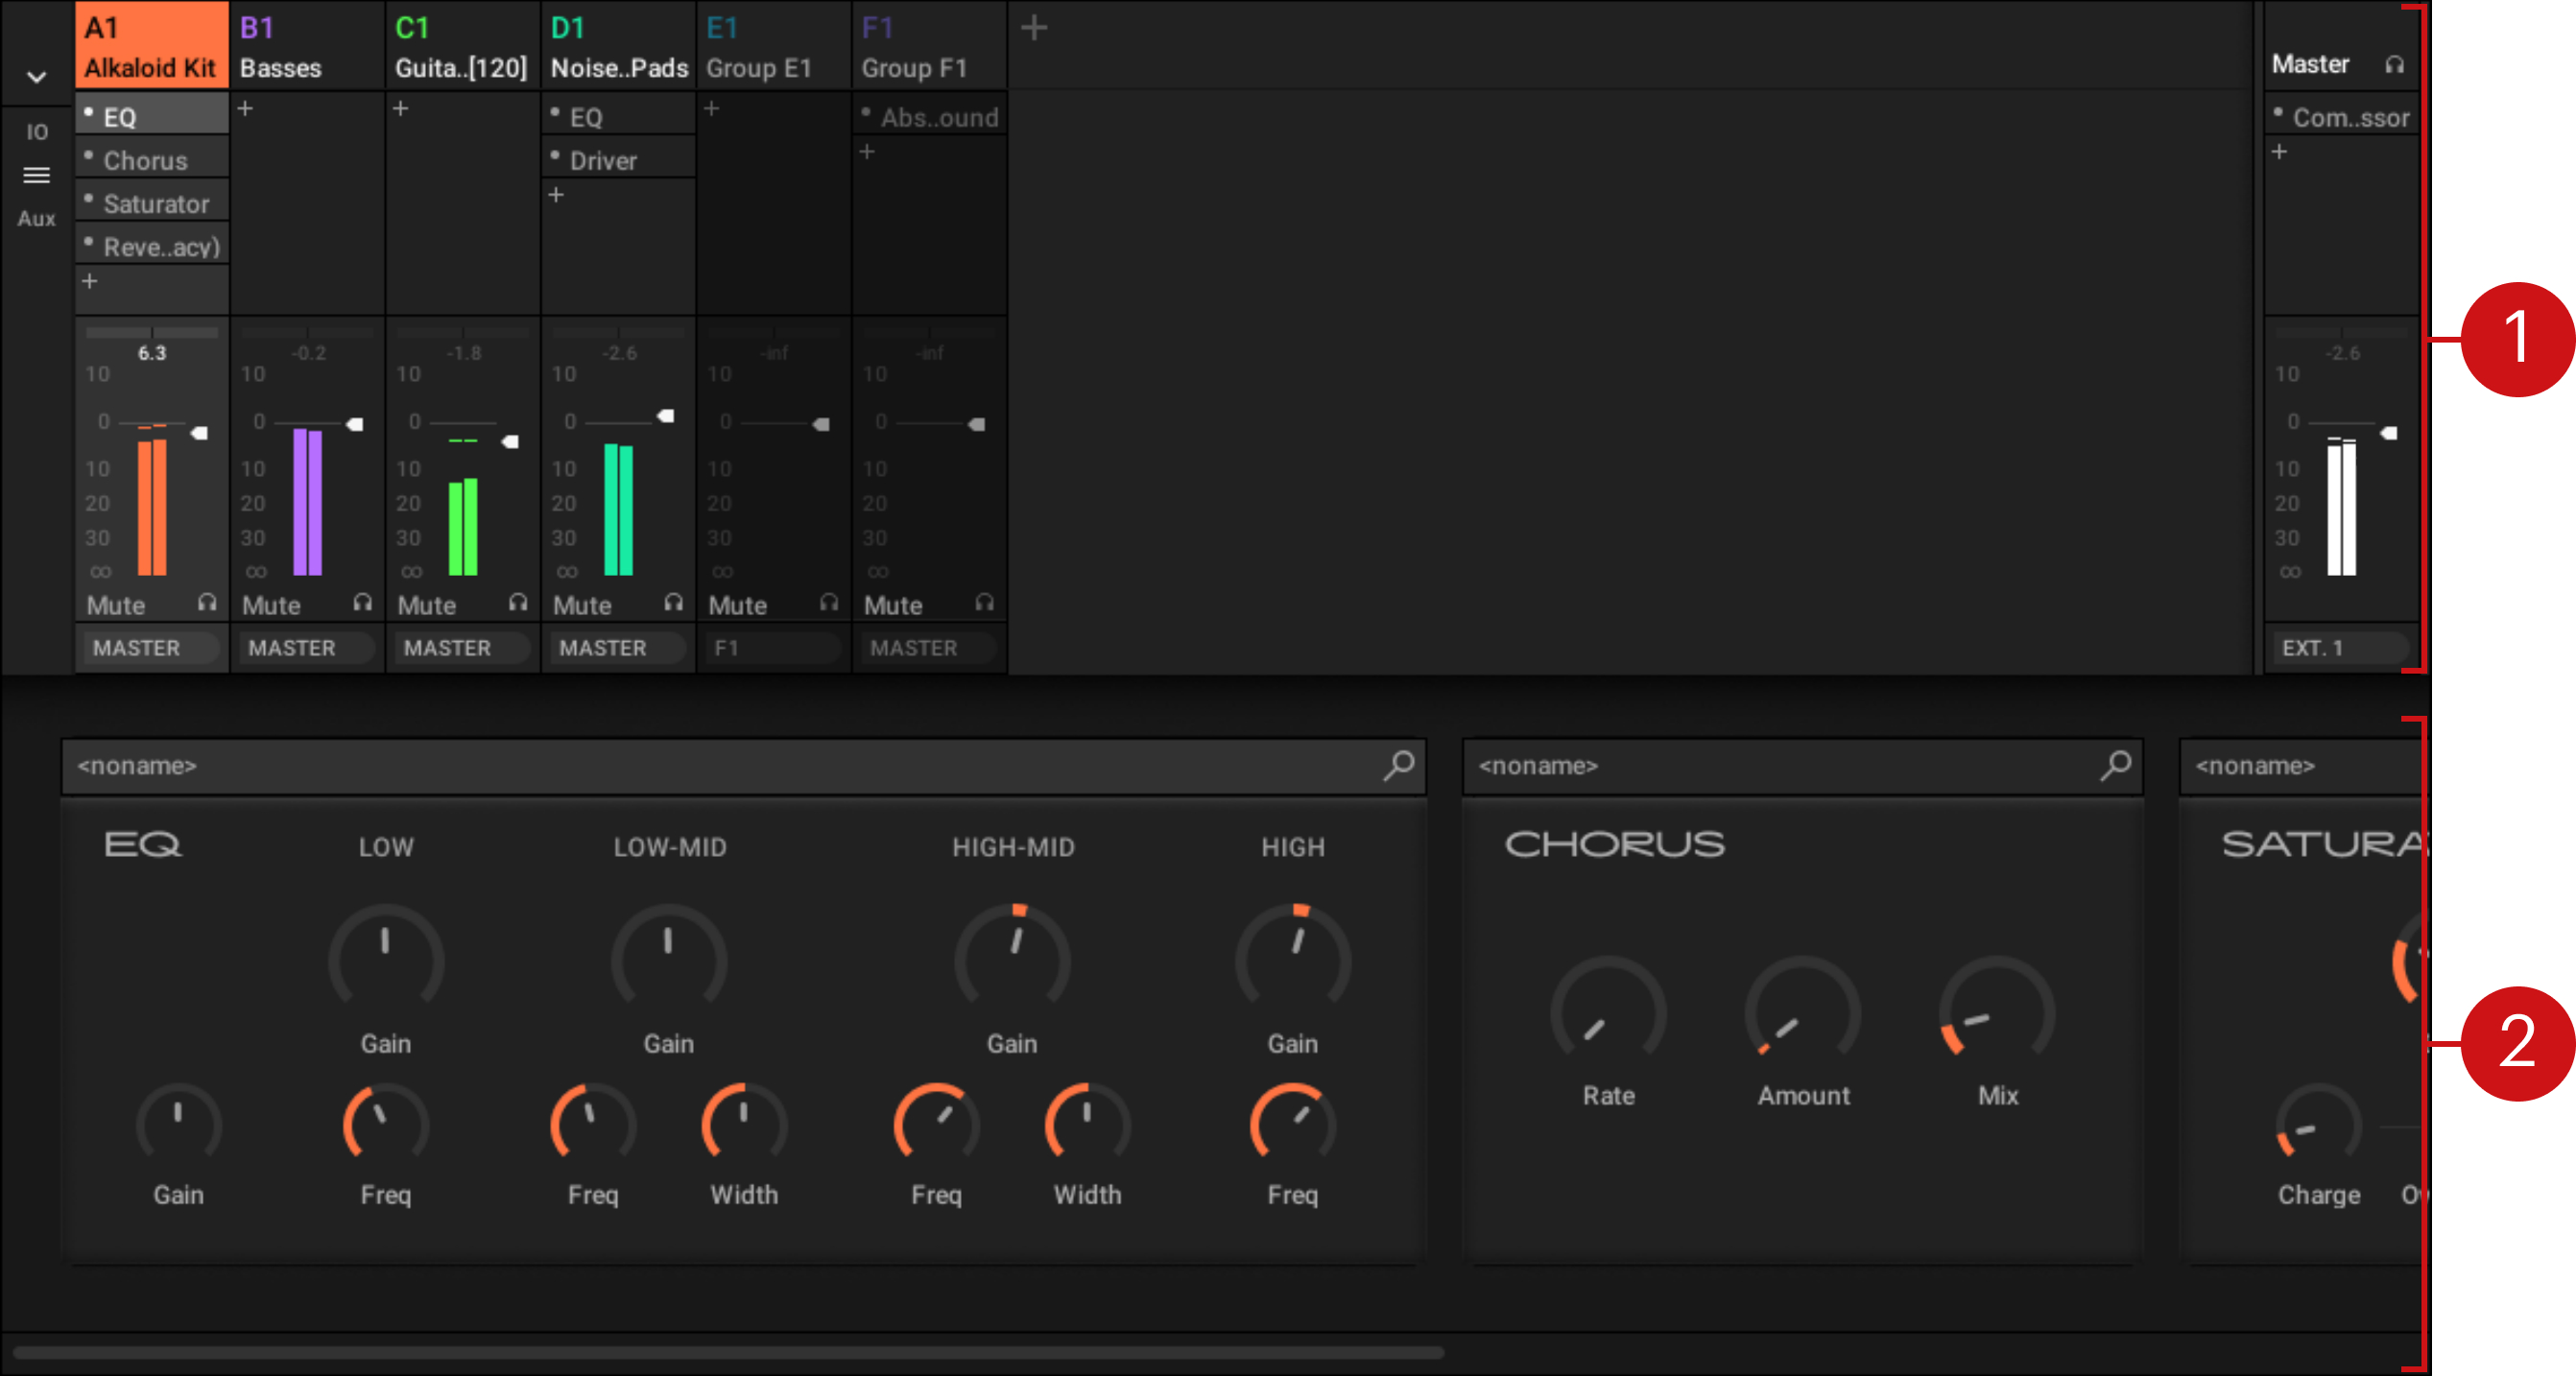
The Plug-in Strip
In the lower part of the Maschine window, the Mix view provides an intuitive representation of all Plug-ins loaded in the channel (Sound, Group, or Master) currently under focus: the Plug-in Strip. The Plug-in Strip shows the loaded Plug-ins as a series of Plug-in panels, each Plug-in having its own panel. The Plug-ins are arranged horizontally, with the audio traveling from left to right through every Plug-in.

The Plug-in Strip of a channel, with a distinct interface for each Plug-in.
In the Plug-in Strip the Plug-in panels vary with the type of Plug-in (Internal, Native Instruments or External):
For all types of Plug-ins, the panel shows a Plug-in Header at the top: The Plug-in Header.
Internal Effects and Drum Synths have their own custom panels: Panels for Drum Synths and Internal Effects.
The Sampler Plug-in has a special, extended panel: Panel for the Sampler.
Native Instruments Plug-ins provide dedicated panels inspired from the user interface of each particular Native Instruments product: Custom panels for Native Instruments Plug-ins.
Native Instruments and External Plug-ins can also be undocked and opened in a floating window: Undocking a Plug-in panel (Native Instruments and External Plug-ins only).
Navigating the Plug-in Strip
If the Maschine window is not wide enough to show all the Plug-in panels at once, a horizontal scroll bar at the bottom of the Plug-in Strip lets you display the remaining Plug-ins.

Use the horizontal scroll bar to display the other Plug-in panels.
If you want to quickly jump to the panel of one particular Plug-in, you can click the Plug-in name from the Plug-in List in the Mixer above, and the Plug-in Strip will directly scroll to its panel.
Note
If the Plug-in List is not visible in the Mixer, you can show it by clicking the Plug-in icon on the left of the Mixer. For more information on showing or hiding particular sections of the Mixer, refer to Adjusting the Mixer layout.
If the Maschine window is not high enough to display a Plug-in panel entirely, a vertical scroll bar on the right of the panel lets you display the remaining part of the panel.
The Plug-in Header
For all types of Plug-ins (Internal, Native Instruments, and External) the Plug-in panel displays a Plug-in Header at the top:
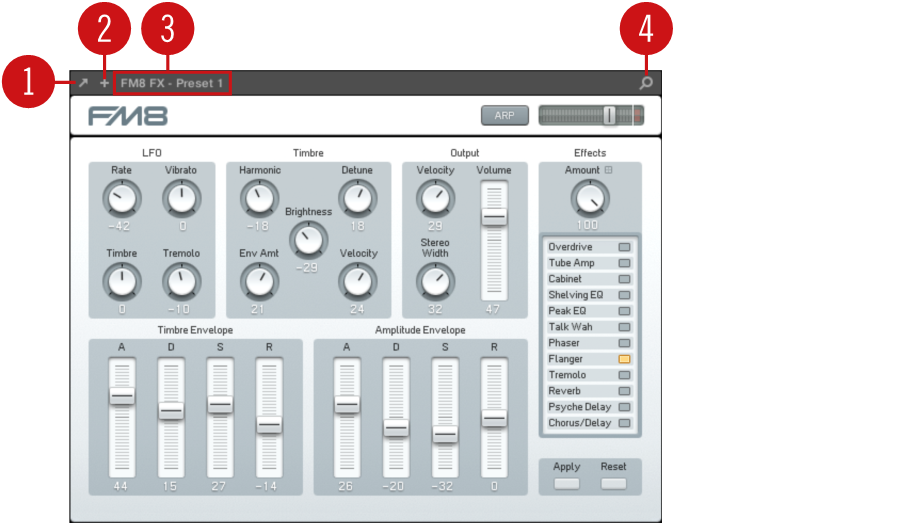
The Plug-in Header at the top of the Plug-in panel.
The Plug-in Header can contain following elements, from left to right:
(1) Open Plug-in Window button (Native Instruments and External Plug-ins only): Click the little arrow icon to open/close the Plug-in interface in an external window. See section Custom panels for Native Instruments Plug-ins for more on this.
(2) Additional View button (specific Native Instruments Plug-ins only): Some Native Instruments Plug-ins provide two different views in their panel. Click the little “+” to switch between Default view and Additional view. See section Custom panels for Native Instruments Plug-ins for more on this.
(3) Preset name: Shows the name of the preset currently loaded, if any.
(4) Quick Browse button: Click the magnifying glass to run the Quick Browse function and recall in the Browser the search query you performed to get to the loaded preset.
Panels for Drum Synths and Internal Effects
For Drum Synths and Internal Effects, the panels in the Plug-in Strip provide intuitive visual representations of the Plug-ins and their parameters.
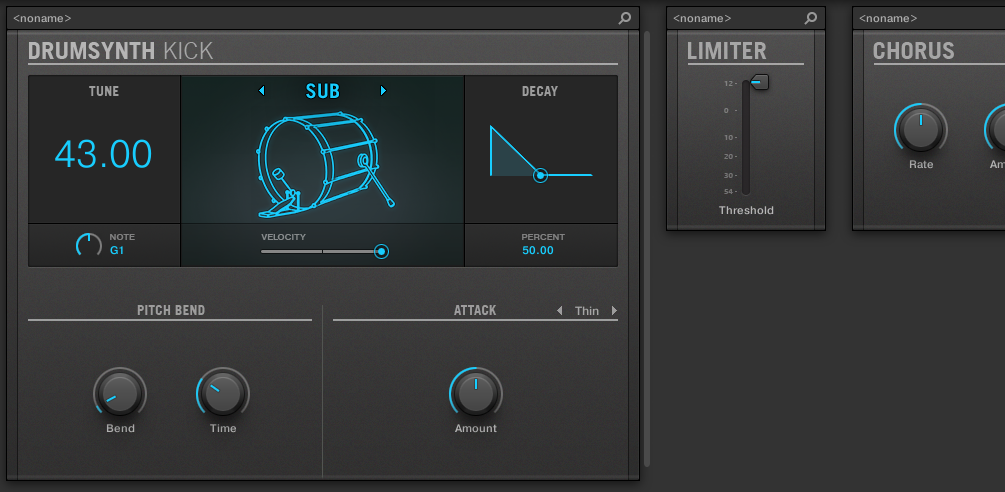
The Plug-in panel of a Drum Synth and two Internal Effects.
As with all other Plug-ins, the panels for Drum Synths and Internal Effects show the Plug-in Header at the top. This Header contains the name of the current preset and the Quick Browse icon — see section The Plug-in Header above for more details.
Although parameters are organized differently than in the Parameter pages of the Arrange view, the panels for Drum Synths and Internal Effects contain the exact same parameters as the Parameter pages in Arrange view.
Notice
The only exceptions are the Compressor, the Gate, and the Limiter: their panels contain an additional level meter not available in the Control area (gain reduction for the Compressor, and input level for the Gate and the Limiter).
For an exhaustive description of the parameters available in each panel, please refer to chapter Drum Synths for Drum Synths and chapter Effect reference for Internal Effects.
Notice
Parameter modulation is not indicated in the panel for Internal Plug-ins. As a consequence, the value of modulated parameters might change even if their control element doesn’t move in the panel. See section Recording and editing modulation for more on modulating parameters.
Panel for the Sampler
For the Sampler, the Plug-in Strip provides a custom panel containing a judicious mix of parameters available in the three first pages of the Control area along with parameters available in the Zone page of the Sample Editor.
As with all other Plug-ins, the panel for the Sampler shows the Plug-in Header at the top. This Header contains the name of the current preset and the Quick Browse icon — see section The Plug-in Header above for more details.
The Sampler panel contains two distinct panes: MAIN and ZONE. These can be displayed by clicking the MAIN and ZONE button in the Pane selector at the top of the Sampler interface, respectively.
Notice
Parameter modulation is not indicated in the panel for Internal Plug-ins. As a consequence, the value of modulated parameters might change even if their control element doesn’t move in the panel. See section Recording and editing modulation for more on modulating parameters.
Sampler – MAIN pane
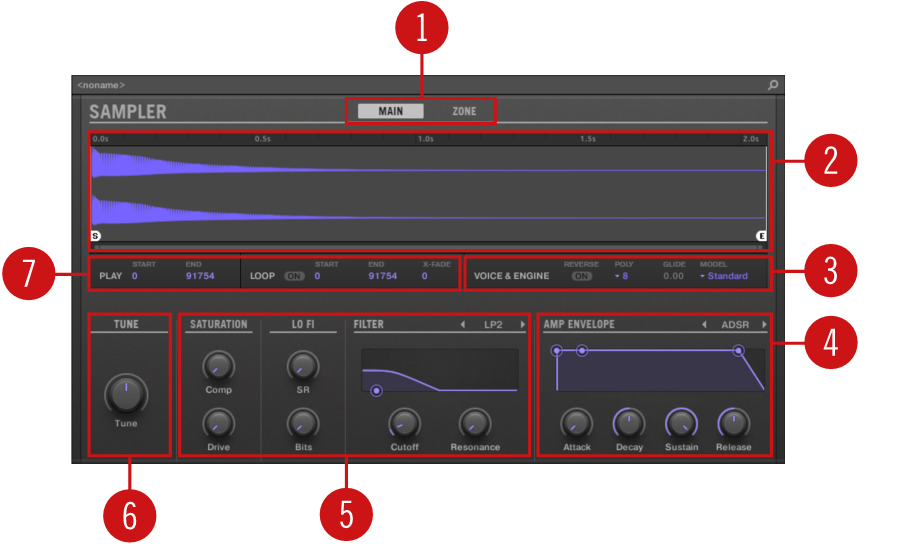
The Sampler in the Plug-in Strip.
(1) Pane selector: Click MAIN or ZONE to show the corresponding pane in the Plug-in.
(2) Sample waveform: Shows the waveform or the Sample used in the selected Zone. It provides the same features as the waveform found in the Sample view of the Zone page in the Sample Editor: Start and End markers, zooming, etc. For more details, refer to section Sampling and sample mapping.
(3) VOICE & ENGINE section: Allows you to adjust the Polyphony, Glide, and Mode parameter from the Voice Settings / Engine page in the Control area, and the Reverse button from the Pitch/Envelope page in the Control area. For more details, refer to section Page 1: Voice Settings / Engine and Page 2: Pitch / Envelope, respectively.
(4) AMP ENVELOPE section: Allows you to adjust the Type parameter and the envelope parameters from the Pitch/Envelope page in the Control area. For more details, refer to section Page 2: Pitch / Envelope.
(5) SATURATION, LO FI, and FILTER sections: Allows you to adjust the parameters from the FX/Filter page in the Control area. For more details, refer to section Page 3: FX / Filter.
(6) TUNE section: Allows you to adjust the Tune parameter from the Pitch/Envelope page in the Control area. For more details, refer to section Page 2: Pitch / Envelope.
(7) PLAY and LOOP sections: Allow you to adjust the play range and loop settings of the selected zone, respectively. These provide the same parameters as the PLAY RANGE and LOOP sections found in the Zone page of the Sample Editor. For more details, refer to section Sampling and sample mapping.
Sampler – ZONE pane
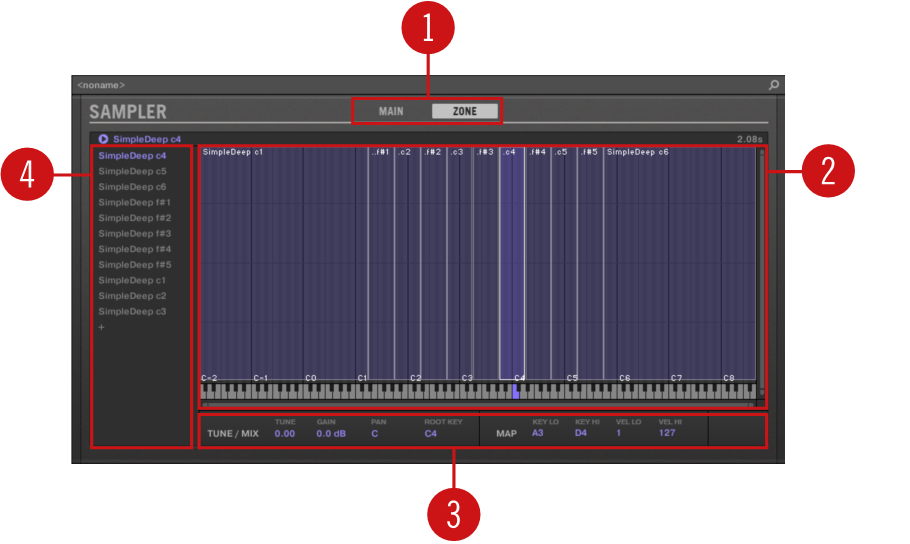
The Sampler in the Plug-in Strip.
(1) Pane selector: Click MAIN or ZONE to show the corresponding pane in the Plug-in.
(2) Sample Map: Allows you to adjust the key and velocity ranges of your Zones. This the same as the Map view available in the Zone page of the Sample Editor. For more details, refer to section Sampling and sample mapping.
(3) TUNE / MIX and MAP sections: Allow you to adjust the tuning and gain parameters as well as the key and velocity ranges of your Zones. These are the same as the TUNE and MAP sections from the Zone page of the Sample Editor. For more details, refer to section Adjusting the Zone settings.
(4) Zone List: Allows you to manage your Zones. This is the same as the Zone List available in the Zone page of the Sample Editor. For more details, refer to section Sampling and sample mapping.
Notice
As with all Internal Plug-ins, parameter modulation is not indicated in the panel for the Sampler. As a consequence, the value of modulated parameters might change even if their control element doesn’t move in the panel. See section Recording and editing modulation for more on modulating parameters.
Custom panels for Native Instruments Plug-ins
The panels for Native Instruments Plug-ins provide an extra feature: one or two custom views that group the most important parameters of the Plug-in into a clear and concise interface while retaining the overall feel and look of each Native Instruments product:
The Default view is available for every Native Instruments Plug-in.
An Additional view, only available for particular Native Instruments Plug-ins, provides an alternate set of controls for the Plug-in.
For example:
ABSYNTH 5’s Default view shows the main elements of the Perform window of ABSYNTH 5:
Massive’s Default view shows specific parts of the Synth view (the eight Macro Controls at the top and the Modulation pages underneath):
Guitar Rig’s Default view shows a mini Rack with a reduced version of the Global Header at the top:
As with all other Plug-ins, the panel for Native Instruments Plug-ins shows the Plug-in Header at the top containing a button for opening the Plug-in in a floating window as well as the name of the current preset and the Quick Browse icon — see section The Plug-in Header above for more details.
For Native Instruments Plug-ins providing an Additional view, the Header also contains an Additional View button (a little “+” symbol) allowing to switch between Default and Additional view:
Click the little “+” in the Plug-in Header to switch between Default and Additional view.
Notice
macOS users: The VST plug-in of a Native Instruments product must be installed for this product’s Default view (and Additional view, if any) to appear in the Plug-in Strip. If you normally use the AU version of this Native Instruments product, please check that its VST version is also installed on your computer to ensure the perfect integration of this plug-in into Maschine. You can show/hide the AU version of Native Instruments plug-ins in the Plug-in menu (software) and Plug-in Browser (controller) via the Use NI Audio Units checkbox in the Plug-ins page of the Preferences panel — see section Preferences – Plug-ins page for more information.
You can also undock any Native Instruments Plug-in and open it in a separate floating window. In the floating window you can notably switch between the Default view and the full user interface of the original Native Instruments product — see section Undocking a Plug-in panel (Native Instruments and External Plug-ins only) for more information.
Undocking a Plug-in panel (Native Instruments and External Plug-ins only)
You can undock the panel of a Native Instruments or External Plug-in and open it in its own floating window by clicking the little diagonal arrow in the Plug-in Header:

Click the little diagonal arrow to open the Plug-in in a floating window.
To undock a Native Instruments or External Plug-in and open it in its dedicated floating window, click the little diagonal arrow on the left of the Plug-in Header.
The Plug-in shows up in its own floating window.
Notice
When undocking Native Instruments Plug-ins, their panel in the Plug-in Strip is replaced by a thin Plug-in placeholder (see below).
Tip
Plug-ins of Native Instruments platform products (Reaktor, Kontakt, Guitar Rig) are automatically opened in floating windows when loaded from the Plug-in menu.
Maschine will always show the open floating windows of the focused channel (Sound, Group or Master). In this channel you can have as many open floating windows as you see fit. When you set the focus to another channel, all open floating windows disappear, possibly replaced by those for Native Instruments and/or External Plug-ins loaded in the newly focused channel (Sound, Group or Master).
Notice
The Plug-in floating window is the same as in Arrange view — see section Opening/closing Plug-in windows for more on this.
Undocking a Native Instruments Plug-in
When you open a Native Instruments Plug-in its own floating window, following things additionally happen:
In the Plug-in Strip the Plug-in panel is replaced with a thin vertical Plug-in placeholder containing only the little diagonal arrow — this allows you to dock the Plug-in back into the Plug-in Strip (see below).
The floating window also displays the Plug-in Header at the top. In addition to the Header’s elements described in section Custom panels for Native Instruments Plug-ins, this Header contains an additional Edit button (showing a pencil icon) allowing you to switch to the Edit view, which shows the full interface of the original Native Instruments product:
Closing the Plug-in’s floating window
To dock a Native Instruments or External Plug-in back into the Plug-in Strip and close its dedicated floating window, click the little diagonal arrow in the Plug-in placeholder (Native Instruments Plug-ins) or in the header of the generic Plug-in panel (External Plug-ins) in the Plug-in Strip.
Tip
You can also close any floating window via the common button provided by your operating system at the top left or right corner of the window. The Plug-in will be inserted back into the Plug-in Strip.