Layer Edit Pages
SCHEMA: DARK's Layer Edit pages allow you to precisely configure the behavior of the loop played in each layer, including the pattern and layer settings.
The Layer Edit pages allow you to precisely configure the behavior of the loop played in each layer, including the pattern and layer settings.
To open the Layer Edit page of a particular layer, click the colored quarter icon left of the label in the desired layer tab.

To close the page and return to the Main page, click the little cross in the top right corner of the page. You can also switch directly to another page by clicking its dedicated button or tab.

A Layer Edit page consists of three main areas:
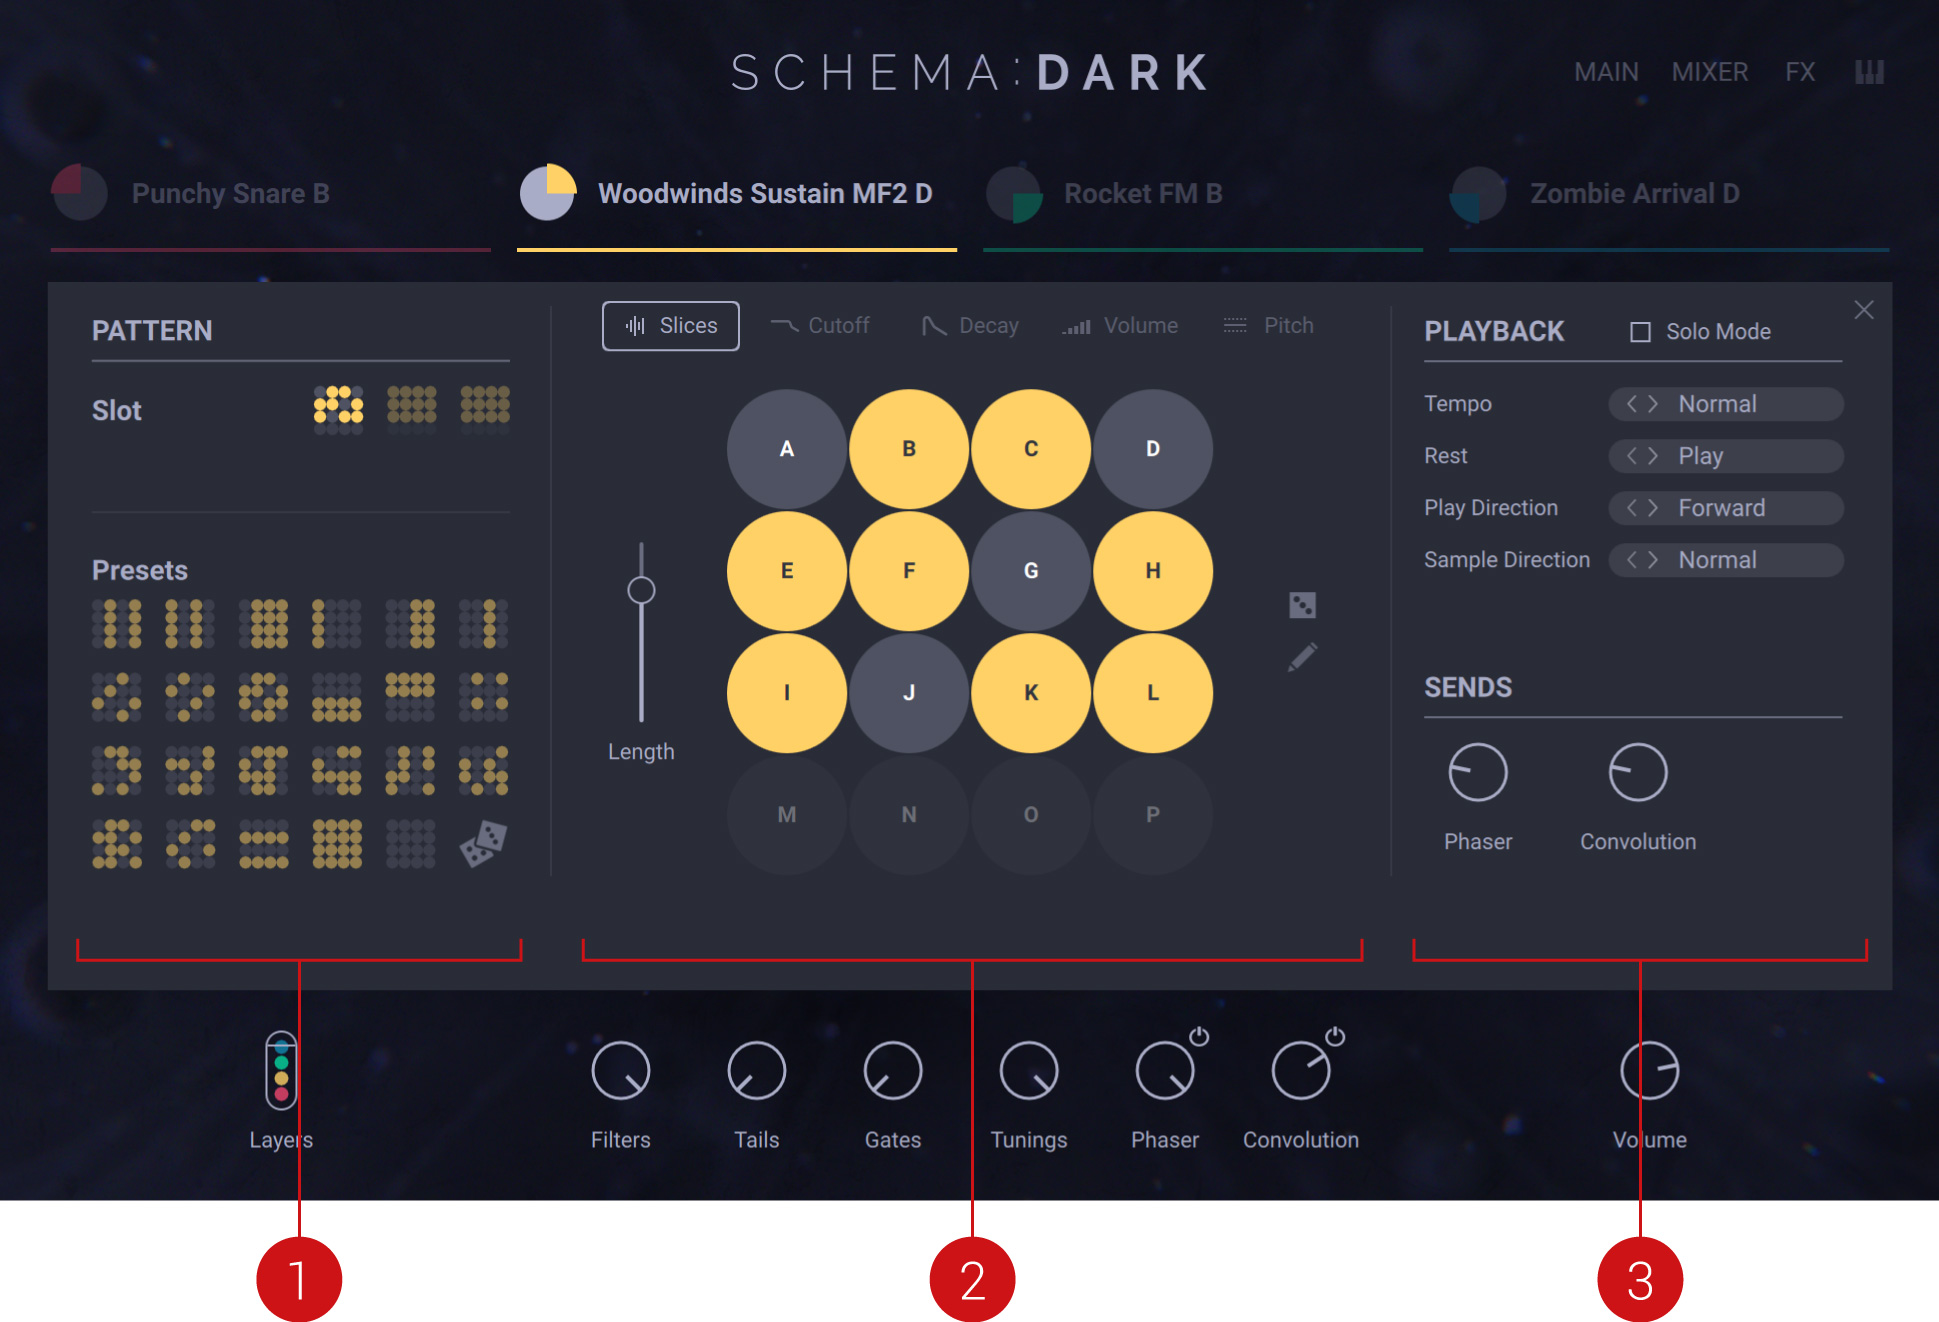
PATTERN area: In the left part of the page, you can select a pattern for use and for editing. The selected pattern is loaded and its details appear in the middle part of the page. For more information, refer to Selecting a Pattern.
Pattern Edit panels: In the middle part of the page, the pattern settings are organized into various panels in which you can precisely adjust pattern parameters for each single step. Furthermore, the panels let you modify how the Macros affect the sound of this layer. For more information, refer to Pattern Edit Panels.
PLAYBACK and SENDS areas: In the right part of the page, you can adjust global settings for the layer. For more information, refer to Layer Settings.
Selecting a Pattern
In the left part of the Layer Edit page, the PATTERN area allows you to select patterns, both for playing and for editing.
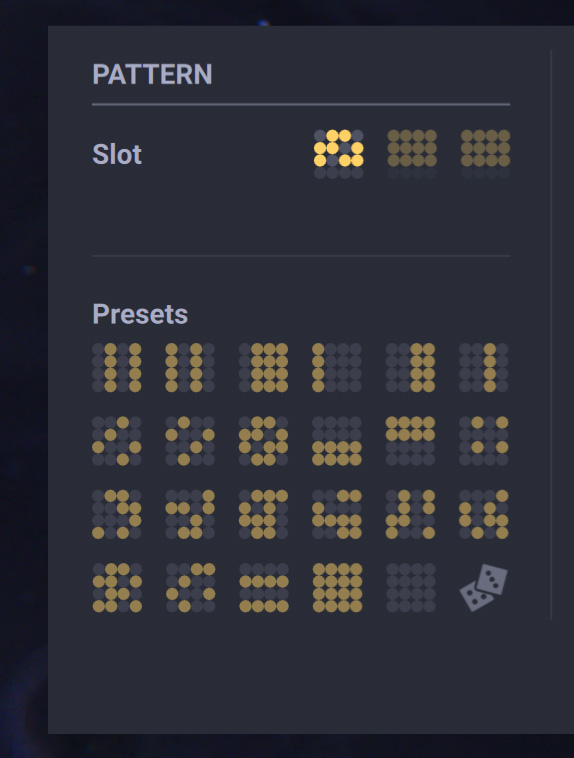 |
The PATTERN area contains the following elements:
Slot section: Contains the three pattern slots available in the layer. These slots let you quickly switch between your preferred patterns.
The highlighted slot indicates the active pattern: This pattern is loaded in the layer and its settings are displayed and can be modified in the Pattern Edit panels (in the middle of the page). Any modification you make in the Pattern Edit panels or in the Presets section below will always affect the pattern in this highlighted slot.
You can load another pattern at any time by clicking another pattern slot. The selected pattern will be used for playback in this layer and its details will show up in the Pattern Edit panels.
Presets section: Contains presets to quickly replace the entire sequence of on/off steps in the pattern:
Clicking any preset loads it into the pattern. The on/off states of the pattern steps are updated accordingly, as indicated by the lit steps in the Pattern Edit panels (in the middle of the page).
Clicking the little dice randomizes the on/off state of the steps. You can click repeatedly until you find a step sequence to your liking.
Note that these presets only affects the on/off state of the steps. All other step parameters stay untouched. You can further adjust the on/off state of individual steps using the Slices panel in the middle of the page, and adjust all other step parameters using the other Pattern Edit panels. For more information, refer to Pattern Edit Panels.
Pattern Edit Panels
In the middle part of the Layer Edit page, a series of panels allow you to edit in detail the settings for each step in the loaded pattern.
 |
To open the desired Pattern Edit panel, click the panel’s tab in the top row in the middle part of the Layer Edit page.

The following panels are available:
Slices panel: Defines the on/off state of each step. Only steps that are on will be played. Furthermore, the Slices panel lets you reorder the 16 slices of the loop and freely place them onto the desired steps. For more information, refer to Slices Panel.
Cutoff panel: Adjusts the filter applied to each single step. For more information, refer to Cutoff Panel.
Decay panel: Adjusts the decay phase of each single step. For more information, refer to Decay Panel.
Volume panel: Adjusts the volume level of each single step. For more information, refer to Volume Panel.
Pitch panel: Adjusts the pitch offset of each single step. For more information, refer to Pitch Panel.
Additionally, the Cutoff, Decay, Volume, and Pitch panels allow you to adjust how much each step will be affected by the four Macros available at the bottom of the Instrument. For more information, refer to Adjusting Macros.
Slices Panel
The Slices panel lets you configure two essential features:
By default, you can activate or deactivate each single step of the pattern. Only active steps will be played.
In Reorder mode, you can reorder the slices in the pattern by defining which slice should be played on each step.
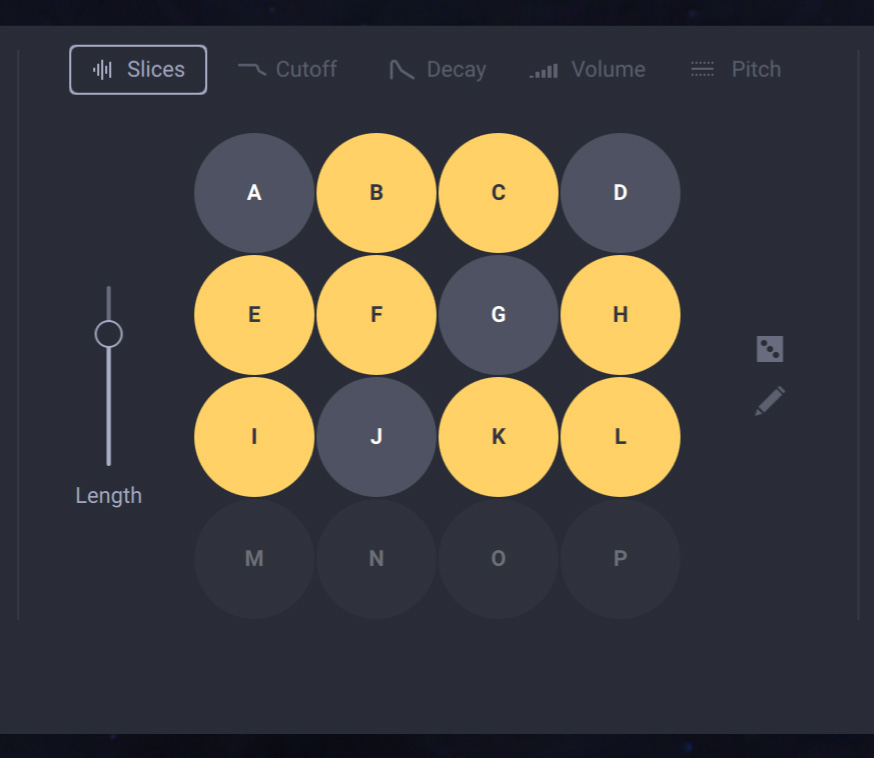 |
By default, the elements in the Slices panel work as follows:
Length: Adjusts the pattern length from 1 step (slider at the bottom) to 16 steps (slider at the top). Steps beyond the current length are outside the pattern: They are grayed out and cannot be edited. The Length slider is available on all panels.
Step grid: Clicking the desired steps lets you activate or deactivate them. Active steps are lit with the layer’s color, while inactive steps are gray. Only active steps will be playing a slice. The played slice is indicated by the letter on each step.
Tip
You can also quickly set the state for all steps at once by selecting the desired pattern preset in the Preset area in the left part of the page. For more information, refer to Selecting a Pattern.
Dice: Reorders the slices randomly within the pattern. You can also manually reorder slices by enabling the Pen button underneath (see below).
Pen: Activates or deactivates Reorder mode, which allows you to reorder slices within the pattern. When Reorder mode is active, the Pen button is lit. See below for more information about reordering slices.
Reordering Slices Within the Pattern
By clicking the pen icon on the right of the Slices panel, you switch the panel to Reorder mode. In Reorder mode you can move slices to the desired steps in the pattern and reorder the slices to your liking.
Tip
The audio loop loaded in the selected layer is cut into 16 audio pieces called slices. These slices can be freely placed on the 16 steps of the pattern.
The 16 slices of your loop are indicated by the letters A to P. In the Step grid, the letter on each step indicates which slice is loaded on that step.
In Reorder mode, use the Step grid as follows to reorder your slices:
In the Step grid, click the step on which you want to load another slice.
The selected step is highlighted with a white circle.
In the row of letters under the Step grid, click a letter to load the corresponding slice onto the selected step.
The selected slice is loaded onto the step. The step now indicates the letter of the new slice.
Clicking a particular step will not activate or deactivate it, but instead it will select it (the step gets a white circle around it) so that you can choose a slice to use in this step from the row of letters at the bottom.
In Reorder mode, the following additional elements show up in the Slices panel:
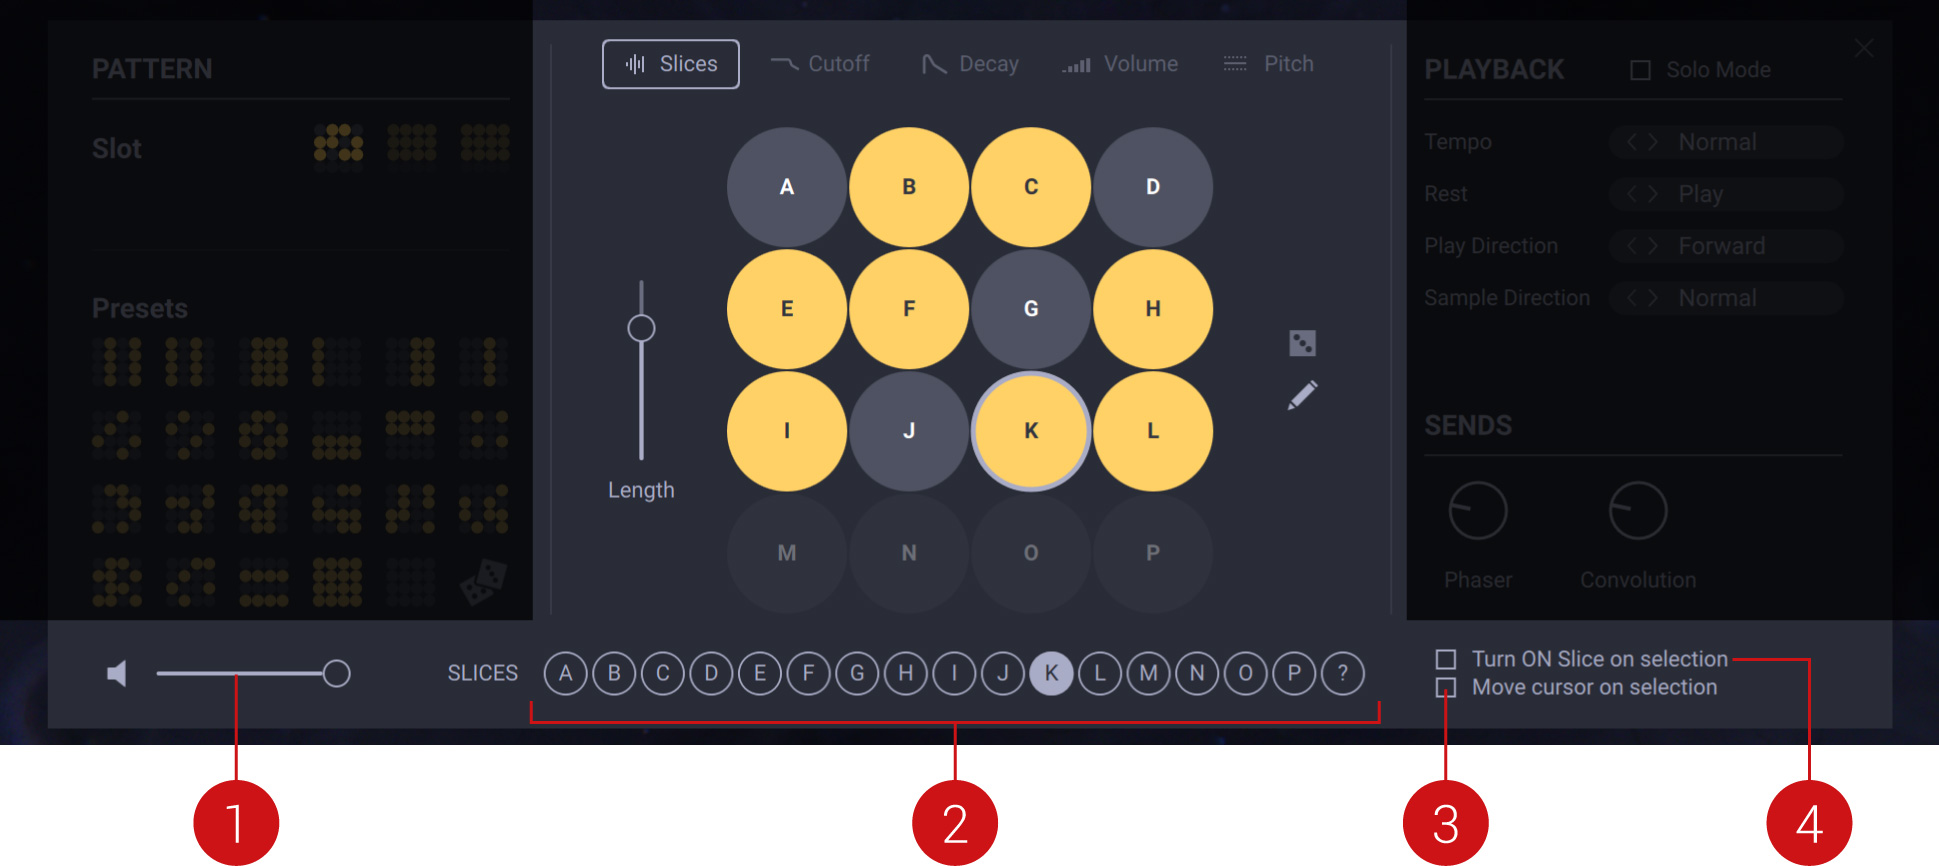
Prelisten: Adjusts the volume level at which you can prelisten the slice A–P upon selection. You can turn the Prelisten feature on or off by clicking the little speaker on the left.
Slice letters: The highlighted letter indicates which slice is loaded into the step selected in the grid above. You can choose another slice for this step by clicking its letter.
Move cursor on selection: When this button is on, as soon as you click a slice letter in the bottom row to load that slice onto the selected step, the next step gets automatically selected, as indicated by the white circle around it. This way, starting from a particular step, you can click the desired letters one after each other to quickly build the desired sequence of slices.
Turn ON Slice on selection: When this button is on, the selected step is automatically activated (if it was not) as you load a slice onto it.
Note
You cannot activate or deactivate steps in your pattern using your mouse when Reorder mode is active. To do this, first deactivate Reorder mode by clicking the little pen icon (it turns off).
Cutoff Panel
The Cutoff panel lets you configure a filter that can affect each step differently.
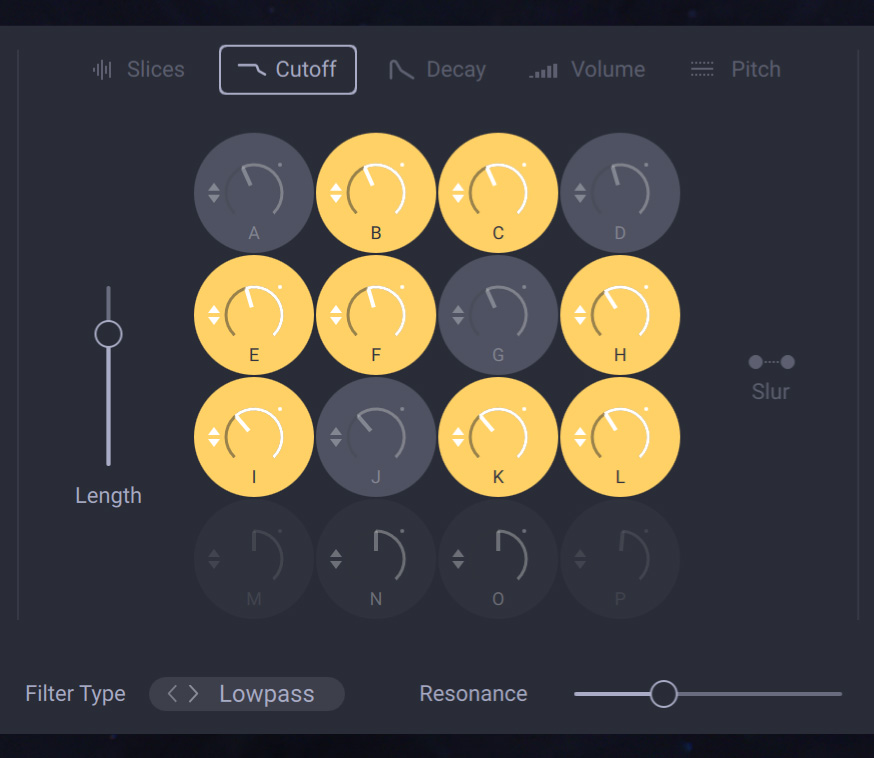 |
The Cutoff panel contains the following elements:
Length: Adjusts the pattern length from 1 step (slider at the bottom) to 16 steps (slider at the top). Steps beyond the current length are outside the pattern: They are grayed out and cannot be edited. The Length slider is available on all panels.
Step grid: On each step, you can click the knob and drag your mouse vertically to adjust the cutoff frequency of the filter for that particular step. The cutoff frequency value temporarily appears under the knob as you drag your mouse. Additionally, the two little arrows to the left of the knob let you adjust how the Filters Macro (located at the bottom of the instrument’s window) will influence this particular control. For more information about adjusting Macros, refer to Adjusting Macros.
Slur: Smoothens the jump in the parameter value between the steps. Any abrupt changes in the parameter value, as set by the various knob positions in the Step grid, are shaped into smooth transitions.
Filter Type: Selects from various types of filters, each of them affecting the sound differently. For all filter types, you can adjust the filter’s cutoff frequency for each single step using the knobs in the Step grid, as described above. The following filter types are available:
Lowpass: A low-pass filter that attenuates frequency content above the cutoff frequency.
Highpass: A high-pass filter that attenuates frequency content below the cutoff frequency.
Daft: A low-pass filter adapted from the MASSIVE synthesizer and with a more aggressive filter design. The filter is a 2-pole low-pass, which attenuates frequencies above the cutoff frequency at a rate of -12 dB/octave.
Resonance: Controls the amount of boost around the cutoff frequency. High resonance makes the filter sound colorful and more noticeable.
Decay Panel
The Decay panel lets you configure how fast the sound fades out on each step.
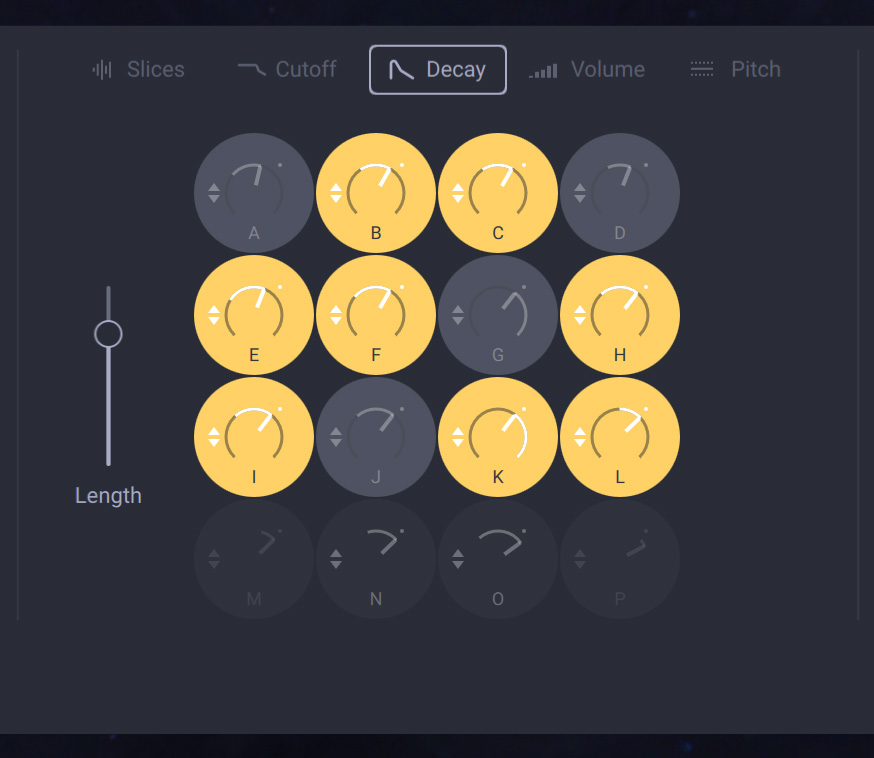 |
The Decay panel contains the following elements:
Length: Adjusts the pattern length from 1 step (slider at the bottom) to 16 steps (slider at the top). Steps beyond the current length are outside the pattern: They are grayed out and cannot be edited. The Length slider is available on all panels.
Step grid: On each step, you can click the knob and drag your mouse vertically to adjust the decay of the amplitude level for that particular step, i.e. the time it takes for the slice to fade out. The decay value temporarily appears under the knob as you drag your mouse. Additionally, the two little arrows to the left of the knob let you adjust how the Tails Macro (located at the bottom of the instrument’s window) will influence this particular control. For more information about adjusting Macros, refer to Adjusting Macros.
Volume Panel
The Volume panel lets you adjust the volume attenuation of each step.
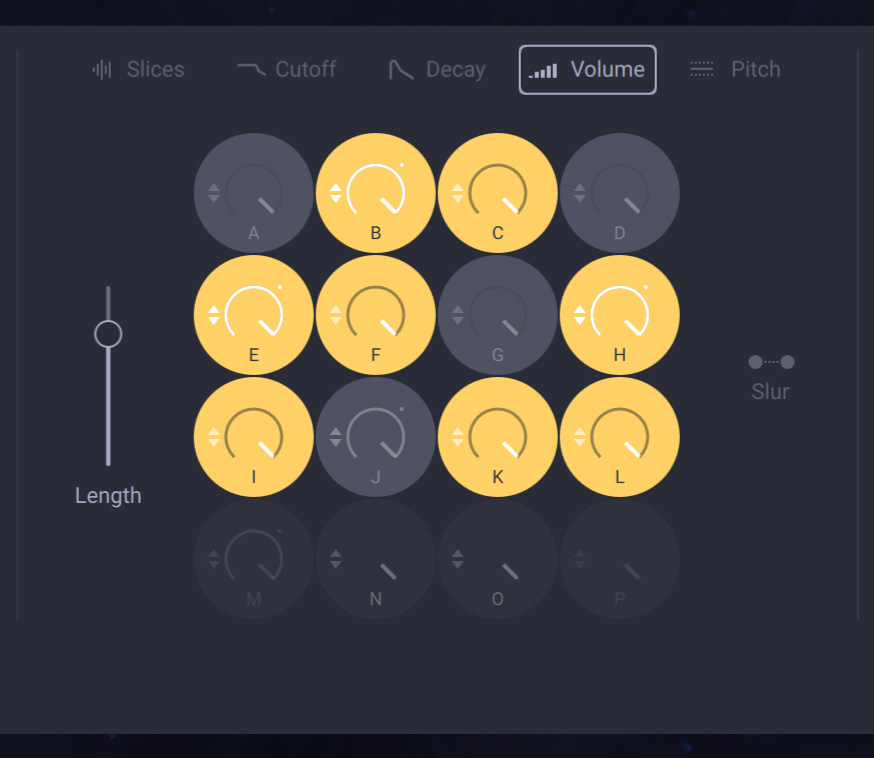 |
The Volume panel contains the following elements:
Length: Adjusts the pattern length from 1 step (slider at the bottom) to 16 steps (slider at the top). Steps beyond the current length are outside the pattern: They are grayed out and cannot be edited. The Length slider is available on all panels.
Step grid: On each step, you can click the knob and drag your mouse vertically to adjust the volume attenuation (in dB) of that particular step. With the knob at full right, the slice is played at its original volume level. With the knob at full left, the attenuation is infinite and the slice is not audible. The volume level temporarily appears under the knob as you drag your mouse. Additionally, the two little arrows to the left of the knob let you adjust how the Gates Macro (located at the bottom of the Instrument’s window) will influence this particular control. For more information about adjusting Macros, refer to Adjusting Macros.
Slur: Smoothens the jump in the parameter value between the steps. Any abrupt changes in the parameter value, as set by the various knob positions in the Step grid, are shaped into smooth transitions.
Pitch Panel
The Pitch panel lets you adjust the pitch offset of each step.
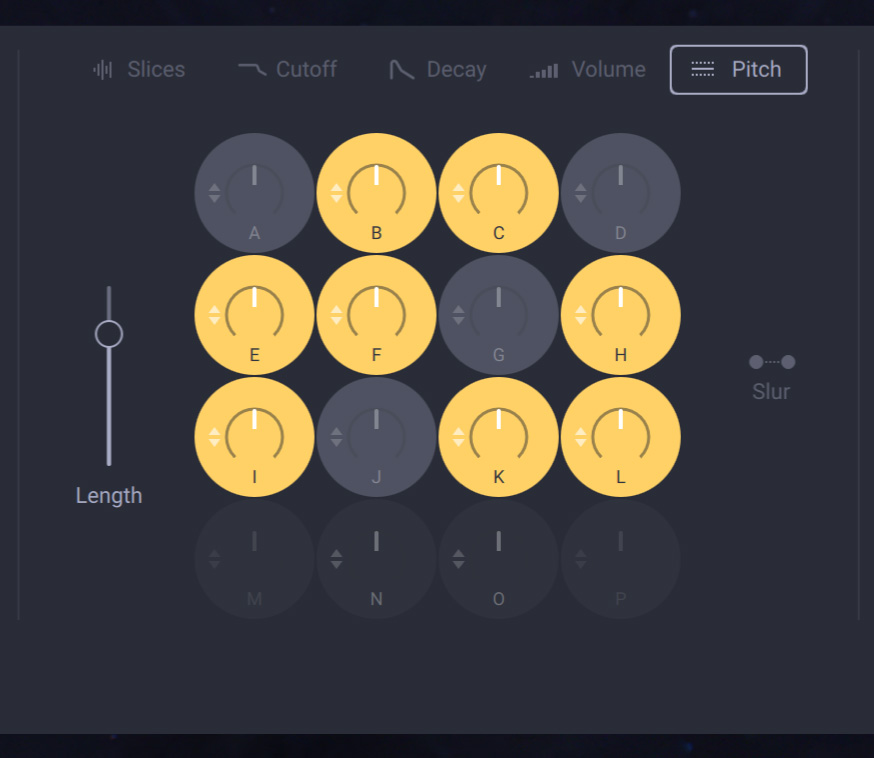 |
The Pitch panel contains the following elements:
Length: Adjusts the pattern length from 1 step (slider at the bottom) to 16 steps (slider at the top). Steps beyond the current length are outside the pattern: They are grayed out and cannot be edited. The Length slider is available on all panels.
Step grid: On each step, you can click the knob and drag your mouse vertically to shift the pitch of that particular step between -12 and +12 semitones. The pitch offset temporarily appears under the knob as you drag your mouse. Additionally, the two little arrows to the left of the knob let you adjust how the Tunings Macro (located at the bottom of the Instrument’s window) will influence this particular control. For more information about adjusting Macros, refer to Adjusting Macros.
Slur: Smoothens the jump in the parameter value between the steps. Any abrupt changes in the parameter value, as set by the various knob positions in the Step grid, are shaped into smooth transitions.
Adjusting Macros
SCHEMA: DARK provides four Macros, always visible at the bottom of the instrument:
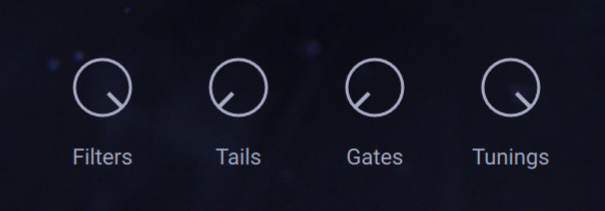 |
Each Macro affects one dedicated parameter from a particular panel in the Layer Edit pages. It affects this parameter for all steps in all layers, however to a different, customizable extent for each individual step:
The Filters Macro affects the cutoff frequencies set by the controls on the Cutoff panel of the Layer Edit pages. For more information, refer to Cutoff Panel.
The Tails Macro affects the decay times set by the controls on the Decay panel of the Layer Edit pages. For more information, refer to Decay Panel.
The Gates Macro affects the volume attenuations set by the controls on the Volume panel of the Layer Edit pages. For more information, refer to Volume Panel.
The Tunings Macro affects the pitch offsets set by the controls on the Pitch panel of the Layer Edit pages. For more information, refer to Pitch Panel.
The influence of a Macro on its dedicated parameter comes on top of the current parameter value as defined by its control. In that, the Macro acts as a modulator.
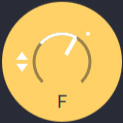
You can configure the Macro influence on a particular control by using the little up and down arrows on that control:
To adjust the extent at which a Macro will modify the parameter value for a step, click the little up and down arrows left of the step’s control and drag your mouse vertically.
The extent at which this parameter will be affected by the Macro is indicated by a white segment on the control’s ring. Additionally, a white point indicates that this control is affected by the Macro.
Note
The modulation from the Macro is bipolar: From the middle (unmodulated) position, if you drag your mouse upward the Macro will have a positive influence on the parameter (turning up the Macro will increase the parameter value), whereas if you drag your mouse downward the Macro will have a negative influence on the parameter (turning up the Macro will decrease the parameter value). This is always indicated by the position of the white segment on either side of the control’s cursor.
By adjusting this Macro modulation on each individual step and for each layer, you can finely tailor how each of the four Macros will affect the overall sound.
Layer Settings
In the right part of the Layer Edit page, the PLAYBACK and SENDS areas allow you to adjust settings that apply to the entire layer, independently of the loaded pattern.
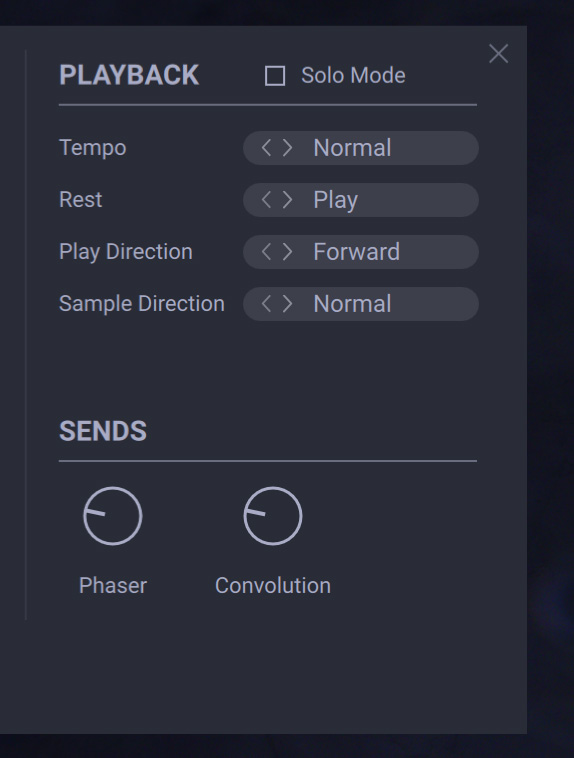 |
The PLAYBACK area contains the following elements:
Solo Mode: Mutes all other layers as long as the Layer Edit page is open. Enabling Solo mode can help you focus on editing tiny sonic details of the selected layer without being disturbed by the sound of the other layers.
Tempo: Adjusts how the tempo of patterns in that layer relates to KONTAKT’s master tempo. You can select either Normal (default value, patterns play at KONTAKT’s tempo), Halftime (patterns play at half speed), or Doubletime (patterns play at double speed).
Rest: Selects what to do with inactive steps in the patterns: If Play is selected, a silence is played for each inactive step. If Skip is selected, the playback directly jumps to the next active step.
Play Direction: Selects in which direction patterns are played. Available directions are Forward (default), Backward, and PingPong (alternating between forward and backward).
Sample Direction: Selects in which direction audio samples (the loops and their slices) are played back. You can choose between Normal (default) and Reverse.
The SENDS area contains two controls, which adjust how much audio from this layer is sent to each effect, respectively. You can select and configure Effects in the FX page.