Managing your Track Collection
In this section you learn how to manage your Track Collection in Traktor Play.
In this section you learn how to manage your Track Collection.
About the Track Collection
The Track Collection represents all the music you use in Traktor. With the Track Collection you can organize, tag, and prepare your tracks for being played as part of your mix.
A benefit of the Track Collection is that it stores the metadata of the tracks, like track title, artist name, tempo, genre, key etc. It also stores Traktor-specific information about your tracks.
Compatible audio file formats
Traktor supports the following music file formats: MP3, M4A (AAC), WAV, AIFF, FLAC, and Ogg Vorbis.
Notice
DRM-protected music files cannot be played back in Traktor. This affects for example AAC-tracks bought in the iTunes store.
Notice
WMA files are not supported in Traktor.
Importing music files from the local music folder
You can import the music contained in the local music folder of your operating system:
Right-click the Track Collection folder in the Browser Tree to open the context menu.
Select Import Music Folders.
Traktor now imports the music files from the local music folder.
Adding music from other folders
If you have stored tracks in other folders or on external storage devices, you can add these folders to the list of Traktor Music Folders as follows:
Open the File Management page in the Preferences.
Under Music Folders click Add….
In the dialog navigate to a folder you want to add.
Confirm your selection.
Repeat to add all of your music folders.
Click Close to close the Preferences.
When now selecting the folder Music Folders in the Explorer folder in the Browser Tree, Traktor scans the respective folders and update the Track List accordingly. Subfolders are automatically included in the scan.
Importing iTunes tracks into your Track Collection
You can import tracks from your iTunes library into the Track Collection:
Select the iTunes folder in the Browser Tree to display its content in the Track List. A double-click expands the folder in the Browser Tree.
Select the track(s) that you want to import into the Track Collection.
Right-click on the selection to open the context menu.
Hover the mouse over Import to Collection to display further importing options.
Select either as Tracks, as Looped Samples, or as One-Shot Samples to load the selection into the Track Collection accordingly.
Beatport/Beatsource Streaming
Traktor is fully integrated with Beatport and Beatsource streaming services, giving you access to a catalogue of millions of tracks which can be streamed live into your sets or stored locally on your device. A paid subscription is required for these services, or you can sign up for a free trial if you want to test it out.
Even without any subscription, the Beatport/Beatsource previews let you access and load track excerpts directly from Traktor’s Browser. You can also use the generic folders of both streaming services in the Browser Tree and use their search functionality.
Once you have subscribed, you will need to log in once with your credentials from the Streaming page of the Preferences, and Traktor will save your details for future use. You will then find your Beatport and Beatsource playlists and saved tracks in dedicated folders of the Browser Tree.
Beatport/Beatsource folders in the Browser Tree
Whether you are logged in or not, you can find the tracks recommended and curated by Beatport and Beatsource. You can browse themed Curated Playlists, search by Genre, or see what’s popular right now in the Top 100. Each of these can be found in a dedicated subfolder of the Beatport or Beatsource folder in the Browser Tree.
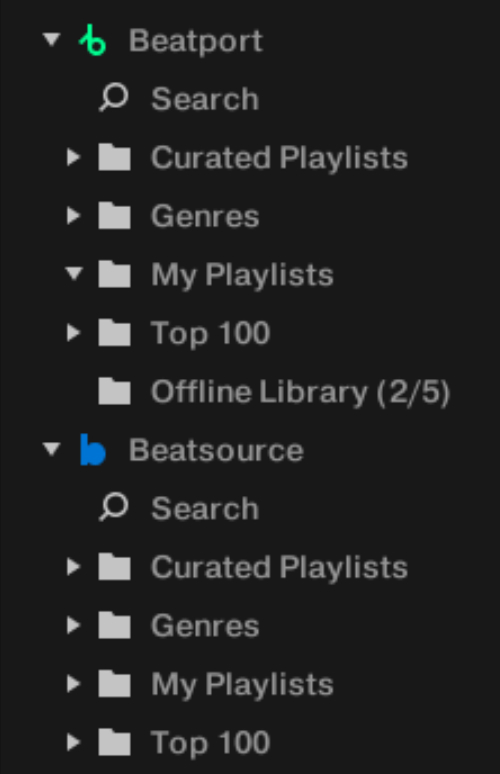 |
You can identify which tracks in your Traktor Collection are from Beatport or Beatsource by their colored logo in the Status column of the Track List.
Loading, playing and analyzing Beatport/Beatsource tracks
Playing Beatport/Beatsource Streaming tracks is done exactly the same way as with offline tracks on your hard drive. The tracks need to be fully cached (which means temporarily stored) on your local device for the automatic analysis to be triggered and for the cover artwork to show.
Searching the Beatport/Beatsource catalogue
You can search the extensive Beatport/Beatsource catalogues by clicking the Beatport/Beatsource folder or its Search subfolder in the Browser Tree, typing your search term into the search field above the Browser Tree, hitting [Enter], and optionally using the Search In filters:
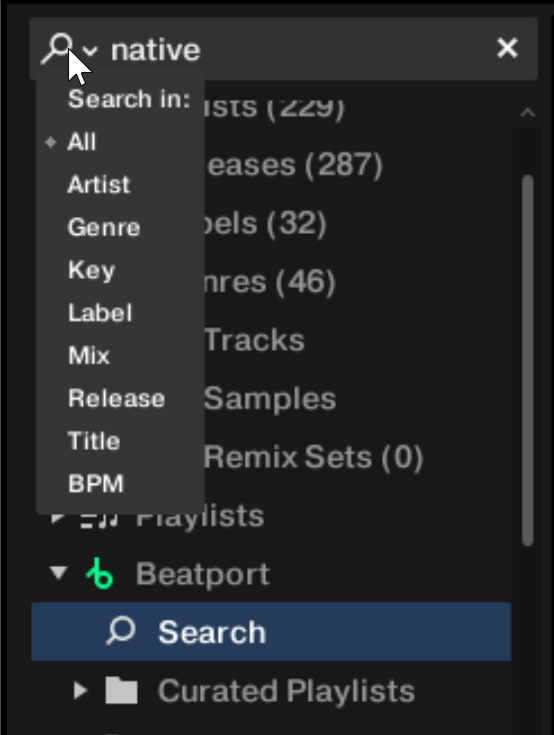 |
If you select the All filter, Traktor triggers the same global search algorithm that is used on the main search of the Beatport/Beatsource website.
When specifying which property to search, for example Artist or Title, the search term must match exactly including empty spaces and does not support multiple search terms.
Organizing Beatport/Beatsource playlists
You can create playlists to organize your sets and collection in the same way that you would for offline files. You can also bookmark tracks that you discover in the Beatport/Beatsource catalogue for later.
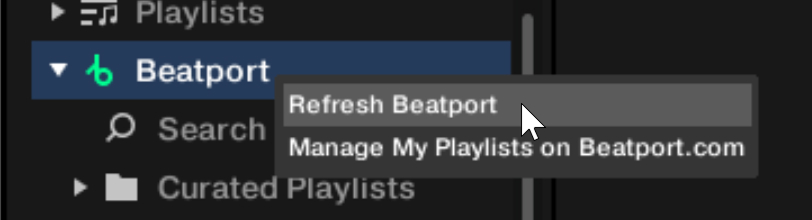
Using My Playlists from Beatport/Beatsource
You can create and edit playlists on Beatport and Beatsource’s websites for use within Traktor.
To sync your creations and edits:
Right-click the desired Playlist in the Browser Tree to open the context menu.
Select Refresh Beatport or Refresh Beatsource from the menu.
 |
Adding tags and Markers to Beatport/Beatsource tracks
You can add tags and Markers in the same way as you can for purchased and local tracks. You can add searchable comments, Cue Points, and Loops to your Beatport/Beatsource Streaming tracks, and make changes to their Beatgrids: All the information will be stored within your Collection.nml file and ready to transfer to other computers.
Note
Tags, Markers, and Beatgrids created for Beatport tracks will be recalled throughout sessions as long as you do not remove the tracks from your Collection. This is also the case when you remove tracks from the Offline Library to make space for other tracks.
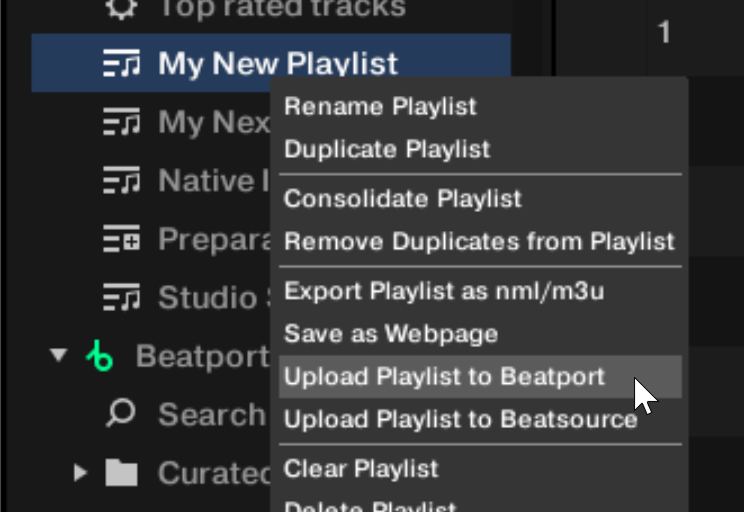
Uploading playlists to Beatport/Beatsource
If you have created Playlists in Traktor using Beatport/Beatsource Streaming tracks, you can upload the Playlists to your Beatport/Beatsource account. This will allow you to share the playlists or to make full purchases of the tracks as permanent downloads. The uploaded playlists will appear in your My Playlists section on the Beatport/Beatsource website.
To upload a Playlist to your Beatport/Beatsource account:
Right-click the desired Playlist in the Browser Tree to open the context menu.
Select Upload Playlist to Beatport or Upload Playlist to Beatsource from the menu.
 |
Restrictions when using Beatport/Beatsource Streaming tracks
Due to licensing restrictions, the following functions are unavailable when any Beatport Streaming or Beatsource track is loaded onto any Deck in Traktor:
Exporting playlists with tracks as files to other locations and devices
Locating your Beatport/Beatsource data
You can find your Beatport/Beatsource data folders within your local application support folder:
The default file path for Mac users is:
User > Library > Application Support > Native Instruments > Traktor > Streaming.The default file path for PC users is:
C:\Users\[username]\AppData\Local\Native Instruments\Traktor\Streaming.
Troubleshooting Beatport/Beatsource login issues
If you are having trouble logging in, try the following:
Clear your internet browser cookies for Beatport and/or Beatsource.
If this does not help, delete the Beatport/Beatsource login data from your computer. To do this:
On Mac, open the Finder and go to
User > Library > Application Support > Native Instruments > Traktor > Streaming.On PC, open the Explorer and go to
C:\Users\[username]\AppData\Local\Native Instruments\Traktor\Streaming.At the root this folder, delete the
u.txtandv.txtfiles, which contain the login information.Close Traktor and reopen it.
If you are still having issues, please contact our Support team.
Switching off Wi-Fi under bad conditions
If you are experiencing an unstable Wi-Fi connection, we recommend disabling your computer’s wireless network adapter so that Traktor remains stable in offline mode. A computer that is continually attempting to connect and losing connection may produce erratic behavior in Traktor.
Syncing your Offline Library
Beatport/Beatsource’s Offline Library is designed to help when you have an unstable or nonexistent Wi-Fi connection.
When you load a track from Beatport/Beatsource into a Deck it is fully cached in memory. Loading may take longer under bad networking conditions, but once the tracks have been fully loaded, playback will not be affected by wireless network problems and you can safely play the tracks without interruptions. The Offline Library lets you download in advance all the tracks you will need in your mix.
You can store up to 1000 tracks from Beatport/Beatsource Streaming locally on your device. They will appear in the Offline Library folder of the Browser Tree. Please verify your plan as different plans have different Offline Library capacities. This requires a stable network connection to download the tracks to your device. Once the tracks have synced to your local device, you cannot move or copy them to other locations or devices, they can only be used within Traktor.
To add a track to your Offline Library:
Locate the track within the Beatport or Beatsource folder in the Browser Tree.
Right-click (Windows) / [option]-click (Mac) the track name and choose Add to Offline Library’.
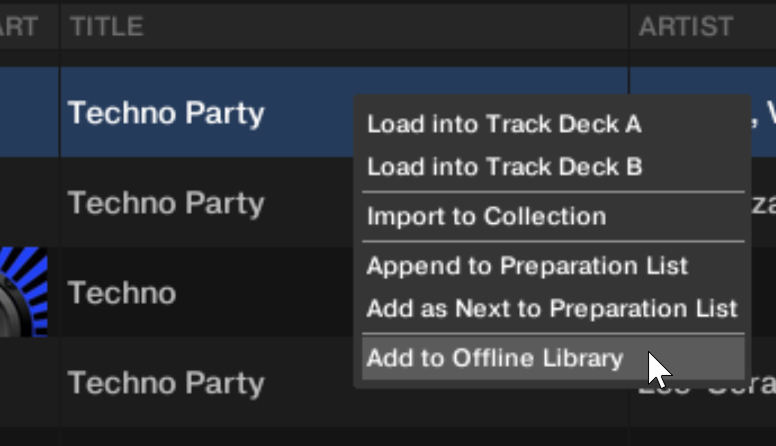
You can repeat the process to remove it from your Offline Library.
The tracks added to your Offline Library will also automatically be added to your Track Collection, just as any tracks that you add to your playlists will be.
Show tracks on your local drive
To open the location of a track stored on your local drive:
Right-click the track in the Track List to open the context menu.
Select Show Track in Explorer/Finder.
Your operating system opens the folder containing the track on your local drive.
Editing track metadata in the Track List
Each track in your Collection can contain track metadata including properties such as track title, artist name, album name, cover artwork, etc. Traktor gives you the option to edit these properties in two ways.
Tip
If you are using iTunes for collection management we recommend that you only edit tag metadata in iTunes.
Select a track in the Track List to highlight it.
Click in the property field that you want to edit, for example, the artist name.
A cursor appears in the property field.
Edit the artist’s name.
If you want to edit further properties, repeat the steps above.
Press [Enter] on your keyboard to confirm your changes, or press [Esc] to cancel your changes.
Editing track metadata using the Edit dialog
Not all properties of a track are visible in the Track List. To get access to all the available properties of a track, use the Edit Dialog. This dialog lets you edit multiple tracks at once.
Edit dialog overview
The dialog contains the following elements:
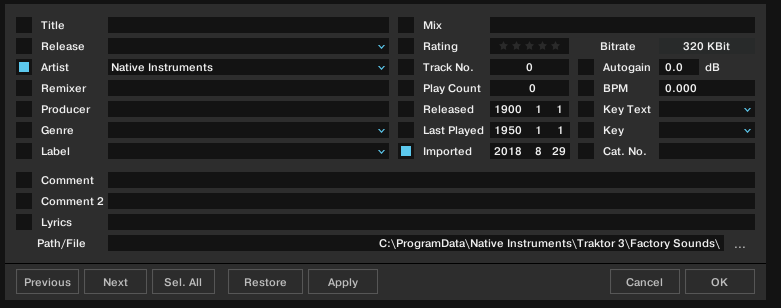
Edit dialog.
Editing a single track
Select a track in the Track List.
Right-click a track to open the context menu.
Select Edit.
The Track List turns into the Edit dialog.
Edit the individual information for your track.
Use the drop-down menu in any track property field to reuse a previously stored tag from your Track Collection.
To apply your changes, you can click Apply and keep the Edit dialog open, or OK to close the Edit dialog and return to the Track List.
To undo any changes you have made, you can click Restore and keep the Edit dialog open, or Cancel to close the Edit dialog.
Editing multiple tracks
If you want to edit multiple tracks, for example, all tracks of an album:
Select the tracks in the Track List.
Right-click any of the selected tracks to open the context menu.
Select Edit to open the Edit dialog.
The Edit dialog appears. The active check boxes indicate which of the attributes share the same value across the selected tracks. The checks also indicate that anything written into these fields will be saved to the metadata tags upon applying changes. Inactive check boxes indicate that the tracks do not have identical values for these attributes.
To change an attribute globally for all the selected tracks, make sure that the box is checked.
To edit your selected tracks one by one, use the Previous and Next buttons at the bottom of the dialog.
To apply your changes, you can click Apply and keep the Edit dialog open, or OK to close the Edit dialog and return to the Track List.
To undo any changes you have made, you can click Restore and keep the Edit dialog open, or Cancel to close the Edit dialog.
Editing the tracks’ cover artwork
Traktor allows you to either import or delete JPEG cover artwork for the tracks of your Track Collection.
Importing cover artworks
To import or replace cover artworks for tracks:
Right-click the track or the selection of tracks in the Track List to open the context menu.
Select Import Cover.
In the dialog, select the cover artwork file on your computer and confirm.
The cover artwork is now stored within the track file(s).
Deleting cover artworks
To delete cover artworks from tracks:
Right-click the track or the selection of tracks in the Track List to open the context menu.
Select Delete Cover.
The cover artwork(s) is/are deleted from the track(s).
Track Collection maintenance
In this section you learn to maintain your Track Collection in terms of consistency and security backups. There are many things to keep track of, such as removing obsolete tracks, relocating tracks that have been moved to another folder on your local drive, etc. These maintenance tasks can be time consuming, so we recommend to not perform them during live situations.
Checking the consistency of your Track Collection
Importing tracks without analysis, reorganizing local music folders, and deleting tracks from local music folders lead to an inconsistent Track Collection. To keep track of your changes you can execute a consistency check on your Track Collection and get a detailed result in the Consistency Check Report.
Executing the consistency check
Right-click the Track Collection folder in the Browser Tree to open the context menu.
Select Check Consistency to execute the consistency check.
Once Traktor has run the check, the Consistency Check Report will appear showing the results.
Note
You can also run the consistency check on any subfolder of your Track Collection, or on any tracks in the Track List.
The Consistency Check Report dialog
The Consistency Check Report provides an overview of your Track Collection and provides options for immediately solving problems.
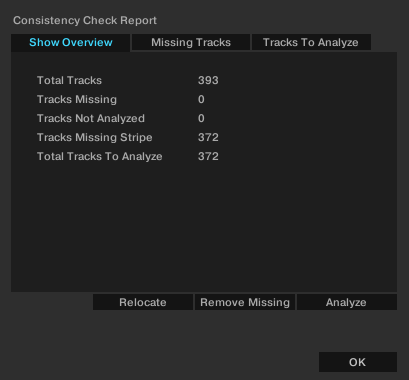 |
Consistency Check Report dialog.
Show Overview / Missing Tracks / Tracks To Analyze tabs: Each tab shows a panel with detailed information about the Consistency Check Report.
Relocate button: Opens the Relocate dialog to start relocation of missing tracks.
Remove Missing button: Removes references to missing tracks from the Track Collection.
Analyze button: Starts the analysis of the tracks to be analyzed or re-analyzed.
Show Overview tab
The Show Overview tab shows the following information:
Total Tracks: The total number of tracks in your Track Collection.
Tracks Missing: The total number of tracks that have been deleted from your hard drive or moved from their original location.
Tracks Not Analyzed: The total number of tracks that have not been analyzed.
Tracks Missing Stripe: The total number of tracks that have been imported and analyzed but whose Stripe view information has been moved or deleted.
Total Tracks To Analyze: The total number of tracks that need to be analyzed or re-analyzed.
Missing Tracks tab
The Missing Tracks tab shows a list of all the missing tracks in your Track Collection.
Tracks To Analyze tab
The Tracks To Analyze tab shows a list of all the tracks in your Track Collection that need to be analyzed or re-analyzed.
Executing the consistency check on Traktor startup
To execute the consistency check and show its report when starting Traktor:
Open the File Management page of the Preferences.
Check the box labeled Show Consistency Check Report on Startup.
Close the Preferences.
The consistency check will now be executed each time you start Traktor.
Notice
Executing the Consistency Check on startup can increase Traktor’s startup time.
Analyzing tracks manually
In a live situation, analyzing tracks or even collections of tracks can be very time consuming when importing them into the Track Collection or when loading tracks into Decks. The moment(s) for the automatic analysis can be specified on the File Management page of the Preferences. You can also switch it off entirely. In this case, you can still analyze your tracks manually when not in a live situation.
Notice
Stem files always need to be analyzed before loading them into a Deck.
Executing the analysis
Right-click a track or a selection of tracks in the Track List to open the context menu. You can also right-click a Playlist in the Browser Tree.
Select Analyze.
The Analyze dialog opens.
Select the desired options for the analysis.
Click OK to start the analysis.
Analyze options
The Analyze dialog provides the following options:
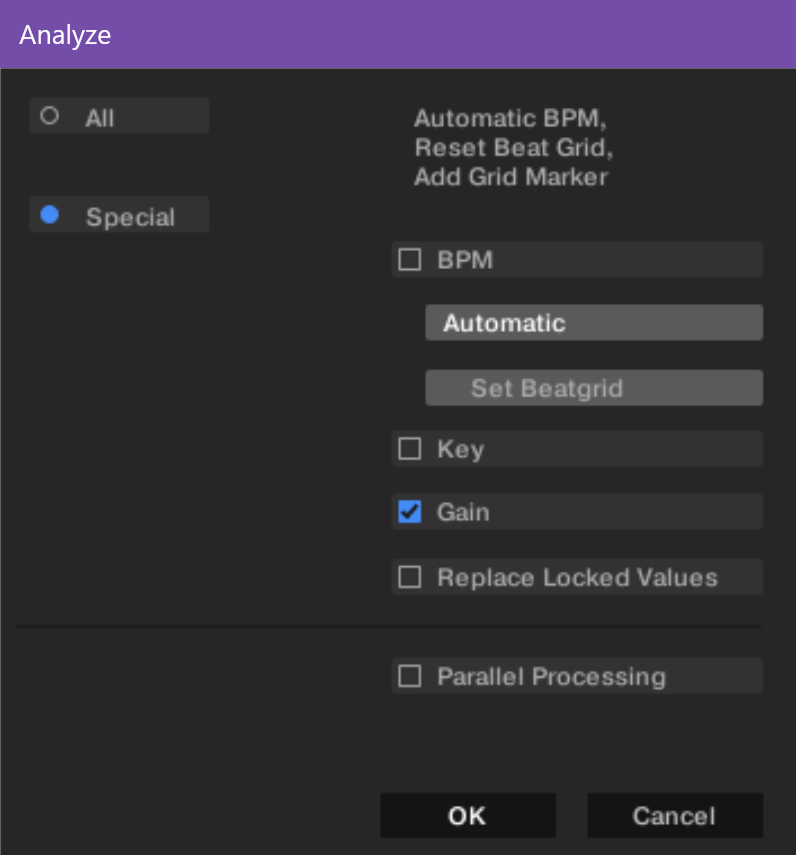 |
All: Analyzes all aspects of the tracks according to the settings in the Analyze Options page of the Preferences.
Notice
For locked tracks the All option does not permit the BPM, Beatgrid markers, Gain, or Key to be overwritten.
Special: Lets you choose which specific aspects of the tracks you want to analyze. The following aspects are available:
BPM: Calculates the tempo of the tracks. When this is selected, you can adjust the following options:
BPM Range menu: Selects a pre-defined tempo range that you want Traktor to use to calculate the track tempo.
Notice
If you are analyzing a large number of tracks with very different tempos, select either a wide range or leave it to automatic. However, narrowing down the tempo range will provide more accurate results.
Set Beatgrid: Sets the Beatgrid on the tracks and aligns it to the nearest downbeat. If the tracks already contain a Beatgrid, Traktor will move it accordingly.
Notice
Beatgrids cannot be set without checking BPM, as the two options are interlinked.
Key: Detects the key of the tracks.
Gain: Calculates the Auto Gain value of the tracks.
Replace Locked Values: Momentarily unlocks tracks for letting the options selected above apply to locked tracks as well.
Parallel Processing: Activates the parallel analysis of tracks.
Notice
This option increases CPU load and should not be used in live situation.
Relocating missing tracks
If you have reorganized a music folder on your local drive, the references to the contained tracks in the Track Collection might lead to missing tracks. This can be corrected by relocating the missing tracks:
Right-click the track or the selection of tracks in the Track List to open the context menu.
Select Relocate.
In the browse dialog, navigate to the destination where your missing track(s) have been moved. To find multiple tracks in different folders, navigate to the top-level folder where they are stored. You can even select your main hard drive folder.
Confirm the location.
The track(s) is/are now relocated.
Deleting tracks from the Track Collection
To delete tracks from your Track Collection:
Right-click the track or the selection of tracks in the Track List to open the context menu.
Select Delete from Collection.
From the confirmation dialog select one of the following options:
delete from collection: Removes the track(s) from the Track Collection and from all Playlists.
additionally remove Traktor tags (may take some time): Removes the track(s) from the Track Collection and from all Playlists, and removes all Traktor-specific tags from the music files on your hard drive.
additionally delete file(s) from hard drive: Removes the track(s) from the Track Collection and from all Playlists, and deletes the music file(s) from your computer.
The tracks are deleted from your Track Collection.
Saving your Track Collection
The Track Collection is automatically saved each time you close Traktor. However, you can also save your edits in the Track Collection manually:
Right-click the Track Collection folder in the Browser Tree to open the context menu.
Select Save Collection.
Exporting your Track Collection
You can export your entire Track Collection as backup onto another hard drive.
Right-click the Track Collection folder in the Browser Tree to open the context menu.
Select Export the Collection to open the Exporting Tracks dialog.
Enter the title for the backup in the Playlist Title field. Do not remove the $ symbol in the beginning.
Select the path to which the backup will be saved in the Destination field.
Select the file format in the Export Format drop-down menu.
Activate the Copy Tracks To Destination check box.
Click OK to confirm.
Traktor now exports your Track Collection.
Restoring the Track Collection from an automatic backup
Each time you change something in your Track Collection and close Traktor, a backup of your Track Collection is created in the Backup folder in Traktor’s Root folder on your local drive. If you delete something in your Track Collection by mistake, you can restore it to an earlier version:
Right-click the Track Collection folder in the Browser Tree to open the context menu.
Select Import another Collection.
An Open dialog appears.
In the dialog, double-click the
Backupfolder to open it.Double-click the
Collectionfolder to open it.The dialog shows the available backups of your Track Collection. The file names indicate the creation date and time of each backup.
Select the backup version to which you would like to restore the Track Collection.
Click OK to confirm.
The Track Collection is now restored to a previous version.
Clearing your Track Collection
To clear your Track Collection:
Right-click the Track Collection folder in the Browser Tree to open the context menu.
Select Clear Collection.
In the warning dialog, select one of the following options:
clear collection: Removes all tracks from the Track Collection and from all Playlists.
additionally remove Traktor tags (may take some time): Removes all tracks from the Track Collection and from all Playlists, and removes all Traktor-specific tags from the music files on your local drive.
additionally delete file(s) from hard drive: Removes all tracks from the Track Collection and from all Playlists, and deletes the music files from your computer.
All tracks are deleted from your Track Collection.