Working with Playlists
In this section you learn about Playlists in Traktor Play and how to use them.
In this section you learn about Playlists and how to use them. Playlists are effective tools of organizing your tracks for different purposes. Generally, a Playlist is a collection of tracks to be used for preparing for DJ sets.
One track can be contained in multiple Playlists.
A Playlist can be re-ordered or reset to the original state rapidly.
Additional functions are saving, loading and exporting Playlists.
Creating Playlists
You can create a new Playlist either in the Browser Tree or directly from the selected tracks.
Creating a new Playlist in the Browser Tree
Right-click the Playlists folder in the Browser Tree.
Select Create Playlist from the context menu.
Type a name for your new Playlist in the dialog.
Click OK to confirm.
Your new empty Playlist appears under the Playlists folder.
Creating a new Playlist from the selected tracks
Select one or more tracks in the Track List.
Drag these tracks onto the Playlists folder in the Browser Tree.
Type a name for your Playlist in the dialog.
Click OK to confirm.
Your new Playlist appears under the Playlists folder and includes the selected tracks.
Adding tracks to Playlists
Select one or more tracks in the Track List.
Drag the selection onto any Playlist in the Browser Tree.
The tracks are added at the end of the Playlist.
You can also directly add the tracks at the desired position in the Playlist:
Select one or more tracks in the Track List.
Drag the selection over the desired Playlist and keep the mouse button depressed.
The tracks in the Playlist appear in the Track List.
Drag the selection back to the Track List.
Following the mouse movements, an orange line indicates where the tracks would be inserted.
Drop the tracks at the desired position by releasing the mouse button.
The tracks are inserted into the Playlist at the chosen position.
Sorting tracks in Playlists
There are several ways to sort tracks in Playlists:
Sorting tracks by original order
Click the header of the #-column to sort the Playlist by original track order.
Sorting tracks by category
Click the category label in the column header to sort the Playlist by this category. A second click inverts the sorting order.
After restarting Traktor all Playlists will reset to their original track order.
Consolidating a categorized track sorting
To make a categorized track sorting permanent:
Right-click the Playlist in the Browser Tree to open the context menu.
Select Consolidate.
Changing the original track order
You can change the original order of the tracks as follows:
Click the header of the #-column to sort the Playlist by original track order.
Select one or more track(s) and drag them up or down in the Playlist. The orange line indicates where the selection will drop when releasing the mouse button.
Using track colors
You can assign colors to the tracks using the Color Picker. This can help you further organize your tracks to your liking. You can then sort or search tracks according to their color.
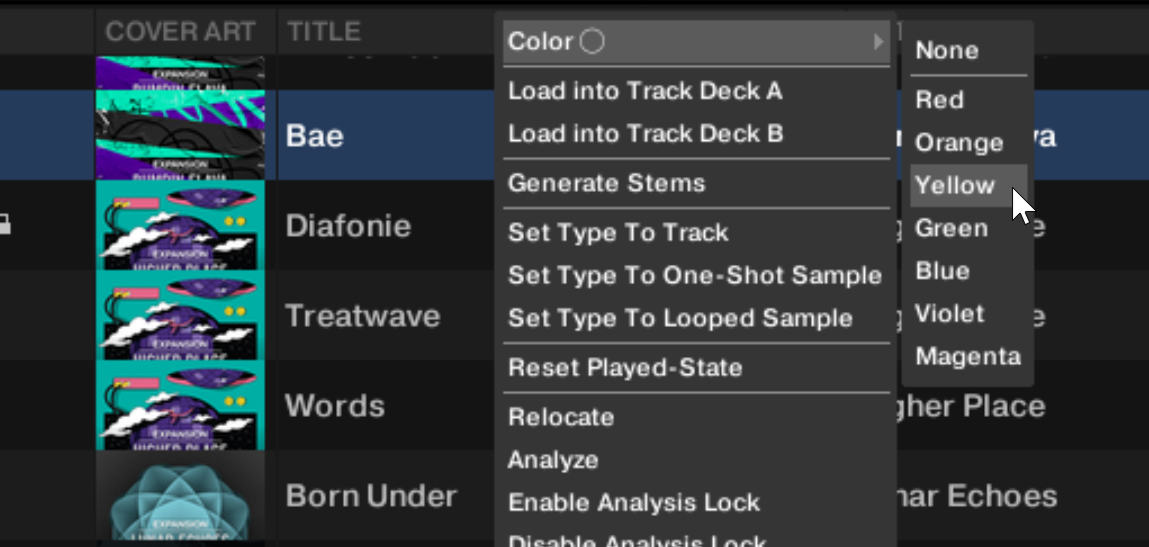 |
Right-click a track in the Playlist.
From the context menu, choose Color and select a color from the submenu to assign to the track.
In the Track List, the track shows a colored bullet in the Color column (by default the leftmost column of the Track List). The track row’s background also mirrors a faded version of the selected color.
To remove a color assignment, select None at the top of the Color submenu.
Sorting tracks by color
To sort the Track List by color, click header of the Color column.
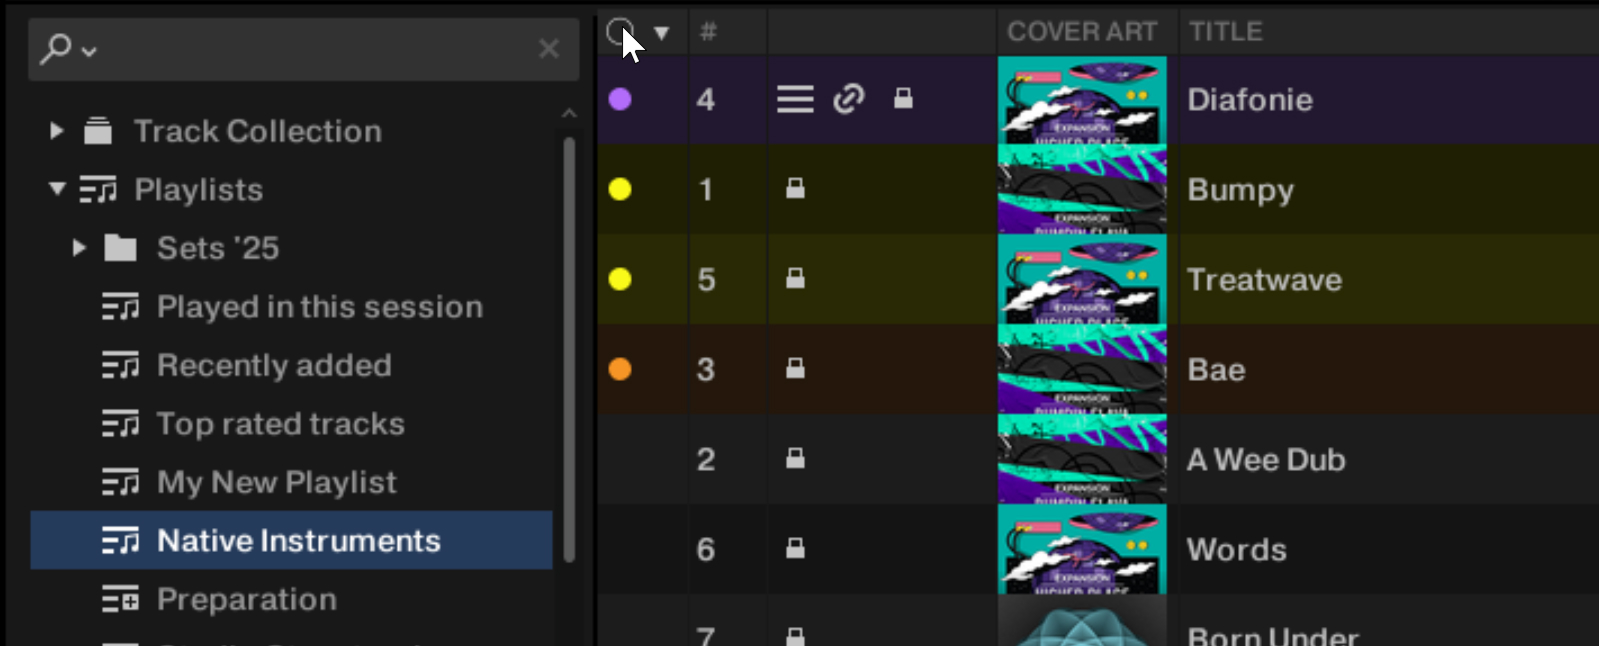
Searching tracks by color
To search your library by color:
Hover with your mouse over the color bullet of a track.
A little magnifying glass appears next to the color bullet.
Click the magnifying glass that appeared.
The Browser Tree switches to the Track Collection, the Search field above is set to the color of the track, and the Track List shows only the tracks with the same color.
 |
Locking tracks from the analysis
To prevent the Beatgrid, key, or Auto Gain value of tracks from being altered, you can lock the tracks:
Right-click the track or the selection of tracks in the Track List to open the context menu.
Select Enable Analysis Lock.
The selected tracks are now locked. You cannot change their Beatgrid, key, or Auto Gain value until the lock is removed by selecting Disable Analysis Lock from the context menu.
Note
If a track is loaded on a Deck, you can also lock the track by activating the Analysis Lock button on the GRID page of the Deck’s Advanced panel.
Organizing Playlists in folders
You have the option to further organize your Playlists by creating Playlist folders:
Right-click the Playlists folder or a Playlist subfolder in the Browser Tree to open the context menu.
Select Create Folder.
Type in the name for the Playlist folder in the dialog.
Click OK to confirm.
Your new Playlist folder will appear under the Playlists folder. You can now add Playlists to this folder via drag-and-drop.
Exporting Playlists
You can export your Playlists including their tracks and play them on other computers with Traktor. Exporting a Playlist creates a folder containing the tracks in the Playlist as well as the Playlist file.
To export a Playlist:
Right-click the desired Playlist in the Browser Tree to open the context menu.
Select Export Playlist.
Enter a name for the Playlist to be exported in the dialog.
Enter a destination path.
Click OK to confirm.
Traktor now exports the Playlist including the tracks to the destination on your computer.
Importing Playlists
You can import Playlists including their tracks from another computer with Traktor by using the context menu or drag and drop.
Importing Playlists using the context menu
Right-click on the Playlists folder or a Playlist subfolder in the Browser Tree to open the context menu.
Select Import Playlist.
An Open dialog appears.
In the dialog, navigate to the folder containing the desired Playlist file (*.nml), select the Playlist file and click Open.
The Playlist and all the contained tracks are added to your Track Collection.
Importing Playlists using drag and drop
Locate the Playlist file (*.nml) on your computer.
Drag and drop the Playlist file onto the Playlists folder in the Browser Tree or onto a Playlist subfolder of our choice.
The Playlist and all the contained tracks are added to your Track Collection.
Importing iTunes playlists
You can directly import iTunes playlists into your Traktor Playlists folder:
Double-click the iTunes folder in the Browser Tree to display the iTunes playlists.
Right-click a playlist to open the context menu.
Select Import to Playlists.
In the dialog enter a name for the new Playlist.
Click OK to confirm.
Using the Preparation Playlist
The Preparation Playlist lets you prepare your next mix. When adding tracks to the Preparation Playlist, they show a dedicated icon in the Status column of the Track List. Any existing Playlist can be used as the Preparation Playlist.
Selecting a Playlist as the Preparation Playlist
Right-click a Playlist in the Browser Tree to open the context menu.
Select Select as Preparation List.
The Playlist icon switches to the Preparation Playlist icon.
Appending tracks to the Preparation Playlist
Right-click any track or selection of tracks in the Track List to open the context menu.
Select Append to Preparation List to add the selection to the Preparation Playlist.
Alternatively, select Add as Next to Preparation List to insert the selection after the last loaded track into the Preparation Playlist.
Each track shows the special icon indicating that the track is on the Preparation Playlist.
Track status icons in the Track List
When loading and playing tracks, Traktor records the status of the individual tracks in the icon column in the Track List. The icons indicate the following:
Deck Letters A and B: Tracks currently loaded into the Decks.
Check mark: Tracks that have already been played.
Exclamation mark: Tracks which are not found at the file’s previous location. Some possible reasons for this could be that a storage medium is unavailable (external hard drive for example), the location of the track has been changed or the track has been renamed.
Lock icon: Tracks with a locked Beatgrid.
Sorting the Track List by track status
When sorting the Track List by the Status column, the tracks are listed in the following order:
Already played tracks on top.
Currently playing tracks in the center.
Unplayed tracks below.
Missing tracks at the bottom.
Playlist maintenance
Traktor provides several functions and commands to maintain your Playlists.
Renaming Playlists
To rename a Playlist:
Right-click the Playlist in the Browser Tree to open the context menu.
Select Rename.
Enter the new name for the Playlist and confirm by pressing [Enter] on your computer keyboard.
The Playlist is renamed.
Removing tracks from Playlists
To remove tracks from a Playlist:
Right-click the track or the selection of tracks in the Track List to open the context menu.
Select Delete from Playlist.
The track or selection of tracks is removed.
Restoring the Auto Gain values
If you manually changed the Auto Gain value of one or more tracks in the Playlist, you can reset it to the original Auto Gain value that was calculated during the track analysis:
Right-click the track or the selection of tracks in the Track List to open the context menu.
Select Restore AutoGain.
The original Auto Gain value is restored.
Resetting the played state of tracks
To reset the state of played tracks in your Playlist:
Right-click the track or the selection of tracks in the Track List to open the context menu.
Select Reset Played State.
The play count and the played state are reset.
Deleting Playlists
To delete a Playlist from the Browser Tree:
Right-click the Playlist in the Browser Tree to open the context menu.
Select Delete Playlist.
The Playlist is deleted.
Removing duplicates from Playlists
To remove tracks which are more than one time in your Playlist:
Right-click the Playlist in the Browser Tree to open the context menu.
Select Remove Duplicates from Playlist.
All double entries in the Playlist are removed.
Saving Playlists as web pages
You can save a Playlist to a web page file (HTML file), which allows you to create an overview of the running order of tracks.
Right-click the Playlist in the Browser Tree to open the context menu.
Select Save as Webpage.
Enter a name for the Playlist.
Enter a destination for the exported file.
From the List Options select the columns that you want to add to the Playlist file.
Click OK to confirm.
The Playlist is saved as a HTML file.
Searching tracks in Playlists
To find out if tracks are already added to a Playlist:
Right-click a track in the Track List to open the context menu.
Select Search in Playlists.
Traktor searches for the selected track and opens a report showing all the Playlists containing the track.
Clearing Playlists
To remove all the tracks from a Playlist:
Right-click the Playlist in the Browser Tree to open the context menu.
Select Clear Playlist.
All the tracks are removed from the Playlist.