Preferences
The Preferences provides you with various options to customize specific parts of your Traktor setup.
The Preferences provides you with various options to customize specific parts of your Traktor setup. This section describes the Preferences dialog including all options in the corresponding pages in order of appearance.
Preferences dialog overview
Traktor provides various options to customize specific parts of your system. This section describes all options from the Preferences dialog in order of appearance.
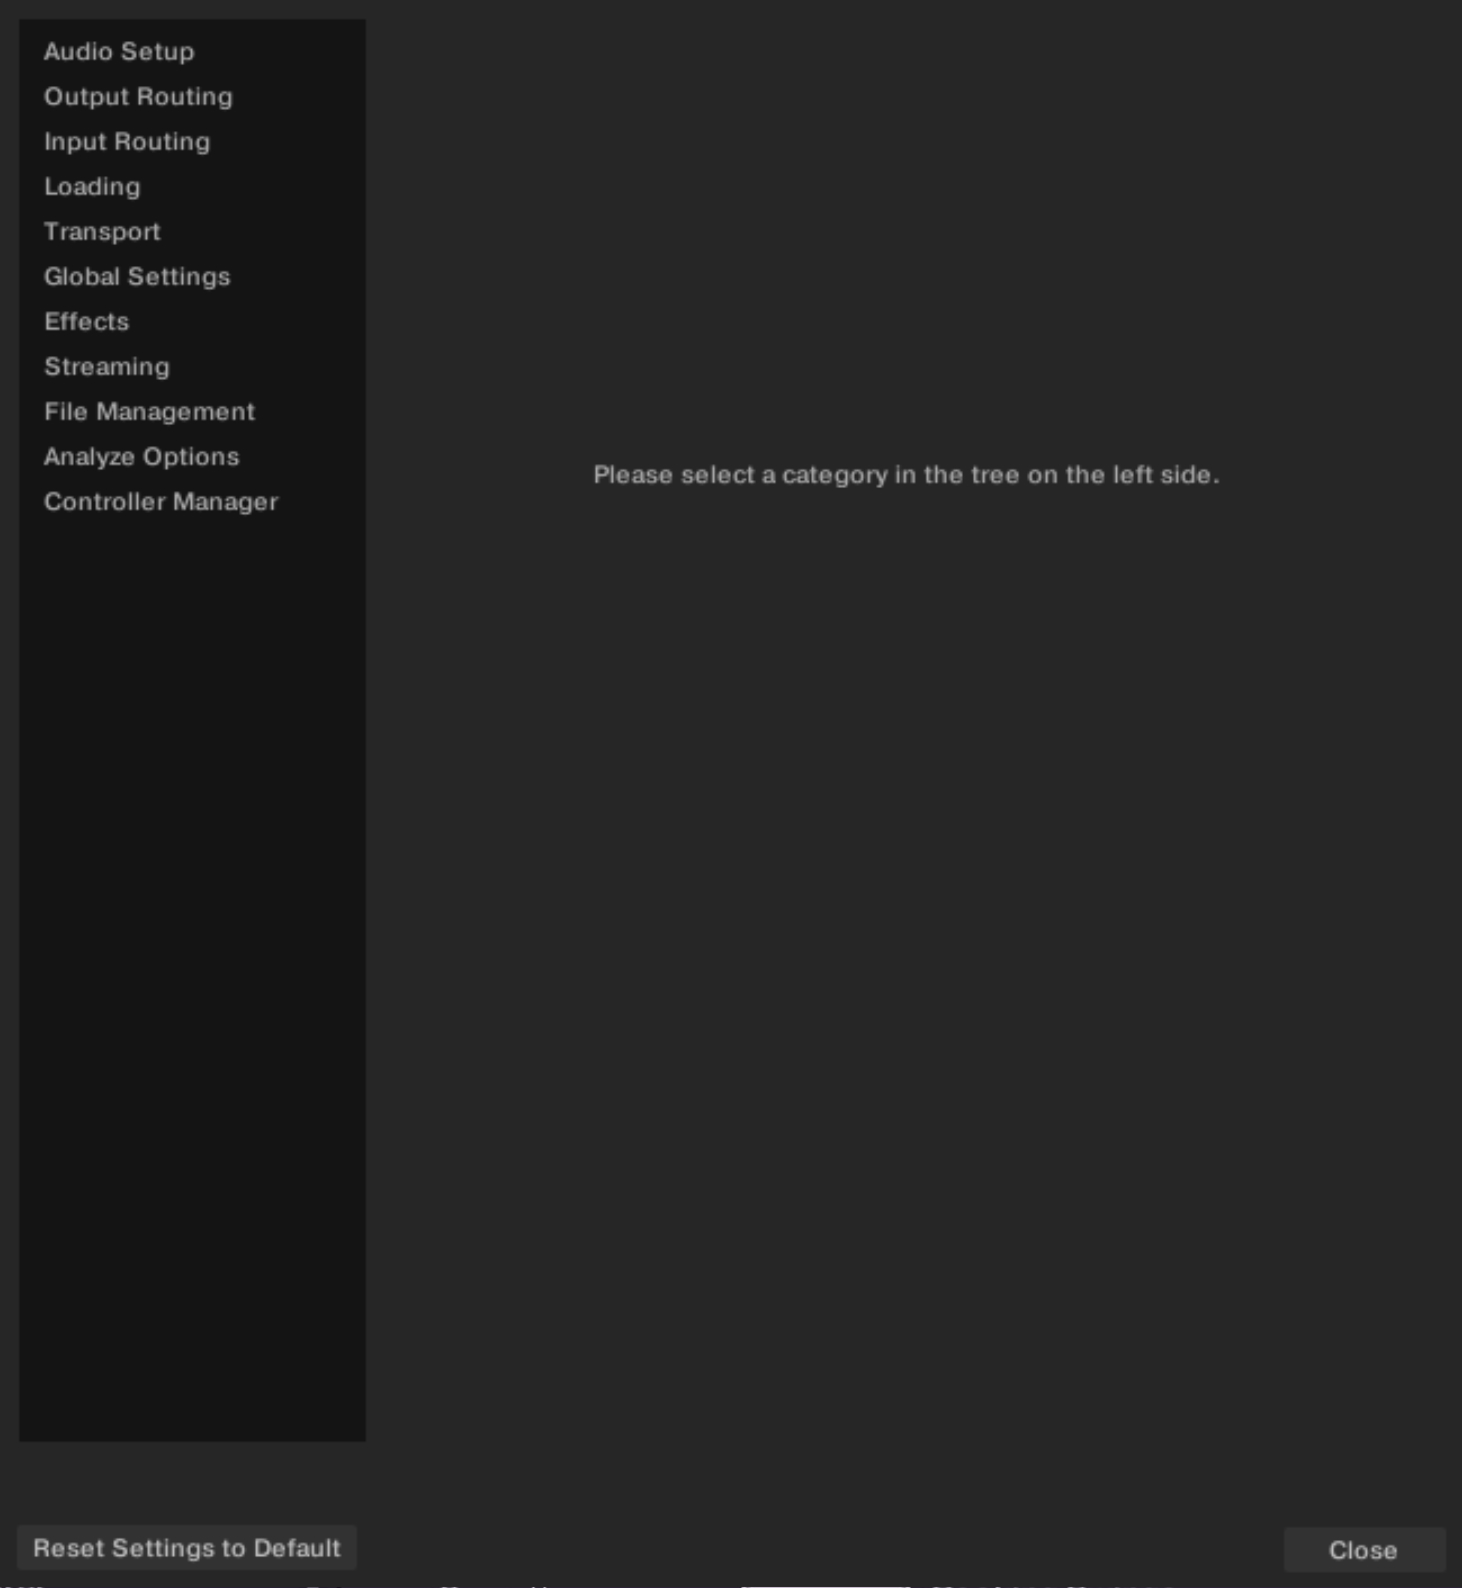 |
Preferences dialog.
The Preferences dialog contains the following main elements:
Page list: The customization options are organized into pages, which are listed in the left column of the Preferences dialog. You can open the desired page by clicking its name in the list.
Reset Settings to Default button: Sets all the Traktor settings (for example, the settings on the Preferences pages and the layout adjustments) back to their default values. This allows you to start with a fresh Traktor Play setup if needed.
Close button: Closes the Preferences dialog.
Preferences – Audio Setup page
This section describes the options in the Audio Setup page.
 |
Preferences – Audio Setup page.
Audio Setup
Audio Device: Allows you to select the external audio interface. If no external audio interface is available, you can always select the built-in sound card as the audio device.
Sample Rate: Allows you to select a sample rate according to the audio interface. Note that higher sample rates require more CPU load. The standard sample rate is at 44.1 kHz which is also used by audio by CDs.
Buffer Size: Determines the size of the audio data packages which are sent to and processed by the CPU. The higher the buffer size, the longer it takes for a signal to finally arrive at the output as audio. We recommend a value below 256 or 512.
Latency: Displays the calculated latency values determined by the Sample Rate and Buffer Size. Lower latency values are better but require more CPU load. A value too low can lead to audio dropouts, artifacts, or other unwanted behavior. Start with a latency setting of around 15 ms and adjust it according to your system. A value of between 5 ms and 10 ms is considered adequate.
On macOS, use the slider to set an audio latency that is suitable for your system. On Windows, use the Settings button to open your audio device’s control panel that lets you set the audio latency.
Phono / Line
Input Channel: Affects only the Native Instruments AUDIO 4 DJ and AUDIO 8 DJ interfaces. This setting lets you switch the Input channel from Phono to Line mode, which is necessary when switching from turntables to CD players.
Built-in Soundcard
Win Built-In: On Windows, you can select here the internal soundcard as fallback. This will be the soundcard used by Traktor in case the Audio Device set in the Audio Setup section is not available (for example, if you are on the road and don’t have your audio interface or integrated DJ controller at hand).
Multi-Core
Enable Multi-Core Processing: When activated, the CPU load can be brought down for demanding tasks such as running Key Lock on all Decks. The function must be deactivated, when running a second real-time application on the same computer.
Preferences – Output Routing page
On this page you can configure the signal path from Traktor to the audio interface of your DJ controller.
Note
Usually the audio routing is automatically configured for Traktor certified controllers and you should not need to adjust the settings here.
The Output Routing page provides the following options:
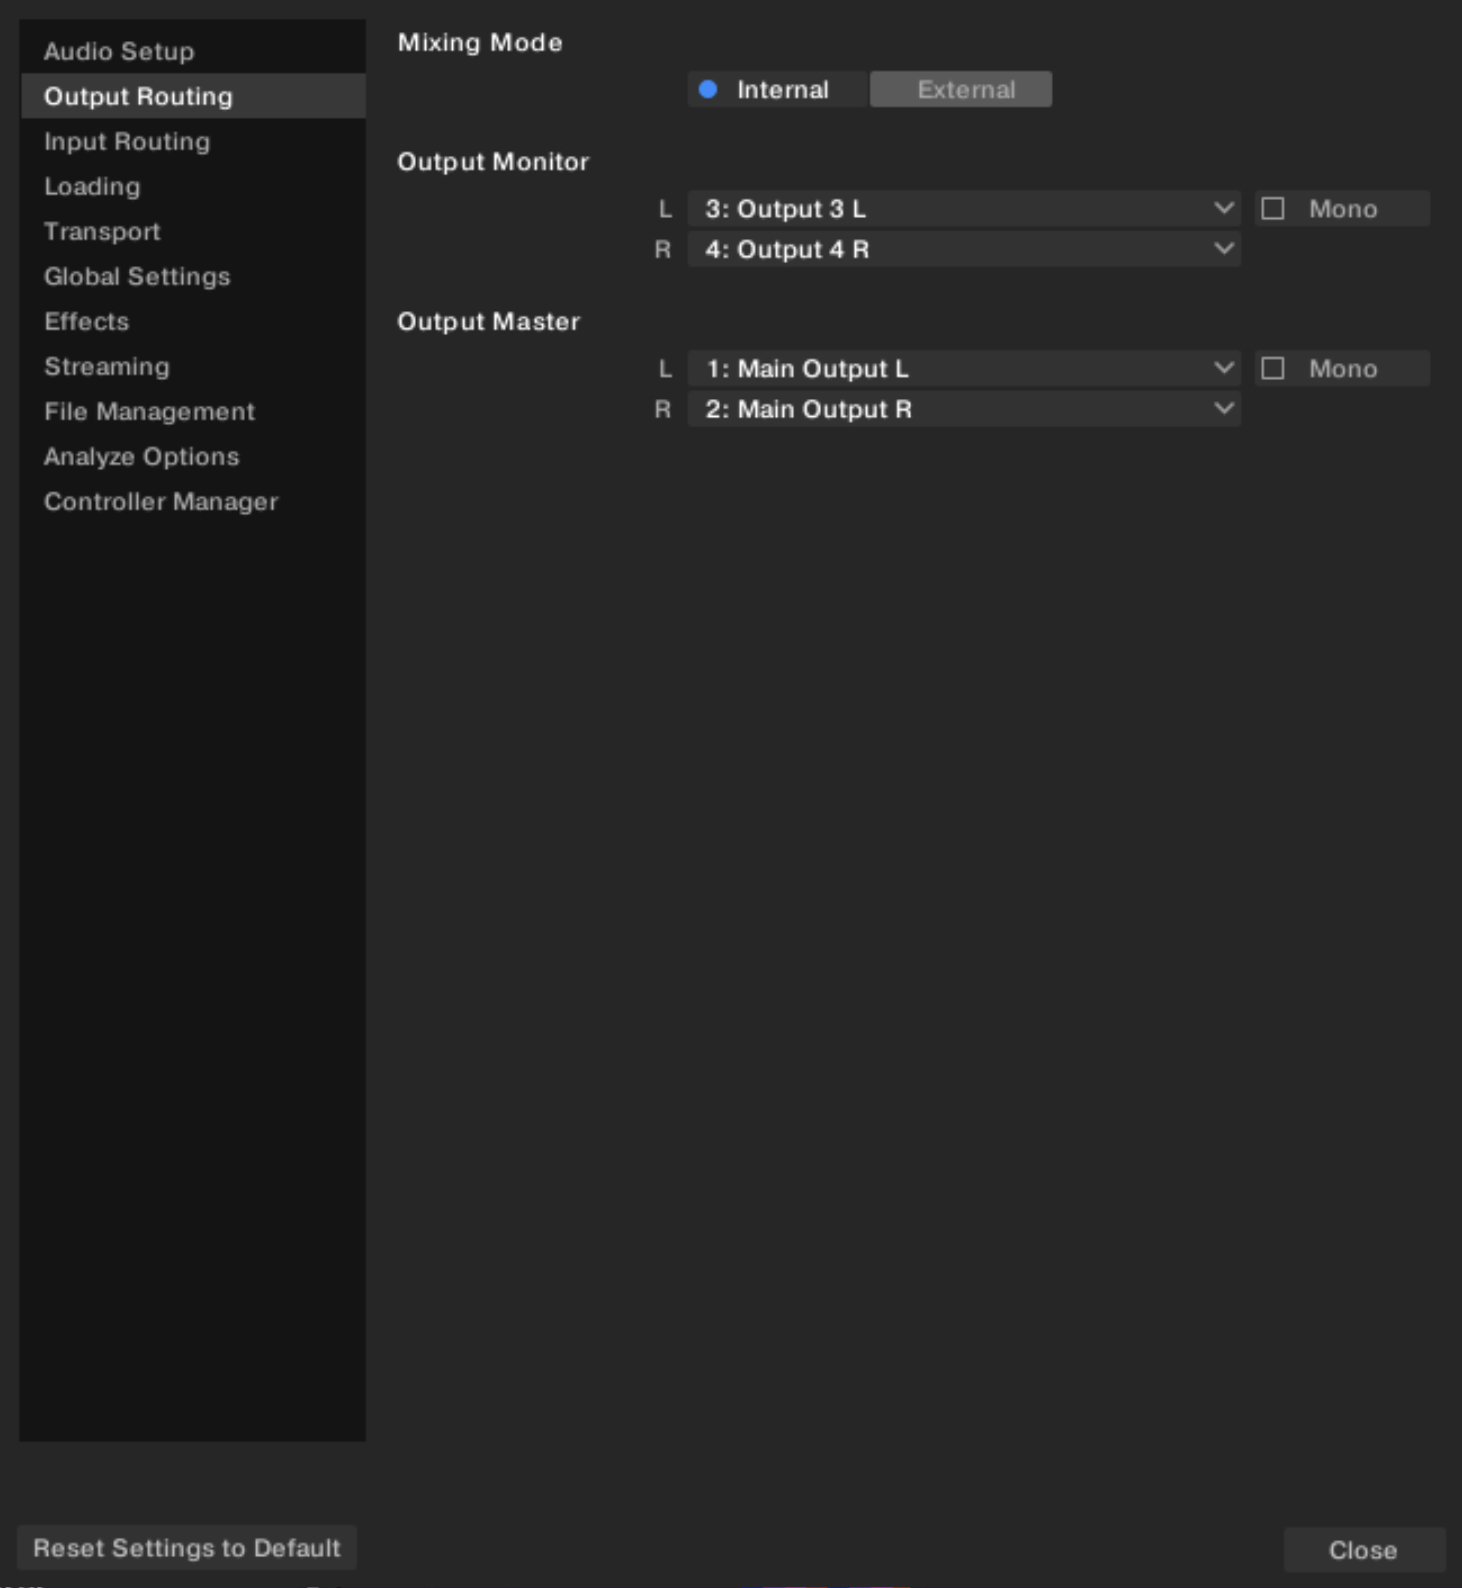 |
Preferences – Output Routing page.
Mixing Mode: Selects whether Traktor should use its internal Mixer or an external hardware mixer. In Traktor Play this is set to Internal and cannot be modified. In Traktor Pro you can use the Traktor Decks together with an external mixer connected to your audio interface.
Output Monitor: Selects the output pair connected to your headphones and used to pre-listen to your tracks.
Activating the Headphones Cue button on either channel of the Mixer will send its audio to this separate output pair.
Mono: Merges the channels into mono mode.
Output Master: Selects the output pair for the main output.
Mono: Merges the channels into mono mode.
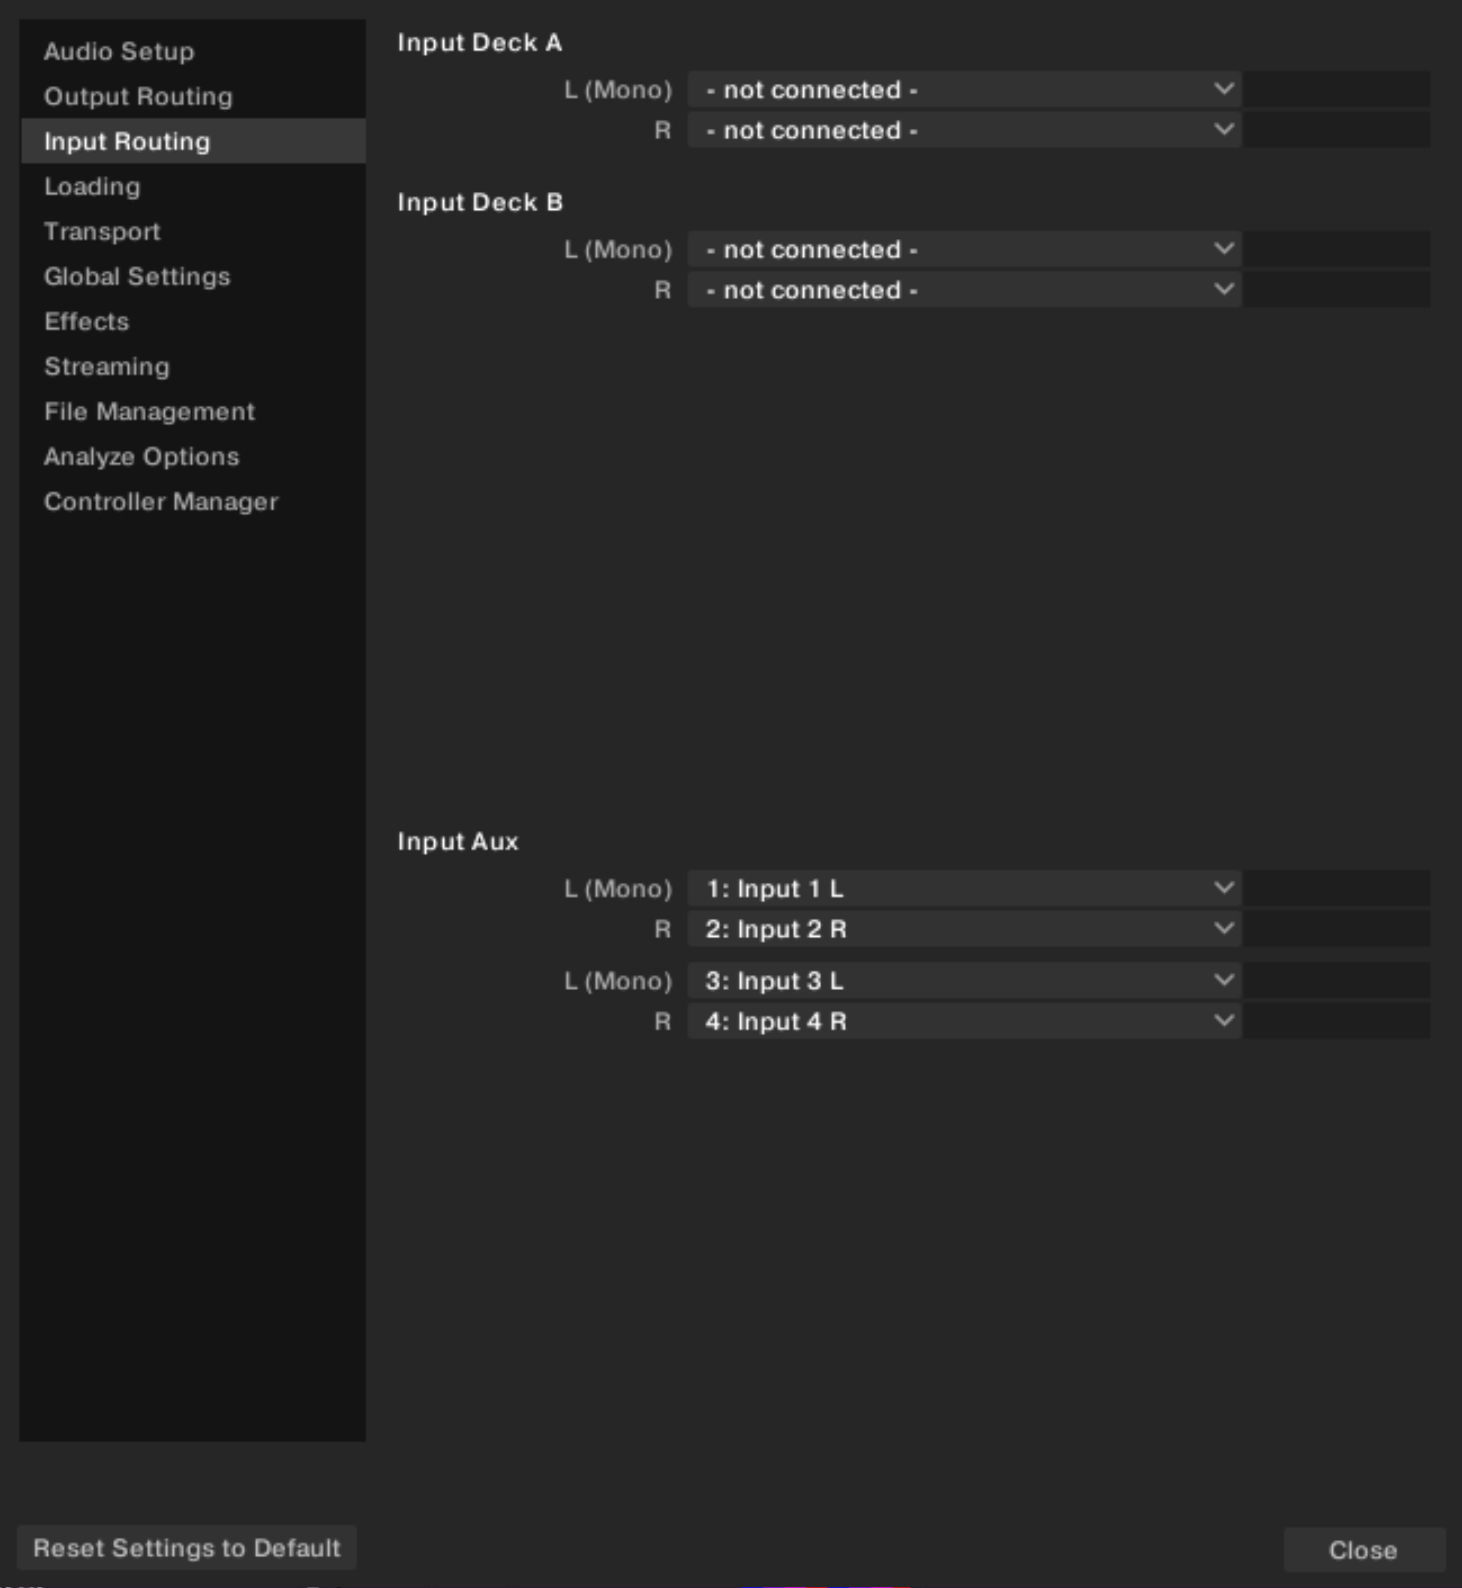
Preferences – Input Routing page
Here you can configure how Traktor to use the various inputs of your audio interface for incorporating audio signals from external audio devices. The Level meters to the right of the input selectors will display the signal level if a signal is present. You may also sum Decks up to one input pair.
 |
Preferences – Input Routing page.
Input Deck A / B: Selects an input pair for incorporating the audio signal from an external audio device into the respective Deck.
Input Aux: Selects an input pair for the auxiliary input.
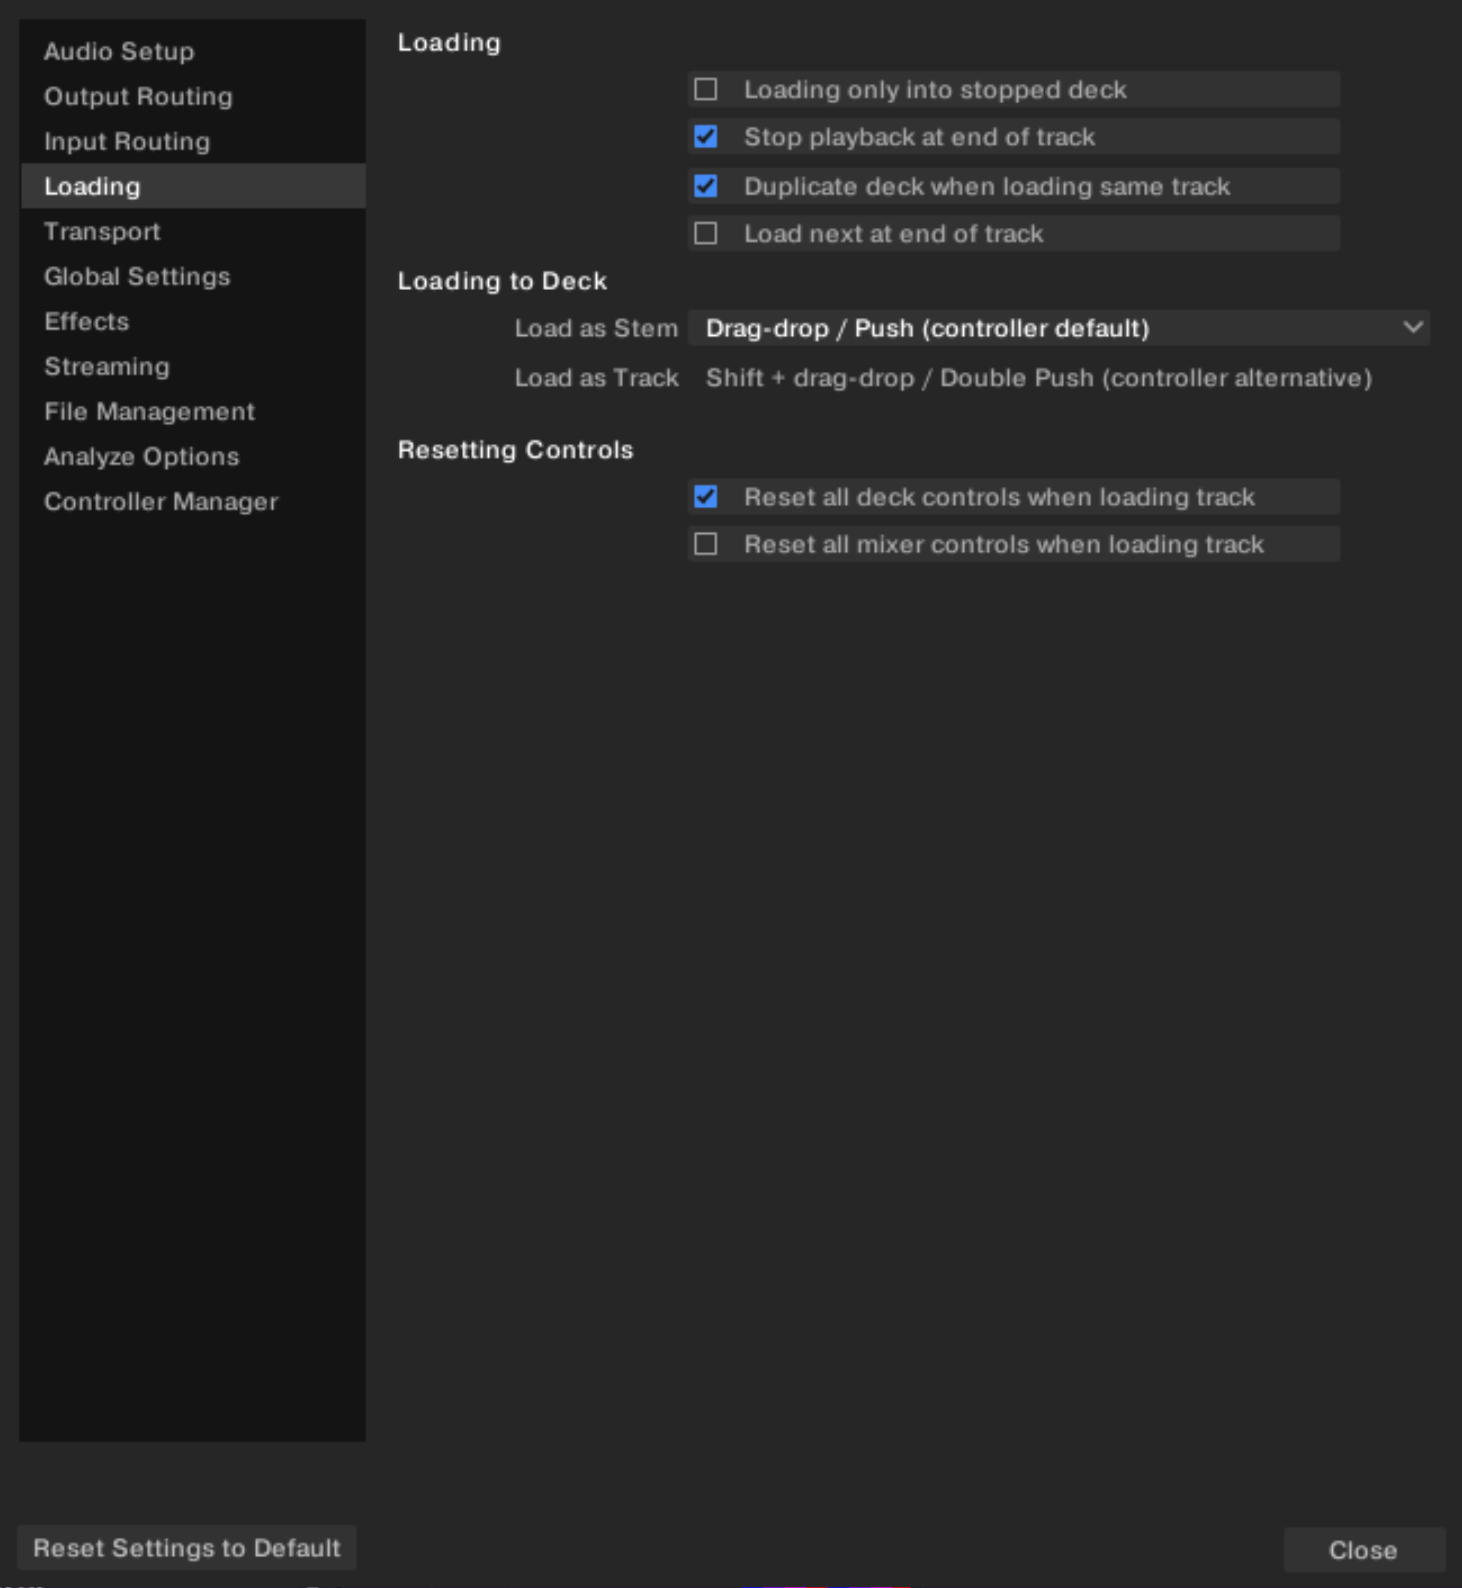
Preferences – Loading page
This section describes the options in the Loading page.
 |
Preferences – Loading page.
Loading
Loading only into stopped Deck: Prevents loading into a playing Deck and therefore stops you from accidentally loading a track into the wrong Deck.
Stop playback at end of track: Stops the playback of a Deck when a track is at its end.
Duplicate Deck when loading same track: If a track is currently loaded into a Deck, you can directly copy the track and its playback position by using drag and drop from the Deck Heading to another Deck.
Load next at end of track: Enables Traktor to automatically load the next track from the current Playlist. Switching to another Playlist during playback does not activate another Playlist.
Loading to Deck
Both settings in this section affect the loading behavior for tracks with a Stem version available.
Load as Stem: Selects the action for loading the Stem version of the track. The options selected here and in Load as Track are mutually exclusive.
Load as Track: Selects the action for loading the original track. The options selected here and in Load as Stem are mutually exclusive.
These settings also affect the loading behavior on your hardware controller. For more information on the Stem versions of your tracks, refer to Working with Stems.
Resetting Controls
Reset all Deck controls when loading track: Resets all Deck controls to their default value when a track is loaded.
Reset all mixer controls when loading track: Resets all mixer controls to their default value when a track is loaded.
Preferences – Transport page
This section describes the Transport page options.
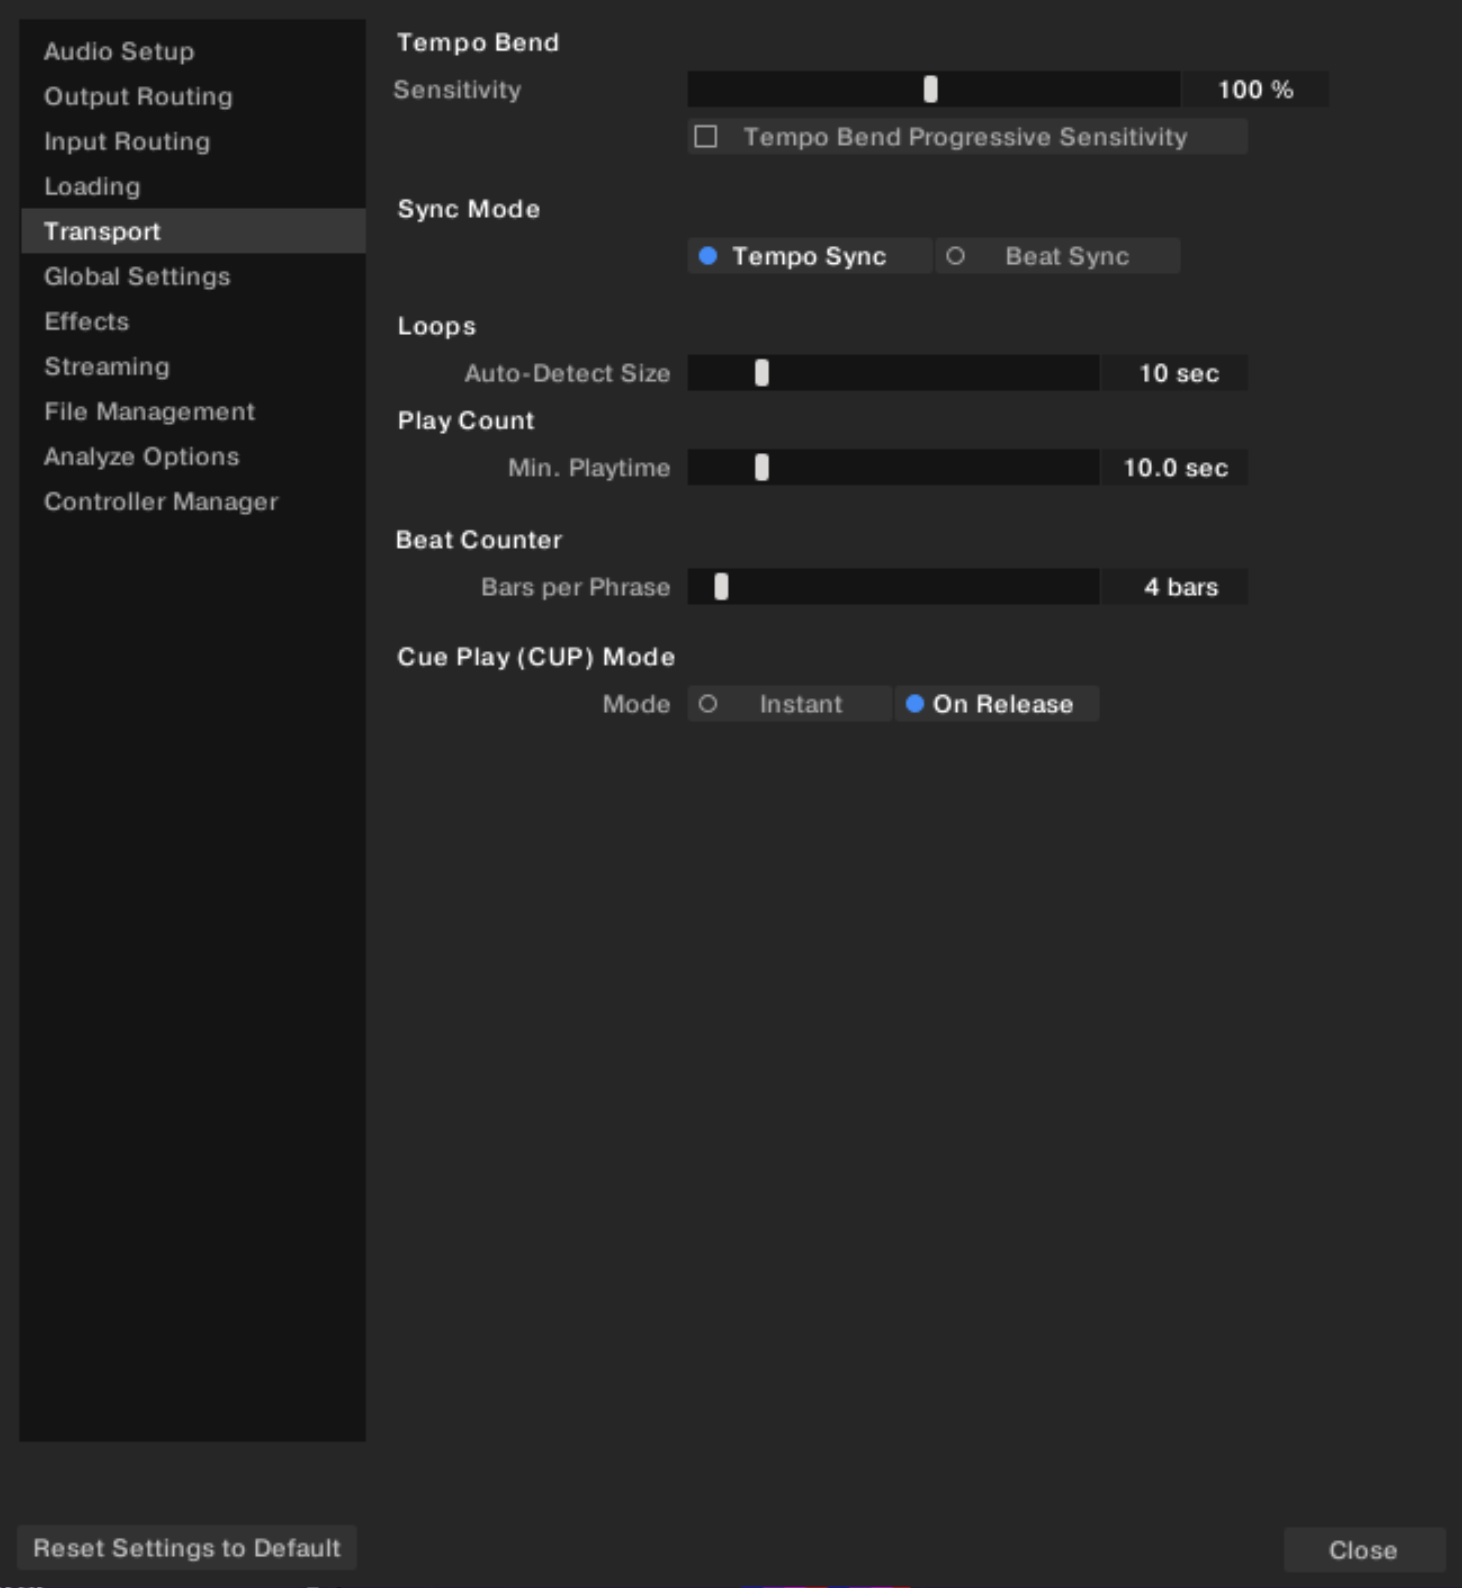 |
Preferences – Transport page.
Tempo Bend
Sensitivity: Adjusts the sensitivity of the Tempo Bend function. The value range of the slider is 0–200%. By default the Sensitivity is 100%.
Tempo Bend Progressive Sensitivity: When this option is off, holding either Tempo Bend button slightly increases or decreases the tempo by a fixed amount as long as you hold the button depressed. When you activate this option, the tempo increasingly speeds up or slows down as you keep holding the button depressed.
Sync Mode
There are two methods for synchronizing tracks: Tempo Sync and Beat Sync.
Tempo Sync: Maintains tempo-only synchronization between the tracks. The phase of the Decks will be aligned when the SYNC button is used. If the phase of the Decks are shifted, SYNC will turn dim. The tempos will remain synced in this mode.
Beat Sync: Forces tempo and phase synchronization between the tracks. The phase of the Decks will be aligned when the SYNC button is used. If the phase of the tracks are shifted manually, for example, by Scratching or holding a Deck in the stopped position, SYNC will turn dim, but Traktor will re-align the phase of the tracks when the Deck plays normally again, when you release the record or Jog Wheel.
Loops
Auto-Detect Size: Determines the size beneath which a track is automatically detected as a loop and therefore will be looped automatically. An automatically detected loop will show the green loop markers at the beginning and end in the Waveform and in the Stripe.
Play Count
Min. Playtime: Determines the playing time that must be exceeded for the track to be marked as played. When this minimum playtime is reached, the track appears in the Track List with the check mark icon, which marks it as played, and its Play Count is raised.
Beat Counter
Bars per Phrase: Determines how many bars a phrase shall contain. A bar consists of 4 beats.
Cue Play (CUP) Mode
The Mode selector affects the behavior of the CUP button (Cue Play) on the Decks. The following modes are available:
Instant: Instantly starts playback when clicking CUP.
On Release: Starts playback after releasing the CUP button.
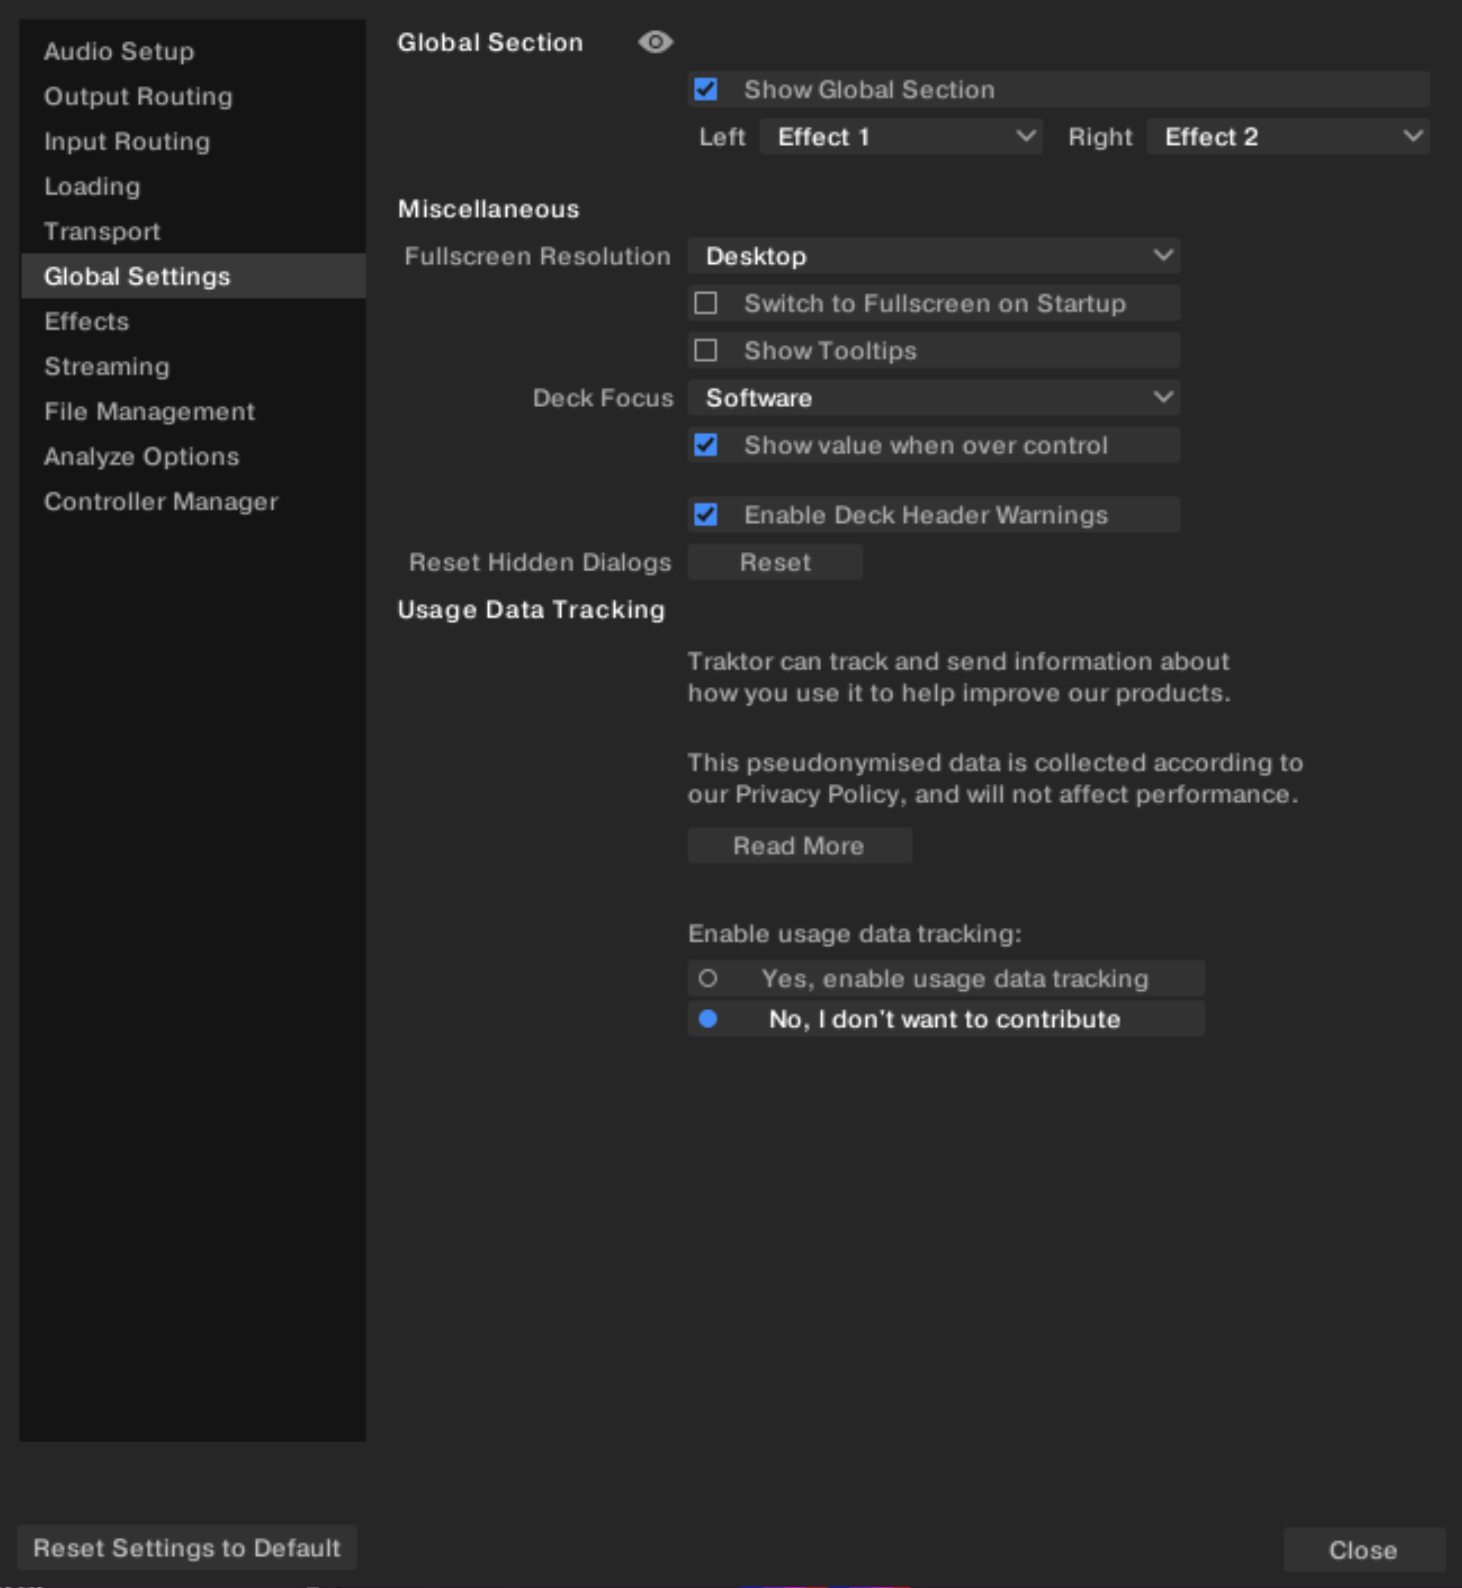
Preferences – Global Settings page
This section describes the options in the Global Settings page.
 |
Preferences – Global Settings page.
Global Section
Show Global Section: Shows or hides the Global section.
Left: Determines if FX Unit 1 or LOOP RECORDER to be displayed by default on the left-hand side of the Global section.
Right: Determines if FX Unit 2 or AUDIO RECORDER to be displayed by default on the right-hand side of the Global section.
Miscellaneous
Fullscreen Resolution: Determines the zoom factor of Traktor’s fullscreen view. If set to Desktop, Traktor uses the native resolution of your computer 1:1. When choosing another option, the full screen view appears larger (zoomed in) because Traktor assumes a lower screen resolution. The available options depend on your hardware.
Switch to Fullscreen on Startup: With this selected, Traktor will open in full screen mode (maximizing the Traktor window) each time it is started.
Show Tooltips: Enable or disable Tools Tips. If you would like to familiarize yourself with Traktor we recommend you enable Tool Tips as they provide a short descriptions of interface.
Deck Focus: Select control of the visual Deck Focus from the following menu:
Software: Enable Software control of Deck Focus.
Hardware: Enable Hardware control of Deck Focus.
None: Disable Deck Focus.
Show value when over control: With this option checked, knobs like Gain, Master Volume, or the Effects’ knobs show their actual value when hovering over it.
Enable Deck Header Warnings: When activated, Traktor informs you of important deck related warning messages directly through the Deck Headers. With the Deck Header Warnings deactivated, Traktor's status bar will still display warnings.
Reset Hidden Dialogs: Resets all dialogs that have been hidden by clicking on the “Don’t Show This Again” check box.
Usage Data Tracking
Usage Data Tracking can be deactivated or activated at any time, allowing you to decide exactly when you wish to share anonymous data.
Read More button: Opens your web browser and directs you to more information about Usage Data Tracking on the Native Instruments website.
Yes, enable Usage Data Tracking: Activates Usage Data tracking.
No, I don’t want to contribute: Deactivates Usage Data tracking.
For more information on Usage Data Tracking, refer to the knowledge-base https://support.native-instruments.com/hc/en-us/articles/209545029.
Notice
Usage Data Tracking technology is activated or deactivated on each computer individually. This means that if you use Traktor on more than one computer, activating or deactivating Usage Data Tracking will not automatically activate or deactivate it on the other computers.
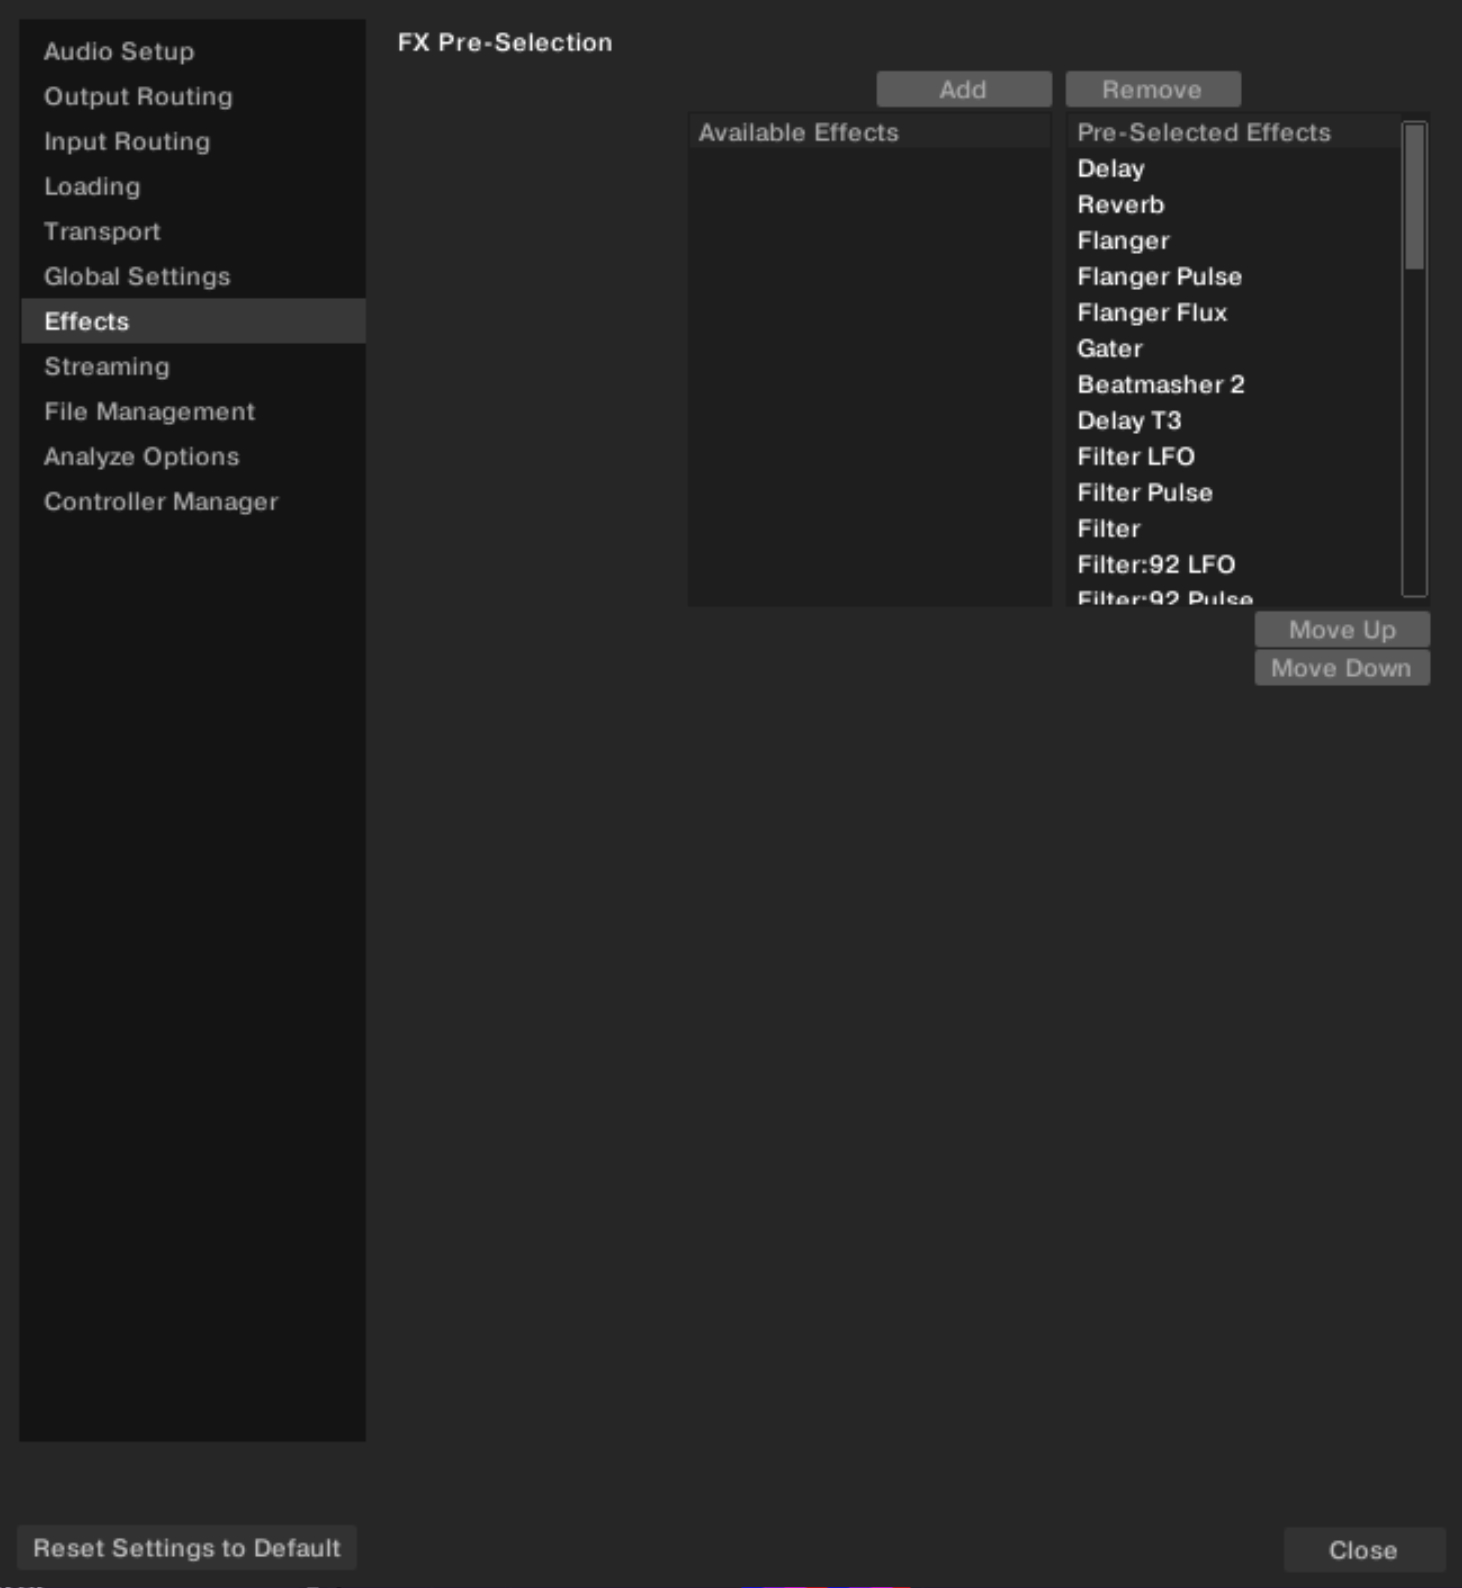
Preferences – Effects page
This section describes the options in the Effects page.
 |
Preferences – Effects page.
FX Pre-Selection
Traktor Pro provides a vast range of effects. In Traktor Play only a few of them are available, but the remaining effects still appear in the effect selectors of the FX Units.
The FX Pre-Selection table lets you create a reduced selection of all available effects in order to narrow down the number of entries appearing in the effect selectors.
Add: You can add the selected FX from the Pre-Selected Effects column to the Available Effects column with a click on Add.
Remove: You can remove the selected FX from the Available Effects column to the Pre-Selected Effects column with a click on Remove.
Move Up / Move Down: Let you move the selected FX in the Pre-Selected Effects column up or down.
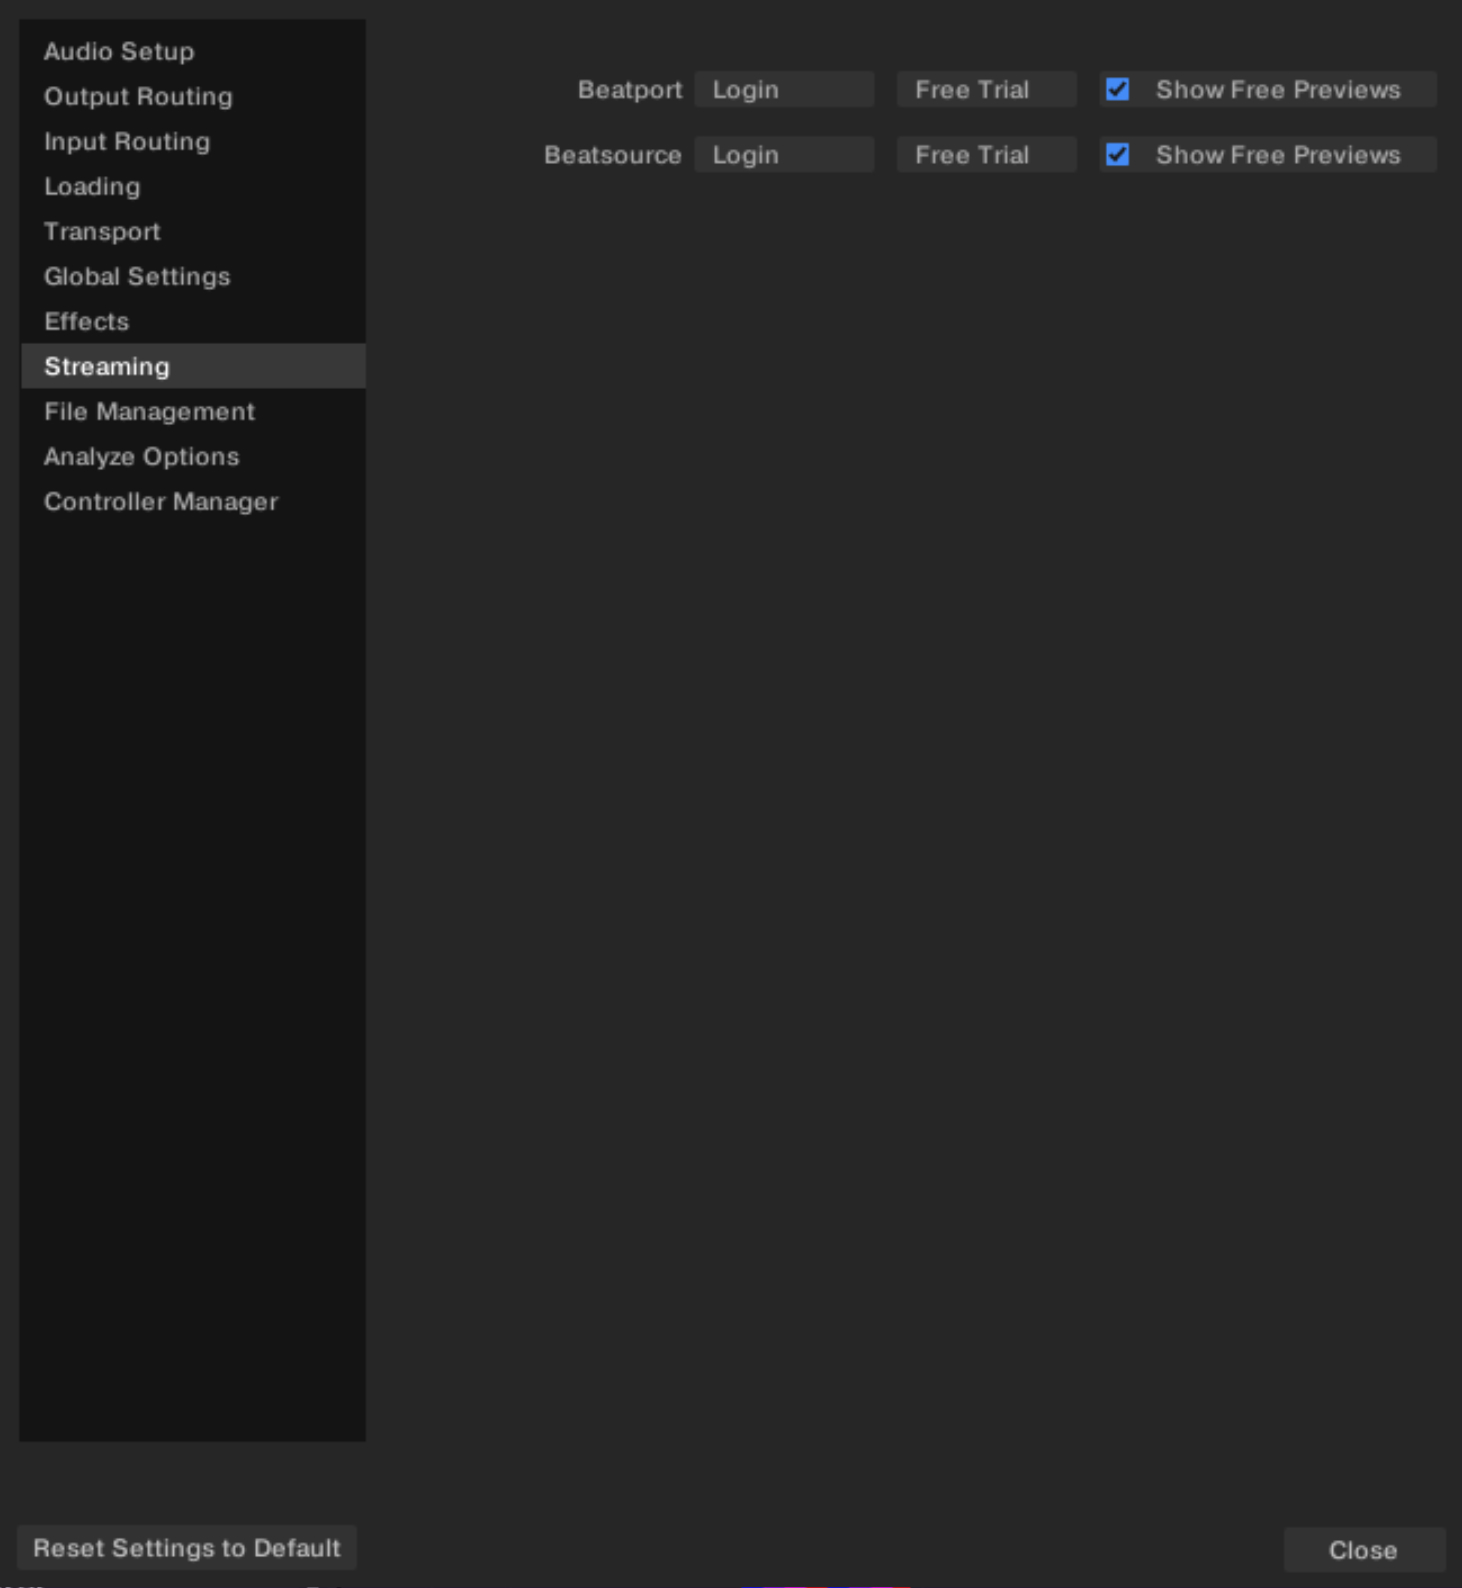
Preferences – Streaming page
This section describes the options in the Streaming page.
Traktor is fully integrated with Beatport Streaming and Beatsource Streaming, giving you access to a catalog of millions of tracks which can be streamed live into your sets or stored locally on your device. A paid subscription is required for these services, but you can sign up for a free trial if you want to test it out, or use the Free Previews directly available in Traktor to get an idea. Once signed up and logged in, all the Beatport and/or Beatsource features become available in the Traktor Browser. You can find more information about these features in Beatport/Beatsource Streaming.
 |
Preferences – Streaming page.
The Beatport and Beatsource areas respectively manage your login status and options for Beatport Streaming and Beatsource Streaming.
If you are not logged in, the Beatport or Beatsource area shows the following controls:
Login: Opens the login page on the Beatport/Beatsource website. Once you are logged in, the website will return you to Traktor where you will see your login status. Traktor will remember your login status, you don’t need to log in or out between sessions. You can also log out from here if required.
Free Trial: Opens the free trial page on the Beatport/Beatsource website.
Show Free Previews: By default this check box is active and you can access excerpts of the tracks at lower quality from the Traktor Browser without any Beatport/Beatsource account. Deactivating this check box will hide the Beatport (Preview) or Beatsource (Preview) folder from the Browser Tree.
Once you are logged in, the Beatport or Beatsource area shows a single control:
 |
Logout: Logs Traktor out of your Beatport or Beatsource account.
Preferences – File Management page
This section describes the options in the File Management page.
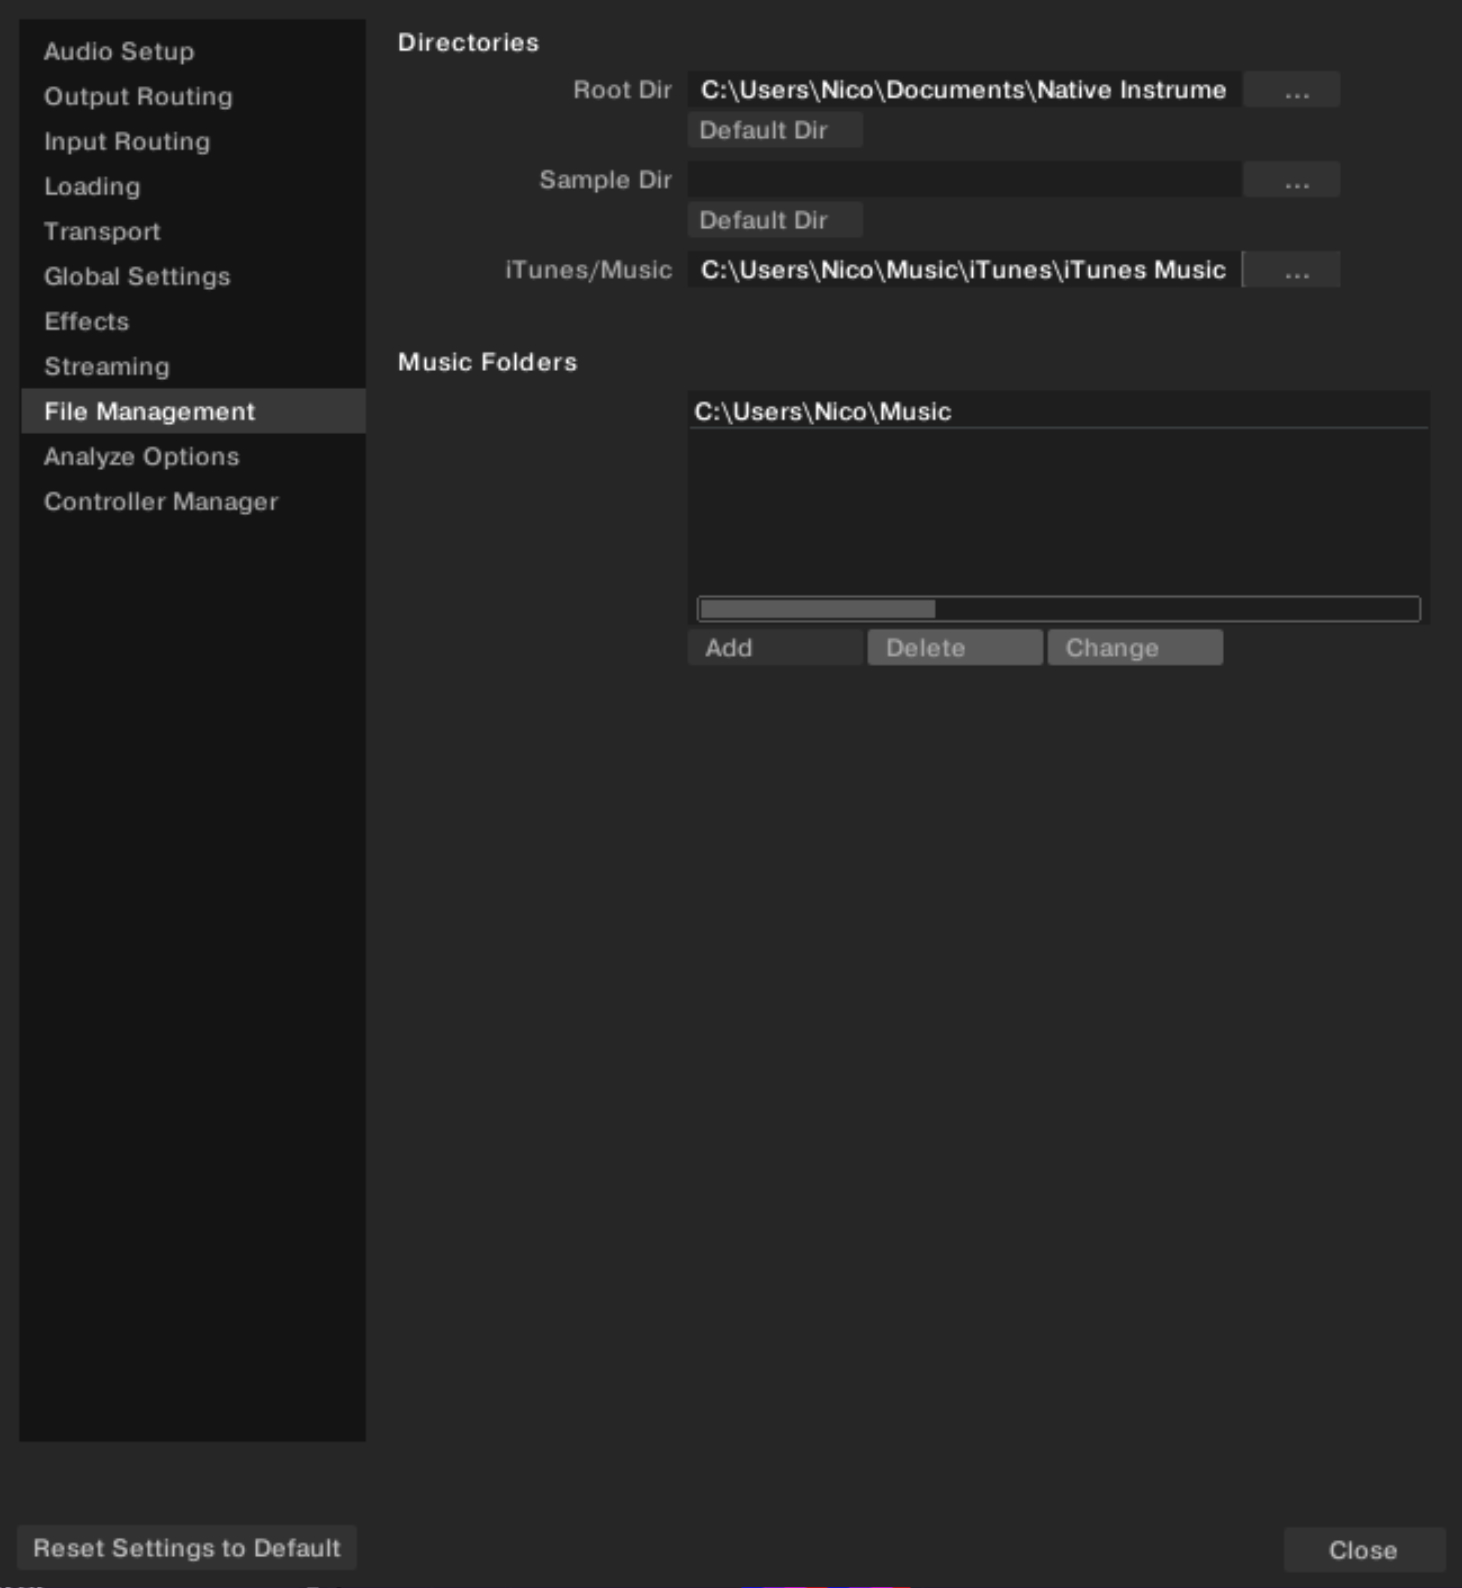 |
Preferences – File Management page.
Directories
These settings define Traktor’s directories. The directories can be changed by clicking the … button and selecting the path of the preferred folder. Clicking the Default Dir buttons set the directories back to the defaults paths.
Root Dir: This is the path to your Track Collection / Playlists / Settings / Mappings files.
iTunes/Apple Music Integration: By default Traktor links to Apple Music automatically via Apple Music's API. For legacy versions of iTunes, Traktor needs to create the link via iTunes' XML file, which can be activated here alongside specifying the path to the XML file on your computer.
Music Folders
If you want to use your own music folder structure, you can add your music folders to this list. They will appear in the dedicated Music Folders node within the Explorer in the Browser Tree.
Add…: Lets you add folders as Music Folders.
Delete: Deletes the selected Music Folder from the list.
Change…: If you changed the directory or the name of a Music Folder in your system use this button to change the path of the directory also in Traktor.
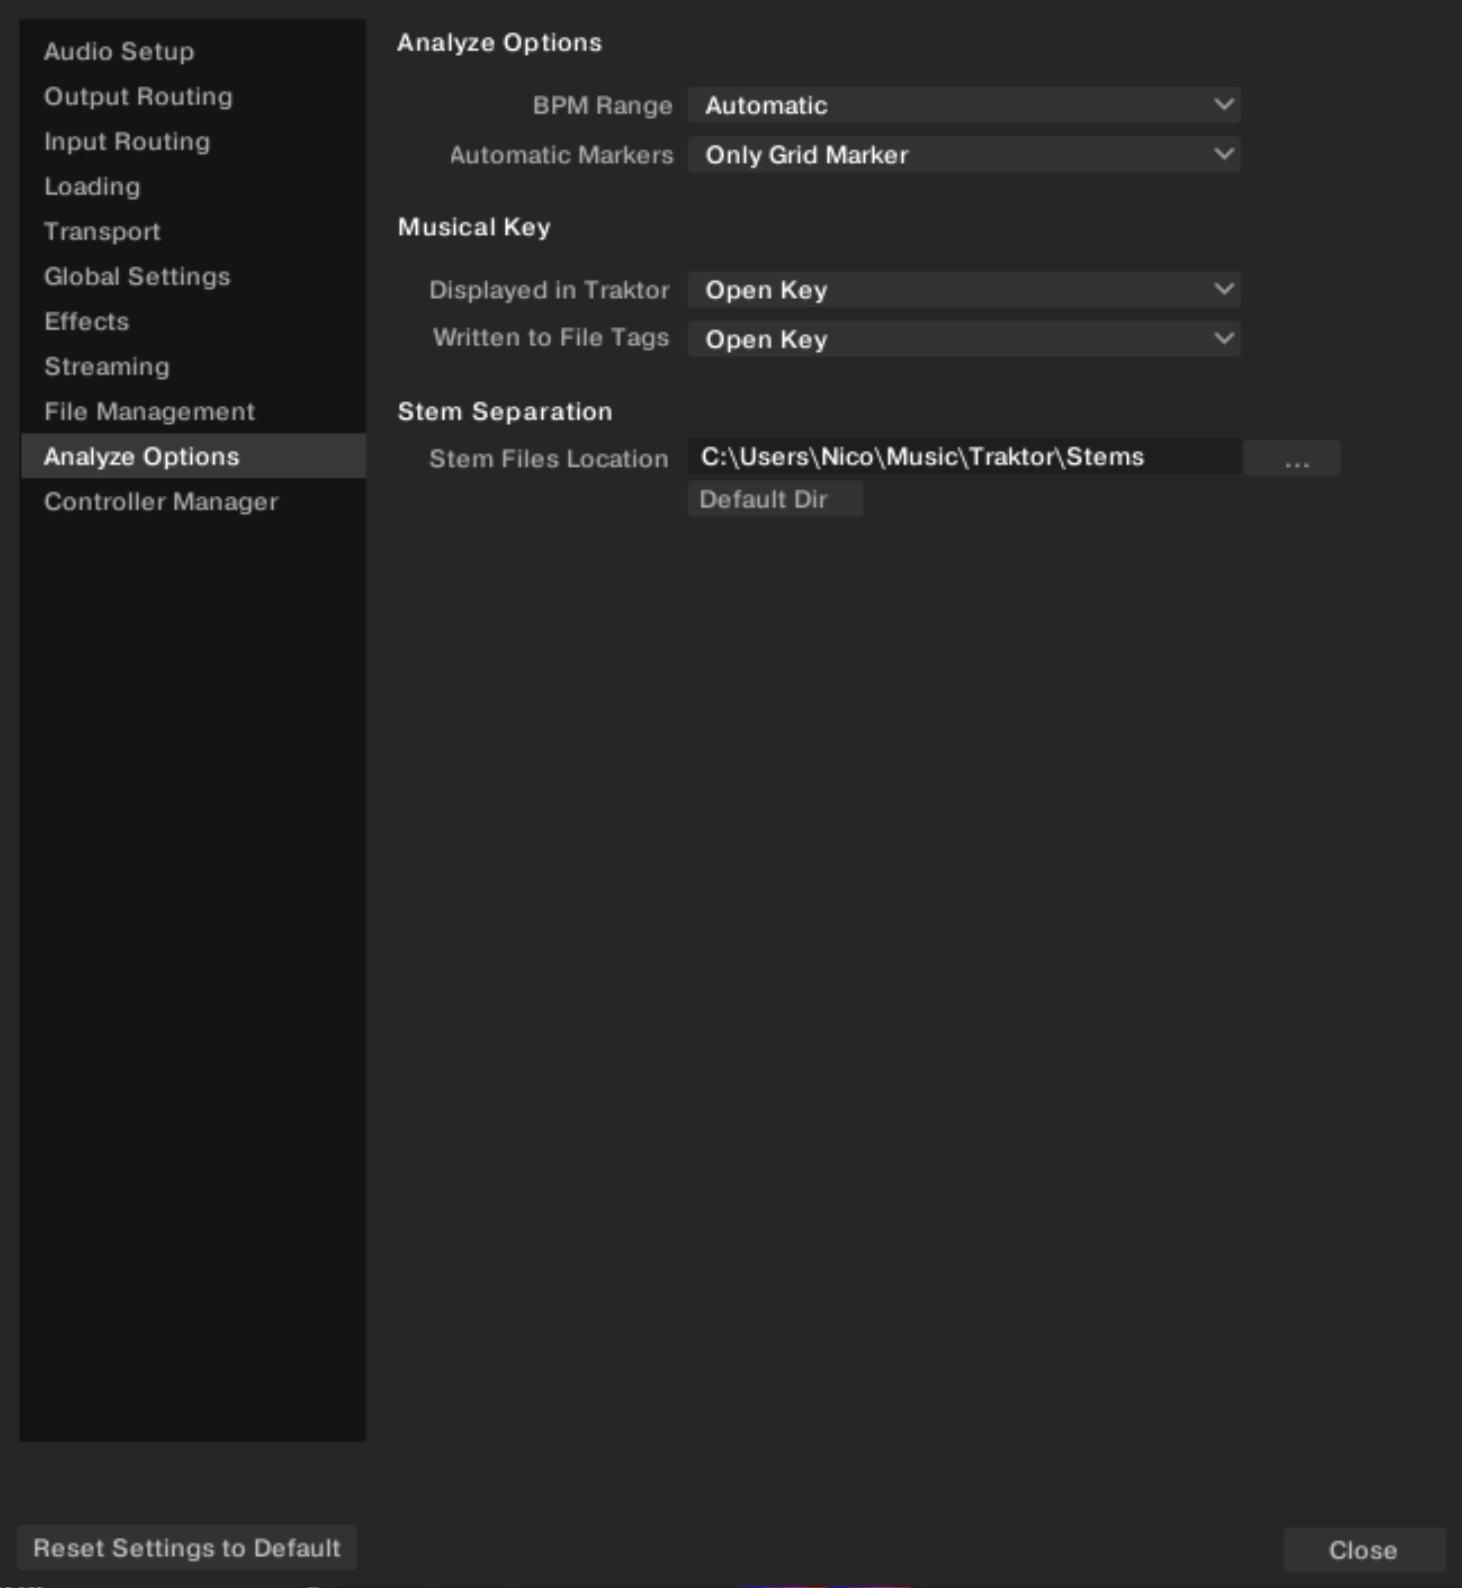
Preferences – Analyze Options page
This page provides options concerning the default settings of the Analysis function when importing/analyzing audio files.
 |
Preferences – Analyze Options page.
Analyze Options
BPM Range: Selects the minimum and maximum beats per minute (BPM) values of the tracks you are going to analyze.
This will help Traktor’s BPM-analysis find the correct BPM value when analyzing. The Automatic setting uses artificial intelligence techniques to help improve the tempo and downbeat results. For example, Drum and Bass tracks will have tempos in the 170BPM range instead of 85BPM.
Tip
We recommend to use this setting if your collection contains a wide variety of genres which you want to analyze together.
Automatic Markers: Defines which markers should be automatically set when the track is analyzed. The following settings are available:
No Markers: Traktor does not set any markers during analysis.
Only Grid Marker (default setting): Traktor will place a Beatgrid on the track and will align it to the nearest downbeat by setting a Grid Marker onto that position. If the track already contains a Beatgrid, Traktor will move it, if necessary, to make it start on the Grid Marker.
Grid Marker and Cue Point: Traktor will place a Beatgrid on the track and will align it to the nearest downbeat by setting a Grid Marker onto that position. If the track already contains a Beatgrid, Traktor will move it, if necessary, to make it start on the Grid Marker. Additionally, Traktor will set a Cue Point at the Grid Marker position. Note that removing this Cue Point at a later time will not affect the Grid Marker.
Musical Key
Traktor automatically detects a track’s key which can be displayed in Traktor as well as be written into the metadata of the track. The following settings are available:
Displayed in Traktor: Selects the notation to be displayed in the Key column of the Browser. This option can be changed at any time and will change the way all Keys are displayed in Traktor. Available notations are: Musical, Musical (all sharps), Open Key.
Written to File Tags: Selects the notation to be written into the metadata of a track file itself so that the notation information can be used in third party software applications. Available notations are: Musical, Musical (all sharps), Open Key, Key Text.
Stem Separation
Stem Files Location: Selects the directory in which Traktor will store the Stem versions of your tracks, which are generated when you trigger the Generate Stems command in the Track Collection. By default, this directory is the Stems subfolder in your Traktor user folder. By clicking the three little dots on the right, you can choose another location for storing the Stem versions of your tracks. For example, this allows you to store your stems on an external hard drive. At any time, you can click the Default Dir button below to reset the location to the default Stems folder.
Note
Stem versions of your tracks are not stored using their original track’s file name but a hashed name serving the fast association to the original track. It is not recommended to load and play the stems from the folder defined here, because they would miss most of their associated metadata. Instead, load the corresponding track from your Track Collection onto the Deck. For more information on using Stems, refer to Working with Stems.
You can store your original tracks and their generated Stems on different drives. You can also play your original tracks even if the drive containing their Stems is not connected.
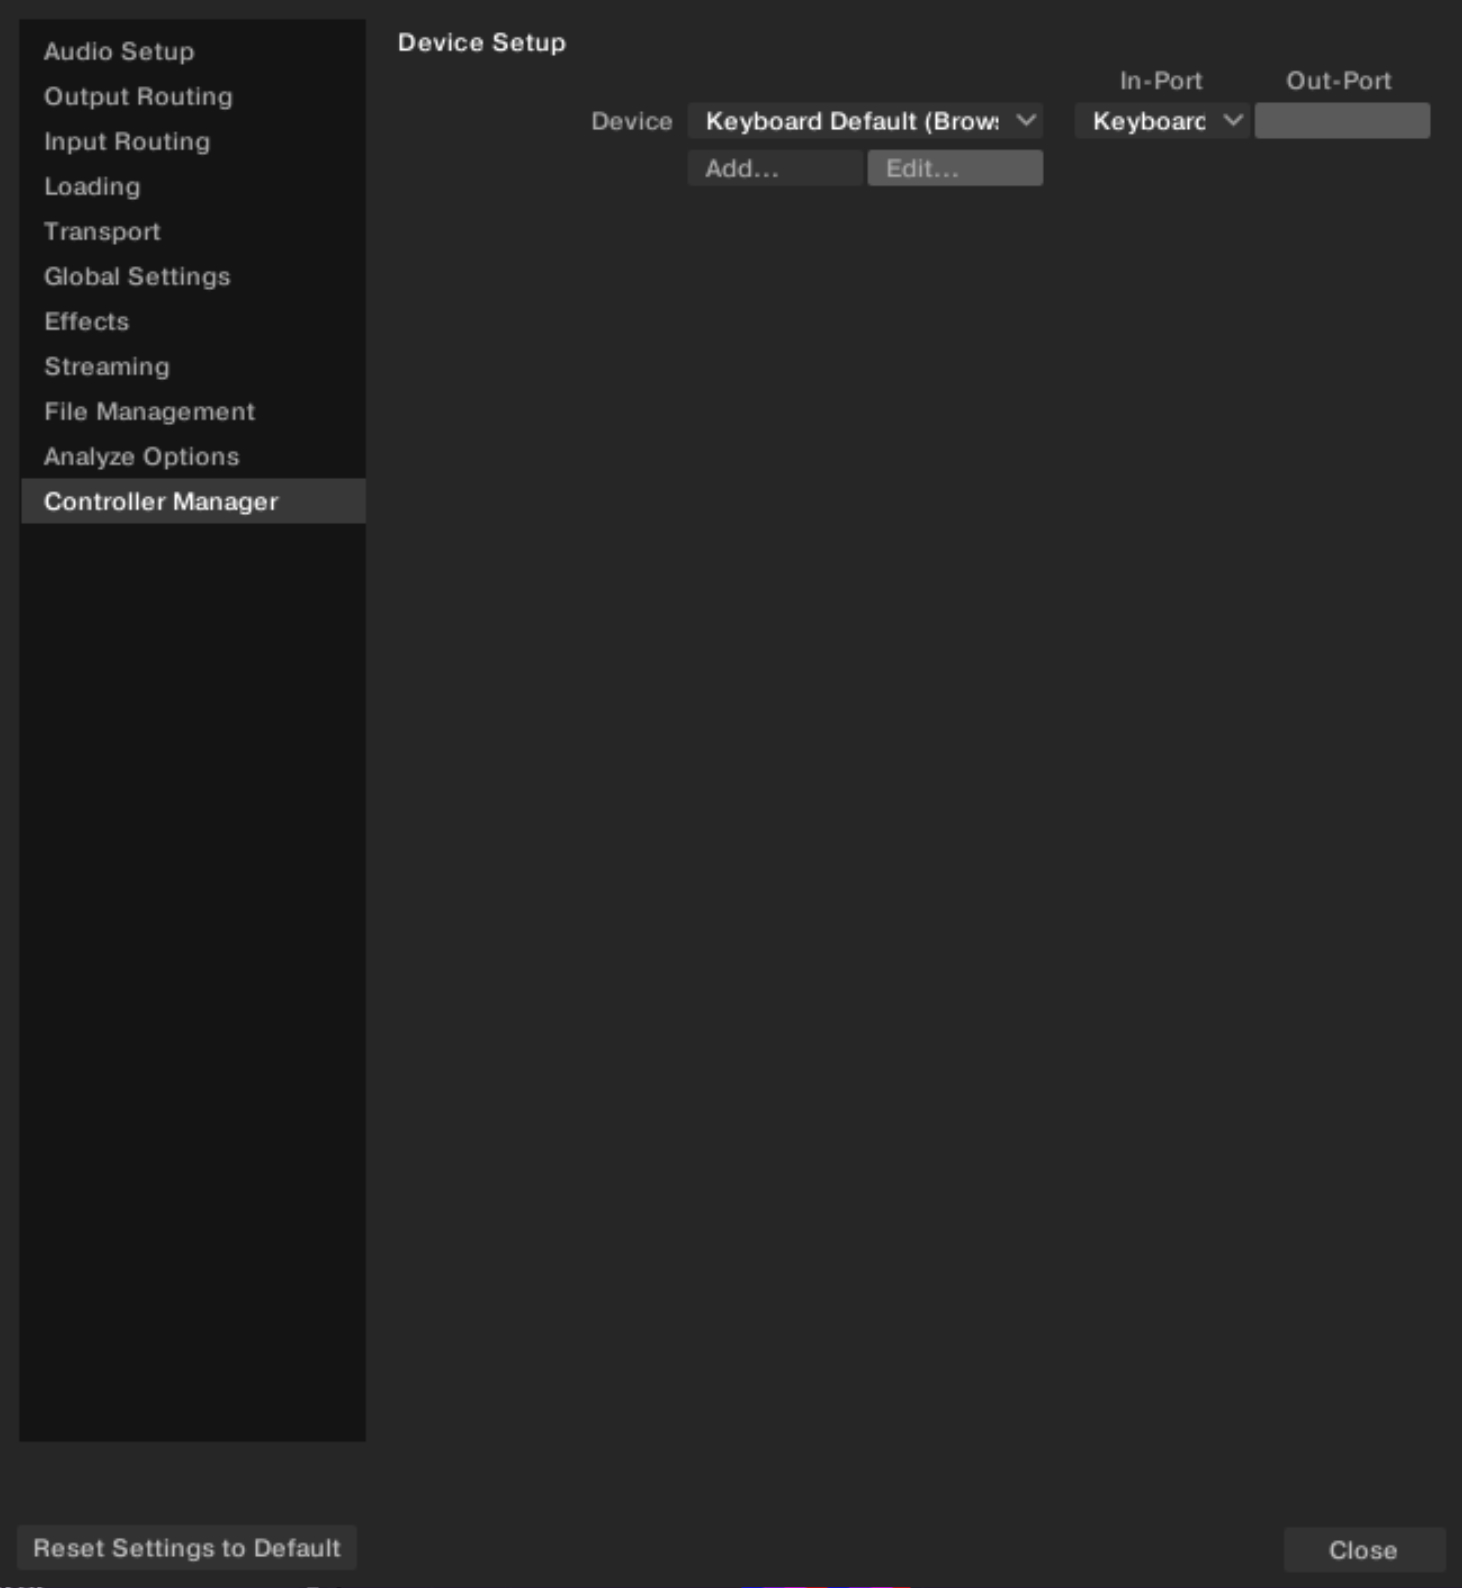
Preferences – Controller Manager page
The Controller Manager page lets you select the DJ controller that will be used with Traktor.
 |
Preferences – Controller Manager page.
Device Setup:
Device menu: Selects the device that will control Traktor Play. Once a device is selected, you can choose its In-Port and Out-Port from the menus on the right.
Add…: Lets you add the mapping for another pre-mapped device.