Play page
The Play page in Circular lets you access the main parameters of the four layers.
The Play page is the default page of Circular. It lets you adjust the main parameters of the four layers A–D and shows a real-time circular animation of the playing sequences. This visualization also acts as a basic sequencer in which you can quickly activate steps and adjust their velocities. The Play page also provides a set of panels with additional features for each layer.
To open the Play page, click the Play button in the top right corner of the instrument:
The Play page contains the following elements:
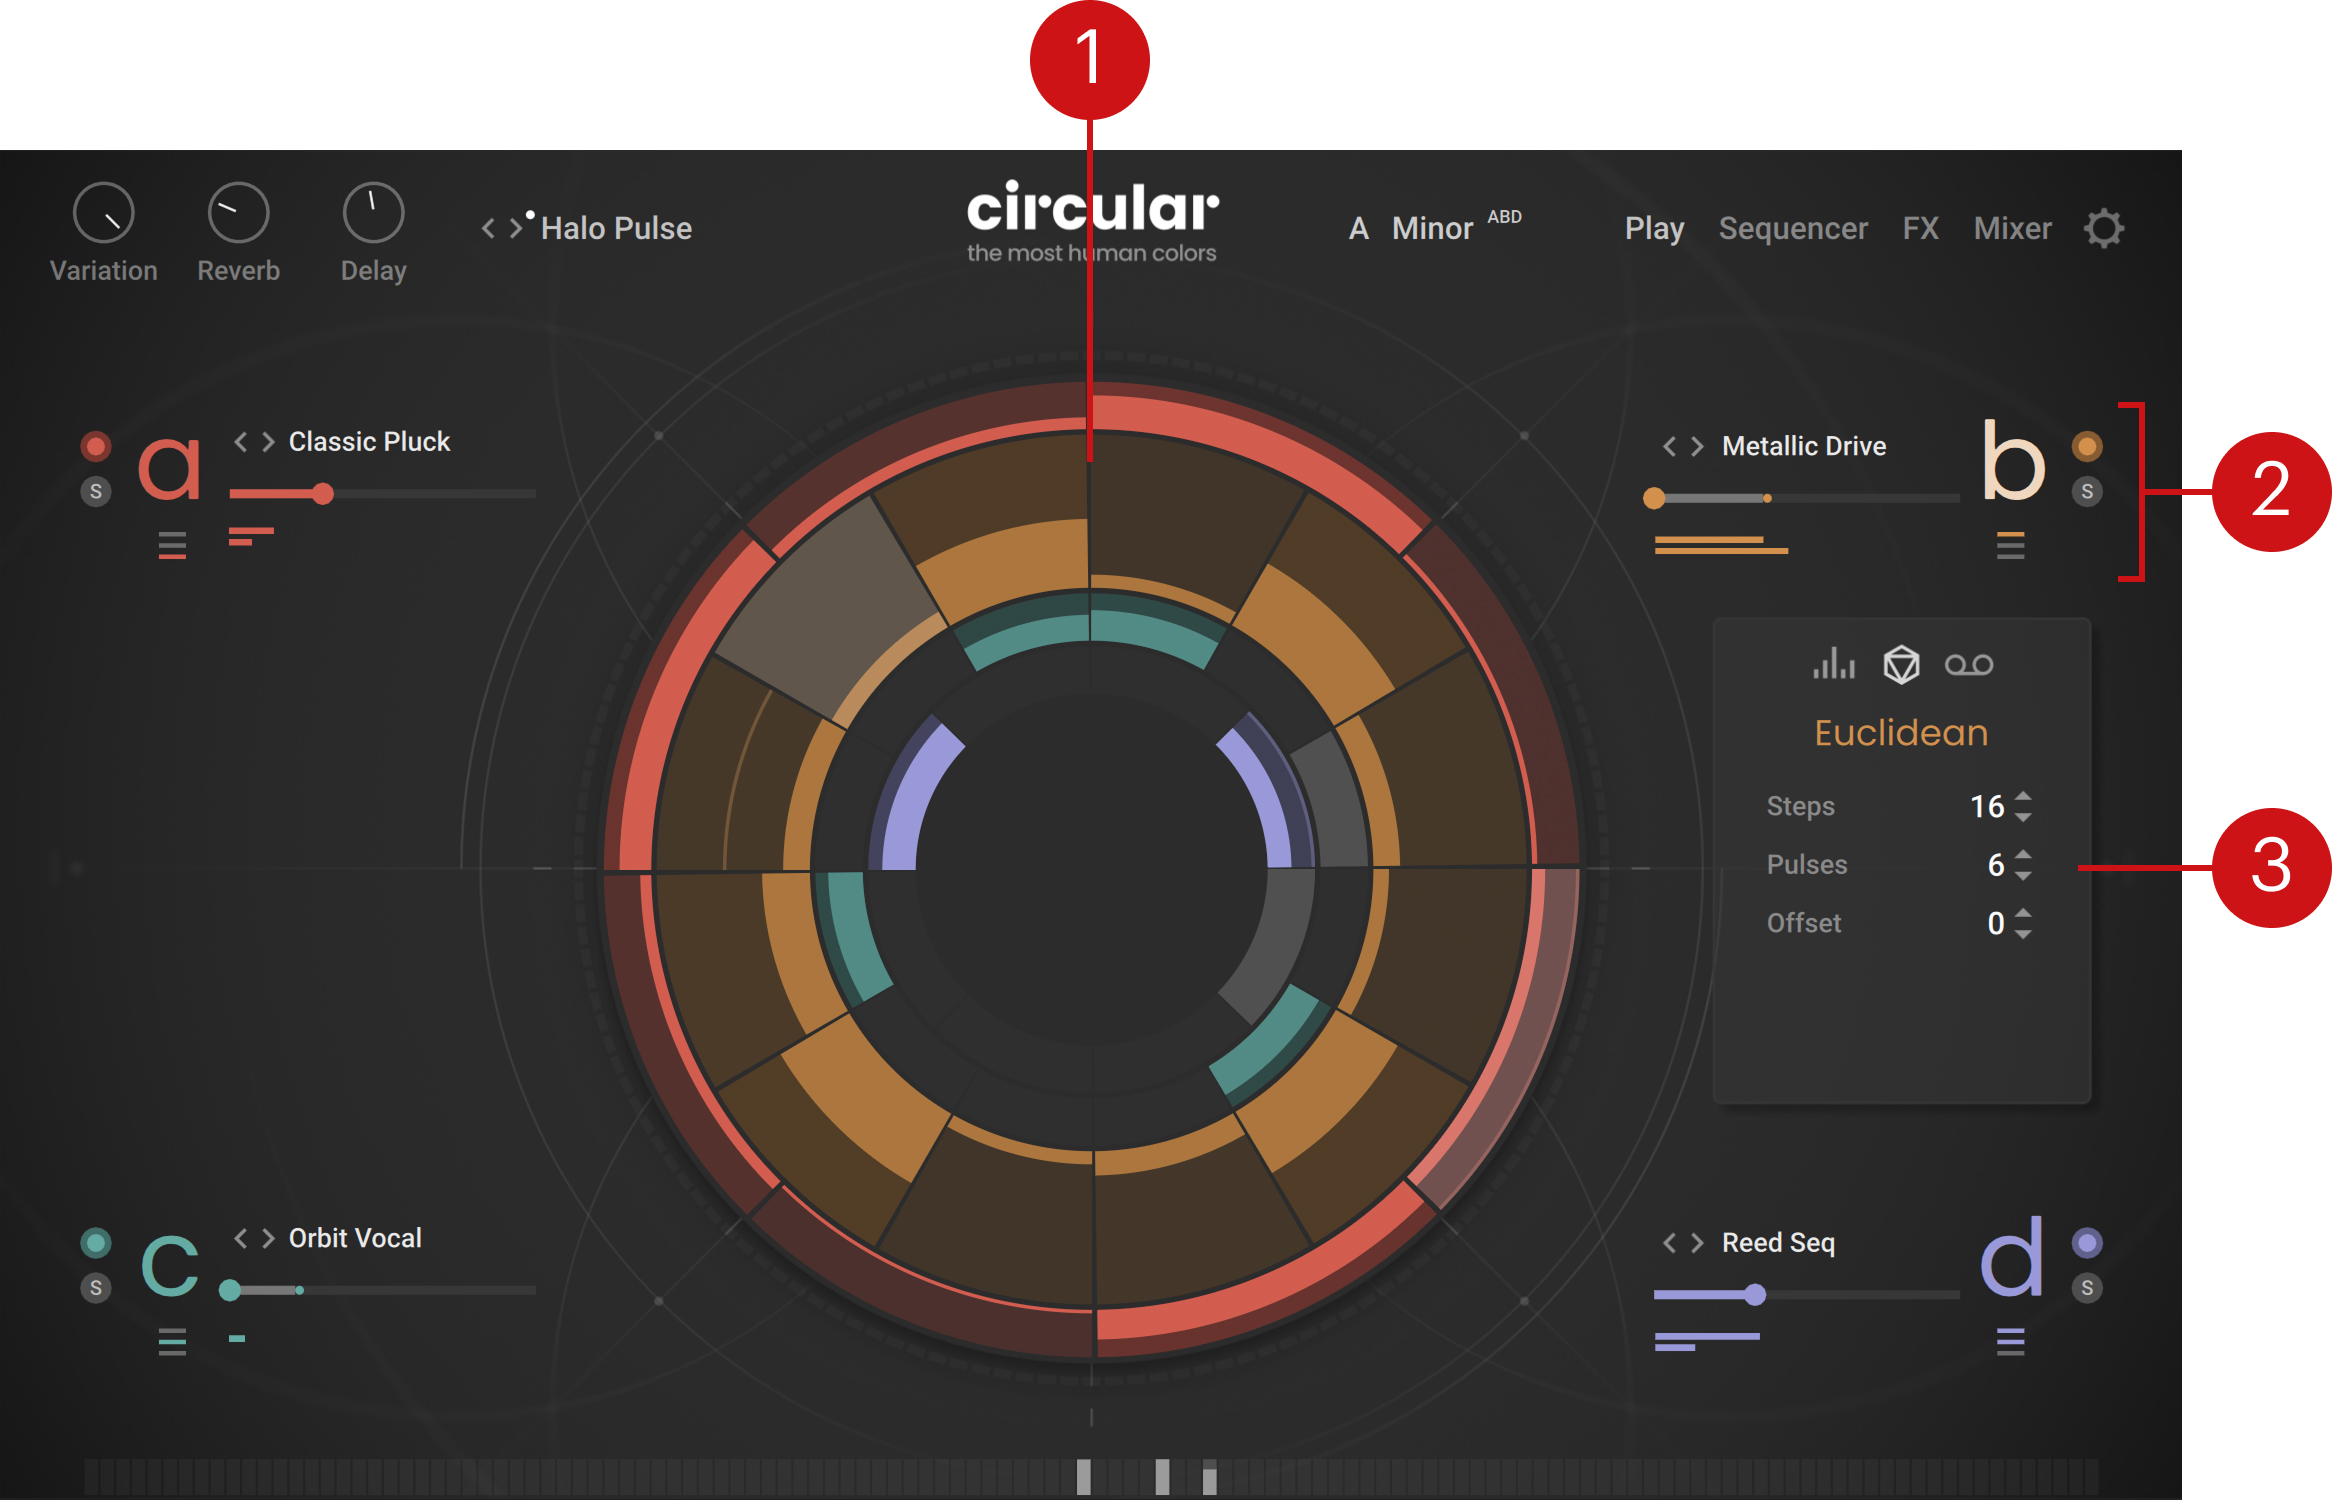
Circular display: Visually represents the sequences of the layers A–D as four circles mirroring the layer colors. The sequences start at the top and run clockwise. Each circle shows a certain number of steps. On each step, the brighter bar indicates the note velocity. If a step has no bar (velocity is null), the step is darker and will not trigger any note. As you hold some keys on your keyboard, the playing steps are highlighted. Since the sequences in the four layers are independent from each other, they can have different lengths, rates, playback directions, step lengths, etc. This makes Circular a true polyrhythmic instrument: On the Circular display, you can visualize it with the various playback positions getting out of sync. Clicking a step widens its circle and selects that layer. You can also quickly edit the sequences on-the-fly on the Circular display: Clicking any step and dragging your mouse away from, or toward the center will adjust the note velocity on this step. As you click and hold a step, its velocity value appears in the center. Setting a velocity to zero makes the corresponding step silent.
Layer basic controls: Each of the four layers A–D provides a set of basic controls mirroring the layer color. Refer to Layer basic controls.
Additional panels: These panels are visible only if a layer is selected and provide additional features for that layer. With the Random Rhythm panel and the Euclidean panel you can quickly generate a random or a regular sequence, respectively. The MIDI Recorder panel lets you export your sequences as MIDI patterns for further use in your DAW. Refer to Additional panels.
Layer basic controls
The Play page provides a set of basic controls for each of the four layers a–d:
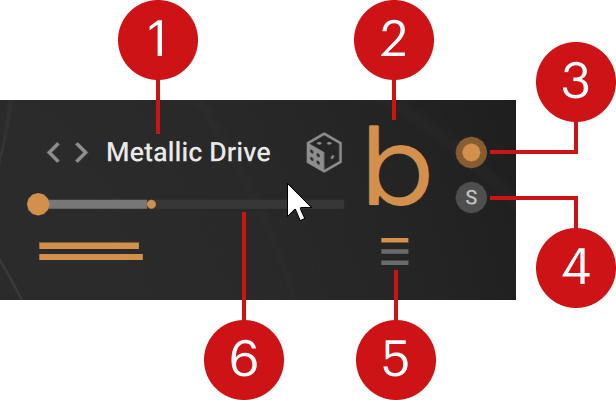 |
Layer Preset selector: Shows the name of the loaded layer preset. Layer presets contain values for all the parameters of a layer. You can click the preset name to open the Layer Browser and choose another preset from the factory library. You can also click the left and right arrows to quickly cycle through the presets in the current Result list of the Layer Browser, or click the dice icon (showing up when hovering over the layer controls) to load a random preset from the current Result list. On all these controls (preset name, left/right arrows, and dice icon), you can use [option]+click (Mac) or [Alt]+click (Windows) to pre-select the tags of the current layer preset, which narrows down the Result list to similar-sounding presets, or [Shift]+click to clear any selected tags and use a Result list including the entire preset library. For more information on the Layer Browser and the Result list, refer to Browsers.
Layer letter a–d: Selects or deselects the layer. The selected layer is indicated by a brighter letter and a wider circle in the Circular display. The selected layer’s additional panels are visible.
Layer on/off: Activates or deactivates the layer. If you deactivate the layer, it will not trigger any new notes, but the previous notes that are still sounding will stay audible. The on/off switch also lets you copy and paste the layer: You can [option]+click (Mac) or [Alt]+click (Windows) the on/off switch to copy the layer, then [option]+[shift]+click (Mac) or [Alt]+[Shift]+click (Windows) the on/off switch of the target layer to paste this layer there.
Solo (S): Deactivates all the other layers. Soloing a layer can be useful to focus on that layer when designing your sound, or as a performance tool when playing live.
Input Note Filter: Selects which of the incoming notes (the keys you are holding) should be used in that layer. You can set the layer to use all the notes, only the lowest note, only the highest note, all but the lowest note, all but the highest note, or neither the lowest nor the highest note (that is, only the notes in between). Limiting a layer to specific incoming notes can be useful to assign different roles to your layers, for example, focusing one layer on the bass line and the remaining layers on other parts of the sound. The 3-bar icon of the Input Note Filter indicates you the current filtering: The lower bar represents the lowest note, the upper bar the highest note, and the middle bar the notes in between. A colored bar means that the corresponding note(s) will be used by that layer, whereas a dark bar means that these notes will be ignored.
Layer Level slider: Adjusts the volume level of the layer.
Layer Level meter: Shows the current level of the layer’s signal.
Additional panels
The additional panels provide extra features for the selected layer. They appear on the left or right side of the Circular display, depending on the selected layer. If no layer is selected, the additional panels are not visible.
Note
You can select the desired layer by clicking its colored letter a–d in the layer’s basic controls, or by clicking its colored circle in the Circular display.
To switch between the panels, click the icons at the top:
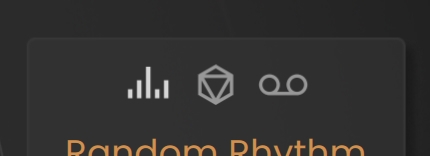
From left to right, the three icons open the Random Rhythm panel, the Euclidean panel, and the MIDI Recorder panel, respectively.
Random Rhythm panel
The Random Rhythm panel lets you quickly generate a random sequence of note velocities that will replace the current sequence in the selected layer. It contains the following controls:
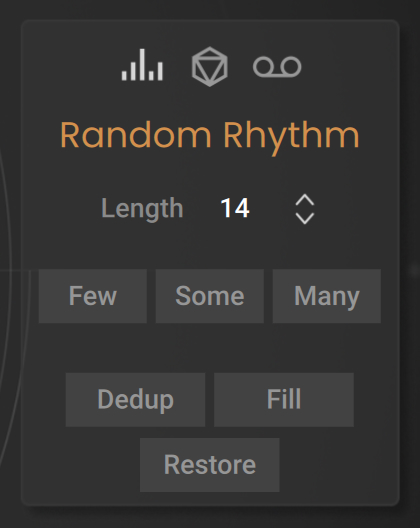 |
Length: Adjusts the number of steps in the random sequence to be generated.
Few/Some/Many: Click either button to respectively generate a few, some, or many velocities randomly distributed through the sequence. You can click the buttons repeatedly to create various random sequences until you find one that you like.
Dedup (Deduplicate): Removes notes from the random sequence at the times where another layer already plays a note. This prevents layers from playing simultaneously and it is an easy way to thin out the arrangement of multiple layers.
Fill: Removes notes from the random sequence at the play times where another layer already plays a note (like Dedup), and also insert extra notes where no other layer plays. This can help you distribute notes harmoniously among multiple layers.
Restore: Cancels your actions in the panel and recalls the original sequence. Clicking [option] + Restore (Mac) / [Alt] + Restore (Windows) lets you define the current state as the new restore state: From now on, clicking Restore will return to the current sequence.
Note
This Random Rhythm panel is strictly equivalent to the Random Rhythm panel available in the Parameter Lane of the Sequencer page.
Euclidean panel
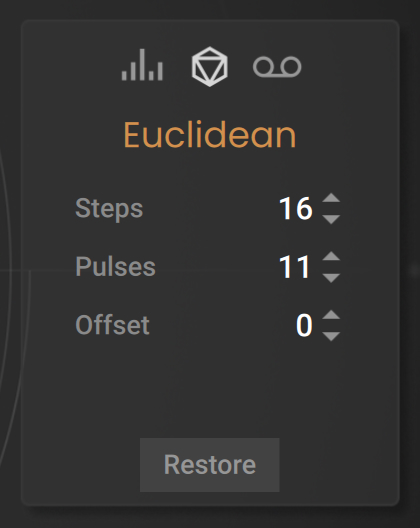
The Euclidean panel lets you quickly generate a regular sequence of notes at full velocity (or “pulses”) that will replace the current sequence in the selected layer. It contains the following controls:
 |
Note
Adjusting any parameter in the panel will automatically create the corresponding sequence.
Steps: Adjusts the number of steps in the sequence.
Pulses: Adjusts the number of notes in the sequence. The notes will be distributed as evenly as possible through the sequence using the Euclidean algorithm.
Offset: Specifies a backward or forward shift applied to the whole sequence.
Restore: Cancels your actions in the panel and recalls the original sequence. Clicking [option] + Restore (Mac) / [Alt] + Restore (Windows) lets you define the current state as the new restore state: From now on, clicking Restore will return to the current sequence.
Note
The Euclidean panel is also available in the Sequencer settings of the Sequencer page.
MIDI Recorder panel
The MIDI Recorder panel lets you record the active layers and export their sequences as MIDI patterns for further use in your DAW. It contains the following controls:
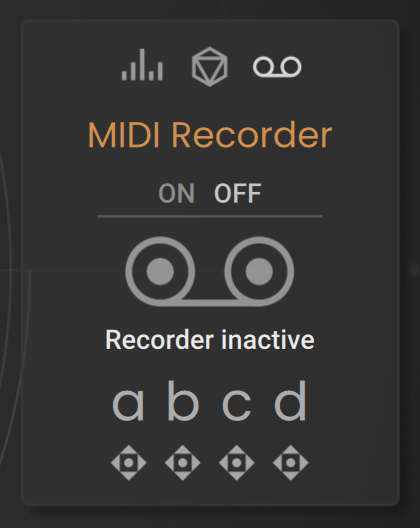 |
ON/OFF switch: Arms or disarms the MIDI recorder. By default the switch is set to OFF and the recorder status below reads Recorder inactive. Clicking ON will arm the recorder and the status will read Ready to record. The recording will start when you play the first key, and stop when you release the last key. Only the active layer will be recorded. After the recording, the status below will read Ready to drag.
a, b, c, d drag handles: The four drag handles at the bottom correspond to the four layers a–d. If a layer is deactivated, its handle is grayed out and inactive. Once a recording has been done, you can drag the handle of any active layer onto your DAW to export the recording of this layer as a MIDI pattern.