Sequencer page
The Sequencer page in Circular lets you precisely configure the sequences used in each layer.
The Sequencer page lets you precisely configure the sequences used in each of the four layers a–d. Each layer of Circular uses its own sequencing facilities independently from the other layers. Inside each layer, the generated sequence of notes results from a combination of several sequences running in parallel, each of them controlling a rhythmic, melodic, or sonic aspect of the layer.
To open the Sequencer page, click the Sequencer button in the top right corner of the instrument:
The Sequencer page provides four tabs, each tab containing the sequencing details for a particular layer. The Sequencer page contains the following areas:
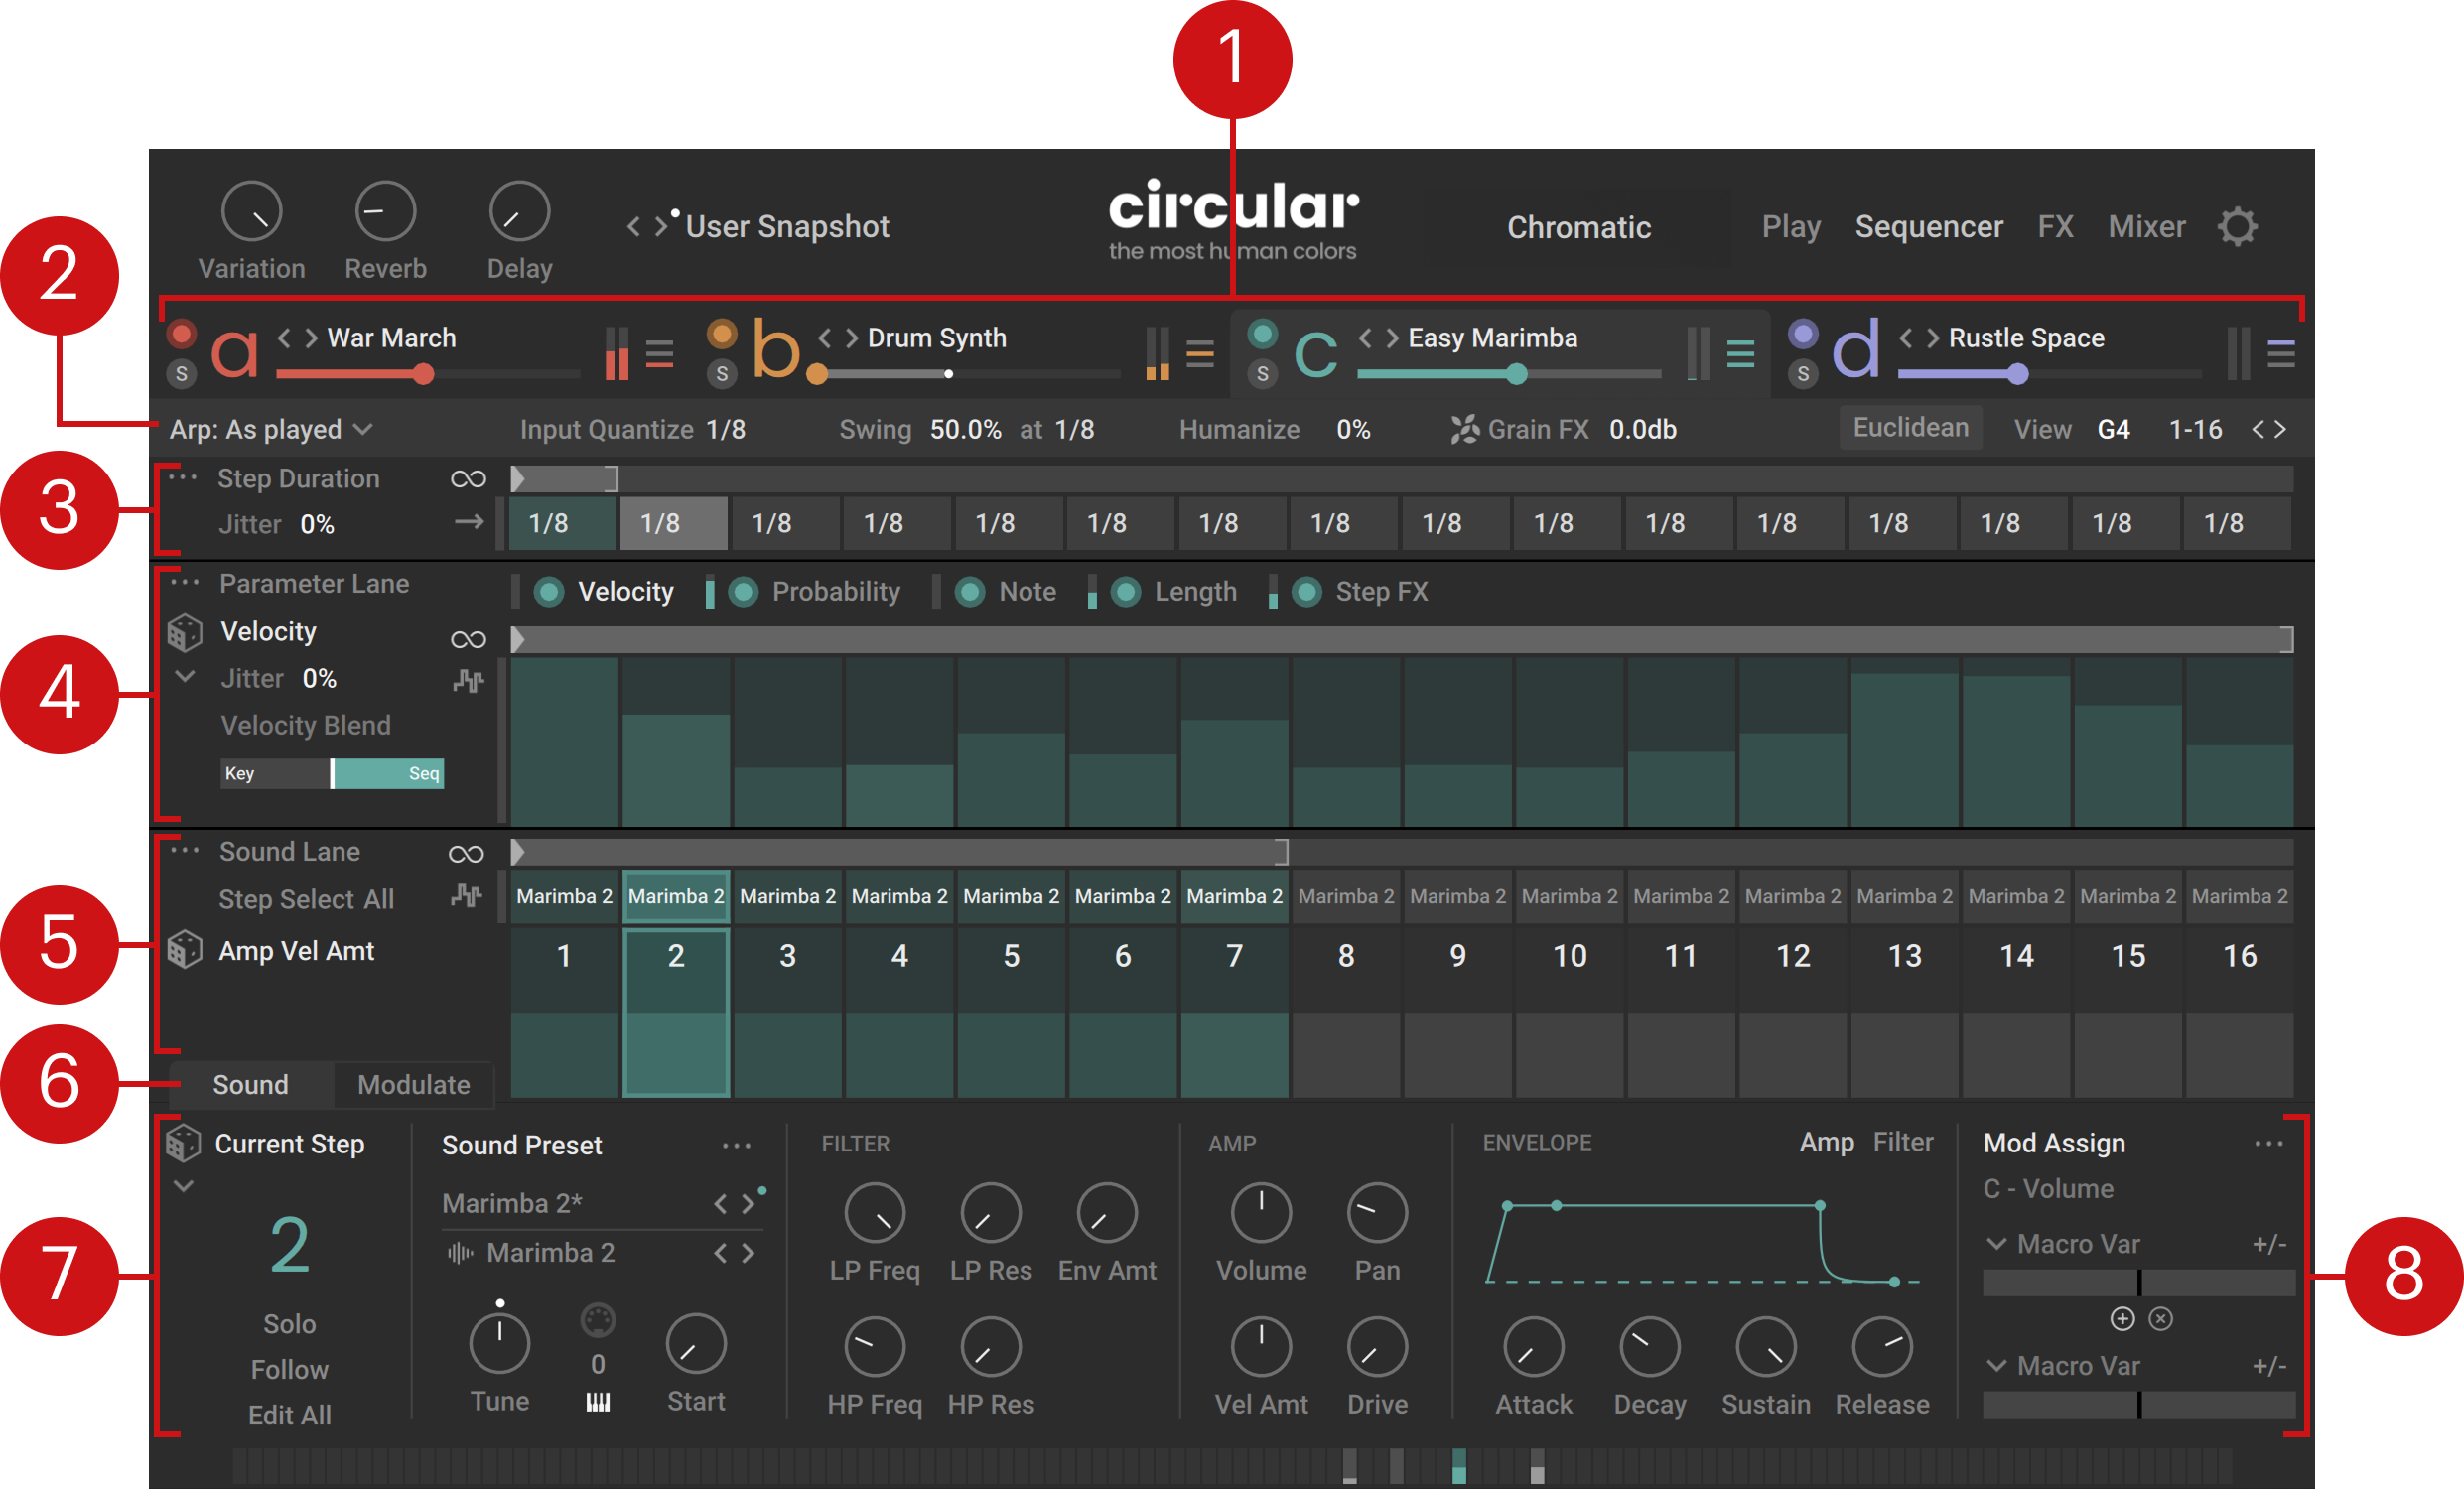
Tab headers: Each header lets you switch to the sequencing details for one layer, while providing a set of basic layer controls. All the areas below are specific to the layer selected here. Refer to Tab headers.
Sequencer settings: Global settings affecting all the sequences in the layer. Refer to Sequencer settings.
Step Duration Lane: Defines a sequence controlling the duration of each individual step. Refer to Step Duration Lane.
Parameter Lane: Defines sequences controlling various parameters of the triggered notes: velocity, probability, transposition, length, and Step FX. Refer to Parameter Lane.
Sound Lane: Lets you select specific steps for further editing, load sounds onto steps, and define sequences for the desired parameters in the Sound panel below. Refer to Sound Lane.
Sound / Modulate: Switches between the panels displayed below. By default the Sound panel is displayed. Clicking Modulate switches to the Modulate panel, where you can configure the internal modulators available in Circular. For more information on the Modulate panel, refer to Adjusting the internal modulators.
Sound panel: Adjusts the parameters of the sound loaded on the selected step(s). Most of these parameters can be controlled using dedicated sequences (configured in the Sound Lane) and modulation sources (assigned in the Mod Assign section). Refer to Sound panel.
Mod Assign section: Lets you choose and configure up to two modulation sources for nearly any parameter in the page. The Mod Assign section is available in the Sequencer, FX, and Mixer pages. Refer to Assigning and editing modulations.
Tab headers
At the top of the Sequencer page, the tab headers let you switch between the tabs and provide a set of basic controls for the layers, similar to those on the Play page:

Each tab header contains the following controls:
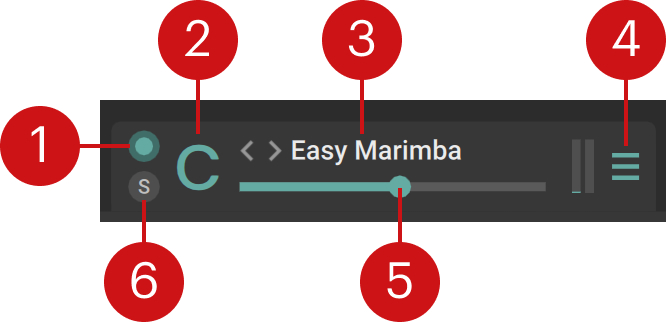 |
Layer on/off: Activates or deactivates the layer. If you deactivate the layer, it will not trigger any new notes, but the previous notes that are still sounding will stay audible. The on/off switch also lets you copy and paste the layer: You can [option]+click (Mac) or [Alt]+click (Windows) the on/off switch to copy the layer, then [option]+[shift]+click (Mac) or [Alt]+[Shift]+click (Windows) the on/off switch of the target layer to paste this layer there.
Layer letter a–d: Opens the tab containing the sequencer parameters for that layer. All the controls in the tab below will affect only that layer.
Layer Preset selector: Shows the name of the loaded layer preset. Layer presets contain values for all the parameters of a layer. You can click the preset name to open the Layer Browser and choose another preset from the factory library. You can also click the left and right arrows to quickly cycle through the presets in the current Result list of the Layer Browser. On these controls (preset name and left/right arrows) you can also use [option]+click (Mac) or [Alt]+click (Windows) to pre-select the tags of the current layer preset, which narrows down the Result list to similar-sounding presets, or use [Shift]+click to clear any selected tags and extend the Result list to the entire preset library. For more information on the Layer Browser and the Result list, refer to Browsers.
Input Note Filter: Selects which of the incoming notes (the keys you are holding) should be used in that layer. You can set the layer to use all the notes, only the lowest note, only the highest note, all but the lowest note, all but the highest note, or neither the lowest nor the highest note (that is, only the notes in between). Limiting a layer to specific incoming notes can be useful to assign different roles to your layers, for example, focusing one layer on the bass line and the remaining layers on other parts of the sound. The 3-bar icon of the Input Note Filter indicates you the current filtering: The lower bar represents the lowest note, the upper bar the highest note, and the middle bar the notes in between. A colored bar means that the corresponding note(s) will be used by that layer, whereas a dark bar means that these notes will be ignored.
Layer Level meter: Shows the current level of the layer’s signal.
Layer Level slider: Adjusts the volume level of the layer.
Solo (S): Deactivates all the other layers. Soloing a layer can be useful to focus on that layer when designing your sound, or as a performance tool when playing live.
Sequencer settings
At the top of the Sequencer page, just below the tab headers, the Sequencer settings define essential sequencing parameters that globally affect all the sequences in the layer. They include the following controls, from left to right:

Sequencing Mode menu: Selects how the played notes will be sequenced. Refer to Sequencing Mode menu.
Input Quantize: Adjusts the step size used for the quantization of the played keys.
Swing: Adjusts the swing amount relative to the base timing value defined by at.
Humanize: Adjusts the amount of imprecision in the note timings.
Grain FX: Adjusts the level at which the output of the granular Step effects used in this layer is sent to the Grain FX bus. For more information, refer to FX page.
Euclidean: Opens the Euclidean panel, which lets you quickly generate a regular sequence of notes. Refer to Euclidean panel.
View: Indicates the particular key (among the held keys) whose Aftertouch or Slide value is shown in the modulation meters available on the page.
Step Display selector: Switches the display to another group of 16 steps. You sequences can have up to 64 steps. You can click the displayed value or the left/right arrows next to it to show the steps 1–16, 17–32, 33–48, or 49–64.
Note
The Sequencer settings also host the Playback and Loop settings when you are adjusting the Play or Loop Range of a particular lane.
Sequencing Mode menu
The Sequencing Mode menu is the first element from the left in the Sequencing settings. The menu lets you select how the played notes will be sequenced.
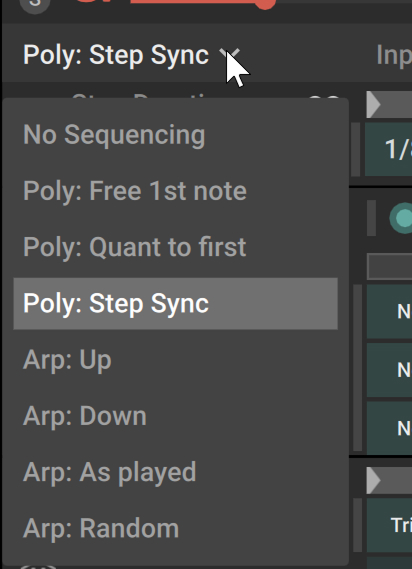 |
You can choose from the following modes:
No Sequencing: The played keys are not sequenced. The notes are triggered as you play them, like on a real instrument. This mode can also be useful in combination with the Advance on Key playback mode available in the various Lanes below. For example, if you set the Sound Lane’s playback mode to Advance on Key and load a different sound onto each step, playing legato will trigger a different sound on each key. For more information on the playback mode, refer for example to Sound Lane.
Poly: Free 1st note: This mode is similar to the Poly: Quant to first mode, except that for each pressed key the first note of the sequence is not quantized but played as you press the key. This lets you have a sequence looping while playing a free melody on top simultaneously.
Poly: Quant to first: Each held key runs its own sequence, and the following sequences start on the closest quantization step relative to the first sequence. If the Input Quantize value is equal to the step size of the sequences (which is the case by default), this results in all the sequenced notes playing tight but with shifted starts.
Poly: Step Sync: Each held key runs its own sequence, and the following sequences are synchronized to the first sequence. This results in all the notes playing the same sequence together. This is the standard “chord mode” available on many sequencers.
Arp: Up: All the held keys are combined into one sequence starting from the lowest key up to the highest key.
Arp: Down: All the held keys are combined into one sequence starting from the highest key down to the lowest key.
Arp: As played: All the held keys are combined into one sequence that follows the order in which you played them.
Arp: Random: All the held keys are combined into one sequence in random order.
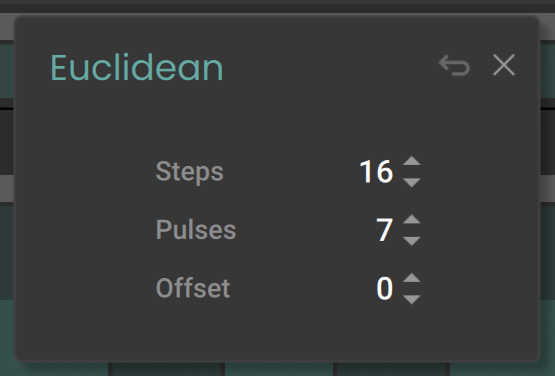
Euclidean panel
The Euclidean panel lets you quickly generate a regular sequence of notes at full velocity (or “pulses”) that will replace the current sequence in the selected layer. It contains the following controls:
 |
Note
Adjusting any parameter in the panel will automatically create the corresponding sequence.
Steps: Adjusts the number of steps in the sequence.
Pulses: Adjusts the number of notes in the sequence. The notes will be distributed as evenly as possible through the sequence using the Euclidean algorithm.
Offset: Specifies a backward or forward shift applied to the whole sequence.
Restore (returning arrow icon): Cancels your actions in the panel and recalls the original sequence. Clicking [option] + Restore (Mac) / [Alt] + Restore (Windows) lets you define the current state as the new restore state: From now on, clicking Restore will return to the current sequence.
Close (“x”): Closes the panel.
Note
The Euclidean panel is also available in the Play page.
Playback and Loop settings
When you click in the timeline in the Step Duration Lane, Parameter Lane, or Sound Lane, the middle part of the Sequencer settings is temporarily replaced with the Playback and Loop settings for that lane:

On the left, the colored label reminds you which lane is being edited. On the right, the Close button (“x”) closes the Playback and Loop settings and returns to the usual Sequencer settings. In between, the controls of the Playback and Loop settings mirror the equivalent controls available in the lane being edited, from left to right: Playback Mode menu, Play Range Start and End, Loop on/off switch, Loop Start, and Loop End. You can adjust the controls either here or in the respective lane, both methods are strictly equivalent. For more information on these controls, refer to Step Duration Lane, Parameter Lane, or Sound Lane, depending on the lane that you are currently adjusting.
Step Duration Lane
The Step Duration Lane lets you set up a sequence that defines the length of each single step. It contains the following controls:

Step Duration label: Clicking the lane label puts this lane under focus in the Mod Assign section, so that you can configure the modulation for the lane. The modulation can halve or double the step durations. For more information on how to set up modulation, refer to Modulating your sound.
Loop on/off: Activates or deactivates the looped playback. When the loop is on, the Loop Range appears as a bright gray overlay on the timeline on the right.
Play Range: Represents the portion of the sequence that is played when you press and hold some keys. The Play Range starts at the little triangle and spans the gray region on the timeline. You can adjust the Play Range’s start point by dragging the triangle horizontally. When the loop is off, you can adjust the Play Range’s end point by dragging the closing bracket. You can also move the whole Play Range by clicking inside the range (but not inside the Loop Range, if active) and dragging it horizontally. Whenever you click on the timeline, the Playback and Loop settings open up in the Sequencer settings and let you adjust the Play Range using the Start and End parameters.
Loop Range: Represents the portion of the sequence that is looped when you press and hold some keys. It is visible only when the Loop on/off switch is turned on. The Loop Range is indicated by the brighter region between brackets on the timeline. You can adjust the Loop Range’s start and end points by dragging the opening and closing brackets horizontally, respectively. You can also move the whole Loop Range by clicking within the range and dragging it horizontally. Whenever you click on the timeline, the Playback and Loop settings open up in the Sequencer settings and let you adjust the Loop Range using the Loop Start and Loop End parameters.
Step durations: Each step shows its current duration. To change the duration of a step, click its value and select another value from the menu. You can also change the duration of multiple steps at once by selecting them in the Sound Lane and changing the duration of any of them.
Playback Mode menu: Specifies the order in which the steps will be played back. In Forward mode the playback runs from left to right, in Bounce mode it runs back and forth, in Random mode it randomly jumps between steps, in Forward Random Start mode it starts on a random step and runs from left to right, in Advance on Key mode it goes to the next step each time you press another key.
Jitter: Adjusts the probability that the duration of a step gets halved or doubled.
Duration Lane Edit menu (...): Provides various editing functions for the lane. Refer to Duration Lane Edit menu.
Duration Lane Edit menu
In the top left corner of the Step Duration Lane, the Lane Edit menu (...) provides the following commands:
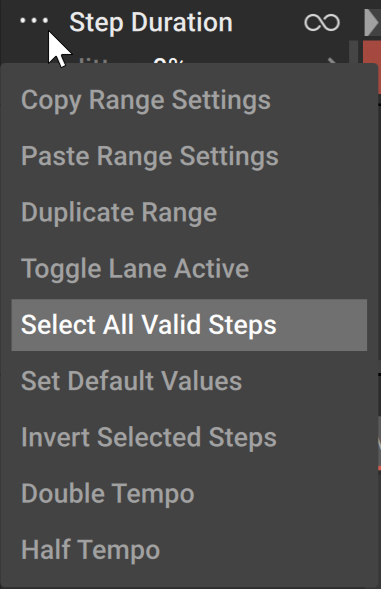 |
Copy Range Settings: Stores the range settings to the clipboard. The copied settings include the Loop on/off state, the selected entry from the Playback Mode menu, the Play Range, and the Loop Range.
Paste Range Settings: Replaces the current range settings with the settings stored in the clipboard. Copying/pasting the range settings let you easily port them between the Step Duration Lane, the Parameter Lane, and the Sound Lane.
Duplicate Range: If the loop is on, this command doubles the Loop Range and duplicates its steps. If the loop is off, the command doubles the Play Range and duplicates its steps.
Toggle Lane Activity: Activates or deactivates the Step Duration Lane. When the lane is deactivated, all the steps are played with the default duration.
Select All Valid Steps: Selects all the steps.
Set Default Values: Resets all the steps to their default value.
Invert Selected Steps: Inverts the current selection of steps.
Double Tempo: Halves all the step values, which doubles the tempo of the sequence.
Half Tempo: Doubles all the step values, which halves the tempo of the sequence.
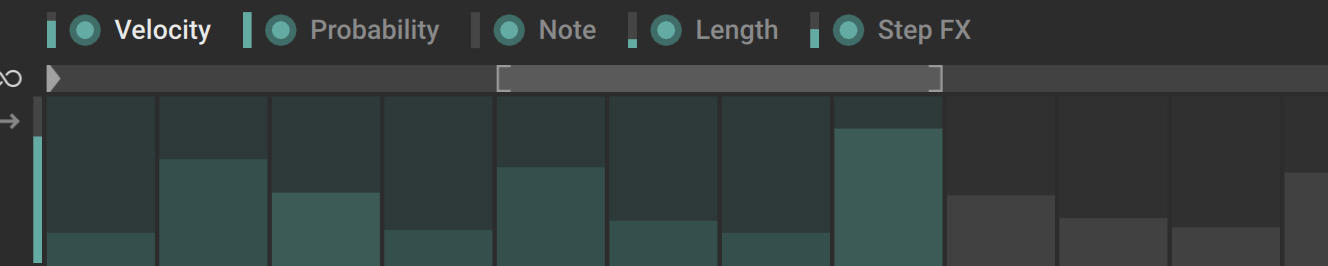
Parameter Lane
The Parameter Lane lets you set up sequences controlling five parameters of the triggered notes: their velocity, probability, transposition, length, and Step FX. It contains the following controls:

Parameter name: Shows the parameter being edited. Clicking the label puts that parameter under focus in the Mod Assign section, so that you can configure its modulation. For more information on how to set up modulation, refer to Modulating your sound. You can [option]+click (Mac) or [Alt]+click (Windows) the parameter label to activate or deactivate the lane, [command]+click (Mac) or [Ctrl]+click (Windows) the label to reset all the steps to their default value, or double click the label to select all the valid steps. These commands are also available from the Lane Edit menu showing the three dots (...) in the top left corner.
Loop on/off: Activates or deactivates the looped playback. When the loop is on, the Loop Range appears as a bright gray overlay on the timeline on the right.
Parameter selector: Clicking either parameter name selects this parameter for display. All the remaining controls in the Parameter Lane affect the parameter selected here. Left of each parameter name, a colored Sequence on/off switch lets you activate or deactivate the lane for this parameter, and a little vertical bar shows you the current parameter value resulting from the combination of the step values (if the sequence is active) and the active modulation for this parameter. Clicking a parameter name also puts its lane under focus in the Mod Assign section. You can prevent this by [Shift] + clicking the parameter name instead. For a description of the available parameters, refer to Available parameters in the Parameter Lane.
Play Range: Represents the portion of the sequence that is played when you press and hold some keys. The Play Range starts at the little triangle and spans the gray region on the timeline. You can adjust the Play Range’s start point by dragging the triangle horizontally. When the loop is off, you can adjust the Play Range’s end point by dragging the closing bracket. You can also move the whole Play Range by clicking inside the range (but not inside the Loop Range, if active) and dragging it horizontally. Whenever you click on the timeline, the Playback and Loop settings open up in the Sequencer settings and let you adjust the Play Range using the Start and End parameters.
Loop Range: Represents the portion of the sequence that is looped when you press and hold some keys. It is visible only when the Loop on/off switch is turned on. The Loop Range is indicated by the brighter region between brackets on the timeline. You can adjust the Loop Range’s start and end points by dragging the opening and closing brackets horizontally, respectively. You can also move the whole Loop Range by clicking within the range and dragging it horizontally. Whenever you click on the timeline, the Playback and Loop settings open up in the Sequencer settings and let you adjust the Loop Range using the Loop Start and Loop End parameters.
Step area: Shows and lets you modify the values of the selected parameter for each step. The look and handling of the steps depend on the selected parameter. For more information, refer to Using the Step area in the Parameter Lane. Note that the actual value of the parameter can also depend on modulation.
Output value indicator: When the sequencer is running, this vertical bar shows the current parameter value resulting from the combination of the step value and any active modulation for this parameter. For the Note lane, the indicator shows the actual note sent to the Sound panel before the Key Transpose value is applied. For more information, refer to Sound Preset section: main controls.
Playback Mode menu: Specifies the order in which the steps will be played back. In Forward mode the playback runs from left to right, in Bounce mode it runs back and forth, in Random mode it randomly jumps between steps, in Forward Random Start mode it starts from a random step and runs from left to right, in Advance on Key mode it goes to the next step each time you press another key. In Link to Sound Lane mode, the Loop on/off switch, the Play Range, and the Loop Range are deactivated and the playback follows the Sound Lane’s playback. This mode can help quickly set up a simple instrument preset.
Velocity Blend (Velocity Lane only): Adjusts the relative influence of the key velocities and sequencer velocities on the resulting note velocities. At full left (Key), the generated notes will use only the velocity of the played keys. At full right (Seq), the generated notes will use only the velocities defined in the sequence shown on the right. In the center position (default setting), the played keys and the sequence will equally affect the generated notes’ velocity.
Jitter: Adjusts an amount of random but musically meaningful value variation applied to each note individually. For example, this will apply random octave shifts in the Note lane.
Variation (dice icon): Opens the variation panel for the selected parameter. The variation panel lets you generate random variations of the parameter on the selected steps. Refer to Variation panels in the Parameter Lane.
Parameter Lane Edit menu (...): Provides various editing functions for the lane. Refer to Parameter Lane Edit menu.
Available parameters in the Parameter Lane
The Parameter Lane can display the following parameters, which you can select from the Parameter selector at the top of the Parameter Lane:
 |
Velocity: Velocity of the generated note. By default the velocity of the steps is set to 35, which leaves enough headroom, for example, to also control the velocity dynamically using the aftertouch modulation. Setting the velocity to zero on a step will mute this step (the note will not be triggered). Setting the velocity to 128 will force the note to use the velocity of the played key.
Probability: Probability that the note will be triggered. By default the probability is set to 100 %, which makes sure that the note will be triggered. Reducing the probability on a step will mute this step from time to time. Setting the probability to zero will mute the step entirely.
Note: Transposition of the original key. This parameter is bipolar. Its default value is zero (no transposition) and its available values range from -48 to +48 semitones (-4 octaves to +4 octaves).
Length: Length of the generated note, measured as a percentage of the step duration. By default the length is set to 100 % and its available values range from 0 to 400 % (four times the step duration).
Step FX: You can insert up to three dedicated Step effects on each single step. The step will apply either Step effect according to the current value of the modulation assigned to it. For more information, refer to Using the Step area in the Parameter Lane.
Using the Step area in the Parameter Lane
The Step area of the Parameter Lane looks and behaves differently depending on whether the Step FX Lane or any other lane (Velocity, Probability, Note, or Length) is selected.
Adjusting the step values in the Velocity, Probability, Note, and Length lanes
In the Step area of the Velocity, Probability, Note, and Length lanes, each cell represents a step. The colored steps are the steps that will be played given the current Play Range and Loop Range configuration, the remaining steps are gray. The brighter vertical bar on each step indicates the parameter value.
 |
As you hover over the Step area with your mouse, the numerical values of the parameter appear at the top of the steps. You can change the parameter values using the following methods:
You can click at the desired position in a cell to set the height of the brighter bar.
You can drag the bar vertically with your mouse to adjust its height. Holding [Shift] while dragging your mouse lets you adjust the value in finer steps. In the Note lane, dragging a bar adjusts the transposition in octaves, whereas [Shift]+dragging the bar adjusts it in semitones.
You can change the values on multiple steps at once by selecting them in the Sound Lane, and holding [option] (Mac) or [Alt] (Windows) as you drag the mouse on any of them: all the step values will follow your mouse while keeping their respective gaps.
You can hold [command] (Mac) or [Ctrl] (Windows), click one position in a step and drag your mouse to another position in another step to draw a line and create a linear progression across multiple steps.
Note
The notes generated by the Note lane will be quantized to the scale shown in the Scale selector at the top of the instrument. Refer to Circular overview.
Using Step effects
In the Step area of the Step FX lane, each step contains three cells layed out vertically on top of each other. Each cell represents an Step effect slot for that step.
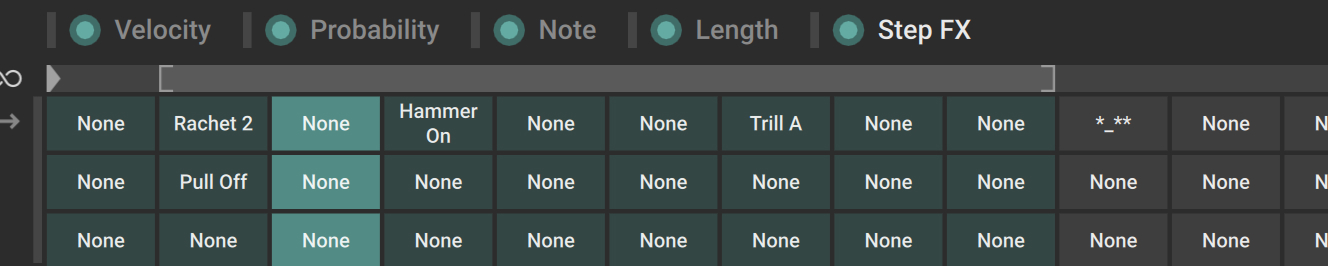 |
Slots containing a Step effect show its name, empty slots show None instead. Each time a step is played back, one of its slots will process the note. The particular slot processing the note will vary with the current value of the modulation assigned to it: Depending on whether the modulation value is in the lower, middle, or upper third of the modulation range, the lower, middle, or upper slot will process the note. For example, by assigning the aftertouch as modulation source for the Step FX Lane in the Mod Assign section, you can select the effect applied to the note using your pressure on the key. For more information on assigning modulation, refer to Assigning and editing modulations.
Clicking a slot opens the Step FX Browser and lets you choose a Step effect preset and load it into that slot. For more information on the Browsers, refer to Browsers.
Tip
By clicking the desired Step effect preset from the Browser’s Result list only once instead of double-clicking it, you can load that preset into the selected slot while keeping the Step FX Browser open. This way you can rapidly load series of Step effect presets onto several slots by alternatively selecting one slot in the Step area, then one preset in the Step FX Browser, and repeat the operation as needed.
The following actions are available on the Step effect slots:
Load into multiple steps: You can load the same effect preset into multiple steps at once by selecting multiple steps in the Selection Lane of the Sound Lane, clicking the lower, middle, or upper slot in any of the selected step, and loading the desired effect preset from the Step FX Browser. The effect preset will be loaded into the corresponding slot in all the selected steps. Clicking a cell in a step that is not selected will select that step only.
Copy/paste effect slots: You can [option]+click (Mac) or [Alt]+click (Windows) a slot to copy its effect preset, then [option]+[shift]+click (Mac) or [Alt]+[Shift]+click (Windows) another slot to paste the copied effect preset into that slot.
Randomize in the same category: You can [shift]+click a slot to replace its effect preset with a random effect preset from the same effect category.
Randomize in all the categories: You can [command]+[shift]+click (Mac) or [Ctrl]+[Shift]+click (Windows) a slot to replace its effect preset with a random effect preset from any category.
Clear slot: You can [command]+click (Mac) or [Ctrl]+click (Windows) a slot to remove its effect preset. The slot will then read None to indicate that it is empty.
Note
A Step effect from the Arpeggio category will not be triggered if there is already another arpeggio playing on that step. Only one arpeggio effect can be triggered at a time in the instrument in order to avoid colliding or piled up notes.
The Step effects in the Grain category have a particularity: You can send their output to a dedicated Grain FX channel containing up to four additional effects. You can configure these effects on the Grain FX tab of the FX page. In each layer you can adjust the level at which the grain effects’ outputs are sent to this additional effect channel, for example using the layer’s Grain FX control in the Sequencer settings of the Sequencer page.
Note
In some situations you might want to limit the Grain effects to the highest note only. This can be done in the Settings page.
Variation panels in the Parameter Lane
For each parameter available in the Parameter Lane, clicking the dice icon on the left opens a dedicated Variation panel. The Variation panels let you quickly generate random values for the current parameter on the selected steps.
Tip
When a Variation panel is open, you can quickly switch to another Variation panel by clicking the desired parameter in the Parameter selector.
Random Rhythm panel
The Random Rhythm panel of the Parameter Lane is equivalent to the Random Rhythm panel available on the Play page. It lets you quickly generate a random sequence of note velocities that will replace the current sequence in the selected layer.
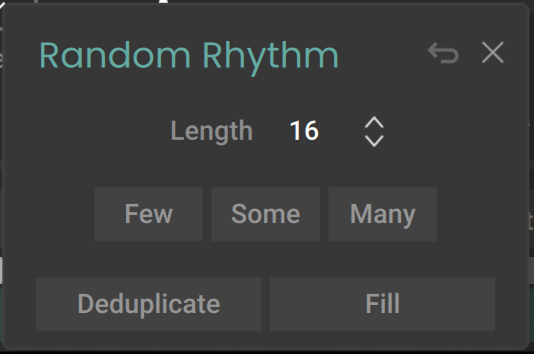 |
Length: Adjusts the number of steps in the random sequence to be generated.
Few/Some/Many: Click either button to respectively generate a few, some, or many velocities randomly distributed through the sequence. You can click the buttons repeatedly to create various random sequences until you find one that you like.
Deduplicate: Removes notes from the random sequence at the times where another layer already plays a note. This prevents layers from playing simultaneously and it is an easy way to thin out the arrangement of multiple layers.
Fill: Removes notes from the random sequence at the play times where another layer already plays a note (like Deduplicate), and also insert extra notes where no other layer plays. This can help you distribute notes harmoniously among multiple layers.
Restore (returning arrow): This button appears only after triggering a randomization. The Restore button recalls the original state of the layer before starting the randomization. Any variations you might have generated in other Variation panels will be canceled as well. Clicking [option] + Restore (Mac) or [Alt] + Restore (Windows) lets you define the current state as the new restore state.
Close (“x”): Closes the panel.
Probability Variation panel
The Probability Variation panel lets you quickly generate a random sequence of note probabilities that will replace the current sequence in the Probability lane of the Parameter Lane.
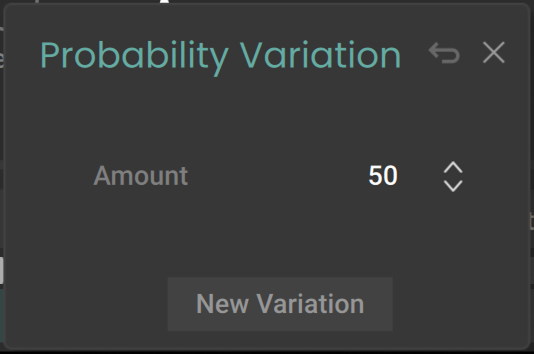 |
Amount: Adjusts the extent of the variations around the original step values.
New Variation: Generates a new set of randomized step values.
Restore (returning arrow): This button appears only after triggering a randomization. The Restore button recalls the original state of the layer before starting the randomization. Any variations you might have generated in other Variation panels will be canceled as well. Clicking [option] + Restore (Mac) or [Alt] + Restore (Windows) lets you define the current state as the new restore state.
Close (“x”): Closes the panel.
Note Variation panel
The Note Variation panel lets you quickly generate a random sequence of note transpositions that will replace the current sequence in the Note lane of the Parameter Lane.
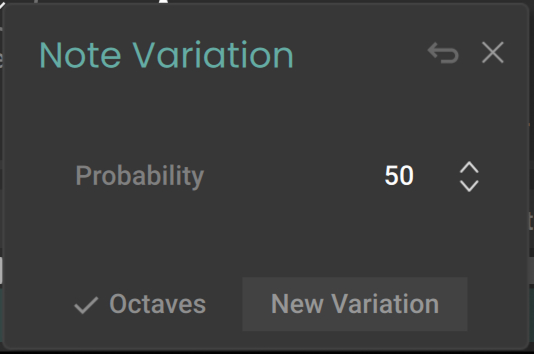 |
Probability: Adjusts the probability for each step to get a new value.
Octaves: When active, the new values can only be octaves of the original ones. When inactive, the new values can reach any semitones in between.
New Variation: Generates a new set of randomized step values.
Restore (returning arrow): This button appears only after triggering a randomization. The Restore button recalls the original state of the layer before starting the randomization. Any variations you might have generated in other Variation panels will be canceled as well. Clicking [option] + Restore (Mac) or [Alt] + Restore (Windows) lets you define the current state as the new restore state.
Close (“x”): Closes the panel.
Note
The note transpositions are randomized in a practical range of +/- 24 semitones.
Length Variation panel
The Length Variation panel lets you quickly generate a random sequence of note lengths that will replace the current sequence in the Length lane of the Parameter Lane.
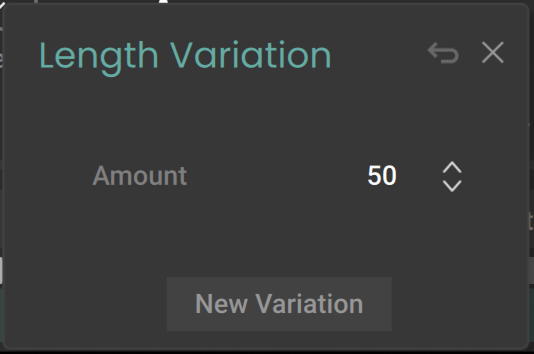 |
Amount: Adjusts the extent of the variations around the original step values.
New Variation: Generates a new set of randomized step values.
Restore (returning arrow): This button appears only after triggering a randomization. The Restore button recalls the original state of the layer before starting the randomization. Any variations you might have generated in other Variation panels will be canceled as well. Clicking [option] + Restore (Mac) or [Alt] + Restore (Windows) lets you define the current state as the new restore state.
Close (“x”): Closes the panel.
Note
The note lengths are randomized in a practical range between 20 % and 150 % of the step length.
Step FX Variation panel
The Step FX Variation panel lets you quickly generate a random sequence of Step effects for the desired slots within the Step FX lane of the Parameter Lane.
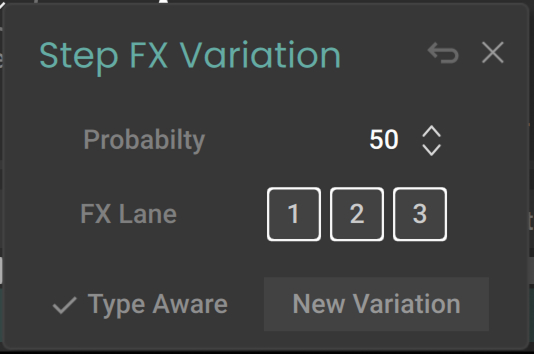 |
Probability: Adjusts the probability for each step to get a new value.
FX Lane: Selects the lane(s) that should be randomized. You can click the desired numbers to activate or deactivate them. The numbers refer to the rows of Step FX slots: “1” refers to the lower slots, “2” to the middle slots, and “3” to the upper slots.
Type Aware: When activated, the new Step effects are randomly selected in the same effect category as the original effects.
New Variation: Generates a new set of randomized step values.
Restore (returning arrow): This button appears only after triggering a randomization. The Restore button recalls the original state of the layer before starting the randomization. Any variations you might have generated in other Variation panels will be canceled as well. Clicking [option] + Restore (Mac) or [Alt] + Restore (Windows) lets you define the current state as the new restore state.
Close (“x”): Closes the panel.
Parameter Lane Edit menu
In the top left corner of the Parameter Lane, the Lane Edit menu (...) provides various editing commands affecting the displayed sequence. The following commands are available:
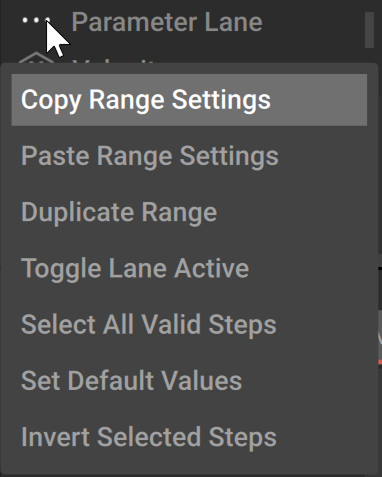 |
Copy Range Settings: Stores the range settings to the clipboard. The copied settings include the Loop on/off state, the selected entry from the Playback Mode menu, the Play Range, and the Loop Range.
Paste Range Settings: Replaces the current range settings with the settings stored in the clipboard. Copying/pasting the range settings let you easily port them between the Step Duration Lane, the Parameter Lane, and the Sound Lane.
Duplicate Range: If the loop is on, this command doubles the Loop Range and duplicates its steps. If the loop is off, the command doubles the Play Range and duplicates its steps.
Toggle Lane Activity: Activates or deactivates the lane of the selected parameter.
Select All Valid Steps: Selects all the steps that generate a note. For example, steps with a velocity set to zero will not be selected.
Set Default Values: Resets all the steps to their default value.
Invert Selected Steps: Inverts the current selection of steps.
Sound Lane
The Sound Lane has three main purposes:
Select steps to edit them while leaving the remaining steps unaffected.
Load your own samples and use them in your sequences.
Set up sequences for the sampler parameters available in the Sound panel below.
The Sound Lane contains the following controls:
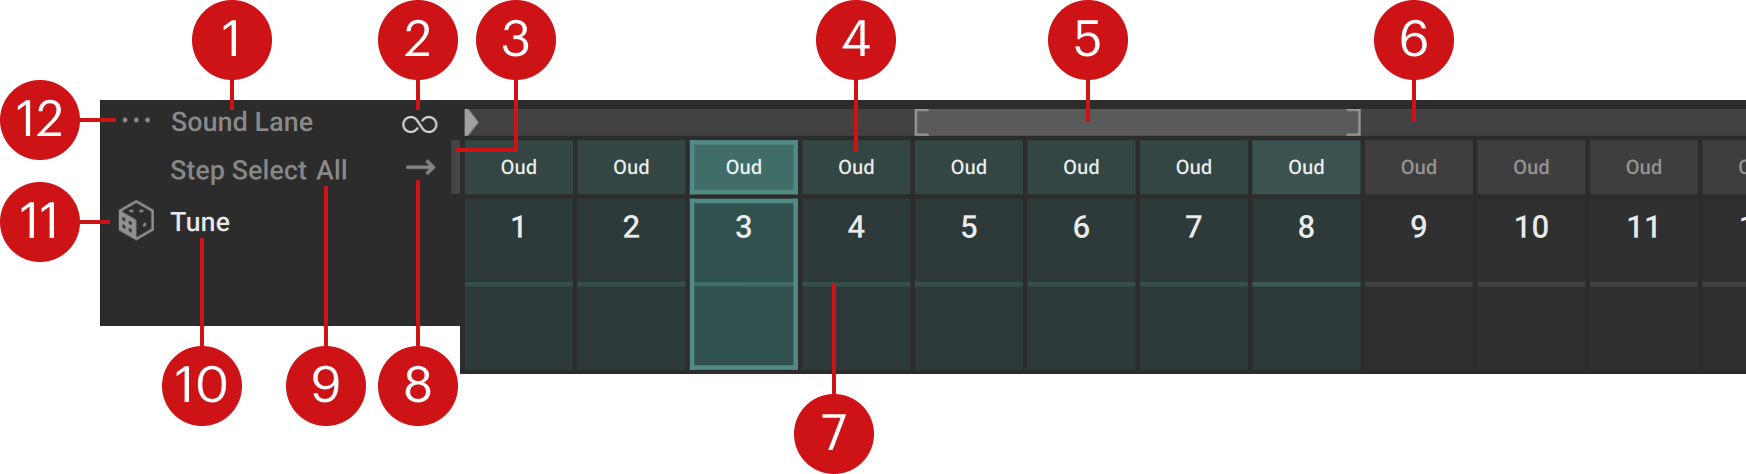
Sound Lane label: Clicking the lane label puts this lane under focus in the Mod Assign section, so that you can configure the modulation for the lane. This modulation will control the starting step of the sequence. For more information on how to set up modulation, refer to Modulating your sound. You can also double-click the Sound Lane label to select all the steps.
Loop on/off: Activates or deactivates the looped playback. When the loop is on, the Loop Range appears as a bright gray overlay on the timeline on the right.
Starting Step indicator: When the sequencer is running, this vertical bar indicates the current starting step resulting from the combination of the Play Range and any active modulation for this starting step.
Selection Lane: Lets you select steps, copy/paste sounds between steps, and load your own samples. Refer to Selection Lane.
Loop Range: Represents the portion of the sequence that is looped when you press and hold some keys. It is visible only when the Loop on/off switch is turned on. The Loop Range is indicated by the brighter region between brackets on the timeline. You can adjust the Loop Range’s start and end points by dragging the opening and closing brackets horizontally, respectively. You can also move the whole Loop Range by clicking within the range and dragging it horizontally. Whenever you click on the timeline, the Playback and Loop settings open up in the Sequencer settings and let you adjust the Loop Range using the Loop Start and Loop End parameters.
Play Range: Represents the portion of the sequence that is played when you press and hold some keys. The Play Range starts at the little triangle and spans the gray region on the timeline. You can adjust the Play Range’s start point by dragging the triangle horizontally. When the loop is off, you can adjust the Play Range’s end point by dragging the closing bracket. You can also move the whole Play Range by clicking inside the range (but not inside the Loop Range, if active) and dragging it horizontally. Whenever you click on the timeline, the Playback and Loop settings open up in the Sequencer settings and let you adjust the Play Range using the Start and End parameters.
Sampler Lane: Lets you adjust the step values for the parameter currently under focus. To switch the focus to another parameter, simply click its control in the Sound panel below. Refer to Sampler Lane.
Playback Mode menu: Specifies the order in which the steps will be played back. In Forward mode the playback runs from left to right, in Bounce mode it runs back and forth, in Random mode it randomly jumps between steps, in Forward Random Start mode it starts on a random step and runs from left to right, in Advance on Key mode it goes to the next step each time you press another key.
All: Selects all the steps.
Parameter name: Shows which parameter from the Sound panel is under focus. To switch the focus to another parameter, simply click its control in the Sound panel below.
Variation (dice icon): Clicking the dice generates new random values for the selected steps in the Sampler Lane in a range of 20 % around their current values. You can [option]+click (Mac) or [Alt]+click (Windows) the dice to generate random values in the full range instead.
Sound Lane Edit menu (...): Provides various editing functions for the lane. Refer to Sound Lane Edit menu.
Selection Lane
The Selection Lane lets you select the desired steps, copy/paste sounds between steps, and load your own samples onto steps.
 |
Each cell in the lane represents a step. Each step indicates the name of the sample it triggers, or Free if the step has no sound loaded.
Selecting steps works as follows: You can click a single step to select it, or use the usual keyboard modifiers of your operating system for multiple selection: [Shift]+clicking two steps will select these two steps and all the steps in between, and [command]+clicking (Mac) or [Ctrl]+clicking (Windows) a step will add or remove it from the current selection. The selected steps are highlighted.
Note
The step selection made here applies to many actions done elsewhere in the Sequencer page: For example, adjusting a parameter in the Sound panel or loading of a Step effect in the Parameter Lane will affect all the selected steps.
You can also use the Selection Lane to copy/paste sounds between steps:
[option]+click (Mac) or [Alt]+click (Windows) the source step to copy its sound to the clipboard.
[option]+[shift]+click (Mac) or [Alt]+[Shift]+click (Windows) the target step to paste the sound there.
The sound of the source step is copied to the target step, including its sample and all its parameter values in the Sound panel.
Finally, you can load your own samples into the steps by dragging the sample files from your desktop and dropping them onto the desired cells. This allows you to build sequences with your own sounds. When you have loaded a custom sample into a step, the sample will be available in the Sample Browser, appearing as “User [sample name]” in one of the 128 user slots available.
Sampler Lane
The Sampler Lane lets you adjust the step values for the sampler parameter under focus (its name appears on the left).
 |
Each cell in the lane represents a step. The colored steps are the steps that will be played given the current Play Range and Loop Range configuration. The brighter vertical bar on each step represents the parameter value. You can change the parameter values using the following methods:
You can click at the desired position in a cell to set the height of the brighter bar.
You can drag the bar vertically with your mouse to adjust its height. Holding [Shift] while dragging your mouse lets you adjust the value in finer steps.
You can adjust the values in multiple steps at once by selecting the steps in the Selection Lane above, and moving the parameter control itself in the Sound panel below: all the step values will follow your mouse while keeping their respective gaps.
You can hold [command] (Mac) or [Ctrl] (Windows), click one position in a step and drag your mouse to another position in another step to draw a line and create a linear progression across multiple steps.
Sound Lane Edit menu
In the top left corner of the Sound Lane, the Lane Edit menu (...) provides various editing commands affecting the displayed sequence. The following commands are available:
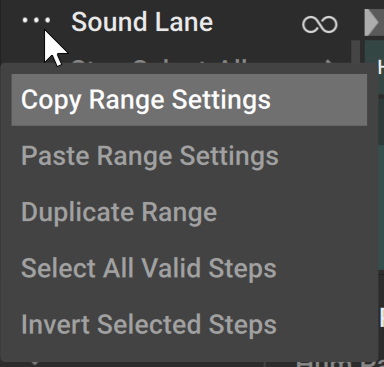 |
Copy Range Settings: Stores the range settings to the clipboard. The copied settings include the Loop on/off state, the selected entry from the Playback Mode menu, the Play Range, and the Loop Range.
Paste Range Settings: Replaces the current range settings with the settings stored in the clipboard. Copying/pasting the range settings let you easily port them between the Step Duration Lane, the Parameter Lane, and the Sound Lane.
Duplicate Range: If the loop is on, this command doubles the Loop Range and duplicates its steps. If the loop is off, the command doubles the Play Range and duplicates its steps.
Select All Valid Steps: Selects all the steps.
Invert Selected Steps: Inverts the current selection of steps.
Setting up sequences for the parameter modulations
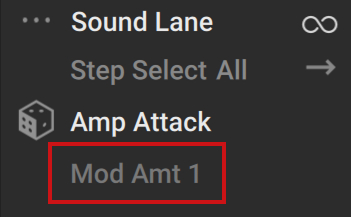
You can configure sequences in the Sampler Lane not only for parameters but also for their modulations: Once you have clicked the target parameter in the Sound panel to bring it under focus in the Mod Assign section, you can click a Modulation Amount slider in the Mod Assign section to bring it under focus in the Sound Lane. You can then create a sequence controlling the slider value, that is, the modulation range for that parameter.
When a Modulation Amount slider is under focus in the Sound Lane it appears as a gray Mod Amt 1 or Mod Amt 2 label below the name of the target parameter:
 |
Sound panel
At the bottom of the Sequencer page, the Sound panel lets you configure the sound loaded on the selected step(s). Each sound includes a sample along with a set of sampler parameters that specify how the sample will be played back and processed.
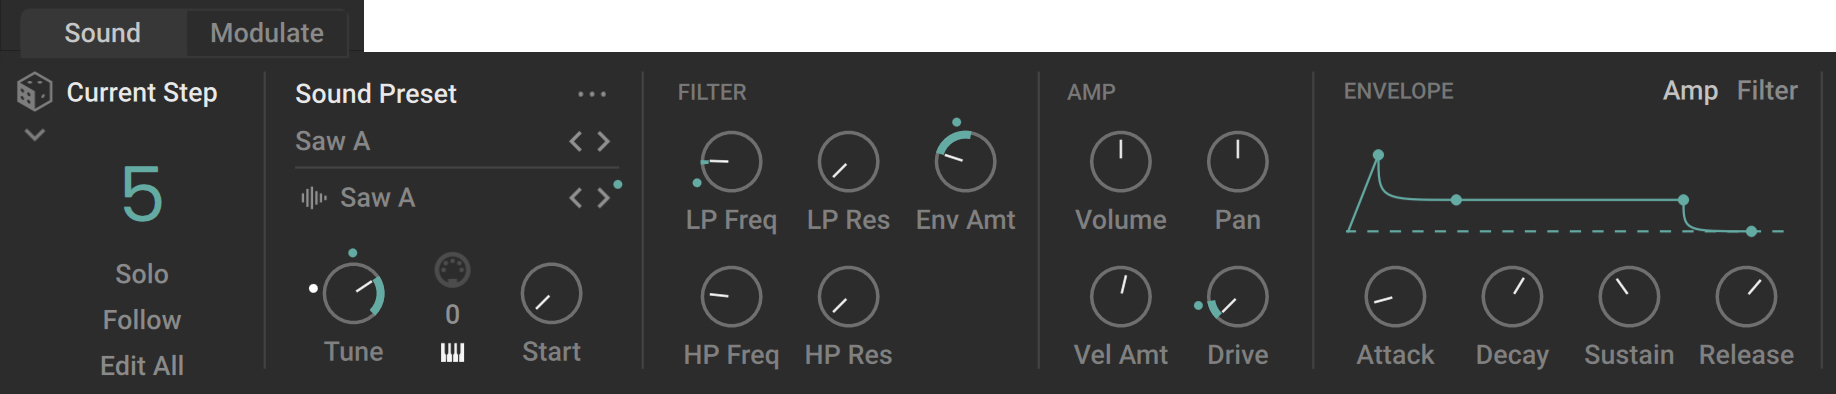
The Sound panel contains two sections:
The Current Step section shows you the step whose sound is being displayed, lets you replace the loaded sound with a random sound using the Sound Variation panel, and provides a few additional settings. Refer to Current Step section.
The Sound Preset section includes the following areas:
In the main and leftmost area of the Sound Preset section, you can select a sound preset, select a sample, configure the basics of the sample playback, and access editing commands. Refer to Sound Preset section: main controls.
The Filter area lets you adjust a low-pass and a high-pass filters. Refer to Filter area.
The Amp area lets you adjust the amplification settings. Refer to Amp area.
The Envelope area lets you configure an envelope for the amplification and another for the filtering. Refer to Envelope area.
Note
The Mod Assign section at the far right does not belong to the Sound panel: Instead, it lets you configure modulation sources for most parameters in the Sequencer page, FX page, and Mixer page. Nevertheless, the sound presets also include the modulations configured for the parameters in the Sound panel. For more information on assigning modulation, refer to Assigning and editing modulations.
Current Step section
The Current Step section contains the following elements:
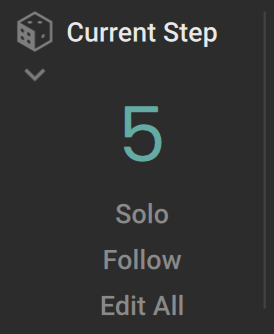 |
Step number: The big colored number indicates the step from which the sound is displayed in the Sound panel.
Solo: Mutes everything except for the current step, in order to focus on its sound: The other layers are deactivated and the playback of the current layer is limited to the current step.
Follow: When this is on, the Sound panel follows the play position and always show the sound of the step being played.
Edit All: When this is on, all your actions in the Sound panel will affect all the steps instead of affecting the selected step(s) only.
Sound Variation (dice icon): Opens the Sound Variation panel, which lets you replace the sounds of the selected steps with a random sound. Refer to Sound Variation panel.
Sound Variation panel
In the Sound Variation panel you can replace the sounds of the selected steps with a random sound from the factory library. The panel contains the following controls:
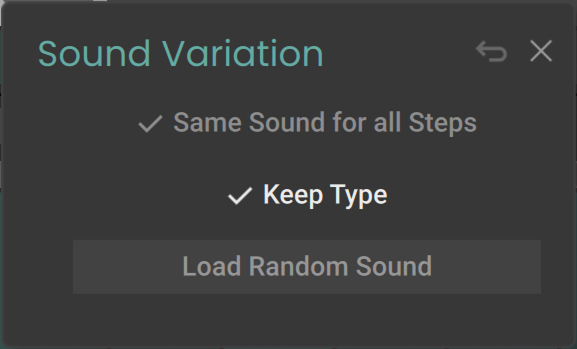 |
Same Sound for all Steps: When this is on, the same random sound will be loaded into all the selected steps. When off, a different random sound is loaded in each selected step.
Keep Type: When this is on, the new sound will be randomly chosen from all the sounds that have the same tags as the current sound, making sure that the new sound will be similar to the current one.
Load Random Sound: Replaces the current sound with a random sound according to the settings above.
Restore (returning arrow): This button appears only after triggering a randomization. The Restore button recalls the original state of the layer before starting the randomization. Any variations you might have generated in other Variation panels will be canceled as well. Clicking [option] + Restore (Mac) or [Alt] + Restore (Windows) lets you define the current state as the new restore state.
Close (“x”): Closes the panel.
Sound Preset section: main controls
The leftmost area in the Sound Preset section contains basic controls for the sound:
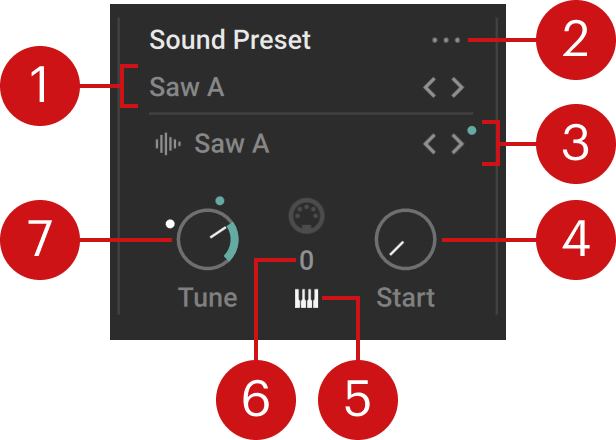 |
Sound Preset selector: Shows the name of the loaded sound preset. Sound presets contain a sample along with values for all the parameters in the Sound Preset section. You can click the preset name to open the Sound Browser and choose another preset from the factory library. You can also click the left and right arrows to quickly cycle through the presets in the current Result list of the Sound Browser, or click the dice icon (showing up when hovering over the preset selector) to load a random preset from the current Result list. On all these controls (preset name, left/right arrows, and dice icon) you can also use [option]+click (Mac) or [Alt]+click (Windows) to pre-select the tags of the current sound preset, which narrows down the Result list to similar-sounding presets, or use [Shift]+click to clear any selected tags and extend the Result list to the entire preset library. A little dot next to the left/right arrows indicates that some tags are selected in the Browser, that is, the Result list does not currently include all the available presets. For more information on the Sound Browser and the Result list, refer to Browsers.
Sound Preset Edit menu (...): Provides various editing functions for the current sound preset. Refer to Sound Preset Edit menu.
Sample selector: Shows the name of the loaded sample. In the factory library, You can click the preset name to open the Sample Browser and choose another preset from the factory library. You can also click the left and right arrows to quickly cycle through the presets in the current Result list of the Sample Browser, or click the dice icon (showing up when hovering over the preset selector) to load a random preset from the current Result list. On all these controls (preset name, left/right arrows, and dice icon) you can also use [option]+click (Mac) or [Alt]+click (Windows) to pre-select the tags of the current sample, which narrows down the Result list to similar samples, or use [Shift]+click to clear any selected tags and extend the Result list to the entire sample library. A little dot next to the left/right arrows indicates that some tags are selected in the Browser, that is, the Result list does not currently include all the available presets. For more information on the Sample Browser and the Result list, refer to Browsers.
Start: Adjusts the start position of the playback in the sample within the first 2 seconds of the sample. If the sample is shorter, the range is adjusted accordingly.
Key Tracking switch (keyboard icon): When this is on (default setting), the sample follows the pitch of the played keys. When it is off, the sample plays at its original pitch no matter which key is pressed. In this case the step triggering is limited to one voice to avoid phasing artifacts.
Key Transpose: Transposes the triggered key in semitones. The values range from -24 semitones (-2 octaves) to +24 semitones (+2 octaves).
Tune: Adjusts the pitch of the sample by changing its playback speed, in a range going from -36 semitones (-3 octaves) to +36 semitones (+3 octaves). You can hold [Shift] while you drag the knob to adjust the value in finer increments. In addition to the colored dot appearing on any parameter controlled by a modulation, the Tune knob also shows a white dot: Due to its greater sensitivity, the white dot will move even with the tiniest change in the modulation value, whereas the movement of the colored dot would be barely noticeable. This makes the white dot a useful visual indicator for subtle modulations of the Tune parameter.
Sound Preset Edit menu
The Sound Preset Edit menu (...) provides various editing commands affecting the sound preset. The following commands are available:
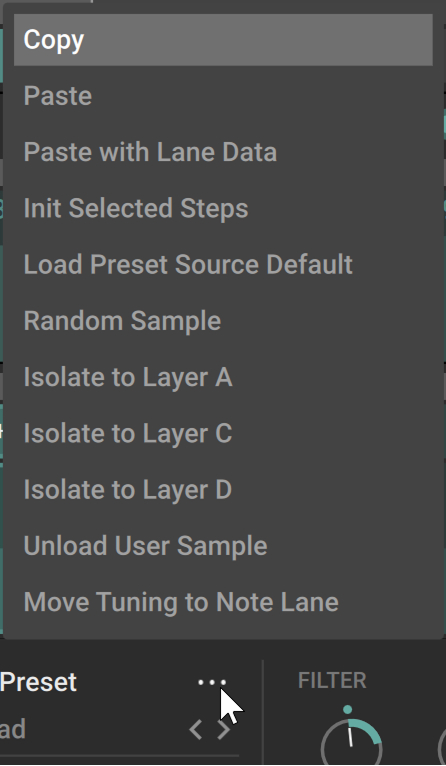 |
Copy: Copies the displayed sound to the clipboard, including its sample and parameters. This is equivalent to [option]+clicking (Mac) or [Alt]+clicking (Windows) the step in the Selection Lane of the Sound Lane.
Paste: Pastes the sound (including its sample and all its parameters) onto the Sound Preset section, replacing the current sample and parameter values. This is equivalent to [option]+[shift]+clicking (Mac) or [Alt]+[Shift]+clicking (Windows) the step in the Selection Lane of the Sound Lane. You can also copy/paste sounds between layers.
Paste with Lane Data: Pastes the copied sound (including its sample and all its parameters) onto the Sound Preset section and also the values of the Parameter Lane onto the selected steps. This is equivalent to [command]+[option]+[shift]+clicking (Mac) or [Ctrl]+[Alt]+[Shift]+clicking (Windows) the step in the Selection Lane of the Sound Lane. You can also copy/paste sounds with lane data between layers.
Init Selected Steps: Resets all the parameters in the Sound Preset section to their default values for the selected steps. This also removes the parameter modulations, if any.
Load Preset Source Default: Loads the parameter values from the sound preset corresponding to the current sample (the sound preset with an identical name).
Random Sample: Loads a random sample.
Isolate to Layer A, B, C, or D: Mutes the selected steps in the current layer and moves them to the desired target layer. In that target layer, all other steps are muted and only the transferred steps are audible.
Unload User Sample: Removes any user samples currently loaded. This also clears their user slots in the Sample Browser.
Move Tuning to Note Lane: Converts the Tune values for each step to the corresponding values in the Note lane of the Parameter Lane. The main purpose of this command is to force the layer to follow the scale quantization defined in the Scale selector at the top of the instrument: The Note lane’s output is mapped to that scale, contrary to the Tune parameter, which is processing the sample’s audio at a later stage.
Note
When using the Move Tuning to Note Lane command, you might notice that the Tune sequence in the Sound Lane is not removed although its values have been transferred to the Note lane. This is to preserve the sonic character (formant shift) of the original sequence: Instead of resetting the Tune values to zero, the command adds their opposite values to the Key Transpose control located on its right, effectively canceling the detuning without losing the formant shift.
Amp area
The Amp area lets you adjust the amplification of the sample. The area contains the following controls:
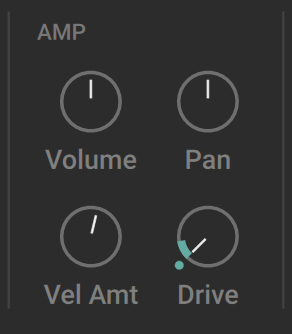 |
Volume: Adjusts the amplification level.
Pan: Adjusts the panoramic position of the sample in the stereo field.
Vel Amt: Adjusts the influence of the key velocity over the volume level.
Drive: Adjusts a saturation at the amplification stage. This saturation can add grit to the sound. Contrary to the layer effects available on the FX page, which are applied to the overall signal of the layer, this saturation is applied to each note individually.
Filter area
The Filter area lets you configure a low-pass filter and a high-pass filter applied to the sample. The low-pass filter can be controlled by the filter envelope defined in the Envelope area. The high-pass filter can help you remove, for example, high-frequency rumble.
The area contains the following controls:
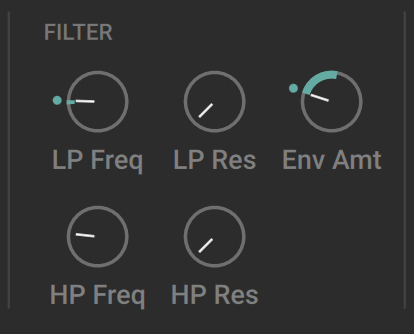 |
LP Freq: Adjusts the cutoff frequency of the low-pass filter.
LP Res: Adjusts the resonance of the low-pass filter.
Env Amt: Adjusts how much the cutoff frequency of the low-pass filter will be influenced by the filter envelope defined in the Envelope area.
HP Freq: Adjusts the cutoff frequency of the high-pass filter.
HP Res: Adjusts the resonance of the high-pass filter.
Envelope area
The Envelope area lets you configure an envelope for the amplification and another envelope for the low-pass filter. It contains the following elements:
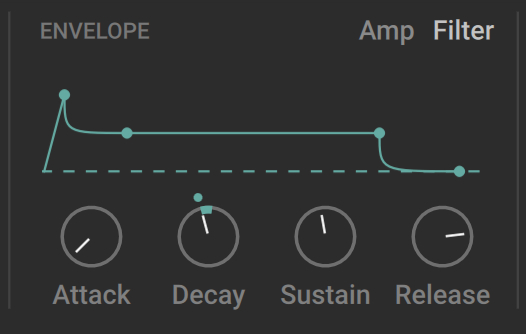 |
Amp/Filter switch: Switches between the amplitude envelope (Amp) and the filter envelope (Filter). The other controls in the Envelope area will affect the envelope selected here.
Envelope Display: Shows an overview of the envelope. The four segments of the shape correspond to the four controls below. You can configure the envelope either by dragging the segments on the display or adjusting the controls below.
Attack: Adjusts the time taken for the level to increase from zero to its maximum.
Decay: Adjusts the time taken for the level to decrease from its maximum to the sustain level.
Sustain: Adjusts the level maintained until the key is released.
Release: Adjusts the time taken for the level to decrease to zero once the key has been released.