Setting Up Your Keyboard
This section provides basic setup information for using your Kontrol S-Series MK3 keyboard in different situations.
This section provides basic setup information for using your keyboard in different situations: with the stand-alone Kontakt software, the stand-alone Komplete Kontrol software, or with any of them loaded as plug-in within a DAW.
Connecting the Keyboard to Your Computer
To connect the Kontrol MK3 keyboard to your computer:
Attach the round, barrel-style end of the included USB-C cable to the HOST USB-C socket on the rear panel of your keyboard.

Attach the other end of the included USB-C cable to an available USB-C port on your computer.
Press the ON switch on the rear panel of the keyboard to switch it on.
The keyboard is now detected by the operating system.
Note
You can also connect your keyboard to a USB-C hub. In this case, make sure that the USB-C port on your hub is identified to transfer both power and data. If in doubt, refer to the documentation of your USB-C hub.
Connecting the Keyboard to a Computer Without USB-C
If your computer only has USB-A ports, you will need the following additional items (not included):
A USB-C female to USB-A male adapter/cable
A USB-C power supply (5 V, 7.5 W or higher, 1.5 A or higher) with its own USB-C cable.
To connect the keyboard to your computer, do the following:
Attach the round, barrel-style end of the included USB-C cable to the HOST USB-C socket on the rear panel of your keyboard.
Attach the other end of the included USB-C cable to the USB-C to USB-A adapter/cable.
Attach the USB-C to USB-A adapter/cable to an available USB-A port on your computer.
Attach the USB-C power supply to the flat, power-only USB-C socket on the rear panel of your keyboard.

Plug the USB-C power supply into the wall outlet.
Press the ON switch on the rear panel of the keyboard to switch it on.
The keyboard is now detected by the operating system.
Connecting Pedals to the Keyboard
The Kontrol MK3 keyboard provides four pedal inputs (in the form of 1/4" sockets) on its rear panel: SUSTAIN, EXPRESSION, ASSIGN 1, ASSIGN 2.

The pedal inputs on the rear panel of the keyboard.
All four pedal inputs allow you to connect either a continuous or a switch pedal in order to further refine your performance. You can precisely configure the behavior and the MIDI message assigned to each pedal in the keyboard settings.
Connecting External MIDI Devices to the Keyboard
The Kontrol MK3 keyboard has dedicated MIDI sockets that allow you to directly connect other MIDI devices using a 5-pin DIN MIDI cable. You can select the corresponding ports in your MIDI software and use the keyboard as a MIDI interface, or use the keyboard as a stand-alone MIDI controller.

The MIDI sockets on the rear panel of the Kontrol MK3 keyboard.
To connect your external MIDI devices:
Connect the device receiving MIDI signals to the MIDI OUT socket on the rear panel of the keyboard using a 5-pin DIN MIDI cable.
Connect the device sending MIDI signals to the MIDI IN socket on the rear panel of the keyboard using a 5-pin DIN MIDI cable.
The MIDI device is connected.
Additional configuration might be required in the software depending on how you want to use the MIDI devices connected to your keyboard, as described below.
Using the Keyboard as a MIDI Interface
You can use the keyboard as a MIDI interface to send and receive MIDI on your computer.
If the connected software (Kontakt or Komplete Kontrol) is running as a stand-alone application, you need to open the MIDI page in the Options dialog (Kontakt) or in the Preferences (Komplete Kontrol), and activate there the MIDI input/output corresponding to the MIDI socket(s) that you want to use on the rear panel of the keyboard:
MIDI input: The MIDI IN socket on your keyboard appears in your software as KONTROL S[xx] MK3 (MIDI) (macOS) or MIDIIN3 (KONTROL S[xx] MK3) (Windows).
MIDI output: The MIDI OUT socket on your keyboard appears in your software as KONTROL S[xx] MK3 (MIDI) (macOS) or MIDIOUT3 (KONTROL S[xx] MK3) (Windows).
If the connected software is running as a plug-in in a DAW, the MIDI configuration is managed by the DAW: You need to activate in your DAW the MIDI input/output corresponding to the MIDI socket(s) that you want to use on the rear panel of the keyboard:
MIDI input: The MIDI IN socket on your keyboard appear in your software as KONTROL S[xx] MK3 (MIDI) (macOS) or MIDIIN3 (KONTROL S[xx] MK3) (Windows).
MIDI output: The MIDI OUT socket on your keyboard appear in your software as KONTROL S[xx] MK3 (MIDI) (macOS) or MIDIOUT3 (KONTROL S[xx] MK3) (Windows).
For more information, refer to the documentation of your DAW.
Using the Keyboard as a Stand-alone MIDI Controller
You can also use the keyboard as a stand-alone MIDI controller: MIDI data is then directly sent and received via the keyboard’s MIDI IN and MIDI OUT sockets. For more information, refer to MIDI Mode.
Setting Up Stand-alone Applications
When you launch the Kontakt or Komplete Kontrol software from its installation directory, it starts as a stand-alone application independently from a DAW.
By default, the application uses the standard audio interface of your computer. In order to use another audio interface, and receive MIDI data from the keyboard, you need to configure the application as described in the following sections.
Setting Up the Stand-alone Kontakt Application
Configuring the Audio Interface in Kontakt
In Kontakt, do the following:
Click the gear icon in the Header to open the Options dialog.
Click Audio to display the Audio page.
Select the hardware driver supported by your audio interface from the Driver drop-down menu.
Select the audio interface from the Device drop-down menu.
The first two outputs of your audio interface are by default assigned to the main outputs of Kontakt.
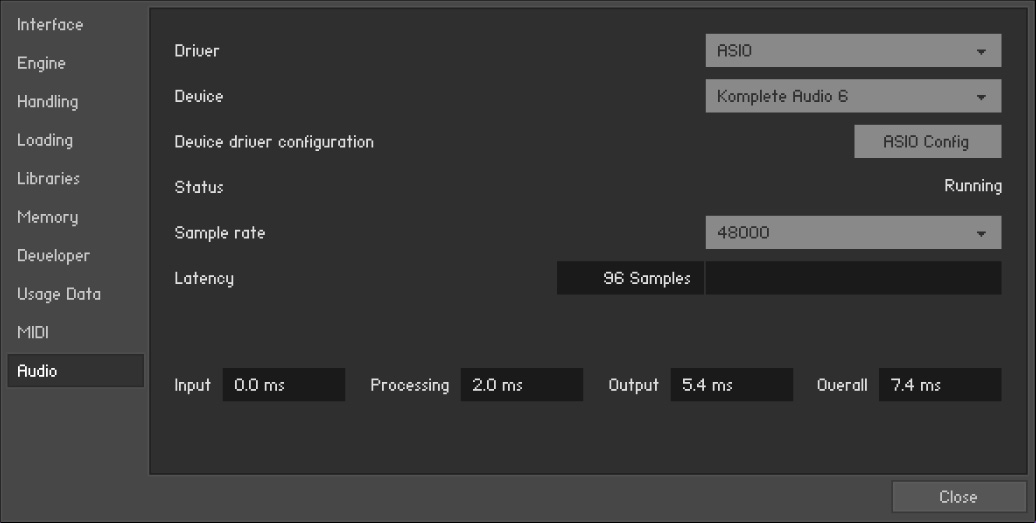 |
Options dialog – Audio page.
Note
You can configure more advanced audio routing in the Outputs section of Kontakt. For more information, refer to the Kontakt documentation.
Enabling MIDI Control in Kontakt
In Kontakt, do the following:
Click the gear icon in the Header to open the Options dialog.
Click MIDI to display the MIDI page.
Click Inputs to display the available devices for incoming MIDI signals.
In the KONTROL S[xx] MK3 row, click the Off label in the Status column and select the desired port from Port A–D.
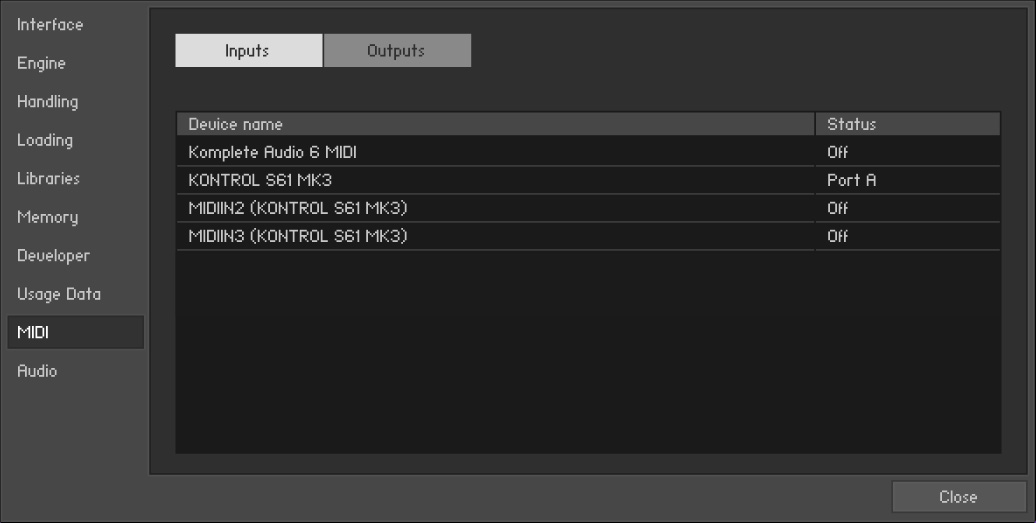 |
Options dialog – MIDI page (entries may vary on your computer).
Note
This procedure activates incoming MIDI notes that you play on the keyboard. If you wish to activate MIDI signals coming from the MIDI IN socket on the rear panel of the keyboard, you have to change the corresponding status in the KONTROL S[xx] MK3 (MIDI) row (macOS) or in the MIDIIN3 (KONTROL S[xx] MK3) row (Windows). For more information on using the MIDI IN and MIDI OUT sockets on the rear panel of your keyboard, refer to Connecting External MIDI Devices to the Keyboard.
Setting Up the Stand-alone Komplete Kontrol Application
Configuring the Audio Interface in Komplete Kontrol
In the Komplete Kontrol software, do the following:
In the Komplete Kontrol menu click Edit > Preferences to open the Preferences.
Click Audio to display the Audio page.
Select the hardware driver supported by your audio interface from the Driver drop-down menu.
Select the audio interface from the Device drop-down menu.
Under Routings, select the left and right output channels that you want to use for Komplete Kontrol’s master output in the Komplete Kontrol Out 1 L and Komplete Kontrol Out 1 R drop-down menus.
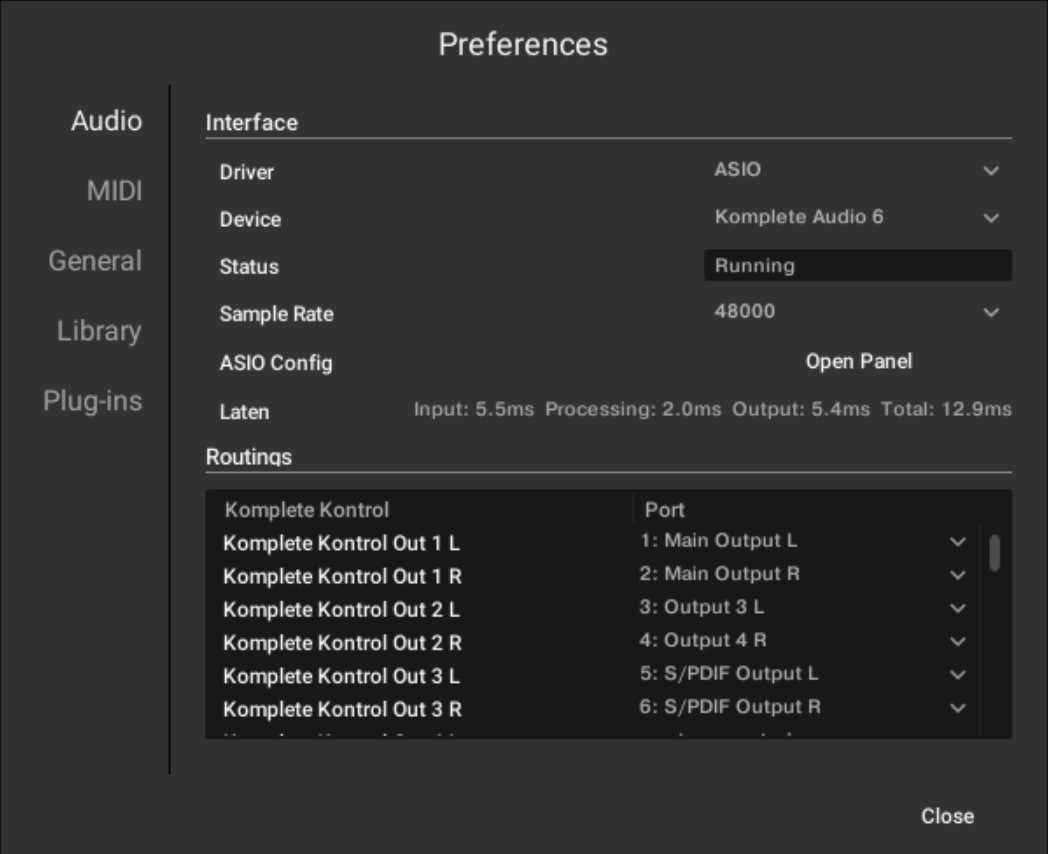 |
Preferences panel – Audio page.
Enabling MIDI Control in Komplete Kontrol
In the Komplete Kontrol software, do the following:
In the Komplete Kontrol menu click Edit > Preferences to open the Preferences.
Click MIDI to display the MIDI page.
Click Input in the Devices section to display the available devices for incoming MIDI signals.
Click the KONTROL S[xx] MK3 checkbox to activate incoming MIDI signals from the keyboard.
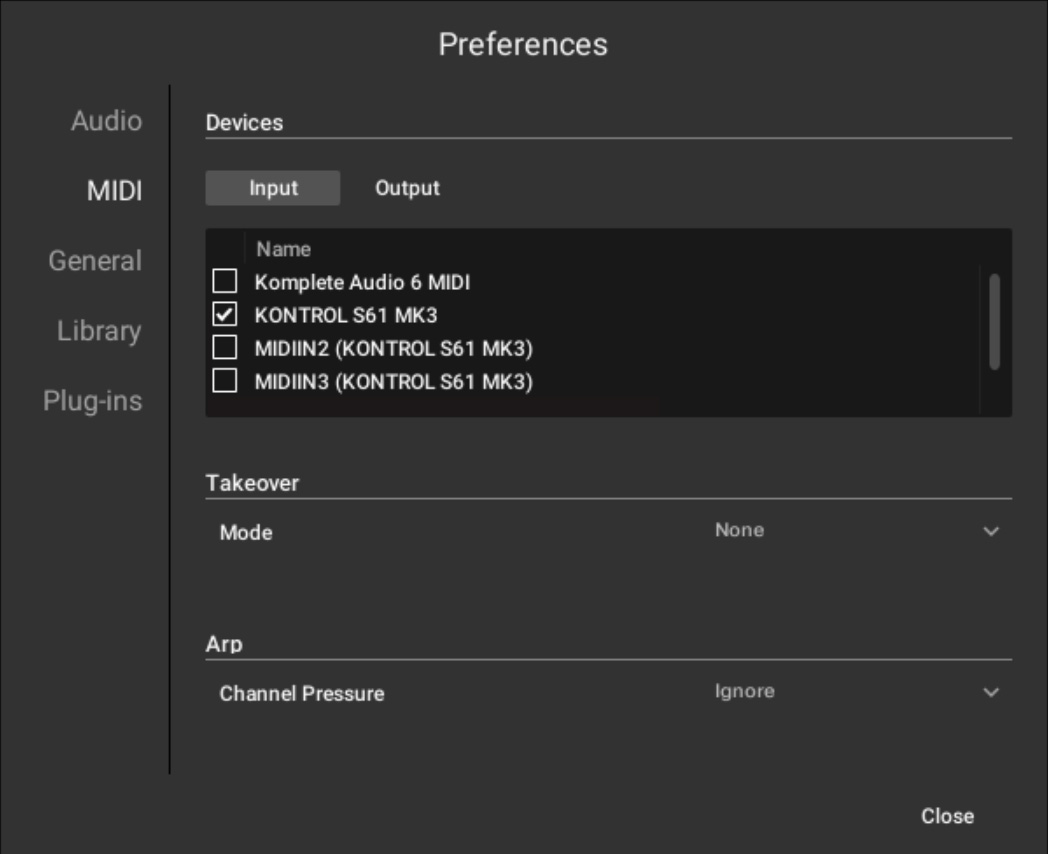 |
Preferences panel – MIDI page (entries may vary on your computer).
Note
This procedure activates incoming MIDI notes that you play on the keyboard. If you wish to activate MIDI signals coming from the MIDI IN socket on the rear panel of the keyboard, you have to click the KONTROL S[xx] MK3 (MIDI) checkbox (macOS) or the MIDIIN3 (KONTROL S[xx] MK3) checkbox (Windows). For more information on using the MIDI IN and MIDI OUT sockets on the rear panel of your keyboard, refer to Connecting External MIDI Devices to the Keyboard.
Setting Up DAW Control
You can set up the Kontrol MK3 keyboard to integrate with a number of DAWs, enabling you to control the transport, track selection, and mixer in your DAW directly from the keyboard’s Control section.
The Kontrol MK3 keyboard integrates with the following DAWs:
Apple Logic Pro: For information about setting up the keyboard for DAW control in Apple Logic Pro, refer to Setting Up Apple Logic Pro.
Ableton Live: For information about setting up the keyboard for DAW control in Ableton Live, refer to Setting Up Ableton Live.
Steinberg Cubase and Nuendo: For information about setting up the keyboard for DAW control in Steinberg Cubase/Nuendo, refer to Setting Up Steinberg Cubase and Nuendo.
Tip
For information about integration with other DAWs, refer to the following article in our Knowledge Base: How to Integrate Your Kontrol Keyboard with Your DAW
Setting Up Apple Logic Pro
Before you can control DAW functions in Apple Logic Pro from the keyboard, you must confirm its automatic configuration as a control surface.
To set up the keyboard for DAW control in Apple Logic Pro:
Connect the Kontrol MK3 keyboard to the computer and make sure it is switched on.
Launch the Apple Logic application on your computer.
When asked for confirmation if you want to automatically assign controls of KONTROL S[xx] MK3, click Auto Assign.
You can now use your keyboard to control DAW functions in Apple Logic Pro.
Note
For information about the DAW functions and how they are mapped to the controls on your keyboard, refer to DAW Integration in Apple Logic Pro.
Setting Up Ableton Live
Before you can control DAW functions in Ableton Live from the keyboard, you must configure it as a control surface in the Ableton Live Preferences.
To set up the keyboard for DAW control in Ableton Live:
Connect the Kontrol MK3 keyboard to the computer and make sure it is switched on.
Launch the Ableton Live application on your computer.
In Ableton Live, open the Preferences and go to the Link/MIDI tab.
Select Kontrol MK3 from the Control Surface drop-down menu in an unused control surface slot.
Select KONTROL S[xx] MK3 (DAW) (macOS) or KONTROL S[xx] MK3 (Port 2) (Windows) from the Input drop-down menu in the same control surface slot.
Select KONTROL S[xx] MK3 (DAW) (macOS) or KONTROL S[xx] MK3 (Port 2) (Windows) from the Output drop-down menu in the same control surface slot.
Note
For information about the DAW functions and how they are mapped to the controls on your keyboard, refer to DAW Integration in Ableton Live.
Setting Up Steinberg Cubase and Nuendo
Before you can control DAW functions in Steinberg Cubase/Nuendo from the keyboard, you must configure it as a device in the Steinberg Cubase/Nuendo Studio Setup.
To set up the keyboard for DAW control in Steinberg Cubase/Nuendo:
Connect the Kontrol MK3 keyboard to the computer and make sure it is switched on.
Launch the Steinberg Cubase/Nuendo application on your computer.
In Steinberg Cubase/Nuendo, open the Studio Setup from the Studio menu.
Click the + button in the upper left corner of the Studio Setup and select Kontrol MK3 from the drop-down menu.
Set MIDI Input for Kontrol MK3 to KONTROL S[xx] MK3 (DAW) (macOS) or MIDIIN2 (KONTROL S[xx] MK3) (Windows).
Set MIDI Output for Kontrol MK3 to KONTROL S[xx] MK3 (DAW) (macOS) or MIDIOUT2 (KONTROL S[xx] MK3) (Windows).
You can now use your keyboard to control DAW functions in Steinberg Cubase/Nuendo.
Note
For information about the DAW functions and how they are mapped to the controls on your keyboard, refer to DAW Integration in Steinberg Cubase and Nuendo.