Managing Sounds, Groups, and your Project
Sounds, Groups, and the Master bus make up the general structure of any Maschine project. This section explains in detail how to manage these concepts.
This chapter explains how to handle the various objects that structure any Maschine Project: Sounds, Groups, and the Master.
Overview of the Sounds, Groups, and Master
In a Maschine Project, objects are organized into three hierarchic levels, from the lowest to the highest:
Sounds are played by the pads. They are loaded into Sound slots. In the software, in Arrange view Sound slots are displayed in the column at the left of the Pattern Editor: the Sound List (1). Each Sound of the selected Group is by default mapped to one of the 16 pads on the Maschine hardware controller, so you can play all Sounds of a Group by pressing the pads. Sounds are made up of any number of Plug-ins that process the audio in series. Sounds are the only objects in Maschine that can accept Instrument Plug-ins — these go in the Sounds’ first Plug-in slot. The type of the Plug-in (Instrument or Effect) loaded in this first Plug-in slot will define the Sound’s role (audio source or bussing point, respectively). For more information on Plug-ins and how they define the Sound’s role, please refer to section Plug-in overview.
Groups contain 16 Sound slots each with all their parameters. The 16 pads on your controller can play one entire Group at a time. In the software, in Arrange view Group are displayed in the column at the left of the Arranger: the Group List (2). A Maschine Project can have any number of Groups, which are organized in banks of eight Groups each. Each Group can have any number of insert effects, which will globally apply to all Sounds contained in that Group, as well as any number of Patterns organized in banks of 16 Patterns each. More on Patterns in chapter Working with Patterns and Clips.
The Master is the place where all signals from the Groups are being mixed together. Just like the Groups and Sounds, the Master can host any number of insert effects.
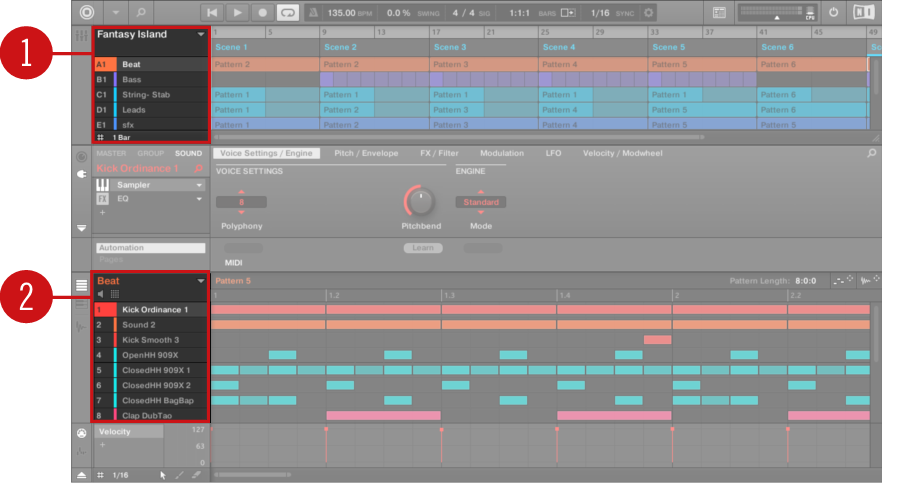
The Group List (1) and the Sound List (2) in the Arrange view of the software.
The Sound, Group, and Master channels
From an routing point of view, each Sound, each Group, and the Master represents a distinct channel in Maschine. The channels of the 16 Sounds in a Group are mixed together and sent to the Group channel, where their sum will be processed by the Group’s Plug-ins, if any. Similarly, the channels of all Groups in your Project are mixed together and sent to the Master channel, where their sum will be processed by the Master’s Plug-ins, if any. The resulting signal is sent to Maschine’s audio outputs.
Each channel provides various set of Channel properties that adjust the input, output, groove, and Macro Control settings for that particular Sound, Group, or for the Master, independently of the Plug-ins it contains. Please refer to chapter Audio routing, remote control, and Macro Controls and section Groove for more details on these.
When the software is in Mix view, Sounds, Groups, and the Master are represented by channel strips in the Mixer. This view provides you with an intuitive control on both the audio and MIDI routings of any Sound, Group, and the Master. Please refer to section The Mixer for more information.
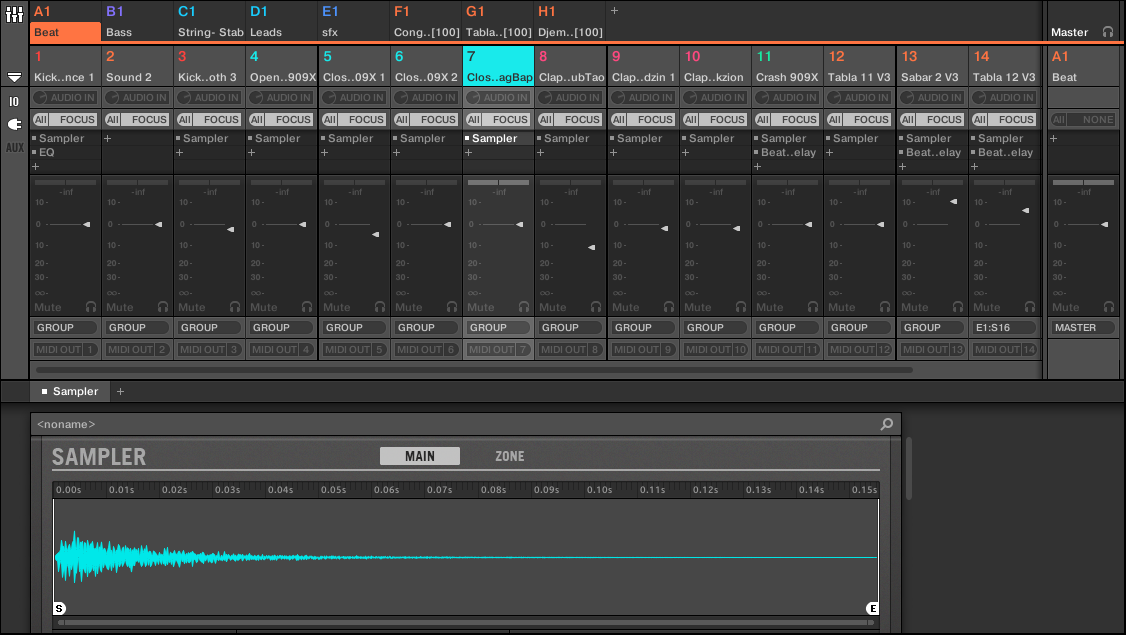
The Mixer displaying the channel strips for all Sounds in a Group.
Similarities and differences in handling Sounds and Groups
Sounds and Groups are handled in very similar ways — see section Managing Sounds and Managing Groups below for all details. These are the main differences between both:
In each Group you always have a fixed number of Sound slots — namely 16. Some of these Sound slots might be empty, and you can have gaps in your slots (i.e. some empty Sound slots between other slots containing Sounds), depending on how you prefer to play your Sounds from your pads. You cannot create Sound slots, but instead you can load/unload Sounds to/from the 16 existing Sound slots in each Group.
In your Project you can have any number of Groups. You can create, fill up, and delete Groups as you see fit. If you delete a Group, all following Groups are shifted up in the Group List to fill the gap. If you use more than eight Groups, another Group bank is automatically created.
Selecting multiple Sounds or Groups
In Maschine you can select multiple Sounds or multiple Groups at once. This notably allows you to change a parameter value for all selected Sounds/Groups at a time.
To achieve this, Maschine distinguishes the “focus” from the “selection”:
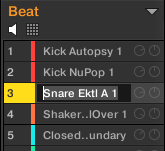
The focus determines what is displayed in the Control area and on your controller. For example, by clicking a Sound in the Sound List you are putting the focus on that Sound, and the Control area and your controller will display its parameters (Channel properties, Plug-ins, etc.). For the focus, the following rule applies:At each level (Sound and Group) there is always one object, and only one, in focus.The focused object is highlighted in the Sound/Group List, and the background of its leading letter and/or number has the color of the object itself.
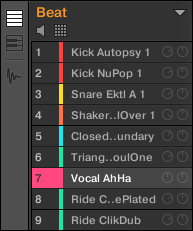
The Sound Vocal AhHa is focused (and selected).
The selection determines what will be affected by your actions (e.g., adjusting a parameter). For example, the focused Sound (the one you clicked in the Sound List) is implicitly selected — nothing special here: This just means that the Sound whose parameters are currently displayed will be affected by the changes you do on these parameters. But you can select additional objects on top of the focused object, thereby extending your selection. Selected objects are highlighted in the Sound/Group List, but their leading letter and/or number stays gray if they are not in focus.
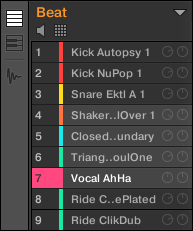
Other Sounds were added to the selection (but they are not in focus).
Notice
You cannot select Sounds and Groups simultaneously.
Each Group remembers its own Sound selection and focus.
When setting the focus to a new Sound or Group, following rules apply:
If you set the focus to a Sound or Group which is not selected, both the focus and the selection are moved to this new Sound or Group.
If you set the focus to a Sound or Group which is already included in the current selection, the focus is moved to this new Sound or Group but the selection is preserved. This notably allows you to check the parameters of any selected Sound or Group while keeping the ability to modify parameters for the entire selection.
What is affected by the multiple selection, and how?
When multiple Sounds or multiple Groups are selected, the following changes to the focused Sound or Group will be mirrored in the other selected Sounds or Groups, respectively:
Channel properties: Parameter adjustments apply to all selected Sounds/Groups for any parameter in any set of Channel properties. Refer to Audio routing, remote control, and Macro Controls for more information on the Channel properties.
Plug-ins: Parameter adjustments apply to all selected Sounds/Groups that have the same Plug-in loaded in the same Plug-in slot. Refer to Working with Plug-ins for more information on Plug-ins.
Pad view: Base key, Choke group, and Link group settings apply to all selected Sounds. Refer to Adjusting the Sound trigger and playback for more information on these settings.
You can change the color of multiple Sounds or Groups at once. Refer to Changing the Sound color and Changing the Group color for more information.
You can cut/copy/paste multiple Sounds or Groups. Refer to Copying and pasting Sounds and Copying and pasting Groups for more information.
You can move multiple Sound slots or multiple Groups at once. Refer to Moving Sounds and Reordering Groups for more information.
You can reset multiple Sound slots and delete multiple Groups at once. Refer to Resetting Sound slots and Deleting Groups for more information.
Notice
The adjustments made in the Assignment area are never mirrored in any other selected Sound/Group.
Furthermore, the exact influence on the equivalent parameter in the affected Sounds/Groups depends on the type of parameter:
Continuous parameters (knob): the values in all selected Sounds/Groups are incremented/decremented by the same amount as the value in the focused Sound/Group. Values are clipped when they reach their range limit.
Discrete parameter (button or selector): the values in all selected Sounds/Groups are set to the value of the focused Sound/Group.
Selecting multiple Sounds or Groups on the controller
You can select multiple Sounds or Groups by using the Select mode:
Press and hold SELECT to enter Select mode. You can also press SELECT + Button 1 to pin this mode and make it permanent.
You are ready to select more than one Sound or Group.

Selecting Sounds and Groups via the Select mode
You have the following selection tools at your disposal:
Selection Tool | Description |
|---|---|
Pads | Press any pad to set the focus to that particular Sound slot. The pad lights up to indicate that the Sound slot is focused (and selected). Unlit pads indicate unselected, empty Sound slots, and half-lit pads indicate unselected Sounds. The selection behavior depends on the state of the MULTI option (Button 8, refer to below). |
Group buttons A–H | Press any Group button to set the focus to that particular Group in the current Group bank. The button lights up to indicate that the Group is focused (and selected). Unlit Group buttons cannot be pressed (they don’t correspond to any existing Group), and half-lit Group buttons indicate unselected Groups. The selection behavior depends on the state of the MULTI option (Button 8, refer to below). |
Button 3/4 (PREV/NEXT) | Selects the previous/next Group bank. |
Button 5 (ALL) | Selects all Sounds in the current Group without changing the focus. |
Button 6 (NONE) | Deselects all Sounds in the current Group except the focused Sound. |
Button 8 (MULTI) | Activated/deactivates the multiple selection mode. Toggling this option does nothing to the current focus nor selection but changes the behavior of the selection process, refer to below. |
The MULTI option (Button 8) switches between single and multiple selections:
When MULTI is deactivated (Button 8 off):
Pressing the Group button/pad of an unselected Group/Sound sets the focus to that Group/Sound and clears the current Group/Sound selection (only the focused Group/Sound is then selected). The Group button/pad lights up.
Pressing the Group button/pad of a selected Group/Sound only sets the focus to that Group/Sound without changing the current Group/Sound selection. The Group button/pad stays fully lit.
When MULTI is activated (Button 8 on):
Pressing the Group button/pad of an unselected Group/Sound adds it to the current Group/Sound selection without changing the current focus. The Group button/pad lights up.
Pressing the Group button/pad of a selected Group/Sound unselects it unless it is the focused Group/Sound. The Group button turns half-lit; the pad turns half-lit (if it contains a Sound) or off (if it is empty).
Managing Sounds
This section describes how to manage the Sounds and Sound slots in the focused Group.
Sound List or Pad view
Most of the procedures described in the following sections are available both in the Sound List and in the Pad view. The Pad view is an alternative representation of your Sound slots that puts emphasis on their relationship with the pads on your controller. You can select Sound slots in either the Sound List or the Pad view as you see fit, both selections are strictly equivalent. For more information, refer to The Pad view.
Note
The Pad view provides additional settings affecting the playback behavior of the Sound slots. For more information, refer to Adjusting the Sound trigger and playback.
The Pad view
The Pad view provides an alternative, pad-oriented view of your Sound slots. In addition it lets you adjust the triggering and playback behavior of the Sound slots.
The Pad view is activated via the Pad View button above the Sound List in the Pattern Editor:
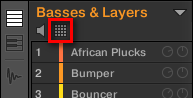
The Pad View button.
Click the Pad View button to show or hide the Pad view.
When you turn on the Pad View button, the Pad view replaces the Sound List below:
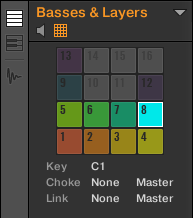
The Pad view replaces the Sound List.
At the top of the Pad view, the grid of pads 1–16 gives you access to all Sound slots of the current Group. The focused pad is fully lit; other pads containing a Sound are dim lit; empty pads are off. The following actions are available in the grid:
Click any pad to select the corresponding Sound slot. Each pad mirrors the Sound slot’s color. Grayed out pads indicate empty Sound slots. The parameters below show the settings for the selected Sound slot(s).
Drag and drop a pad to move it to another location in the grid. This is strictly equivalent to moving Sound slots in the Sound List. For more information, refer to Moving Sounds.
Right-click ([Ctrl]-click on macOS) any pad to open the same context menu as in the Sound List. For more information on the available commands, refer to Managing Sounds.
Notice
You can select multiple pads in the grid of pads as you can in the Sound List, and adjust parameters in the Pad view and in the Control area for all of them at once. For more information on multiple selection, refer to Selecting multiple Sounds or Groups.
Under the grid of pads, a few parameters let you modify how the Sound slots’ playback should react to your input and to other Sound slots. Refer to Adjusting the Sound trigger and playback for more information.
Loading Sounds
You can load a ready-made Sound from the Browser or from your operating system. The Sound can be included in the factory library of Maschine or any Expansion, but it can also be a Sound you have created yourself and saved for later use.
Auditioning Sounds
You can audition the Sounds of the focused Group as you bring them into focus in the software. To do this:
Click the speaker button above the Sound List (or the Pad view) to activate or deactivate Sound auditioning in the focused Group:
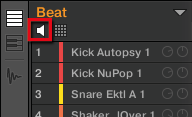
When the speaker button is active, each time you set the focus on a Sound by clicking it in the Sound List or in Pad view, this Sound will be played back. This is useful as quick reminder of the various Sounds loaded in the Group.
Notice
Sounds cannot be moved within the Sound List when Audition (speaker button) is switched on.
Note
The speaker button also controls the note preview in the Pattern Editor’s Event area. For more information, refer to Auditioning notes.
Adjusting the Sound trigger and playback
You can modify how the Sound in each slot should react to your input, to the events in your Patterns, and to other Sound slots’ playback:
The base key defines the default pitch of the Sound(s). Refer to Adjusting the base key.
Choke groups let you selectively cancel Sounds when other Sounds are triggered. Refer to Using Choke groups.
Link groups let you trigger multiple Sounds by hitting only one pad or from single notes in your Patterns. Refer to Using Link groups.
Adjusting the base key
By default, the base key of every Sound slot is C3 (i.e. middle C in the Maschine convention).
Changing the base key only affects the events created afterwards: The events already recorded in your Patterns are not affected. For more information on adjusting the key of the events in Patterns, refer to Editing events.
Tip
You can select multiple Sound slots and quickly change the base key for all of them at once. Refer to Selecting multiple Sounds or Groups for more information.
Using Choke groups
Choke groups allow you to build sets of “mutually exclusive” Sounds: For Sounds within a Choke group, each newly triggered Sound will mute the audio of the other Sounds already playing. This is a behavior that you can find in vintage drum machines (typically used to “choke” the open hi-hat with the closed one), but also in monophonic synthesizers that are only capable of playing one note at a time.
Within a Group, each Sound slot can be assigned to one of eight Choke groups. When you assign a Sound slot to a Choke group, you can set it to Send or Receive:
A Sound slot set to Send (default setting) will mute the other Sounds in the Choke group.
A Sound slot set to Receive will not mute any other Sound in the Choke group, but it will be muted by other Sound slots set to Send within the Choke group.
You may set more than one Sound slot to Send or Receive within the same Choke group. You can also select multiple Sound slots and quickly assign them to a particular Choke group at once.
Choke groups modify the Sounds’ playback behavior relative to other Sounds in the Group. For this reason, their configuration is saved together with the Group and not within each individual Sound.
Note
Choke groups affect the notes you play on the pads, the notes triggered by the Patterns, and the MIDI notes controlling your Sounds.
Tip
The Hi-hat is an ideal candidate for making use of Choke groups: By setting the closed and open hi-hat Sounds to the same Choke group with the closed hi-hat set to Send mode, any sounding open hi-hat will be interrupted by the next closed hi-hat, as on a real drum set.
Using Link groups
Link groups allow you to link Sounds with each other, so that you can trigger multiple Sounds from single notes or by hitting only one pad.
Within a Group, each Sound slot can be assigned to one of eight Link groups. When you assign a Sound slot to a Link group, you can set it to Send or Receive:
A Sound slot set to Send (default setting) will trigger other Sounds in the Link group.
A Sound slot set to Receive will only trigger itself, but it will be triggered by other Sound slots set to Send within the Link group.
You may set more than one Sound slot to Send or Receive within the same Link group. You can also select multiple Sound slots and quickly assign them to a particular Link group at once.
Link groups modify the Sounds’ triggering behavior relative to other Sounds in the Group. For this reason, their configuration is saved together with the Group and not within each individual Sound.
Note
Link groups affect the notes you play on the pads, the notes triggered by the Patterns, and the MIDI notes controlling your Sounds.
Notice
Link groups are a “live” feature: They only affect the note triggers. In Record mode, Link groups don’t create additional notes in your Patterns: the notes will not be recorded for the linked Sounds. This allows you to modify your Link group assignments after recording. If you want to copy the notes from one Sound to another Sound in Patterns, refer to Editing events.
Adjusting the Key, Choke, and Link parameters for multiple Sounds
In the software, if you select multiple Sounds with different Key, Choke and/or Link values, the corresponding parameters in Pad view display MULTI. On your controller with PAD MODE active, the corresponding parameters display (MULTI).
You can adjust these parameters for the selected Sounds as described below.
Adjusting the base key for multiple Sounds with different Key values
Click and drag the MULTI label next to Key to transpose the base key of all selected Sounds. While dragging, the field displays a +/-x value indicating the transposition that will apply to all Sounds as you release the mouse button.

Sound slots 1 to 4 are selected. If they have different Key values, a MULTI label appears (left). When you drag it (middle), a transpose value appears (right) that will be applied to all selected Sounds when you will release the mouse button.
This is also true when adjusting the parameter from your controller.
Adjusting the Choke or Link group for multiple Sounds with different Choke or Link groups
Click the MULTI label next to Choke or Link and select the desired value from the list to set all selected Sounds to that same Choke or Link group, respectively. This also applies to the Send/Receive setting next to it.
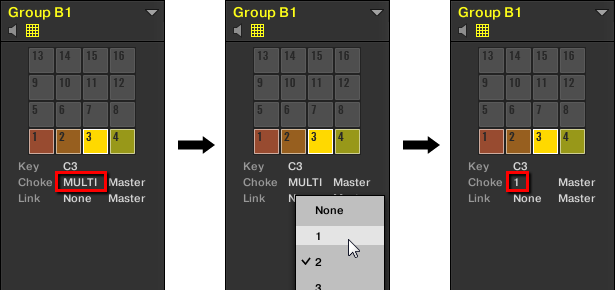
Sound slots 1 to 4 are selected. If they have different Choke values, a MULTI label appears (left). When you click it and select a new Choke or Link group from the list (middle), this new group is applied to all selected Sounds.
This is also true when adjusting the parameter from your controller.
Renaming Sound slots
By default, Sound slots are named Sound 1–16. If you load a Sound, a Plug-in preset or a Sample (e.g., from the Browser) into the Sound slot, the Sound slot takes the Sound’s, preset’s or Sample’s name. You can rename Sound slots to your liking.
Naming is only available from within the software, but any changes will also show up on your controller.
To rename a Sound slot:
Double-click the name of the desired Sound slot or right-click ([Ctrl]-click on macOS) the Sound slot and select Rename from the context menu.The Sound slot’s name is now highlighted and editable.
Modify the name of the Sound slot via your computer keyboard. Press [Enter] on your computer keyboard to confirm.
Notice
If you use Maschine as a plug-in, some hosts will utilize the [Enter] key, as it is mapped to some function of the host software. In this case, click anywhere else in the Maschine plug-in window to confirm the name you have entered.
Changing the Sound color
You can change the color of each individual Sound.
To change the color of a Sound:
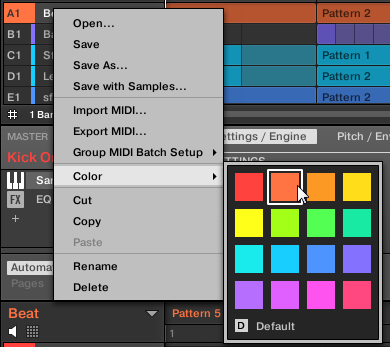
Right-click ([Ctrl]-click on macOS) the desired Sound slot in the Sound List or in the Pad view and select Color from the context menu. A Color Palette appears. In the Palette, the current color of the Sound is highlighted.
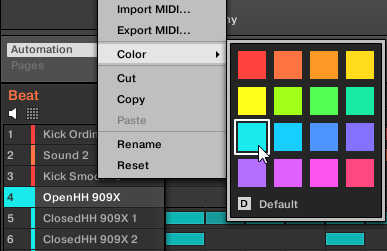
Select the desired color in the Palette. You can also choose to set the Sound back to the default color corresponding to its position in the list by selecting Default in the Color Palette.
Changing the color of multiple Sounds
When multiple Sounds are selected and you open the Color Palette in order to choose a new color for the selected Sounds:
If the selected Sounds have the same color (any particular color or the default color), this color is highlighted in the Color Palette.
If the selected Sounds have different colors, no color is highlighted in the Color Palette.
Refer to Selecting multiple Sounds or Groups for more information on multiple selection.
Notice
By default Sounds inherit the color of their Group. But you can choose another default color for Sounds in Preferences > Colors > Sound Default. See section Preferences – Colors page for more information.
Tip
Once you have set a custom color for a Sound, the Sound will retain its color when you move it in the Sound List, and the color will be stored with the Sound when you save the Sound for later use. Note that you can select the same color as the one used by default: In that case the color (even unchanged) will be considered as a custom color and will follow the Sound as you move it.
Saving Sounds
You can save your Sounds as individual files (extension “.mxsnd”). This can be only done in the software.
Saving your modifications into the original Sound file
If you have made changes to a Sound loaded in your Project, you can save your modifications as follows:
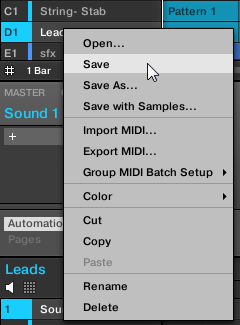
Right-click (on macOS: [Ctrl]-click) the Sound slot in the Sound List or in the Pad view and select Save from the context menu:
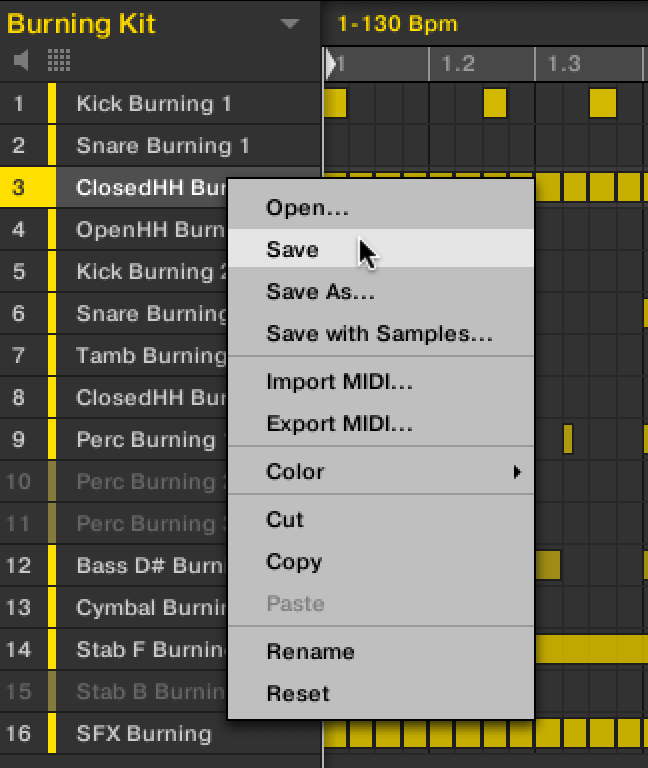
Your modifications are saved to the Sound file.
Tip
Even if you don’t save a Sound individually, its current settings will still be saved with your Project. But once a Sound is saved and tagged, it is available in the Browser for use in other Groups and Projects.
You cannot save changes to factory files as these files are read-only. If you run the Save command on a factory file, it automatically turns into the Save As… command: a Save Sound dialog opens and lets you save your modified Sound to your user library. Refer to the next paragraph for more details. The same happens with Sounds you have built from scratch.
Saving your modifications as a new Sound
If you want to save the modifications you have made to a Sound originating from a factory library, or if you don’t want to overwrite the original Sound with your modified version, or if there is no original version of your Sound (i.e. you built it from scratch), you can save it as a new Sound file:
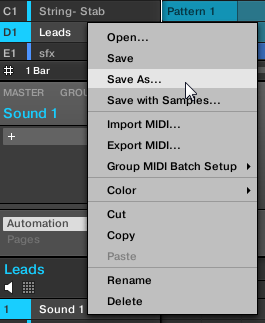
Right-click (on macOS: [Ctrl]-click) the Sound slot in the Sound List or in the Pad view and select Save As… from the context menu:
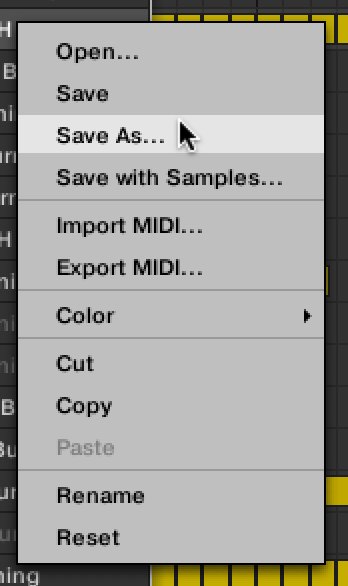
A Save Sound dialog appears. By default, the Sound file inherits the name of its Sound slot and it will be saved in your Standard User Directory (as defined in Preferences > Library > User, refer to Preferences – Library page for more information).
If you wish, choose another path and/or type another name with your computer keyboard.
Press [Enter] to confirm and close the Save Sound dialog.
Your Sound is now saved. The Sound will be added to the user library and is ready to be tagged in the Browser. Refer to Editing the files’ tags and properties for more information.
Tip
Even if you don’t save a Sound individually, its current settings will still be saved with your Project. But once a Sound is saved and tagged, it is available in the Browser for use in other Groups and Projects.
Saving your Sound with its Samples
You can save your Sounds with Samples. This is very useful if you want to save Sounds for use in other Projects or share Sounds including their Sample files with other Maschine users. It can also be beneficial to save Sounds with Samples when creating instruments using the Auto Sampler. Refer to Auto Sampler.
To save a Sound with its Samples:
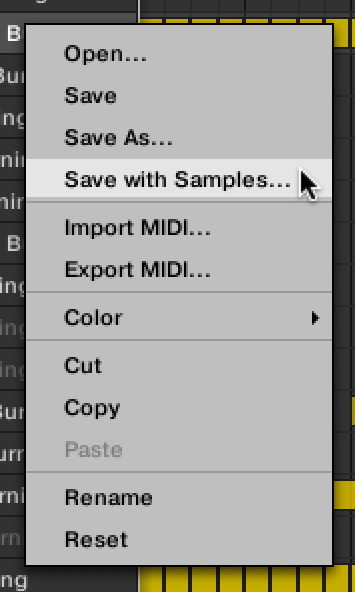
Right-click (on macOS: [Ctrl]-click) the Sound slot in the Sound List or in the Pad view and select Save with Samples... from the context menu:
A Save Sound dialog appears. By default, the Sound file inherits the name of its Sound slot and it will be saved in your Standard User Directory (as defined in Preferences > Library > User, refer to section Preferences – Library page for more information).
If you wish, choose another path and/or type another name with your computer keyboard.
Press [Enter] to confirm and close the Save Sound dialog.
Your Sound is now saved. The Sound will be added to the user library and is ready to be tagged in the Browser. Refer to Editing the files’ tags and properties for more information.
Copying and pasting Sounds
You can copy and paste Sounds across Sound slots (and thereby across pads) and across Groups in your Project.
To copy and paste Sounds in the software:
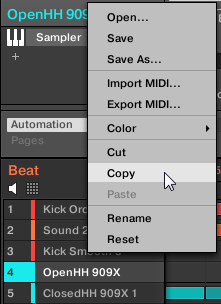
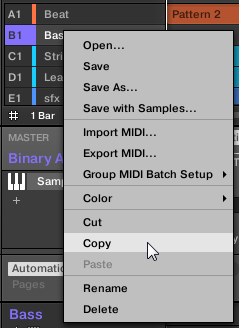
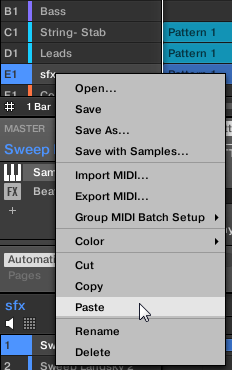
Right-click (on macOS: [Ctrl]-click) the Sound slot (in the Sound List or in the Pad view) containing the Sound you want to copy.
In the context menu, choose Cut to cut the Sound or Copy to copy it.
To paste the Sound, right-click (macOS: [Ctrl]-click) another Sound slot (this can also be in another Group, in this case first click the desired Group in the Group List of the Arranger) and select Paste from the context menu.
All parameters of the Sound will be copied except for the source’s Pattern content. The Sound previously loaded in that Sound slot will be replaced.
Tip
If you want to copy a Sound more than once, just keep on choosing Paste from the context menu on other Sound slots: the source Sound stays in the clipboard, ready for the next use!
When you copy/paste Sounds in the software, the entire content of the copied Sound(s) is pasted, including their events. Notably, pasting a Sound into a Sound slot of a different Group will create the needed Patterns if they do not exist, and replace the events for that Sound slot in any existing Patterns.
Notice
In the sentence above, “existing Patterns” means the Patterns with the same IDs (i.e. the same position in the Pattern List) as in the source Group. For example, if the source Sound contains events in Pattern 1, 2, and 3 of its Group and you paste that Sound into another Group that only has Pattern 1 and 4, Pattern 2 and 3 will be automatically created to host the events of the pasted Sound.
Cutting, copying, and pasting multiple Sounds
When you cut multiple Sounds, they are placed into the clipboard and removed from the Sound List. Their Sound slots are reset to their default state.
When you copy multiple Sounds, they are both placed into the clipboard and kept in the Sound List.
When you paste multiple Sounds onto a Sound slot, the pasted Sounds replace the current Sound in that slot and in the following slots — if the last Sound slot is reached, the remaining copied Sounds will not be pasted at all. Note that this is not affected by any multiple selection you might have made when pasting. For example, if you paste the Sounds 1, 2, 4, and 7 onto the Sound slot 14, the duplicates of the Sounds 1, 2, and 4 will replace any existing Sounds in the Sound slots 14, 15, and 16, respectively, while the Sound 7 won’t be pasted at all.
Refer to Selecting multiple Sounds or Groups for more information on multiple selection.
Moving Sounds
You can reorder Sounds via drag-and-drop in the software. It can be helpful to organize your Sounds more conveniently. Notably, this allows you to move your Sounds to other pads, and create a Group that is easier to play from the pads.
Tip
You can select multiple Sounds to move them all at once. See Selecting multiple Sounds or Groups for more information.
To move one or more Sounds:
Click and hold the desired Sound slot(s) in the Sound List or in the Pad view.
While holding the mouse button, drag your mouse toward the desired location in the Sound List or in the Pad view. As the mouse cursor moves an insertion line appears at the potential places where you can drop the Sound slot(s).

When the insertion line appears at the desired location in the Sound List or in the Pad view, release the mouse button.
Each Sound takes its new place in the Group. On your controller, the Sounds will be triggered by the pads whose numbers appear left of the Sound slots in the Sound List or on the cells in the Pad view.
You can also drag Sounds to another Group in the Group List of the Arranger: The Sounds will be inserted in the first empty Sound slots of that Group, and that Group will automatically get the focus. However, in that case the Pattern content of the Sounds will not be moved.
Notice
Sounds cannot be moved within the Sound List when Audition (the speaker button) is switched on.
Tip
If you drag the Sound(s) to the “+” at the end of the Group List, a new Group is automatically created and your Sound(s) will be moved to the first Sound slot(s) of that Group.
Resetting Sound slots
Resetting a Sound slot will remove the Sound it contains and reset all its settings (Channel properties, name, color…) back to their default values.
Tip
You can select multiple Sound slots to reset them all at once. See Selecting multiple Sounds or Groups for more information.
To reset a Sound slot, select it in the Sound List or in the Pad view and press [Del] on your computer keyboard, or right-click (on macOS: [Ctrl]-click) the Sound slot and choose Reset from the context menu.
The content of the Sound slot is removed and the Sound slot is reset to its default settings and name.
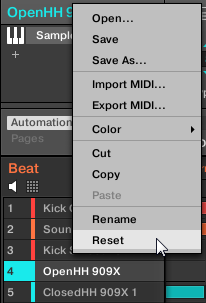
Resetting a Sound slot.
Bouncing Sounds in place
You can bounce individual Sound slots in place. Bouncing a Sound slot will render its Pattern contents into audio. This can save CPU resources but also lets you apply further audio edits to the Sound.
Note
Bouncing Sounds in place is available only when the Arranger is in Ideas view. For more information, refer to Arranger basics.
When you bounce a Sound slot, the following happens:
In each Pattern playing this Sound, the note sequence of the Sound is rendered into an audio sample.
The Plug-ins loaded in the Sound are replaced with an Audio Plug-in.
The rendered samples are loaded as Takes in the Audio Plug-in, each Take being triggered by its originating Pattern.
Caution
Bouncing a Sound will also remove its MIDI events from the Clips, if any. Once it has been bounced, this Sound will remain silent in Clips. The other Sounds stay unaffected.
Note
Bouncing Sounds in place is a destructive operation. You can undo it by using the Undo command within the session. Once the Maschine application has been closed and re-opened, you cannot restore the original Sound anymore.
Bouncing Sounds in the software
To bounce a Sound in place in the software:
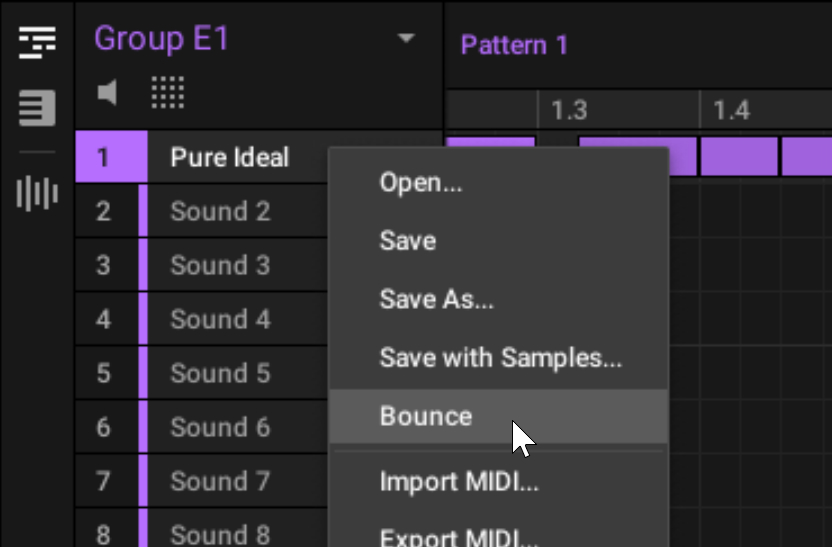
Right-click the Sound slot in the Sound List or in the Pad view and select Bounce from the context menu.
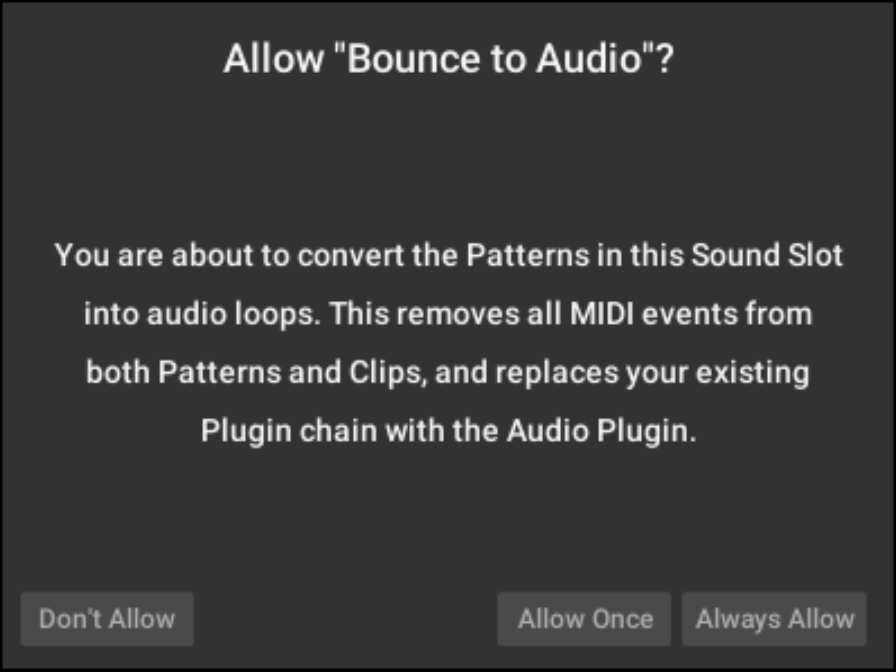
In the confirmation dialog that shows up, click Allow Once to confirm or Always Allow to confirm and prevent this dialog from reappearing. You can also click Don’t Allow to cancel the operation.
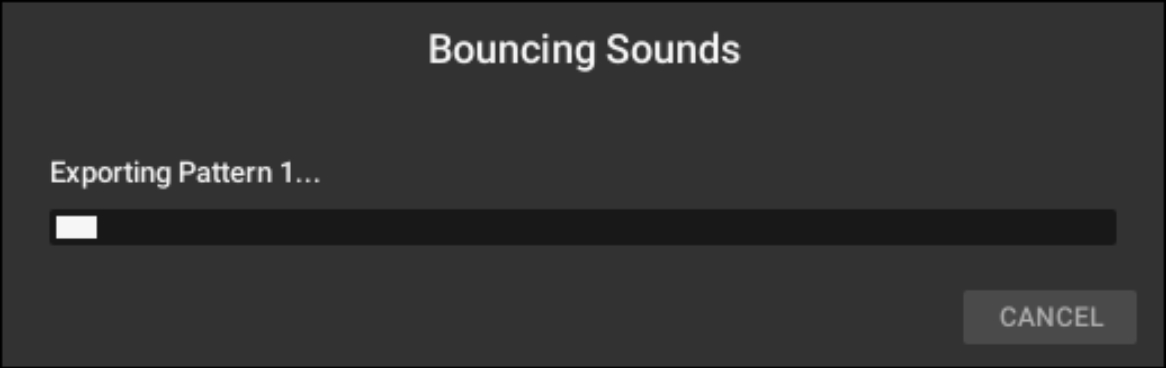
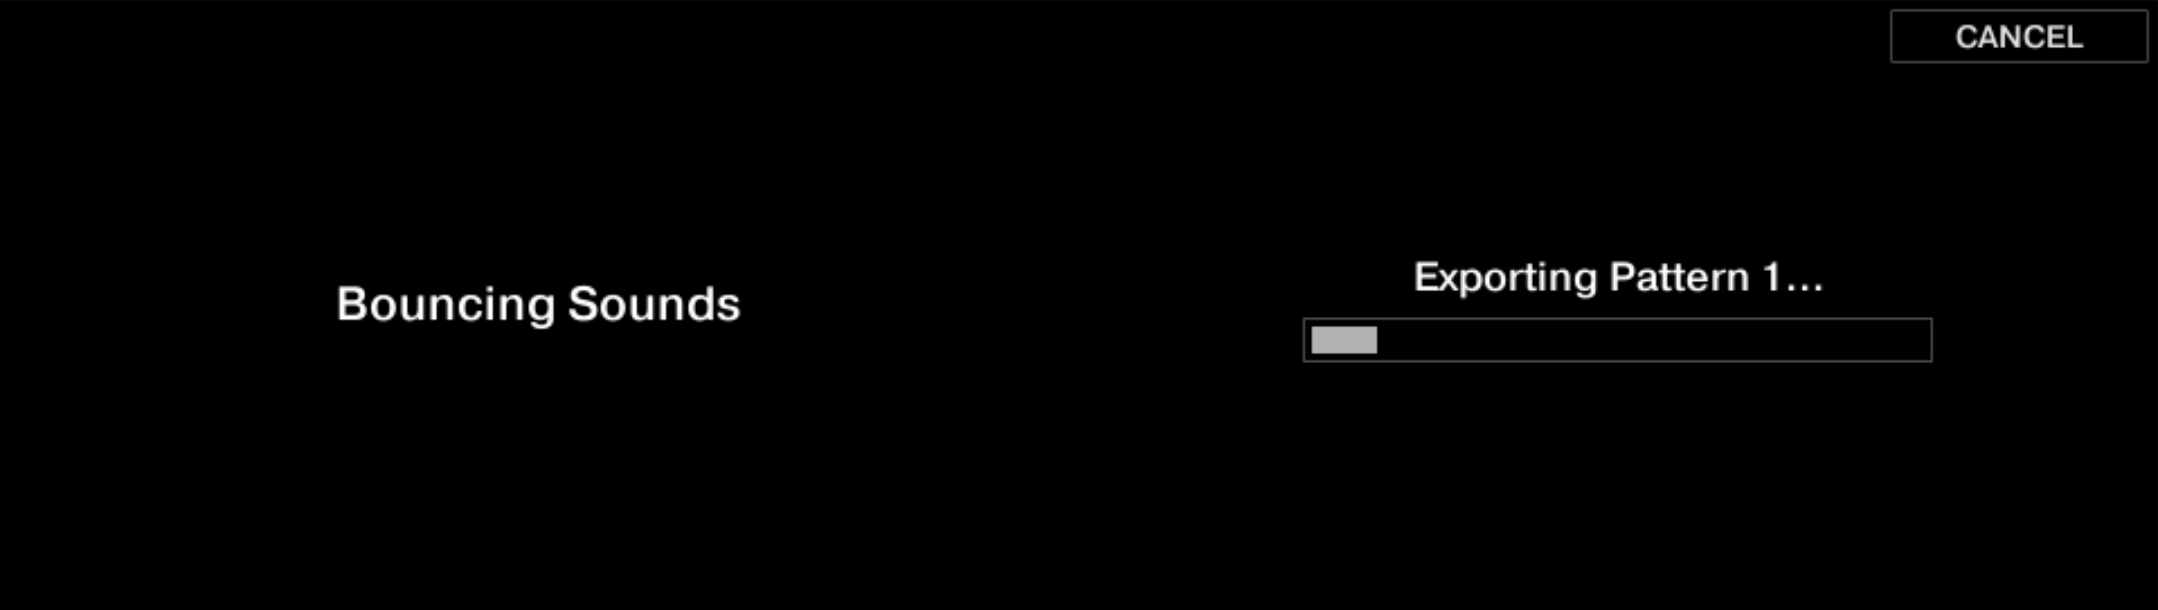
A progress dialog appears until the bouncing is complete. While the bouncing is running, you can click Cancel to cancel the operation.
You can also bounce multiple Sounds at once by selecting their slots, right-clicking any of them, and clicking the Bounce entry. For more information on selecting multiple Sounds in the Group, refer to Selecting multiple Sounds or Groups.
Bouncing Sounds on the controller
To bounce a Sound in place on the controller:
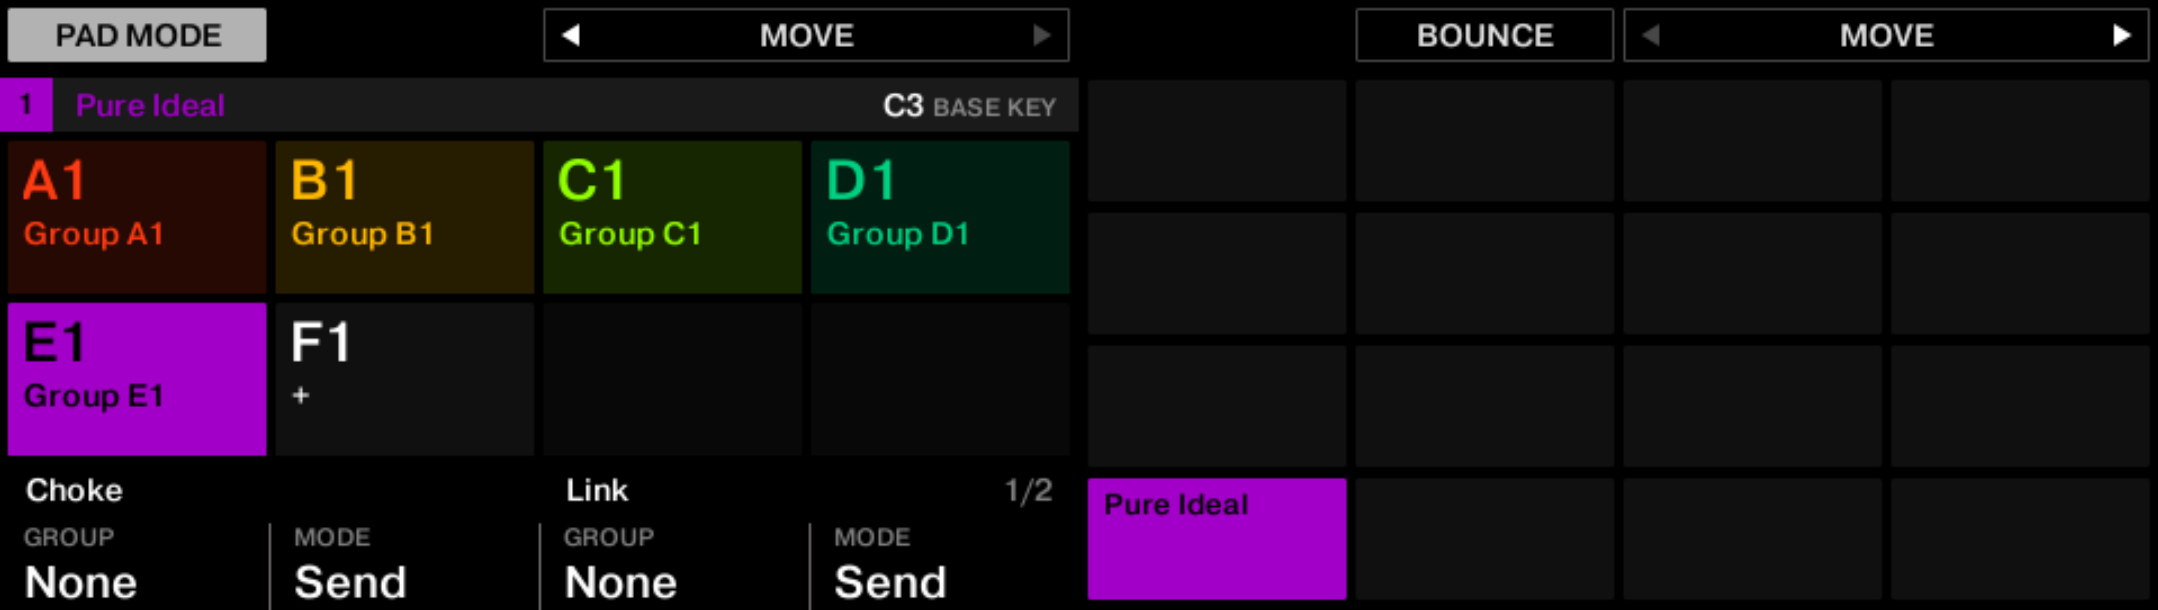
Press PAD MODE.
Press the desired pad to select its Sound slot.
Press SHIFT + Button 6 (BOUNCE).
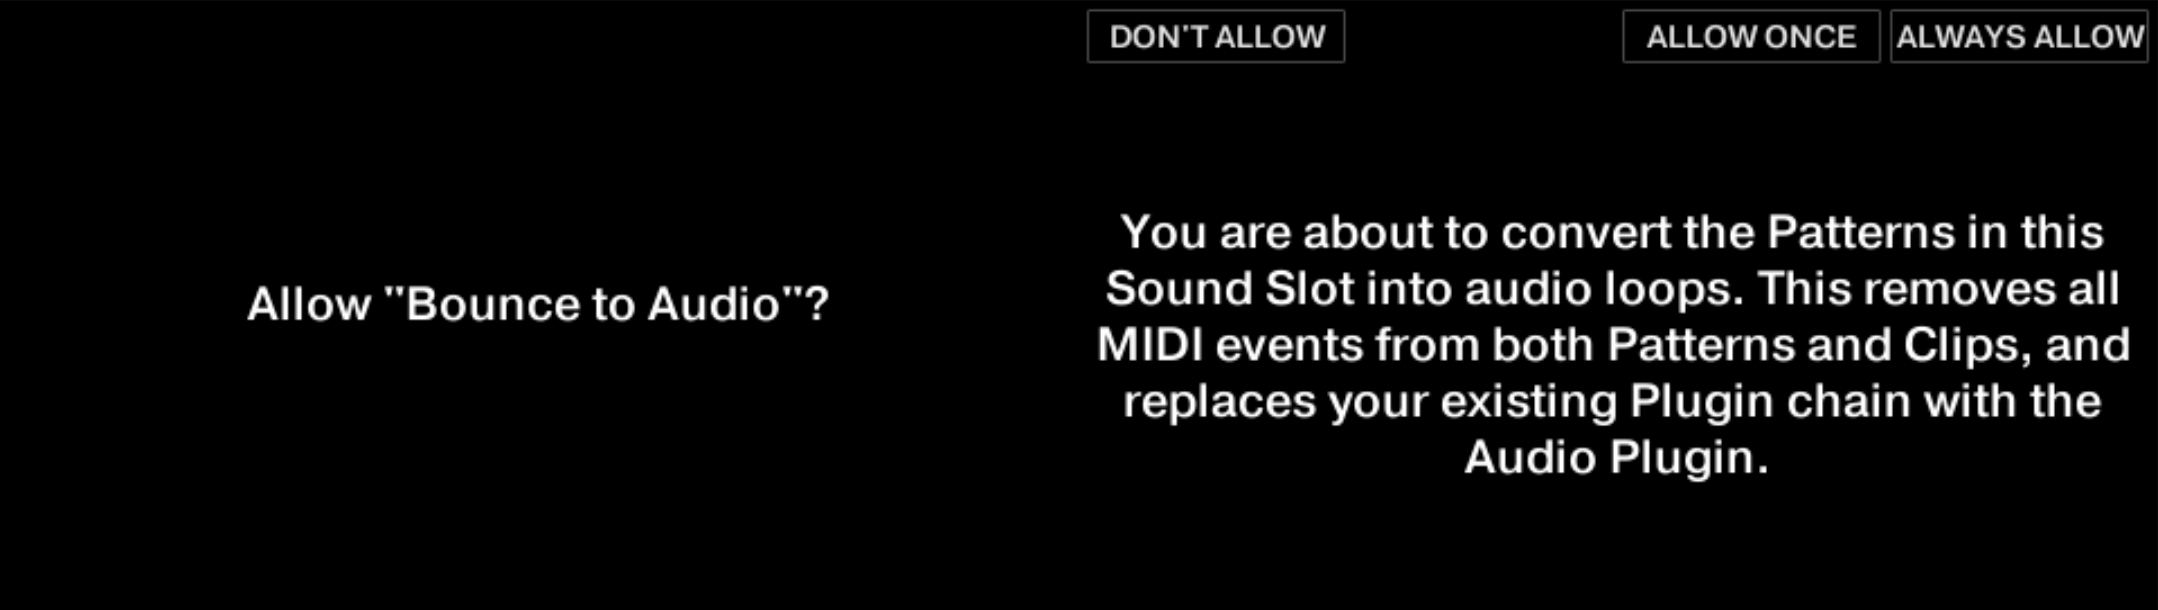
In the confirmation dialog that shows up, press Button 7 (ALLOW ONCE) to confirm or Button 8 (ALWAYS ALLOW) to confirm and prevent this dialog from reappearing. You can also press Button 5 (DON’T ALLOW) to cancel the operation.
A progress dialog appears until the bouncing is complete. While the bouncing is running, you can press Button 8 (CANCEL) to cancel the operation.
You can also bounce multiple Sounds at once by holding SELECT, pressing Button 8 (MULTI) to activate it, and pressing the desired pads before triggering the Bounce command as described above. For more information on selecting multiple Sounds in the Group, refer to Selecting multiple Sounds or Groups.
Managing Groups
This section describes the global editing functions available for Groups.
Group menus
Many of the functions described in the following sections are available in the following two context menus:
The context menu of the Groups in the Group List, opened via a right-click ([Ctrl]-click on macOS) on the desired Group:
The context menu of the focused Group in the Pattern Editor, opened via a right-click ([Ctrl]-click on macOS) on the Group name in the top left corner of the Pattern Editor:
Both context menus are equivalent: Use either menu as you see fit.
Creating Groups
Creating a Group will add a new empty Group at the end of the Group List. You can then fill this Group with the Sounds of your choice.
To create a Group, click the “+” at the end of the Group List.
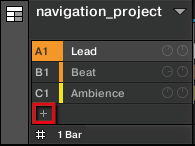
A new empty Group is created at the end of the Group List with the default name and color.
Automatic Group bank management
In Maschine, Group banks are managed automatically so that you don’t have to create or delete them manually. Groups are always adjacent in the Group List: you cannot have any gap in the Group List — nor in any Group bank. When you create a new Group, the following happens:
As long as the last Group bank contains less than eight Groups, the new Group is created in that bank.
If the last bank already contains eight Groups, a new Group bank is automatically created after the existing bank(s) and the new Group is created in that new bank.
Loading Groups
You can load a ready-made Group from the Browser or from your operating system. The Group can be included in the factory library of Maschine or any Expansion, but it can also be a Group you have created yourself and saved for later use.
Renaming Groups
By default, new Groups are named Group Ax–Hx, where “x” indicates the bank number (Group A1–H1, Group A2–H2, etc.). You can rename Groups to your liking.
Naming is only available from within the software, but any changes will also show up on your controller.
To rename a Group:
Double-click the name of the desired Group in the Group List or right-click ([Ctrl]-click on macOS) the Group and select Rename from the context menu.The Group name is now highlighted and editable.
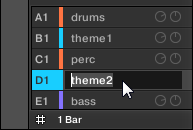
Modify the name of the Group. Press [Enter] on your computer keyboard to confirm.
Notice
If you use Maschine as a plug-in, some hosts will utilize the [Enter] key, as it is mapped to some function of the host software. In this case, click anywhere else in the Maschine plug-in window to confirm the name you have entered.
Changing the Group color
You can change the color of each individual Group. To do this:
To change the color of a Group:
Right-click ([Ctrl]-click on macOS) the desired Group in the Group List or the Group name in the top left corner of the Pattern Editor and select Color from the context menu.A Color Palette appears. In the Palette, the current color of the Group is highlighted.
Select the desired color in the Palette. You can also choose to set the Group back to the default color corresponding to its position in the list by selecting Default in the Color Palette.
The Group buttons of the Maschine MK3, Maschine Studio, Maschine MK2 controllers, and the pads of the Maschine Mikro MK3, Maschine Mikro MK2 controller (when you hold the GROUP button) mirror the Group colors you have selected.
Notice
By default each Group has a different color. But you can choose a common default color for Groups in Preferences > Colors > Group Default. See section Preferences – Colors page for more information.
Tip
Once you have set a custom color for a Group as described above, the Group will retain its color when you move it in the Group List, and the color will be stored with the Group when you save the Group for later use. Note that you can select the same color as the one used by default: In that case the color (even unchanged) will be considered as a custom color and will follow the Group as you move it.
Saving Groups
You can save your Groups as individual files (extension “.mxgrp”). This can be only done in the software.
Saving your modifications into the original Group file
If you have made changes to a Group loaded in your Project, you can save your modifications as follows:
Right-click (on macOS: [Ctrl]-click) the Group in the Group List or the Group name in the top left corner of the Pattern Editor and select Save from the context menu:
Your modifications are saved to the Group file.
Tip
Even if you don’t save a Group individually, its current settings will still be saved with your Project. But once a Group is saved and tagged, it is available in the Browser for use in other Projects.
You cannot save changes to factory files — these files are read-only. If you run the Save command on a factory file, it automatically turns into the Save As… command: a Save Group dialog opens and lets you save your modified Group to your user library. See next paragraph for more details. The same happens with Groups you have built from scratch.
Saving your modifications as a new Group
If you want to save modifications you have made on a Group originating from a factory library, or if you don’t want to overwrite the original Group with your modified version, or if there is no original version of your Group (i.e. you built it from scratch), you can save it as a new Group file:
Right-click (on macOS: [Ctrl]-click) the Group in the Group List or the Group name in the top left corner of the Pattern Editor and select Save As… from the context menu:
A Save Group dialog appears. By default, the Group file will be saved in your Standard User Directory (as defined in Preferences > Library > User, refer to section Preferences – Default page for more information).
If you wish, choose another path and/or type another name with your computer keyboard.
Press [Enter] to confirm and close the Save Group dialog.
Your Group is now saved. The Group will be added to the Library and is ready to be tagged in the Browser. Refer to Editing the files’ tags and properties for more information on this.
Tip
You can also save a Group together with all the Samples used in the Group. This can be useful to use a drum kit on another computer or share it with other users. Refer to Saving a Group with its Samples for more information.
Copying and pasting Groups
You can copy and paste Groups in your Project.
To copy and paste Groups in the software:
Right-click (on macOS: [Ctrl]-click) the Group you want to copy in the Group List or the Group name in the top left corner of the Pattern Editor.
In the context menu, choose Copy to copy the Group.
Right-click (macOS: [Ctrl]-click) any Group in the Group List and select Paste from the context menu to replace that Group with the copied one. If you want to paste the Group without affecting the existing Groups, first click the “+” under the last Group to create a new empty Group and paste the Group there.
All parameters of the Group will be copied. The Group previously in that position in the Group List will be replaced.
Tip
If you want to duplicate a Group more than once, just keep choosing Paste from the context menu on other Groups: the source Group stays in the clipboard, ready for the next use.
When you copy/paste Sounds or Groups in the software, the entire content of the copied Sound(s) or Group(s) is pasted, including their events and Patterns. Notably, pasting a Sound into a Sound slot of a different Group will create the needed Patterns if they do not exist, and replace the events for that Sound slot in an existing Patterns.
Notice
In the sentence above, “existing Patterns” means the Patterns with the same IDs (i.e. the same position in the Pattern List) as in the source Group. Example: If the source Sound contains events in Pattern 1, 2, and 3 of its Group and you paste that Sound into another Group that only has Pattern 1 and 4, Pattern 2 and 3 will be automatically created to host the events of the pasted Sound.
Tip
You can also duplicate a Group in Ideas view and Song view by clicking the Group slot while holding the [Alt] key (or [Ctrl] key on PC), and dragging the mouse. After the mouse is released a duplicate copy of the Group is created.
Cutting, copying, and pasting multiple Groups
When you cut a selection of Groups, they are placed into the clipboard and removed from the Group List. All following Groups in the list are shifted up to fill the gap.
When you copy a selection of Groups, they are both placed into the clipboard and kept in the Group List.
When you paste a selection of Groups onto an existing Group, the pasted Groups replace that Group and the following Groups. Example: If you paste the Groups A1 and B1 onto the Group E2, the duplicates of A1 and B1 will replace the Groups E2 and F2, respectively (if, say, F2 did not exist it is automatically created).
Refer to Selecting multiple Sounds or Groups for more information on multiple selection.
Reordering Groups
You can reorder Groups via drag-and-drop in the Ideas view or Song view of the software. For convenience it can be helpful to organize your Groups.
Tip
You can select multiple Groups to reorder them all at once. See Selecting multiple Sounds or Groups for more information.
Deleting Groups
Deleting a Group will remove it from the Group List.
Notice
It is not possible to have a Project without any Groups: Attempting to delete the last remaining Group in a Project will reset the Group to the default values.
Tip
You can select multiple Groups to delete them all at once! See Selecting multiple Sounds or Groups for more information.
To delete a Group, select it in the Group List and press [Del] on your computer keyboard. You can also right-click (on macOS: [Ctrl]-click) the Group in the Group List or the Group name in the top left corner of the Pattern Editor and choose Delete from the context menu.

The Group is removed. All following Group are shifted up in the Group List to fill the gap. If the last Group bank is empty after the Groups have been shifted, the bank is deleted.
Exporting Maschine objects and audio
This section describes how to save single Groups or whole Projects for use in another Maschine installation, and how to export audio from various sources in your Project.
Tip
You can also export your Patterns as audio or MIDI files via drag and drop. This is described in section Exporting audio from Patterns and Exporting MIDI from Patterns.
Saving a Group with its Samples
Sometimes it is useful to have the ability to save a Group with its Samples outside of the Maschine Library. If you want to take a Group to another studio or if you want to backup or share a custom drum kit with all the related files, this comes in handy.
To save a Group with its Samples:
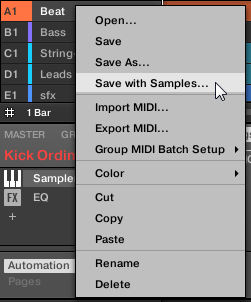
Right-click (on macOS: [Ctrl]-click) the Group in the Group List left of the Arranger and select Save with Samples… from the context menu:
You will be presented with the Save Group with Samples panel:
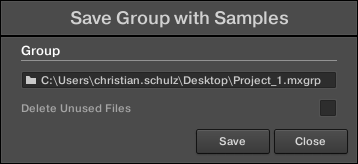
In this panel, adjust the settings (see table below) and click Save to confirm or Close to cancel the operation.
Controls | Description |
|---|---|
Group | Displays the name and location of the Group file to be created. The Samples will be put in a folder with the same name in the same location. By default, the Group file inherits the name of the Group in the Project and it will be saved in the “Groups” subfolder of your Standard User Directory (as defined in Preferences > Library > User, refer to Preferences – Default page for more information). Click the folder icon on the right to choose another name and/or path. |
Delete Unused Files | Enable this checkbox to delete unused files, thereby minimizing the amount of audio data to be exported. |
Notice
This command is also available from the Group menu opened by right-clicking ([Ctrl]-clicking on macOS)) the Group name above the Sound List, in the top left corner of the Pattern Editor.
Tip
You can also save your whole Project with its Samples. See section Saving a Project with its Samples.
Saving a Project with its Samples
Sometimes it is useful to have the ability to save all Samples used in your Project outside of the Maschine Library. If you want to take a Project to another studio or if you want to backup a production with all the related files, this comes in handy.
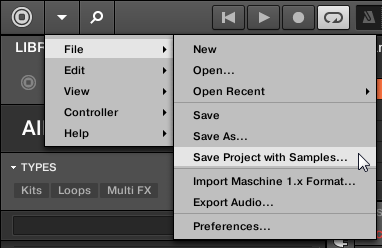
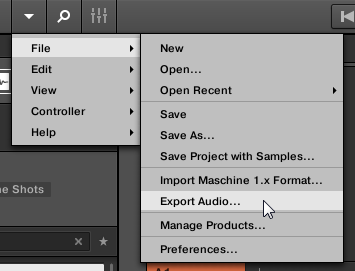
Choose Save Project with Samples… from the File menu or the File submenu in the Maschine menu:
You will be presented with the Save Project with Samples panel:
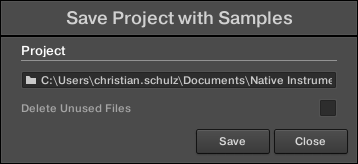
In this panel, adjust the settings (see table below) and click Save to confirm or Close to cancel the operation.
Element | Description |
|---|---|
Project | Displays the name and location of the Project file to be created. The Samples will be put in a folder with the same name in the same location. By default, the Project file inherits the name of the Project and it will be saved in the “Projects” subfolder of your Standard User Directory (as defined in Preferences > Library > User, refer to section Preferences – Default page for more information). Click the folder icon on the right to select another name and/or path. |
Delete Unused Files | Enable this checkbox to delete unused files, thereby minimizing the amount of audio data to be exported. |
Tip
You can also save single Groups with their Samples. See Saving a Group with its Samples.
Exporting audio
Use the Export Audio panel in the software to export the complete song or the current loop as an audio file from the Song view, or to export individual Scenes as audio files from the Ideas view.
Notice
You can also export the audio of particular Patterns via drag and drop. The audio will be exported according to the settings described here, except for the exported region, the particular Sound/Group exported, and the name of the exported audio file. Refer to Exporting audio from Patterns for more information.
The Export Audio panel is available from both the Ideas view and Song view of the Arranger:
In the Ideas view the Export Ideas as Audio panel can be used to export individual Scenes or all Scenes at once.
In the Song view, the Export Song as Audio panel can be used to export your complete Project arrangement or individual Sections of the arrangement depending on the Loop Range.
To export audio from Maschine:
If the Arranger is in Song view, set the Loop Range to the region that you want to export. If you want to export the entire song, you can ignore this.
Choose Export Audio… from the File menu or from the File submenu in the Maschine menu.
Depending on whether the Arranger is in Song view or Ideas view, you will be presented with the Export Song as Audio or Export Ideas as Audio panel, respectively (refer to picture below).
Set the desired settings in the Source, Destination, and Options sections (refer to description below).
At the bottom of the panel, click Export to start the export process, or Close to cancel the operation and close the panel without exporting anything.
Export Ideas as Audio / Export Song as Audio panel
The Export Ideas as Audio / Export Song as Audio panel allows you to select the source and destination as well as make various settings for the audio you want to export from the Ideas view or Song view.
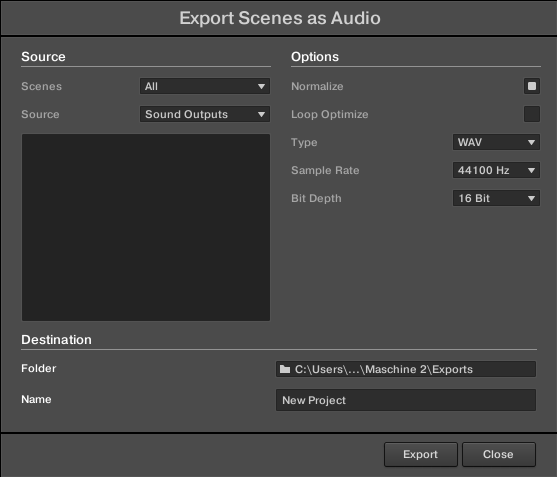
The Export Ideas as Audio panel.
The panel is split into three distinct sections: Source, Options, and Destination.
Source section
The Source section allows you to define exactly what will be exported.
Element | Description |
|---|---|
Range | Available only in the Export Song as Audio panel. The Range menu lets you define the range of the audio to be exported. The following options are available:
|
Scenes | Available only in the Export Ideas as Audio panel. The Scenes menu lets you select the Scene(s) to be exported. The following options are available:
|
Source | Selects what you want to export. The content of the Output list under the menu depends on your selection in the menu:
|
Options section
The Options section allows you to make settings related to the quality of the audio export.
Destination section
The Destination section allows you to define where to save your audio and how it is named.
Element | Description |
|---|---|
Folder | Displays the folder on your hard disk where the exported audio file(s) will be saved. To change the destination folder, click the field and select the desired folder in the navigation dialog that opens. |
Name | Displays the name of the destination audio file which by default will take the name of the Project. Click into the field if you want to rename the destination file. |
Names of the exported audio files
The exported audio files are named according to the following rules:
If Master is selected in the Source menu the audio file will be named as follows:[Project name] - [BPM].wav/aiff
If Group is selected in the Source menu the audio files will be named as follows:[Project name] - [Group order number] [Group index (letter + number)] [Group name] - [BPM].wav/aiffThe Group order number is a two-digit number indicating the “order of appearance” of the Group in the Group List. This ensures that an alphabetical listing of the exported files will reflect the structure of your Project.
If Sound is selected in the Source menu the audio files will be named as follows:[Project name] - [Sound name] - [BPM].wav/aiff
Notice
In addition, if the name of the file about to be exported is already used in the destination folder, a hyphen followed by an index number is added to the name (e.g., “ - 1,” “ - 2,” “ - 3,”) to avoid any file being overwritten.
Importing third-party file formats
Loading REX files into Sound slots
Maschine supports REX (ReCycle) files to be loaded. REX files are loops that are already sliced and mapped to MIDI notes.
Notice
Only REX2 files are currently supported.
The Samples are loaded into the Sound slot. A new Pattern is created in that Group and directly loaded in the Pattern Editor (switch the Pattern Editor to Keyboard view to better see the Pattern — see section Group view and Keyboard view). This Pattern contains the sequence data of the REX file. For each REX file you import a Pattern will be created and added.

A REX file loaded in the first Sound slot.
Importing MPC Programs to Groups
Maschine allows you to import Drum Program files (.PGM and .AKP) from the Akai MPC series to Groups. Supported models include the MPC4000, MPC3000, MPC2000, MPC500, MPC1000 and the MPC2500.
Supported parameters from MPC Programs
Since Maschine has a different approach to handling and naming parameters, please refer to this list to find out how MPC Program settings are being translated into Maschine settings.
MPC parameter | MPC500, 1000, 2500 | MPC4000 | MPC2000 (XL) | MPC3000 | Maschine parameter |
|---|---|---|---|---|---|
Sample Name | x | x | x | x | Sample Name |
Play Mode | x | x | − | − | Playback Type (ADSR, One-shot, AHD) |
Sample Level | x | x | − | − | Zone Level |
Sample Pan | − | x | − | − | Zone Pan |
Range Lower/Higher | x | x | − | − | High/Low Key |
Tuning | x | x | x | x | Tune |
Attack | x | x | x | x | Attack |
Decay | x | x | x | x | Decay |
Voice Overlap | x | − | x | x | Polyphony |
Filter1 Type | x | − | − | − | Filter Type |
Filter1 Frequency | x | − | x | x | Filter Cutoff |
Filter1 Resonance | x | − | x | x | Filter Resonance |
Filter1 Velocity to Frequency | x | − | − | − | Velocity Cutoff |
Mixer Level | x | x | x | x | Track Level |
Mixer Pan | x | − | x | x | Track Pan |
Velocity to Level | x | − | − | − | Velocity to Volume |
Mute Group | x | − | − | − | Choke Group |
Importing MPC Program files
To import an MPC Program file, open the Browser in the Maschine software and click the Files tab.
Navigate to the MPC Program file you want to import and double-click it. You will be prompted with the MPC Import panel:
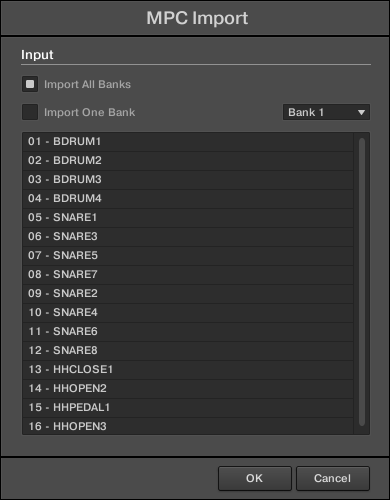
In the Input section of the panel, select one of the import options (refer to table below).
Click OK to start the import procedure or Cancel to close the panel without importing anything.
Control | Description |
|---|---|
Import All Banks | Select this to import all Banks of the MPC Program file. Each Bank will be loaded into a separate Group. |
Import One Bank | Select this if you only want to import a single Bank. Use the drop-down menu to the right to select which Bank you want to import. The list below shows you a preview of the sounds in the selected MPC Bank. |