Playing on the controller
Learn how to get the most out of your Maschine MK3 controller, both for live performances and when recording Patterns.
This chapter describes the numerous features available in Maschine to assist and enhance your playing on the controller, both during live performances and when recording Patterns.
Selecting a pad mode
You can switch the pads of your controller between different input modes to adapt the way they react to your playing:
In Group mode (the default pad input mode) each Sound of the focused Group is mapped to one pad: Each pad triggers a different Sound and you can play the entire Group at once. For example, this is well suited for drum kits or collections of loops. Refer to Playing the entire Group.
In Keyboard mode the 16 pads play the same Sound at 16 different pitches, which allows you to play melodies. You can also set the pads to play in the desired scale. Refer to Playing melodies and selecting scales.
In Chord mode the pads let you trigger chords by hitting single pads. You can choose chords from the desired scale, from factory chord sets, or from your own custom chord sets. Refer to Playing chords.
In Step mode you can use the pads to create your Patterns in a step sequencer. For more information on the Step mode, refer to Recording Patterns with the step sequencer.
By default, your pads are velocity-sensitive: they will play louder if you hit them harder. Instead, in 16 Velocities mode the 16 pads play the focused Sound at 16 different predefined velocities, while the Fixed Velocity option lets you trigger all your Sounds at a constant velocity. Refer to Using the Fixed Velocity option and the 16 Velocities mode.
Note
You can adjust the touch sensitivity and the velocity scaling of your pads on the Hardware page of the Preferences. Refer to Preferences – Hardware page for more information.
Playing the entire Group
The PAD MODE button located above the pads allows you to switch the pads of your controller to Group mode, which is the pads’ default mode. In Group mode each Sound of the focused Group is mapped to one pad. For example, this is well suited for drum kits.
With the pads in Group mode, hitting a pad both triggers its Sound and sets this Sound under focus.
Press PAD MODE to switch the pads to Group mode.
The PAD MODE button turns on and your pads trigger the various Sounds in your Group.
Activating Group mode on your controller automatically switches the Pattern Editor to Group view in the software, and inversely.
Group mode settings
Pressing PAD MODE lets you access various pad settings on the displays:
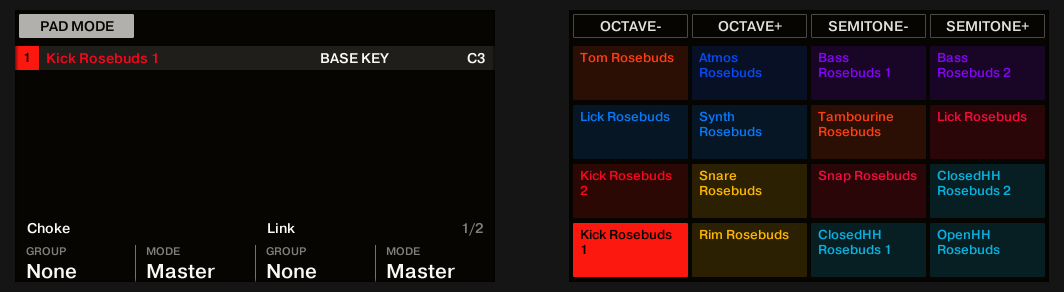
The pad settings on the controller when the pads are in Group mode.
Note
When you leave these displays and switch back to Control mode (by pressing PAD MODE again, or by pressing CHANNEL or PLUG-IN), your pads stay in Group mode, as indicated by the dim lit PAD MODE button. The pads will stay in Group mode until you explicitly switch them to another pad input mode by pressing another button above the pads.
The right display shows the name and color of the Sound played by each pad. The selected pad / Sound slot is highlighted. You can adjust its base key using Button 5–8:
Parameter | Description |
|---|---|
OCTAVE-, OCTAVE+, SEMITONE-, and SEMITONE+ (Button 5–8) | Adjust the base key for the selected pad. The current base key is indicated in the right part of the Info bar at the top of the left display. The base key defines the pitch at which the Sound is triggered by the pad. Refer to Adjusting the base key for more information. |
At the bottom of the left display you can adjust various settings for the selected Sound slot with Knob 1–4. The settings are split into two parameter pages, which you can select using the Page buttons (left/right arrows) at the left of the displays. The parameter pages contain the following parameters:
Parameter | Description |
|---|---|
Page 1 | |
Choke section (Knob 1 and 2) | Configures the Choke group for the selected pad. Refer to Using Choke groups for more information. |
Link section (Knob 3 and 4) | Configures the Link group for the selected pad. Refer to Using Link groups for more information. |
Page 2 | |
Colors section (Knob 1 and 2) | Selects a color for the Group (Knob 1) and for the Sound (Knob 2). These controls are equivalent to the commands found in the context menus of the Groups and Sound slots, respectively. Refer to Changing the Group color and Changing the Sound color for more information. |
Fixed Velocity (Knob 3) | Adjusts the velocity value used by the Fixed Velocity option. This velocity value is shared across all pad modes. Refer to Using the Fixed Velocity option and the 16 Velocities mode for more information. |
Playing melodies and selecting scales
The KEYBOARD button located above the pads allows you to switch the pads to Keyboard mode. In Keyboard mode your pads play the focused Sound at different pitches. This is well suited for melodic instruments. By default, the pads trigger every semitone of the chromatic scale, starting from the root note on pad 1. You can change this behavior by mapping the pads to the scale of your choice.
Press KEYBOARD to switch the pads to Keyboard mode.
The KEYBOARD button turns on. When you now play on the pads, they all trigger the focused Sound, but at different pitches.
Activating Keyboard mode on your controller automatically switches the Pattern Editor to Keyboard view in the software, and inversely.
Tip
Try to experiment with all kinds of Samples in the Keyboard mode; some unnoticed Samples can sound really interesting if you play them at very low or very high pitches.
About scales and the Keyboard mode
When using Keyboard mode to play scales, keep in mind the following:
The scale parameters are the same for all Sound slots in the Group. You can have different scale parameters for each Group. The scale parameters in each Group are saved with the Project. However, when you save a Group, the scale parameters are not saved with the Group.
The scales apply only to the pads of your controller. They do not affect the input from third-party MIDI controllers nor the notes recorded in the Patterns.
The scale parameters cannot be modulated nor automated in Maschine.
If a Sound slot contains a Komplete instrument providing control notes on particular keys (e.g., key switches), these notes will not be triggered by the scales.
Keyboard mode settings
Pressing KEYBOARD lets you access various pad information and settings on the displays:

The pad settings on the controller when the pads are in Keyboard mode.
Note
When you switch the displays back to Control mode (by pressing KEYBOARD again, or by pressing CHANNEL or PLUG-IN), your pads stay in Keyboard mode, as indicated by the lit KEYBOARD button. The pads will stay in Keyboard mode until you explicitly switch them to another pad input mode by pressing another button above the pads.
The right display shows the pitch played by each pad (all are shown in the color of the focused Sound). The pads triggering the root note and its octaves are highlighted on the right display and on your controller, the other pads are dimmed. You can adjust the root note by pressing Button 5–8:
Parameter | Description |
|---|---|
OCTAVE-, OCTAVE+, SEMITONE-, and SEMITONE+ (Button 5–8) | Adjust the root note of the scale played by the pads (C3 by default). The root note is always mapped to pad 1. The current root note is indicated in the right part of the info bar at the top of the left display. As you adjust the root note, the pitches played by the pads are transposed accordingly, as indicated on the right display. |
At the bottom of the left display you can adjust various parameters of the Keyboard mode. The parameters are split into two parameter pages, which you can select using the Page buttons (left/right arrows) at the left of the displays. The following parameters are available:
Parameter | Description |
|---|---|
Page 1 | |
Scale BANK (Knob 1) | Selects a bank of scales. The scales from the selected bank will be available in the Scale TYPE menu (Knob 2). By default the Main bank is selected. |
Scale TYPE (Knob 2) | Selects the scale mapped onto the pads: The root note is on pad 1, the 2nd note of the selected scale is on pad 2, etc. Once all notes are mapped, the following pads trigger the scale in the next octave. By default the chromatic scale (Chrom) is selected and the pads trigger the 16 semitones upwards starting from the root note. Refer to Available scales for a list of the available scales. |
Page 2 | |
Fixed Velocity (Knob 1) | Adjusts the velocity used for the Fixed Velocity option. This velocity value is shared across all pad modes. Refer to Using the Fixed Velocity option and the 16 Velocities mode for more information. |
When you create a new Group, the last selected scale is automatically assigned.
Note
The scale parameters (Root Note, Scale Bank, and Scale Type) are common to the Keyboard mode and the Chord mode. This allows you to quickly switch between single notes and matching chords by pressing the KEYBOARD and CHORDS buttons. For more information on the Chord mode, refer to Playing chords.
Button 4 (USER CHD) lets you switch to User Chord Edit mode and compose your own chords for later use. For more information, refer to Creating your own chords.
Enharmonic spelling of the root note
On your controller, depending on the selected Scale Type, the root note will be spelled differently to optimize the spelling of the scales:
Scale Type | Enharmonic spelling | |||||||||||
|---|---|---|---|---|---|---|---|---|---|---|---|---|
Chromatic | C | C♯ | D | D♯ | E | F | F♯ | G | G♯ | A | A♯ | B |
not Chromatic | C | C♯ | D | E♭ | E | F | F♯ | G | A♭ | A | B♭ | B |
Available scales
The following scale types are available in the various scale banks:
Main scales
Scale | Bank | Type | Degree formula |
|---|---|---|---|
Chromatic | Main | Chrom | 1 ♭2 2 ♭3 3 4 ♭5 5 ♭6 6 ♭7 7 |
Major | Main | Major | 1 2 3 4 5 6 7 |
Minor | Main | Minor | 1 2 ♭3 4 5 ♭6 ♭7 |
Harm Min | Main | Harm Min | 1 2 ♭3 4 5 ♭6 7 |
Maj Pent | Main | Maj Pent | 1 2 3 5 6 |
Min Pent | Main | Min Pent | 1 ♭3 4 5 ♭7 |
Blues | Main | Blues | 1 ♭3 4 ♯4 5 ♭7 |
Japanese | Main | Japanese | 1 2 ♭3 5 ♭6 |
Freygish | Main | Freygish | 1 ♭2 3 4 5 ♭6 ♭7 |
Gypsy | Main | Gypsy | 1 2 ♭3 ♯4 5 ♭6 7 |
Arabic | Main | Arabic | 1 ♭2 3 4 5 ♭6 7 |
Altered | Main | Altered | 1 ♭2 ♯2 3 ♯4 ♭6 ♭7 |
Whole Tone | Main | WH Tone | 1 2 3 ♯4 ♯5 ♭7 |
H-W Dim | Main | H-W Dim | 1 ♭2 ♯2 3 ♯4 5 6 ♭7 |
W-H Dim | Main | W-H Dim | 1 2 ♭3 4 ♯4 ♯5 6 7 |
Modes scales
Scale | Bank | Type | Degree formula |
|---|---|---|---|
Ionian | Modes | Ionian | 1 2 3 4 5 6 7 |
Dorian | Modes | Dorian | 1 2 ♭3 4 5 6 ♭7 |
Phrygian | Modes | Phrygian | 1 ♭2 ♭3 4 5 ♭6 ♭7 |
Lydian | Modes | Lydian | 1 2 3 ♯4 5 6 7 |
Mixolydian | Modes | Mixolyd | 1 2 3 4 5 6 ♭7 |
Aeolian | Modes | Aeolian | 1 2 ♭3 4 5 ♭6 ♭7 |
Locrian | Modes | Locrian | 1 ♭2 ♭3 4 ♭5 ♭6 ♭7 |
Ionian b2 | Modes | Ion b2 | 1 ♭2 3 4 5 6 7 |
Dorian b5 | Modes | Dor b5 | 1 2 ♭3 4 ♭5 6 ♭7 |
Harm Phryg | Modes | Har Phry | 1 ♭2 ♭3 4 5 ♭6 7 |
Phryg Major | Modes | Phry Maj | 1 ♭2 ♭3 4 5 6 7 |
Lydian b3 | Modes | Lyd b3 | 1 2 ♭3 ♯4 5 6 7 |
Major Locrian | Modes | Maj Loc | 1 2 3 4 ♭5 ♭6 ♭7 |
Minor Locrian | Modes | Min Loc | 1 2 ♭3 4 ♭5 ♭6 ♭7 |
Super Locrian | Modes | Sup Loc | 1 ♭2 ♭3 ♭4 ♭5 ♭6 ♭7 |
Jazz scales
Scale | Bank | Type | Degree formula |
|---|---|---|---|
Lydian ♭7 | Jazz | Lyd ♭7 | 1 2 3 ♯4 5 6 ♭7 |
Altered | Jazz | Altered | 1 ♭2 ♯2 3 ♯4 ♭6 ♭7 |
Diminished | Jazz | Diminshd | 1 ♭2 ♯2 3 ♯4 5 6 ♭7 |
Mixo b13 | Jazz | Mix b13 | 1 2 3 4 5 ♭6 ♭7 |
Mixo b9 b13 | Jazz | Mixb9b13 | 1 ♭2 3 4 5 ♭6 ♭7 |
Lydian ♭7 b2 | Jazz | Lyd ♭7b2 | 1 ♭2 3 ♯4 5 6 ♭7 |
Bebop | Jazz | Bebop | 1 2 3 4 5 6 ♭7 7 |
Whole Tone | Jazz | Whole Tn | 1 2 3 ♯4 ♯5 ♭7 |
Blues Maj | Jazz | Blues Ma | 1 2 ♭3 3 5 6 |
Blues Min | Jazz | Blues Mi | 1 ♭3 4 ♯4 5 ♭7 |
Blues Combined | Jazz | BluesCmb | 1 2 ♭3 3 4 ♯4 5 6 ♭7 |
Lydian #5 | Jazz | Lyd #5 | 1 2 3 ♯4 ♯5 6 7 |
Jazz Minor | Jazz | Jazz Mi | 1 2 ♭3 4 5 6 7 |
Half Dim | Jazz | Half Dim | 1 2 ♭3 4 ♭5 ♭6 ♭7 |
Augmented | Jazz | Augmentd | 1 ♭3 3 5 ♯5 7 |
World scales
Scale | Bank | Type | Degree formula |
|---|---|---|---|
Hungarian Min | World | Hung Min | 1 2 ♭3 ♯4 5 ♭6 7 |
Hungarian Maj | World | Hung Maj | 1 ♯2 3 ♯4 5 6 ♭7 |
Neapolitan | World | Neapoltn | 1 ♭2 ♭3 4 5 ♭6 7 |
Spanish | World | Spanish | 1 ♭2 ♭3 3 4 5 ♭6 ♭7 |
Greek | World | Greek | 1 2 ♭3 ♭4 5 ♭6 ♭7 |
Jewish 1 | World | Jewish 1 | 1 ♭2 3 4 5 ♭6 ♭7 |
Jewish 2 | World | Jewish 2 | 1 2 ♭3 ♯4 5 6 ♭7 |
Indian 1 | World | Indian 1 | 1 ♭2 ♭3 ♯4 5 ♭6 7 |
Indian 2 | World | Indian 2 | 1 2 ♭3 ♯4 5 6 7 |
Indian 3 | World | Indian 3 | 1 ♭2 2 4 5 ♭6 6 |
Indian 4 | World | Indian 4 | 1 ♯2 3 4 5 ♯6 7 |
Mid East 1 | World | M East 1 | 1 ♭2 3 4 5 ♭6 7 |
Mid East 2 | World | M East 2 | 1 ♭2 3 4 ♭5 ♭6 7 |
Mid East 3 | World | M East 3 | 1 ♭2 ♭3 4 ♭5 6 ♭7 |
Mid East 4 | World | M East 4 | 1 ♭2 3 4 ♭5 6 ♭7 |
5-Tone scales
Scale | Bank | Type | Degree formula |
|---|---|---|---|
Penta I | 5-Tone | Pent I | 1 2 3 5 6 |
Penta II | 5-Tone | Pent II | 1 2 4 5 ♭7 |
Penta III | 5-Tone | Pent III | 1 ♭3 4 ♭6 ♭7 |
Penta IV | 5-Tone | Pent IV | 1 2 4 5 6 |
Penta V | 5-Tone | Pent V | 1 ♭3 4 5 ♭7 |
Hirajoshi | 5-Tone | Hira | 1 2 ♭3 5 b6 |
Insen | 5-Tone | Insen | 1 ♭2 4 5 ♭7 |
Kokin Joshi | 5-Tone | Kokin | 1 2 4 5 b6 |
Akebono | 5-Tone | Akebono | 1 2 ♭3 5 6 |
Ryukuan | 5-Tone | Ryukuan | 1 3 4 5 7 |
Abhogi | 5-Tone | Abhogi | 1 2 ♭3 4 6 |
Bhupkali | 5-Tone | Bhupkali | 1 2 3 5 b6 |
Hindolam | 5-Tone | Hindolam | 1 ♭3 4 ♭6 ♭7 |
Bhupalam | 5-Tone | Bhupalam | 1 ♭2 ♭3 5 b6 |
Amritavarshini | 5-Tone | Amrita | 1 3 ♯4 5 7 |
Modern scales
Scale | Bank | Type | Degree formula |
|---|---|---|---|
Octatonic | Modern | Octatonc | 1 2 ♭3 4 ♯4 ♯5 6 7 |
Acoustic | Modern | Acoustic | 1 2 3 ♯4 5 6 ♭7 |
Augmented | Modern | Augmentd | 1 ♭3 3 5 ♯5 7 |
Tritone | Modern | Tritone | 1 ♭2 3 ♭5 5 ♭7 |
Leading Wh Tone | Modern | Lead Wh | 1 2 3 ♯4 ♯5 ♯6 7 |
Enigmatic | Modern | Enigmatc | 1 ♭2 3 ♯4 ♯5 ♯6 7 |
Scriabin | Modern | Scriabin | 1 2 3 ♯4 6 ♭7 |
Tcherepnin | Modern | Tcherepn | 1 ♯1 ♯2 3 4 5 ♯5 6 7 |
Messiaen I | Modern | Mes I | 1 2 3 ♯4 ♯5 #6 |
Messiaen II | Modern | Mes II | 1 ♭2 ♯2 3 ♯4 5 6 ♭7 |
Messiaen III | Modern | Mes III | 1 2 ♭3 3 ♯4 5 ♭6 ♭7 7 |
Messiaen IV | Modern | Mes IV | 1 ♭2 2 4 ♯4 5 ♭6 7 |
Messiaen V | Modern | Mes V | 1 ♭2 4 ♯4 5 7 |
Messiaen VI | Modern | Mes VI | 1 2 3 4 ♯4 ♯5 ♯6 7 |
Messiaen VII | Modern | Mes VII | 1 ♭2 2 ♭3 4 ♯4 5 ♭6 6 7 |
Major scales
Scale | Bank | Type | Degree formula |
|---|---|---|---|
Natural | Major | Natural | 1 2 3 4 5 6 7 |
Lydian | Major | Lydian | 1 2 3 ♯4 5 6 7 |
Mixolydian | Major | Mixolyd | 1 2 3 4 5 6 ♭7 |
Major Minor | Major | Maj Min | 1 2 3 4 5 ♭6 ♭7 |
Harmonic Major | Major | Har Maj | 1 2 3 4 5 ♭6 7 |
Dbl Har Major | Major | Dbl Maj | 1 ♭2 3 4 5 ♭6 7 |
Neapolitan Maj | Major | Nea Maj | 1 ♭2 3 4 5 6 7 |
Major Locrian | Major | Maj Loc | 1 2 3 4 ♭5 ♭6 ♭7 |
Blues Major | Major | Blues Ma | 1 2 ♭3 3 5 6 |
Bebop Major | Major | Bebop Ma | 1 2 3 4 5 ♯5 6 7 |
Hexa 1 | Major | Hexa 1 | 1 2 3 5 6 7 |
Hexa 2 | Major | Hexa 2 | 1 2 3 4 5 6 |
Penta 1 | Major | Penta 1 | 1 2 3 5 6 |
Penta 2 | Major | Penta 2 | 1 3 4 5 7 |
Penta 3 | Major | Penta 3 | 1 3 5 6 7 |
Minor scales
Scale | Bank | Type | Degree formula |
|---|---|---|---|
Natural | Minor | Natural | 1 2 ♭3 4 5 ♭6 ♭7 |
Dorian | Minor | Dorian | 1 2 ♭3 4 5 6 ♭7 |
Phrygian | Minor | Phrygian | 1 ♭2 ♭3 4 5 ♭6 ♭7 |
Minor Major | Minor | Min Maj | 1 2 ♭3 4 5 6 7 |
Harmonic Minor | Minor | Har Min | 1 2 ♭3 4 5 ♭6 7 |
Dbl Har Minor | Minor | Dbl Min | 1 2 ♭3 ♯4 5 ♭6 7 |
Neapolitan Min | Minor | Nea Min | 1 ♭2 ♭3 4 5 ♭6 7 |
Minor Locrian | Minor | Min Loc | 1 2 ♭3 4 ♭5 ♭6 ♭7 |
Blues Min | Minor | Blues Mi | 1 ♭3 4 ♯4 5 ♭7 |
Bebop Minor | Minor | Bebop Mi | 1 2 ♭3 4 5 ♭6 ♭7 7 |
Hexa 1 | Minor | Hexa 1 | 1 2 ♭3 5 ♭6 ♭7 |
Hexa 2 | Minor | Hexa 2 | 1 2 ♭3 4 5 b6 |
Penta 1 | Minor | Penta 1 | 1 2 ♭3 5 b6 |
Penta 2 | Minor | Penta 2 | 1 ♭3 4 5 ♭7 |
Penta 3 | Minor | Penta 3 | 1 ♭3 5 ♭6 ♭7 |
Connecting a MIDI keyboard to play melodies
If you prefer to play your melodies with a MIDI keyboard, you can connect it to the MIDI IN socket on the back of your controller. You can also use any USB-MIDI keyboard selected in the MIDI page of the Preferences panel (see Preferences – MIDI page). By default the connected MIDI input device will always play the selected Sound without the need to explicitly enter Keyboard mode on your controller.
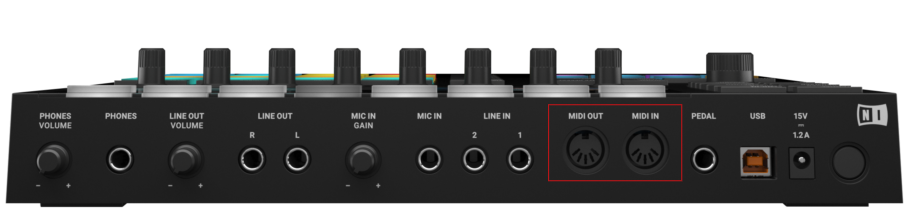
The rear side of the Maschine controller with the MIDI IN and OUT sockets.
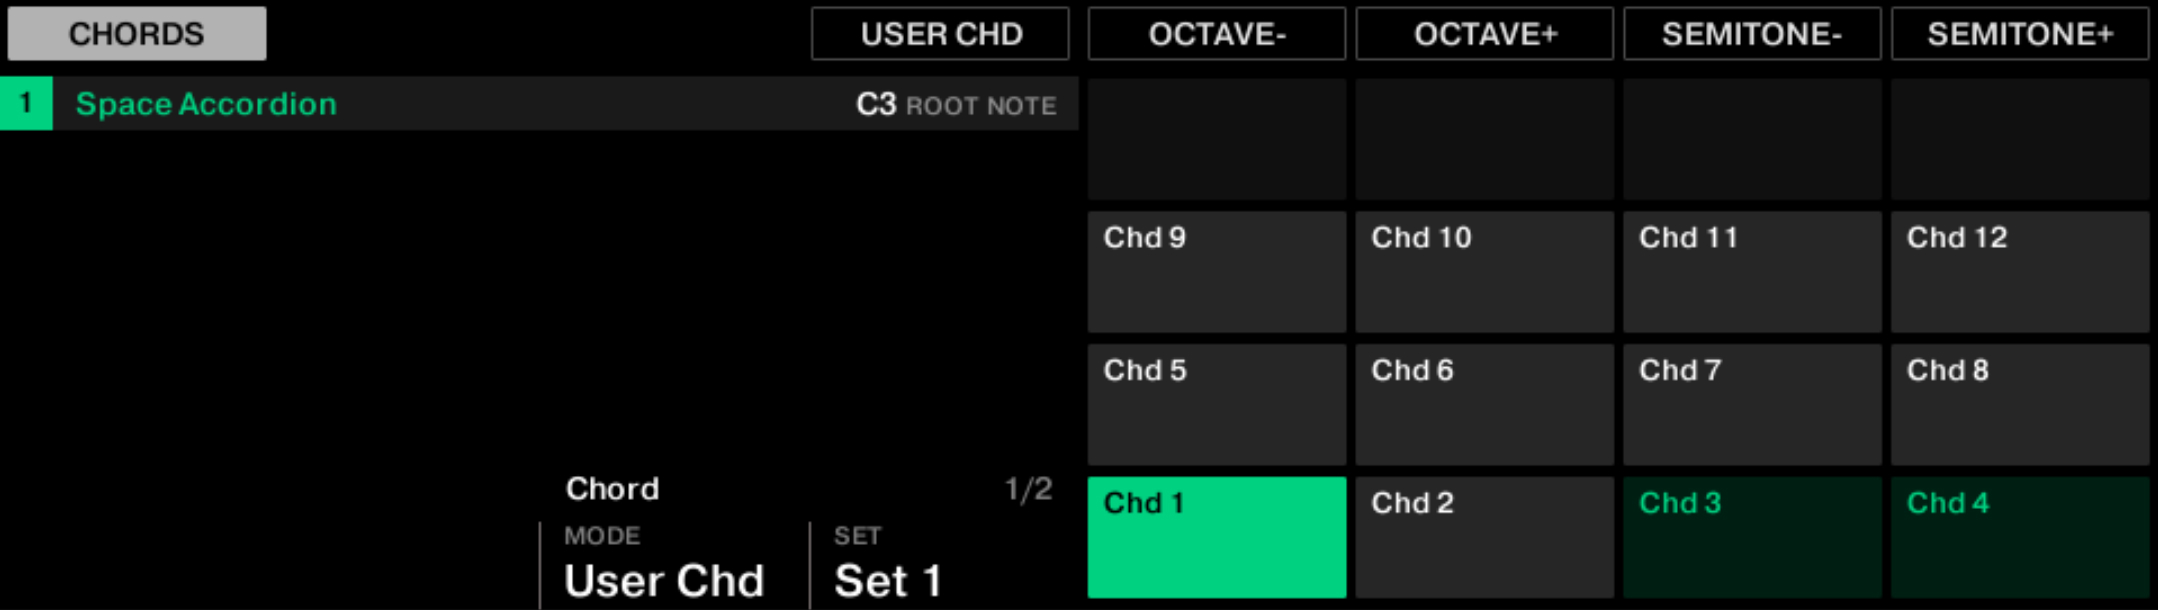
Playing chords
The CHORDS button located above the pads allows you to switch the pads to Chord mode. In Chord mode you can play chords for the focused Sound by hitting single pads. You can choose between chords from the selected scale, chords from factory sets, or custom chords that you have created.
Press CHORDS to switch the pads to Chord mode.
The CHORDS button turns on. When you play on the pads, they trigger various chords.
Activating Chord mode on your controller automatically switches the Pattern Editor to Keyboard view in the software.
About chords and the Chord mode
When using Chord mode to play chords, keep in mind the following:
The chord parameters are the same for all Sound slots in a Group. You can have different chord parameters for each Group. The chord parameters of each Group are saved with the Project. However, when you save a Group, the chord parameters are not saved with the Group.
The chords are generated only when using the pads of your controller. The chord generation does not apply to the input from third-party MIDI controllers nor to the notes recorded in the Patterns.
The chords are recorded into the Patterns.
The chord parameters cannot be modulated nor automated in Maschine.
If a Sound slot contains a Komplete instrument providing control notes on particular keys (e.g., key switches), these notes will not be triggered by the chords.
Chord mode settings
Pressing CHORDS lets you access various pad information and settings on the displays:
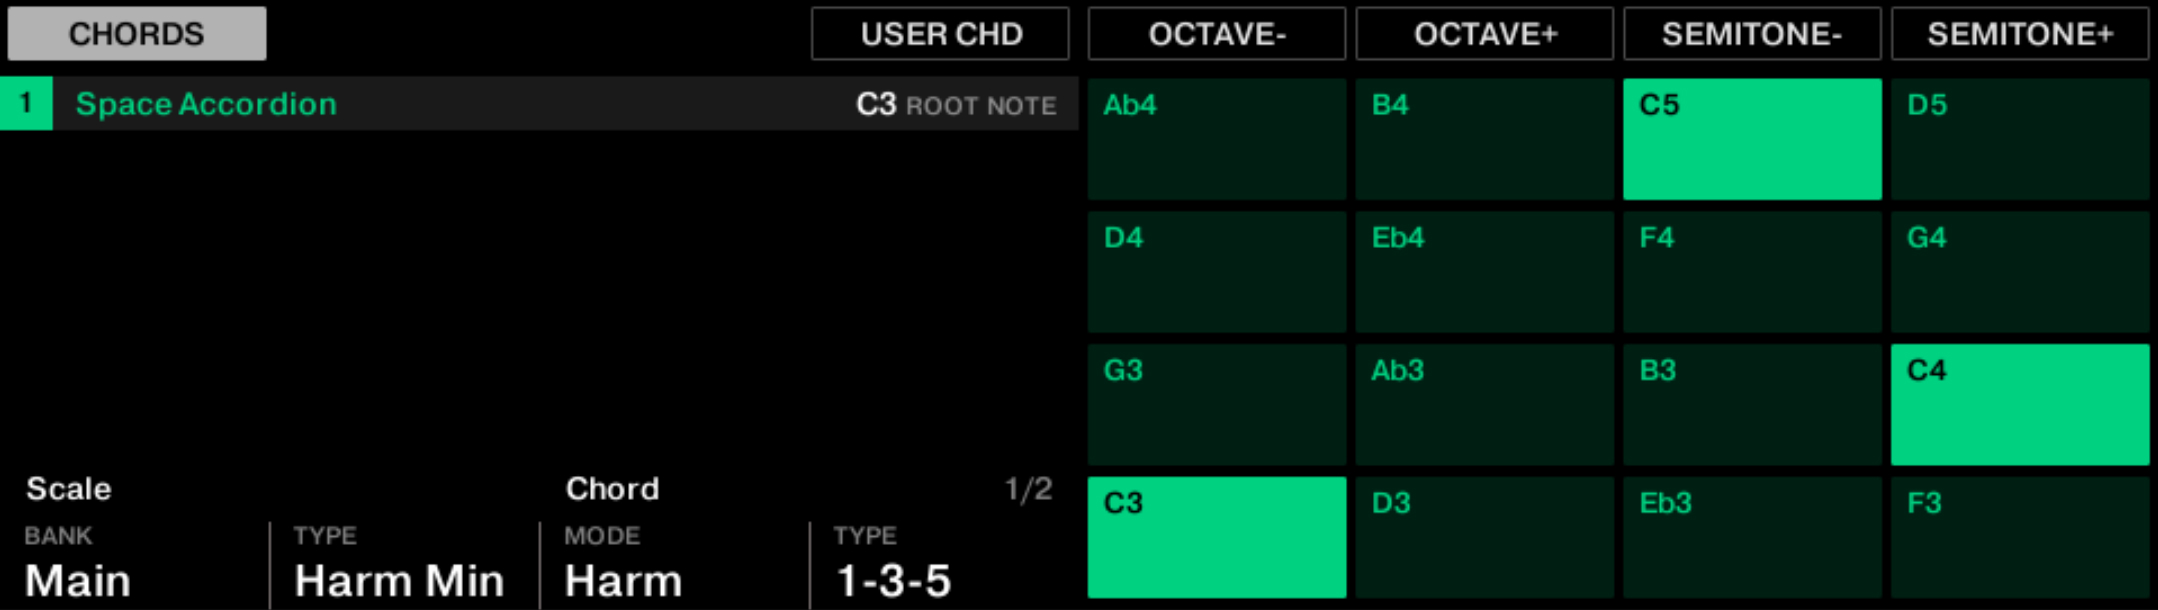
The pad settings on the controller when the pads are in Chord mode.
Note
When you switch the displays back to Control mode (by pressing CHORDS again, or by pressing CHANNEL or PLUG-IN), your pads stay in Chord mode, as indicated by the lit CHORDS button. The pads will stay in Chord mode until you explicitly switch them to another pad input mode by pressing another button above the pads.
The right display indicates the chord played by each pad (all are shown in the color of the focused Sound). The pad 1 always triggers the main chord based on the root note. It is highlighted both on the right display and on your controller, the other pads are dimmed. You can adjust the root note by pressing Button 5–8:
Parameter | Description |
|---|---|
OCTAVE-, OCTAVE+, SEMITONE-, and SEMITONE+ (Button 5–8) | Adjust the root note, which is used to build the chord on pad 1 (C3 by default). The current root note is indicated in the right part of the info bar, at the top of the left display. As you adjust the root note, all the chords played by the pads are transposed accordingly, as indicated on each pad in the right display. |
At the bottom of the left display you can adjust various parameters controlling which chords are generated. The parameters are split into two parameter pages, which you can select using the Page buttons (left/right arrows) at the left of the displays. The following parameters are available:
Parameter | Description |
|---|---|
Page 1 | |
Scale BANK (Knob 1) | Available only if Chord MODE (Knob 3) is set to Harmonizer. Selects a bank of scales. The scales from the selected bank will be available in the Scale TYPE menu (Knob 2). By default the Main bank is selected. |
Scale TYPE (Knob 2) | Available only if Chord MODE (Knob 3) is set to Harmonizer. Selects the scale used to build the chords. The scale starts from the root note specified with Button 5–8. The chords will only include notes from that scale. Pad 1 will trigger a chord starting from the scale’s root note, pad 2 a chord starting from the 2nd note of the scale, etc. Once all notes of the scale are mapped, the next pads trigger the equivalent chords starting from the next octave. By default the chromatic scale (Chrom) is selected and the pads trigger chords starting from every semitone. Refer to Available scales for a list of the available scales. |
Chord MODE (Knob 3) | Selects from three different modes for generating chords:
|
Chord TYPE (Knob 4) | Selects the chords mapped to the pads. The available chord types depend on the selected Chord MODE (Knob 3) and Scale TYPE (Knob 2):
|
Page 2 | |
Chord POSITION (Knob 1) | Selects a chord inversion to be played instead of the original chord. The following values are available:
|
Fixed Velocity (Knob 2) | Adjusts the velocity used for the Fixed Velocity option. This velocity value is shared across all pad modes. Refer to Using the Fixed Velocity option and the 16 Velocities mode for more information. |
Note
The scale parameters (Root Note, Scale Bank, and Scale Type) are common to the Keyboard mode and the Chord mode. This allows you to quickly switch between single notes and matching chords by pressing the KEYBOARD and CHORDS buttons. For more information on the Keyboard mode, refer to Playing melodies and selecting scales.
Button 4 (USER CHD) lets you switch to User Chord Edit mode and compose your own chords for later use. For more information, refer to Creating your own chords.
When erasing notes from your controller, the Chord Mode value determines which notes are deleted:
Harmonizer: Only the notes with the pitch of the pressed pad are deleted. The other notes in the triggered chord are not deleted.
Chord Set and User Chord: No notes are deleted, in other words erasing is deactivated.
Creating your own chords
You can create your own user chords and organize them into sets for later use. Once created, your chords will be available by switching the pads to Chord mode, setting Chord MODE (Knob 3) to User Chords, and selecting the desired user set from the Chord TYPE menu (Knob 4). For more information on the Chord mode, refer to Playing chords.
For creating user chords, your controller provides a dedicated User Chord Edit mode. To create your own chords, do the following:
When the pads are in Keyboard mode or in Chord mode, press Button 4 (USER CHD) to enter User Chord Edit mode.
Button 4 lights up and your controller switches to User Chord Edit mode.
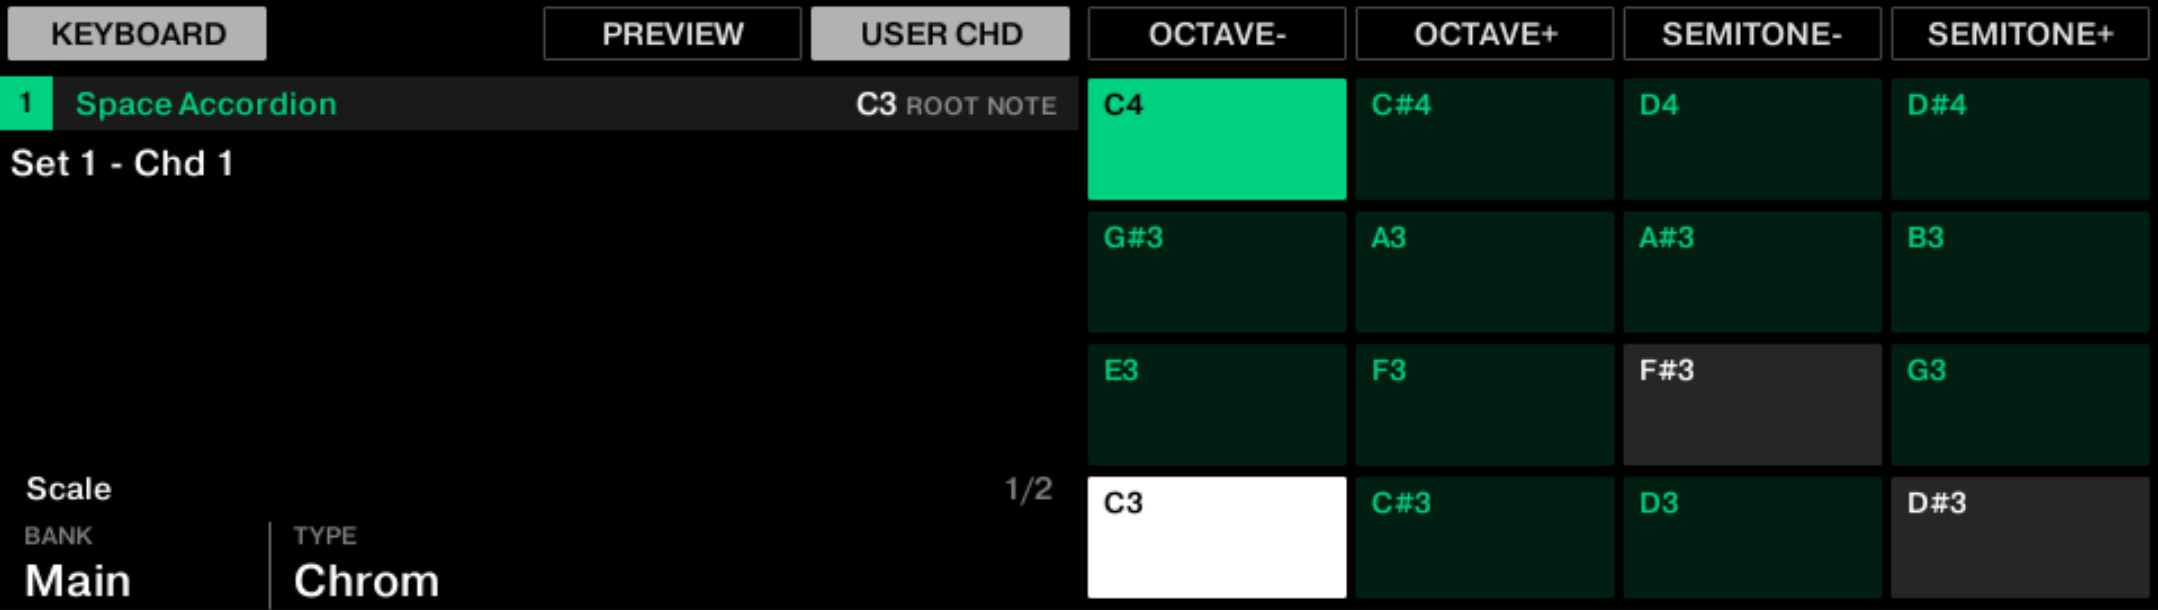
On the left display, the label on the left below the info bar indicates which chord from which user set you are currently editing (by default chord 1 from set 1).
Note
You can quickly switch to another chord slot by deactivating Button 4 (USER CHD), pressing the desired pad, and re-activating Button 4 (USER CHD).
In User Chord Edit mode you can compose the desired chord by pressing the pads to add or remove single notes. The pads basically operate as in Keyboard mode with a few additional features:
As in Keyboard mode, the pads trigger single notes of the selected scale. The scale is specified by the Root Note, Scale Bank (Knob 1), and Scale Type (Knob 2) parameters also used in Keyboard and Chord mode. The Root Note is indicated in the info bar on the left display. The notes triggered by the pads are indicated on the right display. For more information on selecting a scale, refer to Keyboard mode settings.
As in Keyboard mode, the pads triggering the root note and its octaves are fully lit, and the other pads are dim lit.
The pads included in the chord are white. The remaining pads show the Sound color.
Note
You cannot adjust the root note directly from User Chord Edit mode. To adjust it, first switch to Keyboard mode and use Buttons 5–8. For more information, refer to Keyboard mode settings.
You can compose a chord as follows:
Press a pad with the Sound color to add it to the chord.
The pad is triggered and it turns white to indicate that it is now included in the chord.
Press a white pad to remove it from the chord.
The pad is triggered and turns back to the Sound color.
By default the pads play the root note (on pad 1) and the following 15 notes in the selected scale. Pressing Button 5–8 (OCTAVE-/+ and SEMITONE-/+) let you shift the playable range of the pads by octaves or by semitones, so that you can reach notes located further away above or below the root note.
At any time you can press Button 3 (PREVIEW) to hear the resulting chord. As you press the button, the white pads flash and trigger their note.
When you are satisfied with the current chord, you can exit the User Chord Edit mode:
Press the lit Button 4 (USER CHD) to quit User Chord Edit mode.
The current chord is saved to the selected slot (which was indicated on the left display below the info bar). The pads automatically switch to Chord mode with Chord MODE (Knob 3) set to User Chord and Chord TYPE (Knob 4) set to the selected user set, so that you can directly play your new chord by pressing its pad.
While in Chord mode, you can quickly manage your user chords as follows:
You can delete a user chord by pressing its pad and pressing SHIFT + Button 5 (DELETE).
You can move a user chord to another pad by pressing its current pad, holding SHIFT, and pressing Button 7–8 (MOVE) repeatedly to move it to the previous or next slot until it reaches the desired position in your set.
You can create or edit another chord by pressing another lit pad and pressing Button 4 (USER CHD) again to return to User Chord Edit mode.
Note
You can transfer your user chords to other Maschine systems. For example, this allows you to port your chords from your computer to Maschine+ or to share them with other Maschine users. Each set of user chords is saved as a distinct JSON file on your hard disk at the following location: ~/Library/Application Support/Native Instruments/Shared/User Chords/ (macOS) or %USERPROFILE%\AppData\Local\Native Instruments\Shared\User Chords\ (Windows). On Maschine+ the JSON files of your user sets are located on the user data SD card under Native Instruments/Maschine 3/User Chords/. When transferring user set files between Maschine systems, you might need to rename the files to avoid naming conflicts with existing user set files on the target system. While doing so, arbitrary file names may be chosen.
Hardware compatibility with user chords
The following devices support user chords:
Creating, editing, and playing user chords: Maschine MK3, Maschine+ (Controller mode only)
Playing user chords: Maschine Mikro MK3, Maschine Jam, Maschine Studio, Kontrol MK3, Komplete Kontrol S MK2, Komplete Kontrol M32, Komplete Kontrol A-Series.
Enharmonic spelling of the root note
On your controller, depending on the Chord Mode, Scale Type, and Chord Type settings, the root note will be spelled differently to optimize the spelling of the chords:
Chord mode | Scale Type | Enharmonic spelling | |||||||||||
|---|---|---|---|---|---|---|---|---|---|---|---|---|---|
Harmonizer | Chromatic | C | C♯ | D | D♯ | E | F | F♯ | G | G♯ | A | A♯ | B |
not Chromatic | C | C♯ | D | E♭ | E | F | F♯ | G | A♭ | A | B♭ | B | |
Chord mode | Chord Type | Enharmonic spelling | |||||||||||
|---|---|---|---|---|---|---|---|---|---|---|---|---|---|
Chord Set | Major 1–8 | C | D♭ | D | E♭ | E | F | F♯ | G | A♭ | A | B♭ | B |
Minor 1–8 | C | C♯ | D | D♯ | E | F | F♯ | G | G♯ | A | B♭ | B | |
Available chords in Harmonizer mode
When Chord Mode is set to Harmonizer and Scale Type is set to Chromatic, the scale includes all semitones and the chords can use any of them. Chord Type offers the following chords:
Chord Type | Semitones added above the played note |
|---|---|
Octave | 12 |
Perfect 4 | 5 |
Perfect 5 | 7 |
Major | 4 and 7 |
Minor | 3 and 7 |
Suspended 4 | 5 and 7 |
Major 7 | 4, 7, and 11 |
Minor 7 | 3, 7, and 10 |
Dominant 7 | 4, 7, and 10 |
Dominant 9 | 4, 7, 10, and 14 |
Minor 7♭5 | 3, 6, and 10 |
Diminished 7 | 3, 6, and 9 |
Augmented | 4 and 8 |
Quartal | 5, 10, and 15 |
Trichord | 5 and 11 |
When Chord Mode is set to Harmonizer and Scale Type is set to any other scale than Chromatic, the chords are bound to the particular notes included in that scale. Chord Type offers the following chords:
Chord Type | Notes added to the played note |
|---|---|
Octave | Octave |
1-3 | 3rd |
1-5 | 5th |
1-3-5 | 3rd and 5th |
1-4-5 | 4th and 5th |
1-3-5-7 | 3rd, 5th, and 7th |
1-4-7 | 4th and 7th |
Using the Fixed Velocity option and the 16 Velocities mode
When playing on your pads, you can activate either of two additional features, which support your playing in specific situations:
The Fixed Velocity option is available for all pad modes except the 16 Velocities mode. With this option activated, your pads play at the same volume no matter how hard you hit the pads. You can switch the Fixed Velocity option on or off by pressing FIXED VEL above the pads. The button is lit when the option is active. You can adjust the value of this fixed velocity in the settings of the various pad modes. All pad input modes share the same Fixed Velocity value.
In 16 Velocities mode your pads all play the same note of the focused Sound but with sixteen different velocity values. This can be useful to play or program complex drum fills. The right display indicates the velocity values for each pad (all are shown in the color of the focused Sound). The pitch of the played note is defined by the base key (refer to Adjusting the base key). You can activate the 16 Velocities mode by pressing SHIFT + FIXED VEL. Press again to disable. The button is lit when the mode is active.
Setting notes in the step sequencer
The STEP button above the pads lets you switch to Step mode, in which your controller operates as a step sequencer. This pad mode is fundamentally since it is not made for playing live. For more information, refer to Recording Patterns with the step sequencer.
Creating arpeggios and repeated notes
Maschine includes a flexible and versatile Note Repeat / Arp engine, an arpeggiator that effectively lets you play your Sounds in note sequences.
With the pads in Group mode, you can play repeated notes by holding the pads depressed.
With the pads in Keyboard mode, you can play arpeggios based on the pads that you press.
With the pads in Chord mode, you can create arpeggios based on the chord currently triggered. You can even press more than one pad to include the notes of all corresponding chords into your arpeggio.
The Arp engine can be seen as a melodic extension of the Note Repeat: Arp replaces and extends Note Repeat in Keyboard and Chord mode. Instead of playing repeated notes at a constant pitch you can play sequences of notes at different pitches.
Arp and Note Repeat have similar modes on your controller: Depending on whether your pads are in Group mode or Keyboard/Chord mode, pressing NOTE REPEAT (Arp) on your controller will switch to Note Repeat mode or Arp mode, respectively. Arp mode simply adds a few parameters to those found in Note Repeat mode.
General notes on the Note Repeat and Arp engine
The Note Repeat / Arp parameters are the same for all Sound slots in all Groups of your Project. These parameters are saved with the Project.
The Note Repeat / Arp engine processes the live input from the pads of your controller only. The input from third-party MIDI controllers and the data recorded in the Pattern Editor are not processed.
The Note Repeat / Arp engine detects and makes use of any changes in the pressure you apply on every single pad you hold (Polyphonic Aftertouch). This allows you to generate arpeggios and repeated notes with varying velocities.
The output of the Note Repeat / Arp engine is recorded into the Pattern Editor.
The Note Repeat / Arp parameters cannot be modulated nor automated in Maschine.
You can use Note Repeat and Arp even if the transport is not running: In this case, the Note Repeat / Arp engine will use its own central clock. This clock will be reset as soon as you start the playback.
Notice
Kontrol S-Series owners: The central clock is shared by all connected devices so that e.g. repeated notes triggered from your Maschine controller and arpeggios triggered from your Kontrol S-Series keyboard will be synchronized even if the transport is not running.
Pads in Group mode: Note Repeat
Check that your Pattern is playing. If not, press PLAY to start the sequencer.
Hold the NOTE REPEAT (Arp) button to enter Note Repeat mode. You can also press NOTE REPEAT (Arp) + Button 1 to pin the Note Repeat mode and release the NOTE REPEAT (Arp) button.
Hold any pad. The Sound of the pad is repeatedly triggered at the rate highlighted above the right display.
Press Button 5, 6, 7, or 8 above the right display to select another repetition rate.
This is a handy way to add live ornaments to your Pattern!
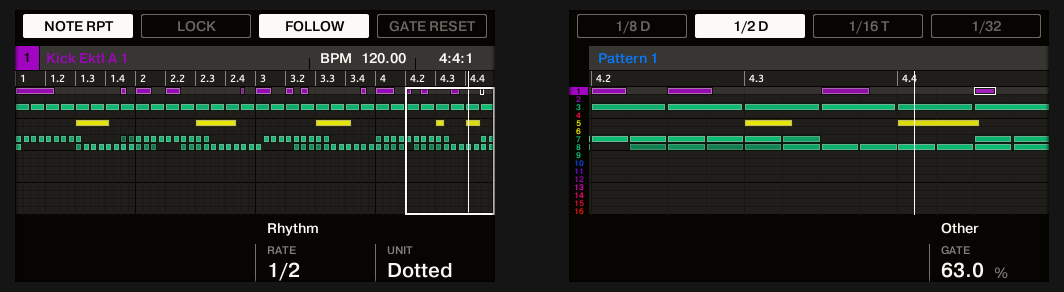
The Note Repeat mode on your controller.
In Note Repeat mode, you can customize the way the notes will be repeated by adjusting the following settings:
Element | Description |
|---|---|
LOCK (Button 2) | Keeps the Note Repeat feature activated even when you leave Note Repeat mode. For example, this can be useful to switch to another Pattern, adjust Plug-in parameters, etc., while keeping repeated notes running. If Note Repeat is locked, when you switch to another controller mode, the NOTE REPEAT button stays dimly lit to remind you that Note Repeat is on. You can also use the shortcut SHIFT + NOTE REPEAT at any time to enable/disable LOCK. |
HOLD (Button 3) | Allows the repeated notes to be latched. This means that you can release the pads and the repeated notes will continue to play. Press HOLD (Button 3) again to stop the repetitions. |
GATE RESET (Button 4) | Press this button at any time to reset the GATE parameter to its default value of 100%. |
Button 5–8 | Selects between four different Note Repeat presets, even during playing. Each preset can store particular values for the RATE (Knob 3) and UNIT (Knob 4) parameters at the bottom of the displays. The rate currently assigned to each button is indicated below on the right display, along with the UNIT value (“T” for triplet values or “D” for dotted values). The selected preset is highlighted. |
RATE (Knob 3) | Adjusts the duration between the repetitions, hence the rate of the repetitions. Available values are 1 BAR and a series of note values going from 1/2 (half note) to 1/128 (a hundred twenty-eighth note). |
UNIT (Knob 4) | Selects from three variations of the original note length defined by the RATE parameter: NORMAL plays the original note length (default setting), TRIPLET plays triplets of the original note length (faster, three notes in the duration of two original notes), and DOTTED plays dotted versions of the original note length (slower, two notes in the duration of three original notes). Under Button 5–8, triplet values are indicated by a “T” and dotted values by a “D” next to the note value. |
GATE (Knob 8) | Adjusts the ratio between the duration of the notes and the duration of the silences between them, measured as a percentage of the note value set by RATE (see above). Available values range from 0% to 200%: At low values, the notes are very short. At 50% , notes and silences are equal. At 100% (midcourse), each note last exactly until the next note is triggered. At higher values notes overlap (provided that the selected Sound is polyphonic). This setting applies globally to all rate presets. |
Notice
Even if Note Repeat is locked (Button 2 active), it won’t be applied to your pads when your controller is displaying the SLICE page of Sampling mode.
Tip
Note Repeat mode seamlessly switches to Arp mode as soon as you switch your pads from Group mode to Keyboard or Chord mode (see below): All the current values (including the LOCK state) will be retained.
Pads in Keyboard or Chord mode: Arp
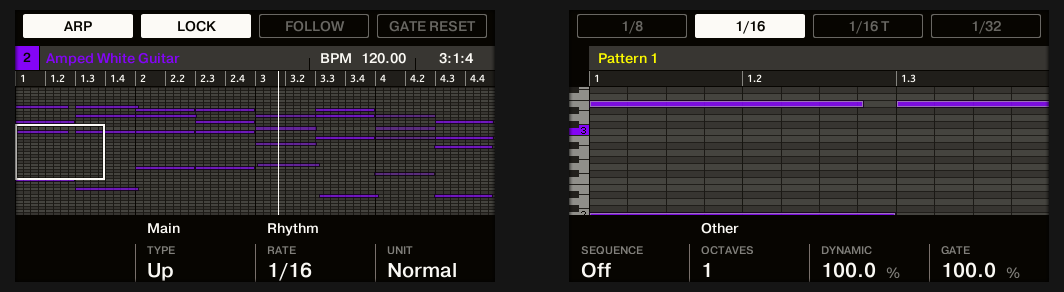
If your pads are in Keyboard or Chord mode, pressing NOTE REPEAT (Arp) switches your controller to Arp mode:
The Arp mode on your controller.
In Arp mode, you can customize the way the notes of the played chord will be arpeggiated by adjusting the following settings:
Arp settings – page 1
Element | Description |
|---|---|
LOCK (Button 2) | Keeps the Arp feature activated even when you leave Arp mode. For example, this can be useful to adjust the chord settings, switch to another Pattern, adjust Plug-in parameters, etc., while keeping arpeggios running. If Arp is locked, when you switch to another controller mode, the NOTE REPEAT (Arp) button stays dimly lit to remind you that Arp is on. You can also use the shortcut SHIFT + NOTE REPEAT at any time to enable/disable LOCK. |
HOLD (Button 3) | Allows the notes played by the arpeggiator to be latched. This means that you can release the pads and the arpeggiated notes will continue to play. Press HOLD (Button 3) again to stop the arpeggiator. |
GATE RESET (Button 4) | Press this button at any time to reset the GATE parameter to its default value of 100%. |
Button 5–8 | Selects between four different presets, even during playing. Each preset can store particular values for the TYPE; RATE, UNIT, SEQUENCE, and OCTAVES parameters at the bottom of the displays (see below). The rate currently assigned to each button is indicated below on the display, along with the UNIT value (“T” for triplet values or “D” for dotted values). The selected preset is highlighted. |
TYPE (Knob 2) | Sets the sequential order of the arpeggiated notes. You can choose from the following settings: Up starts from the root note and plays the notes up through the chord. Down plays the notes the other way around. Up & Downplays the notes in both directions alternatively. Order Played plays the notes in the order you pressed down the corresponding pads on your controller. If you have configured chords, the arpeggio will first play all notes of the chord triggered by the first pad you pressed, then all notes of the chord triggered by the second pad you pressed, etc. Chord plays all notes of the chord together repeatedly. |
RATE (Knob 3) | Adjusts the duration between the arpeggiated notes, hence the rate of the arpeggio. Available values are 1 BAR and a series of note values going from 1/2 (half note) until 1/128 (a hundred twenty-eighth note). |
UNIT (Knob 4) | Selects from three variations of the original note length defined by the RATE parameter: NORMAL plays the original note length (default setting), TRIPLET plays triplets of the original note length (faster, three notes in the duration of two original notes), and DOTTED plays dotted versions of the original note length (slower, two notes in the duration of three original notes). Under Button 5–8, triplet values are indicated by a “T” and dotted values by a “D” next to the note value. |
SEQUENCE (Knob 5) | Allows you to add interesting rhythms to your arpeggiated notes. Select one of eight different sequences and apply it to the arpeggio you are playing. Select Off to use the default regular sequence. |
OCTAVES (Knob 6) | Adjusts the spread of the arpeggiated sequence. You can choose to play back your sequence within the octave of the pads you pressed on your controller only, or you can select up to eight octaves and let the notes of your chord (or the single note of your pad) be played back in as many octaves. |
DYNAMIC (Knob 7) | Amplifies or reduces the velocity derived from the pressure you apply on every single pad you hold (Polyphonic Aftertouch). Available values range from 1% to 200%. This setting applies globally to all rate presets. |
GATE (Knob 8) | Adjusts the ratio between the duration of the notes and the duration of the silences between them, measured as a percentage of the note value set by RATE (see above). Available values range from 0% to 200%: At low values, the notes are very short. At 50% , notes and silences are equal. At 100% (midcourse), each note last exactly until the next note is triggered. At higher values notes overlap (provided that the selected Sound is polyphonic). This setting applies globally to all rate presets. |
Page 2 of the Arpeggiator contains the Advanced and Range settings. The Advanced parameters Retrigger, Repeat, Offset, and Inversion allow you to explore alternative versions of the same arpeggiator sequence. The Range parameters set the minimum and maximum note range of the arpeggiator sequence.
Arp settings – page 2
Element | Description |
|---|---|
RETRIGGER (Knob 1) | Sets a number of steps in the arpeggiator sequence, after which the sequence restarts its cycle, regardless of the number of pitches in the sequence. For example:
Rests in a Sequence are treated as steps:
|
REPEAT (Knob 2) | Sets a number by which each step in the arpeggiator sequence is repeated. For example:
|
OFFSET (Knob 3) | Sets a number by which the steps in the arpeggiator sequence are shifted in the cycle. For example:
|
INVERSION (Knob 4) | Adds inverted alternations of the arpeggiator sequence to the cycle. For example:
|
MIN. KEY (Knob 5) | Sets the lowest key that can be used as an input for the arpeggiator sequence. Note, that the arpeggiator can still generate pitches below the Min. Key setting. |
MAX. KEY (Knob 6) | Sets the highest key that can be used as an input for the arpeggiator sequence. Note, that the arpeggiator can still generate pitches above the Max. Key setting. |
Notice
Arp mode seamlessly switches to Note Repeat mode as soon as you switch your pads from Keyboard or Chord mode to Group mode: All the current values (including the LOCK state) will be retained.
Swing on the Note Repeat / Arp output
The Swing engines (at the Master, Group, and Sound levels) process notes coming from the Pattern Editor and from the Arp engine (pads in Keyboard or Chord mode) or Note Repeat engine (pads in Group mode). In other terms, the swing is applied not only to your Patterns but also to any live sequence generated by the Arp or Note Repeat engine.
For example, when you play live beats on top of a running Pattern, you can use Note Repeat without destroying the Pattern’s groove: the repeated notes will be processed using the same swing parameters as the playing Pattern.
Notice
When the playback is not running, the swing is still applied to the output of Arp (pads in Keyboard/Chord mode) or Note Repeat (pads in Group mode). If you press PLAY on your controller, the playback starts immediately and the swing cycle is reset.
For more information on the swing, refer to Groove.
Mute and Solo
Muting is used to silence a Sound or a Group, whereas Solo is pretty much the opposite: Soloing a Sound or a Group mutes all other Sounds in that Group or all other Groups, respectively, so that you can listen to the selected Sound or Group alone. The combination of both is a useful means to play live and to test different sequences together.
When used on Sounds, the Solo only applies to the current Group: The Sounds in other Groups won’t be affected.
Audio mute vs. trigger mute
At the Group level, the Mute function is an audio mute: The whole audio output of the muted Group will be bypassed. At the Sound level, the Mute function is by default a trigger mute: the Pattern content (the events) for the muted Sound will not be triggered — but any audio remaining from past events for this Sound will still be audible until it fades away. You can change this behavior by enabling the Audio Mute button in the Audio page of the Sound’s Output properties (refer to Configuring the main output of Sounds and Groups) as well as in Solo and Mute mode on your controller: Activating the audio mute for Sounds will ensure that not only the events are muted, but any remaining audio as well.
Tip
To momentarily mute all audio from all Sounds and Groups at once, refer to section Choke All Notes.
Mute and Solo in the software
Tip
We describe here how to mute/solo Groups and Sounds in the Arrange view of the software, but you can also do this from Mix view via the Mute button available in each channel strip of the Mixer. See section Adjusting settings in the channel strips for more information.
Soloing a Sound
Soloing a Group
Muting a Sound
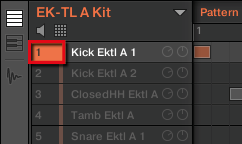
To mute a Sound, click the number on the left side of the Sound slot in the Pattern Editor.
Muting a Sound.
To unmute the Sound, click the number again.
Notice
By default, the Mute on Sounds is an trigger mute: events for muted Sounds are not triggered, but the audio coming from previous events might still be audible (reverb tail, etc.). You can also activate audio mute for Sounds to mute both events and audio — see the beginning of this section for more information.
Muting a Group
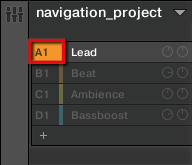
To mute a Group, click the Group index (letter + number) on the left side of the Group in the Arranger:
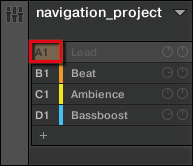
Muting a Group.
To unmute the Group, click the Group index again.
Mute and Solo on your controller
To enter Solo mode on the controller:

The Solo mode on the controller.
Press and hold SOLO to enter Solo mode. You can also press SOLO + Button 1 to pin this mode and make it permanent.
Solo Sounds by pressing their pads, and solo Groups of the current Group bank by pressing their Group buttons. Press Button 3 and 4 to switch to the previous/next Group bank, respectively.
To enter Mute mode on your controller:

The Mute mode on the controller.
Press and hold MUTE to enter Mute mode. You can also press MUTE + Button 1 to pin this mode and make it permanent.
Mute Sounds by pressing their pads, and mute Groups of the current Group bank by pressing their Group buttons. Press Button 3 and 4 to switch to the previous/next Group bank, respectively.
In both Solo and Mute modes you will note the following:
On your controller, the unmuted pads and Group buttons are fully lit, while the muted ones are dim lit (and the empty ones are off).
On the displays, the unmuted Sounds and Groups are highlighted while the muted ones are not (and the empty ones are… empty).
In both Solo and Mute modes the displays provide a few more functions:
ALL ON (Button 5) turns all Sounds on in the selected Group.
NONE (Button 6) turns all Sounds off in the selected Group.
When holding Button 8 (AUDIO) you can see on the pads which Sounds have audio mute activated: Sounds with audio mute activated have fully lit pads, while Sounds with only trigger mute have dim lit pads. This is also indicated on the right display (Sounds with audio mute are highlighted). While holding Button 8 (AUDIO), press any pad to switch the audio mute for this Sound on or off.
Notice
Enabling/disabling audio mute for a Sound does not mute/unmute it, it only sets this Sound to get both its events and its audio muted when you will mute it (by pressing MUTE + its pad).
Tip
Since soloing a Sound mutes all Sounds except one, the MUTE button can then be used to “release” Sounds that have been muted. You can use this technique to create a breakdown: Solo a given Sound such as a kick drum, then build the track up again by bringing the muted Sounds back in one at a time while holding the MUTE button.
Choke All Notes
The Choke All Notes feature allows you to kill any note or event currently playing in your Project. This affects the audio coming from all Plug-ins (Internal, Native Instruments, and External).
Choke All Notes is only available on your controller:
Press SHIFT + MUTE to choke all playing notes.
Choke All Notes can be useful in various situations:
as a creative tool in a live performance, e.g., to create stutter beaks
as a workflow aid, to stop long one-shot Samples that continue playing after you have stopped the sequencer
as a first panic button, if you are not sure where in your Project a particular sound is coming from, and you want to get rid of it.
Tip
Contrary to the Mute function, Choke All Notes is not turning any Group/Sound into another state. Instead, all audio voices currently playing are instantaneously killed. The killed voices cannot be reactivated and are freed up for subsequent notes according to the polyphony setting. Voices triggered by subsequent notes will play normally.
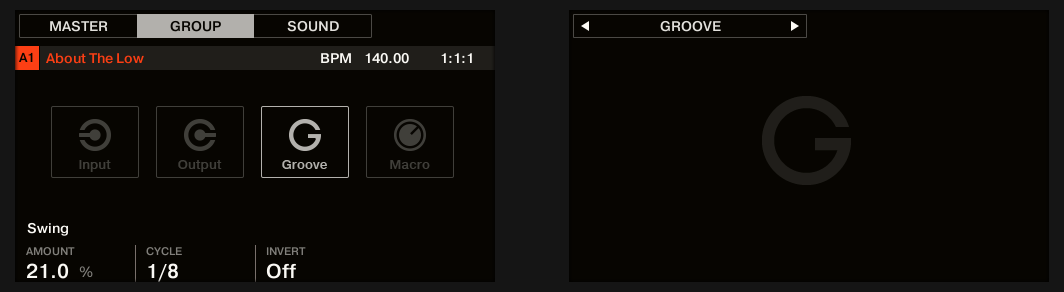
Groove
The groove controls the swing, that is the rhythmic relationship between events in the selected channel (Sound, Group, or Master). By shifting some of the events, you can e.g. give a shuffling, ternary touch to your Patterns.
The groove can be adjusted for each channel individually via its Groove properties.
A groove configured for a channel affects all its contained channels:
The Groove properties of a Sound only affect that particular Sound.
The Groove properties of a Group affect all Sounds in that Group: The Group’s swing is added to the swing of each individual Sound (as defined in its own Groove properties).
At the Master level, the Groove properties affect all Sounds of all Groups. The Master’s swing is added to the swing of each individual Group and Sound (as defined in its own Groove properties).
The Groove properties have a single Parameter page: Swing.
Notice
Please refer to section Navigating Channel properties, Plug-ins, and Parameter pages to know how to display and navigate sets of Channel properties.

The Groove properties for a Sound in the software.
The Groove properties for a Sound on the controller.
Control | Description |
|---|---|
Swing section | |
Amount | Adjusts the amount of swing, i.e. the amount by which some events are shifted. At 0 % events are not shifted. Raise the Amount value to increase the strength of the swing. |
Cycle | Determines on what musical resolution the groove is applied. This directly affects which events will be shifted. Values are measured in fractions of a whole note. |
Invert | Allows you to invert the groove so that instead of being delayed in the Pattern, events will be triggered ahead of time. |
How groove affects the rhythm: an example
Take a simple, regular one-bar rhythm with a hit on each eighth note. We set the Cycle parameter to 1/2, which is one half note, that is two beats.
The following picture shows you how this rhythm would sound with the following settings:
Top: Amount at 0.0 % (no groove).
Middle: Amount at 100.0 % and Invert off.
Bottom: Amount at 100.0 % and Invert activated.
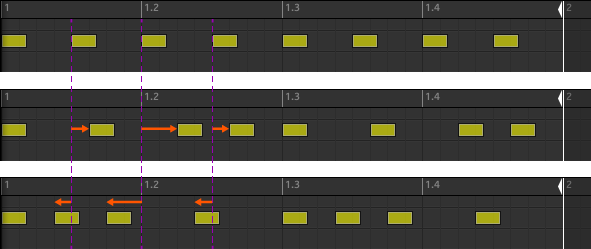
This is how the same regular rhythm would be heard with various groove settings.
Tip
The picture above only illustrates how the groove function affects the triggers — adjusting the Groove properties will not actually move any events in the Pattern Editor.
Level, tempo, tune, and groove shortcuts on your controller
Your controller provides extra shortcuts for various important parameters. Most of these parameters are already available in the Channel properties of the Sounds, Groups, and Master. The shortcuts detailed here give you an additional quick access to them — this is especially useful during live performance.
You can quickly change the output level, the tempo, and the swing (groove) of the Master as well as the output level, the tune, and the swing of any Group or Sound via the Edit section on your controller.
In Step mode you can also use shortcuts to adjust the velocity, position or tune of a selected step.
Volume and velocity shortcuts
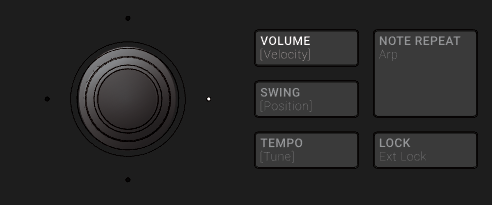
The VOLUME button.
With the pads in Group mode, Keyboard mode or Chords mode:
Press the VOLUME [Velocity] button.
The VOLUME [Velocity] button turns on.
To change the output level of the Master (that is the overall output level of Maschine), simply turn the 4-D encoder.
To change the output level of a Group, hold its Group button (first navigate to its Group bank if necessary) and turn the 4-D encoder.
To change the output level of an individual Sound:
If the pads are in Group mode, hold the pad of the desired Sound and turn the 4-D encoder.
If the pads are in Keyboard or Chord mode, hold any pad and turn the 4-D encoder to adjust the output level of that Sound. You can switch to another Sound by pressing SELECT + the desired pad.
The value that you are adjusting temporarily appears in the info bar at the top of the left display.
Tip
To adjust the values in finer increments, press and turn the 4-D encoder (or hold SHIFT while you turn it).
Notice
These shortcuts control the LEVEL parameter in the AUDIO page of the Master’s, Group’s, and Sound’s Output properties, respectively. See section Configuring the main output of Sounds and Groups and Configuring the Master and Cue outputs of Maschine for a detailed description of these properties.
With the pads in Step mode:
To change the velocity of a selected step in Step mode, hold its pad and turn the 4-D encoder.
The value that you are adjusting temporarily appears in the info bar at the top of the left display.
In the software you can also adjust the output level of the Master by dragging the Master Volume slider horizontally in the Header:

The Master Volume slider in the software’s Header.
Tip
To reset the output level of the Master to 0 dB, double-click the Master Volume slider.
Swing and position shortcuts
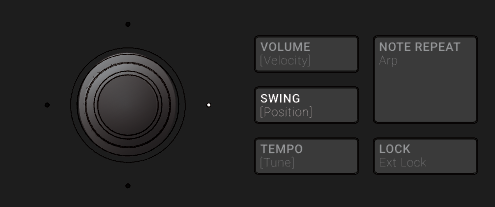
The SWING button.
With the pads in Group mode, Keyboard mode or Chords mode:
Press the SWING [Position] button.
To change the groove of the Master, simply turn the 4-D encoder.
To change the groove of a Group, hold its Group button (first navigate to its Group bank if necessary) and turn the 4-D encoder.
To change the groove of an individual Sound:
If the pads are in Group mode, hold the pad of the desired Sound and turn the 4-D encoder.
If the pads are in Keyboard or Chord mode, hold any pad and turn the 4-D encoder to adjust the groove of that Sound. You can switch to another Sound by pressing SELECT + the desired pad.
The value that you are adjusting temporarily appears in the info bar at the top of the left display.
Tip
To adjust the values in finer increments, press and turn the 4-D encoder (or hold SHIFT while you turn it).
Notice
These shortcuts control the AMOUNT parameter in the SWING page of the Master’s, Group’s, and Sound’s Groove properties, respectively. See section Groove for a detailed description of these properties.
With the pads in Step mode:
To change the position of a selected step in Step mode, hold its pad and turn the 4-D encoder.
The value that you are adjusting temporarily appears in the info bar at the top of the left display.
In the software you can also adjust the Swing amount of your Project by dragging the SWING control vertically in the Header:

The SWING control in the software’s Header.
Tempo and tune shortcuts
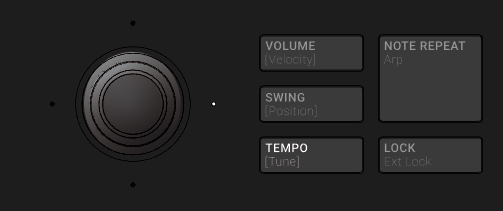
The TEMPO button.
With the pads in Group mode, Keyboard mode or Chords mode:
Press the TEMPO [Tune] button.
To change the tempo of the Master (i.e. the tempo of your Project), simply turn the 4-D encoder.
To change the tune of all Sounds in a Group, hold the desired Group button (first navigate to its Group bank if necessary) and turn the 4-D encoder.
To change the tune of an individual Sound, hold its pad and turn the 4-D encoder.
If the pads are in Group mode, hold the pad of the desired Sound and turn the 4-D encoder.
If the pads are in Keyboard or Chord mode, hold any pad and turn the 4-D encoder to adjust the tune of that Sound. You can switch to another Sound by pressing SELECT + the desired pad.
The value that you are adjusting temporarily appears in the info bar at the top of the left display.
With the pads in Step mode:
To change the tune of a selected step in Step mode, hold its pad and turn the 4-D encoder.
The adjusted value is temporarily shown on the left display.
Tip
You can also set different tempo values for specific Scenes. For more information, refer to Changing the Scene tempo.
Tip
To adjust the values in finer increments, press and turn the 4-D encoder (or hold SHIFT while you turn it).
In the software you can adjust the tempo of your Project by dragging the Tempo parameter vertically in the Header:

The Tempo parameter in the software’s Header.
Notice
At the Group and Sound level, the Tune shortcut works only with Sounds containing a Sampler, an Audio, or a Drum Synth Plug-in. The shortcuts control the Tune parameter located in the Pitch / Envelope page of the Sampler, in the Playback / Engine / Source page of the Audio Plug-in, and in the Main page of any Drum Synth. If you hold a Group button, the shortcut will affect all Sounds of the Group that contain a Sampler, Audio, or Drum Synth Plug-in. For more details on the Tune parameter, refer to Pitch range, tuning, and MIDI notes for the Sampler, Using the Audio Plug-in for the Audio Plug-in, and Page 2: Pitch / Envelope for the Drum Synths.
Tap tempo
You can quickly define the tempo of your Project via the TAP button in the Transport section of the controller:
Repeatedly tap the TAP button to set the desired tempo.
You can also use the TEMPO button to adjust the current tempo:
Press the TEMPO button and turn the Encoder to quickly adjust the tempo of your Project.
Tip
Press and turn the Encoder (or hold SHIFT while you turn it) to adjust the value in finer increments when the TEMPO button is activated.
These shortcuts control the Tempo parameter of Maschine. In the software this parameter is available in the Header:
The Tempo parameter in the software’s Header.
Using Lock Snapshots
Creating a Lock snapshot
Use the LOCK button to capture, update or recall a Lock snapshot.
Using Extended Lock mode
Extended Lock mode presents an overview of all your Lock snapshots. Here you can recall, update, or clear your snapshots. You can also set options for morphing between snapshots.
Updating a Lock snapshot
If you have created a Lock snapshot but find better settings you can update the Lock snapshot. There are two ways to achieve this, you can use the Lock option or the Update option directly within Extended Lock mode. Please note, both methods will overwrite the snapshot selected in Extended Lock mode.
Recalling a Lock snapshot
Within Extended Lock mode you can recall a stored Lock snapshot.
Morphing between Lock snapshots
When switching between two stored snapshots you can set Maschine to morph between them, adding movement and interest to a song. Within Extended Lock mode you can switch on morphing, and set the morphing sync and timing parameters.
Deleting a Lock snapshot
Within Extended Lock mode you can delete a stored Lock snapshot.
Triggering Lock snapshots via MIDI
You can trigger and change Lock snapshots using MIDI Note or MIDI Program Change messages. This is called MIDI Lock Change.
When the MIDI Lock Change feature is activated, MIDI Note or Program Change messages are linked to Maschine’s Lock snapshot slots, whether they contain a snapshot or not:
Lock snapshot slot | MIDI Note number | MIDI Program Change number |
|---|---|---|
1 | 0 (C-2) | 1 |
2 | 1 (C#-2) | 2 |
3 | 2 (D-2) | 3 |
… | … | … |
64 | 63 (D#3) | 64 |
The primary use case for triggering Lock snapshots via MIDI is when using Maschine in plug-in mode and sending the triggering MIDI messages from your host. However, you can also use an external MIDI device such as a keyboard to trigger Lock snapshots when using Maschine in stand-alone mode.
Notice
MIDI Note numbers: Host applications use various conventions to name MIDI notes. For example, in Maschine, MIDI note number 0 is referred to as C-2 and MIDI note number 60 (middle C) as C3. Please refer to the documentation of your host to find out which convention is used.
Notice
MIDI Program Change numbers: Some host applications send Program Change numbers in the range [0–127] instead of [1–128]. In that case, the PC number 0 will trigger snapshot slot 1, PC 1 will trigger snapshot slot 2, etc. Please refer to the documentation of your host to know in which range it sends Program Change numbers.
Enabling the MIDI Lock Change
To enable or disable the MIDI Lock Change feature, do the following:
Click Edit > MIDI Change.
This opens the MIDI Change dialog:
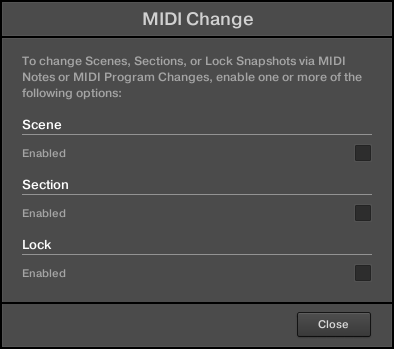
In the Lock section, click the Trigger menu and selects the type of MIDI message (MIDI Note or Program Change) that you want to use for triggering Lock snapshots. You can select None to disable the feature.
In the Source menu that appears below, select the MIDI input that the Lock changes should receive MIDI messages from. The menu shows all the MIDI inputs that have been configured in the MIDI page of the Preferences panel. Refer to Preferences – MIDI page for more information. You can select None to disable the feature.
In the Channel menu, select the MIDI channel on which Lock changes should receive MIDI messages from the selected source (channel 1 by default). If a channel from that source is already in use in the Scene or Section settings above in the dialog, it is grayed out in the Channel menu and cannot be selected. First change the corresponding setting in the other section to make that channel available again.
Note
For more information on triggering Lock snapshots using your DAW (Digital Audio Workstation), please check the Knowledge Base on the Native Instruments website.
Using the Smart Strip
The Smart Strip puts control of several parameters at your fingertips: You can use the Smart Strip to apply pitch bend or modulation to the sound you are playing on the pads, tweak Perform FX in real-time, or play Sounds by strumming on the Smart Strip.
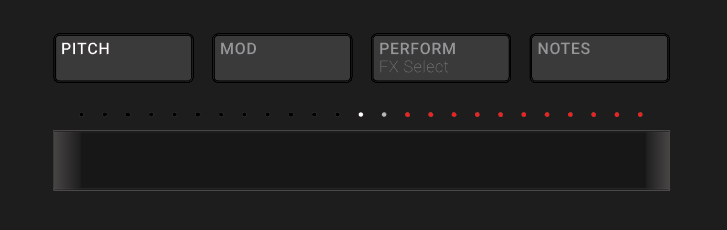 |
Smart Strip with PITCH mode activated.
When the Smart Strip modes are not in use, the Smart Strip’s LEDs show the playhead position within a Pattern or the song:
In Ideas view, the Smart Strip’s LEDs indicate the playhead position within the selected Pattern during playback and recording.
In Song view, the Smart Strip’s LEDs indicate the playhead position within the song.
This feature provides great visual feedback to aid your timing when recording or switching up patterns during a live set.
Note
This feature is not available when the Smart Strip modes (Pitch, Mod, Perform, and Notes) are in use.
Pitch mode
In Pitch mode, sliding your finger on the Smart Strip “bends” the pitch of the notes you play on the pads, i.e., it detunes the sound by a certain amount. If you have used the pitch bend wheel on a synthesizer or standard MIDI keyboard before, you are probably familiar with this effect.
In Pitch mode, the scale on the Smart Strip is centered, as indicated by a white LED in the middle of the Smart Strip. Sliding your finger to the left will flatten the pitch. Sliding your finger to the right will sharpen the pitch. The amount of pitch bend applied to the Sound is indicated by the LED dots above the Smart Strip. Once you lift your finger off the Smart Strip, the pitch of the sound will return to standard tuning.
To enable Pitch mode, press the PITCH button.
Modulation mode
In Modulation mode, sliding your finger on the Smart Strip modulates the sound of the notes you play on the pads. The Smart Strip always controls the parameter that is assigned to the standard MIDI CC #1. This MIDI Continuous Controller is reserved for the modulation wheel. If you have used the modulation wheel on a synthesizer or standard MIDI keyboard before, you are probably familiar with the effect.
In Modulation mode, the scale starts at the left side of the Smart Strip, as indicated by a white LED. Sliding your finger to the right will apply an increasing amount of modulation, as indicated by the LED dots above the Smart Strip. When you lift your finger off the Smart Strip, the modulation value will remain at the position where the strip was last touched; the LED dots above remain lit to indicate this position.
To enable Modulation mode, press the MOD button.
Perform mode
In Perform mode, the Smart Strip controls a parameter of one of the Perform effects (Perform FX) described in Perform FX. For each of the Perform FX, the Smart Strip is mapped to the parameter that makes the most sense to control in real-time.
Notes mode
In Notes mode, sliding your finger on the Smart Strip plays the pads you hold one after the other. Sliding your finger on the Smart Strip while no pad is held will play all Sounds mapped to the pad matrix in Group mode or Keyboard mode. If you slide your finger from left to right, the pads will be played in an ascending manner. If you slide your finger from right to left, the pads will be played in a descending manner. This applies regardless of which pads (if any) are held.
To play notes using the Smart Strip:
Load a Group (in Group mode) or a Sound (in Keyboard/Chords mode) so it is mapped to the pads.
Press the NOTES button to enable Notes mode.
Press and hold the pads you want to play.
Slide your finger on the Smart Strip to “strum” the sounds mapped to the held epads.