Working with Plug-ins
Maschine hosts a variety of Plug-ins, both Maschine exclusive and external VST instruments and effects. Learn everything you need to know about working with Plug-ins here.
Plug-ins are the building blocks of all sound in Maschine. They can be used at all three levels of the Maschine audio routing system: in Sounds, in Groups, and in the Master.
This chapter includes various general or specific Plug-in topics:
An overview of Plug-ins and how to handle them (Plug-in overview).
An exhaustive description of an essential Internal Instrument Plug-in in charge of playing back all sample content in Maschine: the Sampler (The Sampler Plug-in).
Specific information on Native Instruments and External Plug-ins (Using Native Instruments and External Plug-ins).
Plug-in overview
This section describes Plug-ins in general: where you find them, how you adjust their settings, and how you manage them.
Plug-in basics
In Arrange view, the content and settings of the focused Sound/Group or the Master are displayed in the Control area (in the middle of the software window):
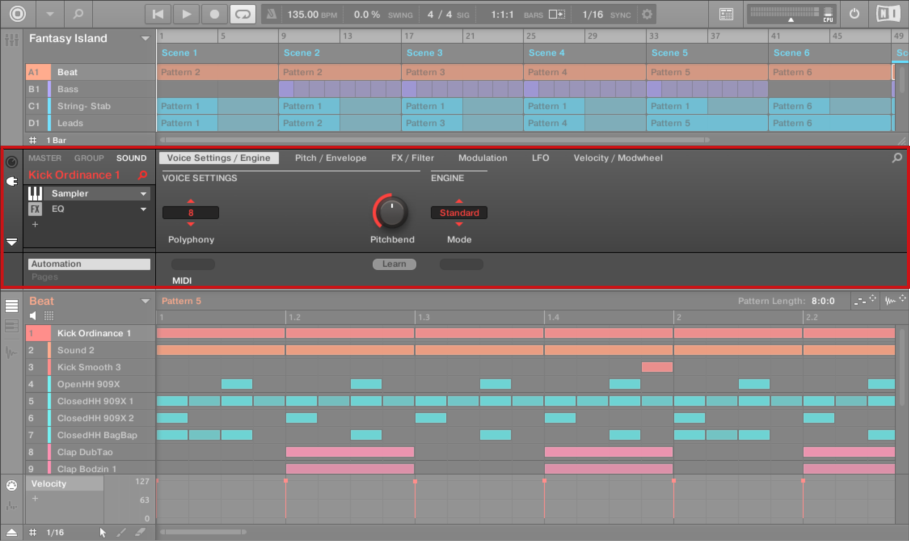
The Control area displaying the content of the Sound Kick Ordinance of the selected Sound slot 1.
Sounds, Groups, and the Master can each hold any number of Plug-ins. These are stacked up in the Plug-in List, on the left of the Control area.
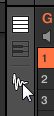
To show the Plug-in List, click the little Plug-in icon at the far left of the Control area:

In the Plug-in List, the processing order is always from top to bottom.
Tip
In addition to Plug-ins, each Sound, each Group, and the Master also provide a set of global settings called Channel properties. For more information, refer to Groove and Audio routing, remote control, and Macro Controls.
Different types of Plug-ins
Plug-ins can be of different types:
Instrument Plug-ins | Effect Plug-ins | |
|---|---|---|
Internal Plug-ins | Audio, Sampler, Drum Synth, Bass Synth, Poly Synth | Maschine internal effects |
Native Instruments Plug-ins | VST/AU instrument plug-ins from Native Instruments’ range of products | VST/AU effect plug-ins from Native Instruments’ range of products |
External Plug-ins | Third-party VST/AU instrument plug-ins | Third-party VST/AU effect plug-ins |
Instruments: These Plug-ins generate sound. Instrument Plug-ins can only be loaded in the first Plug-in slot of Sounds. Following Plug-ins are available:
Audio: Included with Maschine, the Audio Plug-in allows audio loops to playback in time with the tempo of your Project. Adding audio with the Loops tag from the Browser to the Sound slot will automatically load the Audio Plug-in in the first Plug-in slot of the Sound. For more information, refer to Using the Audio Plug-in.
Sampler: Included with Maschine, the Sampler Plug-in allows the selected Sound to playback Samples. Adding a Sample to the Sound slot will automatically load the Sampler in the first Plug-in slot of the Sound. For more information, refer to The Sampler Plug-in.
Drum Synths: Included with Maschine, these Plug-ins are mini-synths specialized in generating drum sounds. For more information, refer to Drum Synths.
Bass Synth: Included with Maschine, this Plug-in is a monophonic synthesizer specialized in generating bass sounds. For more information, refer to Bass Synth.
Poly Synth: Included in Maschine, this Plug-in is based on the Native Instruments Pro-53 plug-in. Poly Synth delivers the colorful character of a classic dual-oscillator synth built for full hands-on control with Maschine. For more information, refer to Poly Synth.
Native Instruments: You can use all Native Instruments Komplete instruments installed on your computer as VST/AU plug-ins. Products from Native Instruments are tightly integrated into Maschine.
External: You can also use VST/AU instrument plug-ins from any third-party manufacturers.
Effects: These Plug-ins modify the audio coming from the previous Plug-in slot (or from the incoming audio if the Effect is loaded in the first Plug-in slot of a Sound). Effect Plug-ins can be loaded in any Plug-in slot. Following Plug-ins are available:
Internal Effects: These are the Effect Plug-ins included with Maschine. To read every detail about each of the Maschine internal effects, and how to use them, refer to Audio routing, remote control, and Macro Controls and Effect reference.
Native Instruments: You can use all Native Instruments Komplete effects installed on your computer as VST/AU plug-ins. Products from Native Instruments are tightly integrated into Maschine.
External: You can also use VST/AU effect plug-ins from any third-party manufacturers.
What to load, and where
The type of Plug-in that you can load depends on the selected level (Sound, Group, or Master) and slot:
Effect Plug-ins (both internal and external) can be loaded in all Plug-in slots at all levels (Sound, Group, Master).
Instrument Plug-ins (both internal and external) can only be loaded in the first Plug-in slot of Sounds.
First Plug-in slot of Sounds: defining the Sound’s role
The Plug-in loaded in the first Plug-in slot of a Sound will determine the general role of this Sound:
If the first Plug-in slot holds an Instrument Plug-in (Sampler, Drum Synth, Native Instruments, or External instruments, refer to Plug-in basics), the Sound will generate its own audio.
If the first Plug-in slot holds an Effect Plug-in (Internal, Native Instruments, or External), the Sound will be available as bussing point for other audio signals (from within Maschine, and possibly from the outside world). This notably allows you to build up send effects or to apply effects to external audio. For more information, refer to Step 1: set Up a Sound or Group as send effect.
Tip
You can also sample directly to a Sound slot. This will automatically load a Sampler in its first Plug-in slot. For more information, refer to Effect reference.
Loading, removing, and replacing a Plug-in
This section describes in detail how to load, remove, and replace a Plug-in.
Loading, removing, and replacing a Plug-in in the software
Loading a Plug-in
The procedure to load a Plug-in with its default settings is common to all levels (Sound, Group, and Master) and all Plug-in types (Internal, Native Instruments, and External, as well as Instrument and Effect):
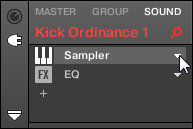
Set the focus to the Sound, Group, or the Master where you want to load the Plug-in (refer to Focusing on a Group or a Sound). In the picture below we click an empty Sound slot in the Sound List of the Pattern Editor and click the SOUND tab in the Control area above.
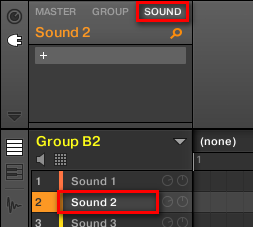
The Control area will now show the content (Channel properties or Plug-ins) of the Sound we have just selected.
At the far left of the Control area, click the little plug icon to display the Plug-ins.

This displays the Plug-in List on the left of the Control area:
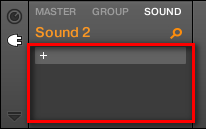
The Plug-in List is still empty because we selected an empty Sound slot. The only visible element in the list is a “+” icon at the top left.
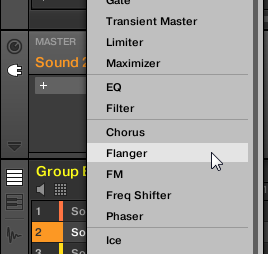
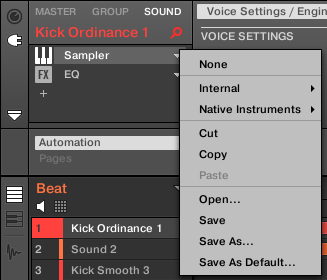
Click the slot with the “+” icon at the top of the Plug-in List.
This opens the Plug-in menu where you can select the desired Plug-in for loading (refer to below for a detailed description of the entries contained in the Plug-in menu).
After your selection the selected Plug-in sits at the top of the Plug-in List, in the first Plug-in slot of the Sound (in our example). In addition, some Native Instruments and External Plug-ins will automatically open in a floating window. For more information, refer to Opening/closing Plug-in windows.
You will notice that the “+” sign has moved to the next slot. Clicking it would allow you to load a Plug-in into the next Plug-in slot of that Sound, and so on.
Tip
Instead of using the Plug-in menu to load a Plug-in with its default settings, you can also use the Browser to load a particular preset for a Plug-in. In particular, this can come in handy to insert a new Plug-in between two existing Plug-ins of the Plug-in List. For more information, refer to Searching and loading files from the Library.
Removing and replacing a Plug-in
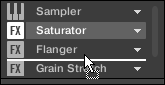
Once you have loaded a Plug-in into a Plug-in slot, the slot shows the name of the loaded Plug-in, preceded by an icon describing the type of Plug-in (Instrument or Effect), and followed by a down-pointing arrow:
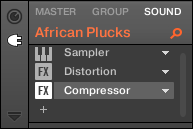
A few Plug-ins loaded.
This down-pointing arrow lets you open the Plug-in menu for slots already hosting a Plug-in.
In the Plug-in List, click the down-pointing arrow at the right of a Plug-in name to open the Plug-in menu for that slot. You can also right-click ([Ctrl]-click on macOS) the Plug-in name in the slot.
This will notably allow you to remove the loaded Plug-in from the slot:
To remove the Plug-in currently loaded in a slot, open its Plug-in menu and select None at the top of the menu.

The Plug-in is unloaded from the slot. All following Plug-ins are shifted one slot upwards to fill the gap.
Furthermore, the Plug-in menu also allows you to replace the loaded Plug-in with another one:
To replace the Plug-in currently loaded in a slot, open its Plug-in menu and select another Plug-in in the menu.
The original Plug-in is replaced with the newly selected one. The rest of the Plug-in List stays untouched.
Tip
You can also recall the search query that was used to find the Plug-in preset currently loaded in the Plug-in slot. For more information, refer to Using Quick Browse.
Content of the Plug-in menu
The entries in the Plug-in menu differ according to the Plug-in slot from which you are calling the menu:
The first Plug-in slot of a Sound accepts both Instrument and Effect Plug-ins. The entries available in their Plug-in menu are listed in the following table.
All other Plug-in slots at the Sound, Group, and Master level only accept Effect Plug-ins. Therefore, their Plug-in menus and submenus provide the same entries except for all entries for Instrument Plug-ins.
The Plug-in menus can have the following entries, from top to bottom:
Plug-in Menu Entry | Description |
|---|---|
Plug-ins | |
Presets submenu (only when a Native Instruments or External Plug-in is loaded) | Lists all VST/AU presets made available to Maschine by the VST/AU plug-in. This allows you to use your favorite presets of the VST/AU plug-in directly inside Maschine. For more information, refer to Using VST/AU Plug-in presets. |
None | Select None to remove the Plug-in currently loaded (refer to the previous paragraph). |
Internal | Lists all of Maschine internal Plug-ins. This includes:
|
Native Instruments | Lists available Native Instruments’ Instruments (first Plug-in slot of Sounds only) and Effects. For products working both as Instrument and Effect, the Effect Plug-in name is followed by the mention FX. If necessary each entry is followed by the plug-in type between brackets: (VST) or (AU). For more information, refer to Using Native Instruments and External Plug-ins. |
External | Lists the available External Plug-ins, for instance, the available VST/AU instrument (first Plug-in slot of Sounds only) and effect plug-ins from third-party manufacturers. Each entry is followed by the plug-in type between brackets: (VST) or (AU). For more information, refer to Using Native Instruments and External Plug-ins. |
Edit Commands | |
Cut | Removes the Plug-in from its current slot and stores the Plug-in and all its settings to the clipboard for later use. |
Copy | Copies the Plug-in and all its settings to the clipboard for later use. |
Paste | Loads into the current slot the Plug-in and all its settings that were cut or copied from another slot. This notably allows you to use a Plug-in in different locations (Sounds, Groups, Master) with the same settings. |
Preset Management | |
Open… | Allows you to open a Plug-in preset you have previously saved. |
Save As… | Allows you to save the current Plug-in settings as a preset for later use. This preset will appear in the Browser. |
Save As Default… (only when a Native Instruments or External Plug-in is loaded) | Allows you to save the current Plug-in settings as a default preset. This default preset will be recalled each time you load the Plug-in from the Plug-in menu. |
Notice
Note that the first two submenus Native Instruments and External only show the Plug-ins that are activated in the Plug-ins page of the Preferences panel. For more information, refer to Preferences – Plug-ins page.
Notice
The edit commands (Cut, Copy, and Paste) and preset management commands (Open, Save As…, and Save As Default…) available at the bottom of the Plug-in menu are covered in section Moving Plug-ins and Saving and recalling Plug-in presets.
Loading, removing, and replacing a Plug-in on the controller
Focusing on a Plug-in slot
On the controller, to navigate to the desired Plug-in slot, do the following:
At the top left of your controller, press the PLUG-IN button to enter Control mode and display the Plug-in slots of the focused Sound, Group or the Master.
Select the Sound, Group or the Master where the Plug-in is located (refer to Focusing on a Group or a Sound).
Move the 4-D encoder to the right to navigate to the desired Plug-in slot. The name of the selected Plug-in appears on the right display in the field between the arrows under Button 5 and 6. If there are no Plug-ins in the channel this will read EMPTY.
The Plug-in slot is in focus. You are now ready to load, insert, remove or replace a Plug-in in this slot as described in the following paragraphs.
Loading a Plug-in in place
To load a Plug-in into the focused Plug-in slot, do the following:
Press SHIFT + BROWSER (Plug-in) to open the Plug-in Browser and browse the available Plug-ins.
If the slot in focus is the first Plug-in slot of a Sound, on the left display, turn Knob 1 to select the TYPE from Instrument or Effect.
The right display shows the list of available instrument or effect Plug-ins. For all other Plug-in slots the TYPE field is not available, only effect Plug-ins will be listed in the right display.
Turn Knob 2 to select the VENDOR from INTERNAL, or the name of the vendor, e.g. Native Instruments.
Turn the 4-D encoder or Knob 8 to browse the Plug-ins corresponding to your TYPE (and possibly VENDOR) selection.
When you have found the Plug-in you want to use, press the 4-D encoder or Button 8 (LOAD) to load it. You can also use Buttons 5 and 6 to step through the list and load each Plug-in directly.
Notice
If the Plug-in slot was not empty, the previous Plug-in will be replaced with the new Plug-in.
Tip
Instead of using the Plug-in Browser, you can also use the common Browser to load a particular preset for a Plug-in (refer to Searching and loading files from the Library).
Inserting a Plug-in
To insert a Plug-in directly after the selected Plug-in slot, do the following:
Press SHIFT + Button 3 (INSERT).
This automatically opens the Browser on your controller and locks the File Type to EFFECT (Button 1 and 2, normally used in the Browser to select the desired File Type, are here deactivated).
Choose and load the desired Plug-in preset via the usual workflow in the Browser (refer to Focusing on a Group or a Sound).
When you finally press the 4-D encoder or Button 8 (LOAD), your controller automatically switches back to Control mode and the new Plug-in is loaded in the next Plug-in slot. All following Plug-ins are shifted one slot downwards to make room for the new Plug-in.
Removing a Plug-in
To remove a Plug-in from its slot, do the following:
Press SHIFT + Button 8 (REMOVE).
The Plug-in is unloaded from the slot. All following Plug-ins are shifted one slot upwards to fill the gap.
Tip
Alternatively, you can press SHIFT + BROWSE, turn the 4-D encoder (or Knob 8) to select (none) at the top of the list in the right display, and press the 4-D encoder or Button 8 (LOAD).
Replacing a Plug-in
To replace a Plug-in, simply focus on its slot and load another Plug-in in place as described above.
Tip
You can also recall the search query that was used to find the Plug-in preset currently loaded in the Plug-in slot. For more information, refer to Using Quick Browse.
Focusing on a Plug-in slot from the Browser on your controller
On your controller, you can choose a Plug-in slot directly from within the Browser using the SHIFT button. While using the Browser, the SHIFT button provides temporary access to the Plug-in mode, allowing you to focus on another slot from the Plug-in List. This works at any level of the Maschine audio routing: in Sounds, in Groups, and in the Master.
To focus on another Plug-in slot from within the Browser:
Press the BROWSE button to enter Browse mode.
Press SHIFT + Button 5 or 6 to focus on another Plug-in slot.
The focus switches to the other Plug-in slot and you can continue browsing the Maschine Library to load the desired preset into that slot.
Adjusting the Plug-in parameters
The procedure for adjusting the Plug-in parameters is common to all types of Plug-ins and all sets of Channel properties. For more information, refer to Navigating Channel properties, Plug-ins, and Parameter pages.
Notice
Native Instruments and External Plug-ins only: You can also adjust the Plug-in parameters via the VST/AU plug-in’s own user interface. Refer to Using Native Instruments and External Plug-ins for more information.
Bypassing Plug-in slots
You can bypass (or “mute”) any Plug-in slot. When a Plug-in slot is bypassed, its Plug-in is temporarily removed from the signal flow and does not process the audio passing through the slot. Instead, the incoming audio is directly sent to the next Plug-in slot for further processing (or to the channel’s output if you bypass the last Plug-in slot).
Bypassing Plug-in slots can be very useful in various situations, for example:
Bypassing and re-enabling an effect during a live performance.
Comparing the sound with and without an effect.
Troubleshooting complex effect chains and routings (“Where does this strange reverb tail come from?”).
Bypassing a Plug-in slot in the software
To bypass a Plug-in, do the following:
If you want to bypass a Plug-in of the Master, click the MASTER tab in the top left corner of the Control area.
If you want to bypass a Plug-in of a Group, click the desired Group on the left of the Arranger, and click the GROUP tab in the top left corner of the Control area.
If you want to bypass a Plug-in of a Sound, click the Group of its parent Group in the Arranger, click the desired Sound slot on the left of the Pattern Editor, and click the SOUND tab in the top left corner of the Control area.
In the Plug-in List, click the icon left to the Plug-in name (keys for an Instrument Plug-in, FX for an Effect Plug-in) to bypass this Plug-in.
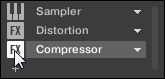
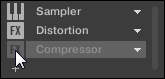
The Plug-in does not affect the sound anymore. The icon is grayed out to indicate that this slot is now bypassed.
Use the same method to unmute the Plug-in:
To activate the bypassed slot again, click its grayed-out icon.
Notice
In most cases, the first Plug-in slot contains an Instrument Plug-in (for example, a Sampler). Be careful: bypassing the slot will mute the whole Sound!
Bypassing a Plug-in slot on the controller
Press the PLUG-IN button to enter Control mode and display Plug-in slots.
If you want to bypass a Plug-in of the Master, press Button 1 to select the MASTER tab.
If you want to bypass a Plug-in of a Group, press Button 2 to select the GROUP tab and press the Group button A–H corresponding to the desired Group. If necessary, first press SHIFT + the desired Group button A–H to switch to the Group bank containing that Group.
If you want to bypass a Plug-in of a Sound, press Button 3 to select the SOUND tab, select its parent Group as described in the previous step, and press SELECT + the pad of that Sound (or simply hit its pad if pads are in Pad Mode).
Press Button 5/6 to select the desired Plug-in slot.
The name of the selected Plug-in appears in the field between the left and right arrows under Button 5 and 6. If there are no Plug-ins in the channel this will read EMPTY.
Press SHIFT + Button 7 (BYPASS) above the right display to bypass the selected Plug-in slot.
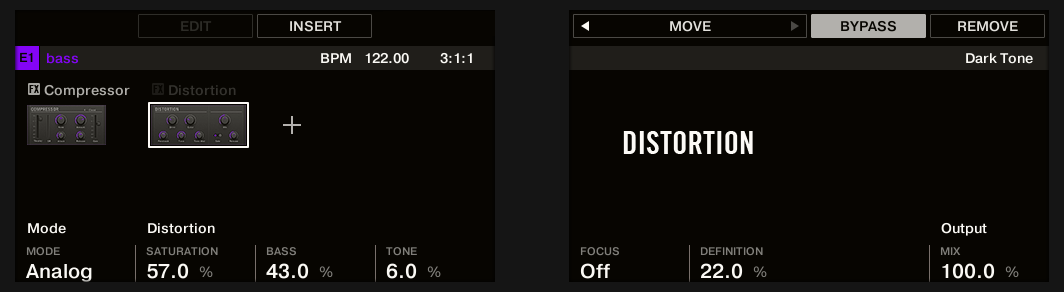
The Plug-in is bypassed and does not affect the sound anymore. In the left display, the Plug-in icon and name are grayed out. When you hold SHIFT, Button 7 is fully lit and the BYPASS label on the right display is highlighted to indicate that this Plug-in slot is now bypassed:
Use the same method to unmute the Plug-in:
To unmute the Plug-in, press SHIFT + the lit Button 7 (BYPASS).
Notice
In most cases, the first Plug-in slot contains an Instrument Plug-in (for example, a Sampler). Be careful: bypassing the slot will mute the whole Sound!
Using side-chain
Some Plug-ins provide side-chaining. This allows you to control their operation using another audio signal sent to their secondary, so-called "side-chain" input. For more information, refer to Using the side-chain input.
Moving Plug-ins
Maschine allows you to move Plug-ins across the Plug-in List and across Sounds and Groups.
Moving Plug-ins within the Plug-in List
To move a Plug-in in the Plug-in List, click its name and drag your mouse vertically. While you are holding the mouse button, an insertion line appears at the place in the Plug-in List where the Plug-in would land if dropped. Drag your mouse until the insertion line is at the desired location, then release the mouse button to drop the Plug-in onto this new location.
The Plug-in takes its new place between the existing Plug-ins while keeping the exact same settings. All other Plug-ins sitting between their old and new location are shifted one slot upwards/downwards to fill the gap.
Tip
Dragging Plug-ins can be very useful if you want to quickly change the effects’ processing order in the channel.
Moving Plug-ins across Sounds and Groups
Moving Plug-ins is not only possible within the same Sound but also across Sounds, across Groups, across levels (e.g., from a Sound to a Group), or across Sounds in different Groups.
To move a Plug-in to another Sound, another Group, or the Master, do the following:
Click the down-pointing arrow of the slot containing the Plug-in that you want to move.
In the Plug-in menu that opens, select Cut.
Select the Sound, Group, or the Master where you want to move the Plug-in (refer to section Focusing on a Group or a Sound).
Click the down-pointing arrow of the target slot (the slot where you want to move the Plug-in to).
In the Plug-in menu that opens, select Paste.
The Plug-in with all its parameters is moved from its original location to its target location.
Duplicating Plug-ins across Sounds and Groups
Instead of selecting Cut in the Plug-in menu of the original slot (see above), select Copy to duplicate the Plug-in to another slot.
Alternative: the Plug-in Strip
You can also manipulate your Plug-ins via the Plug-in Strip in the Mix view of Maschine. For more information, refer to The Plug-in Strip.
Saving and recalling Plug-in presets
All settings and assignments of a Plug-in can be saved as Plug-in presets. Once saved, Plug-in presets can be accessed from the Browser, both in the software and from your controller (refer to Searching and loading files from the Library). This is a very quick and convenient way to recall Plug-ins with their parameters already set to specific values. In addition, a Plug-in preset can be assigned as the default preset so the Plug-in opens with that preset automatically loaded.
The Maschine file format for Native Instruments plug-ins allows you to save a preset in the format native to the plug-in, and freely exchange files between the plug-in in stand-alone mode, Maschine, and Komplete Kontrol.
Notice
To use this feature you must ensure that all installed Native Instruments plug-ins are up-to-date. Check Native Access for the latest updates.
Saving Plug-in presets
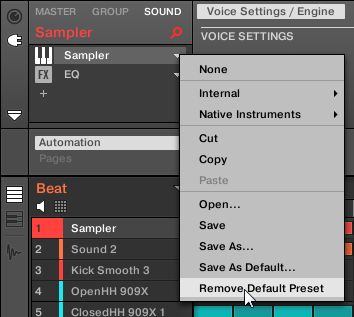
Saving Plug-in presets can only be done in the software via the Plug-in menu. To access the Plug-in menu, click the drop-down arrow on the right-hand side of the Plug-in slot in the Plug-in List:
Opening the Plug-in menu.
The commands for saving Plug-in presets are found at the bottom of the Plug-in menu.
The commands for saving and recalling Plug-in presets in the Plug-in menu.
Plug-in menu entry | Description |
|---|---|
Save | Saves your changes to the preset currently loaded. |
Save As… | Saves the current Plug-in settings as a new preset on your hard disk. |
Save As Default… | Saves the current settings as the default preset for the Plug-in. This default preset will be loaded with this Plug-in the next time it is loaded. |
Remove Default Preset | Removes the default preset for the current Plug-in. This menu item only appears after a default preset has been saved using the Save As Default... command. |
Tip
The Save As… and Save As Default… commands notably allow you to import into the Maschine Library your user presets for Native Instruments instruments/effects as well as both factory and user presets for third-party instruments/effects. For more information, refer to Using VST/AU Plug-in presets.
Recalling Plug-in presets
All Plug-in presets you saved using the Plug-in menu are available in the Browser, both in the software and from your controller. Each Plug-in preset is automatically placed in the corresponding “Instrument” or “Effect” category in the File Type selector of the Browser’s LIBRARY pane. Furthermore, user presets are available when selecting the User content in the Content selector of the Browser’s LIBRARY pane. For more information on how to load Plug-in presets in the Browser, refer to Searching and loading files from the Library.
You can also assign tags to the Plug-in presets that you have saved, making them easier to find in the Browser. For more information, refer to Editing the files’ tags and properties.
In addition, the Maschine Library already provides a collection of Plug-in presets for Maschine’s Internal Plug-ins. Furthermore, any Native Instruments product installed on your computer will have its own factory library already imported into the Maschine Browser so that you can browse and load its factory presets directly from Maschine.
Notice
Komplete products and Maschine Expansions have to be updated to ensure their full integration into the Maschine Library. To update any Native Instruments product installed on your computer, start Native Access. For more information, refer to the Native Access web page.
Alternatively, you can load a Plug-in preset from the Plug-in menu by selecting the Open… command, then navigating your file system and selecting the desired preset file (extension “.mxinst” for Instrument Plug-in presets, “.mxfx” for Effect Plug-in presets, or “.mfxp” for Maschine 1.x Module presets).
Removing a default Plug-in preset
For each Plug-in, you can set a default preset that is loaded automatically every time the Plug-in is loaded. If this default preset is no longer needed, you can use the Plug-in menu to remove it.
To remove the default preset of a Plug-in using the Plug-in menu:
Click the Sound containing the Plug-in.
Click the Plug-in drop-down menu.
Click Remove Default Preset in the menu to remove the default preset.
The default preset for the Plug-in is removed and the Plug-in will use its factory settings next time it is loaded.
You can also use the Plug-in Manager in the Preferences panel to gain an overview of your default Plug-in presets and remove them if required. Refer to Preferences – Plug-ins page for more information.
Notice
Removing the default preset for a plug-in is a software-only feature.
The Sampler Plug-in
The Sampler Plug-in allows you to playback any Sample in Maschine — including all Groups, Sounds, and Samples of the factory library. The Sampler comes with an extensive set of parameters that offer various ways to further shape each of your Sounds individually. You can tune, change basic dynamics and apply effects as well as different modulation options.
Tip
Many of the Sampler parameters can be modulated and automated. For more information, refer to section Recording and editing modulation and Controlling parameters via MIDI and host automation.
Notice
In case Maschine cannot find the Sample(s) loaded in a Sampler Plug-in, a Missing Sample dialog will appear and help you locate the missing Sample(s) again. For more information, refer to Locating missing samples.
This section describes the specific parameters found in the Sampler. For a general description of the features and characteristics of Plug-ins (including the Sampler), refer to Plug-in overview.
The Sampler parameters are organized into six pages:
Page 1: Voice Settings / Engine: Page 1: Voice Settings / Engine.
Page 2: Pitch / Envelope: Page 2: Pitch / Envelope.
Page 3: FX / Filter: Page 3: FX / Filter.
Page 4: Modulation: Page 4: Modulation Envelope.
Page 5: LFO: Page 5: LFO.
Page 6: Velocity / Modwheel: Page 6: Velocity / Modwheel.
You can select these Parameter pages for displaying/editing via the usual way described in Navigating Channel properties, Plug-ins, and Parameter pages. For example:
To display a particular Parameter page in the software, click its label at the top of the Control area.
Notice
We show here the Sampler parameters as they appear in the Control area of the Arrange view. The Sampler also provides a custom panel in the Plug-in Strip of the Mix view. For more information, refer to Panel for the Sampler.
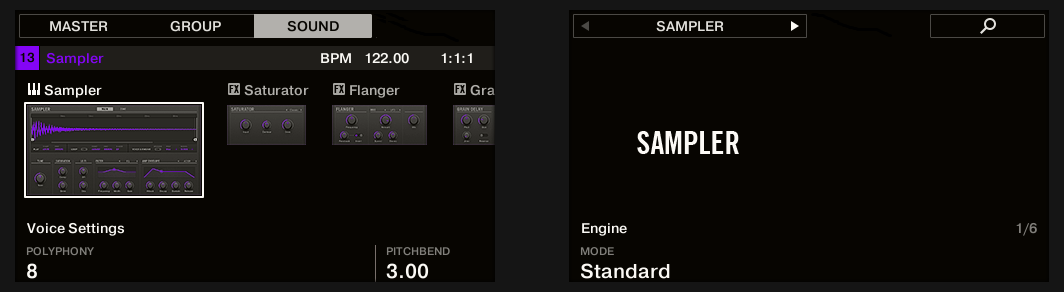
Page 1: Voice Settings / Engine
Sampler parameters, page 1 of 6: Voice Settings and Engine on the controller.

Sampler parameters, page 1 of 6: Voice Settings and Engine in the software.
Parameter | Description |
|---|---|
Voice Settings section | |
Polyphony | Here you can define a voice limit for the Sound, that is the maximum number of voices (notes) the Sampler can play simultaneously. Once this polyphony has been reached, triggering any additional note will kill the “oldest” note still playing (i.e. the note that was triggered first). The available values are 1, 2, 4, 8 (default), 16, 32, and 64. You can also set this to Legato. In that case, the polyphony is set to 1 and the Sampler performs a continuous pitch transition between consecutive notes. |
Glide | Allows the duration between consecutive notes to be adjusted when Legato is selected for the Polyphony parameter. |
Pitchbend | Here you can adjust how the Sound reacts to incoming MIDI Pitchbend messages from an external MIDI controller or your host application. For more information on how to set up your Sounds to receive MIDI. For more information, refer to Triggering Sounds via MIDI notes. |
Engine section | |
Mode | This allows you to select between different models for the sampling engine. Besides the default Standard setting, the other options MP60 and S1200 emulate the sound of two legendary Samplers that are often used in Hip-Hop and similar genres of music. The latter comes in various flavors offering different filtering: S1200 (no filtering), S1200 L (for low-pass filtering), S1200 LM (for low-mid-pass filtering), S1200 HM (for mid-high-pass filtering), and S1200 High (for high-pass filtering). |
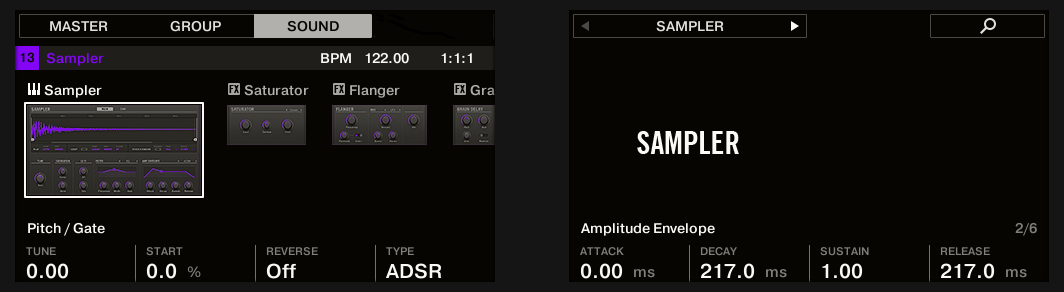
Page 2: Pitch / Envelope
Sampler parameters, page 2 of 6: Pitch / Gate and Amplitude Envelope on the controller.

Sampler parameters, page 2 of 6: Pitch / Gate and Amplitude Envelope in the software.
Parameter | Description |
|---|---|
Pitch / Gate | |
Tune | Defines the basic pitch of your Sample: turn the knob to the right for a higher pitch and to the left for a lower pitch. |
Start | Determines the start point of the Sample. This parameter can also be modulated by the Velocity control. For more information, refer to Page 5: LFO. |
Reverse | If Reverse is activated, the Sample will be played backward. |
Type | Selects from three different types of amplitude envelopes. See below for more information. |
Amplitude Envelope
The Amplitude Envelope section allows you to tailor your Sample in terms of its loudness over time.

The Type selector.
The Type selector allows you to choose from three different types of amplitude envelopes. Depending on the selected type, the available parameters in the Amplitude Envelope section will differ (see table below):
One-shot: This is typical vintage drum machine behavior: the sample is played in its entirety from beginning to end with no envelope. If One-shot is selected, the Amplitude Envelope section doesn’t display any parameters.
AHD: AHD mode disables the Sustain and Release controls of the ADSR envelope (see below), and replaces them with the Hold parameter. AHD mode is ideal for “fire and forget” behavior, whereby you would like to have the sound trigger for a certain amount of time regardless of how long you hold the pad down.
ADSR: Typically, the ADSR envelope is used for longer, sustained Samples that require complex dynamic control.
Tip
Unlike many other hardware devices, the pads on Maschine are sensitive not only to being hit but also to being held, so using the ADSR envelope, you can make the pads behave like a MIDI keyboard and sustain a note only for as long as it is held down.
Parameter | Description |
|---|---|
Amplitude Envelope | |
Attack (AHD and ADSR) | Attack determines how quickly the Sound reaches full volume after being triggered. |
Hold (AHD only) | Hold determines how long the envelope will stay at its maximum level. |
Decay (AHD and ADSR) | Decay determines how fast the envelope drops to the Sustain level in ADSR mode; in AHD mode, it is used to adjust how fast the Sound dies down. This parameter can also be modulated by the Velocity control. For more information, refer to Page 5: LFO. |
Sustain (ADSR only) | Sustain determines the constant level being kept after Decay until the note ends. This can also be controlled by an external MIDI controller or keyboard using the MIDI Control Change 64. |
Release (ADSR only) | Release determines how long the sound takes to fade out after the note has ended. |
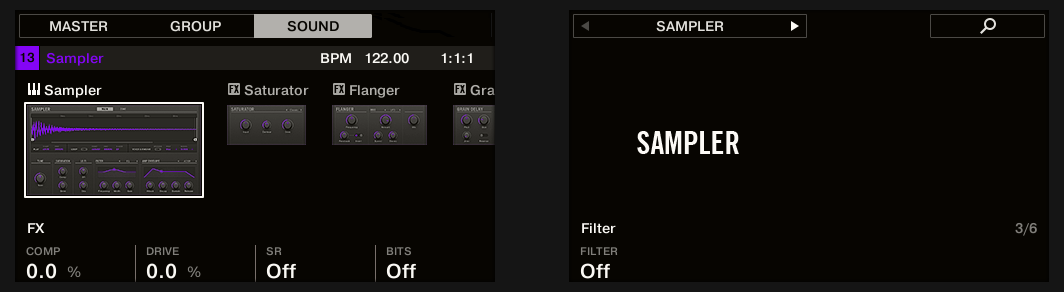
Page 3: FX / Filter
Sampler parameters, page 3 of 6: FX and Filter on the controller.

Sampler parameters, page 3 of 6: FX and Filter in the software.
FX
This is a small selection of basic effects, not to be mixed up with the collection of Effect Plug-ins covered in depth in chapter Effect reference.
Parameter | Description |
|---|---|
FX | |
Comp | Allows you to give a Sound more density. |
Drive | Defines the amount of saturation applied to a Sound. |
SR | SR stands for “sample rate”: you can use it to lower the original sample rate in order to make the Sound more lo-fi. |
Bits | Allows you to lower the original bit depth of the Sound, resulting in a more rough, digital-sounding lo-fi effect. |
Filter
The Filter selector in the Filter section gives you access to a set of different filters. Using the arrows or clicking the type currently displayed, you can choose from different filter type settings: Off, LP2 , BP2 , HP2 , and EQ . Each type results in different parameters to the right of it:
Filter modes | Description |
|---|---|
Off | No filter. |
LP2 | LP2 is a low-pass filter with Cutoff and Resonance parameters. Cutoff can be modulated by Velocity, the Modulation Envelope, the LFO, or the MIDI Modulation Wheel. |
BP2 | BP2 is a band-pass filter with a Cutoff parameter. Cutoff can be modulated by Velocity, the Modulation Envelope, the LFO, or the MIDI Modulation Wheel. |
HP2 | HP2 is a high-pass filter with Cutoff and Resonance parameters. Cutoff can be modulated by Velocity, the Modulation Envelope, the LFO, or the MIDI Modulation Wheel. |
EQ | The EQ is an equalizer with Frequency, Bandwidth , and Gain parameters. |
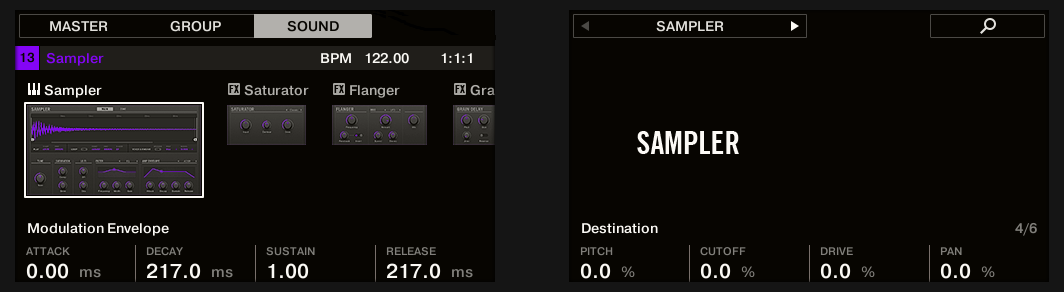
Page 4: Modulation Envelope
Sampler parameters – page 4 of 6: Modulation Envelope and Destination on the controller.

Sampler parameters – page 4 of 6: Modulation Envelope and Destination in the software.
Modulation Envelope
The Modulation Envelope section offers an additional envelope allowing further modification (or “modulation”) of specific Sampler parameters according to the way you play on the pads. Its parameters are matched to those of the Amplitude Envelope section on page 2 (refer to Page 2: Pitch / Envelope), so that you have either an ADSR (Attack, Decay, Sustain, Release) envelope or an AHD (Attack, Hold, Decay) envelope to modulate your parameters. If you choose One-shot mode, only the AHD envelope (pictured) will be available for modulation.
Envelope controls | Description |
|---|---|
Attack | The time it takes for the envelope to reach its maximum level. |
Hold | How long the envelope will stay at its maximum level. |
Decay | With Decay you adjust how fast the envelope drops to the sustain level in ADSR mode; in AHD mode it is used to adjust how fast the envelope fades out. |
Sustain | Maintains the level as long as the note is played. |
Release | The time for the sustain level to return to zero after the note has ended. |
Destination
This is where you define modulation targets for the modulation envelope, i.e. the parameters you want this envelope to control. The knobs adjust the amount of modulation for the following targets:
Parameter | Modulation destination |
|---|---|
Pitch | Tune parameter of the Pitch / Gate section on the Pitch / Envelope page (page 2). |
Cutoff | Cutoff parameter of the Filter section (with filter types LP2, HP2, BP2 only) on the FX / Filter page (page 3). |
Drive | Drive parameter of the FX section on the FX / Filter page (page 3). |
Pan | Pan parameter on the Audio page of the Sound’s Output properties. For more information, refer to Configuring the main output of Sounds and Groups for more information. |
Page 5: LFO
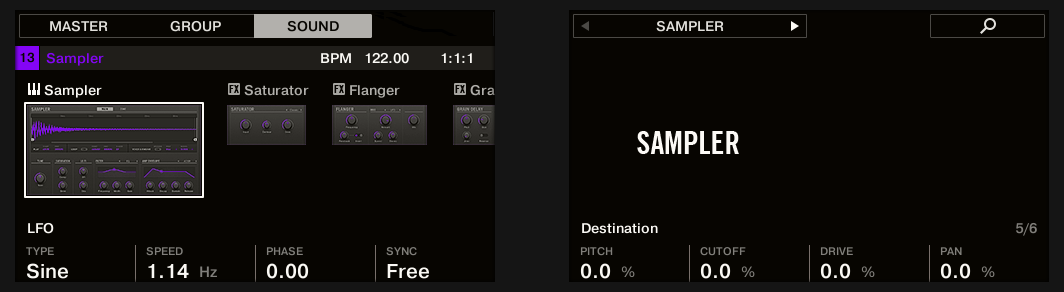
Sampler parameters, page 5 of 6: LFO and Destination on the controller.

Sampler parameters, page 5 of 6: LFO and Destination in the software.
LFO
The LFO (Low-Frequency Oscillator) is another modulation source based on waveforms with different shapes.
LFO controls | Description |
|---|---|
Type | Here you can choose the shape of the LFO waveform. Available shapes are Sine, Tri (Triangle), Rect (Rectangle), Saw,and Random. |
Speed | Controls the rate of the LFO measured in hertz (Hz). If you choose to synchronize the Speed by activating Sync, it will show note values instead of hertz. |
Phase | Defines the initial phase of the LFO waveform, from -0.50 to 0.50. |
Sync | The Sync selector is used to synchronize the LFO with the tempo of your Project. If Free is selected, the LFO rate is independent of the Project tempo. If Retrig or Lock is activated, the values of the Speed parameter will change into note values ranging from 16/1 (= one modulation cycle in 16 bars) to 1/32 (one cycle in 1/32nd note) and be synced with the Project tempo. While Retrig restarts the LFO at each new note (each note has another LFO phase), Lock keeps the LFO phase synchronized to the song position for all notes. |
Destination
This is where you define modulation targets for the LFO, i.e. the parameters you want this LFO to control. The knobs adjust the amount of modulation for the following targets:
Parameter | Modulation destination |
|---|---|
Pitch | Tune parameter of the Pitch / Gate section on the Pitch / Envelope page (page 2). |
Cutoff | Cutoff parameter of the Filter section (with filter types LP2, HP2, BP2 only) on the FX / Filter page (page 3). |
Drive | Drive parameter of the FX section on the FX / Filter page (page 3). |
Pan | Pan parameter on the Audio page of the Sound’s Output properties (see Configuring the main output of Sounds and Groups for more information). |
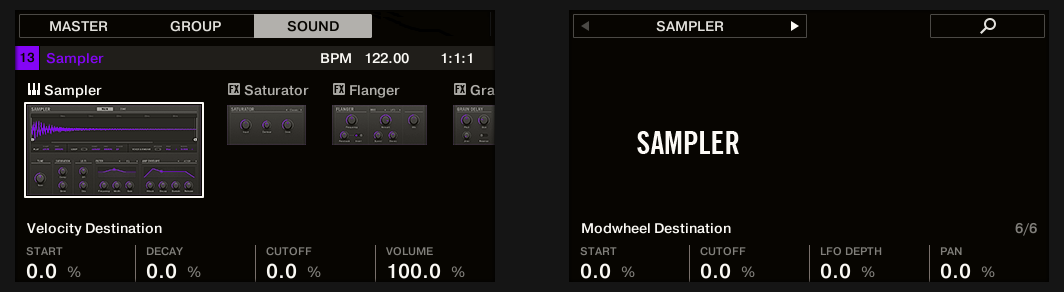
Page 6: Velocity / Modwheel
Sampler parameters – page 6 of 6: Velocity Destination and Modwheel Destination on the controller.

Sampler parameters – page 6 of 6: Velocity Destination and Modwheel Destination in the software.
Velocity Destination
This section allows you to use the input velocity in order to modulate various parameters.
Parameter | Modulation destination |
|---|---|
Start | Start parameter of the Pitch / Gate section on the Pitch / Envelope page (page 2). Positive values shift the Sample start position later in time as you play harder, negative values shift it closer to the beginning of the Sample as you play harder. Tip: a typical example for this parameter is setting it so that the initial attack transient of a snare drum is heard only at high velocity values. This makes it sound “snappier” when you play hard, and “muffled” or muted when you play softly. |
Decay | Decay parameter of the Amplitude Envelope section on the Pitch / Envelope page (page 2). |
Cutoff | Cutoff parameter of the Filter section (with filter types LP2, HP2, BP2 only) on the FX / Filter page (page 3). |
Volume | This allows you to modulate the volume, which is what velocity normally is used for. |
Modwheel Destination
Here you can determine how incoming MIDI data sent by the Modulation Wheel affects various parameters.
Parameter | Modulation destination |
|---|---|
Start | Start parameter of the Pitch / Gate section on the Pitch / Envelope page (page 2). |
Cutoff | Cutoff parameter of the Filter section (with filter types LP2, HP2, BP2 only) on the FX / Filter page (page 3). |
LFO Depth | Use this knob to adjust how much the Modulation Wheel affects the depth of the LFO modulation (for all targets) defined on the LFO page (page 5). |
Pan | Pan parameter on the Audio page of the Sound’s Output properties (see Configuring the main output of Sounds and Groups for more information). |
Using Native Instruments and External Plug-ins
Maschine allows you to load VST/AU plug-ins from Native Instruments (we call them "Native Instruments Plug-ins") or from any third-party manufacturer (we call them "External Plug-ins"), and to use them like the Internal Plug-ins of Maschine.
As with Internal Plug-ins, the following rules apply for loading Native Instruments and External Plug-ins:
An Instrument Plug-in can be loaded only in the first Plug-in slot of a Sound.
An Effect Plug-in can be loaded in any Plug-in slot of any Sound, any Group, or of the Master.
The following sections describe additional features and tasks specific to Native Instruments and/or External Plug-ins compared to Internal Plug-ins. For all other tasks (for example, loading Plug-ins, adjusting Plug-in parameters, etc.), refer to Plug-in overview.
Opening/closing Plug-in windows
When you load a Native Instruments or External Plug-in into a Plug-in slot, you can open a floating window containing the original user interface of the instrument or effect.
Notice
Plug-ins of Native Instruments platform products (Reaktor, Kontakt, Guitar Rig) are automatically opened in floating windows when loaded from the Plug-in menu. All other Native Instruments Plug-ins as well as all External Plug-ins are not opened in floating windows by default, however they will remember their last state: If such a Plug-in has previously been opened in its floating window, when you load a new instance of the same Plug-in it will also open in a floating window.
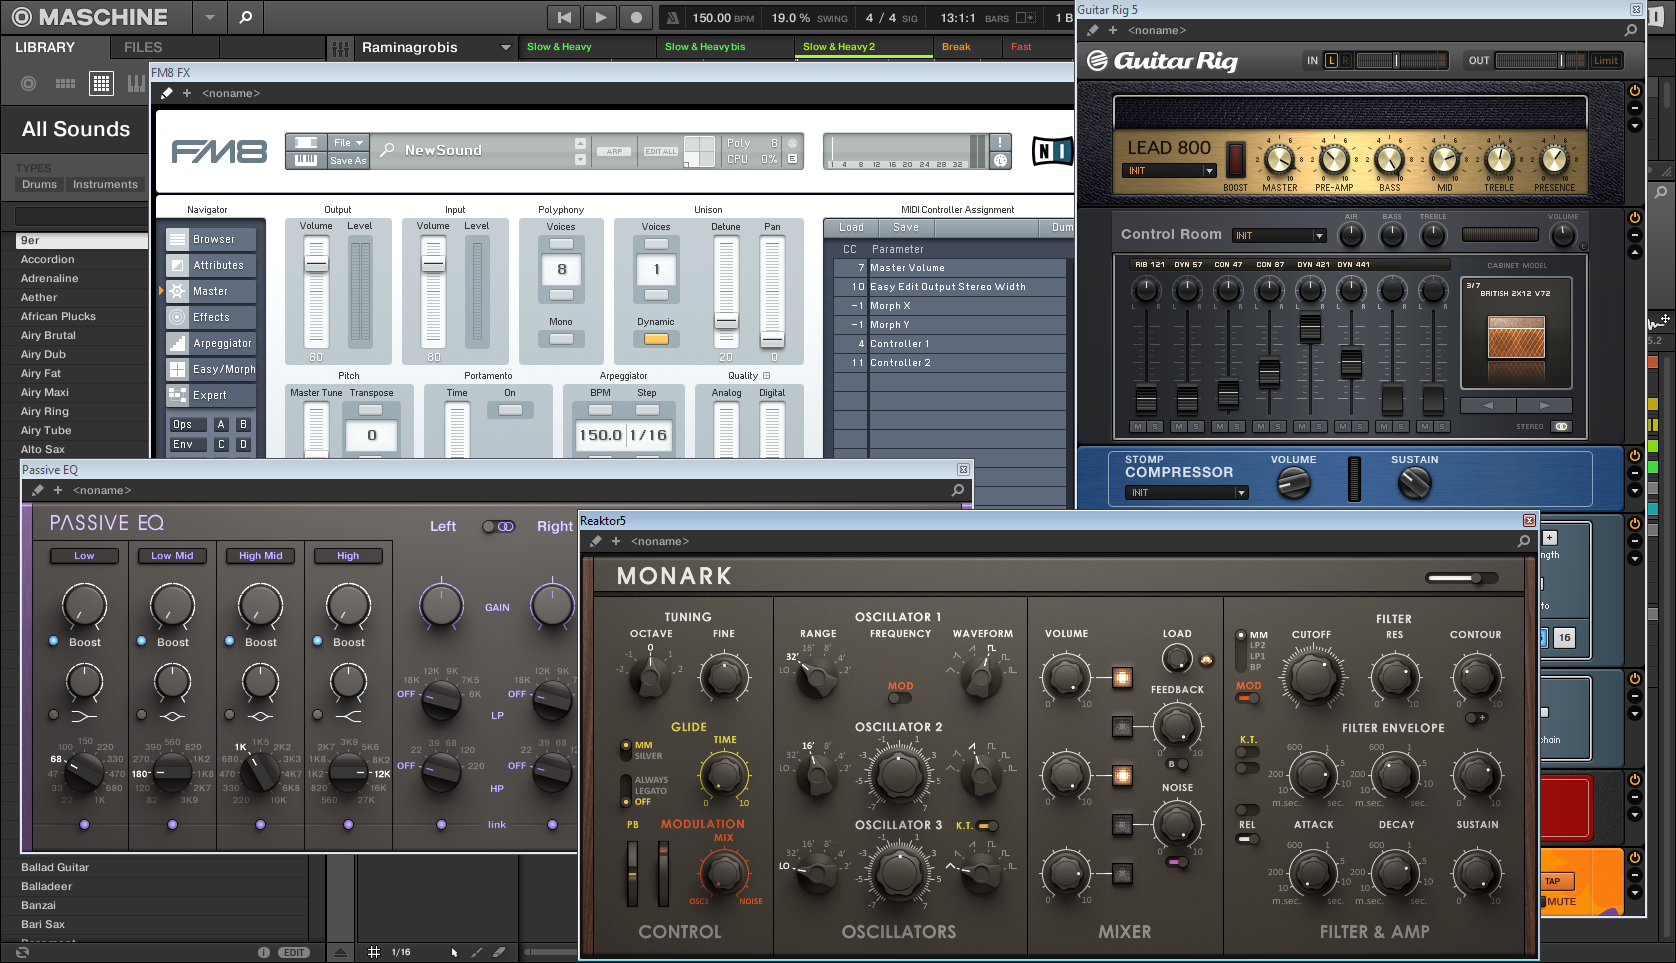
Maschine showing the user interfaces of a few Native Instruments Plug-ins (MONARK, PASSIVE EQ, Guitar Rig, and FM8).
When a Native Instruments or External Plug-in has been loaded into a Plug-in slot, a little diagonal arrow appears left of the Parameter pages’ tabs, at the top of the Control area:
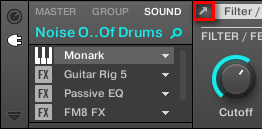
The little diagonal arrow next to the Parameter pages’ tabs.
To open or close the floating window of a Native Instruments or External Plug-in, click the Plug-in name in the Plug-in List and click the little diagonal arrow at the left of the Parameter pages’ tabs (at the top of the Control area). You can also double-click the Plug-in name in the list.
Tip
You can also close any floating window via the common button provided by your operating system at the top left or right corner of the window.
Maschine will always show the open floating windows of the focused Sound, Group or Master when selected. When you set the focus to another Sound, another Group or the Master, all open floating windows disappear, possibly replaced by those for Native Instruments and External Plug-ins loaded in the newly focused Sound/Group/Master.
Notice
For more information on selecting Plug-in slots, refer to Navigating Channel properties, Plug-ins, and Parameter pages.
Native Instruments Plug-ins: Default, Additional, and Edit views
Native Instruments Plug-ins provide the following extra features in the floating window:
Plug-in Header: This is the same as in the Plug-in’s panel in the Plug-in Strip (software in Mix view), with an additional Edit button described below. For more information, refer to Custom panels for Native Instruments Plug-ins.
Default view and Additional view: Each Native Instruments Plug-in can provide one or two custom views including reduced sets of controls. The Default view is available for every Native Instruments Plug-in, while the Additional view is available for specific Native Instruments Plug-ins only. If a Native Instruments Plug-in provides an Additional view, you can switch between the Default and Additional views by clicking the “+” button in the Plug-in Header: These views are also available in the Plug-in’s panel in the Plug-in Strip (Mix view in the software). For more information, refer to Custom panels for Native Instruments Plug-ins.
Edit view: The Edit view shows the full user interface of the original Native Instruments product. You can show/hide the Edit view by clicking the Edit button (showing a pencil icon) in the Plug-in Header:
Using the VST/AU Plug-in parameters
The parameters of Native Instruments and External Plug-ins offer various ways to shape each instrument/effect individually. Of course, you can adjust these parameters using the Plug-in’s own user interface (refer to Opening/closing Plug-in windows above). But Maschine also provides quick and convenient access to the parameters of any Native Instruments or External Plug-in: upon loading these parameters are auto-mapped and organized into Parameter pages that will appear both in the software’s Control area and on your controller in Control mode, exactly like Internal Plug-ins.
Having the Plug-in parameters on Parameter pages in Maschine has the following benefits:
You can step through the Parameter pages and tweak each parameter on your controller via the usual workflow directly after loading the Native Instruments or External Plug-in. For more information, refer to Navigating Channel properties, Plug-ins, and Parameter pages).
The Plug-in parameters can be modulated the same way as any other parameters. For more information, refer to Recording and editing modulation).
The current state of the Plug-in parameters can be saved to the Browser as a Plug-in preset for total recall of the Plug-in. For more information, refer to Saving and recalling Plug-in presets).

An auto-mapped Parameter page of the Massive Plug-in in the software.
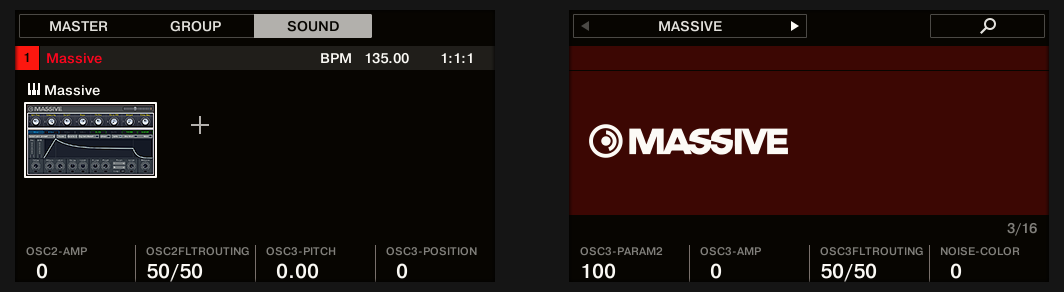
An auto-mapped Parameter page of the Massive Plug-in on the controller.
Setting up your own Parameter pages
As with any Plug-in, the parameters of a Native Instruments or External Plug-in are organized into pages. Each Plug-in can have any number of pages, each containing 8 knobs, which can be assigned to the parameters of the VST/AU instrument or effect.
Parameter pages may be assigned automatically using auto-mapping (refer to Using the VST/AU Plug-in parameters) or created individually via Learn mode. With Learn mode, you can create custom pages containing only the desired parameters arranged to fit your personal workflow. Moreover, you can create sections of parameters within each custom Parameter page, and define custom labels for parameters, sections, and entire Parameter pages.
Notice
Note that parameters of Native Instruments and External Plug-ins are systematically assigned to knobs (not to switches nor selectors) in Maschine, and this is also true in the Maschine software.
Notice
A parameter of a Native Instruments or External Plug-in can be assigned to one knob only.
To begin assigning parameters, do the following:
Select the Plug-in for which you want to customize parameter assignments.
Click the down-pointing arrow in the bottom left corner of the Control area to reveal the Assignment area underneath:
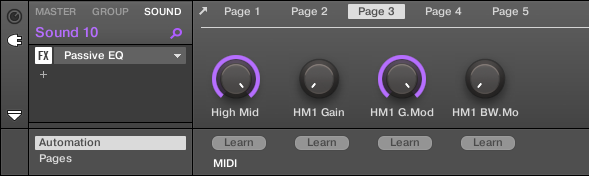
Click the Pages tab in the left part of the Assignment area:
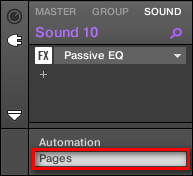
The Pages tab lights up and the Pages pane appears on its right. You are now ready to assign parameters to the Parameter pages.
Notice
The Pages tab can be clicked only for Native Instruments or External Plug-ins, and for the Macro properties. For all other Plug-ins and Channel properties, parameters and Parameter pages are not editable, and the Pages tab is grayed out and inactive. For more information on Macro Properties, refer to Creating custom sets of parameters with the Macro Controls.
When the Pages pane of the Assignment area is open, you also notice a few changes in the Control area above:
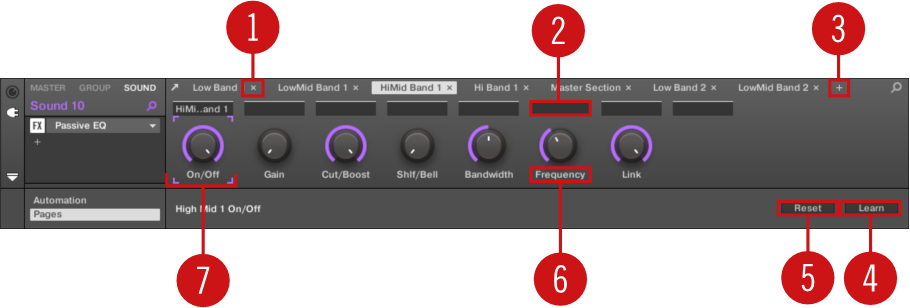
The Control area with the Pages pane active in the Assignment area underneath.
(1) Delete Page button (“x” symbol): Click the little “x” after a page name to delete this Parameter page.
(2) Section Label fields: These fields allow you to define sections of parameters within the displayed page. Double-click the field above the first parameter you want to include in the section, type the desired name for the section, and press [Enter] to confirm. The new section will include all following parameters until the next section starts (this can be seen only after you have closed the Assignment area). Moreover, the Parameter page’s name will mirror the label(s) of its section(s). If there is more than one section, the page name will mirror all of them separated by slashes.
(3) Add Page button (“+” symbol): Click the little “+” after the last page label to append a new page. By default, pages are labeled “Page 1,” “Page 2,” etc. You can change page labels by defining sections within your pages via the Section Label fields (2).
(4) Focus frame: Indicates the knob being assigned. Click any knob to edit its assignment.
(5) Parameter Label fields: Double-click these fields to enter custom labels for your parameters (press [Enter] to confirm). These labels will be mirrored everywhere in Maschine for the corresponding parameters.
(6) Reset button: Click Reset to remove the assignment for the selected knob.
(7) Learn button: Click Learn to enter Learn mode. Learn mode is an intuitive learn process that allows you to quickly assign the desired Plug-in parameters to all eight knobs of the current Parameter page at once. When Learn mode is launched, each knob of the page is successively focused starting with the knob selected for editing, indicated by the Focus frame (4). The next parameter you touch in the plug-in’s user interface (refer to Opening/closing Plug-in windows) will be assigned to the focused knob. Once a knob is assigned, the next knob to the right will become the focal point, and so on until the last knob is assigned. Once complete, Learn mode is automatically deactivated. Alternatively, at any time you can click Learn again if you want to stop assigning parameters. When Learn mode is active, you can manually change the focus of the knobs by clicking the desired knob in the Parameter area.
Tip
Once you have organized the Plug-in parameters into Parameter pages, you can also use Maschine’s Macro Controls to pick the most commonly used parameters, e.g., for live performances. For more information, refer to Creating custom sets of parameters with the Macro Controls.
Parameter slots: context menu
When the Assignment area is opened and the Pages tab is selected, a right-click on an assigned or unassigned Parameter slot’s label brings up a context menu.
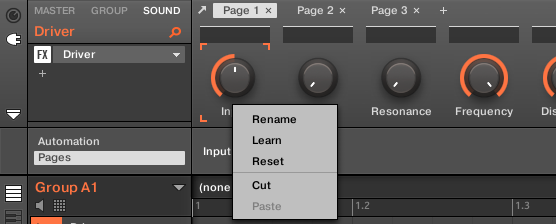
The parameter slots’ context menu.
The context menu contains following items:
Menu Item | Description | Keyboard Shortcuts |
|---|---|---|
Rename | Rename the Parameter. | Ctrl + R / Cmd + R |
Learn | Activates the Learn Mode. | |
Reset | Reset the Parameter. | |
Cut | Cut the Parameter to paste it in another position. | Ctrl + X / Cmd + X |
Copy | Copy the Parameter. | Ctrl + C / Cmd + C |
Paste | Paste a cut or copied Macro to a new position. Paste is only available if an applicable Parameter is in the clipboard: Paste is only available on the same Plug-in, this Plug-in can be placed somewhere else. | Ctrl + V / Cmd + V |
Page names: context menu
When the Assignment Area is opened and the Pages tab is selected, a right-click on a Page name at the top of the Parameter area opens a context menu.
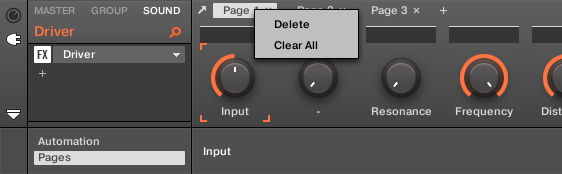
The Parameter pages’ context menu.
The context menu contains the following items:
Menu Item | Description | Keyboard Shortcuts |
|---|---|---|
Delete | Deletes current Page with all assignments. | |
Clear All | Clears all the assignments, and deletes all of the Pages. |
Using VST/AU Plug-in presets
For some of your Native Instruments or third-party VST/AU plug-ins, you might already have a set of factory or user presets (or patches, programs, etc.) that you like to use. Maschine lets you directly load these presets and save them as Plug-in presets within Maschine. Saving your VST/AU presets as Plug-in presets within Maschine will notably allow you to access them from the Maschine Browser, in the software as well as from your controller.
Notice
Saving presets can be done in the Maschine software only.
Accessing factory presets of Native Instruments’ instruments/effects
Accessing factory presets of your Native Instruments instruments and effects is straightforward: factory presets of all Native Instruments instruments/effects installed on your computer are already integrated into the Maschine Library. You will find them in the Browser by selecting the corresponding file type (Instruments or Effects), then selecting the factory content, and using the other Browser features. For more information, refer to Searching and loading files from the Library.
Tip
You can also add to the Maschine Library the user presets you might have created for any Native Instruments product installed on your computer. To do this, simply add the corresponding path(s) to the list found on the User pane of the Library page in the Preferences panel. For more information, refer to Preferences – Library page.
Accessing other VST/AU presets
To access user presets of your Native Instruments instruments/effects as well as both factory and user presets of your third-party VST/AU plug-ins, you first need to load the corresponding Native Instruments or External Plug-in into a Plug-in slot.
Load the desired Native Instruments or External Plug-in into a Plug-in slot (refer to Loading, removing, and replacing a Plug-in).
Open the Plug-in menu by clicking the little arrow at the right of the Plug-in slot.The Plug-in menu now contains an additional Presets submenu:
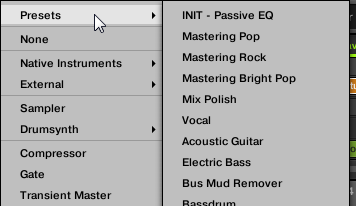
This submenu provides the list of all presets that your VST/AU plug-in has made available to the host (Maschine in this case).
Select the desired preset from the Presets submenu.
The preset is loaded into the Plug-in.
Each VST/AU instrument or effect might handle its presets (or patches, programs…) differently. Please refer to the plug-in documentation to find out how to reveal its presets (or a particular set of presets) to the host.
Tip
For example, in Massive, ABSYNTH 5, and FM8, you need to enable the Program List and fill it up with the desired patches in order to expose these and see them appear in the Presets submenu of the Plug-in menus in Maschine.
Notice
Some VST/AU plug-ins can run as both instrument and effect plug-ins. When loading a preset for such a plug-in, check that the preset can be effectively loaded in the current Plug-in slot, in particular, take care to load presets for instruments in the first Plug-in slot of Sounds only. To avoid any mistake, one solution is to name your VST/AU presets explicitly (for example, by adding a suffix “[FX]” to the effect presets).
Maschine allows you also to change the preset loaded in your Native Instruments or third-party VST/AU plug-in via MIDI Program Change messages. For more information, refer to Controlling parameters via MIDI and host automation.
Saving VST/AU presets as Maschine Plug-in presets
When you have loaded a VST/AU preset (user preset of a Native Instruments instrument/effect or any preset of a third-party VST/AU instrument or effect) using the method described above, you can save it as a Plug-in preset in Maschine via the Save As… or Save As Default… commands of the Plug-in menu (refer to Saving and recalling Plug-in presets). Once this is done, your preset will be available as a user preset in the Instrument or Effect category of the Maschine Browser.
Multiple-output Plug-ins and multitimbral Plug-ins
Maschine allows extended use of multiple-output Plug-ins as well as multitimbral Plug-ins.
Multiple-output Plug-ins
Multiple-output Plug-ins are Plug-ins with more than one audio stereo output.
When a multiple-output Plug-in is loaded into a Sound, Maschine uses its available outputs as follows:
The Plug-in’s first output pair is inserted in the usual Plug-in signal chain: This output pair is fed into the input of the next Plug-in slot (or sent to the channel output if the Plug-in is in the last Plug-in slot).
The Plug-in’s additional outputs are made available as audio sources for other Sounds of the same Group (they appear in the Source menu in the Audio page of the Input properties for these Sounds). This can be used to build advanced routings in Maschine. For more information, refer to Sending external audio to Sounds.
Multitimbral Plug-ins
Multitimbral Plug-ins are Plug-ins that can receive MIDI on top of the host control.
When a multitimbral Plug-in is loaded into a Sound, the other Sounds of the same Group can send MIDI data to this Plug-in: The Plug-in will appear as an additional port in the Dest. the menu on the MIDI page of the Output properties for these Sounds. For more information on configuring MIDI output for Sounds. For more information, refer to Sending MIDI from Sounds.
Using the Audio Plug-in
The Audio Plug-in is Maschine's primary way of working with loops. This section describes its functionality and key workflows.
The Audio Plug-in can playback Samples (drums, percussion, bass lines, guitar riffs, etc.) in sync with the tempo of your Project. It has two modes: Loop mode and Gate mode.
Loop mode is the default setting where the loaded loop will play continuously whenever there is an active Pattern in the Group. You can see the waveform of the Sample in the Pattern Editor to understand how it aligns with the Pattern.
Gate mode is similar to the Loop mode where the loaded loop will play continuously, however the loop will only be audible in locations where you place notes in the Pattern. Furthermore, when using Stretch mode the pitch of the loop will be transposed based on the pitch of the note (for example, note C3 plays the Sample at its original pitch, while C4 plays the Sample one octave higher than normal).
The Audio plug-in specializes in keeping audio loops playing in-sync with your Project and has the optional ability to do so without influencing the key of the loop. Furthermore, you can transpose the loop while it plays so that it fits the key of your song.
You can quickly audition your Samples from within the Browser and then drag and drop them directly onto a Sound. If you drag a Sample containing the Loops tag onto an empty Sound, the Audio Plug-in will load automatically.
Once a loop has been loaded, it will appear as a waveform of the Sample in the Pattern Editor, allowing you to edit the Sample by adjusting the Pattern Length, the overall tuning, the source tempo and length of the Sample, or add MIDI events to regions of the loop for selective playback and pitching. For more fine adjustments you can edit events in a close-up view by toggling the close-up view in the Pattern editor.
Tip
For more information on recording your own loops, refer to the chapter: Sampling and sample mapping.
Loading the Audio Plug-in
The Audio Plug-in can be loaded onto any Sound within a Group. As a Maschine Plug-in, it supports all usual Plug-in workflows. Hence, to know how to load, remove, replace, insert, move, copy/paste the Audio Plug-in, as well as how to access the Audio Plug-in parameters and load/save default presets, refer to Plug-in overview.
Once an Audio Plug-in is loaded, it becomes visible in both the Maschine software and on the controller.

The Audio Plug-in parameters in the software.
Here is an overview of the Audio Plug-in parameters:
Note
The Source Tempo and Source Length values always reflect the take currently selected in the Audio Pool.
Loading a loop into the Audio Plug-in
You can use the Sampler Plug-in to record sound directly from a microphone or from an electric instrument (such as an electric guitar) connected to your computer to create your own loops. Alternatively, you can quickly audition loops within the Maschine Library by using the Loops tag in the Browser to find one you want. To learn how to filter for loops using the Browser, refer to the section Selecting Type and Character tags.
It is possible to load a Sample tagged as Loops directly from the Browser by dragging and dropping it onto an empty Sound, which will load the Sample into an Audio Plug-in and place it directly within the Pattern. As the Sample is loaded into the Pattern, a waveform of the Sample will become visible and Maschine will seamlessly determine tempo information from the Sample and automatically time-stretch it to fit the tempo of your Project. You can begin playback immediately after it has loaded.
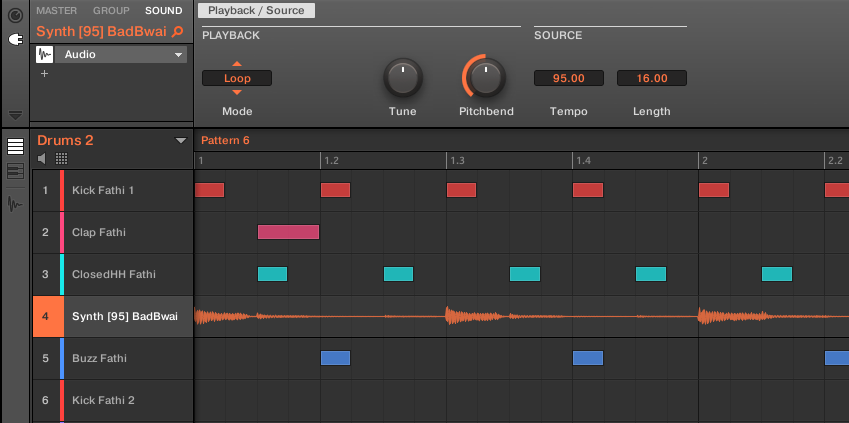
Pattern Editor with the Audio Plug-in in Loop mode loaded on Sound 4.
By default the Audio Plug-in will playback in Loop mode, meaning that the Sample will be repeated for the duration of the Pattern regardless of the length of the Sample. If you want to chop the loop and pitch it, switch to Gate mode. For more information on Loop and Gate modes, refer to Using Loop mode and Using Gate mode, respectively.
Tip
If you are using a Sample with the Sampler Plug-in and decide that you want to use it with the Audio Plug-in, you can quickly switch between both Plug-ins using the controller. This functionality can be handy if attempting to load a loop that does not have the Loops tag, as these files will load into the Sampler Plug-in if they are missing the Loops tag. For more information on selecting Plug-ins, refer to Loading, removing, and replacing a Plug-in on the controller.
Editing audio in the Audio Plug-in
The Audio Plug-in contains an Edit tab which, when clicked, opens the audio plug-in editing features. Here you can change the Playable Range Start and End markers to isolate only a portion of the loaded audio file that you wish to loop, and also perform destructive audio edits to the loaded loop.
To access the Audio Plug-in Editor in the software, do the following:
In the Sound List left of the Pattern Editor, click the desired Sound slot to put it under focus. For more details on how to set the focus to a Sound, please see section Focusing on a Group or a Sound.
Click the Sample Editor button on the left of the Pattern Editor to switch to the Sample Editor.
The Sample Editor appears and displays the Sample content of the focused Sound.
In the Sample Editor, click the desired tab at the top to access the corresponding page:
The Record page allows you to record audio: Recording audio.
The Edit page allows you to apply destructive edits to existing audio: Editing a Sample.
The destructive audio editing features here are the same as those found in the Sample Editor for the Sampler Plug-in. For more information on using the destructive audio editing features, refer to Editing a Sample.
Using Loop mode
Loop mode is the default mode for the Audio Plug-in and is used to playback an audio file in time with your Project. When loaded into a Sound, the audio appears as a waveform in the Pattern Editor and is repeated for the entirety of the Pattern. A detailed overview of the waveform is displayed in Keyboard view.
If the Pattern Length is decreased to a length shorter than the audio, Pattern playback will end up looping back to the start before the entire audio has played, the Pattern Length must be at least as long as the audio in order to hear the entire audio playing in the Pattern. If the Pattern Length is increased to a length longer than the audio, the audio will be automatically looped as needed to fill the entire length of the Pattern, and these iterations will be visualized with darker versions of the waveform. For more information on changing the Pattern Length, refer to the section Adjusting the Arrange Grid and the Pattern Length.
The process of using Loop mode is as follows: load an audio file onto a Sound, and select Loop mode from the parameters of the Audio Plug-in.
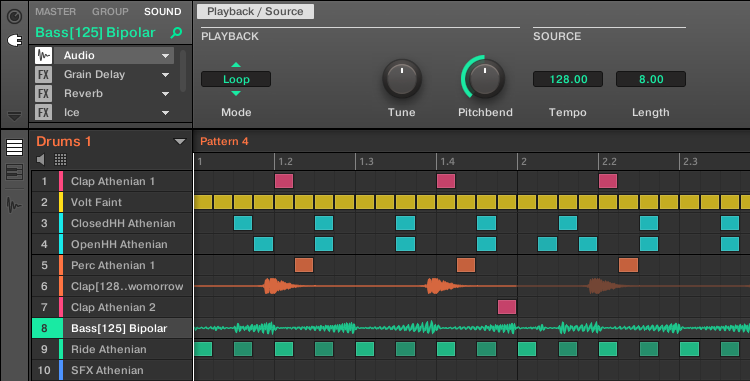
The Audio Plug-in with a bass recording in Loop mode.
Enabling and disabling audio per Pattern
When using Loop mode with the Audio Plug-in, it is possible to enable and disable audio in the current Pattern in the Pattern Editor. By default, when audio is recorded using the Audio plug-in, or if it is tagged as a Loops and loaded directly from the Browser, it will be activated in the Pattern and play back when you press Play.
To disable audio and temporarily remove it from the Pattern, simply double-click its waveform. By clicking the same area again the audio can be reactivated for the Pattern.
Using Gate mode
Gate mode is used to chop and pitch selected parts of your Sample by applying MIDI note events in the Keyboard view of the Pattern Editor or by recording them using your controller. Each event is a gate for the Sample; the length determines the duration of playback, and placement on the scale determines the pitch. By chopping and pitching the loop you can create melodies or even use it for effect on drums.
In Keyboard view, MIDI note events are visually layered on top of the Samples’ waveform and can be edited or deleted at any time, and more importantly, the Sample can be changed at any time while retaining the MIDI note events in the Pattern, meaning you can keep the phrasing and melody but use a different Sample for the playback.
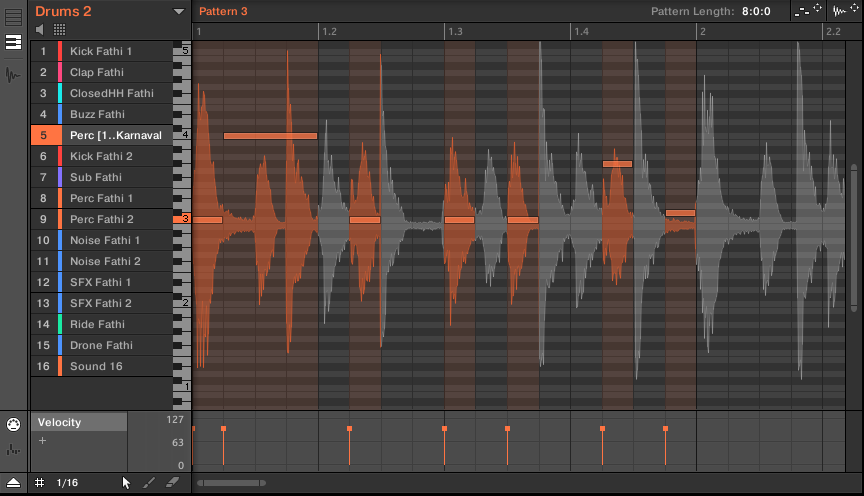
Gate mode in the Pattern Editor with a Sample and MIDI events.
The process of using Gate mode is as follows: load a loop onto a Sound, select Gate mode from the parameters of the Audio Plug-in, and then add MIDI events in the Pattern in the regions where you want to chop and pitch your Sample, or press play on your controller and use the pads to pitch the Sample. For more information on recording and editing events, refer to chapter Working with Patterns and Clips.
Tip
To zoom into a Pattern, double-click on the vertical scroll bar to the right of the Pattern Editor.
Drum Synths
The Maschine Drum Synths are a powerful set of exclusive Plug-ins specifically designed to be played on your Maschine MK3 controller.
Drum Synths are a powerful set of monophonic Internal Instrument Plug-ins (i.e. Instrument Plug-ins included with Maschine) that allow you to generate individual, fine-tuned drum sounds for your music productions. Like any other Instrument Plug-in, you can load them only in the first Plug-in slot of Sounds.
Drum Synths have been designed for extreme playability, both from the high-quality pads of the Maschine controller and from any velocity-sensitive MIDI keyboard. They allow you to quickly build custom drum sounds and give you full control over the characteristics of the various drums. Don’t hesitate to tweak them during your live performance or modulate/automate them like any other Plug-in!
Tip
See section Recording and editing modulation for more information on modulation.
In this chapter you will find:
An overview of the Drum Synths and a presentation of their common features: Using Drum Synths.
A detailed description of each particular Drum Synth:
The Kick Plug-in: The kicks.
The Snare Plug-in: The Snares.
The Hi-hat Plug-in: The Hi-hats.
The Tom Plug-in: The Toms.
The Percussion Plug-in: The Percussions.
The Cymbal Plug-in: The Cymbals.
Notice
We describe here the specific handling and parameters of the Drum Synths. For a an overview of Plug-ins (including the Drum Synths), refer to Plug-in overview.
Using Drum Synths
Drum Synths are Maschine Plug-ins and, as such, they support all usual Plug-in actions and procedures. To learn how to load, remove, replace, insert, move, copy/paste Drum Synths, as well as how to adjust the Drum Synth parameters and load/save presets, refer to section Plug-in overview, where these are described in detail.
Engines: many different drums in each Drum Synth
Each of the available Drum Synths (Kick, Snare, Hi-hat, Tom, and Percussion) actually provides many different drums: Indeed, each Drum Synth allows you to select a particular engine for generating the drum sound. In the same Drum Synth each engine will have its own algorithm, parameters, and sonic characteristics — it is in fact an entirely distinct drum. For example, the Kick provides eight different engines! Some engines will create acoustic drums while others will rather produce electronic sounds.
In each Drum Synth the first parameter (Engine) lets you select the engine you want to use. Most of the other parameters will depend on the selected engine.
Common parameter organization
All Drum Synths have a similar parameter organization, both in the Control area of the Arrange view and in the Plug-in Strip of the Mix view.
Common Parameter pages in the Control area (Arrange view)
In Arrange view, the parameters of all Drum Synths are grouped in similar ways in the Control area:

All Drum Synths share the same parameter organization in the Control area.
Their parameters are grouped into the same three Parameter pages:
The Main page groups the most important parameters for each drum type. Here you can select the engine to be used, the tuning, the decay, etc.
The Advanced page provides access to more complex and finer adjustments to the drum sounds.
The Modulation page allows to adjust the playability of the drum by setting its velocity response.
The Main page always starts with a MAIN section. The other sections on the page differ with each Drum Synth and engine.
Common layout in the Plug-in Strip (Mix view)
In Mix view, the Plug-in panels of all Drum Synths have a similar layout in the Plug-in Strip:
All Drum Synths share the same global layout in the Plug-in Strip.
In the top part of the panel you can adjust the Tune parameter, select the desired engine, adjust the velocity response, and adjust the Decay parameter (or the Filter parameter for the Shaker engine of the Percussion).
In the bottom part of the panel you find the other parameters adjusting the sound of the selected engine.
Notice
For more information on the various Plug-in panels found in the Plug-in Strip, please refer to section The Plug-in Strip.
Various velocity responses
Each engine of each Drum Synth has a different response to the velocity of the notes you are playing. Globally, engines can be grouped into two general categories:
Acoustic sounding engines are heavily velocity-dependant: the velocity affects many characteristics of the generated sound, which allows you to play these drums very expressively.
Electronic sounding engines are generally less velocity-dependent. Most of them only use velocity to modulate the output volume of the sound.
The overall velocity sensitivity for both acoustic and electronic types of engines can be adjusted on the Modulation page via the Velocity control.
Pitch range, tuning, and MIDI notes
All Drum Synths can be played chromatically: the pitch of the sound will be affected by the notes that you play on your MIDI keyboard (or on your pads in Keyboard mode).
For all engines, the Tune parameter lets you define which pitch will be played when hitting the pad of that Sound (with pads in Pad Mode) or playing the middle C (MIDI note 60) base note.
Notice
In the Maschine convention the MIDI note 60 is noted C3.
The engines have different pitch ranges:
Most engines have limited pitch ranges: For example, in the Snare, the Chrome engine can play pitches from MIDI note 60 to 84, while the Iron engine can play pitches from MIDI note 46 to 70. If the pitch of an incoming MIDI note falls outside the pitch range of the engine, the pitch will be bounded to that engine’s allowable pitch range.
Some engines have an unlimited pitch range: For example the Kick’s Sub engine, the Tom’s Fractal and Tronic engines, and the Percussion’s Fractal engine.
In some drum engines it is impossible to set an exact tuning in MIDI notes. For them the Tune parameter is set in percents (from 0 % to 100 %).
The kicks
The Kick Drum Synth can generate a myriad of kick sounds.

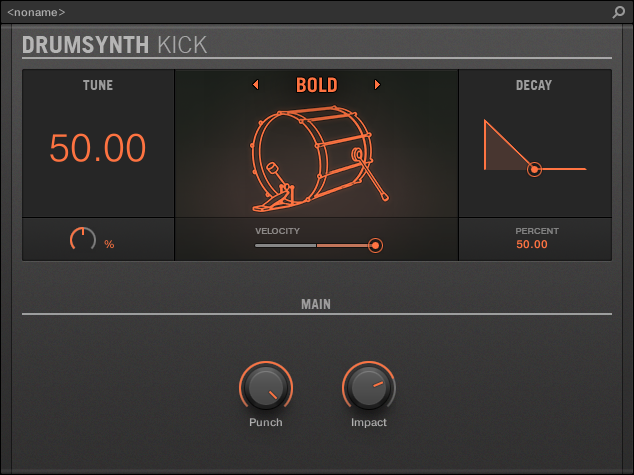
The Kick in the Control area (Main page depicted).

The Kick panel in the Plug-in Strip.
As in every Drum Synth, the engine can be selected via the Engine selector on the Main page. Each engine has a different character and set of parameters, as detailed in the following sections.
The Kick provides the following engines:
Sub (default): Kick – Sub.
Tronic: Kick – Tronic.
Dusty: Kick – Dusty.
Rasper: Kick – Rasper.
Snappy: Kick – Snappy.
Bold: Kick – Bold.
Maple: Kick – Maple.
Push: Kick – Push.
Notice
For more information on engines, refer to Engines: many different drums in each Drum Synth. For general information on the Kick and the other Drum Synths, refer to Using Drum Synths.
Kick – Sub
The Sub engine is the default engine of the Kick.
Based on the kick from a classic analog drum machine, the Sub kick is a clean, subby, sine-based kick drum that can be very effectively abused as sub-bass, tom, or even a bleepy lead if tuned up and played chromatically on the keyboard.
Notice
The parameters described below are presented as they appear in the Control area (Arrange view). The same parameters are available in the Plug-in panel within the Plug-in Strip (Mix view). See The Plug-in Strip for more information on this.
Main page
Element | Description |
|---|---|
MAIN Section | |
Engine | Selects the engine used in the Kick Plug-in. If you change this setting, please refer to The kicks. |
Tune | Adjusts the pitch of the drum played by the middle C, measured in MIDI note numbers and cents. Available values range from 31.00 to 55.00. The default value is 43.00. For more details see Pitch range, tuning, and MIDI notes. |
Decay | Adjusts the duration of the sound’s tail, measured as a percentage. Available values range from 0.0 to 100.0 % (default: 50.0 %). |
Bend | Adjusts the amplitude of the pitch envelope applied throughout the sound duration (punch), measured as a percentage. Available values range from 0.0 to 100.0 % (default: 6,8 %). At zero, the sound stays at its original pitch during its entire decaying phase. As the Bend value is increased, an increasing amount of pitch envelope is applied. This means that the pitch of the drum starts at a higher value and falls to the original value as the sound decays. The greater the Bend value, the higher the starting pitch. |
Time | Adjusts the decay time of the pitch envelope, measured as a percentage. Available values range from 0.0 to 100.0 % (default: 30 %). Note that if the Time value is too long compared to the Decay value, you won’t hear the entire pitch drop but only its beginning — i.e. you will hear a higher pitch than the one set by Tune. |
ATTACK Section | |
Mode | Selects the style of the attack: Thin selects a thin-sounding click, Thick selects a slightly rounder click with added noise, and Noise uses just a noise burst for a less clicky attack. |
Color | Only available if Thick or Noise is selected in the Mode selector. Adjusts the color of the attack, measured as a percentage. Available values range from 0.0 to 100.0 % (default: 50.0 %). At lower values the attack is duller. Increase the Color value to get a more incisive attack. |
Amount | Adjusts the level of the attack. Available values range from 0.0 % (soft attack) to 100.0 % (maximum attack). The default value is 50.0 %. |
Advanced page
For this engine the Advanced page does not contain any parameters.
Modulation page
As with all other engines and Drum Synths, the Modulation page contains one parameter: Velocity.
Element | Description |
|---|---|
SCALE Section | |
Velocity | Adjusts the velocity response of the drum. Available values range from -100.0 % to 100.0 % (default value). At zero (mid course), the drum is played at full velocity, no matter how hard you hit the keys (or pads). From that mid position, by turning the knob to the right you increase the positive velocity response and make the drum more and more sensitive to the velocities at which you hit the keys/pads. From the mid position, turning the knob to the left as the inverse effect: the harder you hit the key/pad, the softer the resulting drum sound will be. |
Kick – Tronic
Fat, punchy, and warm, the Tronic kick is based on another classic analog kick drum which has provided the backbone to countless dance and electronic records for the past 30 years. The Tronic kick takes this classic a step further with extended parameter ranges and chromatic playability, but also adds a specially designed distortion section capable of a wide range of textures, from subtly rounded to all-out gabber assault.
Notice
The parameters described below are presented as they appear in the Control area (Arrange view). The same parameters are available in the Plug-in panel within the Plug-in Strip (Mix view). See The Plug-in Strip for more information on this.
Main page
Element | Description |
|---|---|
MAIN Section | |
Engine | Selects the engine used in the Kick Plug-in. If you change this setting, please refer to The kicks. |
Tune | Adjusts the pitch of the drum played by the middle C, measured in MIDI note numbers and cents. Available values range from 31.00 to 55.00. The default value is 43.00. For more details see Pitch range, tuning, and MIDI notes. |
Decay | Adjusts the duration of the sound’s tail, measured as a percentage. Available values range from 0.0 to 100.0 % (default: 50.0 %). |
Bend | Adjusts the amount of pitch envelope applied throughout the sound duration, measured as a percentage. Available values range from 0.0 to 100.0 % (default: 6.8 %). Low values give a more gentle sound. As Bend is increased, the kick becomes more punchy; at higher values, the pitch envelope is more clearly audible as an actual pitch bend. |
Impact | Adjusts the amount of attack. Available values range from 0.0 % (soft attack) to 100 % (maximum attack). The default value is 75.0 %. |
Advanced page
The Advanced page contains controls for the distortion.
Element | Description |
|---|---|
DISTORTION Section | |
Gain | Adjusts the distortion gain, measured as a percentage. Available values range from 0.0 to 100.0 % (default: 70.0 %). Increase Gain to get a more distorted drum sound. |
Tone | Adjusts the color of the distortion, measured as a percentage. Available values range from 0.0 to 100.0 % (default: 25.0 %). |
Bias | Adjusts the timbre of the distortion, measured as a percentage. Available values range from 0.0 to 100.0 % (default: 50.0 %). At zero, the distortion is symmetrical and introduces mostly odd harmonics. As the Bias value is increased, the distortion becomes more asymmetric and more even harmonics are introduced, resulting in a different tonality, especially at more subtle Gain settings. |
Mix | Adjusts the mix between the clean and distorted signal, measured as a percentage. Available values range from 0.0 to 100.0 % (default: 50.0 %). At zero, none of the distorted drum will be heard. At 100.0 %, only the distorted drum will be heard. |
Notice
Changes to the distortion parameters are only audible when the Mix parameter is set above 0 %.
Modulation page
As with all other engines and Drum Synths, the Modulation page contains one parameter: Velocity.
Element | Description |
|---|---|
SCALE Section | |
Velocity | Adjusts the velocity response of the drum. Available values range from -100.0 % to 100.0 % (default value). At zero (mid course), the drum is played at full velocity, no matter how hard you hit the keys (or pads). From that mid position, by turning the knob to the right you increase the positive velocity response and make the drum more and more sensitive to the velocities at which you hit the keys/pads. From the mid position, turning the knob to the left as the inverse effect: the harder you hit the key/pad, the softer the resulting drum sound will be. |
Kick – Dusty
The Dusty kick is an electronic kick with an organic feel. It’s capable of broken, dusty sounds but can also open up to a thundering warehouse boom.
Notice
The parameters described below are presented as they appear in the Control area (Arrange view). The same parameters are available in the Plug-in panel within the Plug-in Strip (Mix view). See The Plug-in Strip for more information on this.
Main page
Element | Description |
|---|---|
MAIN Section | |
Engine | Selects the engine used in the Kick Plug-in. If you change this setting, please refer to The kicks. |
Tune | Adjusts the pitch of the drum played by the middle C, measured as a percentage. Available values range from 0.0 to 100.0 % (default: 50.0 %). For more details see Pitch range, tuning, and MIDI notes. |
Decay | Adjusts the duration of the sound’s tail, measured as a percentage. Available values range from 0.0 to 100.0 % (default: 50.0 %). |
Impact | Adjusts the amount of attack and click, measured as a percentage. Available values range from 0.0 % (soft attack) to 100.0 % (maximum attack). The default value is 75.0 %. |
CHARACTER Section | |
Filter | Adjusts the timbre of the drum, measured as a percentage. Available values range from 0.0 to 100.0 % (default: 40.0 %). Increase the value to produce richer high frequencies. |
Noise | Adjusts the amount of noise, measured as a percentage. Available values range from 0.0 to 100.0 % (default: 10.0 %). |
Advanced page
For this engine, the Advanced page does not contain any parameters.
Modulation page
As with all other engines and Drum Synths, the Modulation page contains one parameter: Velocity.
Element | Description |
|---|---|
SCALE Section | |
Velocity | Adjusts the velocity response of the drum. Available values range from -100.0 % to 100.0 % (default value). At zero (mid course), the drum is played at full velocity, no matter how hard you hit the keys (or pads). From that mid position, by turning the knob to the right you increase the positive velocity response and make the drum more and more sensitive to the velocities at which you hit the keys/pads. From the mid position, turning the knob to the left as the inverse effect: the harder you hit the key/pad, the softer the resulting drum sound will be. |
Kick – Grit
The Grit kick is a modern electronic kick drum to suit a wide range of styles. It’s quite versatile: with a long decay it has a deep, boomy and airy tonality, but tightened up, it can thump with the best of them. At high tunings, especially with extreme “Aero Grind” and “Aero Amount” values, it becomes very gritty and bitcrushed, great for IDM and electro.
Notice
The parameters described below are presented as they appear in the Control area (Arrange view). The same parameters are available in the Plug-in panel within the Plug-in Strip (Mix view) — for more information please refer to section 9.4 “The Plug-in Strip” in the Maschine 2.0 Manual.
Main page
Element | Description |
|---|---|
MAIN Section | |
Engine | Selects the engine used in the Kick Plug-in. If you change this setting, please refer to section 10.2 “The Kicks” in the Maschine 2.0 Manual. |
Tune | Adjusts the pitch of the drum played by the middle C, measured in MIDI note numbers and cents. Available values range from 31.00 to 55.00. The default value is 43.00. |
Decay | Adjusts the duration of the sound’s tail, measured as a percentage. Available values range from 0.0 to 100.0% (default: 50.0%). |
Bend | Adjusts the amount of pitch envelope applied to the kick, measured as a percentage. Available values range from 0.0 to 100.0% (default: 6.8%). |
Impact | Adjusts the amount of click or initial attack, measured as a percentage. Available values range from 0.0 to 100.0% (default: 75.0%). |
Gate | When activated, the decay of the drum is choked by the end of the note. When deactivated, the drum plays as a one-shot sound, i.e. until the end of its tail, no matter when the note is released, although the sound duration will still depend on the Decay parameter (refer to above). Switching Gate on and setting the Decay parameter to a high value while playing short notes can result in a punchier, more aggressive character than simply using short Decay values with Gate off. |
AERO Section | |
Grind | Adjusts the grittiness of the “aero” component of the sound, measured as a percentage. Available values range from 0.0 to 100.0% (default: 45.0%). Low values produce a boomy reverberation. High values result in a crushed, digital “air” squashed into the drum sound. Note that this parameter will only have an effect if Amount is set to a non-zero value (refer to below). |
Amount | Controls the amount of air or grit in the kick sound, measured as a percentage. Available values range from 0.0 to 100.0% (default: 20.0%). |
Advanced page
For this engine the Advanced page does not contain any parameters.
Modulation page
Like with all other engines and Drum Synths, the Modulation page contains one parameter: Velocity.
Element | Description |
|---|---|
SCALE Section | |
Velocity | Adjusts the velocity response of the drum. Available values range from -100.0% to 100.0% (default value). At zero (mid course), the drum is played at full velocity, no matter how hard you hit the keys (or pads). From that mid position, by turning the knob to the right you increase the positive velocity response and make the drum more sensitive to the velocity at which you hit the keys/pads. From the mid position, turning the knob to the left as the inverse effect: the harder you hit the key/pad, the softer the resulting drum sound will be. |
Kick – Rasper
The Rasper kick is an acoustic bass drum emulation providing a unique and organic sound that can be easily adapted into Drum’n’Bass or Dubstep productions. Its two crispness modes allow for a wide range of bass drums.
Notice
The parameters described below are presented as they appear in the Control area (Arrange view). The same parameters are available in the Plug-in panel within the Plug-in Strip (Mix view). See The Plug-in Strip for more information on this.
Main page
Element | Description |
|---|---|
MAIN Section | |
Engine | Selects the engine used in the Kick Plug-in. If you change this setting, please refer to The kicks. |
Tune | Adjusts the pitch of the drum played by the middle C, measured in MIDI note numbers and cents. Available values range from 38.00 to 62.00. The default value is 50.00. For more details see Pitch range, tuning, and MIDI notes. |
Decay | Adjusts the duration of the sound’s tail, measured as a percentage. Available values range from 0.0 to 100.0 % (default: 50.0 %). |
Punch | Simultaneously adjusts the amount of the pitch envelope and the amount of noise of the attack. Available values range from 0.0 to 100.0 % (default). |
Impact | Adjusts how hard the drum is hit. Available values range from 0.0 % (softest) to 100.0 % (hardest). The default value is 75.0 %. |
CRISPNESS Section | |
Mode | Selects from two different crispness modes: Select A (default) for a tambourine-like sound, and select B for a snare-like sound. |
Decay | Adjusts the duration of the crispness effect, measured as a percentage. Available values range from 0.0 to 100.0 % (default: 34.0 %). |
Amount | Adjusts the amount of crispness, measured as a percentage. Available values range from 0.0 to 100.0 % (default: 50.0 %). |
Advanced page
For this engine the Advanced page does not contain any parameters.
Modulation page
As with all other engines and Drum Synths, the Modulation page contains one parameter: Velocity.
Element | Description |
|---|---|
SCALE Section | |
Velocity | Adjusts the velocity response of the drum. Available values range from -100.0 % to 100.0 % (default value). At zero (mid course), the drum is played at full velocity, no matter how hard you hit the keys (or pads). From that mid position, by turning the knob to the right you increase the positive velocity response and make the drum more and more sensitive to the velocities at which you hit the keys/pads. From the mid position, turning the knob to the left as the inverse effect: the harder you hit the key/pad, the softer the resulting drum sound will be. |
Kick – Snappy
The Snappy kick is an acoustic bass drum emulation that provides control over the mic oscillation before the hit via the Snap control. It’s capable of a mid-range bass drum sound that can be tweaked via the extended punch parameters.
Notice
The parameters described below are presented as they appear in the Control area (Arrange view). The same parameters are available in the Plug-in panel within the Plug-in Strip (Mix view). See The Plug-in Strip for more information on this.
Main page
Element | Description |
|---|---|
MAIN Section | |
Engine | Selects the engine used in the Kick Plug-in. If you change this setting, please refer to The kicks. |
Tune | Adjusts the pitch of the drum played by the middle C, measured in MIDI note numbers and cents. Available values range from 36.00 to 60.00. The default value is 48.00. For more details see Pitch range, tuning, and MIDI notes. |
Decay | Adjusts the duration of the sound’s tail, measured as a percentage. Available values range from 0.0 to 100.0 % (default: 50.0 %). |
Snap | Emulates the air movement caused by the beater before the drum is hit. Therefore, it produces a snap in the waveform the length of which can be controlled through this parameter. Available values range from 0.0 to 100.0 % (default: 50.0 %). |
Impact | Adjusts how hard the drum is hit, measured as a percentage. Available values range from 0.0 % (softest) to 100.0 % (hardest). The default value is 75.0 %. |
PUNCH Section | |
Mode | Selects from two different punch modes: A (default) and B. |
Decay | Adjusts the duration of the punch, measured as a percentage. Available values range from 0.0 to 100.0 % (default: 50.0 %). |
Amount | Adjusts the amount of punch, measured as a percentage. Available values range from 0.0 to 100.0 % (default). |
Advanced page
For this engine the Advanced page does not contain any parameters.
Modulation page
As with all other engines and Drum Synths, the Modulation page contains one parameter: Velocity.
Element | Description |
|---|---|
SCALE Section | |
Velocity | Adjusts the velocity response of the drum. Available values range from -100.0 % to 100.0 % (default value). At zero (mid course), the drum is played at full velocity, no matter how hard you hit the keys (or pads). From that mid position, by turning the knob to the right you increase the positive velocity response and make the drum more and more sensitive to the velocities at which you hit the keys/pads. From the mid position, turning the knob to the left as the inverse effect: the harder you hit the key/pad, the softer the resulting drum sound will be. |
Kick – Bold
The Bold kick is an acoustic bass drum emulation that provides an aggressive character and a punchy and dirty sound. It is capable of a range of sounds, from rock-like kicks to more snappy and tight sub-kicks.
Notice
The parameters described below are presented as they appear in the Control area (Arrange view). The same parameters are available in the Plug-in panel within the Plug-in Strip (Mix view). See Pitch range, tuning, and MIDI notes for more information on this.
Main page
Element | Description |
|---|---|
MAIN Section | |
Engine | Selects the engine used in the Kick Plug-in. If you change this setting, please refer to The kicks. |
Tune | Adjusts the pitch of the drum played by the middle C, measured as a percentage. Available values range from 0.0 to 100.0 % (default: 50.0 %). For more details see Pitch range, tuning, and MIDI notes. |
Decay | Adjusts the duration of the sound’s tail, measured as a percentage. Available values range from 0.0 to 100.0 % (default: 50.0 %). |
Punch | Simultaneously adjusts the amplitude and decay time of the noise in the attack. Available values range from 0.0 to 100.0 % (default). |
Impact | Adjusts how hard the drum is hit, measured as a percentage. Available values range from 0.0 % (softest) to 100.0 % (hardest). The default value is 75.0 %. |
Advanced page
For this engine the Advanced page does not contain any parameters.
Modulation page
As with all other engines and Drum Synths, the Modulation page contains one parameter: Velocity.
Element | Description |
|---|---|
SCALE Section | |
Velocity | Adjusts the velocity response of the drum. Available values range from -100.0 % to 100.0 % (default value). At zero (mid course), the drum is played at full velocity, no matter how hard you hit the keys (or pads). From that mid position, by turning the knob to the right you increase the positive velocity response and make the drum more and more sensitive to the velocities at which you hit the keys/pads. From the mid position, turning the knob to the left as the inverse effect: the harder you hit the key/pad, the softer the resulting drum sound will be. |
Kick – Maple
The Maple kick is an acoustic bass drum emulation that provides a realistic and organic sound. It is suitable for any production where a supporter kick is needed. It fits perfectly with acoustic instruments and its room parameters make it fit seamlessly into any mix.
Notice
The parameters described below are presented as they appear in the Control area (Arrange view). The same parameters are available in the Plug-in panel within the Plug-in Strip (Mix view). See Pitch range, tuning, and MIDI notes for more information on this.
Main page
Element | Description |
|---|---|
MAIN Section | |
Engine | Selects the engine used in the Kick Plug-in. If you change this setting, please refer to The kicks. |
Tune | Adjusts the pitch of the drum played by the middle C, measured in MIDI note numbers and cents. Available values range from 42.00 to 54.00. The default value is 48.00. For more details see Pitch range, tuning, and MIDI notes. |
Decay | Adjusts the duration of the sound’s tail, measured as a percentage. Available values range from 0.0 to 100.0 % (default: 50.0 %). |
Skin Tune | Adjusts the fine-tuning of the skin of the drum, measured as a percentage. Available values range from 0.0 to 100.0 % (default: 50.0 %). |
Impact | Adjusts how hard the drum is hit, measured as a percentage. Available values range from 0.0 % (softest) to 100.0 % (hardest). The default value is 75.0 %. |
ROOM Section | |
Mode | Selects from two different noise types that simulate the room in which the drum is played. Available modes are A (default) and B. |
Size | Adjusts the size of the room, measured as a percentage. Available values range from 0.0 to 100.0 % (default: 50.0 %). |
Amount | Adjusts the amount of room effect applied to the drum sound, measured as a percentage. Available values range from 0.0 to 100.0 % (default: 75.0 %). |
Advanced page
For this engine the Advanced page does not contain any parameters.
Modulation page
As with all other engines and Drum Synths, the Modulation page contains one parameter: Velocity.
Element | Description |
|---|---|
SCALE Section | |
Velocity | Adjusts the velocity response of the drum. Available values range from -100.0 % to 100.0 % (default value). At zero (mid course), the drum is played at full velocity, no matter how hard you hit the keys (or pads). From that mid position, by turning the knob to the right you increase the positive velocity response and make the drum more and more sensitive to the velocities at which you hit the keys/pads. From the mid position, turning the knob to the left as the inverse effect: the harder you hit the key/pad, the softer the resulting drum sound will be. |
Kick – Push
The Push kick is an acoustic bass drum emulation that provides an aggressive and brazen sound. It is essential for mixes where a dirty, tight and powerful kick is required. Its versatility also allows for noisy and clicky kicks.
Notice
The parameters described below are presented as they appear in the Control area (Arrange view). The same parameters are available in the Plug-in panel within the Plug-in Strip (Mix view). See The Plug-in Strip for more information on this.
Main page
Element | Description |
|---|---|
MAIN Section | |
Engine | Selects the engine used in the Kick Plug-in. If you change this setting, please refer to The kicks. |
Tune | Adjusts the pitch of the drum played by the middle C, measured as a percentage. Available values range from 0.0 to 100.0 % (default: 50.0 %). For more details see Pitch range, tuning, and MIDI notes. |
Decay | Adjusts the duration of the sound’s tail, measured as a percentage. Available values range from 0.0 to 100.0 % (default: 50.0 %). |
Punch | Simultaneously adjusts the amount of the pitch envelope and the amount of noise of the attack. Available values range from 0.0 to 100.0 % (default). |
Impact | Adjusts how hard the drum is hit. Available values range from 0.0 % (softest) to 100.0 % (hardest). The default value is 75.0 %. |
Advanced page
For this engine the Advanced page does not contain any parameters.
Modulation page
As with all other engines and Drum Synths, the Modulation page contains one parameter: Velocity.
Element | Description |
|---|---|
SCALE Section | |
Velocity | Adjusts the velocity response of the drum. Available values range from -100.0 % to 100.0 % (default value). At zero (mid course), the drum is played at full velocity, no matter how hard you hit the keys (or pads). From that mid position, by turning the knob to the right you increase the positive velocity response and make the drum more and more sensitive to the velocities at which you hit the keys/pads. From the mid position, turning the knob to the left as the inverse effect: the harder you hit the key/pad, the softer the resulting drum sound will be. |
The Snares
The Snare Drum Synth can generate a multitude of snare sounds.

The Snare in the Control area (Main page depicted).
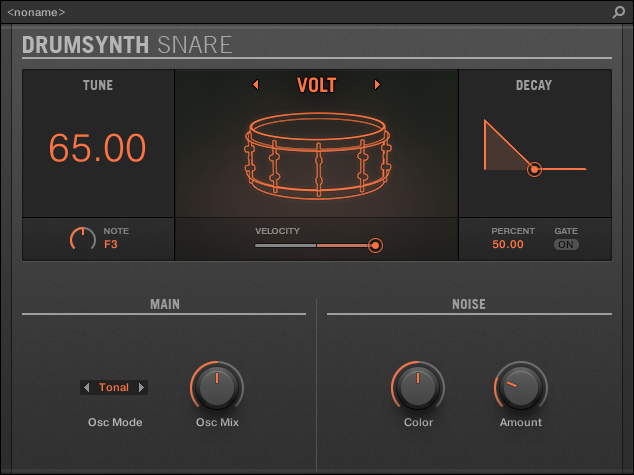
The Snare panel in the Plug-in Strip.
As with every Drum Synth, the engine can be selected via the Engine selector on the Main page. Each engine has a different character and set of parameters, as detailed in the following sections.
The Snare provides the following engines:
Volt (default): Snare – Volt
Bit: Snare – Bit
Pow: Snare – Pow
Sharp: Snare – Sharp
Airy: Snare – Airy
Vintage: Snare – Vintage
Chrome: Snare – Chrome
Iron: Snare – Iron
Clap: Snare – Clap
Breaker: Snare – Breaker.
Notice
For more information on engines, refer to Engines: many different drums in each Drum Synth. For general information on the Snare and the other Drum Synths, refer to Using Drum Synths.
Snare – Volt
The Volt engine is the default engine of the Snare.
The Volt snare is an electronic snare based on a family of analog classics.
Notice
The parameters described below are presented as they appear in the Control area (Arrange view). The same parameters are available in the Plug-in panel within the Plug-in Strip (Mix view). See The Plug-in Strip for more information on this.
Main page
Element | Description |
|---|---|
MAIN Section | |
Engine | Selects the engine used in the Snare Plug-in. If you change this setting, please refer to The Snares. |
Tune | Adjusts the pitch of the drum played by the middle C, measured in MIDI note numbers and cents. Available values range from 53.00 to 77.00. The default value is 65.00. For more details see Pitch range, tuning, and MIDI notes. |
Decay | Adjusts the duration of the sound’s tail, measured as a percentage. Available values range from 0.0 to 100.0 % (default: 50.0 %). |
Gate | When activated, the decay of the drum is choked by the end of the MIDI note. When deactivated (default), the drum plays as a one-shot sound, i.e. until the end of its tail, no matter when the note is released. |
Osc Mode | Selects the oscillator mode: If you select Tonal (default), the engine uses two oscillators running in parallel, the higher of which is extra sensitive to velocity for increased expressivity. If you select Punchy, the engine uses one oscillator with a pitch envelope. |
Osc Mix | Only available if Tonal is selected in the Osc Mode selector (see above). Adjusts the mix between both oscillators, measured as a percentage. Available values range from 0.0 to 100.0 % (default: 50.0 %). |
Punch | Only available if Punchy is selected in the Mode selector (see above). Adjusts the amplitude of the pitch envelope (punch), measured as a percentage. Available values range from 0.0 to 100.0 % (default: 25.0 %). |
NOISE Section | |
Color | Adjusts the tone of the “snare” portion of the sound, measured as a percentage. Available values range from 0.0 to 100.0 % (default: 50.0 %). |
Amount | Adjusts the level of the “snare” portion of the sound, measured as a percentage. Available values range from 0.0 to 100.0 % (default: 25.0 %). |
Advanced page
For this engine the Advanced page does not contain any parameters.
Modulation page
As with all other engines and Drum Synths, the Modulation page contains one parameter: Velocity.
Element | Description |
|---|---|
SCALE Section | |
Velocity | Adjusts the velocity response of the drum. Available values range from -100.0 % to 100.0 % (default value). At zero (mid course), the drum is played at full velocity, no matter how hard you hit the keys (or pads). From that mid position, by turning the knob to the right you increase the positive velocity response and make the drum more and more sensitive to the velocities at which you hit the keys/pads. From the mid position, turning the knob to the left as the inverse effect: the harder you hit the key/pad, the softer the resulting drum sound will be. |
Snare – Bit
The Bit snare is a thin, harsh, digital snare.
Notice
The parameters described below are presented as they appear in the Control area (Arrange view). The same parameters are available in the Plug-in panel within the Plug-in Strip (Mix view). See The Plug-in Strip for more information on this.
Main page
Element | Description |
|---|---|
MAIN Section | |
Engine | Selects the engine used in the Snare Plug-in. If you change this setting, please refer to The Snares. |
Tune | Adjusts the pitch of the drum played by the middle C, measured as a percentage. Available values range from 0.0 % to 100.0 % (default: 50.0 %). For more details see Pitch range, tuning, and MIDI notes. |
Decay | Adjusts the duration of the sound’s tail, measured as a percentage (default: 50.0 %). |
Gate | When activated, the decay of the drum is choked by the end of the MIDI note. When deactivated (default), the drum plays as a one-shot sound, i.e. until the end of its tail, no matter when the note is released. |
Grit | Adjusts the intensity of the bitcrushing, measured as a percentage. Available values range from 0.0 to 100.0 % (default: 30 %). |
NOISE Section | |
Color | Adjusts the tone of the digital noise, measured as a percentage. Available values range from 0.0 to 100.0 % (default: 50.0 %). |
Amount | Adjusts the level of the digital noise, measured as a percentage. Available values range from 0.0 to 100.0 % (default: 25.0 %). |
Advanced page
For this engine the Advanced page does not contain any parameters.
Modulation page
As with all other engines and Drum Synths, the Modulation page contains one parameter: Velocity.
Element | Description |
|---|---|
SCALE Section | |
Velocity | Adjusts the velocity response of the drum. Available values range from -100.0 % to 100.0 % (default value). At zero (mid course), the drum is played at full velocity, no matter how hard you hit the keys (or pads). From that mid position, by turning the knob to the right you increase the positive velocity response and make the drum more and more sensitive to the velocities at which you hit the keys/pads. From the mid position, turning the knob to the left as the inverse effect: the harder you hit the key/pad, the softer the resulting drum sound will be. |
Snare – Pow
The Pow snare is a shot of filtered noise, useful as an electro snare, an effect or a layer in a combined snare sound.
Notice
The parameters described below are presented as they appear in the Control area (Arrange view). The same parameters are available in the Plug-in panel within the Plug-in Strip (Mix view). See The Plug-in Strip for more information on this.
Main page
Element | Description |
|---|---|
MAIN Section | |
Engine | Selects the engine used in the Snare Plug-in. If you change this setting, please refer to The Snares. |
Tune | Adjusts the pitch of the drum played by the middle C, measured as a percentage. Available values range from 0.0 % to 100.0 % (default: 50.0 %). For more details see Pitch range, tuning, and MIDI notes. |
Decay | Adjusts the duration of the sound’s tail, measured as a percentage (default: 50.0 %). |
Bend | Adjusts the pitch sweep of the sound, measured as a percentage. Available values range from -100.0 % to 100.0 % (default: 0.0 %). |
Focus | Adjusts the attack of the sound as well as the speed and shape of the pitch envelope, to produce a different quality of attack and sharpness. Available values range from 0.0 to 100 % (default: 50.0 %). |
Advanced page
For this engine the Advanced page does not contain any parameters.
Modulation page
As with all other engines and Drum Synths, the Modulation page contains one parameter: Velocity.
Element | Description |
|---|---|
SCALE Section | |
Velocity | Adjusts the velocity response of the drum. Available values range from -100.0 % to 100.0 % (default value). At zero (mid course), the drum is played at full velocity, no matter how hard you hit the keys (or pads). From that mid position, by turning the knob to the right you increase the positive velocity response and make the drum more and more sensitive to the velocities at which you hit the keys/pads. From the mid position, turning the knob to the left as the inverse effect: the harder you hit the key/pad, the softer the resulting drum sound will be. |
Snare – Sharp
The Sharp snare is an acoustic snare drum emulation inspired by the sound of 1970s disco snares.
Notice
The parameters described below are presented as they appear in the Control area (Arrange view). The same parameters are available in the Plug-in panel within the Plug-in Strip (Mix view). See The Plug-in Strip for more information on this.
Main page
Element | Description |
|---|---|
MAIN Section | |
Engine | Selects the engine used in the Snare Plug-in. If you change this setting, please refer to The Snares. |
Tune | Adjusts the pitch of the drum played by the middle C, measured as a percentage. Available values range from 0.0 % to 100.0 % (default: 50.0 %). For more details see Pitch range, tuning, and MIDI notes. |
Decay | Adjusts the duration of the sound’s tail, measured as a percentage. Available values range from 0.0 % to 100.0 % (default: 50.0 %). |
Skin Tune | Adjusts the fine-tuning of the skin of the drum, measured as a percentage. Available values range from 0.0 to 100.0 % (default: 50.0 %). |
Impact | Adjusts how hard the drum is hit, measured as a percentage. Available values range from 0.0 % (softest) to 100.0 % (hardest). The default value is 75.0 %. |
Body | Adjusts the level of the snare body independently from the wires level adjusted on the Advanced page (see below). Available values range from 0.0 to 100.0 % (default: 75.0 %). |
Noise | Adjusts the level and duration of the wires sound applied to the drum, measured as a percentage. Available values range from 0.0 to 100.0 % (default: 40.0 %). |
Advanced page
For this engine the Advanced page does not contain any parameters.
Modulation page
As with all other engines and Drum Synths, the Modulation page contains one parameter: Velocity.
Element | Description |
|---|---|
SCALE Section | |
Velocity | Adjusts the velocity response of the drum. Available values range from -100.0 % to 100.0 % (default value). At zero (mid course), the drum is played at full velocity, no matter how hard you hit the keys (or pads). From that mid position, by turning the knob to the right you increase the positive velocity response and make the drum more and more sensitive to the velocities at which you hit the keys/pads. From the mid position, turning the knob to the left as the inverse effect: the harder you hit the key/pad, the softer the resulting drum sound will be. |
Snare – Airy
The Airy snare is an acoustic snare drum model that provides a realistic metallic snare sound. The two modes available on its Advanced page relate to different tension levels of the snare wires, which allows for a wide range of snares that will cut through very well into a mix.
Notice
The parameters described below are presented as they appear in the Control area (Arrange view). The same parameters are available in the Plug-in panel within the Plug-in Strip (Mix view). See The Plug-in Strip for more information on this.
Main page
Element | Description |
|---|---|
MAIN Section | |
Engine | Selects the engine used in the Snare Plug-in. If you change this setting, please refer to The Snares. |
Tune | Adjusts the pitch of the drum played by the middle C, measured in MIDI note numbers and cents. Available values range from 52.00 to 76.00. The default value is 64.00. For more details see Pitch range, tuning, and MIDI notes. |
Decay | Adjusts the duration of the sound’s tail, measured as a percentage. Available values range from 0.0 to 100.0 % (default: 50.0 %). |
Skin Tune | Adjusts the fine-tuning of the skin of the drum, measured as a percentage. Available values range from 0.0 to 100.0 % (default: 50.0 %). |
Impact | Adjusts how hard the drum is hit, measured as a percentage. Available values range from 0.0 % (softest) to 100 % (hardest). The default value is 75.0 %. |
Advanced page
The Advanced page contains parameters controlling the wires’ sound of the drum.
Element | Description |
|---|---|
SPECTRA Section | |
Mode | Selects from two different noise types that simulate the wires of the drum. Available modes are A (default) and B. |
Tune | Provides an independent tuning of the snare noise. It relates to the tension of the snare wires on a real snare drum. Available values range from 0.0 to 100.0 % (default: 50.0 %). |
Decay | Adjusts the length of the sound of the snare wires, independently from the main Decay parameter on the Main page. Available values range from 0.0 % to 100.0 % (default: 40.0 %). |
Amount | Adjusts the amount of snare wire sound applied to the drum, measured as a percentage. Available values range from 0.0 to 100.0 % (default: 75.0 %). |
Modulation page
As with all other engines and Drum Synths, the Modulation page contains one parameter: Velocity.
Element | Description |
|---|---|
SCALE Section | |
Velocity | Adjusts the velocity response of the drum. Available values range from -100.0 % to 100.0 % (default value). At zero (mid course), the drum is played at full velocity, no matter how hard you hit the keys (or pads). From that mid position, by turning the knob to the right you increase the positive velocity response and make the drum more and more sensitive to the velocities at which you hit the keys/pads. From the mid position, turning the knob to the left as the inverse effect: the harder you hit the key/pad, the softer the resulting drum sound will be. |
Snare – Vintage
The Vintage snare is an acoustic snare drum emulation that provides the sound of old, woody snares. The character of the sound comes from its broad spectrum that allows for a wide range of snares via a subtle use of the Tune parameters.
Notice
The parameters described below are presented as they appear in the Control area (Arrange view). The same parameters are available in the Plug-in panel within the Plug-in Strip (Mix view). See The Plug-in Strip for more information on this.
Main page
Element | Description |
|---|---|
MAIN Section | |
Engine | Selects the engine used in the Snare Plug-in. If you change this setting, please refer to The Snares. |
Tune | Adjusts the pitch of the drum played by the middle C, measured in MIDI note numbers and cents. Available values range from 61.00 to 79.00. The default value is 70.00. For more details see Pitch range, tuning, and MIDI notes. |
Decay | Adjusts the duration of the sound’s tail, measured as a percentage. Available values range from 0.0 to 100.0 % (default: 50.0 %). |
Skin Tune | Adjusts the fine-tuning of the skin of the drum, measured as a percentage. Available values range from 0.0 to 100.0 % (default: 50.0 %). |
Impact | Adjusts how hard the drum is hit, measured as a percentage. Available values range from 0.0 % (softest) to 100.0 % (hardest). The default value is 75.0 %. |
Advanced page
The Advanced page contains parameters controlling the wires’ sound of the drum.
Element | Description |
|---|---|
SPECTRA Section | |
Mode | Selects from two different noise types that simulate the wires of the drum. Available modes are A (default) and B. |
Tune | Provides an independent tuning of the snare noise. It relates to the wires tension of a real snare drum. Available values range from 0.0 to 100.0 % (default: 50.0 %). |
Decay | Controls the length of the snare wire sound independently from the main Decay parameter on the Main page. Available values range from 0.0 to 100.0 % (default: 40.0 %). |
Amount | Adjusts the amount of snare wire sound applied to the drum, measured as a percentage. Available values range from 0.0 to 100.0 % (default: 75.0 %). |
Modulation page
As with all other engines and Drum Synths, the Modulation page contains one parameter: Velocity.
Element | Description |
|---|---|
SCALE Section | |
Velocity | Adjusts the velocity response of the drum. Available values range from -100.0 % to 100.0 % (default value). At zero (mid course), the drum is played at full velocity, no matter how hard you hit the keys (or pads). From that mid position, by turning the knob to the right you increase the positive velocity response and make the drum more and more sensitive to the velocities at which you hit the keys/pads. From the mid position, turning the knob to the left as the inverse effect: the harder you hit the key/pad, the softer the resulting drum sound will be. |
Snare – Chrome
The Chrome snare is an acoustic snare drum emulation with a bright sound. The two modes available on its Advanced page relate to different snare wire characteristics: noisy and crispy.
Notice
The parameters described below are presented as they appear in the Control area (Arrange view). The same parameters are available in the Plug-in panel within the Plug-in Strip (Mix view). See The Plug-in Strip for more information on this.
Main page
Element | Description |
|---|---|
MAIN Section | |
Engine | Selects the engine used in the Snare Plug-in. If you change this setting, please refer to The Snares. |
Tune | Adjusts the pitch of the drum played by the middle C, measured in MIDI note numbers and cents. Available values range from 60.00 to 84.00. The default value is 72.00. For more details see Pitch range, tuning, and MIDI notes. |
Decay | Adjusts the duration of the sound’s tail, measured as a percentage. Available values range from 0.0 to 100.0 % (default: 50.0 %). |
Skin Tune | Adjusts the fine-tuning of the skin of the drum, measured as a percentage. Available values range from 0.0 to 100.0 % (default: 50.0 %). |
Impact | Adjusts how hard the drum is hit. Available values range from 0.0 % (softest) to 100.0 % (hardest). The default value is 75.0 %. |
Advanced page
The Advanced page contains parameters controlling the wires’ sound of the drum.
Element | Description |
|---|---|
SPECTRA Section | |
Mode | Selects from two different noise types that simulate the snare wires of the drum. Available modes are A (default) and B. |
Tune | Provides an independent tuning of the snare noise. It relates to the snare wire tension of a real snare drum. Available values range from 0.0 to 100.0 % (default: 50.0 %). |
Decay | Controls the length of the snare wire sound independently from the main Decay parameter on the Main page. Available values range from 0.0 to 100.0 % (default: 40.0 %). |
Amount | Adjusts the amount of snare wire sound applied to the drum, measured as a percentage. Available values range from 0.0 to 100.0 % (default: 75.0 %). |
Modulation page
As with all other engines and Drum Synths, the Modulation page contains one parameter: Velocity.
Element | Description |
|---|---|
SCALE Section | |
Velocity | Adjusts the velocity response of the drum. Available values range from -100.0 % to 100.0 % (default value). At zero (mid course), the drum is played at full velocity, no matter how hard you hit the keys (or pads). From that mid position, by turning the knob to the right you increase the positive velocity response and make the drum more and more sensitive to the velocities at which you hit the keys/pads. From the mid position, turning the knob to the left as the inverse effect: the harder you hit the key/pad, the softer the resulting drum sound will be. |
Snare – Iron
The Iron snare is an acoustic snare drum model that is capable of a metallic, bright sound. The two modes available on its Advanced page select from two different snare wire characteristics.
Notice
The parameters described below are presented as they appear in the Control area (Arrange view). The same parameters are available in the Plug-in panel within the Plug-in Strip (Mix view). See The Plug-in Strip for more information on this.
Main page
Element | Description |
|---|---|
MAIN Section | |
Engine | Selects the engine used in the Snare Plug-in. If you change this setting, please refer to The Snares. |
Tune | Adjusts the pitch of the drum played by the middle C, measured in MIDI note numbers and cents. Available values range from 46.00 to 70.00. The default value is 58.00. For more details see Pitch range, tuning, and MIDI notes. |
Decay | Adjusts the duration of the sound’s tail, measured as a percentage. Available values range from 0.0 to 100.0 % (default: 50.0 %). |
Skin Tune | Adjusts the fine-tuning of the skin of the drum, measured as a percentage. Available values range from 0.0 to 100.0 % (default: 50.0 %). |
Impact | Adjusts how hard the drum is hit, measured as a percentage. Available values range from 0.0 % (softest) to 100.0 % (hardest). The default value is 75.0 %. |
Body | Adjusts the level of the snare body independently from level of the snare wires, which is adjusted on the Advanced page (see below). Available values range from 0.0 to 100.0 % (default: 75.0 %). |
Advanced page
The Advanced page contains parameters controlling the wires’ sound of the drum.
Element | Description |
|---|---|
SPECTRA Section | |
Mode | Selects from two different noise types that simulate the snare wires of the drum. Available modes are A (default) and B. |
Decay | Controls the length of the snare wires’ sound independently from the main Decay parameter on the Main page. Available values range from 0.0 to 100.0 % (default: 40.0 %). |
Amount | Adjusts the amount of snare wire sound applied to the drum, measured as a percentage. Available values range from 0.0 to 100.0 % (default: 75.0 %). |
Modulation page
As with all other engines and Drum Synths, the Modulation page contains one parameter: Velocity.
Element | Description |
|---|---|
SCALE Section | |
Velocity | Adjusts the velocity response of the drum. Available values range from -100.0 % to 100.0 % (default value). At zero (mid course), the drum is played at full velocity, no matter how hard you hit the keys (or pads). From that mid position, by turning the knob to the right you increase the positive velocity response and make the drum more and more sensitive to the velocities at which you hit the keys/pads. From the mid position, turning the knob to the left as the inverse effect: the harder you hit the key/pad, the softer the resulting drum sound will be. |
Snare – Clap
A stalwart of electronic music, the classic analog clap never really sounded like a group of people clapping - but that makes it all the more iconic!
Notice
The parameters described below are presented as they appear in the Control area (Arrange view). The same parameters are available in the Plug-in panel within the Plug-in Strip (Mix view). See The Plug-in Strip for more information on this.
Main page
Element | Description |
|---|---|
MAIN Section | |
Engine | Selects the engine used in the Snare Plug-in. If you change this setting, please refer to The Snares. |
Tune | Adjusts the pitch of the drum played by the middle C, measured as a percentage. Available values range from 0.0 % to 100.0 % (default: 50.0 %). For more details see Pitch range, tuning, and MIDI notes. |
Decay | Adjusts the duration of the sound’s tail, but also the “spread” between the individual claps, measured as a percentage. Available values range from 0.0 to 100.0 % (default: 50.0 %). |
Room | Adjusts the balance between the dry sound — the claps themselves — and the synthesized room sound, measured as a percentage. Available values range from 0.0 to 100.0 % (default: 50.0 %). At high values, extra “air” is added. |
Focus | Adjusts the sharpness of each clap, measured as a percentage. Available values range from 0.0 to 100.0 % (default: 50.0 %). At 0.0 % the sound is very smooth; at 100.0 % the claps are very sharp and staccato. |
Advanced page
For this engine the Advanced page does not contain any parameters.
Modulation page
As with all other engines and Drum Synths, the Modulation page contains one parameter: Velocity.
Element | Description |
|---|---|
SCALE Section | |
Velocity | Adjusts the velocity response of the drum. Available values range from -100.0 % to 100.0 % (default value). At zero (mid course), the drum is played at full velocity, no matter how hard you hit the keys (or pads). From that mid position, by turning the knob to the right you increase the positive velocity response and make the drum more and more sensitive to the velocities at which you hit the keys/pads. From the mid position, turning the knob to the left as the inverse effect: the harder you hit the key/pad, the softer the resulting drum sound will be. |
Snare – Breaker
The Breaker snare is an acoustic high pitched snare drum that cuts through perfectly into mixes containing heavy bass. The adjustment of the wires spectrum provides a great range of snares. It also works very well with the Rasper Kick.
Notice
The parameters described below are presented as they appear in the Control area (Arrange view). The same parameters are available in the Plug-in panel within the Plug-in Strip (Mix view). See The Plug-in Strip for more information on this.
Main page
Element | Description |
|---|---|
MAIN Section | |
Engine | Selects the engine used in the Snare plug-in. For more information on the available engines, please refer to section The Snares. |
Tune | Adjusts the pitch of the drum played by the middle C, measured in MIDI note numbers and cents. Available values range from 61.00 (NOTE C#3) to 85.00 (NOTE C#5). The default value is 73.00 (NOTE C#4). |
Decay | Adjusts the duration of the sound’s tail, measured as a percentage. Available values range from 0.0 to 100.0% (default: 50.0%). |
Skin Tune | Adjusts the fine-tuning of the skin of the drum, measured as a percentage. Available values range from 0.0 to 100.0% (default: 50.0%). |
Impact | Adjusts the amount of click or initial attack, measured as a percentage. Available values range from 0.0 to 100.0% (default: 75.0%). |
Advanced page
For this engine the Advanced page does not contain any parameters.
Element | Description |
|---|---|
SPECTRA Section | |
Mode | Selects from two different noise types that simulate the wires of the drum. Available modes are A (default) and B. |
Tune | Provides an independent tuning of the snare noise. It relates to the tension of the snare wires on a real snare drum. Available values range from 0.0 to 100.0% (default: 50.0%). |
Decay | Adjusts the length of the sound of the snare wires, independently from the main Decay parameter on the Main page. Available values range from 0.0% to 100.0% (default: 40.0%). |
Amount | Adjusts the amount of snare wire sound applied to the drum, measured as a percentage. Available values range from 0.0 to 100.0% (default: 75.0%). |
Modulation page
Like with all other engines and Drum Synths, the Modulation page contains one parameter: Velocity.
Element | Description |
|---|---|
SCALE Section | |
Velocity | Adjusts the velocity response of the drum. Available values range from -100.0% to 100.0% (default value). At zero (mid course), the drum is played at full velocity, no matter how hard you hit the keys (or pads). From that mid position, by turning the knob to the right you increase the positive velocity response and make the drum more sensitive to the velocity at which you hit the keys/pads. From the mid position, turning the knob to the left as the inverse effect: the harder you hit the key/pad, the softer the resulting drum sound will be. |
The Hi-hats
The Hi-hat Drum Synth can generate a variety of hi-hat sounds.

The Hi-hat in the Control area (Main page depicted).
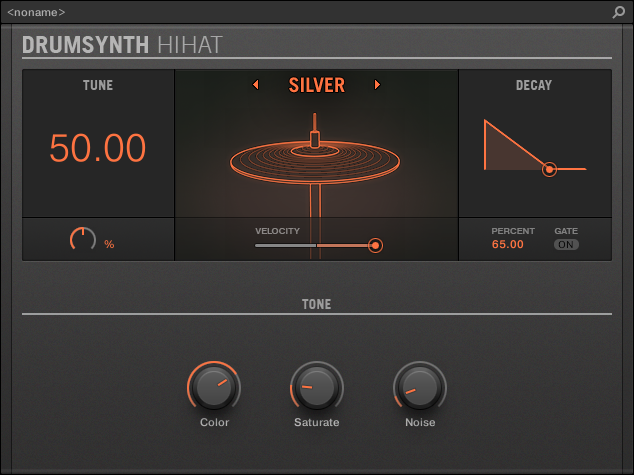
The Hi-hat panel in the Plug-in Strip.
As in every Drum Synth, the engine can be selected via the Engine selector on the Main page. Each engine has a different character and set of parameters, as detailed in the following sections.
The Hi-hat provides the following engines:
Silver (default): Hi-hat – Silver.
Circuit: Hi-hat – Circuit.
Memory: Hi-hat – Memory.
Hybrid: Hi-hat – Hybrid.
In addition, we mention how to use Choke groups with Hi-hat Plug-ins to emulate a closed vs. open hi-hat set up: Creating a Pattern with closed and open hi-hats.
Notice
For more information on engines, refer to Engines: many different drums in each Drum Synth. For general information on the Snare and the other Drum Synths, refer to Using Drum Synths.
Hi-hat – Silver
The Silver engine is the default engine of the Hi-hat.
A classic analog hi-hat that can also be used as percussion or sound effect.
Notice
The parameters described below are presented as they appear in the Control area (Arrange view). The same parameters are available in the Plug-in panel within the Plug-in Strip (Mix view). See The Plug-in Strip for more information on this.
Main page
Element | Description |
|---|---|
MAIN Section | |
Engine | Selects the engine used in the Hi-hat Plug-in. If you change this setting, please refer to The Hi-hats. |
Tune | Adjusts the pitch of the cymbal played by the middle C, measured as a percentage. Available values range from 0.0 % to 100.0 % (default: 50.0 %). For more details see Pitch range, tuning, and MIDI notes. |
Decay | Adjusts the duration of the sound, measured as a percentage. A short decay produces a closed hat; a long decay gives an open hi-hat or cymbal. Available values range from 0.0 to 100.0 % (default: 65.0 %). |
Gate | When activated, the decay of the cymbal is choked by the end of the note. When deactivated (default), the cymbal plays as a one-shot sound, i.e. until the end of its tail, no matter when the note is released, although the sound duration will still depend on the Decay parameter (refer to above). |
TONE Section | |
Color | Adjusts the center frequency of the filter applied to the sound, measured in hertz. Available values range from 932.3 Hz to 16.7 kHz (default: 7.4 kHz). The default position gives a standard metallic analog hi-hat. Colored down, the sound is much more melodic and in the midrange, good for percussion or effects. In a way this parameter is a more effective tuning control than the Tune parameter itself. Note that the Color parameter also follows keyboard tracking (i.e. the key/pad you play) along with the Tune parameter, limited to the range of the parameter. |
Saturate | Adjusts the amount of analog-style saturation applied to the sound for increased thickness, measured as a percentage. Available values range from 0.0 to 100.0 % (default: 19.0 %). |
Noise | Adusts the mix between an oscillator bank and white noise as the signal source, measured as a percentage. Available values range from 0.0 % (oscillator bank only) to 100.0 % (white noise only). The default value is 10.0 %. |
Advanced page
For this engine the Advanced page does not contain any parameters.
Modulation page
As with all other engines and Drum Synths, the Modulation page contains one parameter: Velocity.
Element | Description |
|---|---|
SCALE Section | |
Velocity | Adjusts the velocity response of the drum. Available values range from -100.0 % to 100.0 % (default value). At zero (mid course), the drum is played at full velocity, no matter how hard you hit the keys (or pads). From that mid position, by turning the knob to the right you increase the positive velocity response and make the drum more and more sensitive to the velocities at which you hit the keys/pads. From the mid position, turning the knob to the left as the inverse effect: the harder you hit the key/pad, the softer the resulting drum sound will be. |
Hi-hat – Circuit
Similar to the Silver hi-hat, the Circuit hi-hat uses a more complex oscillator for a more digital, robotic sound.
Notice
The parameters described below are presented as they appear in the Control area (Arrange view). The same parameters are available in the Plug-in panel within the Plug-in Strip (Mix view). See The Plug-in Strip for more information on this.
Main page
Element | Description |
|---|---|
MAIN Section | |
Engine | Selects the engine used in the Hi-hat Plug-in. If you change this setting, please refer to The Hi-hats. |
Tune | Adjusts the pitch of the cymbal played by the middle C, measured as a percentage. Available values range from 0.0 % to 100.0 % (default: 50.0 %). For more details see Pitch range, tuning, and MIDI notes. |
Decay | Adjusts the duration of the sound, measured as a percentage. A short decay produces a closed hat; a long decay gives an open hi-hat or cymbal. Available values range from 0.0 to 100.0 % (default: 65.0 %). |
Gate | When activated, the decay of the cymbal is choked by the end of the note. When deactivated (default), the cymbal plays as a one-shot sound, i.e. until the end of its tail, no matter when the note is released, although the sound duration will still depend on the Decay parameter (refer to above). |
TONE Section | |
Color | Adjusts the center frequency of the filter applied to the sound, measured in hertz. Available values range from 932.3 Hz to 16.7 kHz (default: 7.4 kHz). The default position gives a standard metallic analog hi-hat. Colored down, the sound is much more melodic and in the midrange, good for percussion or effects. In a way this parameter is a more effective tuning control than the Tune parameter itself. Note that the Color parameter also follows keyboard tracking (i.e. the key/pad you play) along with the Tune parameter, limited to the range of the parameter. |
Saturate | Adjusts the amount of analog-style saturation applied to the sound for increased thickness, measured as a percentage. Available values range from 0.0 to 100.0 % (default: 19.0 %). |
Seed | Selects a random sequence to control the waveform produced by the oscillator. Each of the 31 seed values available produces a different set of random pitches and harmonics. |
Dissonance | Affects the randomization of the oscillator, measured as a percentage. Available values range from 0.0 to 100.0 % (default: 25.0 %). Higher values introduce more randomization, resulting in a more noisy sound. Lower values produce a more melodic, oscillator-like sound. |
Advanced page
For this engine the Advanced page does not contain any parameters.
Modulation page
As with all other engines and Drum Synths, the Modulation page contains one parameter: Velocity.
Element | Description |
|---|---|
SCALE Section | |
Velocity | Adjusts the velocity response of the drum. Available values range from -100.0 % to 100.0 % (default value). At zero (mid course), the drum is played at full velocity, no matter how hard you hit the keys (or pads). From that mid position, by turning the knob to the right you increase the positive velocity response and make the drum more and more sensitive to the velocities at which you hit the keys/pads. From the mid position, turning the knob to the left as the inverse effect: the harder you hit the key/pad, the softer the resulting drum sound will be. |
Hi-hat – Memory
The Memory hi-hat is similar to a typical sample-based cymbal but with a modern twist, using analyzed and reconstructed timbres rather than just a recorded sample.
Notice
The parameters described below are presented as they appear in the Control area (Arrange view). The same parameters are available in the Plug-in panel within the Plug-in Strip (Mix view). See The Plug-in Strip for more information on this.
Main page
Element | Description |
|---|---|
MAIN Section | |
Engine | Selects the engine used in the Hi-hat Plug-in. If you change this setting, please refer to The Hi-hats. |
Tune | Adjusts the pitch of the cymbal played by the middle C, measured as a percentage. Available values range from 0.0 % to 100.0 % (default: 50.0 %). For more details see Pitch range, tuning, and MIDI notes. |
Decay | Adjusts the duration of the sound, measured as a percentage. Available values range from 0.0 to 100.0 % (default: 65.0 %). A short decay produces a closed hat; a long decay gives an open hi-hat or cymbal. |
Gate | When activated, the decay of the cymbal is choked by the end of the note. When deactivated (default), the cymbal plays as a one-shot sound, i.e. until the end of its tail, no matter when the note is released, although the sound duration will still depend on the Decay parameter (refer to above). |
Source | Selects the sampled timbre to be used as source. Six modes are available — A (default), B, C, D, E, and F — each corresponding to a different cymbal. |
TONE Section | |
Color | Adjusts the frequency curve of the sound, measured as a percentage. Available values range from 0.0 to 100.0 % (default: 71.5 %). Higher settings produce a brighter sound; lower settings produce a more boxy sound. |
Strike | Adjusts the attack of the cymbal, measured as a percentage. Available values range from 0.0 to 100.0 % (default: 75.0 %). |
Distress | Introduces even more lo-fi grit, crushing and distortion. Available values range from 0.0 % (default) to 100.0 %. |
Advanced page
For this engine the Advanced page does not contain any parameters.
Modulation page
As with all other engines and Drum Synths, the Modulation page contains one parameter: Velocity.
Element | Description |
|---|---|
SCALE Section | |
Velocity | Adjusts the velocity response of the drum. Available values range from -100.0 % to 100.0 % (default value). At zero (mid course), the drum is played at full velocity, no matter how hard you hit the keys (or pads). From that mid position, by turning the knob to the right you increase the positive velocity response and make the drum more and more sensitive to the velocities at which you hit the keys/pads. From the mid position, turning the knob to the left as the inverse effect: the harder you hit the key/pad, the softer the resulting drum sound will be. |
Hi-hat – Hybrid
The Hybrid hi-hat is an acoustic emulation with a distinctive sound, crossing over from acoustic to electronic timbres. It provides authentic acoustic features such as sizzling available through the Rattle parameter, and special electronic characteristics provided by the Metallic parameter. By automating these parameters you can create great sounding hi-hat figures.
Notice
The parameters described below are presented as they appear in the Control area (Arrange view). The same parameters are available in the Plug-in panel within the Plug-in Strip (Mix view) — for more information please refer to section The Plug-in Strip.
Main page
Element | Description |
|---|---|
MAIN Section | |
Engine | Selects the engine used in the Hybrid plug-in. For more information on the available engines, please refer to section The Hi-hats. |
Tune | Adjusts the pitch of the cymbal played by the middle C, measured as a percentage. Available values range from 0.0% to 100.0% (default: 50.0%). |
Decay | Adjusts the duration of the sound’s tail, measured as a percentage. Available values range from 0.0 to 100.0% (default: 65.0%). |
TONE Section | |
Color | Adjusts the cutoff frequency of several low-pass filters in order to achieve the desired timbre. Available values range from 0.0 to 100% (default: 71.5%). |
Metallic | Adjusts an enharmonic metallic character, measured as a percentage. Available values range from 0.0 to 100.0% (default: 0.0%). |
Strike | Adjusts the amount of click or initial attack, measured as a percentage. Available values range from 0.0 to 100.0% (default: 80.0%). |
Character | Adjusts a wider range of timbers from noisy to metallic, measured as a percentage. Available values range from 0.0 to 100.0% (default: 25.0%). |
Advanced page
Element | Description |
|---|---|
HYBRID Section | |
Bend | Adjusts the amount of a pitch envelope for sound design purposes. It is a bipolar control ranging from -100.0 to 100.0% (default: 0.0%) |
Rattle | Adjusts the amount of sizzling from the hi-hat. It is more noticeable with long decays. Available values range from 0.0 to 100.0% (default: 50.0%). |
Modulation page
Like with all other engines and Drum Synths, the Modulation page contains one parameter: Velocity.
Element | Description |
|---|---|
SCALE Section | |
Velocity | Adjusts the velocity response of the drum. Available values range from -100.0% to 100.0% (default value). At zero (mid course), the drum is played at full velocity, no matter how hard you hit the keys (or pads). From that mid position, by turning the knob to the right you increase the positive velocity response and make the drum more sensitive to the velocity at which you hit the keys/pads. From the mid position, turning the knob to the left as the inverse effect: the harder you hit the key/pad, the softer the resulting drum sound will be. |
Creating a Pattern with closed and open hi-hats
Don’t hesitate to use a few Hi-hat Plug-ins within a Choke group! Indeed, by loading two Hi-hat Plug-ins with different settings in two different Sounds (one for the closed hi-hat, one for the open hi-hat), then assigning both Sounds to the same Choke group, and leaving both as Master in the group, you can recreate mutually exclusive hi-hat sounds that cancel each other out when played, like on a real drum set. By the way you are not limited to two hi-hat sounds — e.g., you could add to the same Choke group a third Sound containing a half-opened hi-hat. To know how to do this, please refer to section Using Choke groups where Choke groups are explained in detail.
Tip
With a single Hi-hat Plug-in, you could also recreate an open-closed hi-hat behavior by disabling Gate and modulating the Decay in your Pattern. This rather advanced task might give you even finer control over the duration of your various hi-hat sounds, and thereby help you to give your hi-hat track a “human” feel. Furthermore, since this method makes use of a single Sound you can quickly modify other parameters of your Hi-hat Plug-in, your changes will seamlessly apply to all your hi-hat variants.
The Toms
The Tom Drum Synth can generate a variety of tom sounds.

The Tom in the Control area (Main page depicted).

The Tom panel in the Plug-in Strip.
As in every Drum Synth, the engine can be selected via the Engine selector on the Main page. Each engine has a different character and set of parameters, as detailed in the following sections.
The Tom provides the following engines:
Tronic (default): Tom – Tronic.
Fractal: Tom – Fractal.
Floor: Tom – Floor.
High: Tom – High.
Notice
For more information on engines, refer to Engines: many different drums in each Drum Synth. For general information on the Snare and the other Drum Synths, refer to Using Drum Synths.
Tom – Tronic
The Tronic engine is the default engine of the Tom.
A fat, analog-style tom with two tunable oscillators plus a tunable FM oscillator.
Notice
The parameters described below are presented as they appear in the Control area (Arrange view). The same parameters are available in the Plug-in panel within the Plug-in Strip (Mix view). See The Plug-in Strip for more information on this.
Main page
Element | Description |
|---|---|
MAIN Section | |
Engine | Selects the engine used in the Tom Plug-in. If you change this setting, please refer to The Toms. |
Tune | Adjusts the pitch of the drum played by the middle C, measured in MIDI note numbers and cents. Available values range from 36.00 to 60.00. The default value is 36.00. For more details see Pitch range, tuning, and MIDI notes. |
Decay | Adjusts the duration of the sound’s tail, measured as a percentage. Available values range from 0.0 to 100.0 % (default: 50.0 %). |
Bend | Adjusts the pitch sweep of the sound, measured as a percentage. Available values range from -100.0 % to 100.0 % (default: 0.0 %). At zero the sound stays at its original pitch during its entire decaying phase. At higher values, the pitch bends upwards. At lower values, the pitch bends downwards. |
Impact | Adjusts the amount of attack, measured as a percentage. Available values range from 0.0 % (soft attack) to 100.0 % (maximum attack). The default value is 80.0 %. |
Advanced page
The Advanced page contains parameters controlling the individual oscillators.
Element | Description |
|---|---|
HARMONICS Section | |
Interval | Adjusts the interval between the two oscillators, measured in semitones and cents. Available values range from -0.50 to 13.50 (default: 6.50). At low values the oscillators are tuned close together, giving a detuned sound which can be used for basslines. |
FM Freq | Adjusts the frequency of the FM oscillator, measured as a percentage. Available values range from 0.0 to 100.0 % (default: 50.0 %). |
FM Decay | Adjusts the decay of the FM oscillator, measured as a percentage. Available values range from 0.0 to 100.0 % (default: 35.0 %). Short decays are useful to supplement the attack or impact of the tom. Long decays can be used to embellish the tone or timbre of the tom, especially when applied subtly (see FM Amount below). |
FM Amount | Adjusts the amount of frequency modulation applied by the FM oscillator, measured as a percentage. Available values range from 0.0 to 100.0 % (default: 10.0 %). At 0.0 % there is no frequency modulation so the other FM controls (FM Freq and FM Decay) have no effect. |
Modulation page
As with all other engines and Drum Synths, the Modulation page contains one parameter: Velocity.
Element | Description |
|---|---|
SCALE Section | |
Velocity | Adjusts the velocity response of the drum. Available values range from -100.0 % to 100.0 % (default value). At zero (mid course), the drum is played at full velocity, no matter how hard you hit the keys (or pads). From that mid position, by turning the knob to the right you increase the positive velocity response and make the drum more and more sensitive to the velocities at which you hit the keys/pads. From the mid position, turning the knob to the left as the inverse effect: the harder you hit the key/pad, the softer the resulting drum sound will be. |
Tom – Fractal
The Fractal tom is a modern electronic tom with a broad sonic range from pure and analog-sounding through organic and percussive through bell-like to totally alien. It uses a tone oscillator and a feedback oscillator bank (like the one used in the Fractal engine of the Percussion, refer to Percussion – Fractal), the balance between which is controlled by the Mix parameter on the Advanced page. The tone oscillator on its own produces a simple analog-style bleepy tom. The addition of the feedback oscillator bank facilitates a much wider range of sounds.
Notice
The parameters described below are presented as they appear in the Control area (Arrange view). The same parameters are available in the Plug-in panel within the Plug-in Strip (Mix view). See The Plug-in Strip for more information on this.
Main page
Element | Description |
|---|---|
MAIN Section | |
Engine | Selects the engine used in the Tom Plug-in. If you change this setting, please refer to The Toms. |
Tune | Adjusts the pitch of the drum played by the middle C, measured in MIDI note numbers and cents. Available values range from 48.00 to 72.00. The default value is 48.00. For more details seePitch range, tuning, and MIDI notes. Note that the pitch of this instrument is heavily dependent on the settings on the Advanced page (see below). |
Decay | Adjusts the duration of the sound’s tail, measured as a percentage. Available values range from 0.0 to 100.0 % (default: 50.0 %). |
Bend | Adjusts the pitch sweep of the sound, measured as a percentage. Available values range from -100.0 % to 100.0 % (default: 0.0 %). At zero the sound stays at its original pitch during its entire decaying phase. At higher values, the pitch bends upwards. At lower values, the pitch bends downwards. |
Impact | Adjusts the amount of attack, measured as a percentage. Available values range from 0.0 % (soft attack) to 100.0 % (maximum attack). The default value is 80.0 %. |
Color | Adjusts a simple filter which affects the brightness of the sound. Available values range from 0.0 to 100.0 % (default: 50.0 %). |
Glide | The tuning of the Fractal tom is locked for each note; in other words the change in tuning is applied only when a new note is received. When the Glide parameter is set higher than zero, the pitch glides smoothly to the new tuning. The Glide parameter then defines the duration this glide takes, measured in milliseconds: as you increase the Glide value, the glide gets slower and more audible. This also applies when the tom is played across the keyboard. Available values range from None (no glide) to 350.0 ms (slowest glide). The default value is 5.5 ms. |
Advanced page
The Advanced page contains parameters controlling the individual oscillators.
Element | Description |
|---|---|
HARMONICS Section | |
KTr. Mode (Key Tracking Mode) | Selects from two key tracking modes: Harmonic (default) and Dissonant. In Harmonic mode all oscillators track the Tune parameter (on the Main page, refer to above) and your keyboard evenly. Therefore, the drum stays in tune with itself as the Tune parameter is adjusted, and can be played chromatically across the keyboard. In Dissonant mode the oscillators track the Tune parameter of your keyboard/pads unevenly. Therefore, the drum produces dissonant, detuned harmonics when the Tune parameter is adjusted or when you play different notes. |
Mix | Adjusts the mix between the tone oscillator and the feedback oscillator bank, measured as a percentage. Available values range from 0.0 % (tone oscillator only) to 100.0 % (feedback oscillator bank only). The default value is 5.0 %. |
Transpose | Adjusts the pitch transposition of the feedback oscillator bank only, measured in semitones and cents. This is useful for tuning it to the tone oscillator. Available values range from -12.00 to 12.00 semitones (default: 0.00). |
Freq A | Adjusts the pitch of oscillator A within the feedback oscillator bank, measured as a percentage. Available values range from 0.0 to 100.0 % (default). |
Freq B | Adjusts the pitch of oscillator B within the feedback oscillator bank, measured as a percentage. Available values range from 0.0 to 100.0 % (default: 75.0 %). Note that this control has no effect when FM and AM are set to zero (see below). |
FM | Adjusts the amount of frequency modulation within the feedback oscillator bank, measured as a percentage. Frequency modulation tends to add bell-like, ringing overtones. Available values range from 0.0 to 100.0 % (default: 50.0 %). |
AM | Adjusts the amount of amplitude modulation within the feedback oscillator bank, measured as a percentage. Amplitude modulation tends to add brash, bright overtones. Available values range from 0.0 to 100.0 % (default: 50.0 %). |
Modulation page
As with all other engines and Drum Synths, the Modulation page contains one parameter: Velocity.
Element | Description |
|---|---|
SCALE Section | |
Velocity | Adjusts the velocity response of the drum. Available values range from -100.0 % to 100.0 % (default value). At zero (mid course), the drum is played at full velocity, no matter how hard you hit the keys (or pads). From that mid position, by turning the knob to the right you increase the positive velocity response and make the drum more and more sensitive to the velocities at which you hit the keys/pads. From the mid position, turning the knob to the left as the inverse effect: the harder you hit the key/pad, the softer the resulting drum sound will be. |
Tom – Floor
The Floor Tom is an acoustic tom that provides the emulation of a complete set of toms. Although it is more suitable for floor and low toms, it is also capable of producing interesting mid and high toms. Furthermore the control over the pitch bend and the mute parameters allow for a wide range of sounds.
Notice
The parameters described below are presented as they appear in the Control area (Arrange view). The same parameters are available in the Plug-in panel within the Plug-in Strip (Mix view). See The Plug-in Strip for more information on this.
Main page
Element | Description |
|---|---|
MAIN Section | |
Engine | Selects the engine used in the Tom Plug-in. If you change this setting, please refer to The Toms. |
Tune | Adjusts the pitch of the drum played by the middle C, measured in MIDI note numbers and cents. Available values range from 48.00 to 62.00. The default value is 48.00. For more details see Pitch range, tuning, and MIDI notes. |
Decay | Adjusts the duration of the sound’s tail, measured as a percentage. Available values range from 0.0 to 100.0 % (default: 50.0 %). |
Tension | Adjusts the tension of the drum skin, measured as a percentage, allowing for a longer and bigger pitch bend. Available values range from 0.0 to 100.0 % (default). |
Impact | Adjusts how hard the drum is hit, measured as a percentage. Available values range from 0.0 % (softest) to 100.0 % (hardest). The default value is 80.0 %. |
Flex | Adjusts the elasticity of the skin, measured as a percentage, allowing for a greater pitch bend when the drum is hit. Available values range from 0.0 to 100.0 % (default: 30.0 %). |
MUTE Section | |
Skin | Adjusts the amount of damping applied to the drum skin, measured as a percentage. Available values range from 0.0 % (default) to 100.0 %. |
Air | Adjusts the amount of damping applied to the air, measured as a percentage. Available values range from 0.0 to 100.0 % (default: 50.0 %). |
Advanced page
For this engine the Advanced page does not contain any parameters.
Modulation page
As with all other engines and Drum Synths, the Modulation page contains one parameter: Velocity.
Element | Description |
|---|---|
SCALE Section | |
Velocity | Adjusts the velocity response of the drum. Available values range from -100.0 % to 100.0 % (default value). At zero (mid course), the drum is played at full velocity, no matter how hard you hit the keys (or pads). From the mid position, by turning the knob to the right you increase the positive velocity response and make the drum more and more sensitive to the velocities at which you hit the keys/pads. From the mid position, turning the knob to the left as the inverse effect: the harder you hit the key/pad, the softer the resulting drum sound will be. |
Tom – High
The High Tom is an acoustic tom that complements the Floor Tom. With very few parameters it provides a wide range of tom rolls and fills.
Notice
The parameters described below are presented as they appear in the Control area (Arrange view). The same parameters are available in the Plug-in panel within the Plug-in Strip (Mix view). See The Plug-in Strip for more information on this.
Main page
Element | Description |
|---|---|
MAIN Section | |
Engine | Selects the engine used in the Tom plug-in. For more information on the available engines, please refer to section The Toms. |
Tune | Adjusts the pitch of the drum played by the middle C, measured in MIDI note numbers and cents. Available values range from 57.00 (NOTE A2) to 71.00 (NOTE B3). The default value is 57.00. |
Decay | Adjusts the duration of the sound’s tail, measured as a percentage. Available values range from 0.0 to 100.0% (default: 50.0%). |
Tension | Adjusts the tension of the drum skin, measured as a percentage, allowing for a longer and bigger pitch bend. Available values range from 0.0 to 100.0% (default). |
Impact | Adjusts the amount of click or initial attack, measured as a percentage. Available values range from 0.0 to 100.0% (default: 80.0%). |
Advanced page
For this engine the Advanced page does not contain any parameters.
Modulation page
Like with all other engines and Drum Synths, the Modulation page contains one parameter: Velocity.
Element | Description |
|---|---|
SCALE Section | |
Velocity | Adjusts the velocity response of the drum. Available values range from -100.0% to 100.0% (default value). At zero (mid-course), the drum is played at full velocity, no matter how hard you hit the keys (or pads). From that mid position, by turning the knob to the right you increase the positive velocity response and make the drum more sensitive to the velocity at which you hit the keys/pads. From the mid position, turning the knob to the left as the inverse effect: the harder you hit the key/pad, the softer the resulting drum sound will be. |
The Percussions
The Percussion Drum Synth can generate a variety of percussion sounds.

The Percussion in the Control area (Main page depicted).
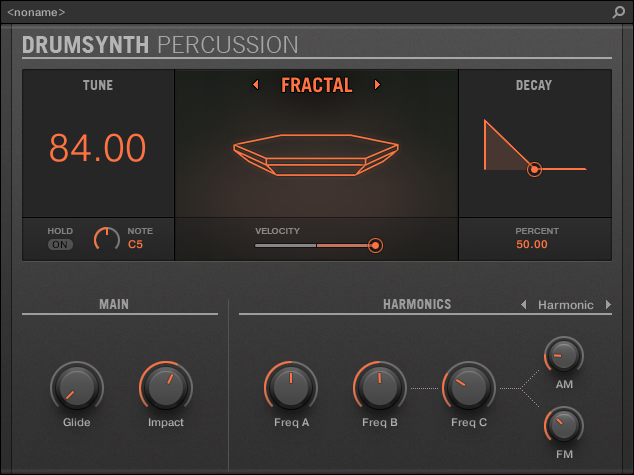
The Percussion panel in the Plug-in Strip.
As in every Drum Synth, the engine can be selected via the Engine selector on the Main page. Each engine has a different character and set of parameters, as detailed in the following sections.
The Percussion provides following engines:
Fractal (default): Percussion – Fractal.
Kettle: Percussion – Kettle.
Shaker: Percussion – Shaker.
Notice
For more information on engines, refer to Engines: many different drums in each Drum Synth. For general information on the Snare and the other Drum Synths, refer to Using Drum Synths.
Percussion – Fractal
The Fractal engine is the default engine of the Percussion.
The Fractal percussion mode is based on the feedback oscillator bank from the Fractal tom (see Tom – Fractal). It’s capable of a broad range of sounds, from bell-like to metallic, cymbal-like, subby, melodic, weird and twisted, and is intended to be played across the keyboard.
Notice
The parameters described below are presented as they appear in the Control area (Arrange view). The same parameters are available in the Plug-in panel within the Plug-in Strip (Mix view). See The Plug-in Strip for more information on this.
Main page
Element | Description |
|---|---|
MAIN Section | |
Engine | Selects the engine used in the Percussion Plug-in. If you change this setting, please refer to The Percussions. |
Tune | Adjusts the pitch of the drum played by the middle C, measured in MIDI note numbers and cents. Available values range from 60.00 to 108.00. The default value is 84.00. For more details see Pitch range, tuning, and MIDI notes. Note that the pitch of this instrument is heavily dependent on the settings on the Advanced page (see below). |
Decay | Adjusts the duration of the sound’s tail, measured as a percentage. Available values range from 0.0 to 100.0 % (default: 50.0 %). |
Tune Hold | When Tune Hold is activated, the tuning behavior is that of the Fractal tom: the tuning is fixed until the next note is received (see Tom – Tronic). This allows you to create arpeggiated patterns by adjusting the Tune parameter while a sequence of notes is playing. When Tune Hold is deactivated (default), the tuning behavior is that of the other modules: the tuning responds immediately when you adjust the Tune parameter. |
Glide | Adjusts the glide between the pitch of new notes, measured in milliseconds. When the Glide parameter is set higher than zero, the pitch glides smoothly to the new tuning. The Glide parameter then defines the duration this glide takes. Available values range from None (no glide, default) to 762.8 ms. |
Impact | Adjusts the amount of attack, measured as a percentage. Available values range from 0.0 % (soft attack) to 100.0 % (maximum attack). The default value is 60.0 %. |
Advanced page
The Advanced page contains parameters controlling the individual oscillators.
Element | Description |
|---|---|
HARMONICS Section | |
KTr. Mode (Key Tracking Mode) | Selects from two key tracking modes: Harmonic (default) and Dissonant. In Harmonic mode all oscillators track the Tune parameter (on the Main page, refer to above) and your keyboard evenly. Therefore, the drum stays in tune with itself as the Tune parameter is adjusted, and can be played chromatically across a keyboard or the pads. In Dissonant mode the oscillators track the Tune parameter you’re your keyboard) unevenly. Therefore, the drum produces dissonant, detuned harmonics when the Tune parameter is adjusted or when you play different notes on a keyboard or the pads. |
Freq A | Adjusts the pitch of oscillator A within the feedback oscillator bank, measured as a percentage. Available values range from 0.0 to 100.0 % (default: 50.0 %). |
Freq B | Adjusts the pitch of oscillator B within the feedback oscillator bank, measured as a percentage. Available values range from 0.0 to 100.0 % (default: 50.0 %). Note that this parameter has no effect when FM and AM are set to zero (see below). |
Freq C | Adjusts the pitch of oscillator C within the feedback oscillator bank, measured as a percentage. Available values range from 0.0 to 100.0 % (default: 29.1 %). Note that this parameter has no effect when FM and AM are set to zero (see below). |
FM | Adjusts the amount of frequency modulation within the feedback oscillator bank, measured as a percentage. Frequency modulation tends to add bell-like, ringing overtones. Available values range from 0.0 to 100.0 % (default: 34.4 %). |
AM | Adjusts the amount of amplitude modulation within the feedback oscillator bank, measured as a percentage. Amplitude modulation tends to add brash, bright overtones. Available values range from 0.0 to 100.0 % (default: 18.6 %). |
Modulation page
As with all other engines and Drum Synths, the Modulation page contains one parameter: Velocity.
Element | Description |
|---|---|
SCALE Section | |
Velocity | Adjusts the velocity response of the drum. Available values range from -100.0 % to 100.0 % (default value). At zero (mid course), the drum is played at full velocity, no matter how hard you hit the keys (or pads). From that mid position, by turning the knob to the right you increase the positive velocity response and make the drum more and more sensitive to the velocities at which you hit the keys/pads. From the mid position, turning the knob to the left as the inverse effect: the harder you hit the key/pad, the softer the resulting drum sound will be. |
Percussion – Kettle
The Kettle percussion is an acoustic timpani emulation that provides an orchestral and rich sound.
Notice
The parameters described below are presented as they appear in the Control area (Arrange view). The same parameters are available in the Plug-in panel within the Plug-in Strip (Mix view). See The Plug-in Strip for more information on this.
Main page
Element | Description |
|---|---|
MAIN Section | |
Engine | Selects the engine used in the Percussion Plug-in. If you change this setting, please refer to The Percussions. |
Tune | Adjusts the pitch of the drum played by the middle C, measured in MIDI note numbers and cents. Available values range from 33.00 to 57.00. The default value is 45.00. For more details see Pitch range, tuning, and MIDI notes. |
Decay | Adjusts the duration of the sound’s tail, measured as a percentage. Available values range from 0.0 to 100.0 % (default: 50.0 %). |
Puff | Adjusts the amount of feedback noise applied to the drum, measured as a percentage. Available values range from 0.0 to 100.0 % (default: 25.0 %). |
Damp | Adjusts the damping amount, measured as a percentage. Available values range from 0.0 % (default) to 100.0 %. |
Impact | Adjusts the amount of attack. Available values range from 0.0 % (soft attack) to 100.0 % (maximum attack). The default value is 60.0 %. |
Advanced page
For this engine the Advanced page does not contain any parameters.
Modulation page
As with all other engines and Drum Synths, the Modulation page contains one parameter: Velocity.
Element | Description |
|---|---|
SCALE Section | |
Velocity | Adjusts the velocity response of the drum. Available values range from -100.0 % to 100.0 % (default value). At zero (mid course), the drum is played at full velocity, no matter how hard you hit the keys (or pads). From that mid position, by turning the knob to the right you increase the positive velocity response and make the drum more and more sensitive to the velocities at which you hit the keys/pads. From the mid position, turning the knob to the left as the inverse effect: the harder you hit the key/pad, the softer the resulting drum sound will be. |
Percussion – Shaker
The Shaker is a versatile electronic shaker/maraca engine.
Notice
The parameters described below are presented as they appear in the Control area (Arrange view). The same parameters are available in the Plug-in panel within the Plug-in Strip (Mix view). See The Plug-in Strip for more information on this.
Main page
Element | Description |
|---|---|
MAIN Section | |
Engine | Selects the engine used in the Percussion Plug-in. If you change this setting, please refer to The Percussions. |
Tune | Adjusts the center frequency of the filter applied to the noise source, which will define the pitch of the drum played by the middle C, measured as a percentage. Available values range from 0.0 % to 100.0 % (default: 50.0 %). For more details see Pitch range, tuning, and MIDI notes. |
Filter | Adjusts the bandwidth of the filter applied to the noise source, measured as a percentage. Higher settings result in a wider filter. Lower settings result in a narrower filter, measured as a percentage. Available values range from 0.0 to 100.0 % (default: 70.0 %). |
Grain | Adjusts the timbre of the noise source, measured as a percentage. Higher settings emulate the grainy sound of a real shaker. Available values range from 0.0 to 100.0 % (default: 50.0 %). Furthermore the Grain parameter is assigned to velocity: lower velocity shakes contain more grain. |
ENVELOPE Section | |
Mode | Selects from two envelope modes: Realistic (default) and Machine. In Realistic mode the envelope uses curved attack and release stages for a more natural sound. In Machine mode the envelope uses linear attack, hold, and release stages for a static, machine-like sound. In Performer mode, instead of producing a one-shot sound like most drums, the shaker plays a rhythmic pattern like a real shaker. In this mode, simply hold the note for as long as you want the pattern to play. |
Attack | Adjusts the duration of the envelope’s attack stage, measured as a percentage. Available values range from 0.0 to 100.0 % (default: 40.0 %). |
Hold (Machine mode only) | Adjusts the duration of the envelope’s hold stage, i.e. the time during which the envelope is held at its highest point, measured as a percentage. Available values range from 0.0 % (default) to 100.0 %. |
Accent (Performer mode only) | Controls the amount of emphasis on certain notes within the shaker pattern, measured as a percentage. At low values, the groove is static and the notes rather quiet, as if the shaker were being shaken very gently and uniformly. As the parameter is increased, key notes in the pattern are emphasized, creating a classic shaker groove. High values simulate a shaker that is being shaken by someone who is having a lot of fun! Available values range from 0.0 to 100.0% (default: 70.0%). |
Fill (Performer mode only) | The Fill parameter is designed to be set to None by default and played manually during performance or automated in the sequencer. By default, the shaker plays a pattern according to the Rate parameter on the Advanced page (see below). When the Fill parameter is set to Double, the speed of the pattern is doubled. When set to Triple, the shaker plays rapid triplets. Use this to insert improvised fills into your shaker parts to add variety and interest. |
Release | Adjusts the duration of the envelope’s release stage, measured as a percentage. Available values range from 0.0 to 100.0 % (default: 35.0 %). |
Advanced page
The Advanced page contains parameters only when the Shaker engine is in Performer mode (see Mode parameter above). These parameters further adjust the envelope.
ENVELOPE Section |
Element | Description |
|---|---|
Sync | The Sync parameter has two options: Lock and Retrig. In Lock mode, the shaker pattern is synced to the song position; that is, it is always in time regardless of when a note is pressed. In Retrig mode, the shaker pattern (including accents) is retriggered on every note on, without quantizing to the nearest beat. In both cases, the tempo of the pattern remains correct for the song. |
Rate | Sets the note division of the shaker pattern. For example, 1/16 (default value) will result in a shaker pattern that plays 16th notes, and so on. |
Length | Adjusts the length of the pattern that is accented by the Accent parameter on the Main page (see above). By default, Length is set to 4, so the pattern will appear to repeat every 4 “shakes” (the note length of which can be set with the Rate parameter above). Syncopated patterns can be created by selecting a value other than 4 or 8 (or 3 or 6 if the Rate parameter is set to a triplet note division). |
Offset | Adjusts the timing offset of the shaker pattern. Fine adjustment will shift the pattern slightly, by less than one note division, affecting the feel of the shaker pattern in relation to the beat. Coarse adjustment will shift the pattern by entire note divisions, allowing you to rapidly introduce syncopated variations to the shaker pattern during performance or using automation. Available values range from -4.00 to 4.00 (default: 0.00). On your controller, coarse adjustment (changing the value in steps of 1.0) occurs by default when the knob is moved. Fine-tuning can be achieved by holding the SHIFT button while turning the knob. |
Swing | Adjusts the amount of swing or shuffle in the shaker pattern. Higher values will result in a pattern with more swing. Note that Swing alone will result in quite a mechanical feel — for a more human feel it is recommended to add some Twist as well (see below). Available values range from 0.0 to 100.0% (default: 0.0%). |
Twist | The Twist parameter “skews” the groove of the shaker pattern. On its own, with the Swing parameter set to zero, it can sound very strange and lopsided. However, used sparingly in conjunction with Swing, the Twist parameter gives the pattern a flowing, natural groove, just like a real person playing a shaker. Available values range from 0.0 to 100.0% (default: 0.0%). |
Modulation page
As with all other engines and Drum Synths, the Modulation page contains one parameter: Velocity.
Element | Description |
|---|---|
SCALE Section | |
Velocity | Adjusts the velocity response of the drum. Available values range from -100.0 % to 100.0 % (default value). At zero (mid course), the drum is played at full velocity, no matter how hard you hit the keys (or pads). From that mid position, by turning the knob to the right you increase the positive velocity response and make the drum more and more sensitive to the velocities at which you hit the keys/pads. From the mid position, turning the knob to the left as the inverse effect: the harder you hit the key/pad, the softer the resulting drum sound will be. |
The Cymbals
The Cymbal Drum Synth can generate a variety of cymbal sounds.

The Crash engine selected for the Cymbal in the Control area (Main page depicted).

The Crash engine selected on the Cymbal panel in the Plug-in Strip.
As in every Drum Synth, the engine can be selected via the Engine selector on the Main page. Each engine has a different character and set of parameters, as detailed in the following sections.
The Cymbal provides following engines:
Crash (default): Cymbal – Crash.
Ride: Cymbal – Ride.
Notice
For more information on engines, refer to Engines: many different drums in each Drum Synth. For general information on the Cymbals and the other Drum Synths, refer to Using Drum Synths.
Cymbal – Crash
The Crash engine creates a wide range of cymbals: from a typical 909-like crash to more acoustic sounding timbres. Its parameters provide a great range of expression and spectral variation.
Notice
The parameters described below are presented as they appear in the Control area (Arrange view). The same parameters are available in the Plug-in panel within the Plug-in Strip (Mix view) — for more information please refer to section The Plug-in Strip.
Main page
Element | Description |
|---|---|
MAIN Section | |
Engine | Selects the engine used in the Cymbal plug-in. Available engines include Crash and Ride. |
Tune | Adjusts the pitch of the drum played by the middle C, measured in MIDI note numbers and cents. Available values range from 0.00 to 100.0% (default value is 30.0%). |
Decay | Adjusts the duration of the sound’s tail, measured as a percentage. Available values range from 0.0 to 100.0% (default: 70.0%). |
Impact | Adjusts the amount of click or initial attack, measured as a percentage. Available values range from 0.0 to 100.0% (default: 70.0%). |
Width | Adjusts the perceived stereo image, measured as a percentage. At zero the sound is mono, at 100.0% the sound is a wide stereo image, replicating the effect of recording with overhead stereo microphones. Available values range from 0.0 to 100.0% (default: 50.0%). |
COLOR Section | |
Density | Adjusts the more complexity to the sound, measured as a percentage. Available values range from 0.0 to 100.0% (default: 100.0%) |
Tone | Adjusts the balance of the spectral content, measured as a percentage. Available values range from 0.0 to 100.0% (default: 50.0%). |
Mode | Selects from three different modes Metallic, Normal, or Soft (default: Metallic). |
Advanced page
For this engine the Advanced page does not contain any parameters.
Modulation page
Like with all other engines and Drum Synths, the Modulation page contains one parameter: Velocity.
Element | Description |
|---|---|
SCALE Section | |
Velocity | Adjusts the velocity response of the drum. Available values range from -100.0% to 100.0% (default value). At zero (mid course), the drum is played at full velocity, no matter how hard you hit the keys (or pads). From that mid position, by turning the knob to the right you increase the positive velocity response and make the drum more sensitive to the velocity at which you hit the keys/pads. From the mid position, turning the knob to the left as the inverse effect: the harder you hit the key/pad, the softer the resulting drum sound will be. |
Cymbal – Ride
The Ride engine is an acoustic emulation that allows the cymbal to be hit in many different ways through the use of the Edge and Bell parameters. The sonic palette ranges from soft Jazz-like rides to more noisy cymbals.
Notice
The parameters described below are presented as they appear in the Control area (Arrange view). The same parameters are available in the Plug-in panel within the Plug-in Strip (Mix view) — for more information please refer to section The Plug-in Strip.
Main page
Element | Description |
|---|---|
MAIN Section | |
Engine | Selects the engine used in the Cymbal plug-in. Available engines include Crash and Ride. |
Tune | Adjusts the pitch of the drum played by the middle C, measured in MIDI note numbers and cents. Available values range from 0.00 to 1.00. The default value is 0.30. |
Decay | Adjusts the duration of the sound’s tail, measured as a percentage. Available values range from 0.0 to 100.0% (default: 70.0%). |
Impact | Adjusts the amount of click or initial attack, measured as a percentage. Available values range from 0.0 to 100.0% (default: 70.0%). |
Width | Adjusts the perceived stereo image, measured as a percentage. At zero the sound is mono, at 100.0% the sound is a wide stereo image, replicating the effect of recording with overhead stereo microphones. Available values range from 0.0 to 100.0% (default: 50.0%). |
STRIKE Section | |
Edge | Adjusts the point where the cymbal is hit, measured as a percentage. Hitting the edge of the cymbal (100%) creates a more chaotic sound, hitting it near the center (0.0%) creates a more high-pitched sound. Available values range from 0.0 to 100.0% (default: 50.0%) |
Bell | Adjusts the high-frequencies on a narrow band, measured as a percentage. (default: 0.0%) |
Advanced page
Element | Description |
|---|---|
HYBRID Section | |
Character | Adjusts a wider range of timbers between more noisy to more metallic ones, measured as a percentage. Available values range from 0.0 to 100.0% (default: 20.0%). |
Tail | Adjusts the length of the sound tail through an envelope. Available values range from 0.0 to 100.0% (default: 100.0%). |
Modulation page
Like with all other engines and Drum Synths, the Modulation page contains one parameter: Velocity.
Element | Description |
|---|---|
SCALE Section | |
Velocity | Adjusts the velocity response of the drum. Available values range from -100.0% to 100.0% (default value). At zero (mid course), the drum is played at full velocity, no matter how hard you hit the keys (or pads). From that mid position, by turning the knob to the right you increase the positive velocity response and make the drum more sensitive to the velocity at which you hit the keys/pads. From the mid position, turning the knob to the left as the inverse effect: the harder you hit the key/pad, the softer the resulting drum sound will be. |
Bass Synth
This section gives a detailed description of Maschine’s Bass Synth, a powerful monophonic synthesizer to quickly create expressive bass lines.
Bass Synth is an internal fun and easy-to-use monophonic synthesizer module that allows you to quickly create expressive bass lines. Like any other Instrument Plug-in, you can load it into the first Plug-in slot of a Sound to gain full control over its parameters in the software and from your hardware controller.
The Bass Synth’s key features are the following:
Two oscillators (monophonic)
Seamlessly morph between sine, saw, and square wave for each oscillator
Octave switch for each oscillator
Filter, modulation envelope, drive (bi-polar saturation/distortion), and note glide
Integrated with Maschine Jam: Program bass and acid lines via notes and glides on Maschine Jam direct from the 8x8 click-pad matrix. For more information on sequencing with Maschine Jam, please read the Maschine Jam Manual available from the Help menu and Native Instruments website.
Tip
Like any other Plug-in, you can also enhance the Bass Synth’s sound by adding internal effects, tweaking its parameters during a live performance, or modulating its parameters.
Using Bass Synth
Bass Synth is a Maschine Plug-in and, as such, it supports the usual workflows and procedures for Plug-ins: To know how to load, remove, replace, insert, move, copy/paste a Bass Synth, adjust the Bass Synth parameters, and load/save Bass Synth presets, refer to Plug-in overview.
Bass Synth parameter overview
The Bass Synth has the same parameters in both the Control area of the Arrange view and in the Plug-in Strip of the Mix view.
Parameter pages in the Control area (Arrange view)
In Arrange view (Ideas view and Song view), the parameters of the Bass Synth appear as follows in the Control area:
 |
The Bass Synth in the Control area (Main page depicted).
The parameters are grouped into two Parameter pages:
The Main page groups the most important parameters: Here you can adjust the shape and octave of each oscillator, the detune of the second oscillator, the mix between both oscillators, and the cutoff and resonance of the filter.
The Advanced page provides access to the modulation envelope parameters (modulation amount and decay), the amount of drive, and the note glide parameters (on/off and glide time).
Common layout in the Plug-in Strip (Mix view)
In Mix view, the Plug-in panel of the Bass Synth in the Plug-in Strip provides easy access to parameters and visualization of the oscillator waveforms:
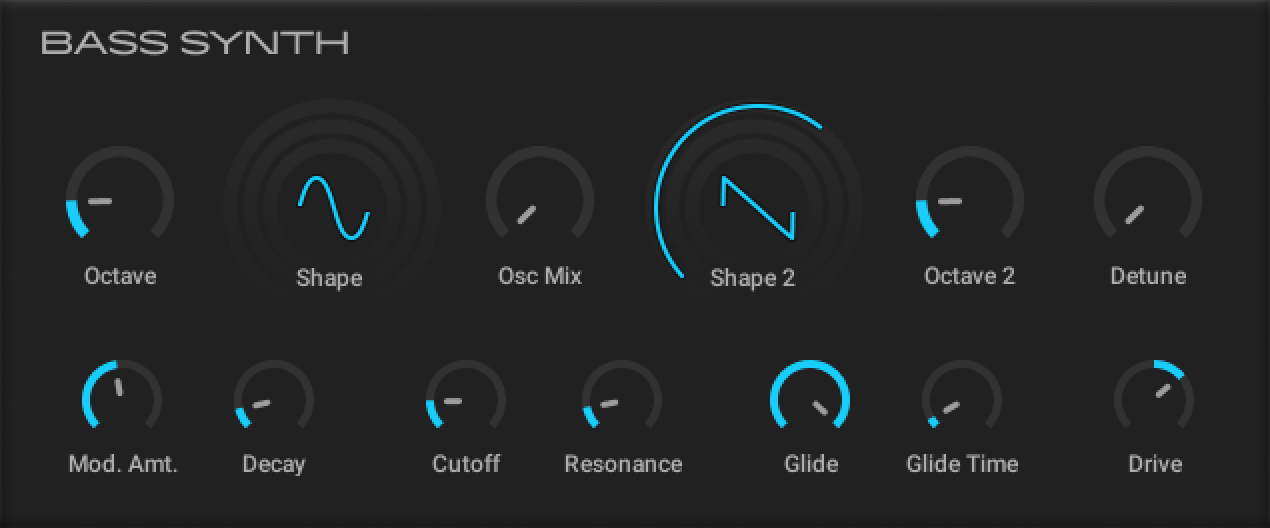 |
The Bass Synth parameters in the Plug-in Strip.
The top row of the panel contains the parameters of the two oscillators.
The bottom row of the panel contains the modulation envelope, filter, note glide, and drive parameters.
Notice
For more information on the various Plug-in panels found in the Plug-in Strip, please refer to section The Plug-in Strip.
Bass Synth parameters
The following parameters are available in the Control area and in the Plug-in Strip:
Notice
The parameters described are presented as they appear in the Control area. The same parameters are available in the Plug-in panel within the Plug-in Strip (Mix view). See The Plug-in Strip for more information on this.
Page 1 — Main page
The Main page of the Bass Synth contains the following parameters:
Element | Description |
|---|---|
OSC1 section | |
Shape | Adjusts the waveform shape of the first oscillator continuously from sine to square. |
Octave | Transposes the base key of the first oscillator in octaves (range: -3 – 3). |
OSC2 section | |
Shape2 | Adjusts the waveform shape of the second oscillator continuously from sine to square. |
Octave2 | Transposes the base key of the second oscillator in octaves (range: -3 – 3). |
Detune | Adjusts the detuning of the second oscillator relative to the first oscillator, from 0 (same pitch) to 1 (a semitone higher). |
OSC MIX section | |
Osc Mix | Adjusts the mix between both oscillators. At full left only the first oscillator is audible, at full right only the second oscillator is audible. |
Filter section | |
Cutoff | Adjusts the frequency of the low-pass filter (range: 14.6 Hz – 23.7 kHz). |
Resonance | Adjusts the amount of boost around the cutoff frequency (range: 0 – 120 %). Values above 100.0 % can lead to self-oscillation. |
Page 2 — Advanced page
The Advanced page of the Bass Synth contains the following parameters:
Element | Description |
|---|---|
Envelope section | |
Mod. Amt. | Adjusts the amount of envelope applied to the filter cutoff (range: 0 – 100 %). |
Decay | Adjusts the rate at which the sound fades to silence (range: 0 – 100 %). |
Tone section | |
Drive | Adjusts the amount of drive (range: -100 % – 100 %). -100% increases the input level for the filter, driving the signal internally into saturation, and 100% controls the drive level of the distortion at the end of the signal chain. |
Note section | |
Glide Time | Adjusts the time it takes to glide from one pitch to the next (range: 10 ms – 1000 ms). |
Glide | Activates or deactivates the note glide. When glide is on, each note glides to the next note in a monophonic manner. |
Poly Synth
The Maschine Poly Synth is based on Native Instruments Pro-53 plug-in. This section describes its functionality and workflows.
Based on the Native Instruments Pro-53 plug-in, Poly Synth delivers the colorful character of a classic dual-oscillator synth built for full hands-on control with Maschine. It provides warm vintage tones, organic bass, and shimmering pads with all of the 80s golden-era style. Assign modulation, switch routings, blend sounds, patch, and play for polysynth magic.
Poly Synth includes the following features:
Up to 16 voices
Two oscillators
Multimode filter
Two envelope generators
One LFO
Modulation and Poly Mod
You can load Poly Synth into the first Plug-in slot of a Sound to gain full control over its parameters in the Control area or direct from your hardware controller. Enhance the sound of the Poly Synth further by adding internal effects, tweaking parameters during a live performance, or automate them like any other plug-in in Maschine.
Notice
The parameters described are presented as they appear in the Control area. In addition, the same parameters are available in the Plug-in panel within the Plug-in Strip (Mix view).
Using Poly Synth
Poly Synth is a Maschine Plug-in and, as such, supports all usual plug-in actions and procedures. Hence, to know how to load, remove, replace, insert, move, copy/paste a Poly Synth, as well as how to adjust the Poly Synth parameters, and load/save presets, please refer to section Plug-in overview, where these are described in detail.
Poly Synth parameters
The Poly Synth has the same parameters in both the Control area and in the Plug-in Strip of the Mix view.
Poly Synth Parameter pages in the Control area (Arranve view)
In the Ideas and Song view, the parameters of the Poly Synth are grouped in the Control area:

Poly Synth parameters in the Control area
The Poly Synth parameters are presented in nine pages:
Page 1: Filter adjusts the brightness of the sound and the filter mode.
Page 2: Envelopes adjusts the filter and amplitude envelope generators.
Page 3: Mix / Voices sets oscillator levels, voice mode, and the number of voices.
Page 4: Oscillator A sets the basic tone and waveforms for Oscillator A.
Page 5 Oscillator B sets the basic tone and waveforms for Oscillator B.
Page 6: LFO sets the rate and modulation destinations for the low-frequency oscillator.
Page 7: Modulation assigns the LFO or Noise signal (or a combination of both) to modify the frequency or pulse width of both oscillators as well as the filter cutoff.
Page 8: Poly Mod sets Oscillator B or the Filter envelope to modulate Oscillator A frequency, Oscillator A pulse-width, and the Filter cutoff.
Page 9: Global changes the overall sound and function of the Poly Synth.
Poly Synth in the Plug-in Strip (Mix view)
In Mix view, the panel of the Poly Synth provides easy access to parameters:
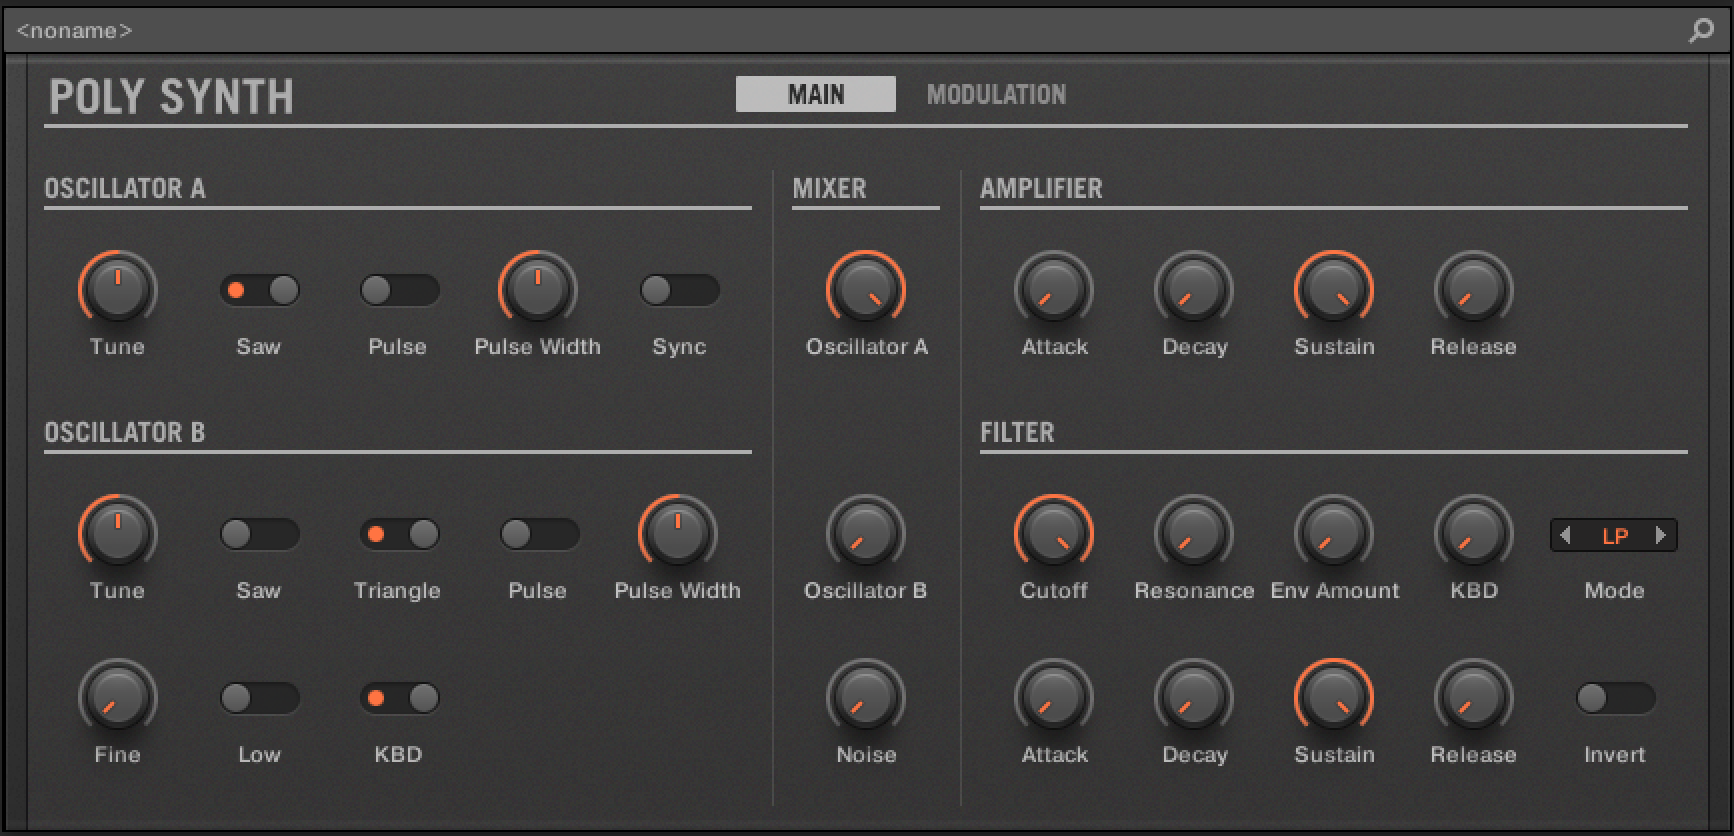
The Poly Synth parameters in the Plug-in Strip
In the Plug-in Strip the Poly Synth parameters are consolidated and grouped into two pages:
Page 1: MAIN contains all main synth parameters, including the Oscillators, Mixer, Amp, and Filter sections.
Page 2: MODULATION contains all global and modulation parameters, including Voicing, Global, LFO, Poly Mod, and Modulation sections.
Notice
For more information on the Plug-in Strip, refer to The Plug-in Strip.
Poly Synth Filter
The function of the filter is to subtract frequencies from the sound produced by the oscillators and noise generator, thereby changing the overall harmonic content of the sound. This change can be varied over time using the Filter Envelope to produce more dynamic timbres. Additionally, you can experiment with the Invert parameter to reverse the envelope's effect on the filter or the powerful Poly Mod feature to modulate the filter further.
The Filter page parameters are presented as follows:
Filter parameters
Element | Description |
|---|---|
Cutoff | Sets the frequency of the filter. A low-pass (LP), band-pass (BP), or hi-pass (HP) characteristic may be selected using the Mode parameter. |
Resonance | Sets the amount of boost around the cutoff frequency for the filter. This emphasizes a narrow band of frequencies. High levels of resonance can cause the filter to self-oscillate. |
Env Amount | Sets the amount of modulation from the filter envelope to the filter’s cutoff frequency. Any setting above zero means that each time you strike a key, the filter envelope controls how the filter opens and closes. Higher amounts affect the cutoff frequency more dramatically. |
Invert | Inverts the effect of the filter envelope on the filter. When the Invert switch is activated, the action of the filter envelope on the filter is inverted. Normally when the Invert switch is off, and the Env Amount is turned up, the filter’s Cutoff rises in the Attack stage and drops back in the Decay and Release stages. However, with Invert on, the Cutoff drops during the Attack stage and comes back up in the Decay and Release stages. This can be useful for creating sound effects. |
KBD | Sets the amount of modulation from the keyboard to the filter’s cutoff frequency. Increasing the amount means that higher notes open the filter more. This is useful for adding brightness to a sound as higher notes are played, which is typically how acoustic instruments behave. The keyboard filter tracking is off at zero, meaning the filter frequency is unaffected by playing higher or lower notes. |
Mode | Selects the low-pass (LP), band-pass (BP), or hi-pass (HP) mode for the filter. |
Poly Synth Envelopes
The Poly Synth contains two 4-stage envelopes; one controls the filter and the other the amplitude.
The Filter envelope provides control over harmonics and brightness over time by modifying the cutoff frequency over four stages, including attack, decay, sustain, and release. Using these controls to filter sound over time can provide a lot of variation and expression.
The Filter Envelope is applied using the Env Amount parameter on the Filter page. Additionally, experiment with the Invert parameter to reverse the effect of the envelope on the filter, and the powerful Poly Mod to modulate the filter further.
The Amp Envelope shapes the volume of a sound over time. Using this envelope, it is possible to mimic the dynamic properties of instruments such as for example, a string with a slow attack and a long release or a drum with a sharp attack and quick release. Of course, there is lots of room for experimentation, especially when combined with the effect of the Filter Envelope.
The Filter and Amp Envelope parameters are presented as follows:
Filter Envelope parameters
Element | Description |
|---|---|
Attack | Sets the attack time of the envelope. Turned fully left, the envelope will start immediately. As the level is increased, the attack becomes longer, allowing the filter to open smoothly. |
Decay | Sets the decay time of the envelope. After a sound reaches the filter frequency set at its attack stage, decay controls how quickly the filter then transitions to the cutoff frequency set with the sustain knob. The higher the setting, the longer the decay. |
Sustain | Determines the control level for the duration of time that the note is being held. Unlike the other settings, Sustain is not time-based. |
Release | Sets the release time of the envelope. This controls how quickly the filter closes after a note is released. If the Release switch on the Global page is set to off, then the Release control here will have no effect. |
Amp Envelope parameters
Element | Description |
|---|---|
Attack | Adjusts the time it takes once a key is pressed for the volume to climb from zero to full volume. It can be used to create a sound with a fast attack or a slow fade-in. |
Decay | Adjusts the time it takes for the volume to fall from its initial full volume to the level set by the Sustain control while a key is held down. |
Sustain | Sets the volume level that the envelope remains at while the key is held down after the decay has expired. |
Release | Adjusts the time it takes for the volume to fall from the sustain level to zero once the key is released. It can be used to create sounds that have a short or long fadeout. |
Poly Synth Mix and Voices
The Mix / Voice page contains two sections that both affect the overall characteristics of the sound.
The Mix section enables you to adjust the levels of the various sound generators on the Poly Synth. These include Oscillator A, Oscillator B, and the noise generator. The level of at least one of these must be increased to make sound with the Poly Synth.
The Voice section contains parameters that can be used to set the polyphony (the number of voices used) and mode of the sound.
The Mix and Voice parameters are presented as follows:
Mix parameters
Element | Description |
|---|---|
Level A | Adjusts the level of Oscillator A. At the far left position the oscillator is not heard. To the far right, the oscillator is at full volume. |
Level B | Sets the level of Oscillator B. At the far left position the oscillator is not heard. To the far right, the oscillator is at full volume. |
Noise | Sets the level of the noise generator. At the far left position the noise generator is not heard. To the far right, the oscillator is at full volume. |
Voice parameters
Element | Description |
|---|---|
Glide | Sets the level of glide. When Unison mode is engaged, the Glide parameter determines the amount of time it takes the Poly Synth to slide from the previous note’s pitch to a new pitch. This is the portamento effect that is common among monophonic synthesizers. The range of this function is from 0 seconds (when turned fully to the left) to 5 seconds (when turned fully to the right). |
Mode | Sets the voice mode. In Poly mode, the Voices setting determines the number of voices that can play simultaneously. In Unison mode, all voices sound on one note. For example, if you use 16 voices of polyphony and are in Unison mode, playing a note will force 16 voices to play the same tone. That’s 32 oscillators! This yields a very full lead or bass sound and allows the Glide function for portamento (gliding) effects. To create a “fatter” Unison Mode sound, the Poly Synth subtly detunes each voice. The detuning gives a doubling effect that can be used to create a mighty sound. If Unison with Legato is activated, when detached notes are played, each Attack will still be re-triggered, but when overlapping notes are played, the pitches will change without new Attacks, for Legato response. |
Voices | Sets the number of voices of polyphony available to the Poly Synth synthesis engine. It also functions as the control for changing the amount of polyphony. The range is from 1 to 16 voices. |
Detune | Adds an amount of random deviation throughout the synth engine. This random detuning is particularly noticeable in Unison mode, where the tuning variances will cause a monophonic patch to thicken. When Detune is set at the minimum amount, the Poly Synth is in “digital” mode, where all signals in the synthesis engine are precisely calibrated. |
Poly Synth Oscillator A
The Poly Synth has two oscillators that are split across two pages named Oscillator A and Oscillator B. These oscillators produce waveforms that each have their own inherent sound character based on their harmonic content. The Poly Synth has two oscillators for each voice. If 16 voices are being used that's 32 oscillators! Level controls for each oscillator are located in the Mix / Voice section.
Oscillator A is capable of simultaneously generating sawtooth (ramp-like) and pulse (square-like) waveforms. You can select either waveform, both waveforms, or no waveform. If both waveforms are chosen, the output of this module will be an even mix of sawtooth and pulse waveforms. If neither waveform is selected, there will be no output from Oscillator A. Oscillator B can be hard-synced to Oscillator A to create more complex sounds.
Oscillator A parameters are presented as follows:
Oscillator A parameters
Element | Description |
|---|---|
Tune | Sets the base pitch of Oscillator A. It can be adjusted in semitone increments over a 4-octave range. |
Sync | Activates Oscillator A hard sync. Synchronization forces this oscillator’s waveform to restart each time Oscillator B’s waveform begins. The result of synchronization is the creation of interesting waveforms by either reinforcing harmonics of the controlling oscillator or adding new, unusual harmonics to the output signal. It is important to note that when Sync is activated, the tune settings of Oscillator A only adjust the timbre of the oscillator. Oscillator B alone determines the pitch of the sound. Oscillator A will follow the pitch of incoming MIDI notes. Settings of Oscillator B are simply used to change the harmonic content of this oscillator. |
Shapes parameters
Element | Description |
|---|---|
Saw | Activates the Sawtooth waveform. This is the richest audio signal of the waveforms (it contains all of the harmonics at decreasing volume levels in high frequencies). Its sound is ideal for brass sounds, percussive bass sounds, or rich accompaniments. |
Pulse | Activates the Pulse waveform. The harmonic spectrum of a pulse wave is determined by the duty cycle, which can be changed using the Pulse Width. Acoustically, the wave could be described as changing during the duty cycle from buzzy, nasal and biting for thin pulses to warm, round, and hollow for more evenly spread, squarish waveforms. |
Pulse Width | Changes the width of the pulse wave. It changes from a square wave when the pulse width knob is at its center position to a very narrow pulse wave when the pulse width knob is fully left or right. |
Notice
The parameters described are presented as they appear in the Control area (Arrange view). The same parameters are available in the Plug-in panel within the Plug-in Strip (Mix view). See The Plug-in Strip for more information on this.
Poly Synth Oscillator B
The Poly Synth has two oscillators split across two pages named Oscillator A and Oscillator B. These oscillators produce waveforms with their own inherent sound character based on their harmonic content. The Poly Synth has two oscillators per voice. Level controls for each of these are located in the Mix / Voice section.
Oscillator A is capable of simultaneously generating sawtooth (ramp-like) and pulse (square-like) waveforms. Oscillator B can simultaneously generate sawtooth, triangle, and variable-width pulse waves and can be hard-synced to Oscillator A to create more complex sounds.
Oscillator B is also used as both a sound and modulation source. In addition to having more waveforms and finer frequency control, Oscillator B can be used as an LFO (Low Frequency Oscillator). This can also be disconnected from the incoming MIDI notes, allowing it to operate independently of the pitch being played.
Oscillator B parameters are presented as follows:
Oscillator B parameters
Element | Description |
|---|---|
Tune | Sets the tuning of Oscillator B. The Tune control on Oscillator B works identically to that found on Oscillator A. It increments the frequency by semitones and provides a range of +/- 2-octaves. When the Low Mode is on, this control allows the frequency to be varied from roughly 0.3 Hz (one cycle every three seconds) to 30 Hz. |
Fine | Sets the fine-tuning of Oscillator B. The fine control knob allows the tuning of Oscillator B to be adjusted continuously over a range of one semitone. When this control is turned fully counter-clockwise, there is no effect on the oscillator frequency. |
Low | Turns Oscillator B into a low-frequency oscillator. The frequency range varies from 0.3 Hz to 30 Hz, with the rate selected using the Tune and Fine parameters. |
KBD | Activates MIDI note control of Oscillator B. When turned off, its tuning can only be controlled by the Tune and Fine knobs, MIDI continuous controllers, andmodulation functions. |
Shapes parameters
Element | Description |
|---|---|
Saw | Activates the Sawtooth waveform. This is the richest audio signal of the waveforms (it contains all of the harmonics at decreasing volume levels in high frequencies). Its sound is ideal for brass sounds, percussive bass sounds, or rich accompaniments. |
Triangle | Activates the Triangle waveform. It sounds somewhere in between a square wave and a sine wave. It’s not as buzzy as a square but not as smooth as a sine wave. It sounds clearer, maybe even brighter than a sine wave. |
Pulse | Activates the Pulse waveform. The harmonic spectrum of a pulse wave is determined by the duty cycle, which can be changed using the Pulse Width. Acoustically, the wave could be described as changing during the duty cycle from buzzy, nasal and biting for thin pulses to warm, round, and hollow for more evenly spread, squarish waveforms. |
Pulse Width | Changes the width of the pulse wave. It changes from a square wave when the pulse width knob is at its center position to a very narrow pulse wave when the pulse width knob is fully left or right. |
Poly Synth LFO
The LFO provides a modulation signal with Modwheel control. The LFO is a special-purpose oscillator that produces a frequency typically below the range of human hearing. In addition to standard LFO functionality, the Poly Synth’s LFO can also sync to the Maschine tempo.
An LFO, short for low-frequency oscillator, is an oscillator that runs below audio rate (below 20 cycles per second). The LFO is used for periodic modulation such as vibrato (periodic pitch modulation), filter modulation, and pulse-width modulation. The LFO can be routed to any or all of these destinations using the controls in the Modulation section.
The LFO produces three waveshapes: sawtooth, triangle, and square. Any of these waveshapes can be activated simultaneously. Noise is also available as a modulation source on the Modulation page. When all wave three shapes are switched off, the output of the LFO is a constant. With this, the Mod-Wheel can, for example, be used to directly make a filter sweep. Additionally, when all three waveform selector switches are turned on, the LFO enters the Sample and Hold mode. This is especially effective when combined with the Voice Trig mode, to produce a different Filter Cutoff every time the notes retrigger.
The LFO parameters are presented as follows:
LFO parameters
Element | Description |
|---|---|
Rate | Determines the rate of the low-frequency oscillator. |
Mode | Determines the mode of the LFO. The LFO can be set to run free or synchronized to the tempo of your host sequencer. In Free mode at the minimum Rate setting, the LFO cycles at about 0.04 Hz (1 cycle every 25 seconds). At its maximum Rate setting, the LFO will achieve a 20 Hz (20 cycles per second) rate. When set to Synced, the Frequency control will lock the LFO to the nearest appropriate tempo. As the Rate parameter is increased, the locking function will select a larger quantization value. It is sensitive to 1/16 and 1/8 note values, as well as triplet figures. |
Voice Trig | Resets the Envelope when a MIDI note is received. This will automatically retrigger any held notes. |
Shapes parameters
Element | Description |
|---|---|
Saw | Activates the sawtooth wave of the LFO. Activating/deactivating all of the shapes together will unlock other LFO behaviors. For more information, refer to above. |
Triangle | Activates the triangle wave of the LFO. |
Pulse | Activates the pulse wave of the LFO. |
Poly Synth Modulation
The Modulation page is used to assign the LFO or Noise signal (or a combination of both) to modify the frequency or pulse-width of both oscillators as well as the filter cutoff. The Amount parameter sets the initial modulation level, and the modulation wheel on your MIDI controller can be used to apply the modulation effect further.
The Oscillator A Oscillator B destination switches determine the signals that will be affected by the modulation. Selecting the Freq A or Freq B destinations will allow you to apply LFO or noise modulation to Oscillator A and Oscillator B frequencies, respectively. This can provide interesting pitch and timbre alterations.
The PW A and PW B switches provide modulation of the pulse with the two oscillators. This can add great depth to your patch when using the pulse waveshapes on the oscillators. Finally, the Filter switch will allow you to add LFO and noise modulation of the cutoff frequency. This can create long sweeping or warbling filter effects that can also be controlled by simply moving the modulation wheel.
The Modulation parameters are presented as follows:
Modulation parameters
Element | Description |
|---|---|
Amount | Sets the amount of LFO modulation routed to a destination set in the Destination section. Modulation can also be applied using the modulation wheel. |
LFO<>Noise | Determines the mix of the modulation sources to be applied. When turned to the left, the modulation source is the output of the LFO section. When completely turned to the right, the source is the output of the Noise generator. When placed between these extremes, the source is a mixture of the two signals. |
Destination parameters
Element | Description |
|---|---|
Freq A | Adds LFO or Noise modulation to the frequencies of Oscillator A. This can provide interesting pitch and timbre alterations to Oscillator A. |
Freq B | Adds LFO or Noise modulation to the frequencies of Oscillator B. This can provide interesting pitch and timbre alterations to Oscillator B. |
PW A | Adds LFO or Noise modulation of the pulse on Oscillators A. This can add great depth to your patch when using the pulse waveshapes on Oscillator A. |
PW B | Adds LFO or Noise modulation of the pulse on Oscillators B. This can add great depth to your patch when using the pulse waveshapes on Oscillator B. |
Filter | Adds LFO and Noise modulation of the filter cutoff. This can create long sweeping or warbling filter effects by simply moving the modulation wheel. |
Poly Synth Poly Mod
The Poly Mod (polyphonic modulation) page provides a modulation system unique among polysynths. The Poly Mod system can be set to use Oscillator B or the Filter envelope to modulate Oscillator A frequency, Oscillator A pulse width, or the Filter cutoff frequency. with up to 16 voices this means that voice apply individual modulation to any of these selected destinations, creating interesting and varied results especially if the LFO is not set to retrigger for each new note played.
The Poly Mod parameters are presented as follows:
Poly Mod parameters
Element | Description |
|---|---|
Filter Env | Selects the amount of modulation from the Filter envelope that is applied to a selected destination. For more information on the Filter envelope, refer to Poly Synth Envelopes. |
Oscillator B | Creates FM and vibrato effects using an oscillator as a modulation source. The setting of Oscillator B will determine how much effect the output of Oscillator B will have on the selected modulation destinations. |
Destination parameters
Element | Description |
|---|---|
Freq A | Activates frequency (tuning) of Oscillator A as a modulation destination. When activated, the tuning of Oscillator A will be affected. Depending on the Filter Env and Oscillator B controls settings, you will be able to create pitch slides, FM clanging, or wild pitch LFO effects. |
PW A | Activates pulse width of Oscillator A as a modulation destination. Selecting the PW A switch will cause the Poly Mod system to affect the pulse width of Oscillator A. This is most often used to add thickness to a sound. |
Filter | Activates the cutoff frequency of the filter as a modulation destination. The Filter destination switch will allow the Poly Mod section to modulate the Filter Cutoff setting. Modulating the Filter Cutoff will allow you to create LFO or FM-based filter effects. |
Poly Synth Global
The Global page contains a number of parameters that enable you to change the overall sound and function of the Poly Synth.
The Global parameters are presented as follows:
Global parameters
Element | Description |
|---|---|
Tune | Sets the basic tuning of the entire Poly Synth. The range of this control is +/-1 semitone. |
Pitchbend | Sets the pitchbend range of the Poly Synth. The range of this control is 1 to 24 semitones. |
Velocity | Determines if the incoming MIDI note velocities will control the envelope functions. When engaged, velocity will vary the amplifier envelope by 90%, and the filter envelope by 70%. The use of velocity control can help add dynamics to a sound. |
Release | Determines if the Release settings of the filter and amplifier envelopes are used. When this button is activated, the envelope release times work as expected. When the button is deactivated, release times are set to their minimal positions. |
Hold | Continues to hold played notes until it is deactivated. |