Layer Pages
Learn how to use the Layer pages, which are the main two sound generators in Vocal Colors.
On the Layer pages, you can configure the sound generated by the Layer 1 and Layer 2 modules. Layer 1 and Layer 2 can be seen as the main two sound generators in Vocal Colors, on which the Particles module will add its own, distinctive features.
Click LAYER I or LAYER II at the bottom of the instrument to open or close the desired Layer page:

Each Layer page is split into two main parts:
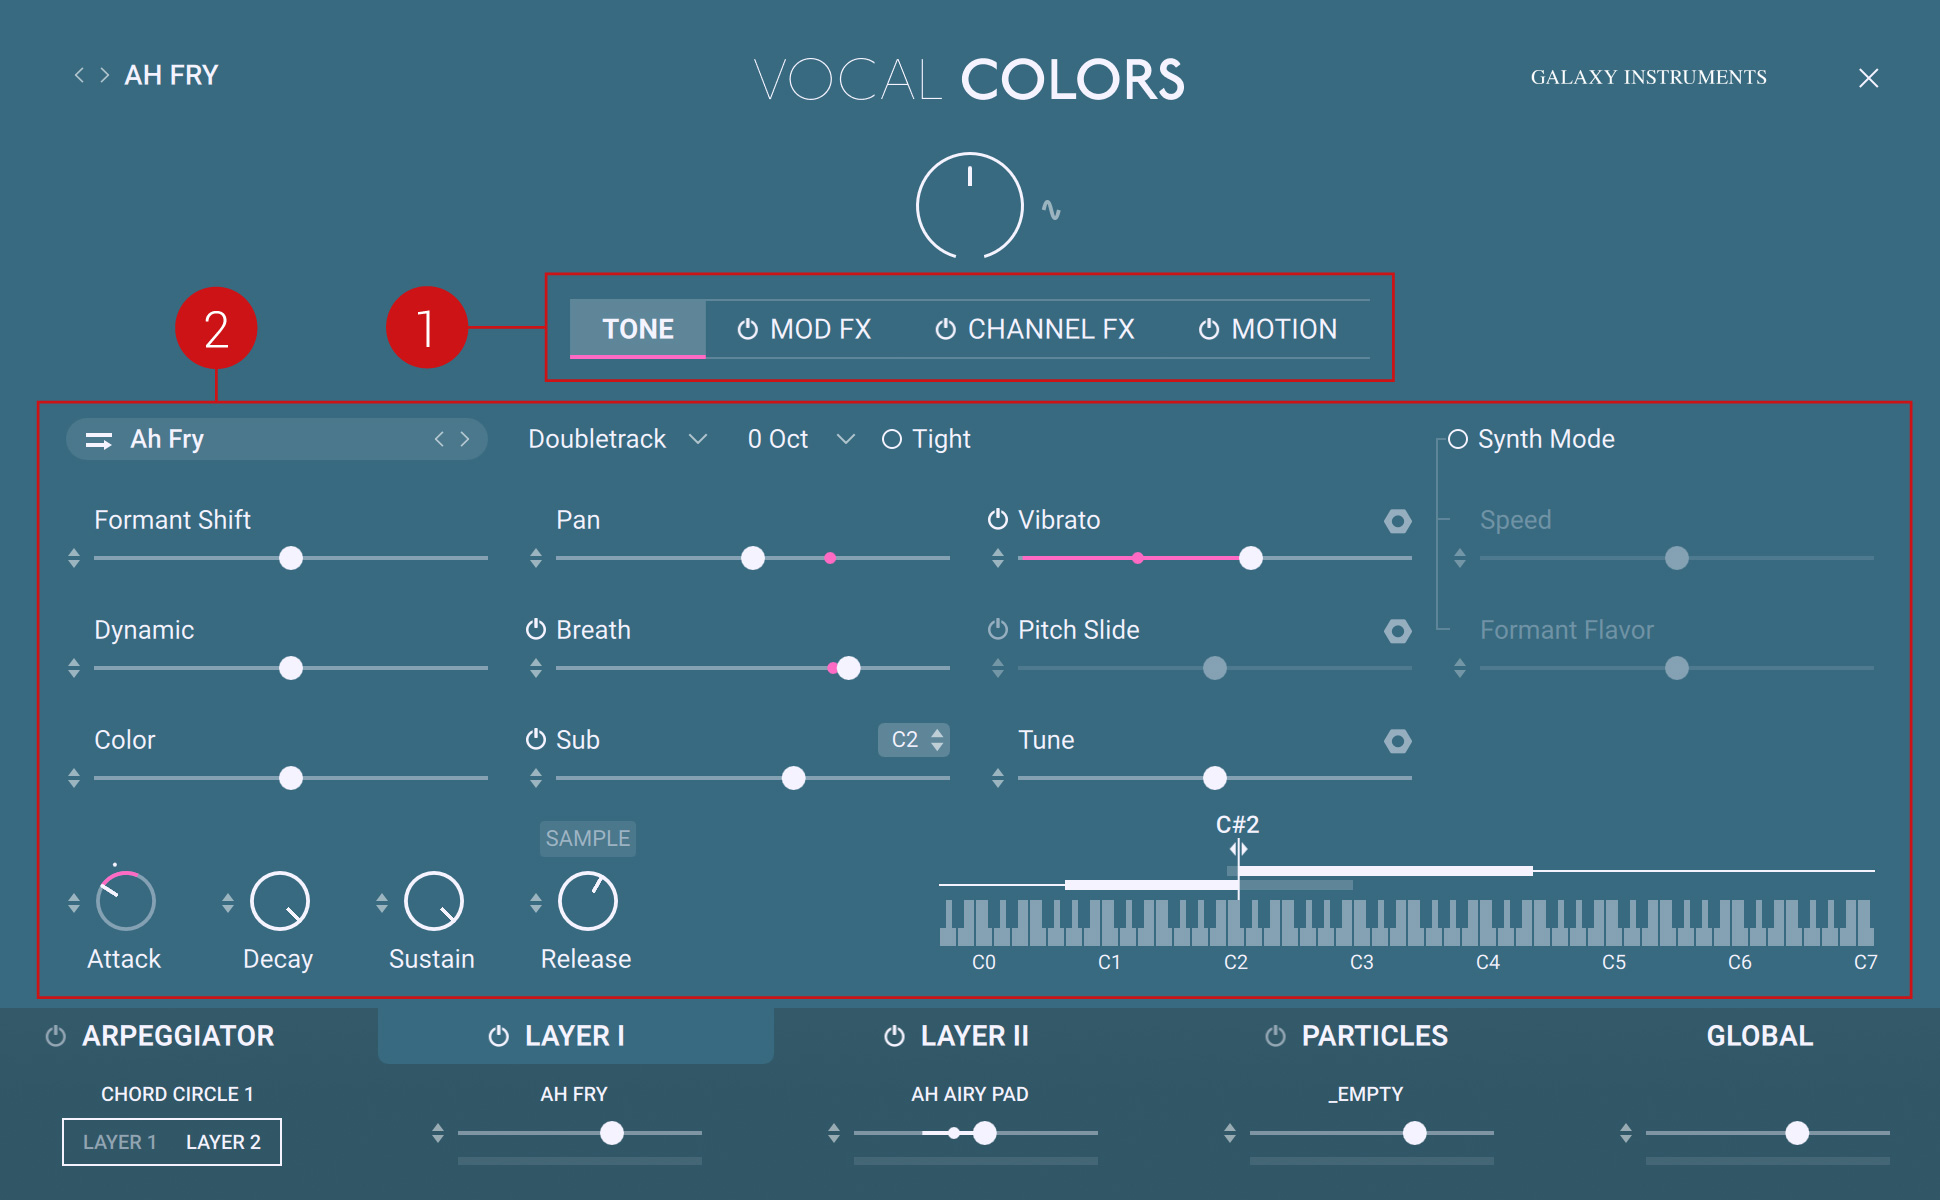
Pane selector: Click a pane name to show its parameters for the Layer. An On/Off switch next to the pane name lets you globally activate or deactivate that particular feature for the Layer.
Layer parameters: The parameters displayed depend on the pane selected.
The Layer pages provide the following panes:
The Tone pane takes care of the basic sample playback. For detailed information, refer to Tone Pane.
The Mod FX pane adds up to four creative effects. For detailed information, refer to Mod FX Pane.
The Channel FX pane includes an equalizer, a compressor and a reverb/delay unit. For detailed information, refer to Channel FX Pane.
The Motion pane provides two internal modulation sources. For detailed information, refer to Motion Pane.
Tone Pane
The Tone pane of the Layer pages lets you select the sample sets used in the Layer and configure its playback, thus defining the basic tone of each Layer.
To display the Tone pane, click TONE in the Pane selector of the Layer page:

The Tone pane contains the following elements:
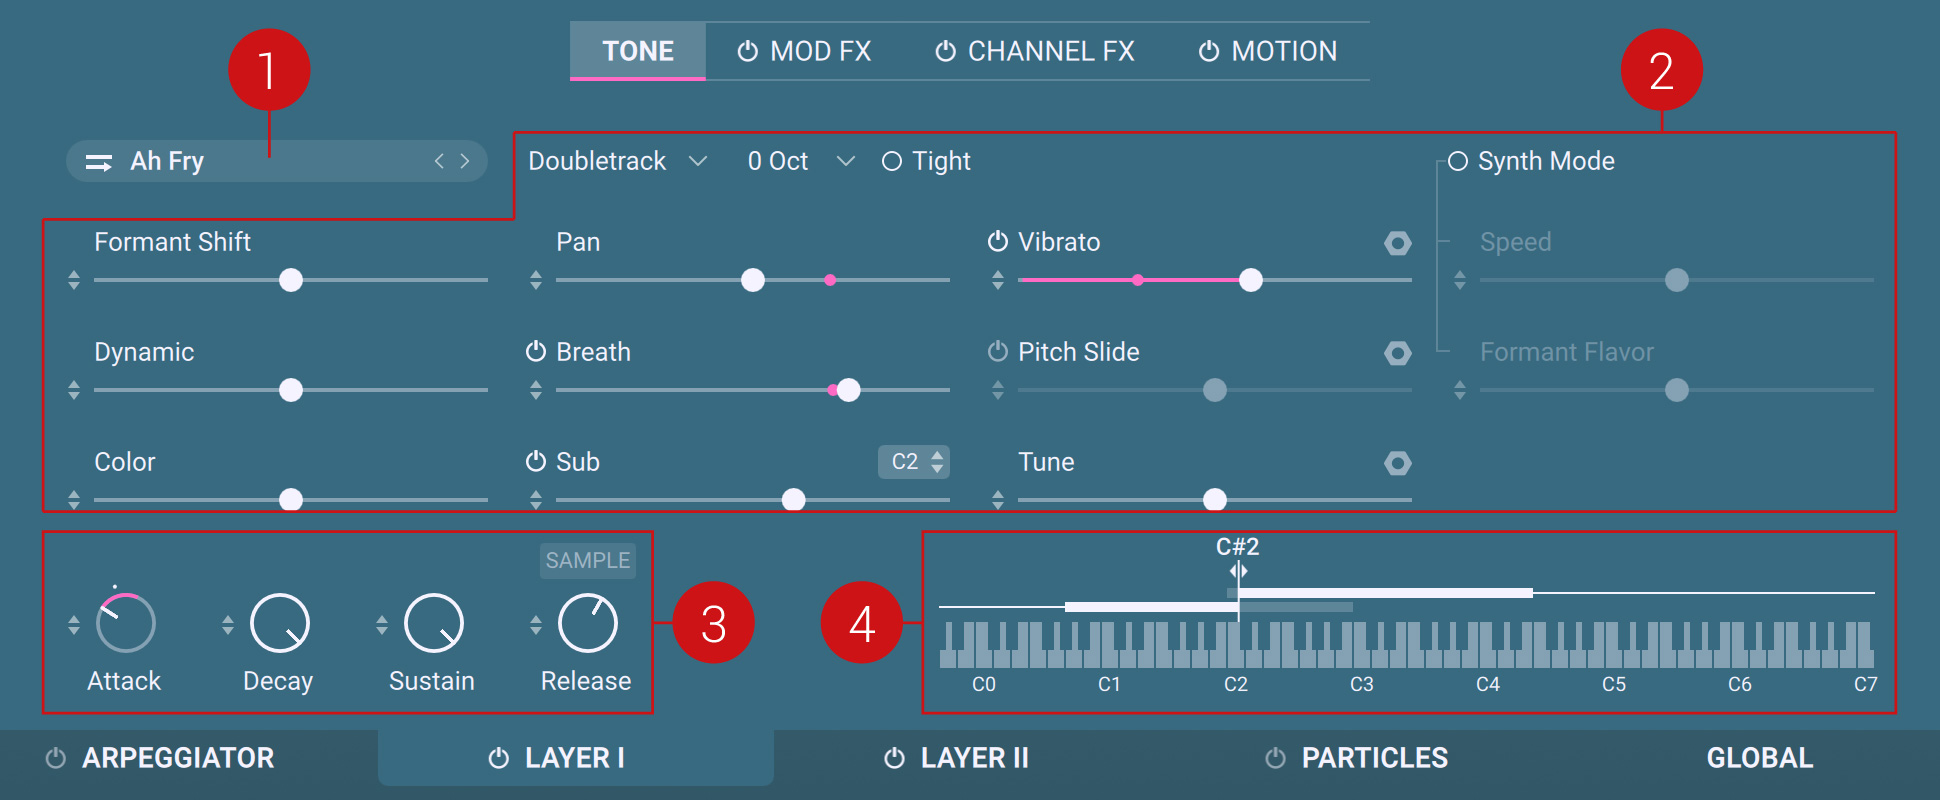
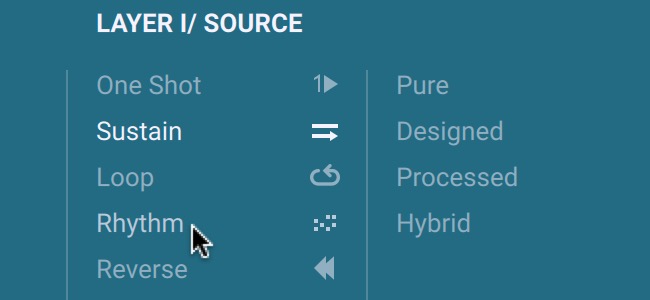
Source Name: Displays the name of the sample set used in that Layer. The icon in front of the name reminds you the type of source (one shot, sustain, loop, rhythm or reverse). Click the source name to open the Source Browser and select another sample set for that Layer. For more information on using the browsers, refer to Browsers. You can also click the arrow icons (<>) near the source name to quickly load the previous or next source from the browser’s Result list without opening the Source Browser.
Source parameters: Let you precisely adjust the sound of the loaded source. The available parameters vary with the source. For a description of every parameter, see Source Parameters.
Envelope controls: The envelope controls let you adjust the various stages of the Layer’s amplitude envelope: The Attack knob adjusts Layer’s attack time, the Decay knob adjusts its decay time, the Sustain knob adjusts its sustain level, and the Release knob adjusts its release time. If the source sound features release samples, an additional Sample button appears: When you switch the Sample button on, the Release knob adjusts the level of these release samples instead of the release time.
Keyboard Display: The two horizontal lines above the keybed represent the sample sets for the lower and higher voice types.
The upper line represents the higher voice type, the lower line represents the lower voice type.
The key value indicates the split between both voices: Playing a key below will trigger the lower voice type, playing a key above will trigger the higher voice type. You can drag the divider under the key value with your mouse to adjust the split position.
For each voice type, the thicker segment represents the note range for which dedicated samples have been recorded (corresponding to the voice’s tessitura). Notes outside these ranges will use pitched samples.
For some sample sets, the lower segment contains a striped part. This part is displayed if the source is using subharmonic samples. This is a special singing technique where the singer can reach even lower notes.
Source Parameters
This section describes all parameters available for the various sources in the Tone pane of the Layer pages. Note that some parameters will be available only for specific sources, depending on the source type (one shot, loop, etc.) or on other characteristics of the sources.
Note
Looped and rhythmic sources also provide a Waveform Display that lets you adjust the section of the sample to be played.
Track menu: Selects from various recording modes:
Doubletrack: Samples from two different recordings are panned to the left and right channels, resulting in a fuller sound.
Singletrack: Samples are from one single recording.
Singlespread: Samples are from one recording but they are panned in the stereo field depending on the played key: Lower notes will be panned to the left, higher notes to the right.
Octave menu: Transposes the voices one or two octaves upwards/downwards.
Tight: Shortens the attack at the beginning of the samples. This way, the samples are playable tightly. This can be useful when using two sources as it reduces flam effects (“double attacks”) between both sources. Deactivate the Tight button for a more natural feeling of the source sound.
Round Robin: When active, different samples of the same note are triggered in a random manner each time the note is played. This makes the voice sound more human.
Link Position: When active, if a sample is already playing, the playback position of new samples will be linked to that of the first sample. This can be useful e.g. for rhythmic sources to ensure that each new note stay in sync with the notes already playing.
Mono: Switches the source to mono.
Dyn Morph: For each note, different samples (called velocity samples) were recorded in order to better reproduce softer and louder sounds. When Dyn Morph is off, these velocity samples are triggered according to the key velocity of the played notes. When Dyn Morph is on, these velocity samples are controlled by the Expression knob instead of the key velocity.
One Shot: When active, the source is played once instead of beeing looped.
Quantize On/Off switch and Quantize menu: The Quantize On/Off switch turns the input quantization on or off. When input quantization is on, the source is triggered in sync with the tempo. Quantization is applied according to the note value set in the Quantize menu nearby.
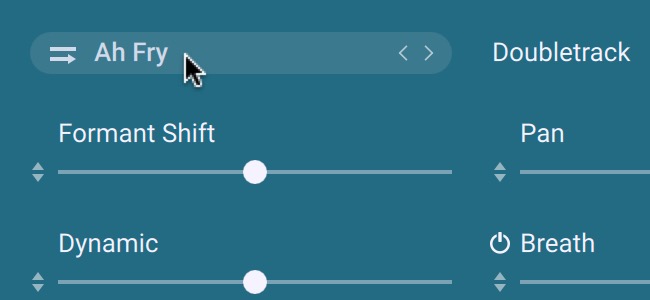
Formant Shift: Adjusts the playback speed of each sample, which results in formant and character changes. Dragging the slider left will make the instrument sound sharper, and dragging it to the right will result in a deeper, darker sound with a less defined attack.
Dynamic: Controls the dynamic range by adjusting the volume while still using all velocity samples. Drag left to shrink or drag right to expand the dynamic range.
Color: Adjusts the tone from soft to hard by readjusting the sample mapping. Dragging the slider right will make the instrument sound harder and crisper, with a more pronounced attack phase. Dragging the slider left will achieve a warmer and softer sound, and the attack phase will be less pronounced.
Pan: Adjusts the panoramic position of the Layer in the stereo field.
Formant Flavor: Adjusts how the Formant Shift parameter affects the source’s formants.
Breath controls: Add non-tonal samples of different kind of breathing. These samples are customized for every source.
Breath On/Off switch: Activates or deactivates the breathing samples.
Breath slider: Adjusts the volume of the breathing samples.
Sub controls: The so-called Sub samples are additional samples that have been recorded in order to enhance the lower frequencies of the voice.
Sub On/Off switch: Activates or deactivates the Sub samples.
Sub Key selector: Sets the split key below which the Sub samples are being triggered.
Sub slider: Adjusts the volume of the Sub samples.
Vibrato controls: Adjust the voice vibrato:
Vibrato On/Off switch: Activates or deactivates the vibrato.
Vibrato slider: Adjusts the vibrato depth.
Nut icon: Opens the vibrato’s avanced parameters.
Pitch Slide controls: Adjust a pitch slide at the beginning of the note:
Pitch Slide On/Off switch: Activates or deactivates the pitch slide.
Pitch Slide slider: Adjusts the depth of the pitch slide.
Nut icon: Opens the Pitch Slide’s advanced parameters.
Tune controls: Adjust the tuning of the source:
Tune slider: Adjusts the tuning in semitones.
Nut icon: Opens the Tune’s advanced parameters.
Random Start controls: Configure a random variation of the start position in the samples:
Random Start On/Off switch: Activates or deactivates the random start feature.
Random Start slider: Adjusts the portion at the beginning of the samples in which the start position will be randomly taken. At full left, the only possible start position is the very beginning of the samples. The more you drag the slider to the right, the more variation you introduce in the start position.
Reverse Time controls (Reverse sources only): Adjust the length of the reverse samples:
Reverse Time slider: Adjusts the length of the reverse samples in milliseconds or note values, depending on the state of the Reverse Sync On/Off button nearby.
Reverse Sync On/Off button: Activates or deactivates the synchronization of the reverse samples’ length. When switched on, the length of the reverse samples is synced to the tempo. When switched off, the length of the reverse samples is freely adjustable.
Synth Mode controls: Synth mode is an alternative playback mode using a time stretching engine, resulting in more synthesizer-like sounds:
Synth Mode On/Off switch: Activates or deactivates the Synth mode.
Speed: Changes the playback speed independently of the pitch. This value is displayed as a percentage of the original speed by default, so 200 % doubles the playback speed, while 50 % halves it. The control goes all the way down to 0 %, which freezes the sound at its current playback position.
Formant Flavor: Adjusts how the Formant Shift parameter affects the source’s formants.
Waveform Display (Looped and Rhythmic Sources)
For looped and rhythmic sources, the Tone pane provides a waveform display that lets you adjust the portion of the sample to be played:
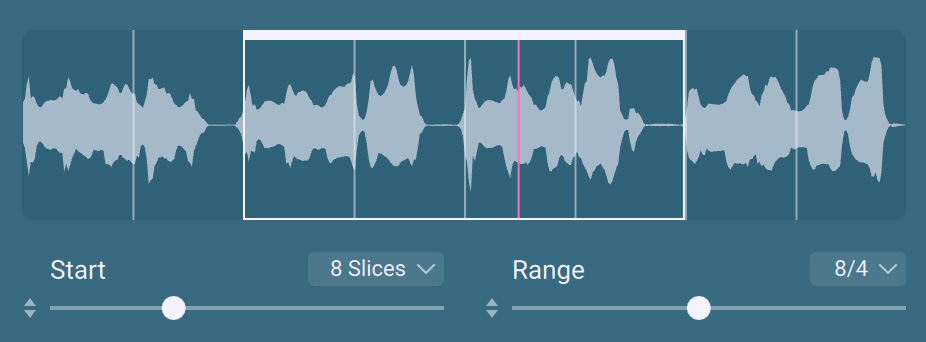 |
The display’s background shows the waveform of the source. The overlay white frame indicates the portion of the sample that is used for playback. The colored segment indicates the current playback position.
Note
The portion indicated by the white frame will be looped as you hold the note, unless you activated the One Shot button.
The controls under the display allow you to adjust the portion of the sample used for playback:
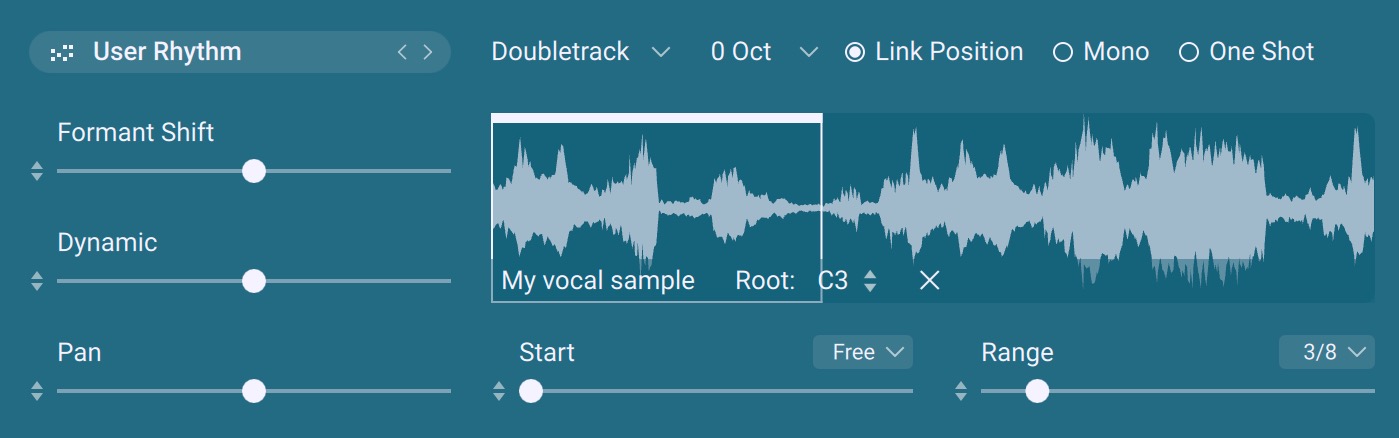
Start slider: Adjusts the start position of the portion. The slider behavior depends on the unit selected in the Start Unit menu nearby.
Start Unit menu: Lets you choose whether the start position should be set freely or snap to fixed-length slices:
If you select Free, the Start slider lets you freely choose the start position as a percentage of the sample length (0 % meaning the beginning of the sample and 100 % meaning its end).
If you select a number of slices, the sample is divided into that number of slices and the Start slider only allows a whole number of slices (1 meaning the 1st slice, 2 the 2nd slice, etc.). The slice markers are indicated by the dimmed white vertical segments on the waveform display.
Range slider: Adjusts the length of the portion. The slider behavior depends on the unit selected in the Range Unit menu nearby.
Range Unit menu: Lets you choose whether the length of the portion should be set freely or as a note value:
If you select Free, the Range slider lets you freely choose the length in milliseconds.
If you select a note value, the Range slider lets you choose the length as a whole number of that note value.
Playback Direction (Looped Sources Only)
For looped sources, an additional Playback Direction control appears at the bottom right of the waveform display:
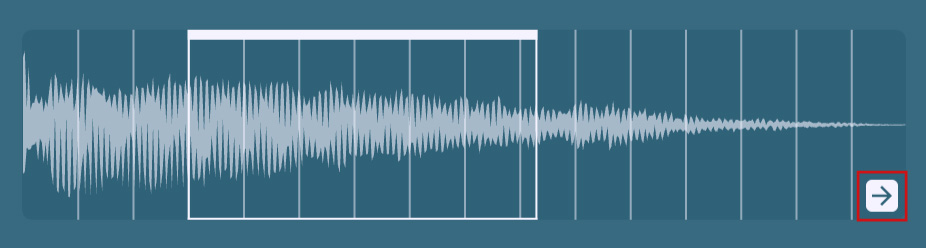 |
By clicking this Playback Direction control, you can select between three playback directions for the looped portion: forward, backward, and forward & backward.
Mouse Interaction on the Waveform Display
You can also adjust the white frame directly on the display using your mouse to modify the portion of the sample being used. As you hover the white frame with your mouse, its editable elements are slightliy dimmed. Following mouse actions are available:
Dragging the white frame’s end marker adjusts the length of the portion (equivalent to the Range slider under the display).
Dragging anywhere within the white frame moves the entire frame across the sample (equivalent to the Start slider under the display).
Dragging the white frame’s start marker also moves the entire frame across the sample unless both Start Unit and Range Unit menus under the display are set to Free, in which case dragging the start marker moves only the start marker itself.
[Alt]+drag horizontally to zoom within the selected area of the waveform. [Alt]+click anywhere in the waveform to zoom out and display the entire sample again.
Importing User Samples
You can import your own user samples for Loop and Rhythm Layers. Vocal Colors automatically detects the pitch of the sample and maps it to the correct key. If you load a rhythmic sample, Vocal Colors automatically detects the length and uses time-stretching to match the tempo of your song.
To import a user sample:
Select either Layer I or Layer II, depending on which layer you want to use to play back your user sample.
Open the Source Browser by clicking on the menu.
Select either the Loop or Rhythm play type.
Select and load an entry from the Result list by double-clicking on it.

Drag and drop the audio file containing your user sample from the file system into the waveform display. PCM audio files in both WAV and AIFF format are supported.
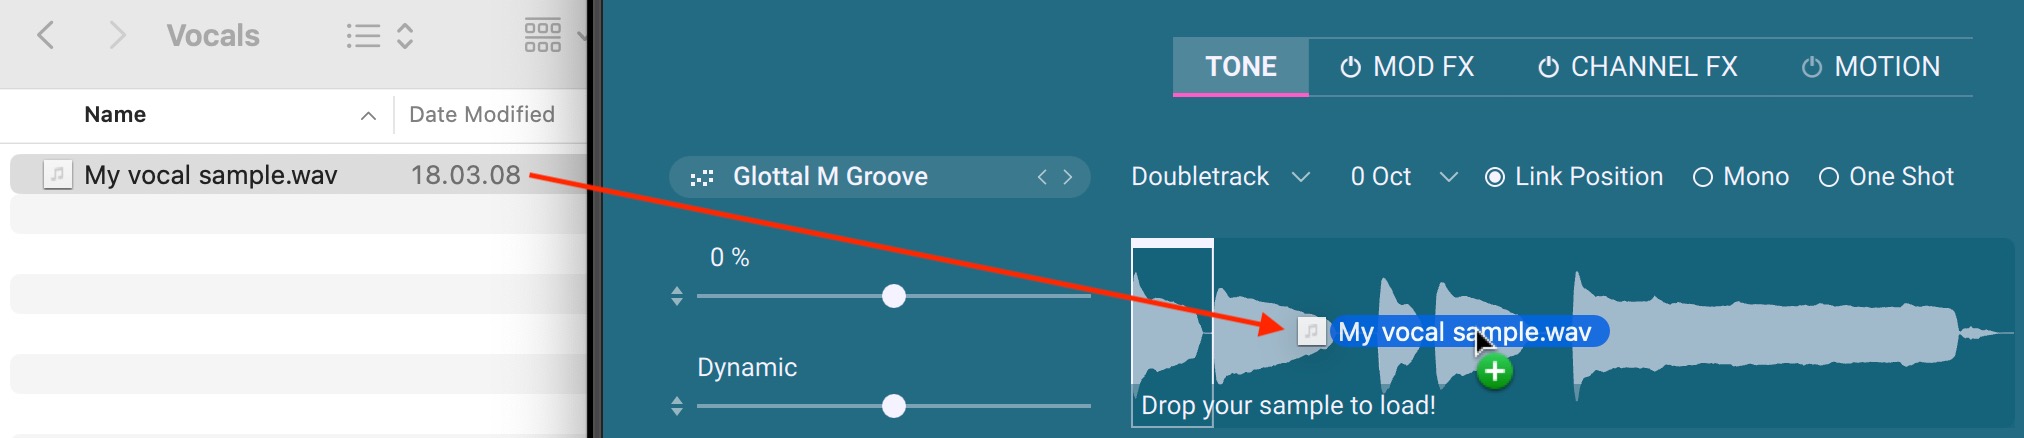
Your user sample is loaded and is shown in the waveform display. The Source Browser menu displays User Loop or User Rhythm, depending on whether you have loaded your user sample into a Loop or Rhythm layer.
Vibrato: Advanced Parameters
A click on the nut icon in the Vibrato controls opens the vibrato’s advanced parameters:
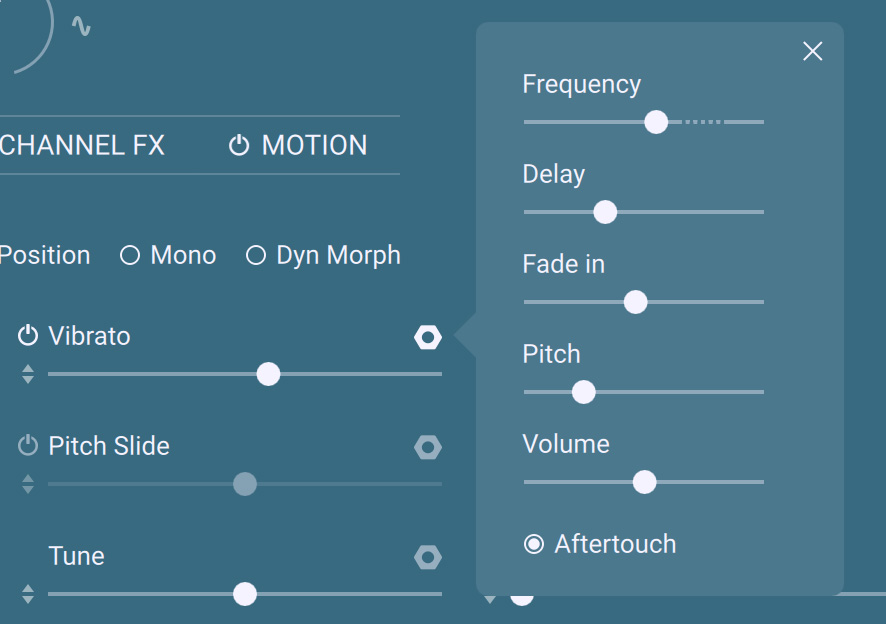 |
The vibrato’s advanced parameters include:
Frequency: Adjusts the frequency (in Hertz) of the vibrato effect. The dotted segment of the slider indicates the natural frequency range of the human voice. Setting the slider outside this range will produce more unnatural vibrato sounds.
Delay: Adjusts the delay (in milliseconds) before the vibrato starts.
Fade in: Adjusts the time (in milliseconds) taken by the vibrato to progressively come into play.
Pitch: Adjusts how strong the pitch is affected by the vibrato (in semitones).
Volume: Adjusts how strong the volume is affected by the vibrato (as a percentage of the current volume).
Aftertouch: Activates or deactivates the aftertouch control. When active, you can control the vibrato depth using MIDI Aftertouch on your keyboard.
Note
Vocal Colors automatically detects polyphonic aftertouch, for example from a Kontrol S-Series MK3 keyboard. If you are playing Vocal Colors using polyphonic aftertouch, you can control the vibrato depth for each note individually by pressing the respective key.
Pitch Slide: Advanced Parameters
A click on the nut icon in the Pitch Slide controls opens the Pitch Slide advanced parameters:
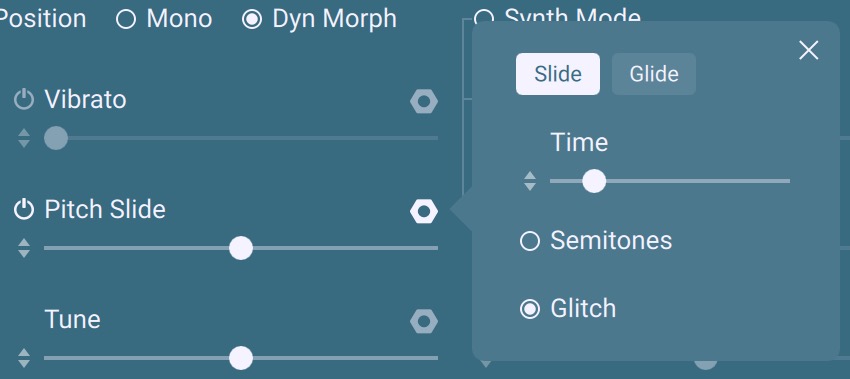 |
The Pitch Slide advanced parameters include:
Slide/Glide: Selects from Slide or Glide mode:
In Slide mode, the pitch slide for a new note starts from a lower note. The starting note is defined by the main Pitch Slide slider.
In Glide mode, the pitch slide for a new note starts from the last played note. When playing chords, the slide will start from each note in the previous chord.
Time: Adjusts the time taken by the slide to reach the final note.
Semitones: If active, the slide uses steps on every semitone. If inactive, the slide is continuous.
Glitch: Adjusts the Pitch Slide response from a linear to a glitchy curve.
Tune: Advanced Parameters
A click on the nut icon in the Tune controls opens the Tune advanced parameters:
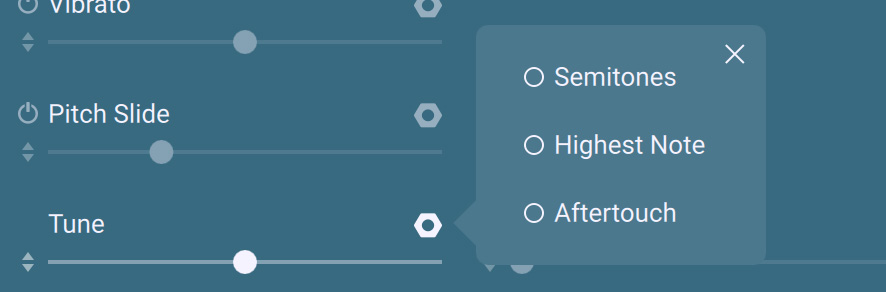 |
The Tune advanced parameters include:
Semitones: Switches the tuning range
Highest Note: When active, the Tune slider will affect the highest played note only.
Aftertouch: Activates or deactivates the aftertouch control. When active, you can control the tuning using MIDI Aftertouch on your keyboard.
Mod FX Pane
The Mod FX pane of the Layer pages lets you configure up to four modulatable effects for each Layer.
To display the Mod FX pane, click MOD FX in the Pane selector of the Layer pages:

The Mod FX pane contains the following elements:
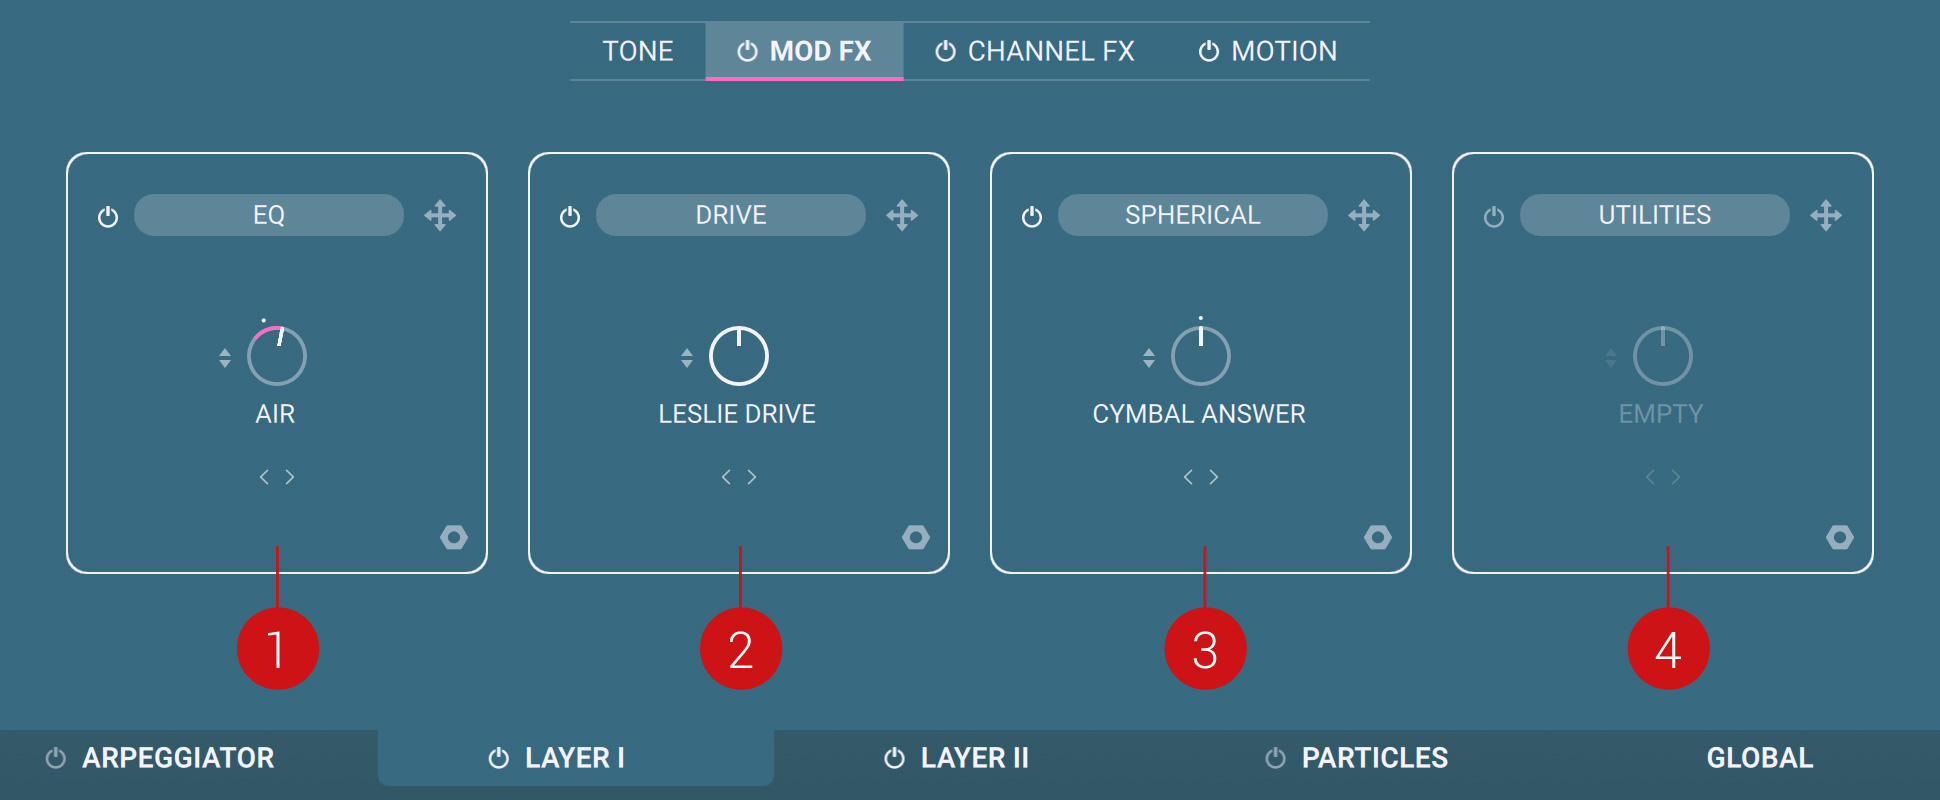
Effect Slot A: Configures the first effect for that Layer.
Effect Slot B: Configures the second effect for that Layer.
Effect Slot C: Configures the third effect for that Layer.
Effect Slot D: Configures the fourth effect for that Layer.
Each Effect slot contains the following elements:
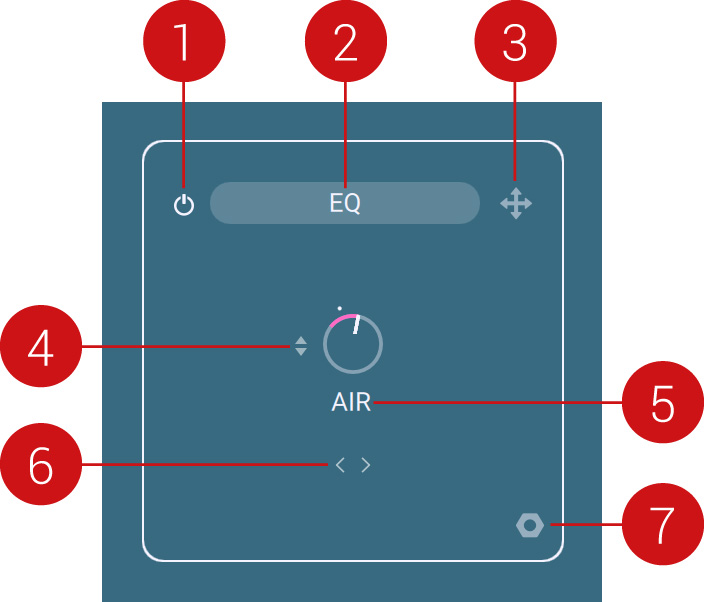 |
Effect On/Off: Switches the effect on or off.
Effect Category: Displays the category of the loaded effect. The particular preset of that effect is displayed under the knob (5). Click the category to open the Effect Browser and select another effect preset. For more information on using the Browsers, refer to Browsers.
Drag icon: Drag this icon and drop it onto another effect slot to move the effect to that other slot. If the target effect slot was not empty, both effects are switched. Note that you can also drag an effect to the other Layer.
Effect Strength: Adjusts the strength of the effect. This knob can be modulated.
Effect Preset: Displays the name of the loaded preset from the Effect Category indicated at the top (2). Click the name to open the Effect Browser and select another effect preset. For more information on using the Browsers, refer to Browsers.
Previous/Next Preset: Click these arrow icons (< >) to quickly load the previous or next effect preset from the browser’s result list without opening the browser.
Advanced Effect Patameters (nut icon): Shows the advanced parameters for that effect. Fore more information, refer to Advanced Effect Parameters.
Advanced Effect Parameters
By clicking the nut icon at the bottom right of an Effect slot, you open the advanced parameters for that effect. The controls for that particular Effect slot expand to the entire Mod FX pane.
In addition to the default effect controls for that slot, the following controls are now available:
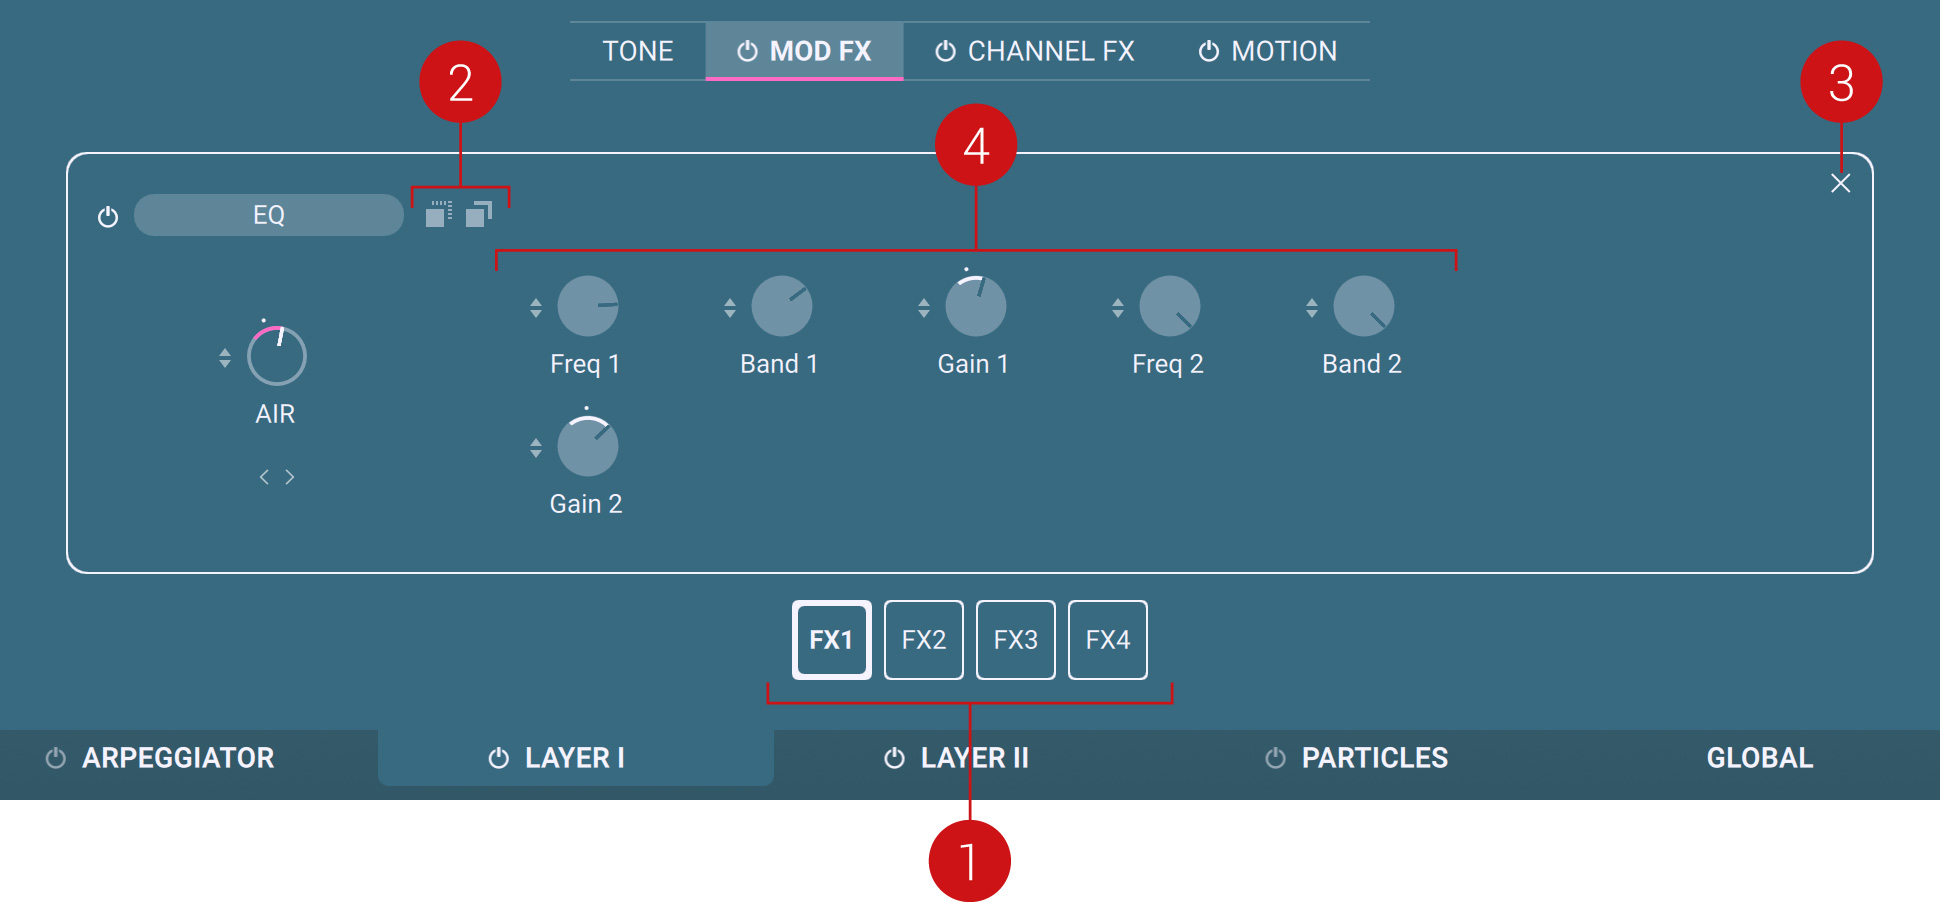
Effect Slot selector: Click FX1 – FX4 to quickly display the advanced parameters for the corresponding slot.
Copy/Paste buttons: Allow to transfer the current settings to another Effect slot. Click the left icon (Copy) to copy the current parameter values, then select another Effect slot from the selector (1) and click the right icon (Paste) to paste these values into the new slot. You can even copy/paste settings between the two Layers.
Close button (cross): Closes the advanced parameters for that effect and returns to the default Mod FX pane showing all four effect slots.
Advanced Parameters: These parameters vary with each effect.
Channel FX Pane
The Channel FX pane of the Layer pages lets you configure an equalization, a compression and a reverb/delay effect for the Layer.
To display the Channel FX pane, click CHANNEL FX in the Pane selector of the Layer page:

The Channel FX pane contains the following main areas:
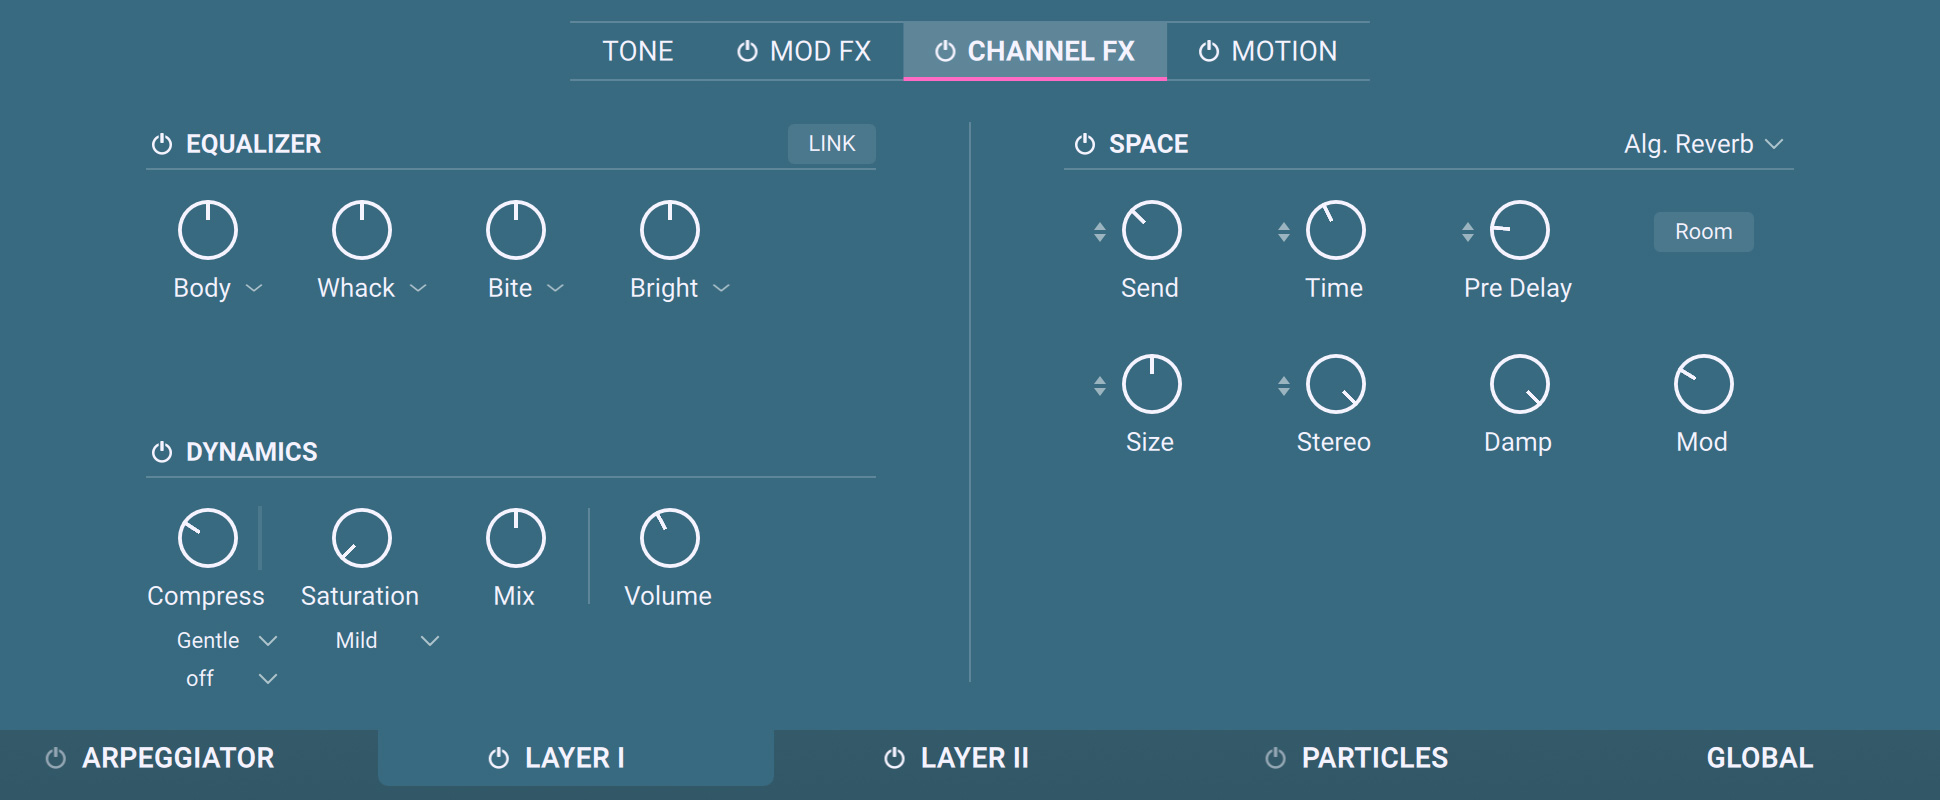
EQUALIZER: Adjusts a four-band equalization applied to the Layer. For more information, refer to Channel Equalization.
DYNAMICS: Adjusts a compression applied to the Layer. For more information, refer to Channel Compression.
SPACE: Adjusts a reverb or delay effect applied to the Layer. For more information, refer to Space Area.
Channel Equalization
The EQUALIZER area of the Channel FX pane in the Layer pages allows you to apply a four-band equalization to each Layer.
The EQUALIZER area contains the following controls:
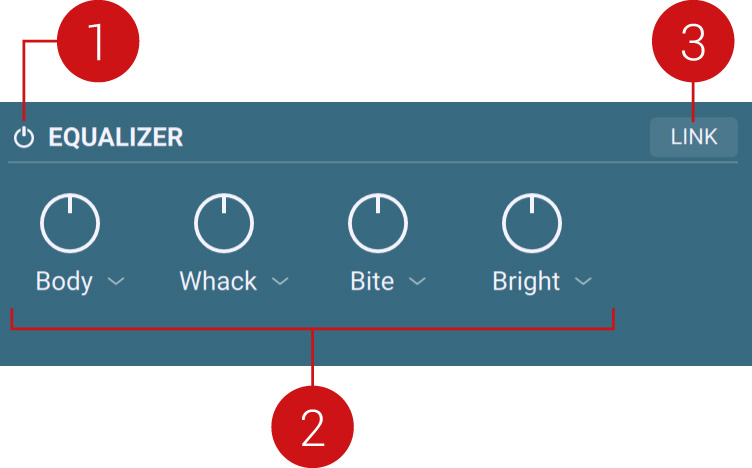 |
EQUALIZER On/Off: Turns the equalizer on or off.
Gain knobs: Adjust the levels of the four frequency bands. From left to right, the knobs control lower to higher frequency bands. The frequency bands are described in musical terms as shown by the labels under the knobs. You can customize the frequency band of each gain knob to your needs, refer to below for more information.
LINK: If you have adjusted the gain knobs in a certain way and switch on LINK, all gain knobs will change proportionally as you adjust one of them, keeping the sound or style of your custom EQ setting.
Adjusting the Frequency Bands and Response Curves
You can adjust the frequency band and response curve of each gain knob. To do this:
Click the label under a gain knob.
A pop-up panel appears underneath with two parameters allowing you to adjust the knob’s frequency response.
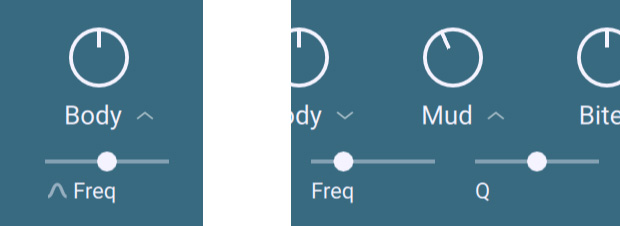 |
Adjusting the frequency band for the lowest gain knob (on the left) and a middle gain knob (on the right)
The two parameters in the popup panel depend on which gain knob you are configuring:
For all four knobs, the Freq slider controls the center frequency of the band. As you adjust the frequency, the musical term under the gain knob changes accordingly.
For the two knobs in the middle, a Q slider controls the sharpness of the bandwidth: The higher Q is, the narrower the band is.
For the outer two knobs, a Bell button lets you switch the frequency band between shelf (button off) and bell (button on).
Channel Compression
The DYNAMICS area in the Channel FX pane of the Layer pages allows you to apply compression to each Layer.
The DYNAMICS area contains the following controls:
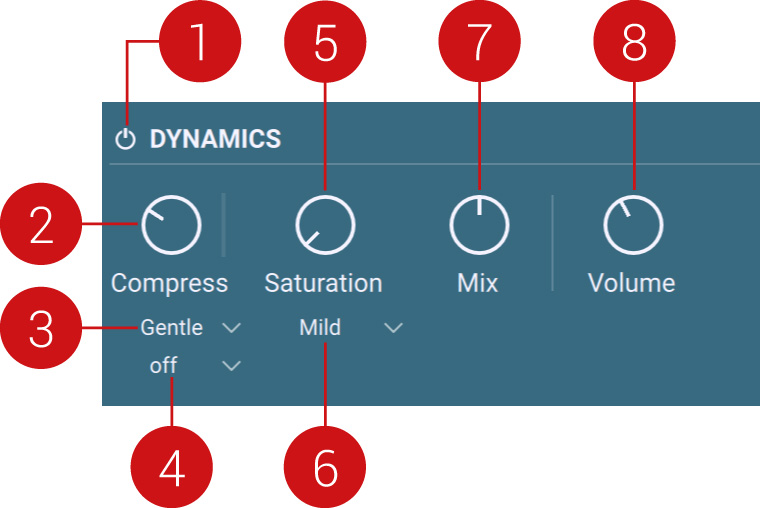 |
DYNAMICS On/Off: Turns the compressor on or off.
Compress: The more you turn the Compress knob clockwise, the more the compression will be applied to the input signal while retaining an even loudness level. As you play, the amount of compression applied is indicated in real-time by the vertical bar right of the Compress knob.
Compression Preset: Selects a preset combining predefined values both for the attack (how fast the compressor reacts to incoming signals) and the release (the time it takes for the compressor to return to its standby state).
High-Pass Filter: You can prevent the compressor from reacting primarily to low-frequency signal peaks by using the high-pass filter. When on, the high-pass filter will cut the internal detector signal below the selected frequency. Switch between the two cutoff frequencies (100 Hz or 300 Hz) to figure out which one works best.
Saturation: Adjusts the amount of saturation. Increase the Saturation value to add dirt, warmth and loudness to your sound.
Saturation Mode: The compressor offers three different Saturation modes you can use to shape your signals. Mild mode is a nice way of coloring signals while retaining a clean sound, while Moderate mode will tastefully add more noticeable harmonics. Switch to Hot mode for maximum saturation and audible distortion.
Mix: Use the Mix knob to dial in parallel compression. The uncompressed (dry) signal will be mixed with a compressed version of the same signal. It gives the excitement of a compressed signal without losing the dynamics and transients of the original signal. With the Mix knob at full right, you only hear the compressed signal. With the Mix knob at full left, you only hear the dry signal. Every setting in-between is a mix of both signals.
Volume: Adjusts the overall level of the Layer. This knob is active even if the compressor’s On/Off switch (1) is off. For instance, the Volume knob allows you also to compensate for extreme settings in the Equalizer area above (refer to Channel Equalization).
Space Area
The Space area in the Channel FX pane of the Layer page lets you configure a reverberation or a delay effect for each Layer.
The Space area contains the following elements:
 |
SPACE On/Off: Turns the Space effect on or off.
Space Engine menu: Selects the Space engine to use from the five engines available: three reverberations (Convolution, Algorithm Reverb and Plate) and two delays (Replika and Psyche).
Space parameters: The parameters available depend on the engine selected in the Space Engine menu above (2).
The parameters available for each Space engine are described in the following sections.
Convolution Reverb
By selecting Convolution in the Space Engine menu, you can set up a convolution reverb. The convolution reverb uses impulse responses of various vintage reverb units and concert halls, churches and studio rooms to recreate those acoustic spaces. It also provides more creative sets of impulse responses, including, for example, reverse impulse responses.
When Convolution is selected in the Space Engine menu, the reverb provides the following parameters:
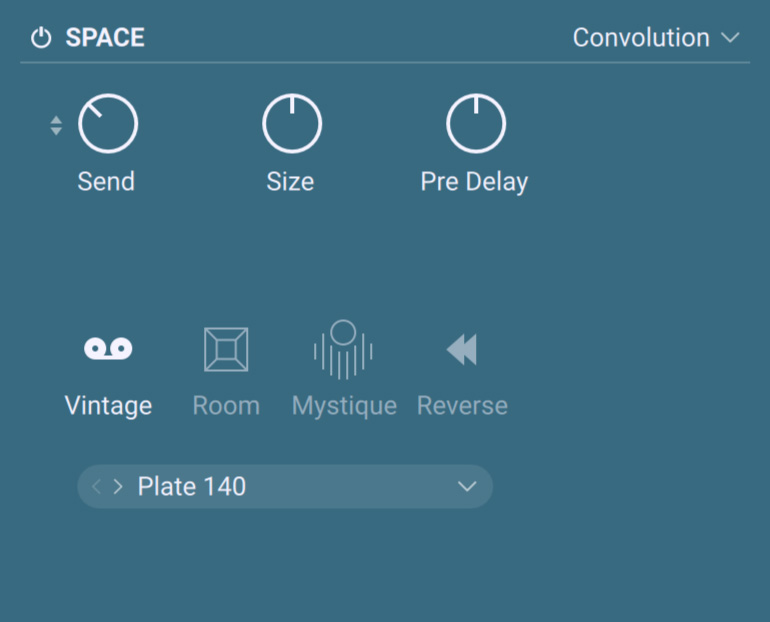 |
Send: Adjusts the level of the signal sent to the reverb.
Size: Adjusts the size of the reverb effect by lengthening or shortening the selected impulse response. If selecting Reverse in the Impulse Response Category menu, the Size knob turns to a Beat knob and you can sync the size to the tempo (time adjustment in note values).
Pre Delay: Adjusts the delay before the reverb starts. If selecting Reverse in the Impulse Response Category menu, the Pre Delay knob is replaced with a Ping Pong button: When active, the reverb signal will alternate between the left and right stereo channel.
Impulse Response Category: Selects the category for the impulse response files. Available categories are Vintage, Room, Mystique and Reverse.
Impulse Response: Selects an impulse response from the category selected above.
Algorithmic Reverb
By selecting Alg. Reverb in the Space Engine menu, you can set up an algorithmic reverb. The reverb then provides the following parameters:
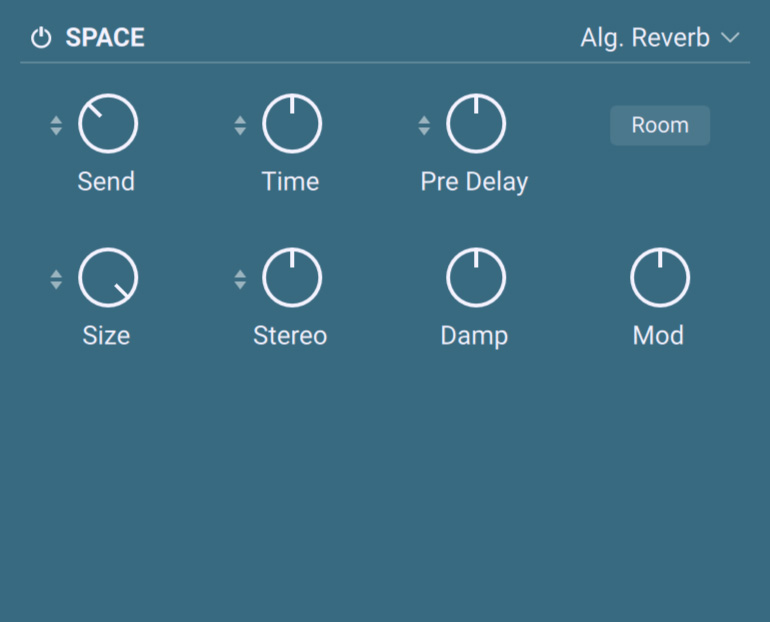 |
Send: Adjusts the level of the signal sent to the reverb.
Time: Adjusts the duration of the reverb effect.
Pre Delay: Adjusts the delay before the reverb starts.
Room/Hall button: Selects between two reverberation modes simulating the sound character of a reverberant hall or room.
Size: Adjusts the size of the hall or room simulated by the reverb effect. Higher values replicate larger spaces.
Stereo: Controls the stereo image of the reverb effect. Higher values result in a wider stereo image.
Damp: Adjusts the amount of absorption in the room simulated by the reverb effect, which affects the tonal quality of the sound. Higher values result in more absorption and attenuate the reverb's high-frequency content, thus darkening the sound.
Mod: Adjusts the amount of movement added to the reverb sound by changing internal parameters of the reverb over time.
Plate Reverb
By selecting Plate in the Space Engine menu, you can set up a plate reverb. Plate reverb was developed as an early method of generating an artificial reverb effect: A vibrating sheet of metal is employed to simulate reflection patterns in acoustical spaces.
When Plate is selected in the Space Engine menu, the reverb provides the following parameters:
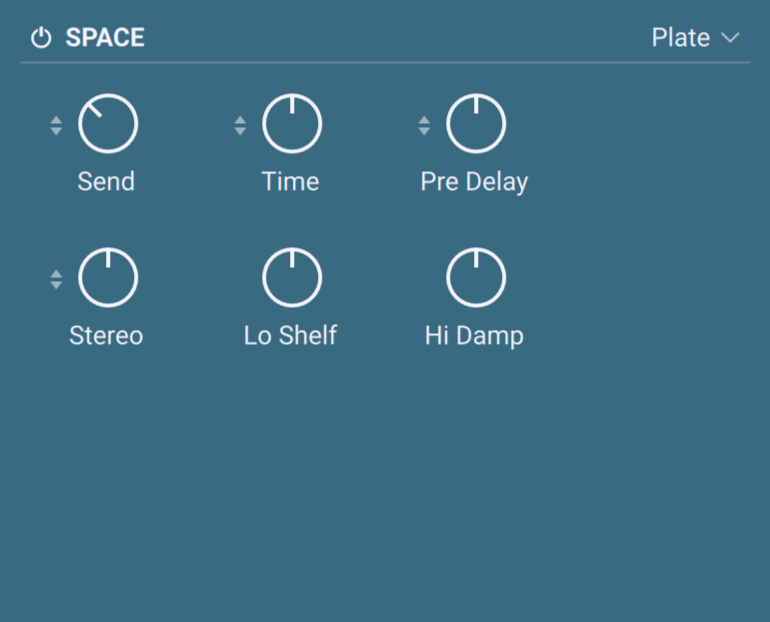 |
Send: Adjusts the level of the signal sent to the reverb.
Time: Adjusts the duration of the reverb effect.
Pre Delay: Adjusts the delay before the reverb starts.
Stereo: Controls the stereo image of the reverb effect. Higher values result in a wider stereo image.
Lo Shelf: Attenuates or amplifies the low-frequency content of the reverb signal. Higher values result in softer low-frequency content.
Hi Damp: Attenuates or amplifies the high-frequency content of the reverb signal. Higher values result in softer high-frequency content.
Replika Delay
By selecting Replika in the Space Engine menu, you activate the Replika delay. The Replika delay is a full-featured delay unit based on the Native Instruments Replika XT delay plug-in. Notably, it includes the five delay styles from Replika XT: Modern, Analog, Vintage, Tape and Diffusion, each with its own unique sound and behavior.
Selecting a Delay Type
When Replika is selected in the Space Engine menu, you can choose the desired delay type from the Delay Type menu at the top center:
 |
Delay Type menu
All delay types share the same settings in the top and bottom rows, so you can switch between types while keeping all your basic delay parameters intact. Each delay type has a set of additional parameters located in the middle row that allow you to further adjust the character of the delay.
The parameters for all delay types are described in the following paragraphs.
Modern Type
The Modern type offers a clean and precise delay with an adjustable, tube-like saturation.
The built-in modulation (Depth and Rate controls) allows you to change the delay time periodically. This shifts the timing and pitch of the delay signal, adding depth and movement to the sound.
The Modern type contains the following controls:
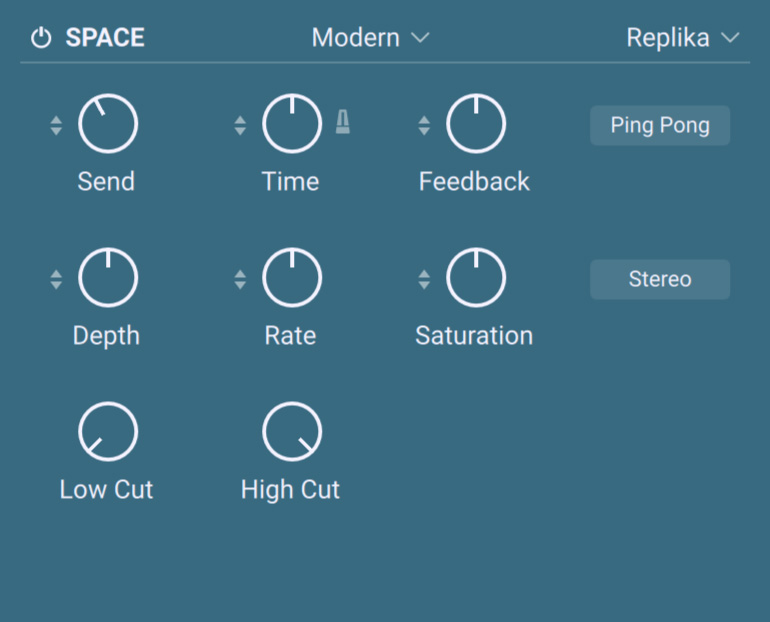 |
Send: Adjusts the level of the signal sent to the delay unit.
Time: Controls the delay time. If the Time Sync button is on, the delay time is tempo-synced and set in note values. Otherwise, you can freely adjust the delay time in milliseconds.
Time Sync On/Off: Turn this button on to synchronize the delay to the tempo.
Feedback: Sets the level of the signal that is being fed back to the delay’s input. Increasing the Feedback creates more delay repeats that decay over time. Feedback levels of 100 % and above are possible, allowing the delay repeats to build up and get louder over time (up to self-oscillation). If the signal levels get out of hand, turn the Feedback knob down.
Ping Pong: Turns Ping Pong mode on or off. In Ping Pong mode, the delay repeats are panned hard left and right in an alternating pattern.
Depth: Sets the amount of built-in modulation applied to the delay time.
Rate: Adjusts the speed of the built-in modulation.
Saturation: Adds tube-like saturation at the delay input. Turned all the way to the left, the knob bypasses saturation, turning it to the right pushes the sound from subtle warmth to overdrive.
Stereo: Switches between stereo and mono operation for the built-in modulation. When the Stereo button is off, the modulation affects both the left and the right stereo channels in the same way. When the Stereo button is on, the modulation between the left and the right stereo channels is offset in time, resulting in a wide stereo effect.
Low Cut: Cuts bass frequencies in the feedback path of the delay with a non-resonant filter. Turned all the way to the left, the filter is off. Turning it to the right raises the filter’s cutoff frequency, resulting in a brighter tone of the delay.
High Cut: Cuts treble frequencies in the feedback path of the delay with a non-resonant filter. Turned all the way to the right, the filter is off. Turning it to the left lowers the filter's cutoff frequency, resulting in a darker tone of the delay.
Analogue Type
The Analogue type emulates the dark and hazy sound of BBD (Bucket Brigade Device) delays, which include old analogue studio effects as well as many contemporary guitar pedals.
Four different BBD models are available (BBD Type control), giving you the full range of warm sounds associated with these delay effects.
The built-in modulation (Depth and Rate controls) allows you to change the delay time periodically. This shifts the timing and pitch of the delay signal, adding depth and movement to the sound.
The Analogue type contains the following controls:
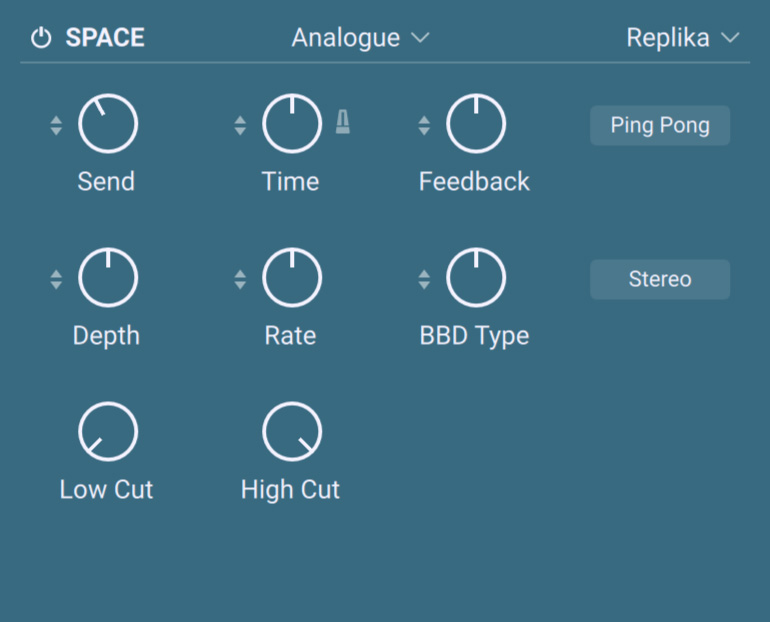 |
Send: Adjusts the level of the signal sent to the delay unit.
Time: Controls the delay time. If the Time Sync button is on, the delay time is tempo-synced and set in note values. Otherwise, you can freely adjust the delay time in milliseconds.
Time Sync On/Off: Turn this button on to synchronize the delay to the tempo.
Feedback: Sets the level of the signal that is being fed back to the delay’s input. Increasing the Feedback creates more delay repeats that decay over time. Feedback levels of 100 % and above are possible, allowing the delay repeats to build up and get louder over time (up to self-oscillation). If the signal levels get out of hand, turn the Feedback knob down.
Ping Pong: Turns Ping Pong mode on or off. In Ping Pong mode, the delay repeats are panned hard left and right in an alternating pattern.
Depth: Sets the amount of built-in modulation applied to the delay time.
Rate: Adjusts the speed of the built-in modulation.
BBD Type: Selects one of four BBD delay models (from right to left): Clean (default setting), Warm, Dark, Grunge. The character of the four models ranges from subtle filtering and distortion (Clean, Warm) to a highly degraded sound (Dark, Grunge).
Stereo: Switches between stereo and mono operation for the built-in modulation. When the Stereo button is off, the modulation affects both the left and the right stereo channels in the same way. When the Stereo button is on, the modulation between the left and the right stereo channels is offset in time, resulting in a wide stereo effect.
Low Cut: Cuts bass frequencies in the feedback path of the delay with a non-resonant filter. Turned all the way to the left, the filter is off. Turning it to the right raises the filter’s cutoff frequency, resulting in a brighter tone of the delay.
High Cut: Cuts treble frequencies in the feedback path of the delay with a non-resonant filter. Turned all the way to the right, the filter is off. Turning it to the left lowers the filter's cutoff frequency, resulting in a darker tone of the delay.
Tape Type
The Tape type emulates the textured and lively sound of classic tape delays. You can fine-tune their unique properties, including the amount of Saturation, the Tape Age, and the intensity of Flutter.
The Tape type contains the following controls:
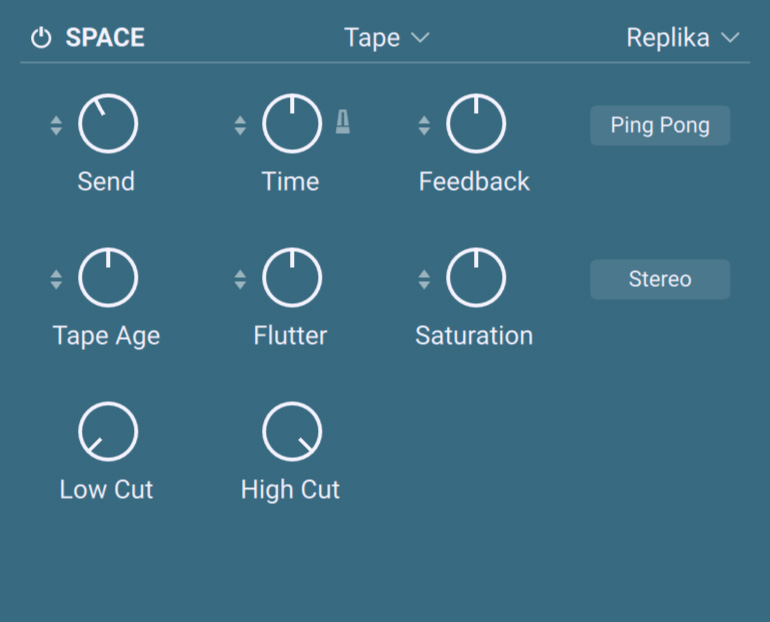 |
Send: Adjusts the level of the signal sent to the delay unit.
Time: Controls the delay time. If the Time Sync button is on, the delay time is tempo-synced and set in note values. Otherwise, you can freely adjust the delay time in milliseconds.
Time Sync On/Off: Turn this button on to synchronize the delay to the tempo.
Feedback: Sets the level of the signal that is being fed back to the delay’s input. Increasing the Feedback creates more delay repeats that decay over time. Feedback levels of 100 % and above are possible, allowing the delay repeats to build up and get louder over time (up to self-oscillation). If the signal levels get out of hand, turn the Feedback knob down.
Ping Pong: Turns Ping Pong mode on or off. In Ping Pong mode, the delay repeats are panned hard left and right in an alternating pattern.
Tape Age: Enhances the characteristics of an aging tape, like limited high-frequency response and hiss (depending on the Noise button’s state).
Flutter: Increases the effects introduced by mechanical imperfections of the tape delay’s motor and tape transport, resulting in pitch variations over time.
Saturation: Sets the amount of tape saturation from a clean sound to overdrive.
Noise: Switches the tape hiss on or off. The amount of hiss depends on the Tape Age knob.
Low Cut: Cuts bass frequencies in the feedback path of the delay with a non-resonant filter. Turned all the way to the left, the filter is off. Turning it to the right raises the filter’s cutoff frequency, resulting in a brighter tone of the delay.
High Cut: Cuts treble frequencies in the feedback path of the delay with a non-resonant filter. Turned all the way to the right, the filter is off. Turning it to the left lowers the filter's cutoff frequency, resulting in a darker tone of the delay.
Vintage Type
The Vintage type emulates the warm and crunchy sound of early digital delay effects.
Four different Quality settings are available, ranging from a bright sound with subtle textures to strong digital artifacts.
The built-in modulation (Depth and Rate controls) allows you to change the delay time periodically. This shifts the timing and pitch of the delay signal, adding depth and movement to the sound.
The Vintage type contains the following controls:
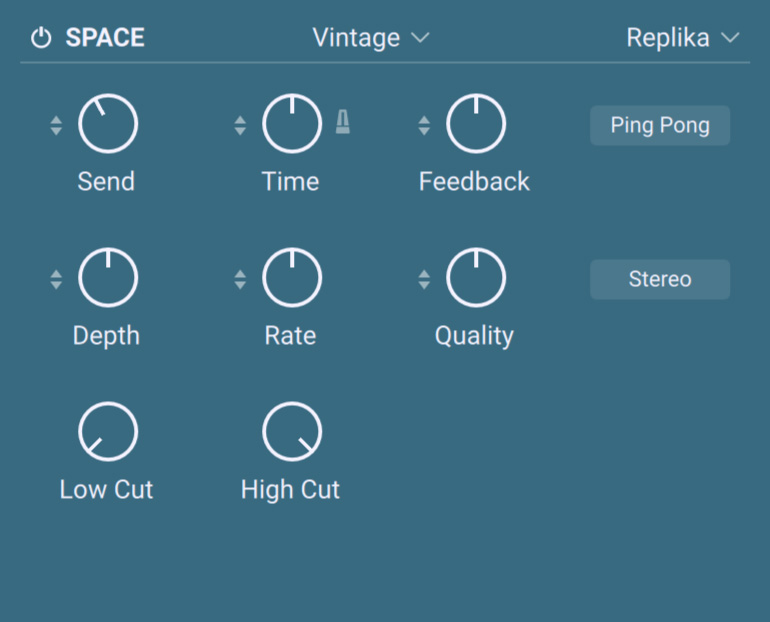 |
Send: Adjusts the level of the signal sent to the delay unit.
Time: Controls the delay time. If the Time Sync button is on, the delay time is tempo-synced and set in note values. Otherwise, you can freely adjust the delay time in milliseconds.
Time Sync On/Off: Turn this button on to synchronize the delay to the tempo.
Feedback: Sets the level of the signal that is being fed back to the delay’s input. Increasing the Feedback creates more delay repeats that decay over time. Feedback levels of 100 % and above are possible, allowing the delay repeats to build up and get louder over time (up to self-oscillation). If the signal levels get out of hand, turn the Feedback knob down.
Ping Pong: Turns Ping Pong mode on or off. In Ping Pong mode, the delay repeats are panned hard left and right in an alternating pattern.
Depth: Sets the amount of built-in modulation applied to the delay time.
Rate: Adjusts the speed of the built-in modulation.
Quality: Selects one of four quality settings for the delay (from right to left): High (default setting), Medium, Low, Crunch. The High setting has a bright, subtly textured sound. Medium and Low sound darker and grittier. Crunch has a bright sound but also introduces a lot of digital artifacts to the signal.
Stereo: Switches between stereo and mono operation for the built-in modulation. When the Stereo button is off, the modulation affects both the left and the right stereo channels in the same way. When the Stereo button is on, the modulation between the left and the right stereo channels is offset in time, resulting in a wide stereo effect.
Low Cut: Cuts bass frequencies in the feedback path of the delay with a non-resonant filter. Turned all the way to the left, the filter is off. Turning it to the right raises the filter’s cutoff frequency, resulting in a brighter tone of the delay.
High Cut: Cuts treble frequencies in the feedback path of the delay with a non-resonant filter. Turned all the way to the right, the filter is off. Turning it to the left lowers the filter's cutoff frequency, resulting in a darker tone of the delay.
Diffusion Type
The Diffusion type links a clean delay to a unique reverb effect. It can be used to create a wide range of different ambiances, from tight and resonant to unnaturally vast spaces (Size control). The Amount of diffusion applied to the delay signal is freely adjustable, and the Movement control allows you to add modulation to the reverb effect.
The Diffusion type contains the following controls:
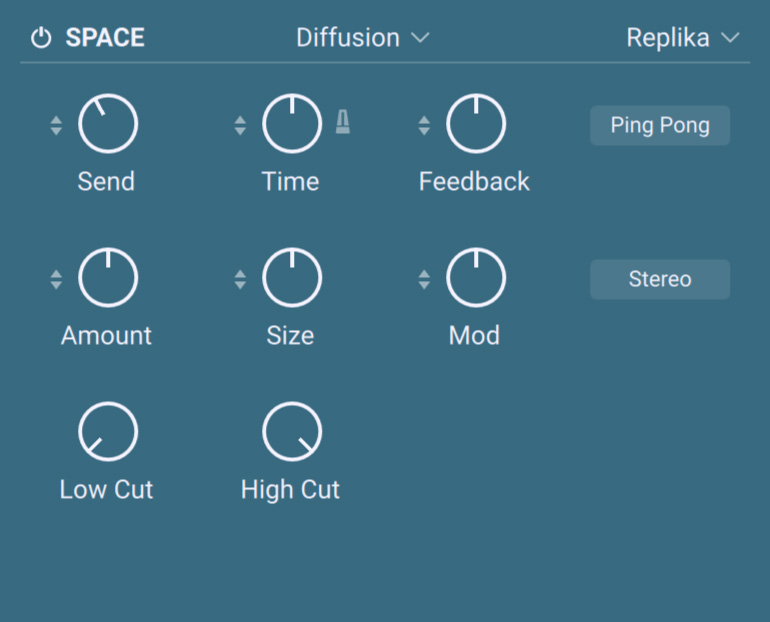 |
Send: Adjusts the level of the signal sent to the delay unit.
Time: Controls the delay time. If the Time Sync button is on, the delay time is tempo-synced and set in note values. Otherwise, you can freely adjust the delay time in milliseconds.
Time Sync On/Off: Turn this button on to synchronize the delay to the tempo.
Feedback: Sets the level of the signal that is being fed back to the delay’s input. Increasing the Feedback creates more delay repeats that decay over time. Feedback levels of 100 % and above are possible, allowing the delay repeats to build up and get louder over time (up to self-oscillation). If the signal levels get out of hand, turn the Feedback knob down.
Ping Pong: Turns Ping Pong mode on or off. In Ping Pong mode, the delay repeats are panned hard left and right in an alternating pattern.
Amount: Sets the amount of diffusion applied to the delay signal, resulting in a reverb effect. High settings make the delay appear out of sync, so low settings are recommended if the rhythmic timing of the delay is essential.
Size: Adjusts the swell, reflection pattern and decay of the reverb effect, giving the impression of differently sized spaces.
Mod: Sets the depth and speed of modulation applied to the diffusion, shifting the timing and pitch of the reflections for a wide reverb effect. Modulation speed starts fast, and reduces as the amount is increased.
Dense: Switches between two density settings for the reflection pattern of the reverb effect.
Low Cut: Cuts bass frequencies in the feedback path of the delay with a non-resonant filter. Turned all the way to the left, the filter is off. Turning it to the right raises the filter’s cutoff frequency, resulting in a brighter tone of the delay.
High Cut: Cuts treble frequencies in the feedback path of the delay with a non-resonant filter. Turned all the way to the right, the filter is off. Turning it to the left lowers the filter's cutoff frequency, resulting in a darker tone of the delay.
Psyche Delay
By selecting Psyche in the Space Engine menu, you activate the Psyche Delay. The Psyche Delay is a stereo delay effect that produces a range of atmospheric ambient echoes and reverse effects reminiscent of the “backwards tape” sound of the 1960s.
When Psyche is selected in the Space Engine menu, the delay provides the following parameters:
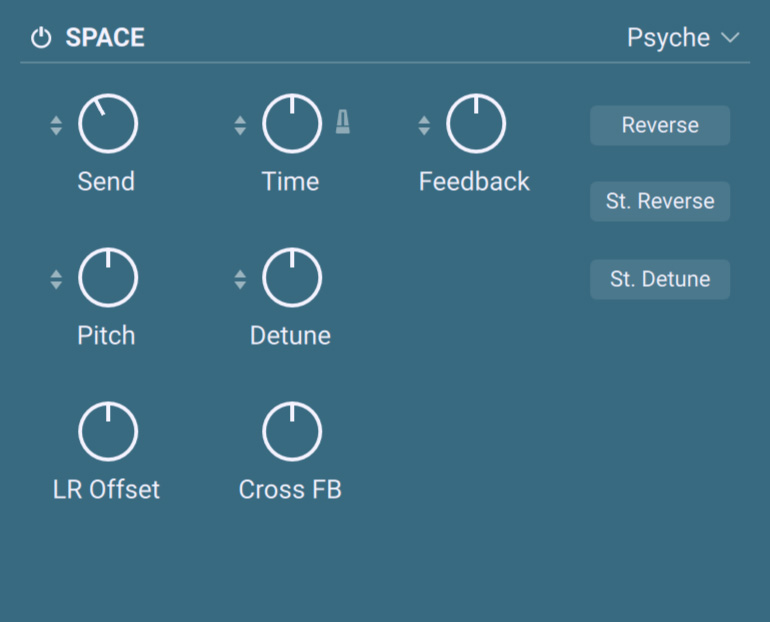 |
Send: Adjusts the level of the signal sent to the delay unit.
Time: Controls the delay time. If the Time Sync button is on, the delay time is tempo-synced and set in note values. Otherwise, you can freely adjust the delay time in milliseconds.
Time Sync On/Off: Turn this button on to synchronize the delay to the tempo.
Feedback: Sets the level of the signal that is being fed back to the delay’s input. Increasing the Feedback creates more delay repeats that decay over time. Feedback levels of 100 % and above are possible, allowing the delay repeats to build up and get louder over time (up to self-oscillation). If the signal levels get out of hand, turn the Feedback knob down.
Reverse: Reverses the playback of subsequent delay repeats.
St. Reverse: Reverses the playback of subsequent delay repeats on one of the stereo channels.
St. Detune: Adjusts the pitch of the echo repeats on the left stereo channel in the range of -50 to +50 cents. Combined with feedback and cross-feedback you can use this to create progressively detuned echo cascades.
Pitch: Adjusts the pitch of the echo repeats in the range of -12 to +12 semitones. Combined with feedback you can use this to create progressively harmonized echo cascades.
Detune: Fine-tunes the pitch of the echo repeats in the range of -50 to +50 cents.
LR Offset: Adjusts the amount of time deviation between the two stereo channels, resulting in wide stereo echos.
Cross FB: Adjusts the amount of feedback from the left to the right stereo channel and vice versa, creating a more complex stereo echo pattern.
Motion Pane
The Motion pane of the Layer pages lets you configure two internal modulation sources for each Layer. Each modulation source can control two different targets in that Layer.
To display the controls of the Motion pane, click MOTION in the Pane selector of the Layer pages:

The Motion pane contains the following controls:
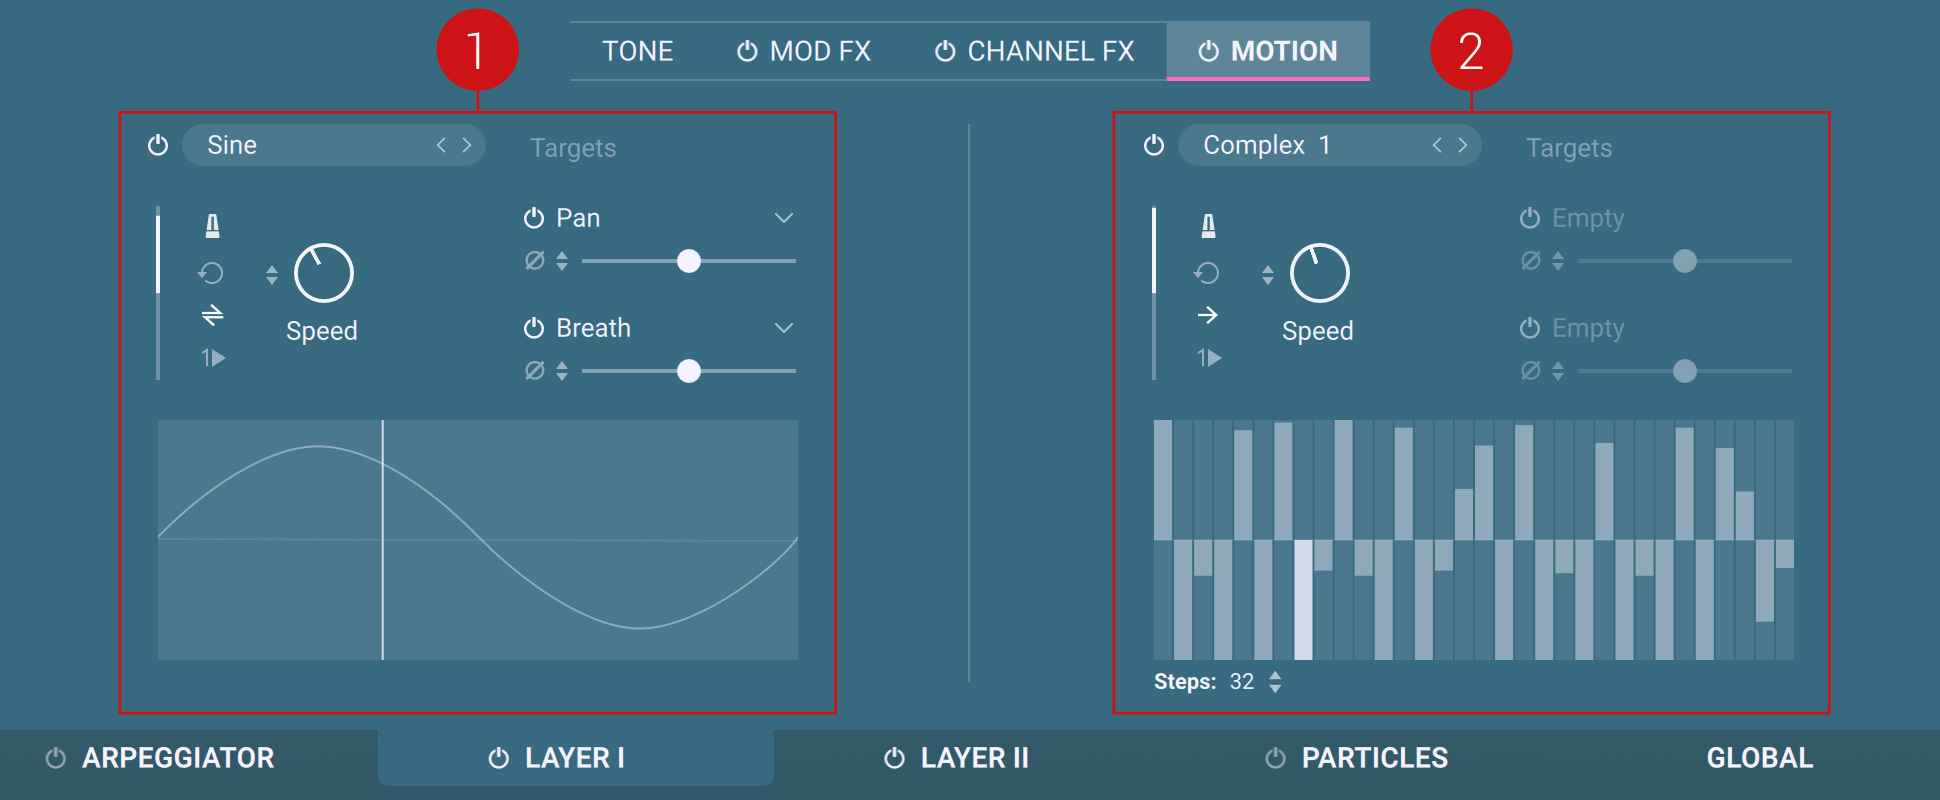
Modulation Source A: Lets you configure the first modulation source for that Layer.
Modulation Source B: Lets you configure the second modulation source for that Layer.
Each modulation source contains the following controls:
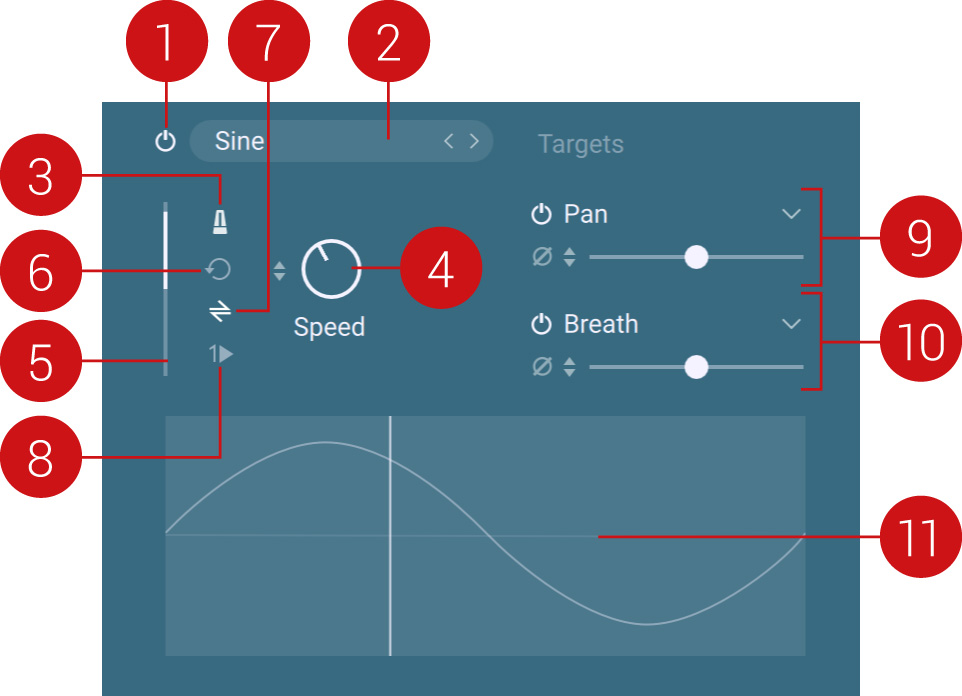 |
Modulation On/Off: Turns this modulation source on or off.
Modulation Source Name: Displays the name of the modulation source. A click on the name opens the Modulation Source Browser, which allows you to select another LFO or step sequencer pattern. For more information, refer to Browsers.
Modulation Sync On/Off: Turn this switch on to sync the modulation speed to the tempo.
Speed: Adjusts the speed of the modulation source. When the Sync switch is on, the Speed knob value is measured in note values, otherwise, it is measured in milliseconds.
Modulation display: Provides visual feedback of the current modulation value.
Retrigger: If this button is on, when notes are already playing, each new note will retrigger the modulation source from the beginning. If this button is off, the LFO or pattern of the modulation source will continue its cycle as long as notes are playing.
Playback Direction: Selects the direction in which the modulation is played back: Click the button to switch between the following directions: left to right, right to left, back and forth.
One-shot: If this button is on, the modulation is played once. If it is off, the modulation is played in loop.
Modulation Target 1 controls: Configures the first target of the modulation source. See Configuring the Modulation Targets in the Layers for more information.
Modulation Target 2 controls: Configures the second target of the modulation source. See Configuring the Modulation Targets in the Layers for more information.
Shape display: Shows the shape of the modulation source. For step sequences, you can edit the sequence directly on the display with your mouse.
Editing the Sequence Used as Modulation Source in the Layers
If a step sequence is selected as modulation source, you can edit the steps directly in the shape display using your mouse:
Configuring the Modulation Targets in the Layers
You can set up two distinct targets for each modulation source. For both targets, the following parameters are available:
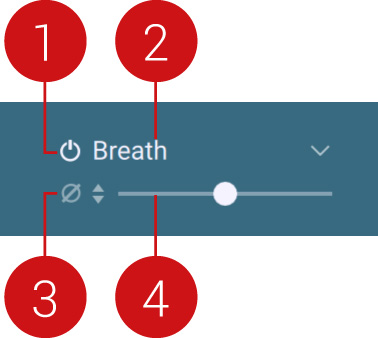 |
Many parameters from the various panes of the Layer page are available as targets in the Target menu. Among them, the entries for the four Effect Strength knobs from the four Mod FX slots mirror the name of the effect presets currently loaded.