Vocal Colors Overview
Vocal Colors's Main page consists of key controls that allow you to tweak your sound, and provides access to a number of specialized editing pages.
This chapter introduces the main concepts of Vocal Colors and its interface. You will also learn how to quickly adjust the different modules.
Instrument Areas
When you first open Vocal Colors, you see the main page of the interface:
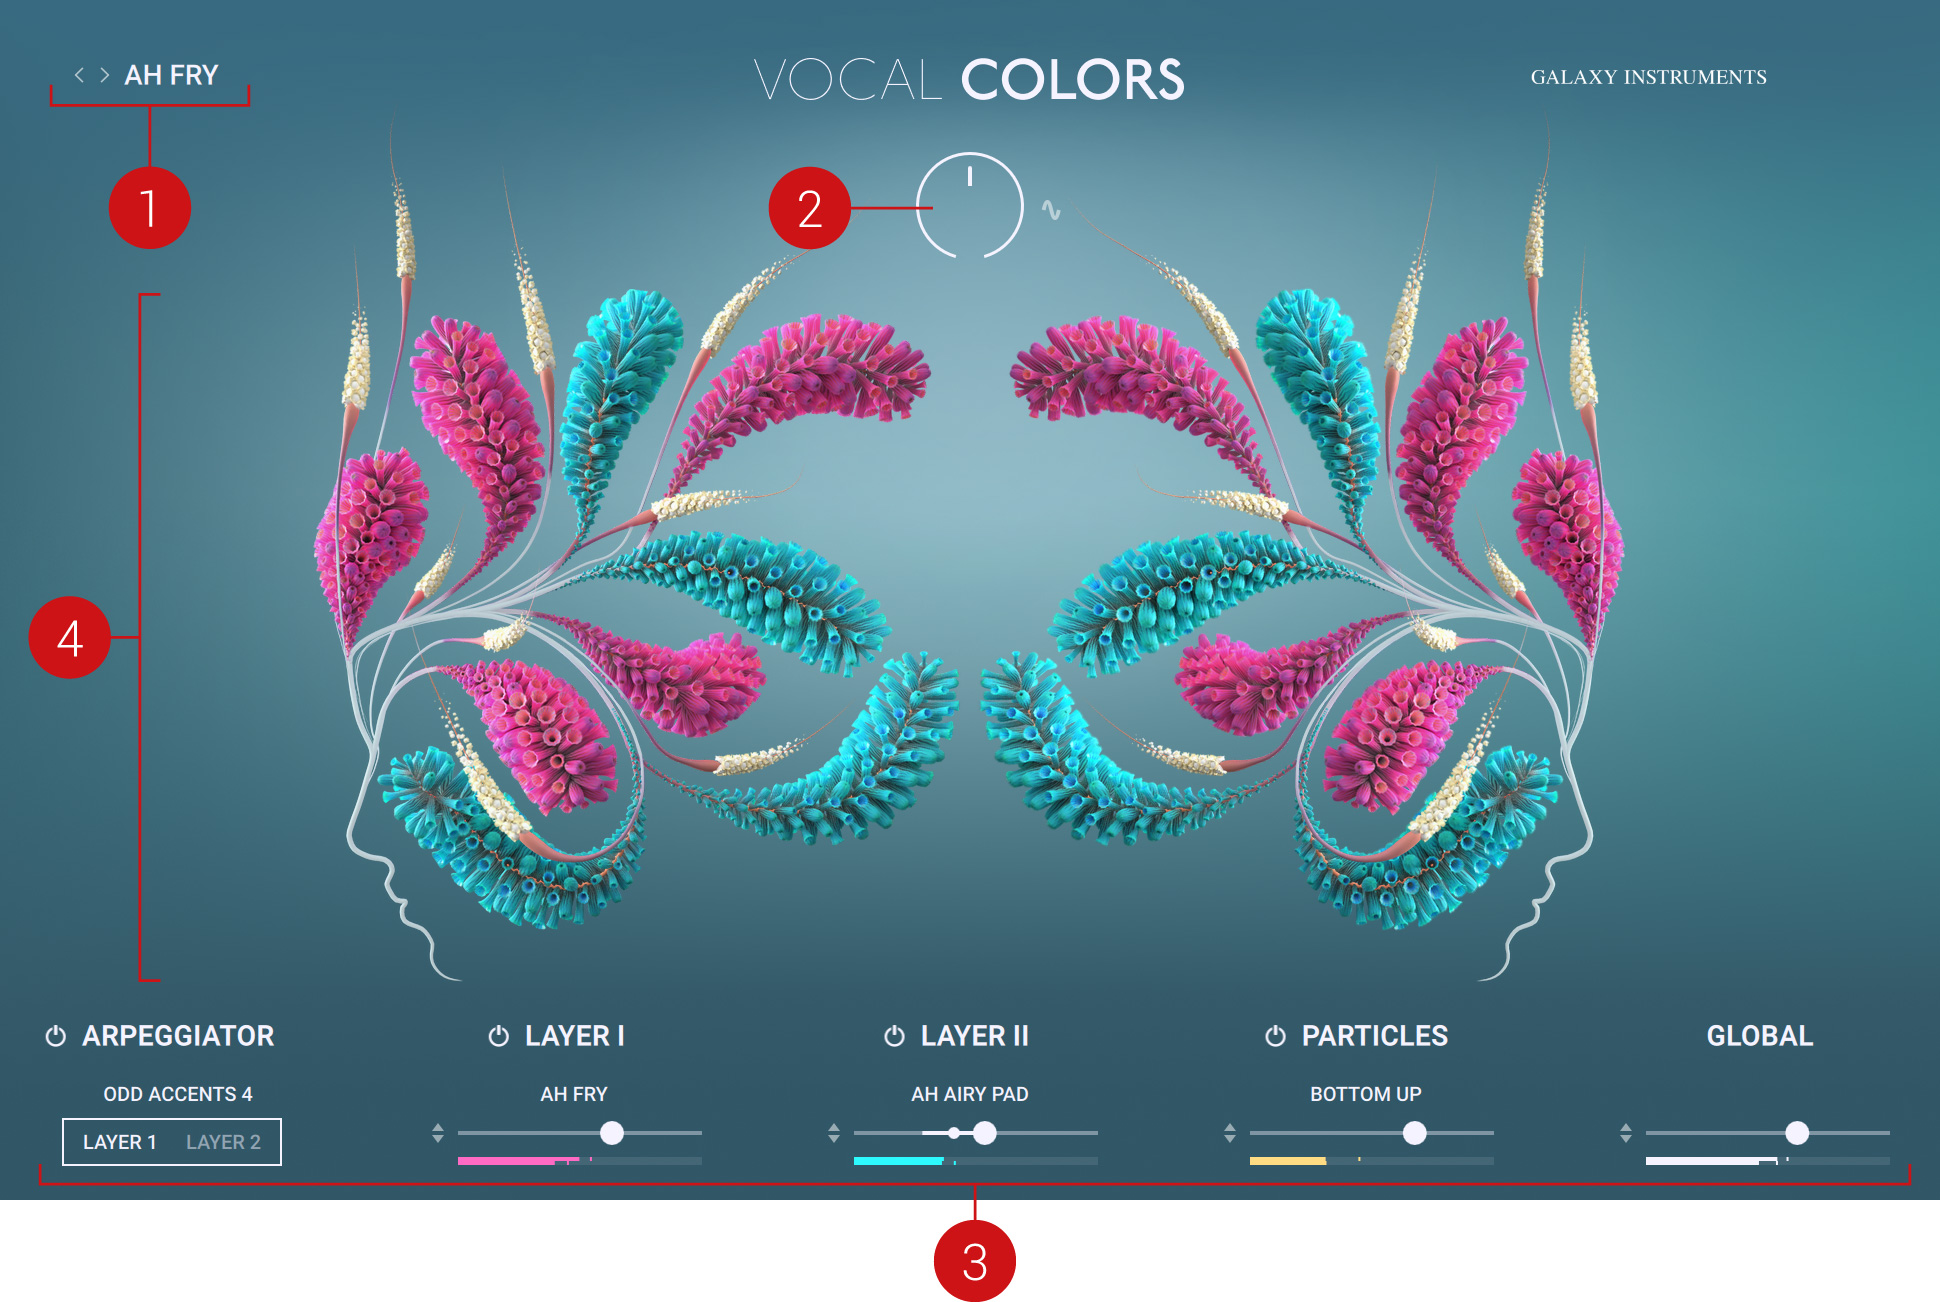
The interface is split into four main parts:
Snapshot: The name of the loaded Snapshot is always visible. Snapshots are global presets containing values for all parameters of the instrument. The name of the Snapshot currently loaded is displayed here. Click the left and right arrows to cycle through Snapshots, or click the name of the loaded Snapshot to open the Snapshot Browser and select another Snapshot from the Vocal Colors factory library. For more information on the various Browsers found in Vocal Colors, refer to Browsers.
Expression knob: The Expression knob is always visible. You can assign the Expression knob to any number of parameters within Vocal Colors, which allows you to control these parameters using the Expression knob. You can also modulate them all at once. For more information, refer to Modulating Your Sound.
Module row: The Module row is always visible. Vocal Colors is based on three sound generators: the Layer 1, Layer 2, and Particles modules. In addition, the Arpeggiator module lets you create advanced sequences of notes playing automatically, and the Global module adjusts the overall sound of your instrument. The main parameters of these modules are available at any time in the Module row, at the bottom of the instrument. For more information, refer to Module Basics.
Central area: This is the biggest part of the instrument and it can display various pages of parameters and Browsers. By default, it shows the main page: You see blossoms with various colors and shapes, which represent the three different sound generators of Vocal Colors: The magenta blossoms represent the Layer 1 module, the turquoise blossoms represent the Layer 2 module, and the smaller white blossoms represent the Particles module. The main controls of all these modules are found in the Module row underneath (3). The blossoms of each type are closed if the corresponding module is deactivated, they are slightly open if the module is active, and they open wider as the module is playing, following the module’s volume level.
Module Basics
At the bottom of the Vocal Colors interface, the Module row is always visible. It lets you adjust at any time the main parameters of the various modules available in Vocal Colors:

The Module row at the bottom of the instrument
The modules in the middle are the sound generators:
The Layer 1 and Layer 2 modules both offer the full range of recordings of Vocal Colors, allowing you to precisely adjust two distinct sample sets with their own effects and modulation, and play them together.
On their right, the Particles module creates an additional cloud of notes based on a distinct sample set.
On the very left, the Arpeggiator module creates sequences of notes based on your playing. You can choose which of the target modules (Layer 1 and Layer 2) should play these sequences.
On the very right, the Global module controls a few general settings for your instrument.
The controls in the Module row are similar for most modules, with slight differences:
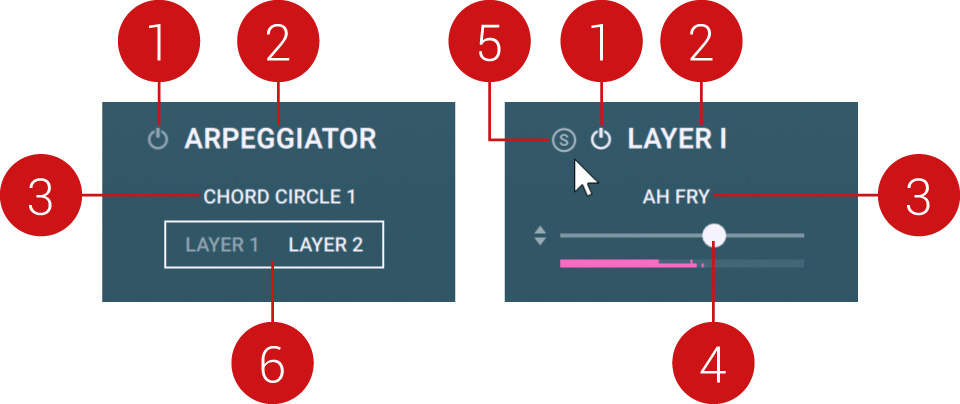 |
Module On/Off (all modules except Global): Click to switch the module on or off. When off, the other controls of the module are grayed out in the Module row.
Module name: Click to open or close the module page in the central area above. The module page contains many more parameters, allowing you to fine-tune the module behavior. The pages for all modules are described in detail in the following chapters of the manual.
Preset name (Arpeggiator, Layer 1 and 2, Particles): Shows the name of the loaded preset. The Arpeggiator, Layer 1 and 2, and Particles modules offer numerous presets. Click the preset name to open the Preset Browser and select another preset for that module (for more information, refer to Browsers). When you hover over the preset name, two arrows appear on either side: Click them to quickly load the previous or next preset from the browser’s result list without opening the browser.
Volume (all modules except Arpeggiator): Adjusts the volume level of the module. [Ctrl]-click (on Windows) or [Cmd]-click (on Mac) to set the slider back to its default level (this works for all sliders and knobs in the instrument). As you play, a pair of horizontal peak meters under the slider show you the current level. Left of the slider, the little up and down arrows are the modulation icon: Click and drag this icon vertically to assign the slider to the Expression knob and modulate the module’s volume level (for more information, refer to Modulating Your Sound).
Solo (Layer 1 and 2, Particles): If you hover left of the Module On/Off button (1), the Solo button shows up to solo the corresponding module.
Target selector (Arpeggiator): Selects which module(s) should play the sequence created in the Arpeggiator module. You can send the Arpeggiator sequence to the following target modules: Layer 1 and Layer 2. Click the desired labels to switch each target on or off. Active targets are lit, inactive targets are grayed out.