Particles Page
Learn how to use the Particles page, which you can use to adjust the behavior of the Particles engine that triggers and processes additional samples.
In the Particles page, you can adjust the behavior of the Particles engine. The Particles engine triggers and processes additional samples, called particles, in relation to the keys that you play on your keyboard. In doing so, it generates a sequence or cloud of notes. You can choose the samples triggered, shape their sound with effects, and modify the algorithm used to generate the cloud of particles. In the middle of the page, you can see the resulting cloud in real-time as you play.
Click PARTICLES at the bottom of the instrument to open or close the Particles page:

The Particles page contains the following areas:
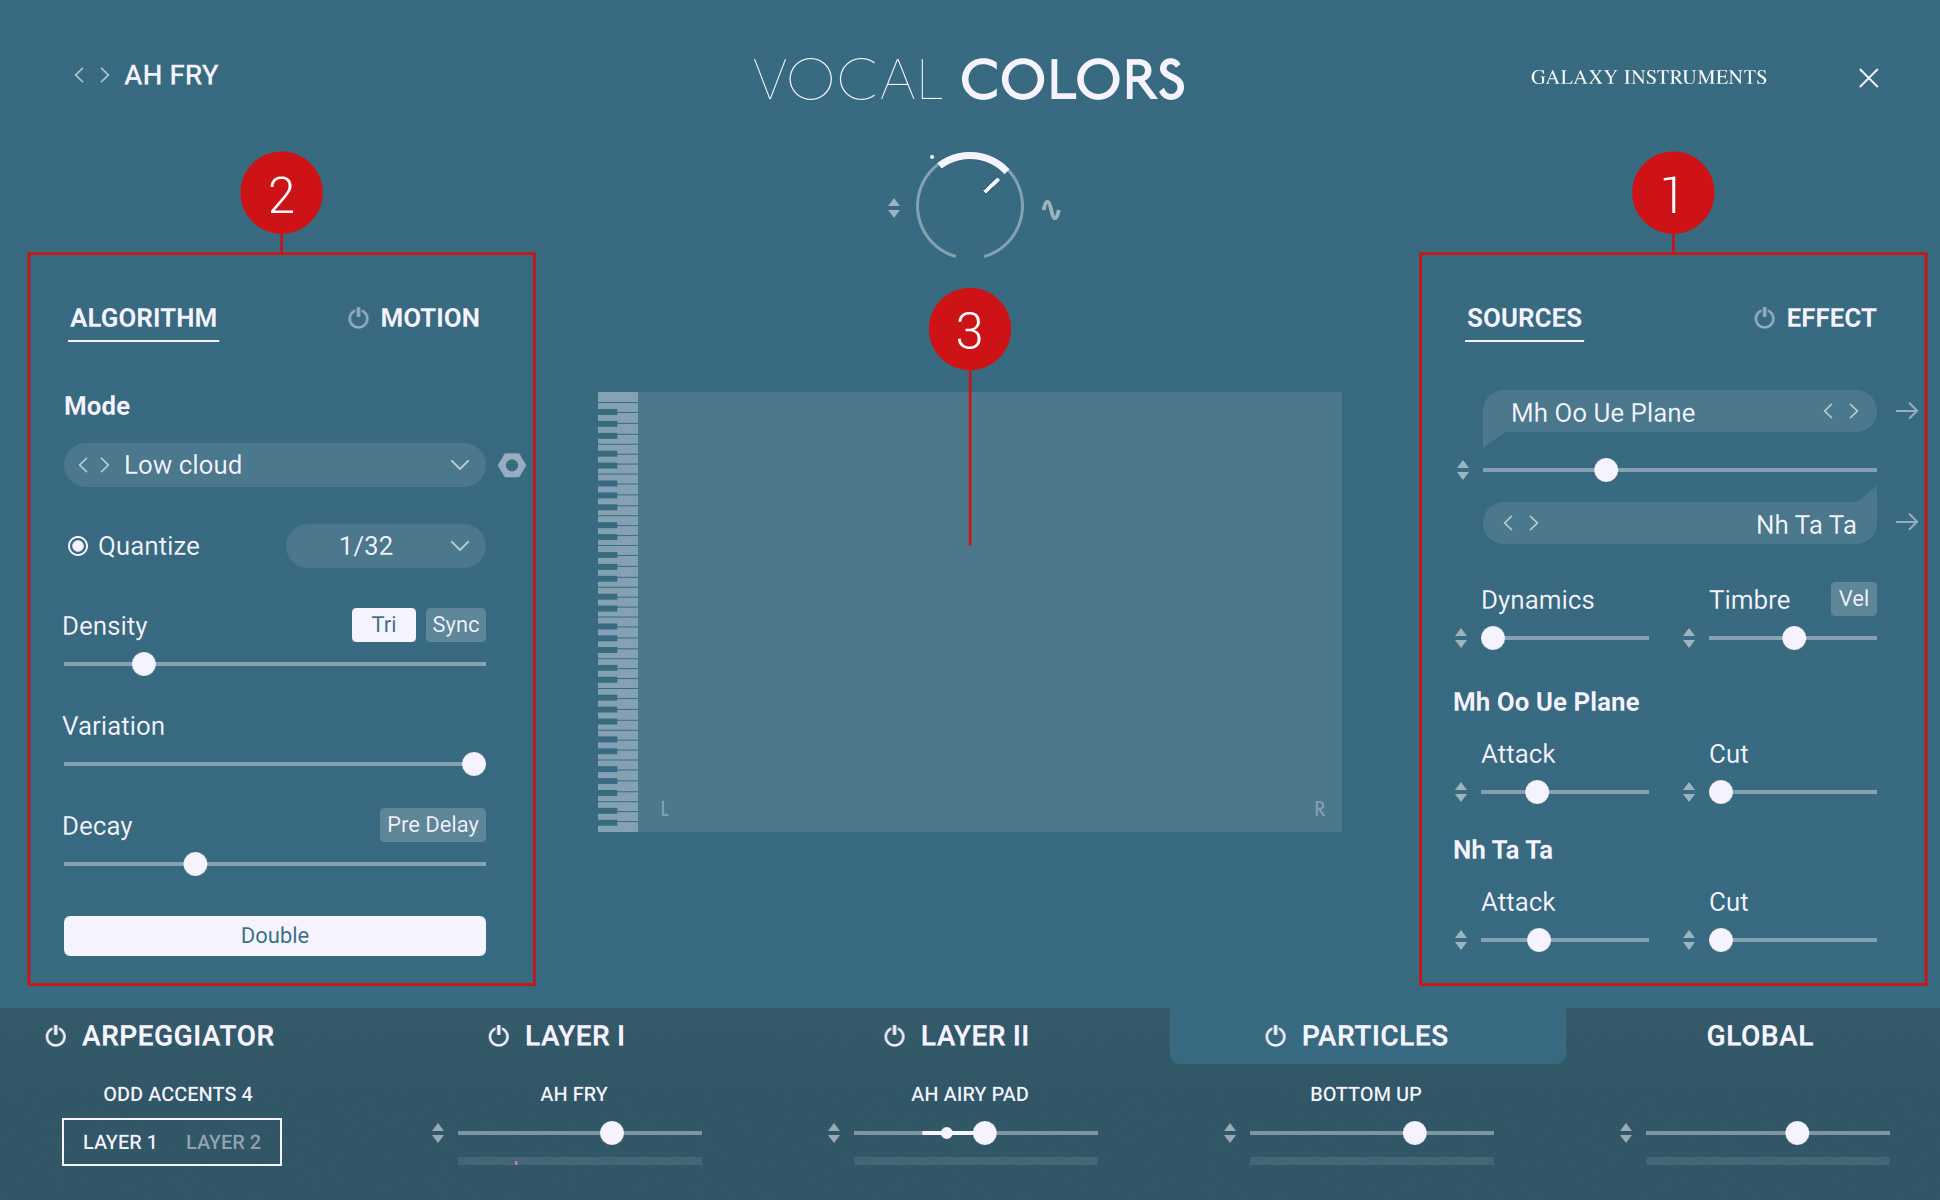
SOURCES and EFFECTS panes: Click SOURCES or EFFECTS at the top to display the corresponding pane underneath. The SOURCES and EFFECTS panes let you define the sound of the particles. On the SOURCES pane, you can choose and adjust the two samples triggered by the Particles engine. For more information, refer to Sources Pane. On the EFFECTS pane, you can set up and apply two effects to the particles. For more information, refer to Effects Pane.
ALGORITHM and MOTION panes: Click ALGORITHM or MOTION at the top to display the corresponding pane underneath. The ALGORITHM pane lets you configure the algorithm used to generate the particles. This will affect the moments and the pitches at which the particles will be triggered. For more information, refer to Algorithm Pane. The MOTION pane lets you add modulation to the particles. For more information, refer to Motion Pane.
Particle display: Displays a visual representation of the particles. As you play and hold notes on your keyboard, you can see the additional notes triggered by the Particles engine according to their pitch (vertical axis) and their panning in the stereo field (horizontal axis).
Sources Pane
The Particles engine can blend two different samples as sources to generate the particles. You can set up these sources in the SOURCES pane of the Particles page:
 |
Source 1 Name: Displays the name of the sample used as the first source. Click the name to open the Source 1 Browser and select another sample for the first source. For more information on using the Browsers, refer to Browsers. You can also click the arrow icons (< >) near the sample name to quickly load the previous or next sample from the browser’s result list without opening the browser.
Source 2 Name: Displays the name of the sample used as the second source. Click the name to open the Source 2 Browser and select another sample for the second source. For more information on using the Browsers, refer to Browsers. You can also click the arrow icons (< >) near the sample name to quickly load the previous or next sample from the browser’s result list without opening the browser.
Source Mix: Adjusts the mix between the first source (1) and the second source (2).
Tight (T), available only for certain samples: Shortens the attack at the beginning of the samples. This way, the samples are playable tightly. This can be useful when using two sources as it reduces flam effects (“double attacks”) between both sources. Deactivate the Tight button for a more natural feeling of the source sound.
Link Position (arrow), available only for certain samples: If a sample is already playing, the playback position of new samples will be linked to that of the first sample. This can be useful for rhythmic particles to ensure that each new particle stay in sync with the particles already playing.
Timbre: Changes the timbre (or tone color) of the particles from soft to hard by readjusting the sample mapping. The particles will be triggered at random timbres within this range. The Timbre slider is bipolar: at the middle position, it allows all timbres. From the middle position, drag the slider to the right to progressively limit the particles to harder sounds, and drag it to the left to progressively limit the particles to softer sounds.
Vel (Velocity): When this button is switched on, the particles’ timbre also reacts to the incoming MIDI velocities, making the Particles engine dynamically playable.
Dynamic: Adjusts the dynamic range of the particles by adjusting their volume while still using the same velocity samples (these are set by the Timbre slider). The particles will be triggered at random velocities within this range. Drag left to shrink, or drag right to expand the dynamic range.
Source 1 Attack: Increases the attack time of the source as you drag the slider to the right.
Source 1 Cut: Increases the decay time of the source as you drag the slider to the right.
Source 2 Attack: Increases the attack time of the source as you drag the slider to the right.
Source 2 Cut: Increases the decay time of the source as you drag the slider to the right.
Effects Pane
The Particles engine provides two freely assignable effect units to shape the sound of the particles, and a diffusion effect to add space to the particle cloud. You can set these up in the EFFECTS pane of the Particles page:
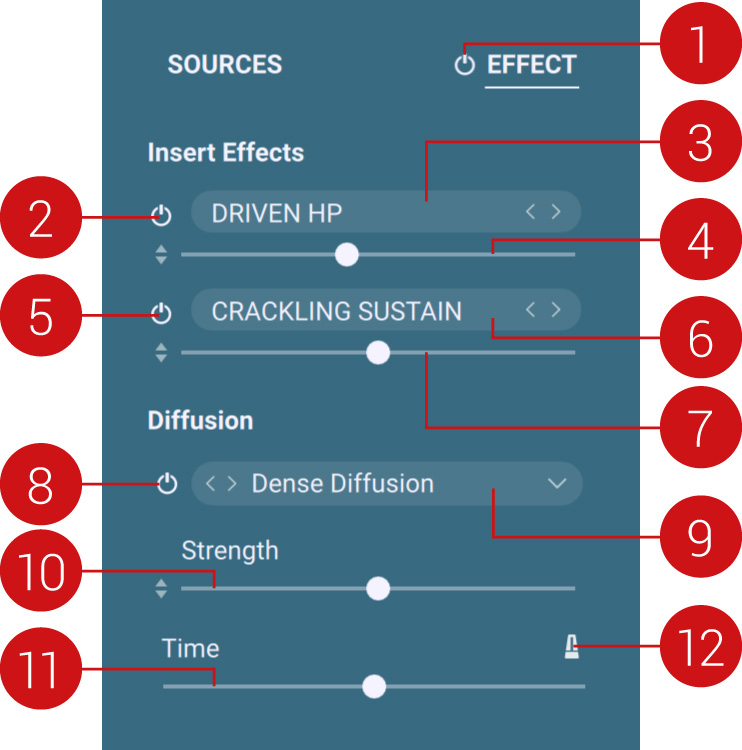 |
Effects On/Off: Globally switches effects of the Particles engine on or off. This button is available at any time, even if another pane is displayed.
Effect A On/Off: Switches effect A on or off.
Effect A Preset: Shows the selected effect preset. Click the preset name to open the Effect Browser and select another effect preset. For more information on the browsers, refer to Browsers. You can also click the arrow icons (<>) near the preset name to quickly load the previous or next effect preset from the browser’s result list without opening the browser.
Effect A Strength: Adjusts the strength of the effect.
Effect B On/Off: Switches effect B on or off.
Effect B Preset: Shows the selected effect preset. Click the preset name to open the Effect Browser and select another effect preset. For more information on using the browsers, refer to Browsers. You can also click the arrow icons (<>) near the preset name to quickly load the previous or next effect preset from the browser’s result list without opening the browser.
Effect B Strength: Adjusts the strength of the effect.
Diffusion On/Off: Turns the Diffusion effect on or off.
Diffusion Preset: Shows the selected Diffusion preset. Click to open the menu and choose from the various delay and reverb presets available. You can also click the arrow icons (<>) near the preset name to quickly load the previous or next preset from the menu.
Strength: Adjusts the strength of the Diffusion effect.
Time: Adjusts the delay or reverb time and thereby the perceived size of the diffusion space.
Sync: This button appears only if a delay preset is selected in the Diffusion Preset menu. Turn on this Sync button to synchronize the diffusion delay with the tempo. When Sync is on, the unit of the Time slider turns to note values.
Algorithm Pane
The ALGORITHM pane of the Particles page lets you fine-tune the moments and pitches at which the particles will be triggered:
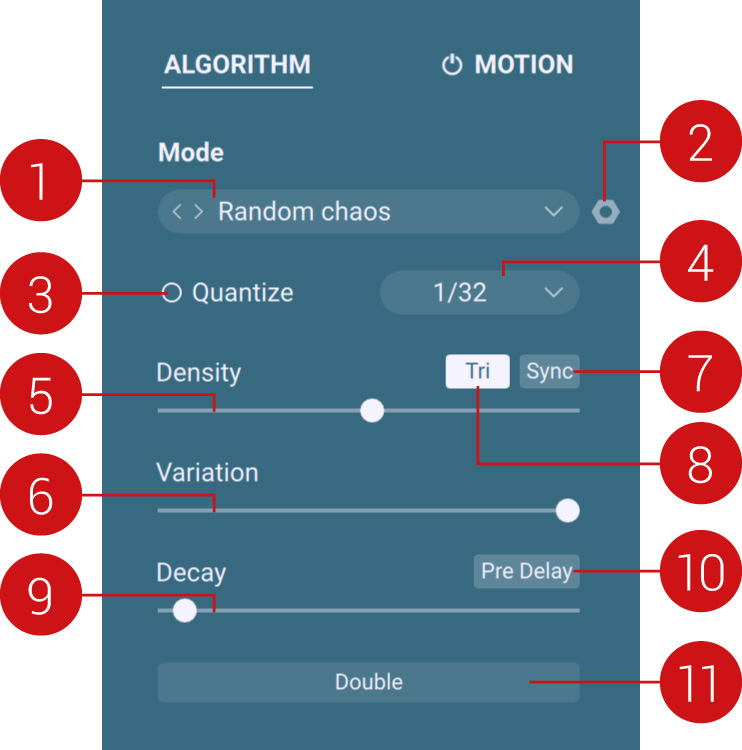 |
Mode Preset: Selects predefined ranges for the pitches of the particles (the additional notes). The Particles algorithm uses both an octave range and a formantshift range: The pitch of each particle is set randomly within these ranges. This menu provides a collection of predefined values for both ranges. You can also click the arrow icons (<>) near the preset name to quickly load the previous or next preset from the menu. Note that if you adjust the ranges using the Mode Edit icon nearby (2), your manual adjustments will override the settings from the selected preset.
Mode Edit: Click this little nut icon to open a Mode Edit panel in which you can manually adjust the octave range and the formant shift range used to create the particles. For more information, refer to Manually Adjusting the Shift Ranges.
Quantize: Switches the input quantization on or off. This feature works only if the Sync button (7) is switched on as well. When the Quantize button is on, the particles are triggered in sync with the tempo. Quantization is applied according to the note value set in the Quantize menu (4) nearby.
Quantize menu: Defines a quantization value to be used when the Quantize button (3) is on.
Density: Defines the shortest delay between two particles. The delay before triggering the next particle is randomly taken between this value and the value of the Variation slider (6). The value is measured in note values when Sync (7) is on, and in milliseconds otherwise.
Variation: Defines the longest delay between two particles. The delay before triggering the next particle is randomly taken between the value of the Density slider (5) and this value. The value is measured in note values when Sync (7) is on, and in milliseconds otherwise.
Sync: When Sync is switched on, the delays between particles depend on the tempo: the delay ranges set by the Density (5) and Variation (6) sliders switch to note values, and the delays between particles are random note values within that range.
Tri: Switches to triplets the random rhythmic pattern at which particles are triggered.
Decay: Adjusts the duration of the decaying cloud after a key is pressed. When set to Infinite (far right position), the cloud will continue until all keys are released.
Pre Delay: When Pre Delay is switched on, a delay is introduced between your original note and the resulting particles. When switched off, the particle cloud starts straight away as you press the key.
Double: Balances the particle cloud in the stereo field. When Double is switched off, the particles from both sources are randomly panned in the stereo field, which can affect the perceived stereo balance. If you want a more balanced picture regarding the panoramic position, switch on the Double button: It creates a kind of double-track effect with a more consistent stereo field.
Manually Adjusting the Shift Ranges
A click on the little nut icon at the top right of the ALGORITHM pane opens the Mode Edit panel, in which you can manually adjust the octave range and the formant shift range used to create the particles:
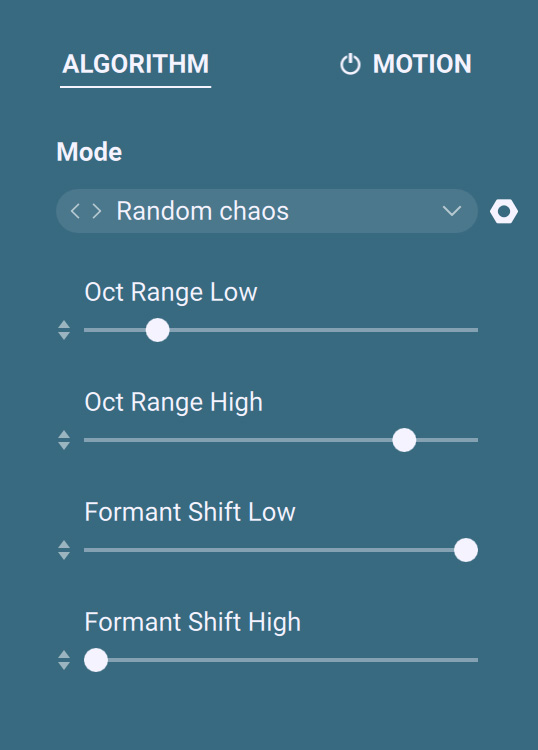 |
The Mode Edit panel
You can adjust either range via a pair of sliders defining the range’s lowest and highest value.
You can also use the modulation icons near the sliders to modulate the ranges; this way you can modify the Particles algorithm in real-time using the Expression knob. For more information on modulation, refer to Modulating Your Sound.
When you are done, click the nut icon again to close the panel.
Note that your adjustments in the Mode Edit panel will override the values of the preset selected in the Mode Preset menu above. To return to the preset values, select the same preset again from the menu.
Motion Pane
The Motion pane of the Particles page lets you configure a modulation source that can control two different targets in the Particles engine.
The Motion pane contains the following controls:
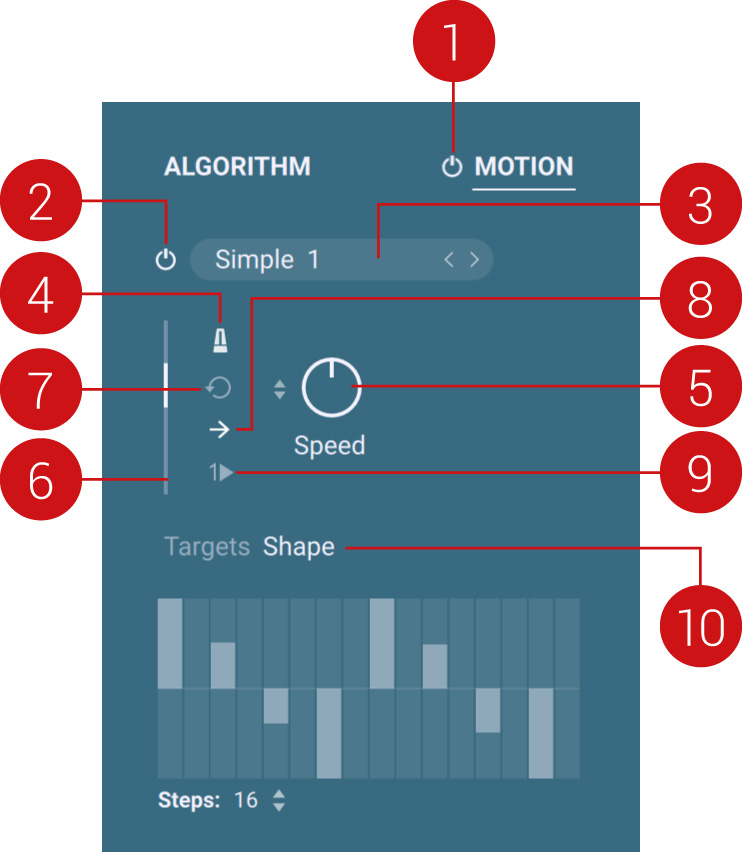 |
Motion On/Off: Globally switches internal modulation of the Particles engine on or off. This button is available at any time, even if another pane is displayed.
Modulation On/Off: Turns this modulation source on or off.
Modulation Source Name: Displays the name of the modulation source. A click on the name opens the Modulation Source Browser, which allows you to select another LFO or step sequencer pattern. For more information, refer to Browsers.
Modulation Sync On/Off: Turn this switch on to sync the modulation speed to the tempo.
Speed: Adjusts the speed of the modulation source. When the Sync switch is on, the Speed knob value is measured in note values, otherwise, it is measured in milliseconds.
Modulation display: Provides visual feedback of the current modulation value.
Retrigger: If this button is on, when notes are already playing, each new note will retrigger the modulation source from the beginning. If this button is off, the LFO or pattern of the modulation source will continue its cycle as long as notes are playing.
Playback Direction: Selects the direction in which the modulation is played back: Click the button to switch between the following directions: left to right, right to left, back and forth.
One-shot: If this button is on, the modulation is played once. If it is off, the modulation is played in loop.
Targets/Shape selector: Switches the area underneath between target controls and shape display:
The target controls let you configure the targets of the modulation source. See Configuring the Modulation Targets in the Particles Engine for more information.
The shape display shows the shape of the modulation source. For step sequences, you can edit the sequence directly on the display with your mouse.
Editing the Sequence Used as Modulation Source in the Particles Engine
When you click Shape in the Motion pane, the shape of the modulation source shows up underneath:
 |
If a step sequence is selected as modulation source, you can edit the steps directly in the shape display using your mouse:
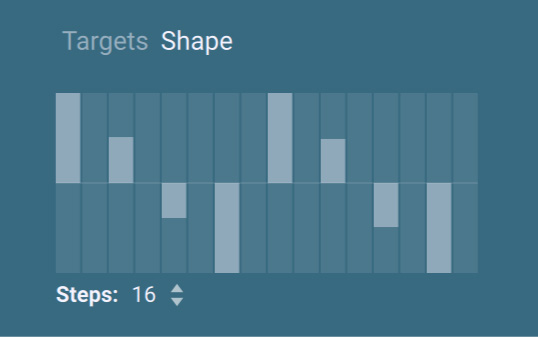 |
Configuring the Modulation Targets in the Particles Engine
When you click Targets in the Motion pane, the controls for the modulation targets show up underneath:
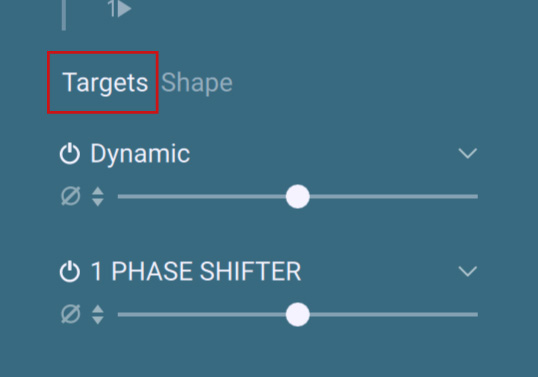 |
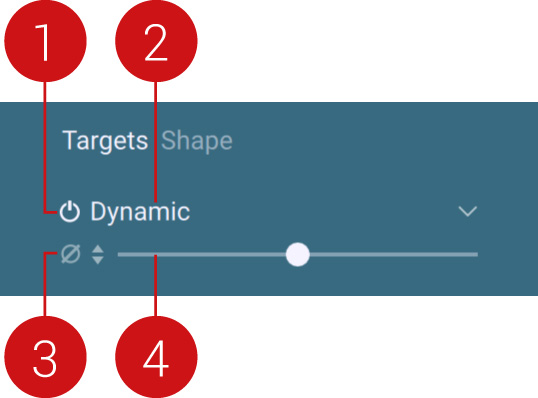
You can set up two distinct targets for each modulation source. For both targets, the following parameters are available:
 |
Many parameters from the various panes of the Particles page are available as targets in the Target menus. Among them, the entries for the Effect Strength parameter from the two Insert Effect slots mirror the name of the effect presets currently loaded.