Editor Page
The Editor page contains audio editing tools, a loop editor, and a layer and mapping editor. It provides you with extensive editing features for each cell.
The Editor page contains audio editing tools, a loop editor, and a layer and mapping editor, all of which provide you with extensive editing features for cells, down to the level of editing individual sample layers within a cell. When the Editor page is opened, The Quick Access area is converted to a full-blown Wave and Loop Editor. For more information, refer to Quick Access Area.
The Editor page contains the following main sections and elements:
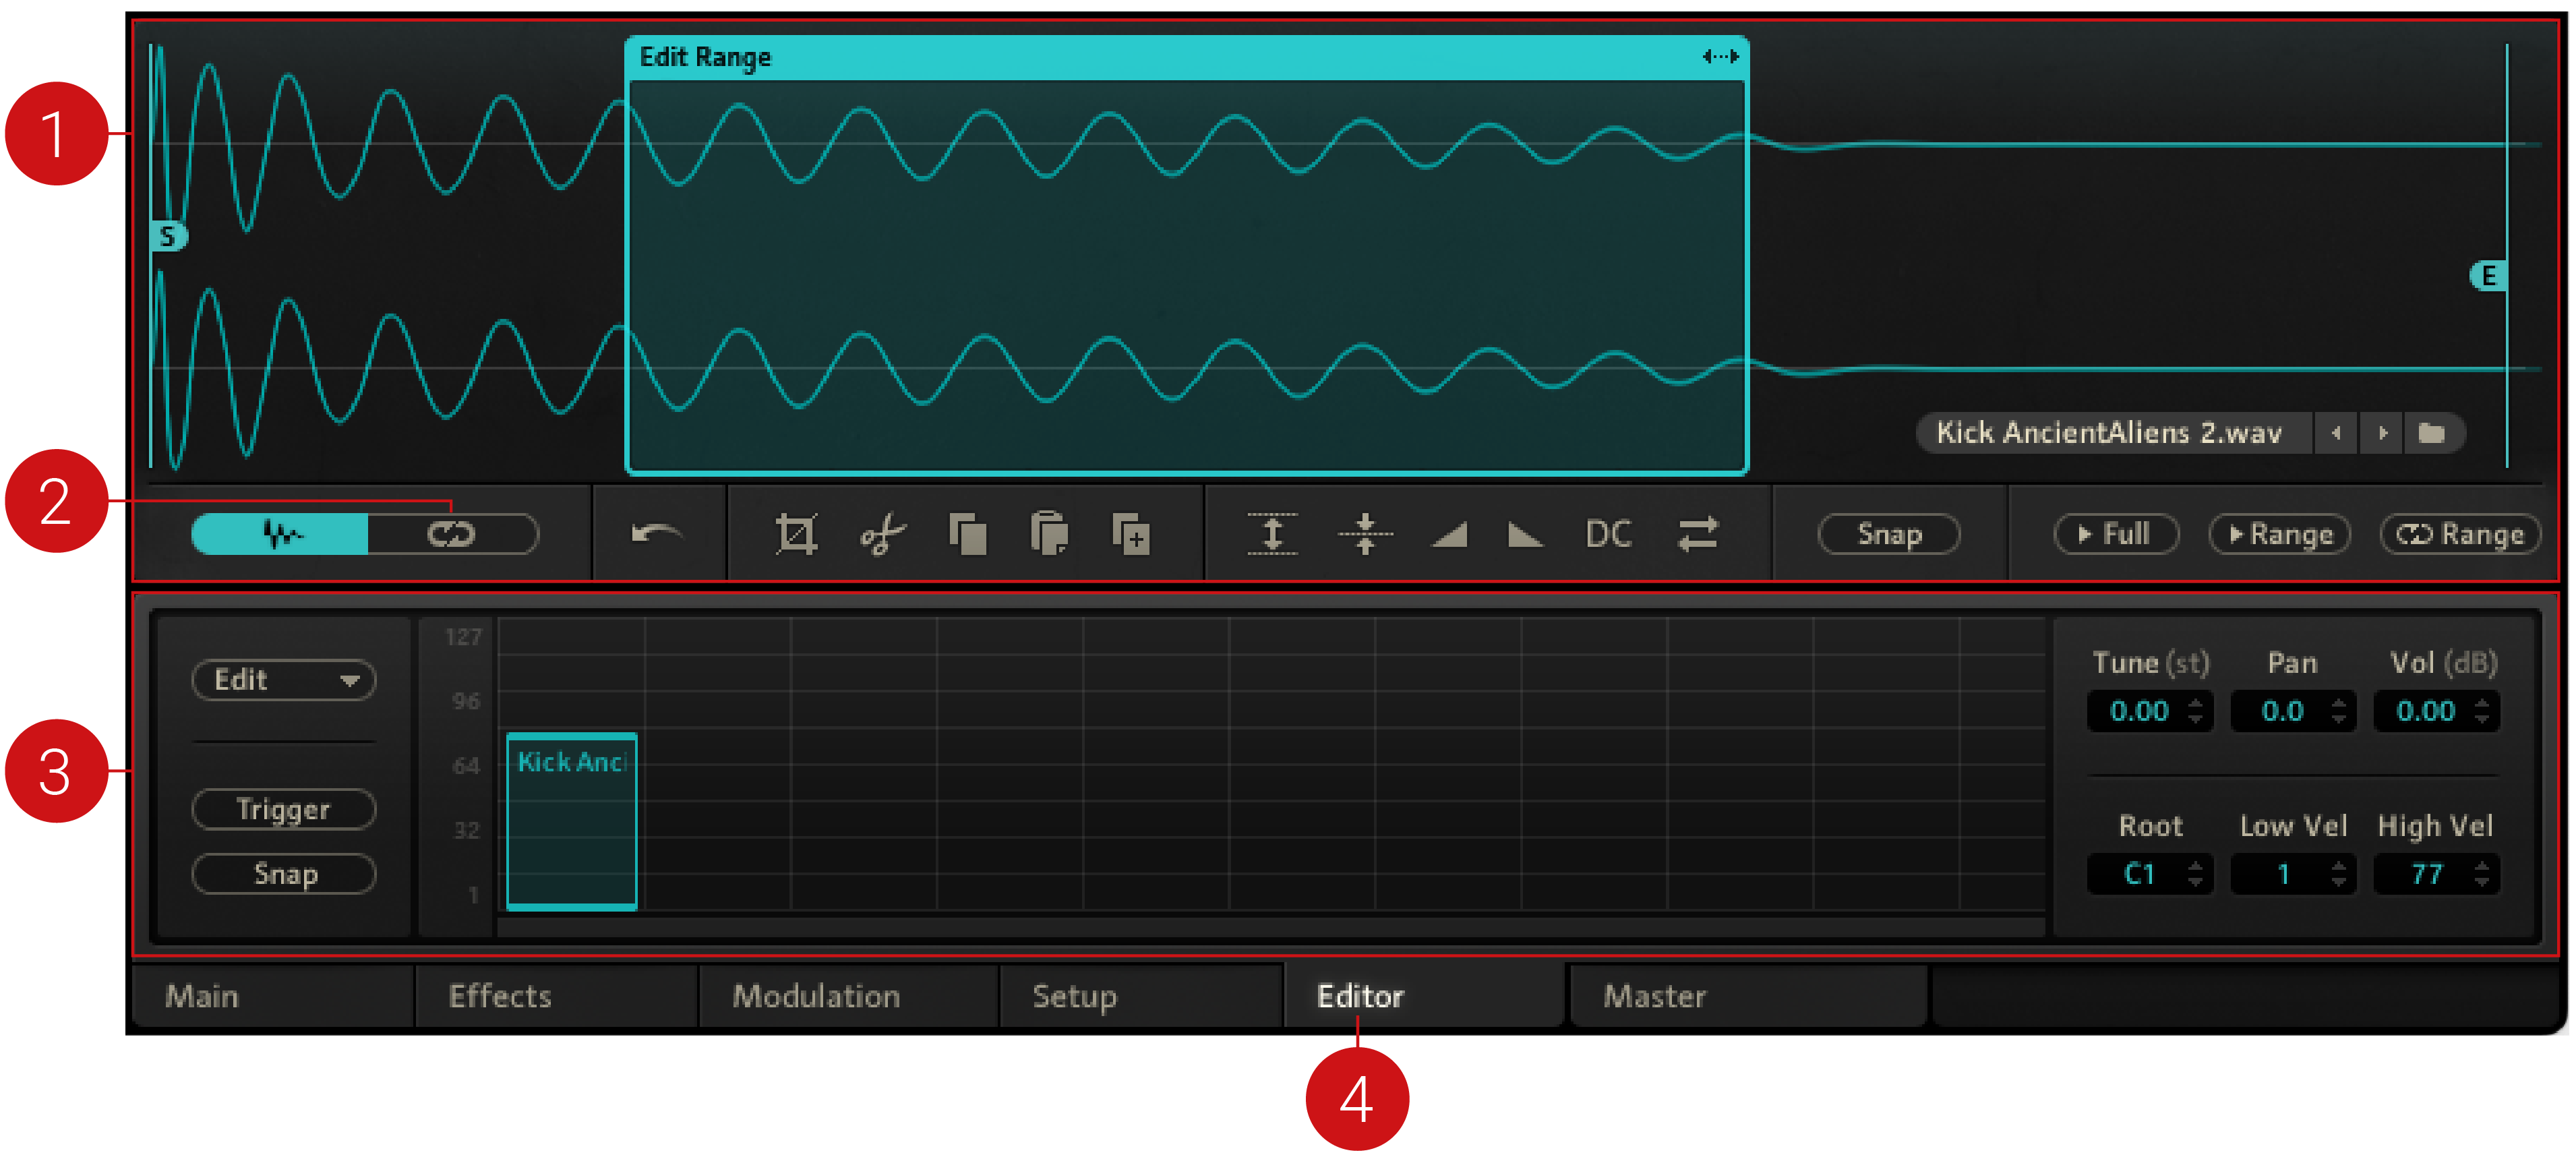
The Editor page
Wave Editor: Allows you to edit the audio samples within a cell. When there are multiple sample layers in a cell, you can edit each of the layers individually. For more information, refer to Wave Editor.
Loop Editor: Allows you to create up to four loop regions in a sample and create loops for each individual sample layer. For more information, refer to Loop Editor.
Mapping Editor: Allows you to edit sample layers and define velocity trigger zones for the sample layers in a cell, enabling you to restrict sample layers triggering within certain velocity zones. For more information, refer to Mapping Editor.
Editor page: Opens the Editor page when selected.
Wave Editor
The Wave Editor allows you to destructively edit the audio samples within a cell. When there are multiple sample layers in a cell, you can edit each of the layers individually.
To open the Wave Editor:
Click the Wave Editor button below the Waveform Control.

Storing of edited samples differs between the stand-alone application and the plug-in:
Stand-alone: BATTERY automatically stores new files for all edited samples when saving a Kit using the option Patch + Samples. Alternatively, you can render a new sample including all edits and effects using Render Cell in Place from the cell context menu. For more information, refer to Applying Effects.
Plug-in: Once you make a destructive edit in the Wave Editor, BATTERY asks you whether or not to store your edited samples. By clicking Yes, edited samples are stored as new files on the hard drive when you save your DAW project file. You can change the location for edited samples on the Engine page of the Preferences. For more information, refer to Engine.
The Wave Editor contains the following controls:
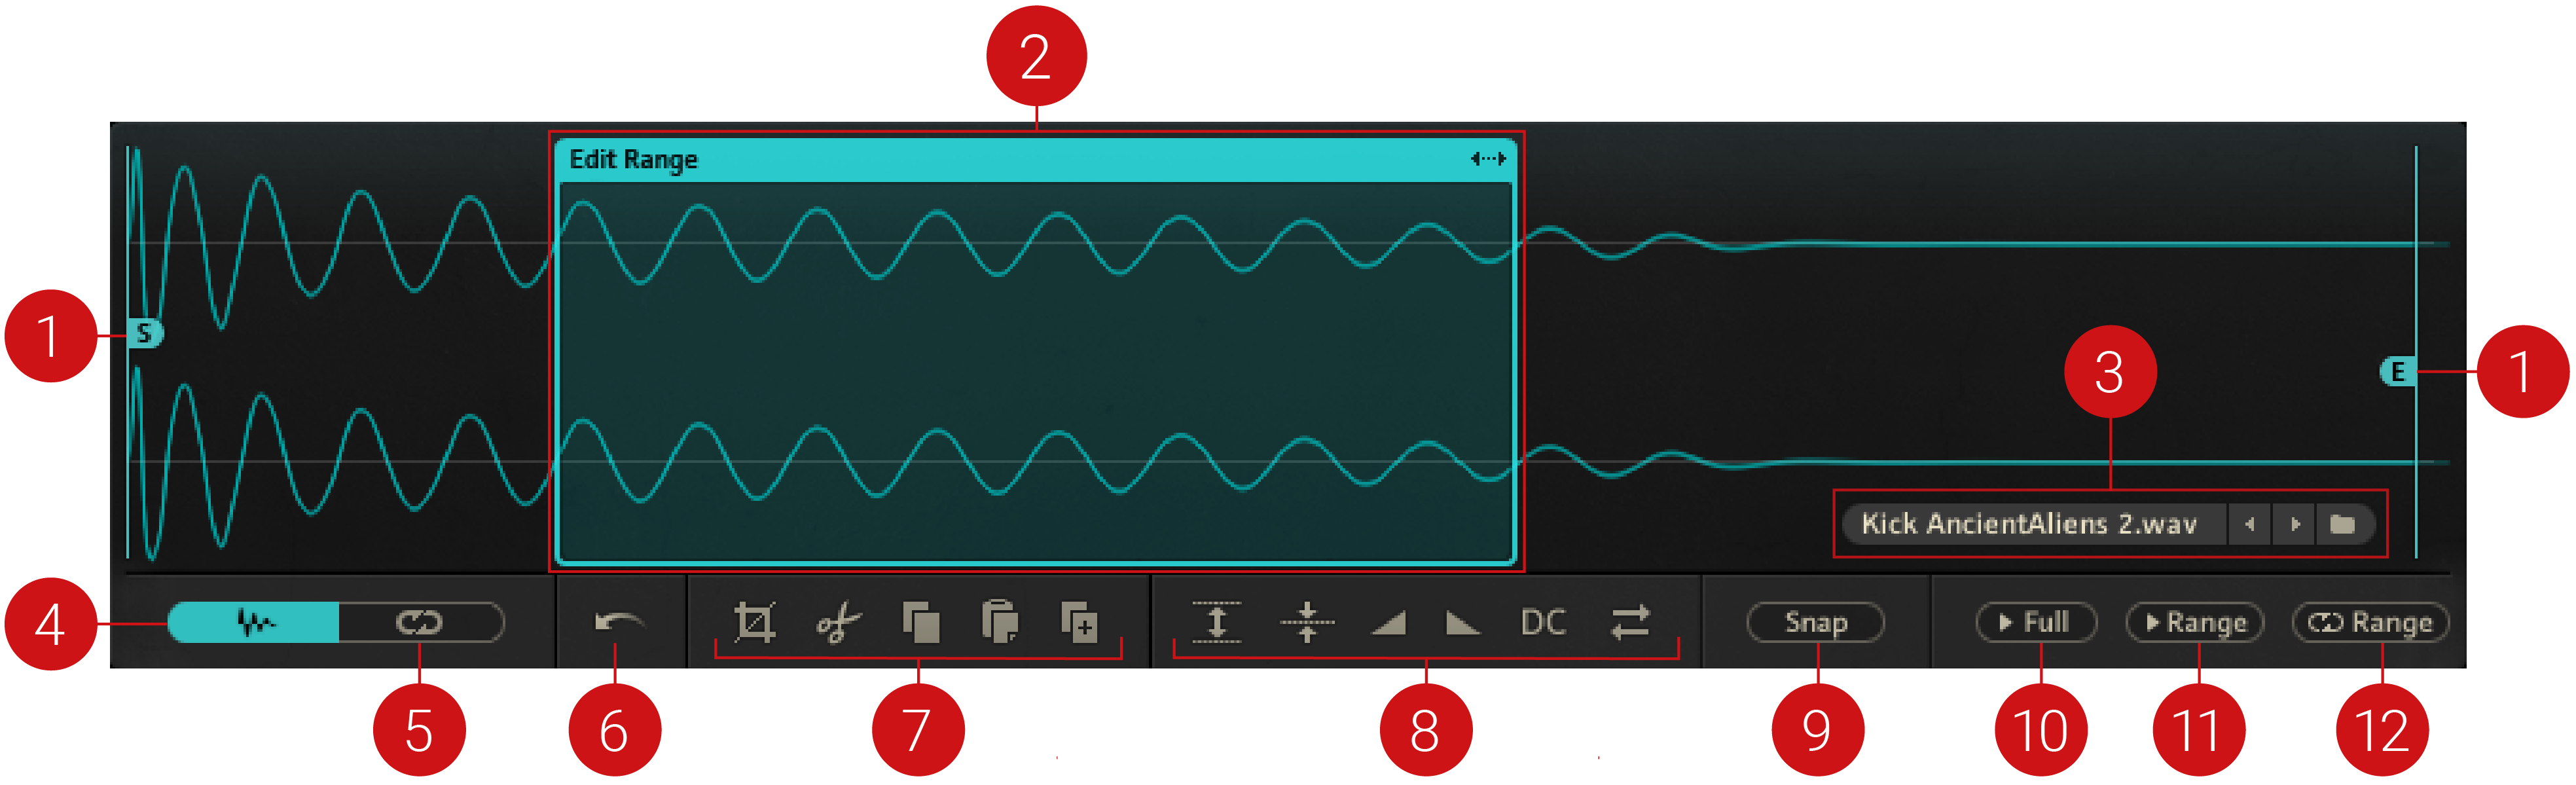
The Wave Editor on the Editor page.
Sample Start/End: Adjusts the sample's start point and end point markers, by clicking and dragging the start (S) and the end marker (E), respectively.
Sample Region Selector: Selects the region to edit. You can adjust the size of the region by clicking and dragging on either side of the Sample Region selector.
Sample Selector: Displays the name of the currently loaded sample / sample layer. The adjacent arrow buttons allow you to quick-load other samples into the cell. If more than one sample layer in a cell, an additional drop-down menu appears on the left side of the sample name field. From that menu, you can select the sample layer to be displayed and edited in the Waveform Control. Refer to Quick Access Area for further information on the Sample Picker.
Wave Editor: Opens the Wave Editor in the Waveform Control.
Loop Editor: Opens the Loop Editor in the Waveform Control.
Undo: Undoes the previous operation performed in the Wave Editor.
Editing Tools: Contains options for cropping, cutting, copying, pasting and duplicating the selected sample:
Crop: Removes all audio data before and after the selected region.
Cut: Cuts out the selected region from the sample.
Copy: Copies the selected region from the sample.
Paste: Pastes audio from the clipboard into the selected region of the sample.
Duplicate: Copies the selected region and appends it at the end of the sample.
Audio Tools: Contains options for normalizing, fading, reversing, inserting silence and eliminating DC drifts in the sample:
Normalize: Adjusts the volume of the selected region to a standard, optimum level.
Silence: Inserts silence in the selected region.
Fade In: Fades your sample in over a selected region.
Fade Out: Fades your sample out out over a selected region.
DC Correct: Eliminates DC drifts in the selected region.
Reverse: Reverses the sample.
Snap: When activated, all markers snap to the next location where the waveform crosses the zero line, or to another marker.
Full (play icon): Plays the whole sample, from start to finish, i.e. from Start marker (S) to End marker (E).
Range (play icon): Plays within the Sample Region selector.
Range (loop icon): Loops the audio material within the Sample Region continuously.
Loop Editor
The Loop Editor allows you to create up to four loop regions in a sample. In case there are multiple sample layers in a cell, you can create loops for each of the sample layers individually.
The Loop Editor contains the following controls:
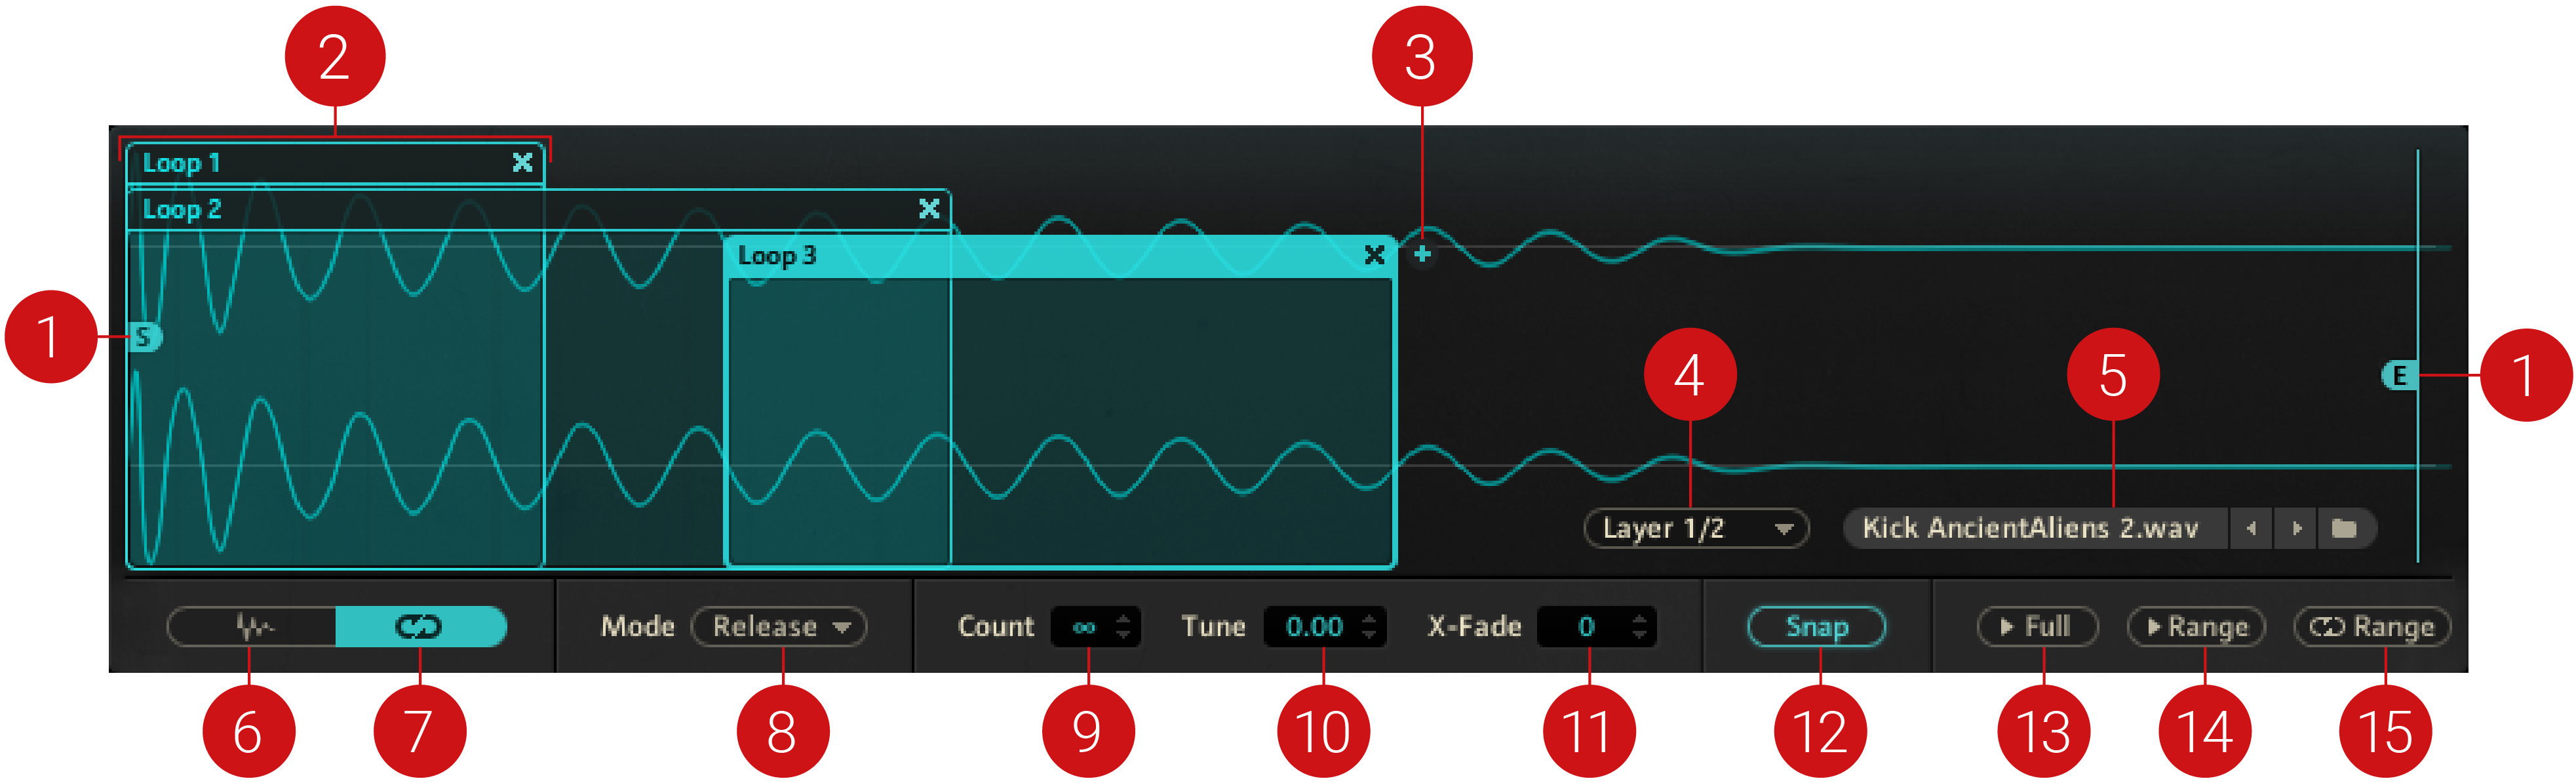
Sample Start/End: Adjusts the sample's start and end point markers, by clicking and dragging the start (S) and the end marker (E), respectively.
Loop Region Selector: Sets the loop region by clicking and dragging on either side of the Loop Region selector. To remove the loop, click on the delete button (x icon) in the upper right corner of the selector.
Add Loop (+ icon): Adds a loop to your sample. In case of more than one loop in your sample, click on an individual Loop Region selector to select it for editing.
Layer Selector: Displays the name of the currently loaded sample layer, when there is more than one sample layer in a cell. Use the drop-down menu on the left side of the sample name field to
Sample Selector: Displays the name of the currently loaded sample. The adjacent arrow buttons allow you to quick-load other samples into the cell. For more information, refer to Quick Access Area.
Wave Editor: Opens the Wave Editor in the Waveform Control.
Loop Editor: Opens the Loop Editor in the Waveform Control.
Mode: Determines whether the loop is played until the volume envelope has passed its release phase (Loop until End of Envelope), or to the exact moment the key is released (Loop until Key Release).
Count: Determines the number of times the loop will repeat before continuing to play through the rest of the sample. Possible repetition settings are 0 to 127, and infinite. When set to 0, the loop repeats for as long as the key is held.
Tune: Adjusts the independent tuning of each loop, in a range of +12/-12 semitones.
X-Fade: Blends the end of a loop with its beginning to create a more seamless transition. The display field shows the length of the section being mixed in, with samples being the unit of length. .
Snap: When activated, loop start and end points will snap to the nearest zero crossing in the waveform to prevent unwanted transition noises. Some sound designers loop at non-zero-amplitude points to create buzzier sounds. Experiment with snapping to see what works best for you. This feature is global affects all loops in the sample.
Full (play icon): Plays the whole sample from start to finish, i.e. from Start marker (S) to End marker (E).
Range (play icon): Plays the selected loop.
Range (loop icon): Loops the material within the loop region continuously.
Mapping Editor
The Mapping Editor allows you to edit sample layers and define velocity trigger zones for the sample layers in a cell. In practice, when you drag-and-drop a sample onto a cell, a velocity zone covering the whole velocity range (1 to 127) is created in the Mapping Editor. Irregardless of how hard or soft you hit a key (or pad) assigned to that cell, the sample will always be triggered. The Mapping Editor allows you to restrict sample layers to be triggered only within certain velocity zones.
The visual representation of the velocity zone is the Sample Block in the Mapping grid. You can also adjust things such as transitioning behavior between sample layers with different velocity zones. Furthermore you can set properties such as tuning and panning for individual layers from the Mapping Editor.
The Mapping Editor contains the following elements and controls:

The Mapping Editor
Edit menu: Provides a range of editing options for your sample layers. Note that layer-specific options affect only the layers currently selected for editing in the Mapping grid:
Add Layer...: Launches the file browser, where you can navigate through your computer's file structure to select and load a sample layer to the cell. You can also drag-and-drop audio files into the Mapping grid. The layer will be replaced, however all layer setting such as tune and pan will stay unaffected.
Cut Layer(s): Cuts the currently selected layer(s) from the cell.
Copy Layer(s): Copies the currently selected layer(s) to the clipboard.
Paste Layer(s): Pastes a layer(s) from the clipboard to the cell.
Delete Layer(s): Deletes the currently selected layer(s) from the cell.
Set Velocity Crossfades: Applies a crossfade between sample layers to provide a smoother transition, useful if the velocity range over which a layer is triggered overlaps with that of another layer. Selecting this menu entry brings up a dotted line in the Sample Block, which represents the crossfade velocity boundaries of the layer. Use the cursor to adjust these boundaries for each individual layer.
Remove Velocity Crossfades: Removes any crossfade velocity boundaries from the selected layers.
Stack Layers: Auto-arranges the cell's layers so that together they span the entire velocity range of the cell in equal shares.
Reset Stacked Layers: Resets all layers so that each one covers the entire velocity range.
Auto-Spread Layers: Auto-arranges the cell's layers so that together they span the entire velocity range of the cell, wherein the upper and lower velocity border of neighboring Sample Blocks meet half way. In case of previously overlapping layers, the borders stay in place.
Reset Overlapping Layers: Auto-arranges overlapping Sample Blocks, wherein the upper and lower velocity border of neighboring Sample Blocks meet half way.
Trigger: When activated, the sample layer is played back when clicking on its Sample Block in the Mapping grid.
Snap: When activated, moving velocity limits snaps to velocity limits of neighboring layers.
Sample Block: Provides a visual representation of a sample layer and its velocity range in the cell.
Mapping grid: Allows you to select the individual layers of a cell for editing by clicking on their Sample Blocks. You can also adjust a layer's velocity limits by clicking and dragging the Sample Block's lower/upper borders.
Root: Sets the original pitch (note center), which typically equals the pitch at which the sample was recorded. The root key also defines the basis for pitch shifting; for each semitone that you deviate from the selected root key note, BATTERY will pitch-shift the selected layer by one semitone. For example, if a layer’s Root key is set to C1, and you play a D1 note, the sample will be pitched up by two semitones.
Low Vel: Sets the lower velocity limit of a layer. This is equivalent to clicking and dragging the lower border of the layer's Sample Block.
High Vel: Sets the upper velocity limit of a layer. This is equivalent to clicking and dragging the upper border of the layer's Sample Block.
Tune (st): Changes tuning of a layer from –12 to +12 semitones.
Pan: Positions the layer in the stereo field: from -100 (fully left); to 0 (center); to +100 (fully right).
Vol: Adjusts the volume level of each layer.